Month: December 2015

  • How to Reduce Editing Time by Automating Your Lightroom Workflow

    Don’t you hate when you realize that you spend more time in front of the computer than actually taking photographs? The realization is even more depressing when you are a travel and landscape photographer and, by definition, you are supposed to travel and discover the world’s beauty.

    Sunset Ride (San Francisco)

    The Crisis

    This is how I felt about 12 months ago during my second ever processing crisis as a photographer.

    The first crisis happened about 10 years ago when I became more serious about photography, and started taking more photos. This was a time when 100% of my editing was done in Photoshop, which quickly led me to feel like I was drowning in gigabytes of digital images. What I did not realize at the time was that a majority of photographers who had switched to the digital realm, shared my pain.

    This is when Adobe saved us all by releasing Lightroom, an application designed specifically for digital photographers. Lightroom not only offered non-destructive photo editing but a complete digital photography workflow with streamlined digital asset management as well.

    I immediately embraced Lightroom by starting with the beta version, which allowed me to cut my photo editing time in half. With every new version, Lightroom became more sophisticated and versatile, almost completely replacing Photoshop in my workflow. After Adobe released Lightroom 6, I recognized that I could complete 90% of my processing in Lightroom, and my need for Photoshop was minimal (10%).

    But, sophistication and versatility had its own price. Lightroom became much slower and its complexity skyrocketed.

    Another factor that contributed to my second processing crisis was my switch from a Canon DSLR, to a Sony mirrorless. The new Sony camera (A6000) had a bigger sensor and produced much bigger file sizes, which slowed my editing down even more.

    After a long trip to Hawaii, California, and the Southwest, I brought back more than 5,000 brand new photos. The process of Lightroom editing was slow and painful, making it obvious that I had to come up with the completely new workflow to reflect a higher volume of larger files.
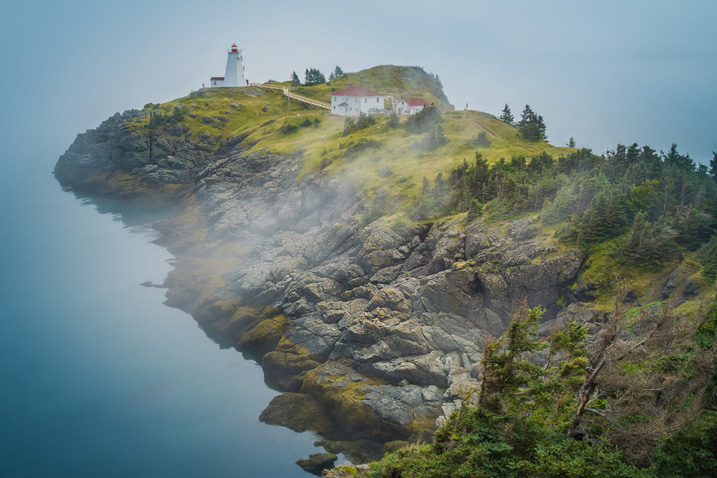
    Swallowtail Light (New Brunswick)

    The Solution

    I started by analyzing my Lightroom editing habits, and soon enough, I made a discovery that became the foundation for my new workflow. Perhaps less of a discovery and more like a simple realization, I noticed that 80% of my edits are identical for every single photo I process, with only 20% varying from photo to photo.

    The solution was obvious. By automating the 80%, I could radically reduce the time I spend in front of the computer. The use of preset functionality in Lightroom was an obvious choice.

    I dove into my Lightroom Portfolio Collection and selected the images that best reflected my personal style and artistic vision. I then created presets based on those selected photos.

    At that point, I faced a challenge. As you have probably noticed, LR presets usually do not work out of the box; their settings are too specific for a particular photo to work with every image. Depending on the lighting condition of the scene, contrast level, shadow depth, and color saturation, the same preset can produce a completely different result across different images.

    I managed to overcome this challenge by separating my presets into two categories, and using a two-level editing approach.

    • Level One: I use presets from a STYLE category, to define an artistic style or the “LOOK” in a photograph. For example: cool or warm, cross processed or natural, contrasted or soft.
    • Level Two: I use ADJUSTMENT presets to fine-tune a photo, compensating for the lighting of the scene, without changing the STYLE that I defined in the previous step.

    Okay, enough theory, let’s get to the practical demonstration – here’s my new Lightroom editing workflow in action:

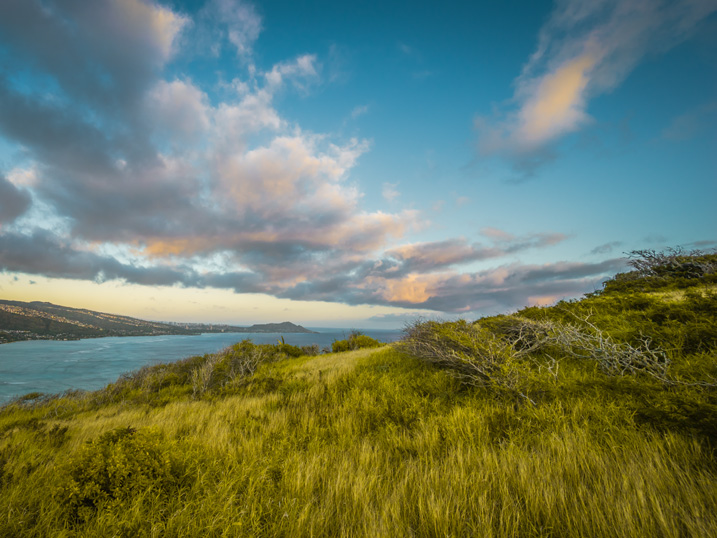
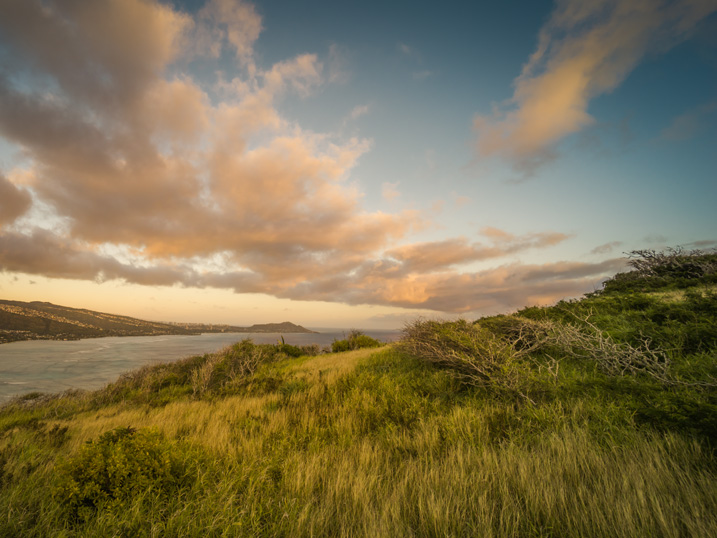
    Here is a photo I took in Hawaii at sunrise. This is a typical landscape photo featuring the open sky and water, mountains, and foreground vegetation. In order to preserve the details in the highlights, I set the exposure for the sky area, as I normally do for the majority of landscapes. It resulted in an underexposed capture.
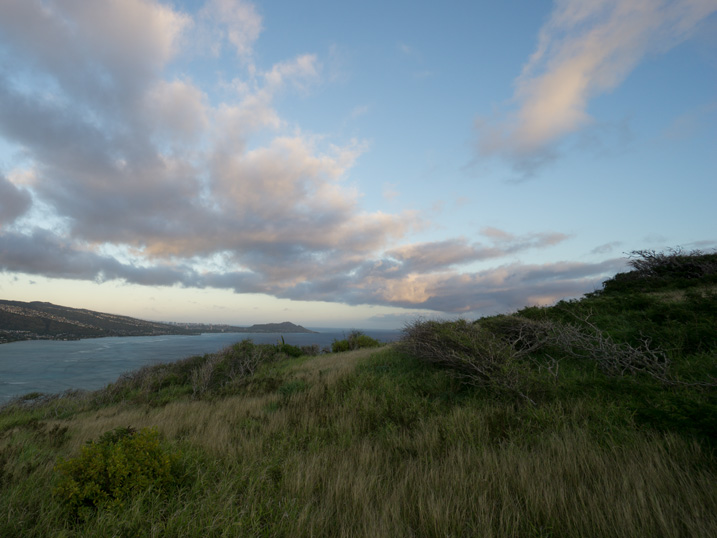
    how_I_educed_my_photo_processing_time_in_half_03

    The goal here is to correct the exposure, recover the shadows, and bring back the rich colors of the tropical sunrise.

    STEP ONE

    I always start my landscape editing by trying to achieve a natural look first by applying the NATURAL preset from my STYLE collection.
    how_I_educed_my_photo_processing_time_in_half_04

    Even though I managed to boost the colors and define the sky, the result is far from exciting, as the photo is much too dark.
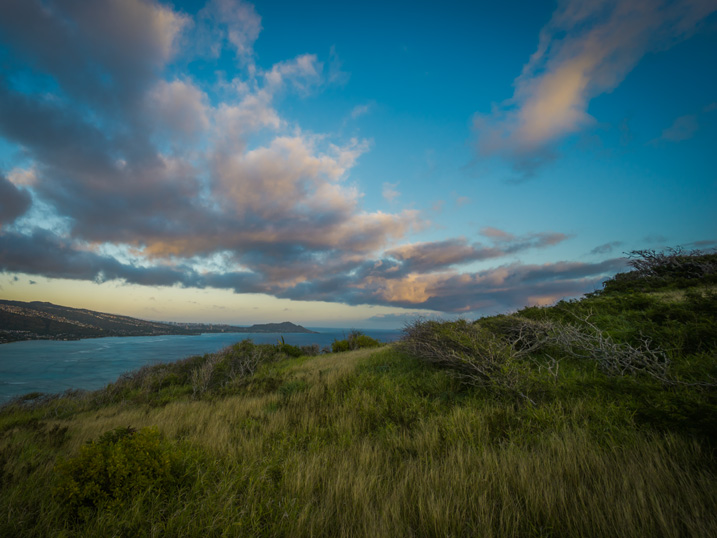
    how_I_educed_my_photo_processing_time_in_half_05

    STEP TWO

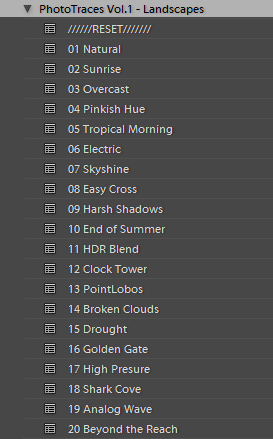
    This is when my ADJUSTMENT collection, which I call the TOOLKIT, comes into play.

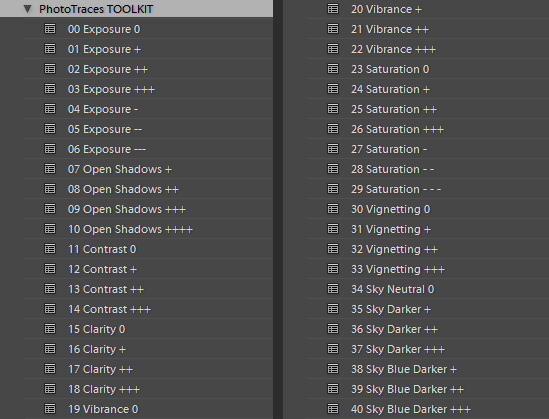
    The TOOLKIT is a selection of 40 presets where each is responsible for changing only one specific parameter, without changing the style of the image. Together, they help to fine-tune different aspects of the photo.
    how_I_educed_my_photo_processing_time_in_half_06

    The TOOLKIT presets are stackable, which means that you can apply multiple presets to the image without the presets overwriting each other.

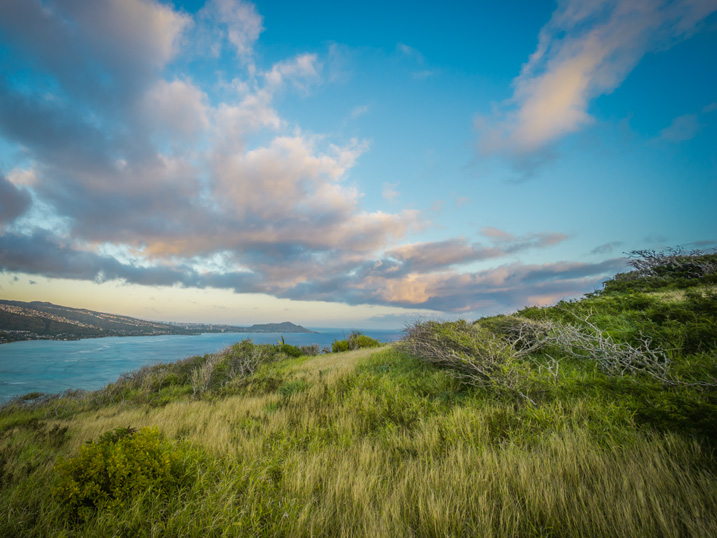
    • To make the image brighter, I apply preset 02. Exposure ++
    • To open up the shadows, I apply preset 10. Open Shadows +++
    • To increase the local contrast, I apply preset 17. Clarity ++
    how_I_educed_my_photo_processing_time_in_half_07

    This is all I had to do. As you can see, I managed to complete 80% of my entire editing in five clicks, without touching the right panel of Lightroom where all of the editing tools are housed.

    STEP THREE

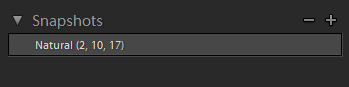
    The last step is to record the editing steps. I use the Snapshot functionality of Lightroom to save my editing steps as a new Snapshot. For the name, I use “Lightroom Editing Formula”.
    how_I_educed_my_photo_processing_time_in_half_08

    The Lightroom Editing Formula starts with the name of the preset and follows with the numbers inside the brackets, where each number represents a specific ADJUSTMENT preset from the TOOLKIT collection.

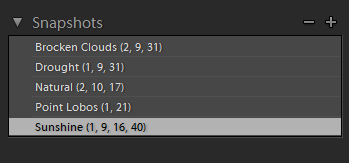
    If I edit a photo for my blog, I might stop here and export it as a JPEG; but, if I am working on a portfolio piece, I try to explore a variety of artistic styles. I follow a similar approach by going through the three steps of my workflow, but each time select a different STYLE preset.

    Every time I achieve a result I like, I save it as another Snapshot.
    how_I_educed_my_photo_processing_time_in_half_09

    By the time I am done, I might have anywhere from four to five different editing versions for the same image.
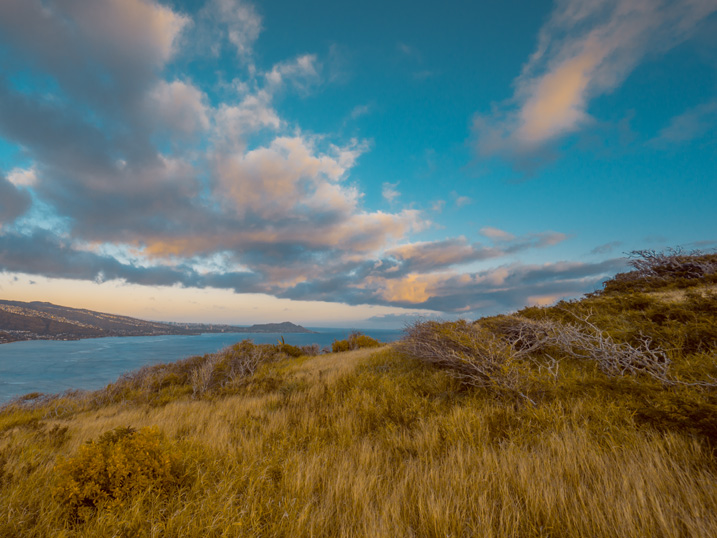
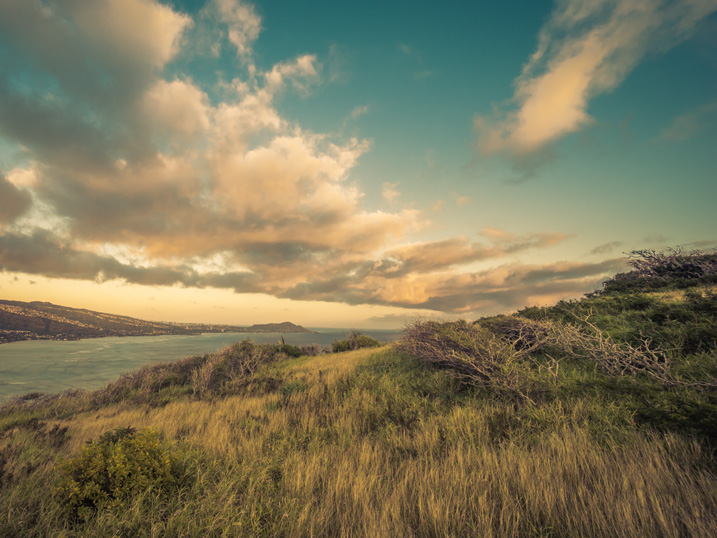
    how_I_educed_my_photo_processing_time_in_half_11

    how_I_educed_my_photo_processing_time_in_half_10

    how_I_educed_my_photo_processing_time_in_half_12

    how_I_educed_my_photo_processing_time_in_half_13

    Here is the most exciting part; I get to select the most interesting version for my portfolio and perhaps another one for Instagram.

    From here, I normally jump to Photoshop and perform the remaining 20% or so of the editing process. In Photoshop, I mostly clean up the image with the help of the Stamp Tool, and do noise reduction using Topaz DeNoise plugin.

    Conclusion

    The entire process of producing five different versions of the featured photo took me less than 10 minutes, and all without having to touch the main editing tools in Lightroom. I call it Lightroom Rapid Editing.

    By streamlining and automating my Lightroom workflow, I managed to reduce the total editing time by more than half.

    How can you use these tips to reduce your editing time? Do you have any other time savers you’d like to share? Please do so in the comments below.

    googletag.cmd.push(function() {
    tablet_slots.push( googletag.defineSlot( “/1005424/_dPSv4_tab-all-article-bottom_(300×250)”, [300, 250], “pb-ad-78623” ).addService( googletag.pubads() ) ); } );

    googletag.cmd.push(function() {
    mobile_slots.push( googletag.defineSlot( “/1005424/_dPSv4_mob-all-article-bottom_(300×250)”, [300, 250], “pb-ad-78158” ).addService( googletag.pubads() ) ); } );

    The post How to Reduce Editing Time by Automating Your Lightroom Workflow by Viktor Elizarov appeared first on Digital Photography School.


    Digital Photography School

  • My Favorite and ONLY Lens: The Canon EF 50mm f/1.2 L USM

    I operate my photography business on a shoe string budget. This started out of necessity, but continued because it became abundantly clear to me early on, that I would rather spend the money I earn from photography towards black t-shirts, home décor, five dollar lattes, and bills. Mainly bills, but no sense in pretending the other indulgences don’t factor into my take-home pay.

    lynseymattingly2

    I started my portrait business with a Canon Rebel, kit glass, and a prayer. As my business grew I invested in a 30D, and later a 5D. One particularly good tax refund, and a little generosity from my mother around my birthday, found me the proud new owner of a Canon 50mm L-series lens. I didn’t even know what the L stood for (to be honest, I still don’t), I just knew that all the photography blogs I read at the time called it the end-all, be-all lens. The It Lens. The Portrait Lens. I also had a seasoned pro tell me that I should spend as much money as possible on good glass, and it doesn’t get any better than this one.

    It’s also important to mention that I was at a place with both photography, and my confidence, that I would listen to just about anyone who even pretended they knew what they were talking about. Had she told me that my pictures would be better if I carried a frog in my pocket, I would have carried two, and a lizard in my shoe just in case.

    lynseymattingly7

    I am going to tell you all a secret. I am going to answer the question I always get asked when I pull out my big, fancy lens that is mounted to my camera body, which to be clear is the Canon 5D model from 4 models ago: does that snazzy lens make photos better? Brace yourselves because, yes. Yes, it does. So much so in fact that I don’t even own another lens.

    I had a fixed 24mm lens for a few years, but it did nothing more than take up space in my bag. Space that I prefer to give to gum and bug spray. So I sold it to increase my coffee and black yoga pants budget. Zoom lenses have never been my favorite, so that narrows down my choices considerably, and a 50mm just feels like the right length for me—I’m close to my subjects but not breathing in their face, even if my breath is minty fresh from my bulk gum purchases.

    lynseymattingly4

    Can you live without a lens that costs three times what my first car did? You bet. But I’ll tell you another thing—you can live without an entire bag of lenses just as easily. A back-up body and lens is nice—some may even say essential (particularly if you are a wedding photographer), and I suppose if you do certain types of photography, you may need a few different lenses. But I am here to tell you that I have operated a very successful portrait and wedding photography business with my one, albeit super fancy, lens and done just fine, thank you very much. I can count on one hand the times I’ve needed a different lens, and each time it was easy to either borrow or rent, and much more cost effective.

    lynseymattingly1

    I know my 50. I named my 50, if we are being honest (its name is Seth—it work well with Nancy my MacBook, and Monte my iMac). At this point it just feels like an extension of my arm, or eyeball. I know what I will see in the viewfinder by the time I get my camera to my face. Since my feet are the zoom, I know exactly where I need to stand to get the frame I want.

    Prime lenses are fast and sharp. If this means I have to walk around a bit more, then I can call it my exercise for the day (okay, fine: week) as well. The bulk of my business is photographing kids, so no matter what, I am going to be on the move. I’d just rather know that upfront, than mess with a zoom and continuously risk less than tack-sharp focus. This isn’t even counting the fact that by not spending a great deal on equipment I am able to be well caffeinated on expensive coffee during shoots, and sit at a very pretty desk while I edit.

    lynseymattingly3

    The other plus of counting on one great lens for everything? I invest my money back into my business in other places, beyond expensive equipment. Places that I feel reach farther than a bag full of stuff. I have a bold website and eye-catching business cards. My clients get their images in top-of-the-line professional packaging. I have a ShootSac and buy lollipops in bulk. I wear the most expensive contact lenses on the market, and you should see my hair tie-back selection.

    I can only afford these things because I’m not up to my expensive contact lens-wearing eyeballs in debt over fancy equipment. Additionally, my fees are not so outrageous that my client base is only a select few. My overhead being lower than average, allows me to continue photographing the families that supported my business when I was just starting. Families that otherwise may not be able to afford my services if I was dealing with extraordinary costs.

    lynseymattingly6

    My mom taught me to buy quality; to save my money and buy a good pair of jeans, instead of the cheapest pair that fit. Sadly this lesson didn’t stick and at this very moment I am dressed head to toe in Target. However, it’s true here; buy the nicest lens you can afford and make it work for you. It’s your paintbrush, your potters wheel, your knives (I’ve heard big-time chefs bring their own knives to everything); make it the best possible one and make it the only one you need.

    lynseymattingly5

    Have you invested in top quality lenses or “glass”? What is your go-to lens and why?

    googletag.cmd.push(function() {
    tablet_slots.push( googletag.defineSlot( “/1005424/_dPSv4_tab-all-article-bottom_(300×250)”, [300, 250], “pb-ad-78623” ).addService( googletag.pubads() ) ); } );

    googletag.cmd.push(function() {
    mobile_slots.push( googletag.defineSlot( “/1005424/_dPSv4_mob-all-article-bottom_(300×250)”, [300, 250], “pb-ad-78158” ).addService( googletag.pubads() ) ); } );

    The post My Favorite and ONLY Lens: The Canon EF 50mm f/1.2 L USM by Lynsey Mattingly appeared first on Digital Photography School.


    Digital Photography School

  • Rezension: Lomo’Instant Wide

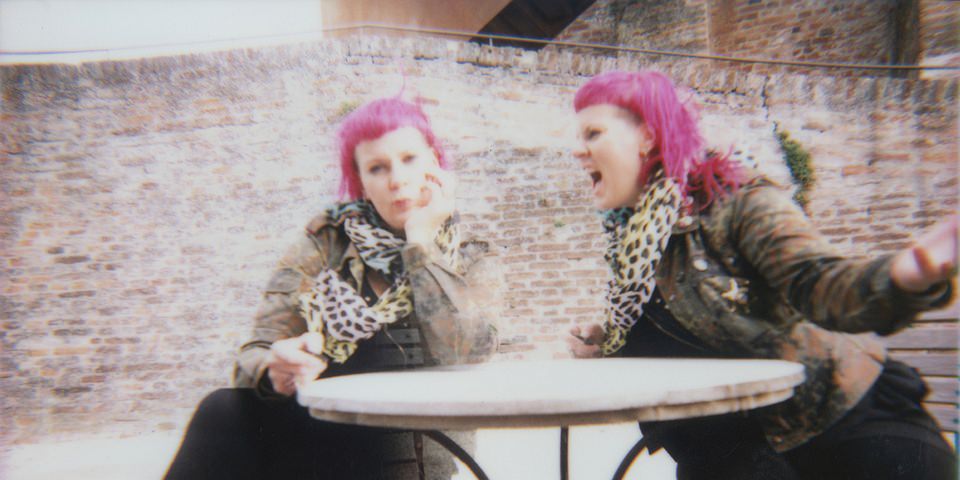
    Eine doppelte Frau sitzt an einem Cafétisch.

    Ein Beitrag von: Tamara Skudies

    Die Lomo’Instant Wide ist das neueste Produkt aus dem Hause Lomography für Fujis „Instax Wide“-Filme. Bisher besitze ich in dem Format eine alte Fuji Instax 200 und das Instant Back für die Lomography Belair. Der Film hat mich schon immer mit seinem Format und der Farbwiedergabe überzeugt und die neue Kamera von Lomography eröffnet einem ganz neue Möglichkeiten, ihn kreativ zu nutzen.
    kwerfeldein – Fotografie Magazin | Fotocommunity

  • Bookshop B&B: Novel Vacation Loft Lets You Run Storefront Below

    [ By WebUrbanist in Boutique & Art Hotels & Travel. ]

    scotland bookworms dream

    If you have ever wanted to fully experience life as a bookseller in a small town by the sea, this quirky combination home-and-bookstore holiday rental may be just be the page-turner you need.

    bookstore b and b

    Located in Wigmore, Scotland, The Open Book is an independent retailer that lets interested parties both rent the flat above the store and oversee its operations during their stay. Guests inclined toward working vacations get to double as volunteers, performing all the duties of the shop owners, including opening, closing, shelf restocking and display design.

    scotland bnb flat

    It may not be a fun novelty for every type of traveler, but presents an opportunity well-suited for those of us who are bookworms, like to stay busy, learn new things and meet locals on getaways.

    scotland vacation book store

    At less than $ 50 USD per night for up to two guests, the work effectively subsidizes the stay, not to mention giving a more complete experience of the place.

    bookstore scotland rental manager

    With small bookshops closing up around the country (and the world), the owners wanted to bring more attention to their store and ask their guests to blog about and share their time as a store manager. People are also asked to stay for a minimum of a week, giving them time to learn the ropes and greet a variety of store visitors, from locals to fellow travelers.

    Share on Facebook


    [ By WebUrbanist in Boutique & Art Hotels & Travel. ]

    [ WebUrbanist | Archives | Galleries | Privacy | TOS ]


    WebUrbanist

  • Apple launches battery case for iPhone 6s

    Battery life is still one of the most obvious weaknesses of smartphones and many devices, even high-end models, will struggle to get through an entire day of normal use without charging. Apple’s iPhones are no exception, which is why there is an abundance of aftermarket battery packs and cases available for the range, but until today no Apple-branded battery expansion had been available. Read more

    Articles: Digital Photography Review (dpreview.com)

  • 8. Dezember 2015

    Das Bild des Tages von: Sandra Drljaca

    23477616181 © Sandra Drljaca

    Im Ausblick: 25 Nachrichtenfotos, Sommersprossen und wer hat Angst vor Fotografinnen?
    kwerfeldein – Fotografie Magazin | Fotocommunity

  • Luna is ‘world’s smallest’ 360-degree camera

    As virtual reality grows in popularity, an increasing number of consumer-grade 360° cameras are hitting the market. Latest among them is Luna, a spherical camera that records 360° footage for viewing on desktop or through a cardboard VR headset. The team behind Luna is seeking funding on Indiegogo to cover design and production costs.

    Luna features a pair of 190° fisheye lenses, and uses ‘artificially intelligent auto-stitching software’ to merge the captured 2K footage into a single 360° HD video. Finalized videos can be shared on social networks or YouTube, and can be viewed using the Luna app and a VR headset. A sample video reel shows relatively low image quality from the camera’s video mode, but it’s unclear whether this is representative of a final production version of the camera.

    Integrated Wi-Fi enables live streaming, as well, and the camera itself is waterproof with an IP68 rating. Luna sticks to any metal surface via a magnetic adapter, and has an optional accessory pack including a monopod, universal accessory adaptor, keychain and docking station. At 170g/6oz and 6cm/2.36in diameter it’s very close in size and weight to a pool ball.

    Memora, the company behind Luna, is accepting pre-orders through Indiegogo, where a ‘mega early bird’ unit is available by pledging $ 199. Shipping is available worldwide and estimated to start for backers in October 2016.

    Articles: Digital Photography Review (dpreview.com)

  • Social Climbers: 7 Vertical Trailer Parks for Mobile Urbanites

    [ By WebUrbanist in Architecture & Houses & Residential. ]

    trailer house theater set

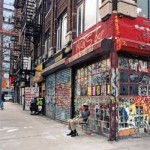
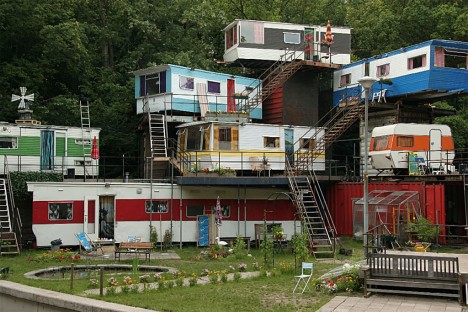
    Addressing the combined challenges of mobility and density, this series of design solutions (both conceptual and actual) turn trailer living into a vertical endeavor. While the image above was alas only a stage set for a theatrical production, there are real-world examples of this approach dating back decades.

    mobile-home-towers

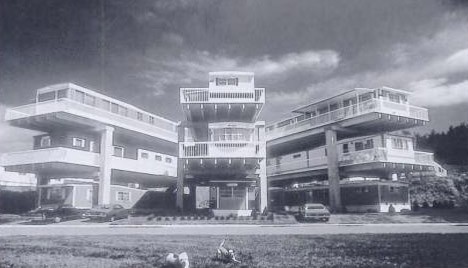
    Industrialist, developer and mobile housing pioneer Elmer Frey pitched an incredible project in the early 1960s: a set of spiraling skyscrapers designed to house roadworthy mobile homes. The 20-story structures would house over 500 homes each with parking below and restaurants and community spaces above. While this grand vision never came to pass, Frey did not give up so easily.

    trailer array multistory structure

    Instead, he approach the problem at a smaller scale, hoping to win support for his bigger ambitions. Built near the Twin Cities of Minneapolis and St. Paul in Minnesota, the SkyRise Terrace was controversial from the time it was constructed.

    vertical trailer park

    The site provided frameworks for stacking conventional mobile homes, arrayed in an arc around a central shared space. Problems with plumbing and fear of tornados contributed to the deconstruction of this complex a few years after its creation.

    mobile home stack fail

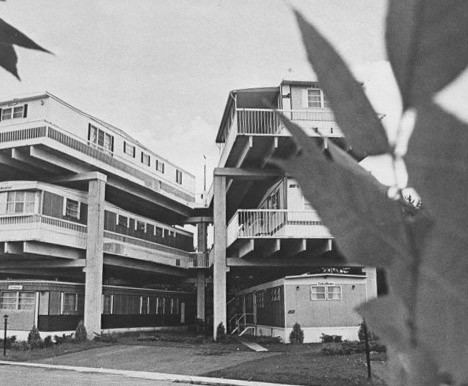
    In nearby Mankato, the Valley View Apartments complex used similar design principles to create an equally-unappealing set of stacked mobile homes framed by concrete supports. Deemed ugly by critics locally and around the country, this complex also was eventually demolished, but was still not the end of trailer-stacking history.

    Next Page – Click Below to Read More:
    Social Climbers 7 Vertical Trailer Parks For Mobile Urbanites

    Share on Facebook


    [ By WebUrbanist in Architecture & Houses & Residential. ]

    [ WebUrbanist | Archives | Galleries | Privacy | TOS ]


    WebUrbanist

  • DPReview Gear of the Year 2015: Nikon D750

    This is less the story of a DPReview.com editor professing his favorite piece of gear from the year, and more the story of a photographer and system owner holding out several years for the perfect camera. This isn’t about Nikon vs Canon or Sony or mirrorless vs DSLR. It’s about investing in a system, expectations, and the joy of photography.

    Nikon D750 – What I love:

    • 24MP Full-frame sensor offers excellent high ISO performance and great dynamic range
    • 1080/60p video capture
    • Robust build-quality, while remaining fairly light-weight for a Full-frame DSLR
    • Flip out 3.2″ LCD lets me get those high and low angles I so crave for skateboard photography
    • 51-point AF system performs well, even in very dark or low contrast shooting environments

    In the Winter of 2012 I purchased a lightly used Nikon D700 for a trip I was planning in the Spring, to document Egypt’s first-ever freely-held presidential elections. While the camera was technically a current model, it had been on the market, at the time of my purchase, for nearly four years.

    I had also strongly considered the D800 at the time, which had been announced a few weeks prior. But after field testing the camera (I was working at Popular Photography at the time), I decided that is was simply not the body for me. I was upgrading from a Nikon D300, and the D800 felt too much like a studio camera: the Raw files were far larger than I needed, or was used to, the burst not fast enough (the D300 with a grip gave me 8 fps), and the price, way more than I could afford to pay. It’s also worth mentioning that the D600 had not been announced yet. So my options were pretty much limited to a camera that appeared to be near the end of its product life.

    Fast forward two and half years to the late Summer of 2014. I had been using the D700 aggressively for freelance work, and put more than a half million actuations on it. Despite the rubber skin starting to peel a bit, the camera still functioned like new. Still, I couldn’t help but feel like I was ready for an upgrade, the same upgrade I had been yearning for when I initially settled on the D700, due to lack of options.

    ISO 640, 1/1000 sec F5.6 shot with a Nikon 24mm F2.8D lens affixed. The D750 is the only Full-frame camera in Nikon’s line that offers an articulating LCD, which I used to frame this image.

    I’ll never forget the day Nikon first unveiled the D750 to us in a press meeting. It was an incredibly muggy August afternoon in New York City. As I walked down Park Avenue with a co-worker, I felt anxious. Rumors had been circulating for months of a new full frame camera, and I was eager to find out if they were true. Moreover, I was eager to find out if the camera I had long dreamed of, since the day I started shooting with my D700, was going to come to fruition.

    At the time, both the Nikon D610 and D810 had been announced. But like so many Nikon shooters upgrading from a D700 or D300, neither camera felt right. I already mentioned my misgivings about the D800 (and the same go for the D810), but on the other end of the spectrum, the D610 felt too plasticky and simply not-professional enough for my use. By comparison, both the Nikon D700 and D300 are substantially more ruggedized than the D610 and I was not willing to purchase a new camera that felt less robust than that I was replacing.

    Needless to say, Nikon PR unveiled the D750 that afternoon, and it was everything I could have asked for: a robust weather sealed body, with an updated sensor, full video capture (neither my D300 nor my D700 offered any sort of real video mode), an articulating screen and built-in Wi-Fi. Months later, as the reviews rolled in, the verdict seemed clear: the D750 offered great image quality and excellent AF performance, in a feature-packed body that also happened to be smaller and lighter than both the D300 and D700 (without sacrificing build quality or weather sealing).

     ISO 1250, 1/400 sec, F4. Shot was a Nikon 85mm F1.8D lens affixed.

    It wasn’t until the Spring of 2015 I was able to afford one: a wedding assignment on the East Coast (I had moved from New York to Seattle in the winter of 2014), was ultimately the reason I pulled the trigger on my purchase. The camera arrived a week before my departure, giving me little time to try it out before the big shoot. To further complicate matters, at the time, I was in between finishing a Sony A77 II review and starting a Fujifilm X-T10 review, which is to say, Nikon cameras and the way they function, were not at the forefront of my brain.

    It didn’t matter. Picking the D750 up instantly felt familiar. I had been using Nikon cameras since 2006, including a D100 and D2h at my college newspaper, and I was pleased to see that generation, to generation, to generation, Nikon had largely kept menus, functions and button placements fairly uniform throughout the company’s high-end models.

    “It was truly a moment of pointing, shooting and hoping. But the D750 did not let me down.”

    The wedding proved to be an epic first field test for the D750. The ceremony took place outdoors, in torrential downpours. It was raining so hard during the reciting of the vows, I physically could not see anything through the viewfinder other than the red AF confirmation square lighting up on what I hoped were the bride and grooms faces. It was truly a moment of pointing, shooting and hoping. But the D750 did not let me down. Despite the shooting conditions, I was able to still capture all of the crucial wedding ceremony moments. And thanks to the camera’s image quality, I was able to work with the Raw files, which were substantial washed out due to fogging and moisture, to add back in some contrast and saturation.

      ISO 1250, 1/400 sec, F4. Shot was a Nikon 85mm F1.8D lens affixed.

    Of course, one of the biggest selling points of Nikon DSLRs are the incredible dynamic range they offer, and the D750 is no exception. I shoot a ton of live music and band portraiture and the amount of detail I can recover from the shadows of Raw files is truly impressive. Simply put, the flexibility of Nikon’s Raw files have, at times, been job saving. The D750 also holds its own in very low light shooting as well as some of the very best cameras I’ve tested. The same goes for AF performance; I rely heavily on a camera’s AF system for shooting in dark venues (I try to avoid using a flash as much as possible), and the D750 provides AF acquisition speeds and performance comparable with the best.

    Video capture and Wi-Fi were also two features I had long yearned for in my D700. And while you can find other DSLRs and mirrorless cameras that offer a wider range of video function, and higher-resolution capture, the D750 is still a pleasure to use for multimedia, and the video quality is very good. Wi-Fi connectivity is also painless to use, and quite handy for transmitting images in a pinch. A close friend of mine, who also purchased a D750 around the same time, swears the D750 has revolutionized the way he sends image of breaking news assignments back to his editor. Of course Wi-Fi connectivity in cameras is nothing new, but the D750 was the first full frame Nikon to offer it, and it does so in a reliable fashion.

     ISO 6400, 1/160 sec, F2.8. Shot with a Nikon 24mm F2.8D affixed.

    At the end of the day, the D750 may not be the greatest camera of all time. And there are plenty of cameras that beat it out in specific shooting scenarios, but as a long time Nikon user, looking for the perfect all-arounder to compliment my system, it is the best camera for me.

    Working at a website like DPReview, I constantly think about cameras in terms of the future. Will mirrorless cameras completely surpass DSLRs to become the pros’ tool of choice? Will the D760 do 4K? How about a Nikon full framer with a stabilized sensor, to bring VR to all lenses? The point is, we can dream and dream, and the perfect camera will always be just one rumor away. But at the end of the day, the best camera is the one you have. And I’m happy to call the D750 my own, finally.

     ISO 3200, 1/400 sec, F2.2. Shot with a Nikon 85mm F1.8D affixed.

    Articles: Digital Photography Review (dpreview.com)

  • Macphun Aurora HDR Pro Software – First Impressions

    HDR, or High Dynamic Range, photography originally started as an attempt to correct the limited dynamic range for standard camera sensors, compared to what the human eye can see or perceive. This is not a new concept, but in case you’ve never heard of it, allow me to explain.

    Back in the day, camera sensors had an average dynamic range of about 5–7 stops, where our eyes can easily adapt and recognize ranges from 11 to 14 stops. Nowadays, sensors of modern cameras are much more capable in terms of dynamic range, but they still, depending on the situation, can’t capture the whole range.

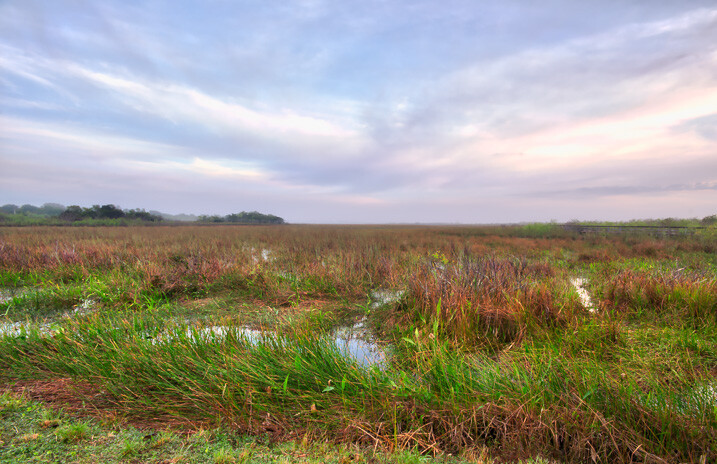
    5 Images 1 Stop Apart - Basic Preset - Slight Contrast Adjustment

    5 Images 1 Stop Apart – Basic Preset – Slight Contrast Adjustment


    So HDR techniques utilize multiple images, with different exposures, of the same subject, that are then merged together to create an exposure range closer to what we can perceive with our eyes. Of course, this is not a new concept, and there is always a lot of controversy among photographers regarding the subject. Some people like it extreme or artsy, and others like it more natural. Both can be achieved through HDR methods. There are many different techniques and types of software for doing HDR. But, not all of them are easy to use and understand, with resulting images that are not natural, and over-processed.

    Recently Macphun, one of the world’s leading developers in consumer and professional photography software for the Mac, has teamed up with Trey Ratcliff, an artist and HDR pioneer who mastered the technique, gaining over nine million fans. According to their statement, “Aurora HDR contains every imaginable tool needed to produce high-quality next generation dramatic images.”

    I’ve been a fan of Trey’s wonderful images myself, so when I heard about the software, I wanted to give it a try. I just received a copy and have been playing around for a couple of days.

    5 Images 2 Stop Apart - Treys Angels Within Preset - Slight Contrast Adjustment

    5 Images 2 Stop Apart – Treys Angels Within Preset – Slight Contrast Adjustment

    Some of the key benefits of Macphun Aurora HDR Pro, as described by the developer, are:

    • Revolutionary HDR algorithms make possible the entire spectrum of HDR looks, from natural to highly stylized.
    • Total HDR editing experience with the most complete set of tools available.
    • Powerful one-click presets, including Signature Pro presets by Trey Ratcliff, yield fantastic results instantly.
    • Layers, masking and brushes provide the ultimate in selective editing.
    • Unique Radiance controls and custom texture blending for creative versatility.
    • Detail enhancement to increase drama in images.
    • Extensive color and toning controls for vibrant color combinations.
    • Approachable user interface makes for a comfortable, understandable experience.
    • Built-in sharing supports popular photo communities and social networks.
    • RAW, JPG, TIFF and other popular files support for the greatest flexibility.
    • Workflow tailored to any style, with support for using as a standalone app, or as a plugin to popular host applications.
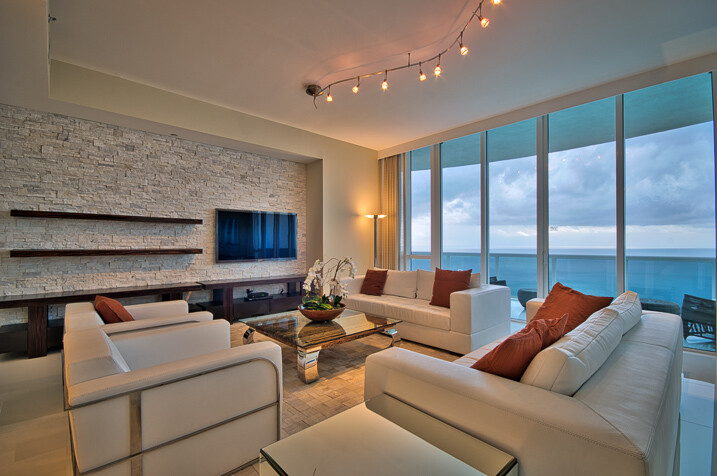
    7 Images 1 Stop Apart - Indoor Bright Preset - Slight Contrast Adjustment

    7 Images 1 Stop Apart – Indoor Bright Preset – Slight Contrast Adjustment

    As mentioned above, the software can be used as a stand-alone application or as an plugin host operation within Adobe Photoshop, Adobe Lightroom or Apple Aperture. Because Lightroom is my base, I have chosen to use it from there.

    After the installation, it took me a while to figure out how to make it work with Lightroom. Most plugins automatically install the extensions but with Aurora, you actually need to open the program, open an image, and then go to the Aurora HDR Pro menu and select Install Plug-Ins. In my opinion, I think it would be better in future editions to have the option of installing the plug-ins upon the initial installation, rather than having to go through this process. But after that, it integrated with Lightroom flawlessly.

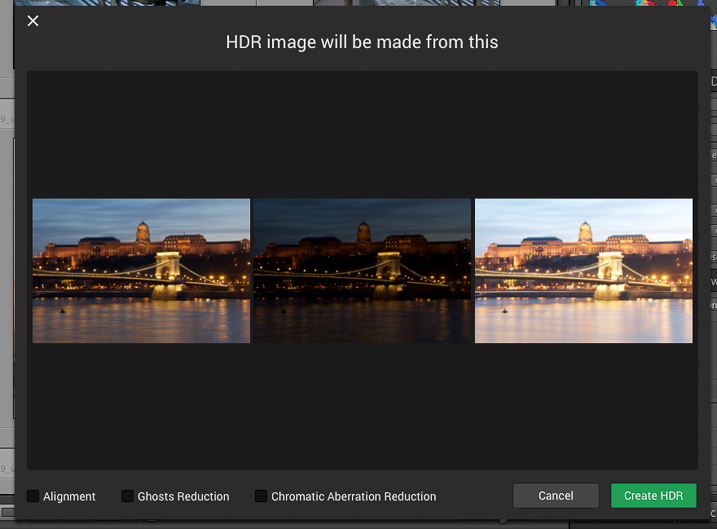
    When launched, the first window that shows up displays the images from which the HDR will be made, as well as options for Alignment, Ghosts and Chromatic Aberration Reduction. So far so good. Pick alignment if the images were shot hand-held, pick Ghosts Reduction if there are moving subjects, and so on.

    MacPhun-Aurora-HDR-First-Impressions (2 of 4)

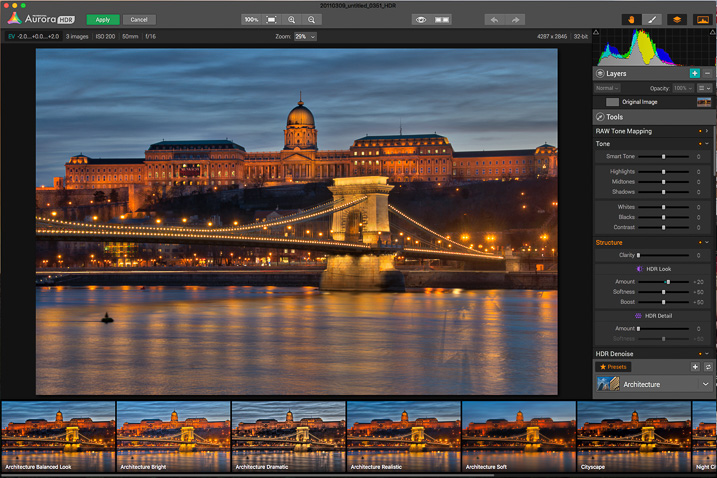
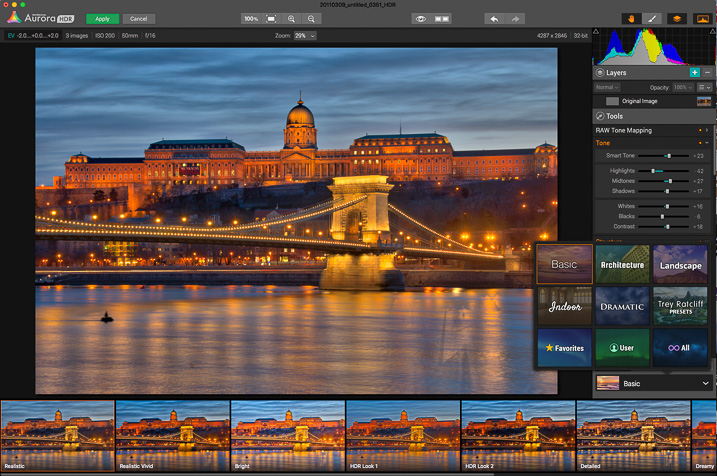
    Once you click Create HDR, the images are combined and the main interface will open up. The interface is well-rounded and easy to navigate. It features a large image view with three main sections: a navigation and tool bar at the top, layer and adjusting tools on the right side, and presets selections at the bottom.

    MacPhun-Aurora-HDR-First-Impressions (3 of 4)

    On the top bar you’ll find: the zooming tools, quick preview and compare options (to check against your original and edited images), a move tool (to move around when zoomed in), and a brush and eraser to use in layers (when creating masks) and the layers tool.

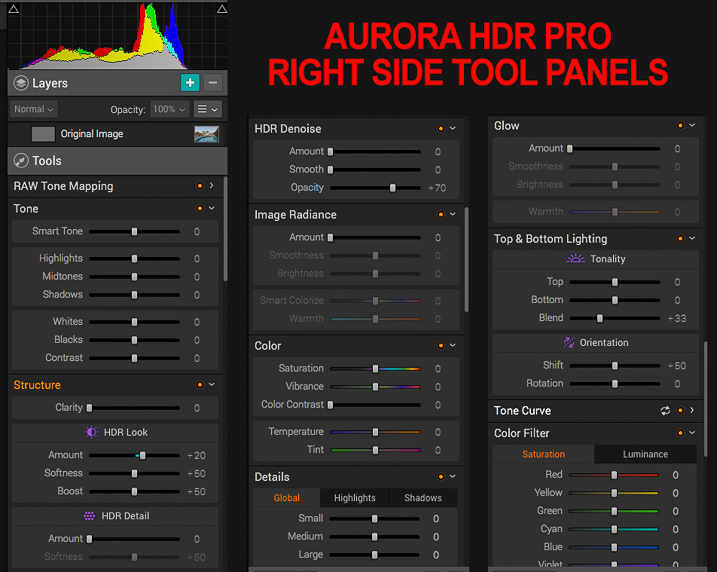
    The main section of right panel contains the following tools:

    • Histogram: Displays the complete tonal range of your image from dark to light. Similar to in Lightroom, clicking the upper right and left corners will display the black and white clipping points.
    • Layers: I really liked this one; layers are a great way to stay organized and add different effects on your image by isolating them using masks. You can add as many layers as you want, and they can be also applied using different blend modes: normal, soft light, hard light, overlay, multiply, screen luminosity and color. They pretty much work as they do in Adobe Photoshop.
    • Tone Mapping: This panel controls how Aurora HDR compresses the files, and the weight it places on each exposure in the bracketed set.
    • Tone: This panel controls the highlights, mid-tones and shadows; it also helps with contrast, as well as pushing the black and white points.
    • Structure: This panel has several functions, but think of it as clarity on steroids. It works by finding edges, and avoids adding contrast to edges but rather, it affects areas. It contains several sliders to play with, including, of course, “Clarity” as well as sub-panels called “HDR Look” and “HDR Detail.” From here you can increase and decrease the texture of the image.
    • HDR De-noise: A tool to eliminate noise and artifacts produced by the merging of the photos.
    • Image Radiance: You can clearly notice Trey’s hand in this one; it gives a “dreamy” feeling to the photos.Right Panel Tools (1 of 1)
    • Color: Includes controls for adjusting color, vibrance, color contrast, temperature and tint in the image.
    • Details: Increased clarity, detail, and sharpness to bring out the details in an image. As there is no sharpening function, this works as a sharpening tool.
    • Glow: Another creative tool. With this one you can create softening effects to the lighter tones.
    • Top & Bottom Lighting: I really liked this addition too; they work similar to a graduated neutral density filter. This control splits the image in two segments and darkens or lightens the image.
    • Tone Curve: The curves tool. As in Adobe Photoshop or Lightroom, if you are familiar with working with curves, the panel is there. You can apply it overall, or it also works with independent channels: red, green and blue.
    • Color Filter: The color filters are available to adjust saturation and luminance to specific colors. It works similar to the HSL panel in Adobe Lightroom, but the Aurora Software lacks the hue option and is limited to six basic colors. Still, it is good to have it there to adjust. I’m not pretending to compare it with Lightroom as this is a different software; just mentioning options that you could be familiar with.
    • Color Toning: With this one you can change the tone of either the highlights or the shadows, and individually increase or decrease saturation of the same. A really nice creative tool for split toning. I also really like the preset options on top of the panel.
    • Vignette: The traditional vignette tool. It works as expected, but there is something very clever as well: the Inner Light function allows you to add more light to the center, or any part of the image.

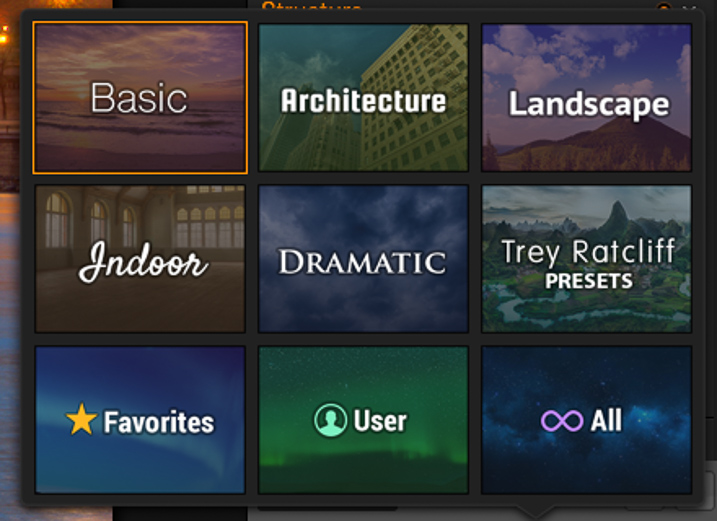
    Lastly, there are the presets, created by Macphun and Trey himself. They provide a good starting point to try out different looks in a single click. Of course, you can also create your own presets and save them for future use.

    MacPhun-Aurora-HDR-First-Impressions (4 of 4)

    MacPhun-Aurora-HDR-First-Impressions (5 of 4)

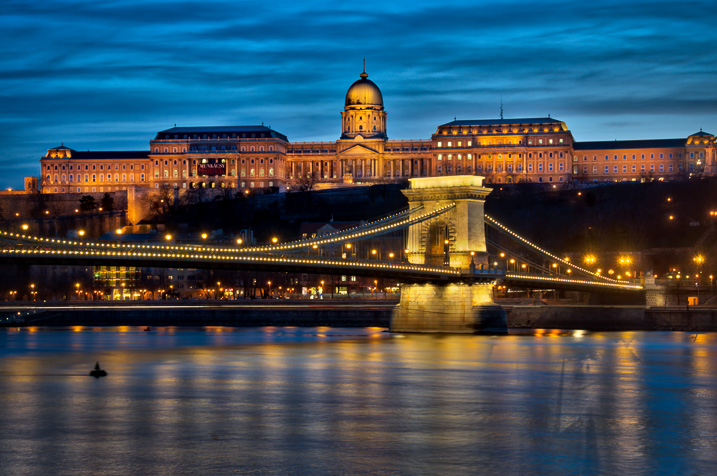
    I created the image below by using three images, shot two stops apart. I started with the Basic Realistic preset as a base, and played with the sliders until I got what I wanted. Then, I added a layer to add more light to the palace in the foreground, and masked out the rest.

    One of the things that I’ve noticed while working, is that the application is fast compared to other software I’ve used in the past, and that is a godsend. Everything loads fast, and the application seems to be very responsive. I’ll definitely continue to use it in the future and test more functions.

    MacPhun-Aurora-HDR-First-Impressions (6 of 6)

    Whether you are an HDR fan or have never experimented with the technique, you should give Macphun Aurora HDR Pro a try. This is a well-rounded application that can serve the needs of pros and amateurs alike.

    Unfortunately, the software is only available for Mac, but I think overall it is a great alternative. They are currently three options. The Aurora HDR currently retails for $ 49.99; with this option there is no RAW support, and it can just run as a standalone application. The tested version is the Aurora HDR Pro that retails for $ 99, and there is also a package that includes the application plus training for $ 129.

    googletag.cmd.push(function() {
    tablet_slots.push( googletag.defineSlot( “/1005424/_dPSv4_tab-all-article-bottom_(300×250)”, [300, 250], “pb-ad-78623” ).addService( googletag.pubads() ) ); } );

    googletag.cmd.push(function() {
    mobile_slots.push( googletag.defineSlot( “/1005424/_dPSv4_mob-all-article-bottom_(300×250)”, [300, 250], “pb-ad-78158” ).addService( googletag.pubads() ) ); } );

    The post Macphun Aurora HDR Pro Software – First Impressions by Daniel Korzeniewski appeared first on Digital Photography School.


    Digital Photography School