RSS
 

Archive for September, 2015

How to Create Better Photos by Adding a Sense of Motion

10 Sep

Photographing subjects in motion can be kind of tricky because of the very nature of photography as an art form: cameras capture still images, not moving pictures (unless you are Harry Potter and like to read the Daily Prophet).

Of course, one solution is to record a movie with your camera or phone, but even a movie is in itself a series of still images projected quickly, that only give the illusion of motion. Each individual frame is not moving, but put together it appears as though everything you see is changing. Another solution, and one I generally prefer, is to use some knowledge of composition to create a sense of motion in a single photograph. It’s not all that difficult, but these techniques do require a bit of knowledge, a lot of practice, and in the end your photos will be much more dynamic and interesting as a result.

motion-and-composition-bike-car

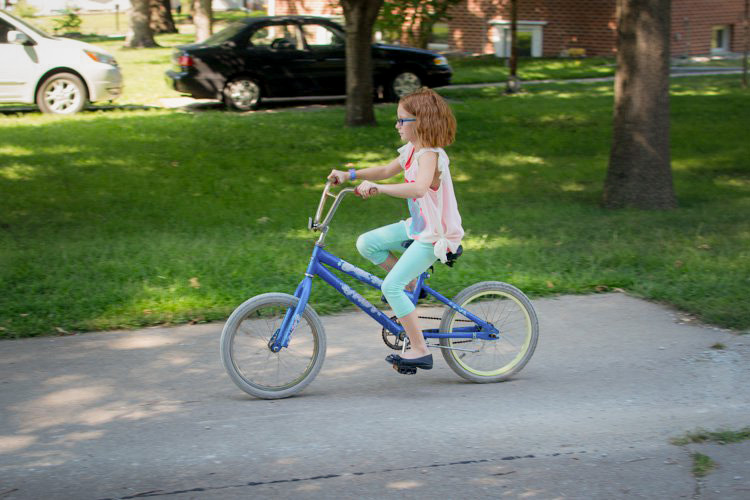
One of the most basic elements of composition is called the Rule of Thirds. It has to do with putting your subjects off-center in order to add more visual impact to your photos. It’s not a hard-and-fast rule, and some people swear by it while others reject it altogether, but understanding how it affects motion photography can go a long way towards giving your pictures an extra boost. To offer an example, take a look at the following image of my niece on her bike.

motion-and-composition-bike-center-panning-2

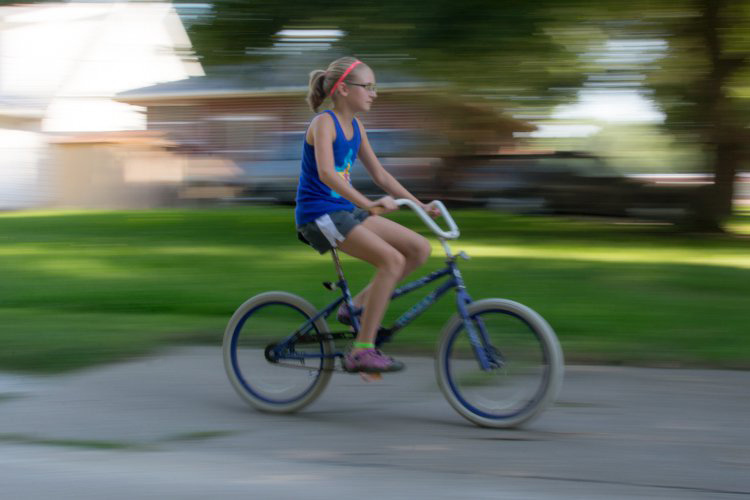
My niece on her bike. There’s clearly a sense of motion, but putting her in the center is not the best use of photographic compositional space.

This image involves a technique called panning, which helps create the illusion of motion by tracking a moving subject with your camera, while the shutter is open. But, take a look at how the girl is framed – she in the center of the image, and you can see her surroundings on all sides. It seems like a good picture at first, but take a look at how a simple compositional change can have a dramatic impact on the sense of motion created by the image.

motion-and-composition-bike-center-panning

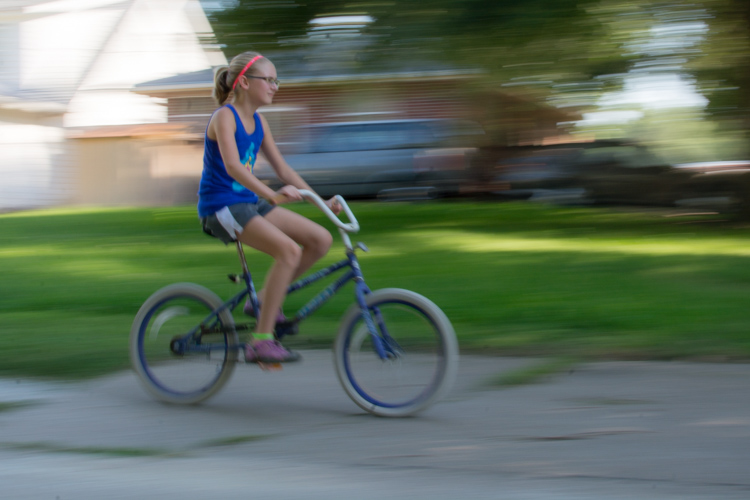
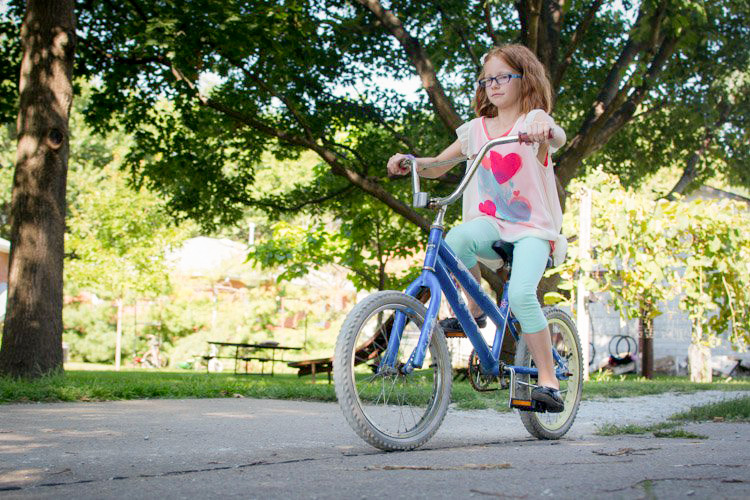
Putting the subject off-center shows not just that the girl is biking, but the space into which she is traveling.

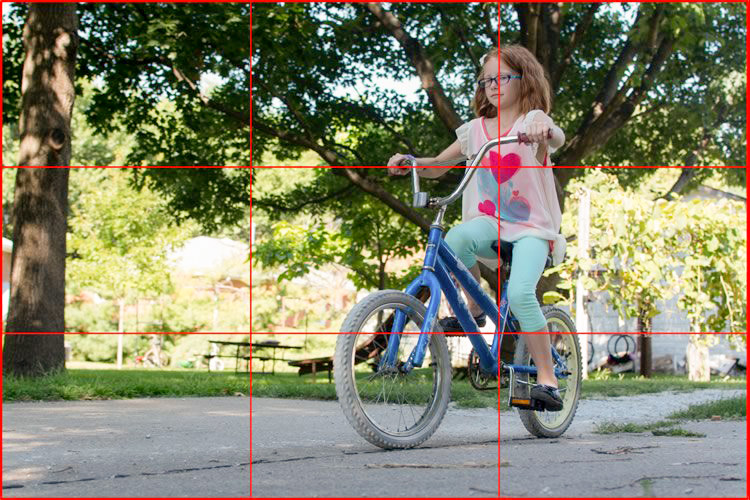
I took this second picture using spot focus on my camera which allowed me to select which focusing point to use, and selected a point on the left side of the frame. Doing this placed my niece right along one of the vertical gridlines, if we look at this image as it relates to the classic Rule of Thirds:

motion-and-composition-bike-left-panning-grid

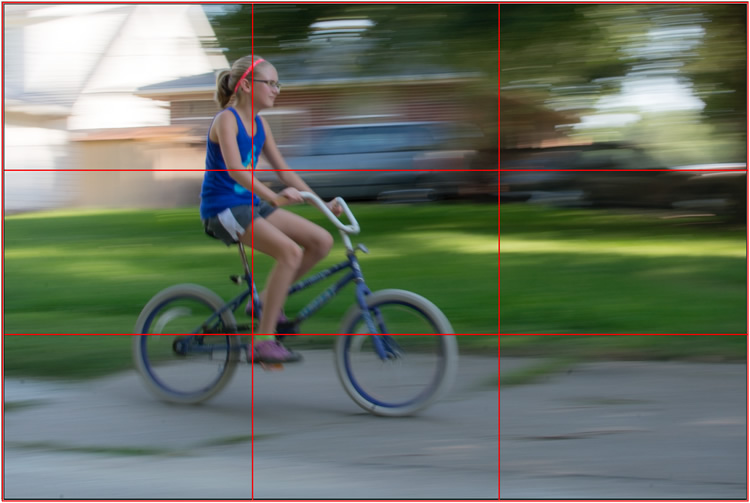
Both the girl, and her bicycle, line-up with the one-third dividing lines, which helps create a more pleasing and dynamic composition.

Aligning my subject on the left third of the image (and the horizontal center of the bike along the bottom third) has done a couple of things. First, it makes for a more pleasing image due to the off-center placement of my subject. It allows us to see more context overall, since she is on one side and not dominating the entire image. Second, the other goal this placement accomplishes has to do with motion – we see her not only biking, but biking to somewhere. By showing us where she is going, our minds essentially create a greater sense of movement because we can see more context.

This works almost any time you have an object in motion, whether you employ the panning technique or not. Simply placing your subject on one side of the image (often along one of the dividers according to the Rule of Thirds) such that it is moving in the direction of the rest of the image (put more space in front of the subject than behind), will help your photos will seem much more dynamic and interesting. It helps your viewers to get a sense that they were actually there with you at the moment of the picture.

If panning isn’t quite your thing, you can still employ some compositional techniques to create a greater sense of motion. Here’s a picture of my other niece riding her bike that I took from a standing position. I see pictures like this posted online quite a bit, and while they are not bad photos, a change to how they are composed can dramatically alter the visual impact.

motion-and-composition-bike-center-2

My other niece biking, taken from a standing position without much thought put into overall composition.

Again you see that she is in the center of the image (above), and while this picture is perfectly serviceable, there is a lot that can be done to create a greater sense of motion. Here’s another picture of the same scenario, but taken from ground level as she approached me down the alley.

motion-and-composition-bike-right-2

Altering my angle to be low to the ground, and putting the girl on the right-hand side, creates a much more dynamic photo. This was shot with a DSLR but could have easily been taken with any camera or even a mobile phone.

I had to lie on the ground to get this shot, but the results were well worth it. The low angle helps make the shot much more interesting, and the open space on the left side shows us the empty street that she will soon be riding on. This general framing is used all the time in photos of moving objects, and is a favorite of the advertising industry as well: you will often see pictures of sports cars not from the top and side (as in the first of these two bike photos) but from a low angle, and the front wheels turned away from the viewer, much more akin to the second photo. And sure enough, this image also conforms quite well to the good old-fashioned Rule of Thirds.

motion-and-composition-bike-right-grid-2

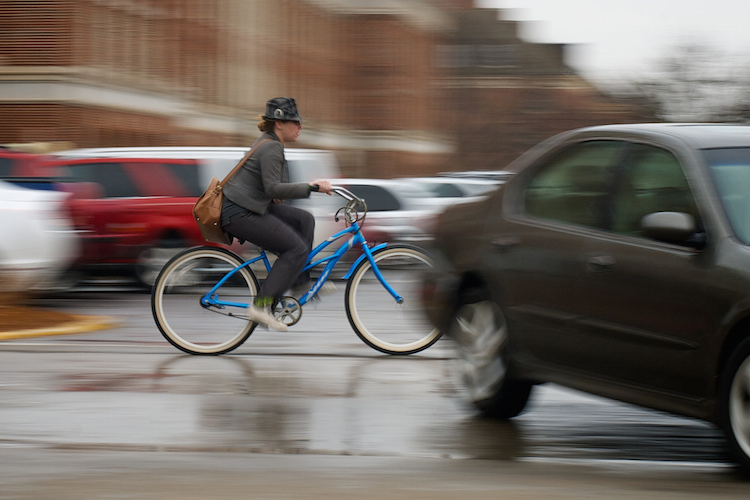
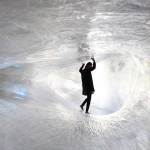
There are other ways to play with composition to create a sense of motion in photos; the Rule of Thirds is just the beginning. This photo of a man walking past a fountain violates the first rule about showing the subject on one side moving towards the rest of the image, but it works because we’re not so much interested in where he is going but what the entire scene is about.

motion-and-composition-fountain

Putting the subject on the left side of this photo creates a different mood and tone than if the man were on the right-hand side.

By using a longer shutter speed, and holding my camera still I was able to capture motion, not only in the man walking, but the water rolling off the fountain. If the position of the man and the fountain were reversed it might look as though he is walking into it. But as it is, the motion of my human subject is one part of the picture as a whole, and the falling water adds another dynamic layer to the image.

The placement of the man creates a bit of tension as well; he is clearly carrying something, and from the words on the wall it’s obvious that he is walking past a library. Is he a student that’s late for class? Is he walking fast to catch up to some friends who are out of the frame? Putting him on the right-hand side would make the image seem a bit more casual and informal. But, intentionally composing this shot so that he is about to walk out of the frame, imparts a different feeling on the viewer that can be very effective when used properly. Also note that both the fountain and the man line up roughly with the traditional Rule of Thirds grid, which helps create a more pleasing composition all around.

I should note that the reliance on the Rule of Thirds can become a crutch, and there are many creative ways to take motion-based images without it. What about you? What are some compositional tricks you have found to help create a sense of motion in your photographs? Do you have any favorite motion images to share? Leave your thoughts in the comments below.

googletag.cmd.push(function() {
tablet_slots.push( googletag.defineSlot( “/1005424/_dPSv4_tab-all-article-bottom_(300×250)”, [300, 250], “pb-ad-78623” ).addService( googletag.pubads() ) ); } );

googletag.cmd.push(function() {
mobile_slots.push( googletag.defineSlot( “/1005424/_dPSv4_mob-all-article-bottom_(300×250)”, [300, 250], “pb-ad-78158” ).addService( googletag.pubads() ) ); } );

The post How to Create Better Photos by Adding a Sense of Motion by Simon Ringsmuth appeared first on Digital Photography School.


Digital Photography School

 
Comments Off on How to Create Better Photos by Adding a Sense of Motion

Posted in Photography


Think Tank unveils Retrospective Leather and Mirrorless Mover 25i bags

10 Sep

Think Tank has expanded its Retrospective photography bag lineup with leather versions of its bags – the Retrospective Leather 5, Leather 7, and Leather 30. The company describes these as ‘upscale, rugged shoulder bags’ with a new Dual Cross buckle on the front flap, Sound Silencers that eliminate front flap noise, YKK zippers, removable padded dividers, and a removable carrying handle. Read more

Articles: Digital Photography Review (dpreview.com)

 
Comments Off on Think Tank unveils Retrospective Leather and Mirrorless Mover 25i bags

Posted in Uncategorized


6 Tips for Taking Better Natural Light Classic Portraits

10 Sep

On now until September 22nd (2015) over on Snapndeals – 20% OFF Wayne’s eBooK – Portrait Tips and Techniques: Natural Light Black & White Portraiture. Grab it before the deal expires.

DPS STUDY 1

RETHINKING NATURAL LIGHT

Many photographers choose to use natural light as their chosen style, almost as a badge of honour. Natural light is a wonderful source, providing ease of use and flattering light to your subjects, but you should be using it the same way as you would studio lights. You need to create light and shade that will add emotion or mood, not flat lighting that gives no shape, texture or mood. Hopefully these tips will help you on a path to refining your natural light classic portraits.

#1 – FINDING QUALITY LIGHT AND SHADOWS

First, find good quality light – preferably open shade, as this offers soft flattering light and is lower in contrast. Avoid the sun as your main light as it will cause harsh shadows and squinting, which is undesirable for quality portraits.

Open shade can be found under awnings, the edge of trees or buildings, and inside doorways or windows, for example. In these images the girls are positioned approximately 1.5 metres (5 feet) inside the doorway of an old timber shed.

Look for the shadows; they are equally important. Shadows subtract the light and create shape and mood.

After you have established your location, check the background. Even if you have found the perfect, open shaded location, make sure the background isn’t too contrasty with sunlit areas. These can be visually distracting, so try and select uncluttered backgrounds that are lower in contrast and darker than the subject’s face. This will allow the face to project forward by being the lightest tone against the background (all the images in this article demonstrate this).

DPS STUDY 2

#2 – FIND THE DIRECTION OF LIGHT

Once you have found good quality of light, check its direction. You want the light to come across your subject’s face at approximately 45 degrees to the nose, and from a higher angle. That height should also be at around 45 degrees, as a basic starting point.

You can check the catchlight positioning by looking at the eyes; there should be one in both eyes at around 10-11 or 1-2 o’clock. (This depends on the side of the face that is being lit and the structure of the eye sockets). Deep-set eyes will need a slightly lower light source. You should also notice the nose shadow to be at around 45 degrees.

To lower the catchlights you need to change the angle of your subject’s head by tilting more or less. Even moving the subject further away from the edge of an overhang will lower the angle of the light. It’s the opposite of being in a studio where you can move the lights. Natural light is fixed and requires you to move the subject and/or camera to achieve good lighting.

DPS STUDY 3

#4 – EYES ARE WINDOWS TO THE SOUL

Catchlights are very important in portraiture. They not only guide you where the light is coming from, but also create a sense of depth. TIP: no catchlights = NO photo. When there are no catchlights, there will be minimal, if any, texture and colour in the eyes. Always study the eyes for guidance.

#5 – SIMPLE POSING

The portraits here are the basic classic style, looking into the camera. It’s usually more flattering to angle the shoulders away from the camera, again 45 degrees is a handy starting point. Leaning the bodies and heads toward each other gives an emotional connection. Upright or leaning away would show detachment from each other.

It’s also a good practice to have the noses turned slightly away from the camera, particularly with adults. Noses that point directly at the camera will look broader in many cases, particularly when combined with flat lighting. With kids, it’s not as critical and good lighting will create better shape.

Arms and hands need to be posed simply so as not to draw attention. In images #1 and #2 above (top of article), the lower arms are bent downwards and the hands clasped softly. Things you should avoid are open fingers, particularly draped over a shoulder, as this can make a portrait busy and untidy. Elbows bent at 90 degrees should also be avoided. Here’s a simple mantra to remember when it comes to posing people’s heads, arms, legs, hands, hips, shoulders, etc:

IF IT BENDS – BEND IT. IF IT CURVES – CURVE IT. IF IT TWISTS – TWIST IT.

Applying this will help you avoid static poses.

DPS STUDY 4

DPS STUDY 5

#6 – EXPRESSION

Above all else, expression is the most important element in a portrait. In most cases, a poorly lit and posed portrait with a beautiful expression will trump a technically perfect portrait with an average expression in most cases, but this is no reason to pursue a path of mediocrity.

Expression is a personal thing. A moody, soulful style is my preference, but your sessions should always include various expressions such as laughing, smiling, pensive, etc. To achieve this soulful style you can’t be jumping around in a hyperactive mood expecting soulful looks. The best approach is a more Zen-like style, quietly giving direction. These classic style portraits produce beautiful open eyes, relaxed facial muscles, and true shape to the lips. Truly timeless, heart and soul portraits, but it all takes PRACTICE.

DPS STUDY 6

SUMMARY

  • Treat natural light photography the same as studio lighting.
  • Find quality soft light.
  • Look for shadows to create shape and mood.
  • Place your subject at 45 degrees to the light as a starting point.
  • The light source is fixed, so move your subject and camera to reduce the height of the light in the eyes.
  • Check for catchlights in the eyes.
  • Simplify your posing.
  • Soft expressions work best for classic low-key portraits.

SPECIAL NOTES

With each of these images, other angles of the face (2/3 face and profile) can be achieved by simply moving the camera position. Although the pose and light would remain the same, you may have to adjust the head tilts slightly and check your backgrounds.

Clothing colours also play a big part with quality portraits. Darker clothing works best for low-key portraits. Your eyes should be drawn to the brightest tone in the portrait, therefore, light-coloured clothing would be visually distracting.

On now until September 22nd (2015) over on Snapndeals – 20% OFF Wayne’s eBooK – Portrait Tips and Techniques: Natural Light Black & White Portraiture. Grab it before the deal expires.


googletag.cmd.push(function() {
tablet_slots.push( googletag.defineSlot( “/1005424/_dPSv4_tab-all-article-bottom_(300×250)”, [300, 250], “pb-ad-78623” ).addService( googletag.pubads() ) ); } );

googletag.cmd.push(function() {
mobile_slots.push( googletag.defineSlot( “/1005424/_dPSv4_mob-all-article-bottom_(300×250)”, [300, 250], “pb-ad-78158” ).addService( googletag.pubads() ) ); } );

The post 6 Tips for Taking Better Natural Light Classic Portraits by Wayne Radford appeared first on Digital Photography School.


Digital Photography School

 
Comments Off on 6 Tips for Taking Better Natural Light Classic Portraits

Posted in Photography


Cecilia Gallery Camera Neck Strap Giveaway

10 Sep

Fashion Photography Blog & Cecilia Gallery presents The Classic Camera Strap Giveaway CompeitionFashionPhotographyBlog.com had recently reviewed Cecilia Gallery’s 2.5cm neck straps. Today, I’m going to let you know just how you can own one of these gorgeously crafted neck straps for your cameraOne of our readers will be the lucky recipient of a black 2.5cm neck strap for their camera valued at $ 68USD,  courtesy of Cecilia Gallery. Now to the exciting part, to decide on who we should give this prize to, we at FashionPhotographyBlog.com are currently holding a competition till the end of this month.


How To Enter The Great Camera Strap Giveaway


1) Take a photo of your favorite item that you use as a photographer.


The item doesn’t need to be restricted to cameras; feel free to think outside the box as much as you want to. It could be an accessory, a piece of software, a tablet, computer or electronic equipment, a book or even an app just to name a few examples.  Feel free to be as creative as you like in the photo – you may even want to appear in the photo if you are comfortable being seen in it. Just make sure that we can clearly identify what the item is (so watch those gradient filters and gaussian blurs ;).


2) Write a short description of at least 25 words telling us why it’s your favorite item that you use as a photographer. You can include how it has benefited yourself or how useful the item has been to your photography. We want to hear why you love it so much!


3) Email these to the team at FPBlog via competition@fashionphotographyblog.com with your first and last name so we know whose entries are whose. Make sure you include the subject line: The Classic Camera Strap Giveaway


4) You can enter as many times as you like, just that each entry needs to be accompanied with a photo and description. One lucky winner will be chosen from the selection by our judging panel.


5) Competition starts now and closes at the end of this month, September 30th at Midnight.

Cecilia Gallery 2.5 cm Camera Neck Strap Review

So that’s how you can will one of Celia Gallery’s trendy 2.5cm neck straps. Make sure that you stay up to date on the contest and tune in to receive the announcement we will make making after the competition ends:


1) LIKE us on Facebook and follow us on social media.

2) Join our mailing list


We would like to thank Cecilia Gallery for supporting our site and offering one of their newly released 2.5cm neck straps as our giveaway prize. We have officially started the competition and are now open for receiving entries.


A big good luck everyone! There can only be one winner:”) 


IMAGE SOURCE:

Image 2 courtesy of Cecilia Gallery


Fashion Photography Blog

 
Comments Off on Cecilia Gallery Camera Neck Strap Giveaway

Posted in Uncategorized


5 Tips for Newbie Landscape Photographers

10 Sep

2-for-1 special

As part of Landscape Photography Week here on dPS, we’re offering TWO for the price of ONE on our best-selling Living & Loving Landscape Photography ebooks!

Click here to take advantage of this offer.


I don’t specialize in Landscape photography but I wanted to go out and see what I could learn so that I could impart some useful tips for beginners who are new to shooting landscapes.

Gear for landscape photography

What gear did I bring with me? I brought two cameras, one lens and a tripod. A wide angle is generally the go-to lens for landscape shooting. I brought my 24-120mm f/4G.

Landscape shot of the Dublin mountains

The Dublin mountains

A tripod is essential for landscape photography for two reasons. First, you will will want to shoot with a small aperture like f/16, that means also using a slower shutter speed. It is better to keep ISO down low to 100 or 200 for less noise. Secondly, by having your camera on a tripod also helps you frame your shot, I’ll cover this more below. If you are going to do long exposures, I would recommend a cable or remote trigger release too. You could also use the built-in self-timer.

Note: I didn’t mention any kind of filters as in Neutral Density (ND), polarizers and so forth. I don’t have any, but I also feel that they are best used when your skills are more advanced and you want to capture movement to produce soft, blurry clouds and misty waterfalls. Plus they are not cheap to buy.

1 – Where do you start?

Start in your own locality. I know for me, I can get so used to my surroundings, that I don’t bother to actually see what’s there. I suppose it’s just familiarity. But when you travel to a new country you have fresh eyes, and everything around you is new and exciting.

So as I live at the foot of some wonderful mountains, I knew where to begin. By car, it only takes me 20 minutes (approximately) to arrive at some breathtaking scenery. My first port of call was this spot, see photo above.

Scoping an area beforehand is an important aspect in landscape photography. This gives you a lay of the land, a chance to look for the best vantage points, see where the sun sets, and so on.

2 – Time of day

The time of day is crucial, as most landscape photographers shoot in the golden hour or at dawn. This doesn’t mean that you can’t shoot at any other time of the day.

Trees-in-forest

Tibradden forest in the Dublin Mountains. I know it’s not taken at the golden hour but I do like the blue sky and white clouds peaking through the trees.

3 – Shoot Raw

I am not going to debate the merits of RAW versus jpeg here. Simply put, RAW offers the most detail, which is essential if you want to get the best out of your images for landscape photography. You can also use the graduated filter in Adobe Camera Raw (ACR) to retrieve details that may have been lost, such as blown out skies, or underexposed areas in mountain regions where shadow detail needs to be brought out. See more about using the Graduated filter in ACR.

The reason Graduated Neutral Density filters (not to be confused with regular Neutral Density filters) are used by landscape photographers is because the land and the sky need different exposure readings – so if you expose for the sky, the land can be too dark and if you expose for the land, the sky gets washed out. This is where a graduated filter comes in handy. The top part is dark, fading to transparent at the bottom.

4 – Where to focus?

For landscapes, you are usually aiming to have the foreground, as well as the background, in clear focus. So, you need a small aperture such as f/16. This means that the depth of field (DOF) is bigger, and more of the image is in sharp focus. As a general rule of thumb, you should focus roughly one-third up from the bottom of the frame.

Focus on an element in your scene using autofocus then switch back to manual focus on the lens to lock it. This ensures that you achieve maximum sharpness and depth of field throughout. If you have Live View, you can zoom the view in to full magnification to manually focus. For more in-depth knowledge on focusing for landscapes, especially how to use hyperfocal focusing, I’d recommend that you read Getting Landscapes Sharp: Hyperfocal Distances and Aperture Selection.

5 – Composition

Composition is essential when framing a landscape shot. I really had to change my style of shooting. I spent more time looking around before even pressing the shutter button. I needed to see what I was going to frame in my shot. The landscape around me was fantastic and expansive.

This is where the rule-of-thirds is a useful guide. Think of your photo with imaginary lines that are drawn dividing the image into thirds both horizontally and vertically. Place important elements of your composition where those lines intersect.

Rule-of-thirds for composition

I really like this tree and the way it’s branches were leaning in so far to the left of the photo. I thought one of the branches seemed to hover over the gap in trees in the background which seemed to say what-is-through-there? Maybe I have watched too many Hobbit movies!

Don’t be afraid to experiment. The next shot maybe not classified as a typical landscape shot but I just loved the lighting on the ferns. I opened the aperture to f/4.5 because I wanted a shallower depth of field, so that the background was a little blurred, giving the ferns some separation from the background.

Close-up-ferns

Close-up of some ferns in Tibradden forest in the Dublin Mountains using a wider aperture of f/4.5

You don’t have to shoot just using landscape (horizontal) mode, try shooting in portrait mode (vertical) as well. I shot the next two images using the portrait style. I wanted the rope bridge to be the focus of attention amongst all the tall trees.

Activity-park-in-forest

A rope bridge forms part of an activity centre in Tribadden forest.

rope-bridge-shadow-in-forest

The shadow of the rope bridge suspended 13 metres up in the trees made an interesting viewpoint leading into the base of the tree.

Tip: Trees like buildings can converge when using wide angle lens. This can be corrected in post-processing, using the lens correction filter in Photoshop or Lightroom. Also try not to have the body of trees touching the side of your frame, crop them out. It will only make your shot close in on itself, give your image room to breathe.

Conclusion

All in all, this exercise was a great excuse to get outdoors and get fresh air. If you don’t shoot landscapes, I would certainly recommend going out and giving it a go. It makes for a great day out plus you are honing your photography skills, just don’t forget the sandwiches!

Are you a landscape photographer? What techniques did you use? If so please share in the comments below.


Here on dPS this is landscape week – here is list of what we’ve covered so far. Watch for a new article (or two) on landscape photography daily for the next day or so.

  • 6 Tips for Better Low-Light Landscape Photography
  • Landscape Photography and the Human Element
  • 5 Ways a Telephoto Lens Can Improve Your Landscape Photography
  • Landscape Photography from the Side of the Road
  • 32 Majestic Landscape Photos to Inspire Your Wanderlust
  • Weekly Photography Challenge – Landscape
  • Landscape Photography – Shooting the Same Location Through the Seasons
  • How to Solve 5 Composition Conundrums Faced by Landscape Photographers
  • 6 Tips for Creating More Captivating Landscape Photographs
  • Tips for Getting Started with Urban Landscape Photography
  • 3 Simple Steps to Make Your Skies Pop in Lightroom
  • Equipment Tips for Landscape Photography

googletag.cmd.push(function() {
tablet_slots.push( googletag.defineSlot( “/1005424/_dPSv4_tab-all-article-bottom_(300×250)”, [300, 250], “pb-ad-78623” ).addService( googletag.pubads() ) ); } );

googletag.cmd.push(function() {
mobile_slots.push( googletag.defineSlot( “/1005424/_dPSv4_mob-all-article-bottom_(300×250)”, [300, 250], “pb-ad-78158” ).addService( googletag.pubads() ) ); } );

The post 5 Tips for Newbie Landscape Photographers by Sarah Hipwell appeared first on Digital Photography School.


Digital Photography School

 
Comments Off on 5 Tips for Newbie Landscape Photographers

Posted in Photography


G-Technology updates Evolution range with adapters, readers and portable storage

10 Sep

Data storage manufacturer G-Technology has revamped products within its Evolution series and has added adapters to make its family of docks and drives more flexible. Read more

Articles: Digital Photography Review (dpreview.com)

 
Comments Off on G-Technology updates Evolution range with adapters, readers and portable storage

Posted in Uncategorized


Cecilia Gallery Camera Neck Strap Review

10 Sep

Hey there FashionPhotographyBlog.com readers! A while ago we posted a review of the unique camera straps produced by New York-ased, camera strap manufacturers, Cecilia Gallery. We loved the Incan-inspired Peruvian designs and great quality of the Argentinian leather in their hand-crafted camera straps. This time round, Cecilia Gallery announced their latest range of 2.5cm leather neck strap and we were fortunate enough to get a hold of one of these new straps to give it a bit of a road test and to find out how these new camera straps stack up to their predecessors – a quite high benchmark I reckon, since we loved their original straps, but we were up to the challenge.

 Cecilia Gallery 2.5 cm Camera Neck Strap Review

In case you are not aware, Cecilia Gallery produces camera straps using quality materials sourced from all over the world, from the alpaca wool of Peru, the cowhide leathers of Argentina, to nylon fro the mills in the US. The unity of these pieces created a stunning range of eclectic, trendy, patterned camera straps for DSLRs. Now the company is expanding with a new set of neck straps, that are thinner and ideal for smaller cameras, like mirrorless cameras. While this new range of camera straps takes on a more simplified approach with a refined elegance compared to the larger, stylish patterned straps onIt the original straps, the new 2.5cm neck straps may be the compatible assessor for the photographer that is looking for a subdued and robust camera strap that is fashioned with good quality leather.     


To put it out there, the black 2.5cm leather neck strap we reviewed is a simple camera strap with very basic design features. Whether that is a pro or a con, that is really up to the individual’s taste. I like the idea of whipping my camera out and intriguing people with my camera strap with its Peruvian patterned stitching. It’s a great conversation starter. However, if I think laterally about it, when I travel overseas I don’t want to draw too much attention to my camera. So really, you know your own circumstance best to know how much attention you would like your camera strap to draw. Just know that Cecilia Gallery has camera straps to cater for both, conservative and colourful tastes. The same soft, Argentinean leather, that is now quintessentially associated with Cecilia Gallery’s products, is echoed through to the 2.5 cm neck straps. The texture of the strap is finely pebbled as I ran my fingers across the quality stitching, Cecilia Gallery definitely upholds their impeccable quality in this strap.    

Cecilia Gallery 2.5 cm Camera Neck Strap Review


I did find that the neck pad on the 2.5cm leather neck strap, quite stiff which makes it tricky to wrap the strap over the wrist. Softer neck pads would make it easier to run from location to location – just shoot, wrap the strap around your wrist like a makeshift hand-strap and then go. Those who do the same thing, you know what I’m talking about right? It wouldn’t be a problem if you are not a “wrist wrapper”. Mind you, I did assume that the neck pad was stiff because the strap was brand new and had not had the leather broken into yet.   


Flexible, small split rings that come with 2.5cm leather neck strap are sturdy and able handle the pulling of any camera gear attached to them. However, one issue that I did find was that on a couple of occasions the split rings got caught on the leather bumpers. This occurred when I put the camera over my neck or shoulder. The rings catch onto the leather bumpers easily because they are thick soft leather pads. In order to avoid this, you’ll need to do manoeuvre the ring upwards and keep it clear from the bumpers, so that rings don’t get caught. It’s just something I noticed, and it won’t bother you unless you are constantly putting down and putting back on multiple cameras on camera straps around your body.


Cecilia Gallery 2.5 cm  Camera Neck Strap Review

If you want to get technical with the specs of this camera strap, I’ve provided them here (courtesy of Cecilia Gallery’s website):  


– Leather: full-grain Argentinian cowhide;

– Interior: nylon (175lb tensile strength)/polyester;

– Hardware: nickel-plated tempered steel ring, zinc-alloy slider & keeper;

– Adjustable length: 37 in. – 54 in. (94 cm – 137 cm);

– Neck length and width: 14.5 in. x 1 in. (37 cm x 2.5 cm).


To adjust the strap to your preference, there are two sliders that can shorten the strap down to 37 inches or increase the length up to 54 inches. The neck pad itself isn’t moveable, however, it’s sufficiently wide enough to rest the camera comfortably around your neck and does the job as you go around with your camera. The strap may look simple, but like Cecilia Gallery’s previous products, they are built to handle the wear and tear that photographers place on their camera straps.


According to Cecilia Gallery’s website, the 2.5cm neck strap camera straps have been tested to carry up to 175 pounds. Mind you, I imagine that the more weight you add to the camera the more pressure you will add to your neck with the weight of camera digging into you. That was a major issue I had other camera straps I’ve used, particularly when I traveled and had to carry baggage or was on foot all day with the camera tugging on me. Luckily, this camera strap has extra polyester padding to distribute and cushion the weight.    


Cecilia Gallery 2.5 cm Camera Neck Strap Review

Cecilia Gallery’s 2.5cm neck strap is a minimal fuss leather camera accessory that pairs itself nicely with mirrorless cameras and their slimline appearance. Soft leather, strong nylon webbing, polyester padding to protect your neck and adjustable straps to custom tailor the length to your needs, this camera strap is an affordable product for the quality you are getting. There were some negligible issues in regards to the bumpers getting caught on the split rings and the rigidness of the neck pad when we first tested the straps. However, I’m sure these can be solved with a bit more time for the leather to wear.


The black 2.5cm neck strap we reviewed is priced on Cecilia Gallery’s website currently at $ 68. Whether that’s cost effective or pricey for you, we are looking at the long-term value of the product. The company is known to make sophisticated and sturdy camera straps, and the last thing I want to deal with when I’m on a shoot is the camera strap breaking on me, and more so, the camera that was around my neck is now smashed on the ground. For me, investing in a Cecilia Gallery camera strap is an affordable insurance for my piece of mind when it comes to handling and protecting my camera. For more information about Cecilia Gallery’s 2.5 neck straps you can check out here.


Stay tuned, because one lucky person can receive their own black 2.5cm neck strap courtesy of Cecilia Gallery. FashionPhotographyBlog.com has one to giveaway, and you can find details on how to enter our competition right here on our website shortly.


Fashion Photography Blog & Cecilia Gallery presents The Classic Camera Strap Giveaway Compeition


PHOTO SOURCE:

Images courtesy of Cecilia Gallery


Fashion Photography Blog

 
Comments Off on Cecilia Gallery Camera Neck Strap Review

Posted in Uncategorized


New iPhone 6s is Here! Come See What We’ve Got in Store For it.

10 Sep

Happy New iPhone Day!!!

While you’re queuing up to snag your brand new phone, check out these accessories to deck it out.

And remember: On Wednesdays, our iPhones wear pink.

(…)
Read the rest of New iPhone 6s is Here! Come See What We’ve Got in Store For it. (0 words)


© Erin for Photojojo, 2015. |
Permalink |
No comment |
Add to
del.icio.us

Post tags:


Photojojo

 
Comments Off on New iPhone 6s is Here! Come See What We’ve Got in Store For it.

Posted in Equipment


Climbing Cocoon: Ascend Gallery Atrium Through Net Tube

10 Sep

[ By Steph in Drawing & Digital. ]

numen for use 1

Test your climbing skills with a vertical ascent through three stories of a gallery atrium with the newest interactive installation by design collective Numen/For Use. Occupying Austria’s Architekturforum Tirol, ‘Tube’ is a network of connected safety nets suspended from the walls and ceiling, inviting visitors to crawl, slide and scramble until they hit various dead ends providing vantage points out the windows or onto other areas of the installation.

numen for use 2

numen for use 3

The angles are as irregular and organic as if they’d been woven by a spider or silkworm, creating a sort of human cocoon. The cables attaching the installation to the wall are elastic so the whole thing gently bobs up and down with the movement of its occupants at any given time. The structural support is designed in such a way that anyone climbing inside experiences the sensation of free-floating.

numen for use 4

numen for use 5

numen for use 6

Stretching upward through an oculus in the gallery’s second floor, ‘Tube’ is an abstract composition, its jagged black form like a brushstroke against a network of erratic geometric lines. Contrasting against the white surfaces of the space, the installation stands out in stark relief, placing the emphasis on the shape of the nets and the bulges created by the people moving around inside.

numen for use 7

numen for use 9


Numen/For Use previously created a grid of climbable strings, a bounce house for adults and a network of translucent tunnels made of packing tape, humans crawling around inside like trapped insects.

Share on Facebook


[ By Steph in Drawing & Digital. ]

[ WebUrbanist | Archives | Galleries | Privacy | TOS ]


WebUrbanist

 
Comments Off on Climbing Cocoon: Ascend Gallery Atrium Through Net Tube

Posted in Creativity


Apple touts photo-editing capabilities of 12.9-inch iPad Pro

10 Sep

Apple has launched the long-rumored iPad Pro today. With its 12.9-inch Retina screen offering 2732 x 2048 resolution the new model is the largest in the iPad line-up. In its presentation, Apple showcased a range of new software applications that take advantage of the iPad Pro’s features including Photoshop Fix, which lets you edit images of up to 50MP size using the new Apple Pencil. Read more

Articles: Digital Photography Review (dpreview.com)

 
Comments Off on Apple touts photo-editing capabilities of 12.9-inch iPad Pro

Posted in Uncategorized