RSS
 

Archive for August, 2015

Reflection Perception: 12 More Mirrored Art Installations

24 Aug

[ By Steph in Art & Installation & Sound. ]

mirror art main

Mirrors can disrupt our perception of our environment, especially when they’re positioned to blur the lines between land and sky, up and down, reality and reflection. These 12 (more) mirrored art installations dazzle us with glinting light, confuse us with illusions and invite us to question the difference between what we are shown and what we believe to be true.

Mirrored Ziggurat by Shirin Abedinirad

mirror art ziggurat 4

mirror ziggurat

mirror art ziggurat 3

Slivers of the sky seem to hover in mid-air if you approach this mirrored ziggurat from one of its corners, the steps reflecting the sky while the walls reflect the grass. “In this installation I have been inspired by the pyramidal structure of Ziggurat, a common form of temple in ancient Mesopotamia, attempting to connect earth and sky, so humans could be nearer to god,” says artist Shirin Abedinirad. “The Mirrored Ziggurat acts as a staircase, which seeks to connect nature with human beings and to create union of ancient history and today’s world. The installation offers a transformative view of the self.”

Dazzling Wolf by Tomoko Konoike

mirror wolf

mirror wolf 2

mirror wolf 3

mirror wolf 4

Tiny shards of mirrors reflect light all over the surrounding surfaces as they form a silvery fragmented coat for a six-legged wolf. Titled ‘Donning Animal Skins and Braided Grass,’ the sculpture by Tomoko Konoike draws inspiration from both tradition and pop culture in the form of manga and Shinto animism.

Landscapes Turned Upon Themselves
landscapes 1

landscapes 2

landscapes 3

landscapes 4

landscapes 5

Portions of a three-dimensional landscape are cut out and pasted on top of themselves in a large-scale mirror series called A Moment’s Reflection by Cody William Smith. The effect is most striking at night, when one side of the sky is dramatically different from the other. “My intention is to draw new connections between familiar forms by interdicting specular reflections to environments where none would typically exist. The mirrors serve as a focal point within a given scene and also function as a window to provide an entirely unique perspective on the same location.”

Maze of Mirrors at Hyde Park

mirror art maze

mirror art maze 2

Visitors carefully navigate a maze full of mirrors in Sydney’s Hyde Park, as it would be far too easy to just walk right into one of the reflective columns. Architecture firm Out of the Dark installed 81 mirrored posts with 423 reflective surfaces at the park as an interactive exhibit encouraging visitors to question what’s real and what’s an illusion.

Next Page – Click Below to Read More:
Reflection Perception 12 Mirrored Art Installations

Share on Facebook


[ By Steph in Art & Installation & Sound. ]

[ WebUrbanist | Archives | Galleries | Privacy | TOS ]


WebUrbanist

 
Comments Off on Reflection Perception: 12 More Mirrored Art Installations

Posted in Creativity


Crazy 8: Panasonic Lumix DMC-GX8 sample gallery

24 Aug

The Panasonic Lumix DMC-GX8 is the follow-up to the company’s successful GX7 rangefinder-style mirrorless camera. The GX8 boasts a new 20MP Four Thirds sensor and ‘Dual IS’, which combines sensor and lens shift image stabilization for better results. The camera’s ISO range tops out at 25,600 and offers a max burst rate of 8 fps with single AF and 6 fps with continuous AF. We’ve been shooting with one for a little while – check out our gallery of samples!

Articles: Digital Photography Review (dpreview.com)

 
Comments Off on Crazy 8: Panasonic Lumix DMC-GX8 sample gallery

Posted in Uncategorized


A Guide to Black and White Conversion in Lightroom

24 Aug

Vintage, retro, moody, classic are all adjectives that might be used to describe black and white photographs. It may seem counter-intuitive in an age where cameras are lauded for their abilities to render colors and skin tones in super accurate or pleasing ways, to just go and eliminate all the colors in post-processing. Nevertheless, the timeless qualities of grayscale images continue to persist, and the alluring beauty shows no sign of subsiding.

A black and white architectural photo

Since most of us see in color, black and white images seem to be inherently abstract.

In Lightroom (LR), the transformation of a photo from color to black and white is simple – drag the Saturation slider all the way to the left. The end.

I’m only half-joking. Although this will drain all of the color from the photo, there are many other considerations to mull over, various entry points to begin the process, and an immense amount of control and fine-tuning to explore.

Image Selection

Naturally you will need to start with a photo, so the decision as to which photo is a good candidate to make the transformation to black and white is your first task.

There are a few characteristics in a photo that would make it qualify as a good candidate. Obviously any photo that has strong colors, which add strength or appeal may not make the cut. You would be doing yourself a disservice by taking a beautiful, saturated sunset shot only to rob it of its finest feature.

I prefer to convert photos which have a lot of repetitive detail, high contrast, or have an inherent look that would be accentuated by converting to black and white. Architectural shots work well, and sweeping landscapes with puffy clouds against a blue sky stretching off into the horizon can be dramatized tastefully.

Without any colors to lean on, black and white images must have other strengths. Your black and white images just may have to rely a tiny bit more on the subject, composition, emotion or lighting. This is a good thing. Thinking in black and white can help train your eye to look for other photographic strengths which will make your color images that much stronger as well.

Where to Start

In Lightroom there are several features built-in that enable you to control the look of your black and white images. Let’s take a look at their dedicated black and white converter.

LR-bw-conversion

The B&W sub-panel gets your images to grayscale in one click.

If you simply click on the B&W panel in the Develop module, LR converts the image to gray scale. The same thing can be accomplished at the top of the Basic panel where it says Treatment by selecting Black & White.

Note that when you do this the eight Black & White Mix sliders are all zeroed out. You may also note that there is a curious little oval-shaped Auto button hanging out underneath the sliders. What might this do? In case you didn’t guess, LR will use its own infinite wisdom to evaluate your image and adjust the color tones to what it thinks is appropriate. I’ve never clicked that button and said “wow” but you never know.

LR-bw-conversion-2

The Auto button adjusts tones as LR sees fit, but I find further editing is usually necessary.

If you like the settings that LR chooses for you with the Auto setting you can have it applied automatically every time you convert an image to black and white by navigating to Edit>Preferences and under the Presets tab, check the box that says: Apply auto mix when first converting to black and white, as shown below.

LR-bw-conversion-3

You can have LR instantly apply its automatic black and white settings upon conversion by navigating to Edit>Preferences and checking the appropriate box.

Filters

Before you open Pandora’s Box and start dragging sliders all over the place, let’s see what other kind of shortcuts LR has to offer.

Within the Navigator panel is the handy Presets menu. The first three selections are dedicated black and white preset menus including Filter Presets, Presets and Toned Presets. The 25 presets found within these menus are pretty cool and are way more powerful one-click options than the Auto button.

A sample of LR's black and white filters

LR is loaded with 25 black and white presets to give you some quick conversion options.

The filters can also be used as jumping-off points from which to work in your editing endeavours.

Start with the Basics

I would like to preface this section with something to keep in mind when converting an image to black and white and processing it: LR edits that may appear to affect colors only, also effect tones and contrast in grayscale images. For example, although I never change them in my black and white processing, the White Balance and Tint sliders are active, and can be used to alter tones in your black and white photo.

The rest of the sliders, in both the Basic and Tone Curve panels, do the same for a black and white image as they do for a color one. You can be more zealous with contrast since there are no colors to be over/under saturated. I also find that the Clarity slider works especially well to tease out tons of detail in black and white images. Beware, however, that it can be unkind to wrinkles and blemishes in portraits, unless that is the look you are going for.

Simply increasing the Clarity on a black and white image can add a lot of drama. No other edits have been made to the above photo except increasing the Clarity to 100 per cent.

Simply increasing the Clarity on a black and white image can add a lot of drama. No other edits have been made to the above photo except increasing the Clarity to 100 per cent.

The HSL/Color/B&W Panel

I briefly touched on this earlier when mentioning the the Auto setting. So what happens when you start messing around with all of those sliders? Well, if you’re anything like me when I was fumbling my way through LR back in the day, you’ve already gone through and started indiscriminately throwing sliders all over the place.

What they do is increase or decrease the luminosity of the corresponding color in the original image, which is now represented in various shades of gray. If you’ve already applied one of LR’s black and white filters these sliders may not be zeroed out any longer.

In addition to adjusting the individual sliders, there is also a click and drag (target adjustment) tool similar to the one found in the Tone Curve panel, and it’s pretty sweet. Once you activate the tool, click on an area in your image and start dragging, you will notice that LR will not only adjust one slider, but will combine multiple sliders to pinpoint the tones you wish to adjust.

LR-bw-conversion-4

The Targeted Adjustment Tool (left arrow) works well to isolate colors to desaturate. Holding the Alt key presents you with the option to reset all the sliders at once to start fresh (arrow on the right) – this option is available in many of LR’s adjustment panels.

Another approach to this whole black and white post-processing thing can also be initiated in the HSL/Color/B&W panel. If you select HSL and choose the Saturation sub-panel, you will be presented with another set of eight color sliders.

These sliders provide you a quick and easy way to achieve selective color effects. You can start by dragging all of the sliders down to -100 and then add the colors you want to preserve. You also have a click and drag tool that works the same sort of magic as the one mentioned earlier.

You can also select the All sub-menu which reveals all of the Hue, Saturation and Luminance sliders. Adjusting the Luminance sliders gives you control over the brightness of individual colors now represented in black and white.

Utilizing the controls found within the Camera Calibration panel can give you similar, yet much more limited, control over your black and white tones.

Split Toning

If you’re looking to add a radical tint to your black and white images, the Split Toning panel is where you want to be. Okay, so it doesn’t have to be too radical but a little tinting can help alter the mood of your image.

The tool gives you control over the intensity of highlight and shadow tint colors, and the ability to balance the two however you wish. Subtle use of this effect can be a fantastic way to sneak a hint of color back into your photo, while still maintaining the charm of black and white.

Split Toning allows you to tint an image's highlights and shadows different colors.

Split Toning allows you to tint an image’s highlights and shadows different colors.

The Split Toning panel is also where you can apply, and fine-tune, sepia toning effects to get that warm antique look that gives images a grungy and elegant look at the same time.

As you have probably found out by this point, LR does a pretty thorough job at giving you a ton of control processing black and white images – from big global adjustments to small tweaks to tease out just the look you are going for. Don’t forget that you can get really creative by throwing the Adjustment Brush and Gradient tools into the mix, not to mention the plethora of plugins available on the market that give you even more options.

Have you been met with some success in black and white conversion with Lightroom? Show off your results in the comments below.

googletag.cmd.push(function() {
tablet_slots.push( googletag.defineSlot( “/1005424/_dPSv4_tab-all-article-bottom_(300×250)”, [300, 250], “pb-ad-78623” ).addService( googletag.pubads() ) ); } );

googletag.cmd.push(function() {
mobile_slots.push( googletag.defineSlot( “/1005424/_dPSv4_mob-all-article-bottom_(300×250)”, [300, 250], “pb-ad-78158” ).addService( googletag.pubads() ) ); } );

The post A Guide to Black and White Conversion in Lightroom by Jeremie Schatz appeared first on Digital Photography School.


Digital Photography School

 
Comments Off on A Guide to Black and White Conversion in Lightroom

Posted in Photography


Two NEW Items for your Grab ‘n Go Lifestyle!

24 Aug

Your life is go-go-go. Sometimes it’s go-go-Netflix, but mostly it’s going. You need super portable video and photo gear at your disposal.

Meet the Mighty Mic Wireless and Pythagorean Lens Pouch!

The Mic gives you clear sound without being tied down and the Lens Pouch helps you keep track of all those small knick-knacks you can never find.

Make killer vids and keep track of your phone lenses. On the go!

(…)
Read the rest of Two NEW Items for your
Grab ‘n Go Lifestyle! (0 words)


© Erin for Photojojo, 2015. |
Permalink |
No comment |
Add to
Grab ‘n Go Lifestyle!”>del.icio.us

Post tags:


Photojojo

 
Comments Off on Two NEW Items for your Grab ‘n Go Lifestyle!

Posted in Equipment


Kosovo: Ein Besuch im Krankenhaus

24 Aug

Menschen warten in einem schwach beleuchteten Raum.

Wir fahren zu einer Frau, Elmase, die zwischen Klina und Prishtina wohnt und sechs Kinder hat. Wir (Sara, die Aktivistin und Violetta, Caritas-Mitarbeiterin) parken den Jeep vor dem Haus und klopfen am Tor. Es öffnet uns eine dünne Frau, die nicht wusste, dass wir kommen würden. Sie freut sich sehr über unseren Besuch und bittet uns herein. Sofort setzen sich ihre beiden Söhne (8 und 6 Jahre alt) zu uns auf die Couch und hören zu.
kwerfeldein – Fotografie Magazin | Fotocommunity

 
Comments Off on Kosovo: Ein Besuch im Krankenhaus

Posted in Equipment


Escape Artist: Giant Ball Rolls Down Streets, ‘Round Corners

24 Aug

[ By WebUrbanist in Art & Installation & Sound. ]

redballroll

Wind and rain conspired to set loose a gigantic inflatable piece of installation art, turning it into a kind of impromptu performance piece for drivers and bystanders as one (very big) red balloon rolled by. In some regards, the resulting viral sensation has taken on a life of its own, extending the reach of the sculpture far beyond its target audience.

caught

Designed to be a source of urban interaction, the RedBall was in the process of being wedged between two downtown businesses before being redirected by forces of nature. Museum staff, installation participants and a handful of bystanders chased the recently-liberated sphere down the streets, eventually catching, deflating and returning it to the installation site. Instagram user jeremy419 happened to catch much of the action from atop a nearby building. Meanwhile, a hacked version of video puts a fresh tomato-style spin on this unexpectedly interactive work of  art.

freshtomatoe

The museum’s director of communications, Kelly Garrow, recapped the sequence of events for reporters: “It started pouring rain, so the ball was wet and slippery. The wind picked up, and it popped up and just started going. You can see in the video that’s going viral that it rolled about halfway down a block and then mysteriously took a left-hand turn. It made its way partially down the street before people caught up with it.

red ball escape

Despite its size (15 feet in diameter), the ball weighs only 250 pounds, minimizing its potential for damage to one bent street sign – quite tame compared to rounded corporate art sculpture set loose in Fight Club as part of Project Mayhem.

public ball of art

A world-traveling artwork, the ball was created by Kurt Perschke to be pressed into tight spaces and has been in play for nearly a decade without incident. Meanwhile, add this escapee to Nena’s 99 Luftballons lyrics and you get a nice rounded “100 red balloons go by.”

Share on Facebook


[ By WebUrbanist in Art & Installation & Sound. ]

[ WebUrbanist | Archives | Galleries | Privacy | TOS ]


WebUrbanist

 
Comments Off on Escape Artist: Giant Ball Rolls Down Streets, ‘Round Corners

Posted in Creativity


9 Helpful Apps for Photographers

24 Aug

Hopefully I’m not the only photographer in the world that tends to get quite excited when I discover a new app, or software that could definitely be used in my career. Yes I’m a bit geeky, but you know what – geeky is the new cool. Anyway, throughout my four years as a professional I’ve come across some really great Apps that you could use for your photography, even if you’re not a pro. What makes this more interesting, is that these Apps are not commonly talked about, so chances are they are probably new to you.

So, let’s get to it:

Quick Disclaimer: I am in no way affiliated with, paid by, or asked to list any of these apps/programs. I am not rewarded in any way from any of the software creators. This is purely a list of apps that I have found useful, besides the all too famous ones like Photoshop and Lightroom.

1) Instagram (Mac and PC – $ 0.00)

Instagram

To get this app to work you need to download and install both parts:

  • ARC Welder extension for Google Chrome
  • Instagram App Direct Download:

Have you ever wanted to share some of your photographic work on Instagram? Well, with this little app, it all becomes possible. Besides the occasional bugs here and there, it does its job just like it would on a phone – and makes sharing your work a real pleasure.

Love:

  • Posting images from my computer. It’s easy, accurate, and can be a huge plus to your workflow as a photographer.
  • How simple it is to set up and get running
  • You can comment, like, post, and update your profile – just like you would on your phone.

Love not so much:

  • Occasional bugs where it doesn’t load correctly.
  • I use a 27” screen, and it works there perfectly. However, when I’m using the 15” display on my MacBook, I cannot resize the window to show the bottom part (the most important part of the window). I’m sure there’s a solution for that somewhere. It does bug me sometimes, but a simple closing and reopening of the app normally fixes it.

Conclusion: Definitely worth testing as I’m sure they will release updates to fix the issues so, it’s worth having it and following along.

2) Blogo ($ 29.99 Mac Only in the App Store)

Blogo

If you’re not familiar with WordPress as a place to build and hold your website, I’d definitely recommend you go and check it out. It’s such a great platform to host a website (although, there is a bit of a learning curve). But, you are already familiar with WP, then Blogo is for you, especially if you love to write articles on your blog.

Blogo presents you with a stylishly clean writing panel, with the ability to add images where you like, as well as easily add Alt-tags, descriptions, links, and other SEO necessities you would normally do directly in WordPress. The best part is, you can write away online and offline, travelling or at home. A simple Publish button will send your post directly to your website and voila, it’s done. Now, the cherry on the cake = it is INCREDIBLY easy to set up. It takes less than one minute to get up and running, plus, their support is second to none.

Love:

  • The clean, stylish writing panel.
  • The features and its offline ability
  • Adding images and SEO tweaks to your images has never been easier
  • Previewing your post on your website (from within Blogo) without actually publishing it
  • Top notch support
  • Very fair pricing

Love not so much:

I personally had some issues with WPML (A multilingual plugin for wordpress that allows me to have a German and English website). But, they were right on top of it and are keeping me updated weekly (via personal emails) to let me know how it’s going.

3) JPEG Mini (Free Trial, $ 19.99, Mac and Windows)

Jpegmini

While we’re on the topic of websites, if you take pride in your website and use it as a highly-valuable business tool, chances are you’ve come across the dilemma of choosing between high-quality, sharp images OR website load speed. Putting it in the simplest form, the higher quality the image, the bigger the file size. The bigger the file size, the longer the page takes to load. So, catch 22? Not with JPEGmini.

JPEGmini does an incredible job of reducing the size of your JPEGS, yet retaining a very acceptable image quality. The best thing is, it’s an application so you can optimize your images on your desktop, offline, and get them ready to be uploaded. I use this program religiously for our website.

750px size original image - 368kb

750px size original image – 359kb

750px-jpegmini

JPGmini version 750px - 148kb

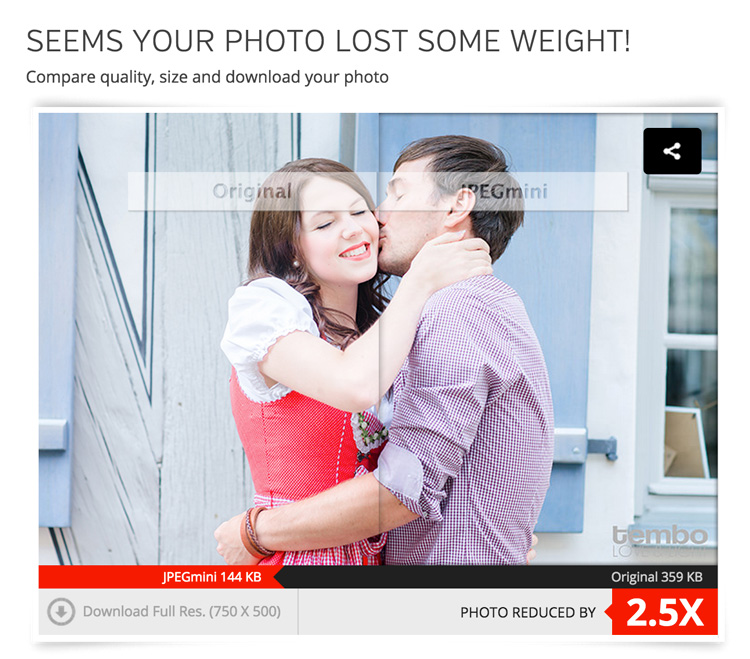
JPEGmini version 750px – 144kb

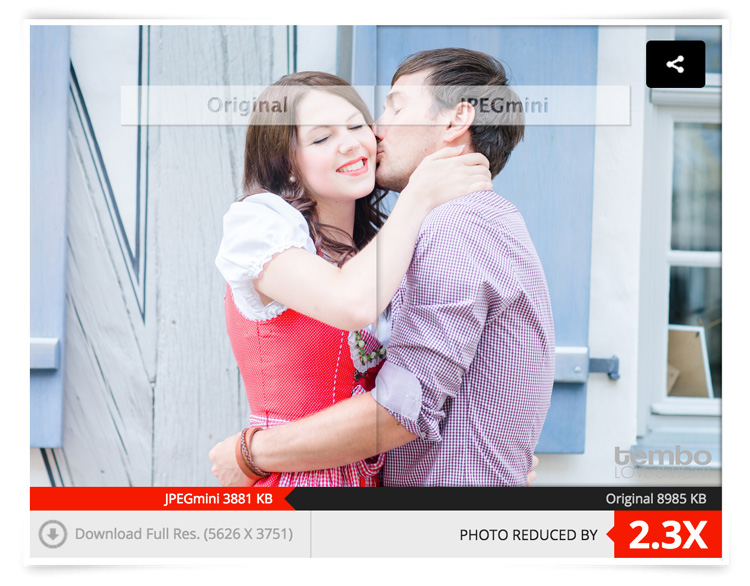
This original image was 359kb (fairly big for an image online). After JPEGmini = 144kb!!! Notice a difference in quality? Here’s what it did with the full sized file:

fullsize-jpegmini

Love:

  • Their lossless compressions and the speed at which it works
  • Bulk optimizing. Drag as many images you want into the window and it’ll get right to work, showing you how much you’re saving
  • Fair pricing (especially if you’re going to use it a lot)
  • Options included to either overwrite the original file or make a copy of it.
  • Lightweight program that works offline
  • So easy to use
  • Mac and PC compatible
  • Free Trial
  • Lightroom Plugin

Love not so much:

I can’t find anything wrong with it.

Conclusion: 100% worth it if you’re into blogging, and want to optimize images for your website, while keeping a fine ratio between size and quality. Do yourself a favor and at least try it, it’s quite incredible.

4) Pixieset (free options as well as paid subscriptions for more features and storage space)

Pixieset

There is a familiar battle between Pixieset versus PASS as there is the Nikon versus Canon debate. Both are great in their own ways, and both do the same thing. However, I personally use Pixieset. I have not really tried PASS, so please do not think I’m being negative towards it. I just found Pixieset to do exactly what I need, when I need it, perfectly every time. Why would I look for something else?

So, what is Pixieset? It’s a stunning, clean, and professional way to create client galleries and send them out. It is so good, that 100% of my clients love it (no lie)! You upload the high-resolution files (pro version only) to the online gallery, design it with a few clicks and some information, and voila, it’s done. It’s responsive, easy to use for anyone (even grandma), and allows your clients to download the high-resolution files (pro version only) or smaller web sized images whenever they want.

Love:

  • The responsiveness: Works amazing on computers as it does on mobile devices.
  • Allows downloads a range of file sizes (from Web, to high resolution, to Full resolution).
  • Let’s face it, the world has shifted to Digital mediums. This is the perfect solution to delivering your work to your clients.
  • Has a Lightroom plugin to automatically upload a set to Pixieset.
  • Frequent updates and features being added.
  • Password protected galleries to make them private.
  • Clients can favorite images and send that list to you, as the photographer, very easily. Perfect for when clients choose images for albums, or to make adjustments on files.
  • The above favorite list can be easily added into your Lightroom catalog to show only those files. Saves you having to manually go and choose the files.
  • Amazing support! These people love their customers.

Love not so much:

You can’t really edit offline, but that’s okay, it’s not to serious. That’s it.

5) Automator (Built into OS X)

Automator

Ever stumbled upon this awesome little robot guy? Well, believe it or not – he’s actually very useful. Remember how I mentioned I always resize my images before compressing them with JPEGmini? Well, Automator is my go-to tool to resize (if I don’t want to do it in LR or PS). Why? Because it’s simple. That’s why. It does its job and it does it fast, and well.

How does it work?

Setting up Automations may seem a bit daunting at first, but it’s really simple once you get the hang of it. Here is the step by step guide:

  1. Open Automator on your Mac (I use spotlight, so CMD+Space and type in Automator)
  2. You’re presented with a drop down window giving you a list of documents you can create. For this purpose (resizing), create an Application
  3. Now, you need to add something to this Application. Above the list of all the options you can choose, there’s a search box. Type in SCALE. The last choice, Scale Images, is the one you want.
  4. Drag it over to the right into the open space.
  5. You will be asked if you want to add another function to the application about creating copies of the original file. Add it if you like, or don’t, it’s up to you. I don’t, I normally copy my High Res from their HD place, put them in a folder on the desktop and resize/rewrite over them. Simple. Just make sure you have them all in full resolution saved somewhere else!
  6. Under the Scale Images options on the right, you can choose between: To Size (pixels) or To Percentage (%). Choose Size, then simply type in how big you want your images to be (on the longest edge). I’ve created eight different sizes and saved them all on my desktop. This way, if I need a 750px image, I have the automation there already. If I need 2048px for Facebook, it’s there.
  7. Choose your size and finally click on File > Export > Give it a Name > Choose Location > and BAM! There you go.
  8. To use it, simply drag your image files onto the actual icon of the Automator and away it goes. Resizing all the images you dragged (it supports bulk drag too, awesome huh?).

6) Smart Albums 2 (free to try, $ 299.00, Mac and PC compatible)

Smartalbum

Before you run away after seeing the above price tag, just hear me out. If you’re into designing albums for your clients, be it Wedding Albums that you sell, or session albums, Smart Albums fixes that all-to-common problem of using really bad, boring, slow and unappealing design software that 99% of the printing companies offer. I mean, some of them are appalling.

Smart Albums links up to some of the most popular printing companies around the world and lets you design your album the way you want, according to the sizes, spreads, and specifications of your chosen printing company. It does this in a beautiful, fast, and very easy to understand way. Yes, it’s expensive, but if it’s a business that you are running, you’ll make it back after one sale. Totally worth it, given the amount of time you save and how much more efficient the whole thing becomes. Of course, it’s free to try so give it a go before you decide if it’s really for you or not.

They have over 30+ printing agencies that are compatible with Smart Albums, on an international level. They work in the USA, Europe, Africa and Asia. They’re constantly adding new agencies to their list, so the chances are high that your favorite printers will be listed.

Love:

  • The simplicity of the program and how easy it is to use.
  • The humungous list of agencies that they can work with.
  • The support. Great help from their team.
  • Mobile support.

Love not so much:

The price is pretty heavy. But, the good thing is that it’s a one-off payment. No need to pay yearly (unless you want their cloud storage).

7) AstroPad (Mac and iOS only: Free, or $ 20 for Pro Features)

Astropad

Own an iPad? Want a graphics tablet to edit your photos with, like a Wacom? Want a free solution that works surprisingly well? Then, AstroPad is for you. After downloading the App both on your Mac and your iPad, you can pretty much control your entire computer from your iPad. Using touch gestures and special movements, you can set this app up to work for you, not against you. If you happen to have a stylus for the iPad, then you’re even closer to having a free graphics tablet. Definitely worth trying, as it’s free, and you may even improve your post-processing, especially if you need delicate movements with the brush tool.

Love:

  • The idea of using an iPad as a graphics tablet.
  • That you can see your image on the iPad and paint/adjust/edit directly on it.
  • That it’s free.
  • That you can control more than just Photoshop.
  • Use it wirelessly (Wi-Fi) or plugged in (when you don’t have Wi-Fi).

Love not so much:

It can have a little delay in terms of what you do on the iPad and what comes out on the computer – only slightly, but enough to notice.

8) Sunseeker ($ 9.99 iOS only)

Sunseeker

Sunseeker is an app for the iPhone or iPad that augments reality into its software to track the sun. It’s surprisingly accurate, and is a perfect tool for photographers who rely on the sun for their shoots. It’s a great way to plan where the sun will be in the sky at a certain point in time. Can you imagine how easy it would be when location scouting?

Simply point the phone up to the sky and follow the trail until you find where the sun will be. You can move a slider to change the position of the sun at a certain hour of a certain day. What’s great is that it uses your camera and projects its overlay on top of what you’re seeing. So, if there’s a building in front of you, you’ll see at what point the sun will just start to hide behind it; giving you valuable planning information as to when is the best time to do something.

Love:

  • That it uses the camera to project the sun’s future and past placement.
  • That it’s simple, easy to use, and fits in your pocket (iPhone only).
  • A great planning tool that you should have with you. Even if you don’t use it too often, it does come in handy from time to time.

Love not so much:

The sliders to change the time of day, and the position of the sun are quite small, and to pin point an exact day can be quite frustrating as you almost always overshoot it.

9) Tave (Free to try, $ 24 – $ 49 per month subscription)

Tave

Running a photography business can be quite chaotic if you don’t have a decent system or workflow. Keeping track of your clients, their anniversaries and important dates, logging your expenses and income, tracking weather, and planning the shoots can all add up to the mess. Tave solves that and 99+ things more. I was hooked on it the moment I set everything up.

Love:

  • A complete business management tool that sits safely online, and can be accessed by more than one person (if you choose).
  • Amazing reports and financial tracking.
  • Huge customizations.
  • Great support. Offers live Chat right in your dashboard.
  • You can create questionnaires to send to your clients that will automatically record their answers, and place them in their respective job areas.
  • Verified by accountants.
  • Works internationally.
  • Works on mobile devices.
  • Tons of features!

Love not so much:

  • It does require a fair amount of time investment to set it up. But once you do, it’s groovy.
  • It doesn’t work offline.
  • A little bit of a learning curve, but they have really great support, and are more than willing to help you along the way.

Conclusion

Those are the nine apps that I personally recommend and use. I hope that I’ve introduced you to some great things that you can use for your own photography. Again, I gain no benefit from listing these apps besides the satisfaction of actually sharing some information with you.

What are your favorite apps for photography that aren’t talked about too often? I’m not talking about Editing Apps, as they’re everywhere, but any apps that you know of that are worth checking out? Let me know in the comments below.

googletag.cmd.push(function() {
tablet_slots.push( googletag.defineSlot( “/1005424/_dPSv4_tab-all-article-bottom_(300×250)”, [300, 250], “pb-ad-78623” ).addService( googletag.pubads() ) ); } );

googletag.cmd.push(function() {
mobile_slots.push( googletag.defineSlot( “/1005424/_dPSv4_mob-all-article-bottom_(300×250)”, [300, 250], “pb-ad-78158” ).addService( googletag.pubads() ) ); } );

The post 9 Helpful Apps for Photographers by Shayne Thomas appeared first on Digital Photography School.


Digital Photography School

 
Comments Off on 9 Helpful Apps for Photographers

Posted in Photography


23. August 2015

24 Aug

Das Bild des Tages von: Max Kipp

Landschaft mit in einem Berg der sich im See spiegelt.


kwerfeldein – Fotografie Magazin | Fotocommunity

 
Comments Off on 23. August 2015

Posted in Equipment


Artist Nikita Nomerz Gives Russian Buildings A New Look

23 Aug

[ By Steve in Art & Street Art & Graffiti. ]

nikita-nomerz-big-brother
Artist Nikita Nomerz is giving abandoned buildings and structures in Russian cities a new look… and the eerily expressive edifices are looking back!

nikita-nomerz-big-brother2

nikita-nomerz-big-brother3

Hailing from the northwestern Russian city of Nizhniy Novgorod, Nikita Nomerz cut his artistic teeth in the field of hip-hop graffiti. For the past few years, however, his focus has been on street art of a different sort. Nomerz gets his inspiration from the buildings and structures he paints, seeing the inner “soul” of the edifice much as a sculptor imagines the finished statue before the first chip of the chisel. “The Big Brother”, above, is one of Nomerz’ earliest such works dating from 2010. The lowest of the three images was taken in April of 2015 – darned graffiti artists!

nikita-nomerz-sly-smile1

nikita-nomerz-sly-smile2

“When you are doing street art, you create a dialogue with passersby, architecture, nature and with other artists,” explains Nomerz. “Maybe on streets, art is not so durable, but it’s for real alive. Works which has been done on the streets are living their own life.” Since not everyone can see the life still couched within these derelict structures, Nomerz employs his own talent and creativity to bring it to the forefront.

nikita-nomerz-the-glutton

nikita-nomerz-the-glutton2

nikita-nomerz-chinese-residents

Since 2010, Nomerz has been engaged in a wide-ranging project he calls The Living Wall. From St. Petersburg eastward to the Chinese border city of Mudanjiang, Nomerz has left his mark – often quite a large mark – upon cities and towns in need of a little extra character. The bizarrely disturbing piece above is titled The Glutton; the striking installation below, The Chinese Residents. The latter stands out for NOT being created on an abandoned structure.

nikita-nomerz-toothy man

nikita-nomerz-toothy man2

nikita-nomerz-toothy man3

Nomerz’ main medium is spray paint but in some of his works, a little added plaster and some shifting of stone and/or brickwork is performed to enhance the composition. It’s startling how a row of decaying bricks can approximate a grinning mouth, as seen on The Toothy Man above – no doubt the building’s original constructors would be shocked at the transformation!

nikita-nomerz-fire-eyes

nikita-nomerz-glasses1

nikita-nomerz-glasses2

If the eyes are the windows of the soul, then the windows of abandoned buildings must be… OK, let’s not go there. Nomerz has no qualms about bringing out the inherent “personalities” of his inanimate subjects, mind you.

Next Page – Click Below to Read More:
Artist Nikita Nomerz Gives Russian Buildings A New Look

Share on Facebook


[ By Steve in Art & Street Art & Graffiti. ]

[ WebUrbanist | Archives | Galleries | Privacy | TOS ]


WebUrbanist

 
Comments Off on Artist Nikita Nomerz Gives Russian Buildings A New Look

Posted in Creativity


7 Tips to Help When You’re Stuck with Only a Prime Lens

23 Aug

As a photographer you must have flip-flopped back and forth between prime and zoom lenses. “Should I choose a prime today, or a zoom for its advantages?” If you have not done this for a purchase, you must at least have read the numerous articles which weigh the pros and cons of each. But what about when you are stuck with a lens that is not ideal for an event? For the sake of discussion and for this learning opportunity, let’s choose the 50mm prime lens, which is one of the most popular and affordable primes, and is made for every camera body known to man.

Canon-EF-50mm-f1.8-STM-Lens.jpg

If something comes up that is unexpected, that’s a good thing! Not ideal if you don’t have a long enough zoom or wide enough lens, BUT it could be worse. What if you didn’t even have your camera at all? So stay upbeat and realize with some ingenuity you can overcome the confines of being stuck with a prime lens.

As a personal note: This tutorial was inspired by a real event in Guatemala. I had chosen my 50mm for a walk-around lens as it is light, and I wasn’t expecting much as I went out to get a cup of coffee. Well, with a caffeine buzz I climbed a hill, and at the top an ancient Mayan ritual of sacrifice was being conducted for the dead. Maintaining cultural sensitivity I knew that it would be totally inappropriate to get my lens in their face. It was pertinent to maintain my distance for respect.

1. Use shallow depth of field

Prime lenses are known for being sharp, especially when you close down your f-stop. Yet when you are confined, or have limitations about how close you can get, or how agressive you can come across as a photographer, using your lens creatively is important. Thus, you may sacrifice some sharpness, add a little chromatic aberration (CA), etc., but you will also get a different style of shot from a lens that inherently has focal length limitations. Go for bokeh.

001 F1.4 landscape resized from Lightroom (750px)

2. Panorama for wider angles

Use panorama techniques to combine images later in post-processing. If you can’t get a wide angle view, make one. Yes the feeling of the final composition will not be exactly the same as a true wide angle, as your foreground and background compression will be greater, but you will be able to give a cinematic effect. Combining images is an easy way to encompass more into your scene when you are limited by your focal length.

006 Panorama resized 1

These two images were combined to show the whole event of the shaman and the fire along with the family members.

3. Shoot with the intention of cropping

Be conscious that cropping is available to you in post-processing. Don’t worry if a hand creeps into your frame, or there is a plastic bottle in the corner. If you consciously shoot for a crop to be performed later you can zoom-in on something specific. This again gives you flexibility and diversity. If you combine this with a shallow depth of field (suggestion number one) you will find that you can achieve a telephoto effect.

003 Crop Before resized

003 Crop After resized

This image was shot for a crop, so cutting off the top of the head is not a problem if you know you will crop in closer in post-processing.

4. B-roll footage

Get photos of activities, reactions, or environmental surroundings which will add to the narrative of the event. If you can’t get any closer, and you have pushed your boundaries of being discreet, then look up, down, and turn around. In film (movies), these are generally called B-roll shots, which helps to transition from one camera angle to another, while also telling the story.

004 B roll resized

The smoke rising up, into the sun, amongst the trees, gives a feeling of the environment around the ceremony.

5. Frame your subject with something in the foreground

Use a leaf, a stone or even another person to cut into the frame, which will both highlight your subject, by leading your eye to what you want the viewer to look at, and it will also create layers in the photograph. Layers add a sense of style and depth to your photography. Trying to use different techniques to create different perspective styles will really improve the overall quality of the group of photos you finally decide to keep.

005 Layer resized

The gravestone, then the grandmother, and finally the fire give layers to the photograph.

6. Use both horizontal and vertical photographs

Again this is about creating diversity in a final product. So turn the camera sideways and you definitely have a different style going for you. Some people get stuck in horizontal mode, or in vertical mode. This is a great opportunity to make a change of pace. When your eye sees a photo it follows a pattern, generally starting in the top left corner then moving, left to right (just as you read) looking for areas of light, contrast, lines, color and patterns. A vertical photo will automatically create a different reading experience to the photo. Or why not crop them into a square even?

002 Verical resized

A simple vertical photo changes the pattern during your final composition. Think both horizontally and vertically.

7. Just enjoy the event

See the event not only through your camera, but also with your own eyes. Experience the event, and it will not only give you great memories, but will allow you to feel the mood as well. Understanding the event will give you insight into what out-of-the-box shot may really highlight the event.

Summary

The general idea is to work with what you have, don’t lament what you left at home. If you do, you might just start lugging around simply too much gear to enjoy yourself. Think of how to diversify your perspectives. By confining yourself (in this instance, when confines are placed upon you) there is great opportunity to use your most advantageous feature… your creative brain!

For most people, photography is a hobby turned passion, and enjoying photography should really be priority one. Photography is always a game of tradeoffs, which can be simply exemplified by the basic lesson of the exposure triangle. By gaining one thing you lose another. So begin gaining something even when you are stuck with just a prime lens.

Maybe we could say, you are challenged to be better at what you love!

googletag.cmd.push(function() {
tablet_slots.push( googletag.defineSlot( “/1005424/_dPSv4_tab-all-article-bottom_(300×250)”, [300, 250], “pb-ad-78623” ).addService( googletag.pubads() ) ); } );

googletag.cmd.push(function() {
mobile_slots.push( googletag.defineSlot( “/1005424/_dPSv4_mob-all-article-bottom_(300×250)”, [300, 250], “pb-ad-78158” ).addService( googletag.pubads() ) ); } );

The post 7 Tips to Help When You’re Stuck with Only a Prime Lens by Branson Quenzer appeared first on Digital Photography School.


Digital Photography School

 
Comments Off on 7 Tips to Help When You’re Stuck with Only a Prime Lens

Posted in Photography