RSS
 

Archive for August, 2015

Is Photoshop a Bad Word?

06 Aug

How many times have you posted or shared a dramatic image only to have someone ask, “Did you Photoshop that?” First of all, let’s get one thing straight – Photoshop is not a verb! Photoshop hall of famer Vincent Versace put it this way:

“Photoshop is not a verb. It’s a noun. It is the means to an end, not the end itself.”

Photoshop has been taking a lot of heat lately with all the retouched tabloid images of models, who with the help of some clever manipulation, look unbelievably perfect. But Photoshop is not to blame for these exaggerated images. Yes, it is the tool used to create them, but it’s not the culprit.

Just because a photographer post-processes images with software such as Photoshop doesn’t mean that the image isn’t showing what the photographer actually saw or felt when they released the shutter. There are many image processing software products available today to post-process your images, but these are considered means of retouching  images. In this article we will refer to Photoshop, but any software being used for post-processing could be included as well.

Composite image of fireworks. Several images were layered together in Photoshop changing the blending mode of the layers to lighten allows the images to blend into what appears to be one image.

Composite image of fireworks. Several images were layered together in Photoshop, and changing the blending mode of the layers from Normal  to Lighten allows the images to blend into what appears to be a single image.

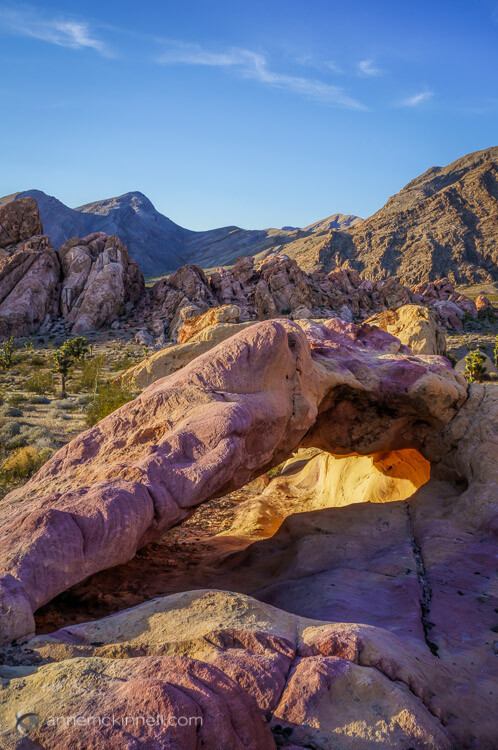
Get it right in-camera!

Have you ever heard or even said, “Oh, I will fix that later in Photoshop.”? While sometimes it is a necessity to post-process an image, you never want to rely on Photoshop to be the fix-all for every image you shoot. It is still a good practice to get it right in-camera as much as possible. Still, almost every image can benefit from a few adjustments.

Is Photoshop a necessity?

Maybe not, but many photographers say, “I don’t use Photoshop. I prefer my images straight out of the camera.” But guess what? If you are one of these photographers, you may not realize that if you are shooting in JPG straight out of your camera, your images are being processed by your camera. Your camera will sharpen, add saturation and contrast, and remove noise. A JPG shot straight out of the camera is also a compressed file, which means digital information about your image is lost and can’t be recovered.

If you are shooting in RAW mode, post-processing is almost always a must. None of the camera adjustments mentioned above are applied to your image, with the exception of white balance (which can also be adjusted in post-processing). If you ask almost any professional photographer whether or not they post-process their images, you will find that nearly 100 percent of them use Photoshop for various amounts of processing.
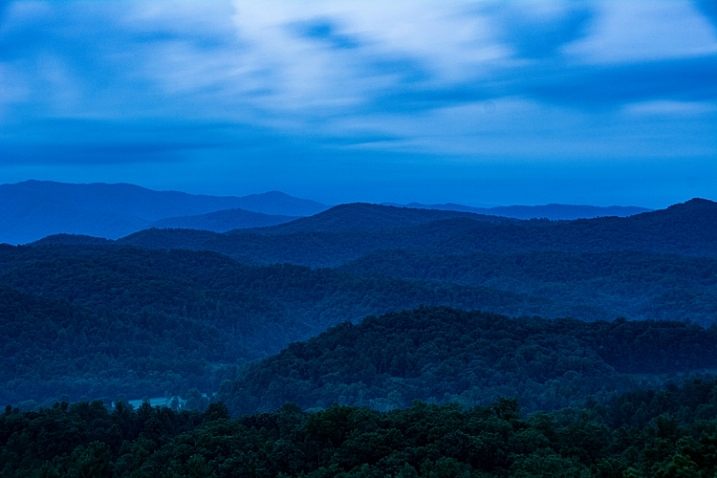
Original

Original

DSC_0456_Edit_new

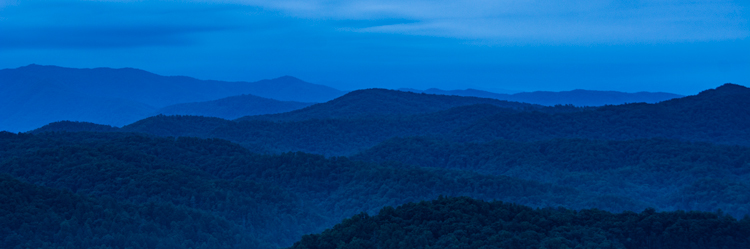
Final image, after cropping and adding contrast and sharpening.

DSC_8861_ORG

BW_silo

Black and white conversion can also be done using Photoshop. Capture your original image in full color, which will provide more image data to use during the conversion process.

Is Photoshop cheating?

Is using Photoshop cheating, or is it just a method of finishing an image? It is very true that Photoshop can be used to manipulate images in a negative or false way.

Sharing images Straight Out Of Camera is great for photographers who are mainly into taking snap shots of family and friends, but is that the only acceptable method for all photographers? No, many camera-savvy shooters want to perfect their images to create works of art, and Photoshop is the tool to make this happen. Is there really such a thing as a perfect image SOOC? It’s safe to say that almost every image can use some sort of enhancing, and programs such as Photoshop are a great tool to perfect your photos.
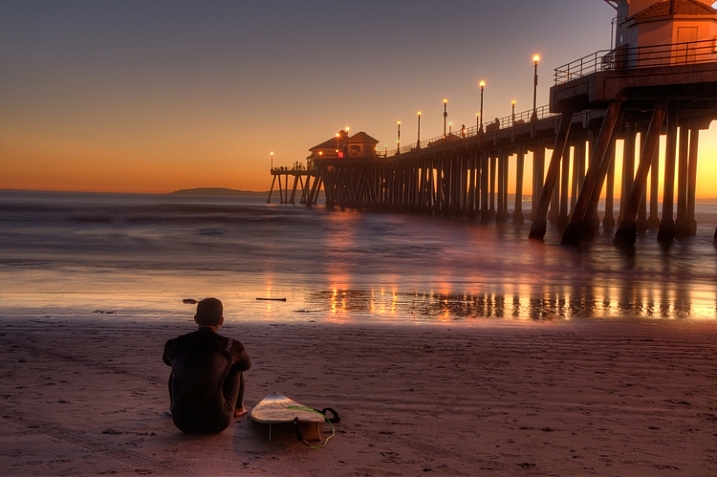
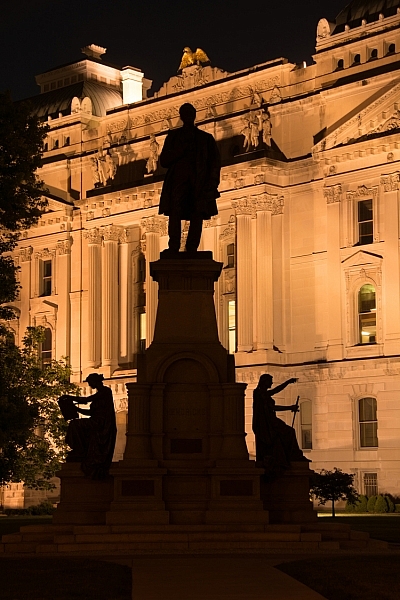
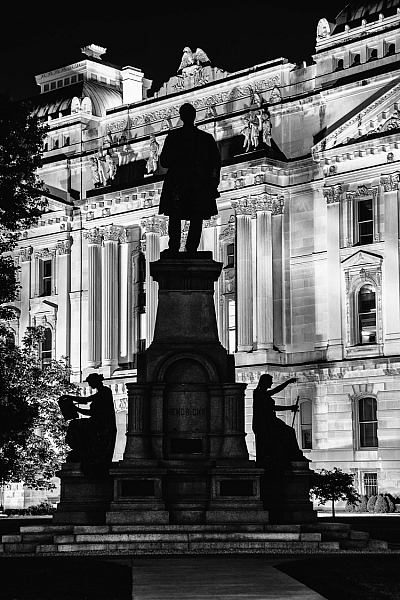
Original

Original

Final image, color correction made to bring out more of the color of the scene, Removed tire tracks in the sand and also dark spot that was coming out of the head of the surfer.

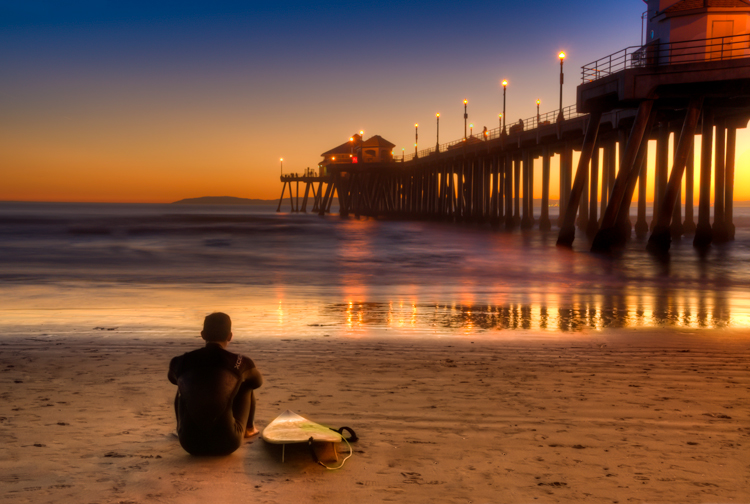
Final image, color corrected to bring out more of the color tones of the actual scene. Tire tracks in the sand were removed, as well as the distracting dark spot close to the head of the surfer.

Photoshop is not magic!

I once heard the story about a person who stopped by a print shop with a photo of a dairy farmer working behind his cow. Upon showing the picture to the proprietor, she explained that it was the only picture she had of her grandfather. Then she asked, “Could you Photoshop this image and remove the cow so I can see what my grandfather looked like?”. This story is a funny example of how Photoshop can be misunderstood, and how its powers seems to be magical.

Why use Photoshop?

When you shoot in RAW mode, your camera saves only the information of the image, no adjustments are made in camera. So why not shoot in RAW and use Photoshop to take control of the processing of your image yourself? Some great uses for Photoshop include, but are not limited to:

  • Cropping
  • Color balancing
  • Contrast adjustments
  • Black and white conversion
  • Removing distracting objects from an otherwise great image
  • Dodging and burning
  • Compositing
  • Watermarking

Photoshop is the new darkroom

Retouching images is not something new to photography. In the early days of photography all adjustment to photos had to be performed in the darkroom, via the processing of film and the exposures of the prints.

The famous photographer Ansel Adams was a master of the darkroom. If you’ve ever seen a straight print of one of his images, (no darkroom adjustments made) you might be surprised to realize the level of manipulation Adams applied to create the final image as he had pre-visualized it. Many of the processes available in Photoshop have their origins from processes performed in the early darkrooms.

Original image

Original image

Here the final image is cropped and the corners of the image were darken in true Ansel Adams style to keep the views eye from wander out of the image.

The final image shown here is cropped, with the corners of the image darkened (in true Ansel Adams style) to keep the viewer’s eye from wandering out of the image.

Don’t be afraid of Photoshop

So why do some photographers have such a fear or dislike of Photoshop?

  • It costs too much – True, for years the cost of Photoshop could’ve been a major deterrent for some photographers. However, now with Photoshop Creative Cloud ($ 9.99/month), the cost is not nearly the issue it once was.
  • Photoshop is too hard to learn – There is a lot to learn with Photoshop, but there are many online sources (like here on dPS) to help you use and master it. Challenge yourself!
  • What if I ruin my photo?  If you shoot in RAW mode you will always have your RAW file to go back to. Any changes made to RAW files are only attached, not applied.

Writing off the use of Photoshop for any of these reasons could be limiting your potential as a photographer.

Conclusion

Is Photoshop for everyone? Probably not, but is Photoshop detrimental to the craft of photography? Most definitely not! Can Photoshop be used to falsify images? Yes, and this article is in no way the complete answer to its basic usages. Is Photoshop a bad word? Is Photoshop a form of digital trickery, or is it a tool that helps photographers create better images?

What do you think? Comment below. (Please be respectful of other’s opinions and keep it friendly!)

googletag.cmd.push(function() {
tablet_slots.push( googletag.defineSlot( “/1005424/_dPSv4_tab-all-article-bottom_(300×250)”, [300, 250], “pb-ad-78623” ).addService( googletag.pubads() ) ); } );

googletag.cmd.push(function() {
mobile_slots.push( googletag.defineSlot( “/1005424/_dPSv4_mob-all-article-bottom_(300×250)”, [300, 250], “pb-ad-78158” ).addService( googletag.pubads() ) ); } );

The post Is Photoshop a Bad Word? by Bruce Wunderlich appeared first on Digital Photography School.


Digital Photography School

 
Comments Off on Is Photoshop a Bad Word?

Posted in Photography


Snow Cover: Subterranean Museum Pierces Alpine Mountain Peak

06 Aug

[ By WebUrbanist in Architecture & Public & Institutional. ]

mountain museum overhang

Buried within a mountaintop nearly 7,500 feet above sea level, this remarkable semi-subterranean mountaineering museum, designed for a unique client – the first man to scale Everest without oxygen.

mountain peak museum

musem picture windows

Designed by Zaha Hadid (images by Werner Huthmacher), the Messner Mountain Museum Corones refers to Reinhold Messner. Located atop Mount Kronplatz in Italy, it is the first in a series of planned mountaintop museums, each designed to create a sense of journey and adventure for its visitors.

mountain view out

In this case, one arrives from the side then continues below the surface before emerging to discover a dazzling view of the surrounding landscapes and peaks, framed by huge windows or enjoyed from a balcony jutting over the edge.

museum curved forms

museum interior design

As one travels through the building, the focus shifts from artifacts and exhibits within the museum back to the outdoor world that inspired this famous climber to become the first to ascend all fourteen of the world’s tallest peaks. The signature curves of Hadid’s work guide one through narrowing and widening spaces, slopes and steps, each shaping the experience.

mountaintop museum plan

From the architects: “A composition of fluid, interconnected volumes, the 1000 sq. m. MMM Corones design is carved within the mountain and informed by the geology and topography of its context. A sharp glass canopy, like a fragment of glacial ice, rises from the rock to mark and protect the museum’s entrance”

mountaintop museum

Without further landscaping, it is hard to say whether the building in reality reflects the mountain-piercing concept, but a freshly-constructed work of architecture is rarely finished until more greenery (and maybe in this case some additional dirt) comes back into play.

museum from above

mountain museum balcony

More from Messner on the museum itself: “On Kronplatz I present the development of modern mountaineering and 250 years of progress with regard to the equipment. I speak of triumphs and tragedies on the world’s most famous peaks – the Matterhorn, Cerro Torre, K2 – and shed light on alpinism with the help of relics, thoughts, works of art, and by reflecting the outside mountain backcloth in the interior of MMM Corones.”

Share on Facebook


[ By WebUrbanist in Architecture & Public & Institutional. ]

[ WebUrbanist | Archives | Galleries | Privacy | TOS ]


WebUrbanist

 
Comments Off on Snow Cover: Subterranean Museum Pierces Alpine Mountain Peak

Posted in Creativity


Take Your Snapchat Game to the Next Level

06 Aug

Snapchat! That app that has everyone saying either, ‘duh!’ or ‘huh?’

For the huh?-ers, Snapchat’s a photo/video messaging app where you can view a Snap for 10 seconds before poof! It’s gone.

For the duh!-ers: you know Snaps can be outstanding photographic art, right? Right!

So read on to learn tricks for creative “snapsterpieces” that are guaranteed to have all of your friends talking.

(…)
Read the rest of Take Your Snapchat
Game to the Next Level (392 words)


© Taylor for Photojojo, 2015. |
Permalink |
No comment |
Add to
Game to the Next Level”>del.icio.us

Post tags:


Photojojo

 
Comments Off on Take Your Snapchat Game to the Next Level

Posted in Equipment


Video: Summing up our Fujifilm X-T10 Review

06 Aug

Our full Fujifilm X-T10 Review takes a comprehensive look at many aspects of the camera’s performance, with in-depth analysis of our studio tests and shooting experiences. But if you’re looking for something more bite-sized, we’ve got that too. Take a look at the quick version of our review, shot in Seattle’s lovely Golden Gardens where many of the images featured in our full review were taken. See video

Articles: Digital Photography Review (dpreview.com)

 
Comments Off on Video: Summing up our Fujifilm X-T10 Review

Posted in Uncategorized


Amazing Modern Maze: Dystopian Steel Labyrinth Installation

06 Aug

[ By Steph in Art & Installation & Sound. ]

modern mine 1

This steel labyrinth looks like something left behind after the production of a dystopian film, its irregular grid of steel rising and falling onto the concrete surface outside Belgium’s C-mine art center. Designed by Gijs Van Vaerenbergh, the maze is an immersive experience in what the artist sees as architecture in its essential form: “a composition of walls that define spaces.” Made of 186 tons of metal, the installation features vertical surfaces towering over 49 feet in the air to properly disorient visitors.

modern mine 3

modern maze 7

modern maze 8

modern mine 2

Entering the maze, you pass through a series of geometric doorways cut into the steel, including a sphere, a cylinder and a cone. Depending on where you are in the maze, these cut-outs might offer a tiny glimpse of what’s on the other side of a wall, or open to reveal a succession of similar cut-outs passing all the way through the installation.

modern maze 5

modern maze 6

The steel, and how it is cut and arranged, offers a unique architectural visual that changes according to your perspective, shifting from abstract lines into distinct geometries and sometimes creating optical illusions that make you uncertain whether you’re looking at a two-dimensional or three-dimensional surface.

modern maze 9

modern maze 10

modern mine 4

A nearby installation of antique mine shafts offers a different way to experience the maze: from above. You can pass through it as an active participant, and then view it as a whole, taking in its complexities from a more detached bird’s eye view.

Share on Facebook


[ By Steph in Art & Installation & Sound. ]

[ WebUrbanist | Archives | Galleries | Privacy | TOS ]


WebUrbanist

 
Comments Off on Amazing Modern Maze: Dystopian Steel Labyrinth Installation

Posted in Creativity


Urbanes Licht

06 Aug

Ausschnitt eines Fotos der Serie Dark City Lights von Oliver Raschka

Ein Beitrag von: Oliver Raschka

Mit beginnender Dunkelheit erhellen unzählige künstliche Lichtquellen die Stadt. Dies mag für uns eine Selbstverständlichkeit sein, unser Verhältnis zur Beleuchtung und zur Dunkelheit ist dabei jedoch seit jeher ambivalent.
kwerfeldein – Fotografie Magazin | Fotocommunity

 
Comments Off on Urbanes Licht

Posted in Equipment


Lowepro Whistler and Photo Sport II backpacks ready for adventure

06 Aug

Lowepro has introduced the Whistler and Photo Sport II backpacks, designed to keep gear safe in the great outdoors. The Whistler is a new series built for alpine adventures, while the Photo Sport II updates a popular rugged design. Read more

Articles: Digital Photography Review (dpreview.com)

 
Comments Off on Lowepro Whistler and Photo Sport II backpacks ready for adventure

Posted in Uncategorized


DJI Phantom 3 Standard photography drone unveiled

06 Aug

DJI has announced a new camera drone called the Phantom 3 Standard. The DJI Phantom 3 Standard is a quadcopter with an integrated camera able to record video at up to ‘2.7K’ at 30 fps and take 12 megapixel still images in JPEG and DNG formats. The quadcopter is designed for consumer-level use. Read more

Articles: Digital Photography Review (dpreview.com)

 
Comments Off on DJI Phantom 3 Standard photography drone unveiled

Posted in Uncategorized


Google and MIT team up on clever method to remove reflections and obstructions from photos

06 Aug

Researchers at MIT and Google have developed a technique for removing unwanted reflections and obstructions from photos. Taking advantage of the parallax effect, this method could prove quite useful in locations where shooting behind glass or a fence is the only option. Read more

Articles: Digital Photography Review (dpreview.com)

 
Comments Off on Google and MIT team up on clever method to remove reflections and obstructions from photos

Posted in Uncategorized


5 Tips for Golden Hour Photography

06 Aug

It’s pretty much an accepted fact that the earlier and later parts of the day are best for photography, but if you want the absolute richest, warmest, most beautiful light, the hours directly following sunrise and leading up to sunset – known as the golden hours – are prime time for natural light.

This is when the subtle golden light from the low-hanging sun bathes the world in a warm glow, and shadows become long and dramatic, but not harsh.

Mono Lake, California, by Anne McKinnell

Those hours can be short-lived, though as once the sun starts to rise or set, it isn’t long before it climbs too high, or disappears altogether. To help you get every second out of each golden hour, consider these tips when you go out shooting.

1. Be There

The first step to making the most of the golden hours is knowing exactly what time that magic light is going to happen. Because the golden light is caused by our view of the sun, the timing will change with the seasons. Exactly what time the sun passes over the horizon depends the time of year and your location.

Sedona, Arizona, by Anne McKinnell

The time of sunrise and set is easy to find in your newspaper or online and that is a good place to start to calculate when the golden light will happen. But golden hour may not be anywhere near as long as an hour depending, on the season and your location. For example, near the equator, the sun rises quickly and you may only get golden minutes. On the other hand, in far northern locations the sun may not rise very high in the sky at all and you might get golden light all day.

You also need to watch how the clouds are forming throughout the day, since clouds on the horizon will cut your golden hour short.

2. Prepare Early

The golden hour (or minutes) can pass very quickly, so if you’re not already out shooting when the golden light starts, it’s likely to be over by the time you find your subject, choose a composition, set up your camera, and take the shot. If you know in advance what time you need to be there, you can plan ahead. Go out a couple of hours beforehand so you’ll have time to get to your location, get set up, and be ready to take the photo by the time the horizon starts to glow.

Depoe Bay, Oregon, by Anne McKinnell

By doing this, of course, you have to think into the future a bit. Rather than compose your image based on where the sun is, you must arrange your frame according to where the sun will be. To do this, think about the path the sun takes through the sky. It rises in the east, so you know where you can expect to see it first, and because it sets in the west you know which direction it’s moving. You can even find out the exact position where the sun will set on the horizon using various website and apps. Plan your shots with this information in mind. A compass will come in handy. Compose your photograph where the sun is going to be, then just relax and wait for the moment to present itself.

3. Balance the Exposure

The contrast between light and shadow isn’t as extreme during the golden hours as it is in the middle of the day, but there can still be a huge tonal range between highlights and lowlights (shadows). Especially if you’re trying to capture the sky itself in the picture, its brightness will almost certainly overpower the scene below it.

There are many ways to balance a difference in brightness between two parts of your composition. Bracketing your shots is a good start – use your camera’s exposure compensation feature (+/- button) to take several pictures of a scene with different levels of brightness. There might be a perfect exposure setting that captures both light and shadow areas.

Organ Pipe National Monument, Arizona, by Anne McKinnell

If you shoot in your camera’s uncompressed RAW format you’ll be able to individually adjust your photo’s highlights and lowlights in post-processing, reducing the contrast while preserving as much detail as possible. This way, if one area of your photo is too dark and another is too bright, you can tone down the whiter shades while bringing up the darker shades to create a well-balanced image. This level of control isn’t possible with compressed JPG files, which don’t save the subtle information in those areas.

If the sky is consistently too bright in your photos, consider using a graduated filter that is tinted at one end, but fades out and is transparent on the other. This will reduce the exposure on only half of the image. By putting the tinted half at the top it will darken the appearance of the sky.

Another option is to take your bracketed shots and combine them in post-processing to make a high dynamic range (HDR) image (Merge to HDR in LR or another method).

4. Use Fill-Flash

Rather than take light away from the brighter areas, your other option is to add light to the darker parts instead. You can do this with a continuous light source like a lamp. Moving the light closer to the subject will make it brighter, and pulling the light away will dim it.

Superstition Mountains by Anne McKinnell

Of course, if you’re outside you probably don’t have a lamp on hand. What you probably do have, though, is your on-camera (or off-camera) flash. Flash doesn’t always have to act as the main light source in a picture – it can enhance an existing light source (such as the sun) by simply adding light into the shadow areas of a photograph.

Flashes also don’t have to be used at full power. Nearly every camera will have a Flash Compensation option. This gives you the ability to turn the brightness of your flash up or down. A dimmer flash will still add light to your scene, but it won’t be strong enough to overtake the primary light source and create new shadows of its own. Using it in this way is known as fill-flash. When your subject is backlit, such as by a fiery sunset, use this method to prevent silhouetting. Bracket your shots using different flash settings to achieve the right balance of brightness between the foreground and background.

5. Set the Colour Temperature

Combining two light sources can cause other complications though – particularly with the white balance. Every light source has a different hue, or colour temperature. Incandescent bulbs have a yellow/orange (warm) cast, while fluorescents are sort of blue/green (cool). Our eyes adjust to those slight shifts on their own, but a camera has to measure the balance of the light so it can alter its colours, and ensure that a white object looks white and not yellow/orange or blue/green. Modern cameras can do this automatically, or you can manually select what kind of light to balance the camera to (daylight, indoor light, candlelight, etc.).

Devils Tower, Wyoming, by Anne McKinnell

The golden hours have a lot of warm coloured light, so if left on auto white balance, the camera will adjust its colours to be a little more blue to compensate. However, if you add in the light of a flash, which is cool in tone, one of two things will happen: the camera will keep the same white balance setting as before, and the flash’s light will appear even more blue, or the camera will re-adjust itself to the white balance of the flash, causing it to look normal but the rest of the picture to appear more orange.

When using two different light sources, it’s important to notice the colour temperature of each. Then, decide which of them you want to appear neutral, and which one should retain its natural colour. Rather than keeping your camera on auto white balance, set it to the type of light you want neutralized. If you shoot in RAW format, this can also be changed in post-processing.

Arch at Whitney Pocket, Nevada, by Anne McKinnell

Remember, golden hour is not sunset or sunrise, but shortly before and after those times when your subject still has direct light falling on it. The magical golden light will transform your photos from ordinary to extraordinary. It’s all about the light!

googletag.cmd.push(function() {
tablet_slots.push( googletag.defineSlot( “/1005424/_dPSv4_tab-all-article-bottom_(300×250)”, [300, 250], “pb-ad-78623” ).addService( googletag.pubads() ) ); } );

googletag.cmd.push(function() {
mobile_slots.push( googletag.defineSlot( “/1005424/_dPSv4_mob-all-article-bottom_(300×250)”, [300, 250], “pb-ad-78158” ).addService( googletag.pubads() ) ); } );

The post 5 Tips for Golden Hour Photography by Anne McKinnell appeared first on Digital Photography School.


Digital Photography School

 
Comments Off on 5 Tips for Golden Hour Photography

Posted in Photography