Das Bild des Tages von: canTon.

Im Ausblick: Foodblogger auf Instagram, was Selfies über uns sagen und das letzte Mahl.
kwerfeldein – Fotografie Magazin | Fotocommunity
Das Bild des Tages von: canTon.
Im Ausblick: Foodblogger auf Instagram, was Selfies über uns sagen und das letzte Mahl.
kwerfeldein – Fotografie Magazin | Fotocommunity
Earlier this week we took you ‘under the hood’ of the Sony a7R II, metaphorically. Now, thanks to our friends at iFixit, it’s possible to take a literal look inside the a7R II. Ifixit took delivery of a production sample a7R II at around the same time as we did, but while we were out testing its AF system and checking to see how its sensor measures up, the hard-working crew at iFixit were busy taking it to pieces. Click through to see what they found
Articles: Digital Photography Review (dpreview.com)
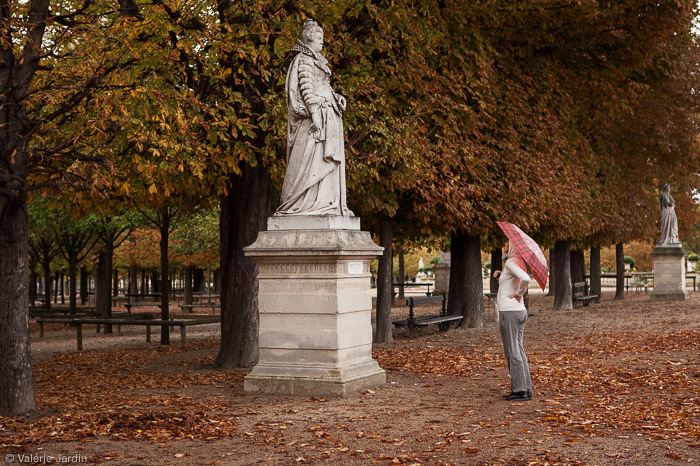
Many photographic situations rely on keeping your camera as still as possible during exposure for pin-sharp images. You may have practiced hard to develop a steady hand and you’ve probably used tripods, remote shutter releases or image stabilisation to reduce the risk of camera shake. But, is keeping your camera still always a good thing? Every now and again, why not throw caution to the wind, move your camera while the shutter is open, and explore the range of creative opportunities this offers you as a photographer.

Intentional Camera Movement (or ICM for short) is a photographic technique where the camera is moved as the image is being taken. One example is panning. The camera movement mimics that of a moving subject to keep the subject sharp and the background blurred. However, moving your camera during exposure can open up a lot more creative options for you to try out. In particular, ICM can be used to take some truly unique landscape shots. The technique can be exceptionally liberating and, by reducing the amount of sharp details in a landscape, it allows you to concentrate on lines, form and colour in your images. A scene that you may ordinarily consider too cluttered, might just come to life through ICM by letting you blend colours and shapes for an interesting abstract shot.
One of the reasons that I have grown to love ICM is that it enables you to capture a landscape in a unique and personal way that cannot easily be reproduced. It can even breathe new life into overly familiar landscapes, letting you see and capture something new about a location you may have photographed many times before. If you are struggling to find inspiration for your next photographic project, or you want to get your creative juices flowing, this is a technique that you should try at least once. It is relatively easy to take some striking shots, you are sure to end up with a unique set of landscapes and it can also be a lot of fun.

A key factor to get right when using ICM is the shutter speed. It needs to be long enough to capture significant motion blur; anything from 1/3 or 1/2 second exposure times, up to multi-second exposures. Because of these slow shutter speeds, shooting in low-light conditions is ideal for ICM. During the daytime, it may be harder to achieve the required shutter speeds even at the lowest ISO setting and the smallest aperture (highest f-stop number). You may need to use a polarizing filter, a neutral density (ND) filter, or a combination of both. Personally, I prefer to use a polarizing filter as a starting point as this helps to boost colours and cut down on reflections and glare. I will then add a 2-stop or a 4-stop ND filter if the shutter speed needs to be slowed down any further.
When starting out with ICM, it may help to shoot in Shutter Priority mode. Set the shutter speed to around half a second to start, and turn the ISO to the lowest available setting on your camera. Once you have practiced at this shutter speed, you can then get longer exposure times by using a combination of low-light and/or filters. Focus manually and turn off the autofocus to prevent the camera searching for focus during exposure. Also, if you are using a lens that has image stabilization, remember to turn it off.

Once you have taken control of the shutter speed, how you move the camera is totally up to you. Get creative, there are no rules. You could move the camera vertically, horizontally, or diagonally – fast or slow. Alternatively, you could rotate the camera 360 degrees during exposure to create a spiral effect, or change the focal distance on a zoom lens during exposure to create a zoom effect. With practice, you can combine two or more of these movements to create something truly unique. The look and feel of your final images will be determined by the speed, direction, and smoothness of your chosen movements. If you wish, you can use a tripod to control the camera movement. This will help you to capture a smoother movement, which can be useful if you wish to retain a straight horizon line. I prefer to work hand-held when moving the camera, as it offers greater flexibility and provides more opportunities to experiment with different movements.
Bold movements can sometimes be more effective as there is a risk that too subtle a movement may end up looking like camera shake in the final image. Waving your camera around may not come that naturally, and it may result in you getting some funny looks from amused onlookers, but the end results definitely can make it worthwhile.

A good place to begin using ICM in your landscape shots is to look for locations that offer striking colours, lines, or patterns. Woodland is a favourite ICM subject of mine, particularly during the spring and autumn seasons. Clean, parallel lines provided by the trees and vibrant colours of nature (provided by bluebells in the spring and fallen leaves in the autumn) lend themselves to a vertical camera movement. This can be from the top-down, or from the bottom-up and can be a quick or slow movement. It really just depends on the effect you wish to capture, and how experimental you want to be. Seascapes can be a good starting point for side-to-side camera movement, panning the camera in line with the horizon.
Alternatively, in rougher waters, you could try to match the movement of your camera to the movement of the waves for an altogether different effect. Shooting at sunrise or sunset could provide you with a greater variety of colours to work with, and shooting city lights after dark can also offer a wide range of creative options.
Once you have found a suitable location, you will probably find yourself taking multiple shots with various different movements. (I should warn you that this technique can sometimes be quite addictive, and you may find your memory cards filling up quite quickly!) You may find it useful to set your camera to shoot in Continuous Shooting Mode so that you can take a series of shots in quick succession, while moving the camera in a particular direction.

As with any type of photography, images created using this technique are not going to be to everybody’s taste. It is highly subjective and what works for you will not work for others. Just keep in mind basic principles of photography such as composition and exposure – these are still just as important. Also, while this technique will render much of the landscape abstract, you may find it helps to have at least one element of the landscape sharp, or recognizable in the final image.
There is an element of trial-and-error when starting out with Intentional Camera Movement. You should soon find out what works for you and what doesn’t; this will help you to develop your own style. Don’t be too concerned if you do not get an effect you like right away – the technique can be quite hit-and-miss sometimes. Take a lot of shots, and don’t be too quick to delete shots that you feel haven’t quite worked out as you had hoped. There is a chance that, after a few days, you may take another look and see something that you like in there after all.
One of the great things about this technique is that it is all about how you express yourself through photography – think of your camera as your paintbrush. Get creative, have fun, and start seeing landscapes in an exciting new way.

I have included several of my attempts at ICM landscape shots. Please feel free to share your own in the comments section.
googletag.cmd.push(function() {
tablet_slots.push( googletag.defineSlot( “/1005424/_dPSv4_tab-all-article-bottom_(300×250)”, [300, 250], “pb-ad-78623” ).addService( googletag.pubads() ) ); } );
googletag.cmd.push(function() {
mobile_slots.push( googletag.defineSlot( “/1005424/_dPSv4_mob-all-article-bottom_(300×250)”, [300, 250], “pb-ad-78158” ).addService( googletag.pubads() ) ); } );
The post How to Take Creative Landscape Shots using Intentional Camera Movement by Richard Beech appeared first on Digital Photography School.
Premium tripod manufacturer Gitzo has released updates to its well-known Traveler range of carbon fiber tripods. The company has introduced its Carbon eXact carbon fiber tubing to the range, which it claims makes the legs stronger. Read more
Articles: Digital Photography Review (dpreview.com)
Ein Beitrag von: Patrick Citera
Patrick Citera ist ein Portraitfotograf. Und er macht sehr gute Portraits von Frauen und auch Männern. Ich wollte mehr darüber erfahren und manchmal braucht es dafür nicht mehr als zwei Fragen.
kwerfeldein – Fotografie Magazin | Fotocommunity
What happens when you screen-cap and re-post a photo to Instagram 90 times? Artist Pete Ashton’s ‘Sitting In Stagram’ project shows just that – and it’s not pretty. Read more
Articles: Digital Photography Review (dpreview.com)
Apple’s latest Digital Camera Raw update for its Mac OS X extends support to a handful of new and notable cameras, including the Sony Cyber-shot DSC-RX100 IV, a7R II and Leica Q. Read more
Articles: Digital Photography Review (dpreview.com)
First, let’s assume that you are shooting with a digital camera and the choice of color or monochrome treatment can be made at the post-processing level. The decision of choosing color or black and white if you are shooting film is a different story, and requires a different frame of mind, as it is usually made before you leave the house.
So, the questions is this: Is street photography better in color or black and white? There is no right or wrong answer to this question, it is definitely a personal preference. Some photographers only shoot in color, others prefer black and white for all their work. For my part, I let the subject dictate the choice and that decision is usually made before I press the shutter.
Here is some of the reasoning behind that decision…

B&W will work best if your subject already has a timeless look.
You may like to use black and white for its timeless quality. If your subject also has a timeless look, a black and white processing will make your image stand the test of time, and often give it a more artistic look. This is even more true when no element in your frame dates your photograph (such as mobile phones, cars, etc.). Other times, the black and white processing will even help hide those elements.
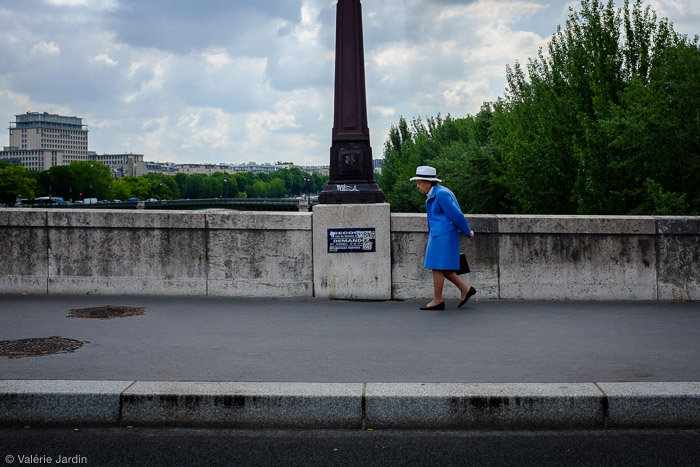
Silhouette photographs are often stronger in black and white than in color. The human element featured should be well-defined, and there needs to be some separation to identify the shape of the body. Removing the color will help make your subject stand out more, especially if it is small in the frame. The eye will automatically be drawn to the human shape.
B&W often works best when photographing silhouettes.
There are also some strategic reasons to favor black and white over color. As street photographers we usually do not remove elements from the frame in post-processing. Our job is to record an authentic moment in time, that never happened before, and will never happen again. A skillful street photographer makes quick decisions, and is able to remove distracting elements from the frame by moving in closer and positioning him/herself correctly, before pressing the shutter. Most of us would not resort to using post-processing tools to remove objects. There are times when bright colorful elements such as stop signs, trash cans, or cars are inevitable, and will draw the attention away from the subject. By removing the color, you are able to bring the attention back to the human element.

In this frame the subject is interesting but your eye is drawn to the colors of the street signs. |

By removing the color distraction it’s a much stronger image, bringing attention right to the subject. |
By shooting in RAW you retain all the color information in your file, which allows you to play with the color sliders in Lightroom and turn a distracting color into a light or dark grey tone to fine-tune your final image.
There are other times when the color is amazing but also overpowering, and risks becoming the subject because the human element is lost in the chaos.
When is color preferred? The color can be an integral part of the story, which also means that a black and white conversation would take away the most important component of the image, and it would not make any sense.
Here a B&W conversion would not make any sense and the subject would lose interest.
Finding a great background, such as a textured wall or a colorful storefront, is a great way to anticipate a shot, by waiting for the right subject to enter your frame. It may be even more important to get the right subject in a color shot than in a black and white picture. Color harmony plays an important role in making, or breaking the image. Most importantly, color should not overpower your subject. It should be part of the story, not a distraction from it.
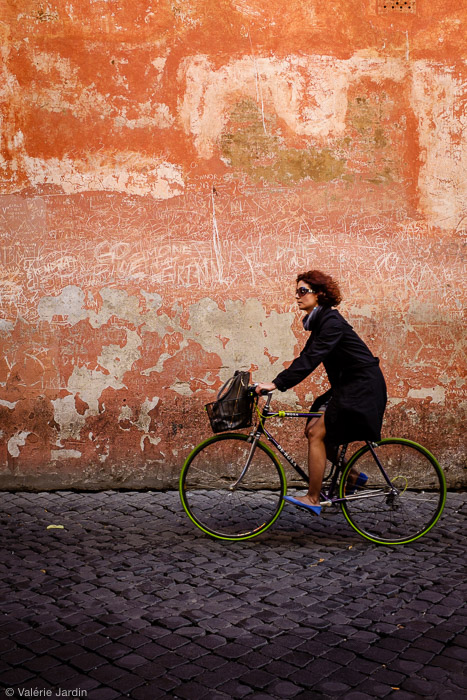
Finding a textured colorful background and waiting for the right subject to enter your frame makes for a strong color street photograph. The green tires and blue shoes completed the shot.
Color will also often give a sense of place or time in street photography. It will evoke the feeling of a season, for example, or the time of the day – from the warm glow of the golden hour, to the cool tones of the blue hour.
Autumn in Paris would not be as well conveyed in a B&W photograph.
Going out on a photo walk with a specific color in mind is also a fun way to approach street photography. You will be surprised at the creative ways you will see the world around you by focusing your vision on one color. Try it!

Choosing a color theme then you are out on a photo walk can be a fun project. Here my color theme was blue!
Don’t forget that it’s your vision, and you are shooting street photography for yourself first. Don’t get stuck, try new things! If you always shoot in color, go out and train yourself to see in grayscale for a few days. If you favor black and white, take another look at the world around you and learn to appreciate and use the colors it has to offer. You may discover a whole new way to see, and you will undoubtedly grow in the process. Have fun!
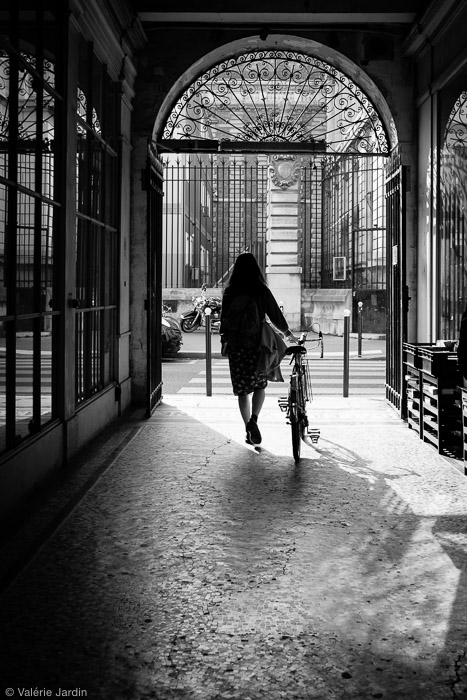
This short video about Color versus B&W is part of my Street Tips series called Hit the Streets with Valerie Jardin
Editor’s Note: This is last of a series of articles this week featuring black and white photography tips. Look for earlier ones below.
googletag.cmd.push(function() {
tablet_slots.push( googletag.defineSlot( “/1005424/_dPSv4_tab-all-article-bottom_(300×250)”, [300, 250], “pb-ad-78623” ).addService( googletag.pubads() ) ); } );
googletag.cmd.push(function() {
mobile_slots.push( googletag.defineSlot( “/1005424/_dPSv4_mob-all-article-bottom_(300×250)”, [300, 250], “pb-ad-78158” ).addService( googletag.pubads() ) ); } );
The post Color or Black and White for Street Photography? by Valerie Jardin appeared first on Digital Photography School.
Das Bild des Tages von: Bassam Allam
Im Ausblick: In amerikanischen Hinterhöfen, Landschaften und Foodporn.
kwerfeldein – Fotografie Magazin | Fotocommunity
[ By WebUrbanist in Architecture & Public & Institutional. ]

Somewhere between a huge funhouse, playground and circus, the City Museum of St. Louis may be the most entertaining and interactive urban architectural experiment in the world. And if you are not having a good time, you can always hop on the 10-story slide, a remnant of the structure’s days as a shoe factory (originally designed to send products down the side of the building).

Eclectic from its stylings to its offerings, this unique place features everything from recycled buses and airplanes to giant multi-story slides and artificial caverns as well as more conventional kid-friendly fun in the form of skate parks and ball pits.


Various other imported, salvaged and upcycled oddities can be found throughout, including a vault and safety deposit boxes from a Chicago bank. And the place is constantly changing, being reconfigured and hacked away at by the Cassilly Crew.

What started inside of a derelict structure in the late 1990s has burst from the walls of the building, featuring an array of exterior ‘exhibits’ as well. Visitors can climb ramps, bridges and tunnels to access a high-hanging plane and other repurposed spaces. Up on the roof sits a small Ferris Wheel while a bus hangs over the edge of the building (and of course: people are welcome to climb inside).


The owners boast that they are “always building,” and Gallery Hip summarizes the strange paradoxes of this ever-changing place: “popular among residents and tourists, the museum bills itself as an ‘eclectic mixture of children’s playground, funhouse, surrealistic pavilion, and architectural marvel.’ Visitors are encouraged to feel, touch, climb on, and play in the various exhibits.” Or, as Colossal describes it: “hundreds of feet of tunnels that traverse from floor to floor, an aquarium, ball pits, a shoe lace factory, a circus arts facility, restaurants, and even a bar… because why not?”


Faced with this amazing place, one is left to wonder: would such an unusual endeavor be approved of were it being started from scratch today, or would safety-minded citizens suck the fun out before it got started? Like Adventure Playgrounds, also more popular in an era now past, it is hard to imagine this kind of project getting off the ground, but thankfully there is a precedent: it is hard to argue with the success of the City Museum.

Like so many secret spaces of New York City, this one-room exhibit space (hidden inside an abandoned elevator) is not exactly on the beaten path. This pop-up …
Click Here to Read More »»

Making art accessible like never before, this interactive gallery encourages people to play around, with and even inside its artworks, extending the frame to …
Click Here to Read More »»

Commissioned for Guatemala City, this weighty megalithic structure is set to be the largest museum commemorating Mayan culture and history in Central America. …
Click Here to Read More »»
![]()


[ By WebUrbanist in Architecture & Public & Institutional. ]
[ WebUrbanist | Archives | Galleries | Privacy | TOS ]
You must be logged in to post a comment.