RSS
 

Archive for August, 2015

Nikon delays AF-S Nikkor 24-70mm f/2.8E ED VR lens until October

22 Aug

In a press release on its Japanese website, Nikon has announced that its new AF-S Nikkor 24-70mm F2.8E ED VR lens – announced earlier this month – is being delayed from its original shipping date of 27th August to October. No specific reason for the delay has been given, only that it is necessary to ‘satisfy the customer’. Click through for more information

Articles: Digital Photography Review (dpreview.com)

 
Comments Off on Nikon delays AF-S Nikkor 24-70mm f/2.8E ED VR lens until October

Posted in Uncategorized


Parallax View: Apple patent hints at 3D effect in photos

22 Aug

Patent spotting site Patentlyaple has discovered an Apple patent application titled “Parallax Depth Rendering” which describes a methodology for rendering images and video that, when viewed on a standard 2D display, give the impression of showing a 3D view. Click through for more details

Articles: Digital Photography Review (dpreview.com)

 
Comments Off on Parallax View: Apple patent hints at 3D effect in photos

Posted in Uncategorized


Dismaland: Banksy’s Disappointing Dystopian Bemusement Park

22 Aug

[ By Steph in Art & Street Art & Graffiti. ]

dismaland 1

Excited ticket holders rush past sullen-faced guards in mouse ears to gain access to Banksy’s Dismaland, a dilapidated, depressing ‘bemusement park’ that’s far from the happiest place on earth. Contained within a derelict seaside swimming complex, the attraction takes everything you love about Disneyland and subverts it into a dystopian vision where nothing works quite like it should, and whatever can go wrong probably will.

dismaland 3

dismaland 2

Visitors pass through a faux security screening complete with cardboard x-ray machines before submitting to a real search, with guards ironically checking for spray paint to make sure no vandals compromise the strange scene Banksy has curated. Inside, they’re greeted by a structure resembling a post-apocalyptic Cinderella’s castle, a giant pinwheel tangled with plastic and the grim reaper as the sole rider at a bumper car attraction.

dismaland 6

dismaland 9


dismaland 10

A photo backdrop labeled ‘selfie hole’ tells you what it’s for and makes a statement on the person using it at the same time. Step past the ‘No Entry’ gate in the fairytale castle and you’ll be treated to CCTV-like footage of Cinderella and her prince on screens before coming upon the wreckage of her overturned carriage, paparazzi flashbulbs going off in a frenzy deliberately echoing the death of Princess Diana. Everything is designed to be a colossal let-down.

dismaland 5

dismaland 4

dismaland 8

Abandoned for nearly a century, the 2.5-acre site has just the right grimy atmosphere for Banksy’s display, which includes almost none of his own work. The artists who collaborated on the project and have works featured inside include Jenny Holzer, Damien Hirst and Jimmy Cauty. The park will be open every day through September 27th, with performances by Run the Jewels, Pussy Riot, Massive Attack and others scheduled each Friday. Tickets are £3 on the Dismaland website. 

Photos by Christopher Jobson at This is Colossal

Share on Facebook


[ By Steph in Art & Street Art & Graffiti. ]

[ WebUrbanist | Archives | Galleries | Privacy | TOS ]


WebUrbanist

 
Comments Off on Dismaland: Banksy’s Disappointing Dystopian Bemusement Park

Posted in Creativity


10 Best Photos from the Summer Landscape Photo Contest – Pick the Winner Now!

21 Aug

Our Summer Landscape Photo Contest is entering the final stage. HUGE THANKS to all the participants who uploaded their photos to our Flickr group pool. It’s great to know that so many talented and creative photographers read our blog. The contest jury had difficult time selecting only 10 photos from all the beautiful images submitted. But the finalists are picked and now only YOU decide Continue Reading

The post 10 Best Photos from the Summer Landscape Photo Contest – Pick the Winner Now! appeared first on Photodoto.


Photodoto

 
Comments Off on 10 Best Photos from the Summer Landscape Photo Contest – Pick the Winner Now!

Posted in Photography


Im Gespräch mit Adi Dekel

21 Aug

© Adi Dekel

Ein Beitrag von: Adi Dekel

Im Frühjahr dieses Jahres habe ich die israelische Fotografin Adi Dekel getroffen, deren Bilder mich schon einige Zeit faszinierten. In Italien verbrachten wir ein paar schöne Tage zusammen mit einigen anderen Fotografen. Die Zeit für lange Gespräche war damals leider viel zu knapp, weshalb ich mich sehr freue, dass ich ihr für kwerfeldein einige Fragen stellen durfte und sie so mit Euch gemeinsam noch etwas näher kennenlernen darf.
kwerfeldein – Fotografie Magazin | Fotocommunity

 
Comments Off on Im Gespräch mit Adi Dekel

Posted in Equipment


The What, Why, and How of Using Lightroom Export Presets

21 Aug

ExportPresets-Header

You’re probably quite familiar with Lightroom presets for editing photos, called Develop Presets. When was the last time you created your own Export Presets, though? These presets can help you speed up your workflow even more, by allowing you to save different export settings, for different needs. Let’s look at what they are, how they can help you in your workflow, and how to create your very own.

What are export presets?

Export presets are simply ones that tell Lightroom the parameters to follow when it exports your image files. Just like develop presets, they save you from applying the same settings repeatedly, only these are for exporting rather than editing.

To see the current presets you have loaded, go to the Library Module, select a sample photo, and click Export. A window will pop up with all your exporting options, including things like destination folder, image name, image size, and watermarking options. The left side of this box will have a list of what export presets are available for you. Alternatively, you can see the list of presets if you go to File -> Export with Preset and you’ll see the list pop up. That view, however, doesn’t show you the details of each preset.

ExportPresets-Locate

Why use export presets?

This is all great, but how are they helpful to you? Let’s work through your general workflow and see how these presets can be beneficial. You import your fresh photos into Lightroom, then go into the Develop module to work your editing magic. Once you’re ready to finalize and export the final product, you click back into the Library module to export. You have loads of options for how you could export this photo, all depending on its intended use.

Will the photo be used for social media? Then the size and resolution will be lower, and most likely you’ll want to add a watermark. Is this photo going to be printed and enlarged? Then you’ll want to make sure to give a large size and higher resolution to allow for enlargements. Is this photo going to be part of a set? Perhaps you want all the final photos to be labeled cohesively (for example: JonesFamilySession-1.jpg). Export presets allow you to set up parameters for each of these situations, saving you from having to remember settings and change them with each export. You can select multiple photos, click Export, and select the export preset that will then be applied to all photos in that export session.

How to use export presets

Great! Export presets are awesome! Let’s talk about how you can create some for yourself. While in the Library module, click Export to get the exporting window to pop-up. Begin at the top with Export Location and choose all the settings to put the images where you want them for your current need. If you’re exporting to send someone proofs from a session, for example, you’ll want to pay attention the resolution, watermarking, and file naming so that they are ready to show to your client. Don’t be shy about clicking on pull-down menus or playing with various numbers – you can always click Cancel and start over.

You can also always delete a preset if it was not properly set up. Now that you have the options all set how you want them, look to the left column where it has the list of existing presets. In the bottom of this column there is an Add button. Click that and a new small window will pop-up for you to input the name. Here is where you will name this preset, so be sure to make it something simple and clear for your future use. You can name it anything as long as it doesn’t have the exact same name of another existing preset. For example, your preset for client proofs may simply be called Proofs.

You can see that I have created a preset for images shown on Digital Photography School to fit the website requirements! Go through this process for each preset you want to create.

ExportPresets-DialogueBox

ExportPresets-New

When you are ready to use one of these presets, select the photos to export, click Export, select the preset you want to use, and then click Export to complete! Note that you can modify these presets as you use them. For example, say I want to export a file with the same parameters as the Proofs preset, but I don’t want to watermark this one. I simply go to export, click on Proofs, then scroll down and modify the setting for the watermark. If this is a one-time use and I do not want to save this as a new preset, then I simply go ahead and click Export. If I decide I want this to be a new modified preset for me, then I would click Add after making my modifications, and name it something different (like: Proofs-clean).

What happens if you make a mistake and save an export preset you no longer want? In the Library module, click to Export. When the window pops up, click once on the export preset you want to delete. When that preset is highlighted, the Remove button next to Add will become available. Click Remove and it’s gone! Note that there is no confirmation window that pops up for deleting the preset, so be sure that you do want to remove it completely before you do this.

Do you have other exporting tips for speeding up your workflow and making life a bit easier? Please share in the comments below!

googletag.cmd.push(function() {
tablet_slots.push( googletag.defineSlot( “/1005424/_dPSv4_tab-all-article-bottom_(300×250)”, [300, 250], “pb-ad-78623” ).addService( googletag.pubads() ) ); } );

googletag.cmd.push(function() {
mobile_slots.push( googletag.defineSlot( “/1005424/_dPSv4_mob-all-article-bottom_(300×250)”, [300, 250], “pb-ad-78158” ).addService( googletag.pubads() ) ); } );

The post The What, Why, and How of Using Lightroom Export Presets by Natalia Robert appeared first on Digital Photography School.


Digital Photography School

 
Comments Off on The What, Why, and How of Using Lightroom Export Presets

Posted in Photography


20. August 2015

21 Aug

Das Bild des Tages von: Bastian Block

got-you-©-Bastian-Block-19656896054

Im Ausblick: Deutsche Waffenbesitzer, ein Nassplatten-Bild und Griechenlands Oberschicht.
kwerfeldein – Fotografie Magazin | Fotocommunity

 
Comments Off on 20. August 2015

Posted in Equipment


Huawei’s Honor 7i comes with 13MP flip-out camera

21 Aug

Huawei has launched a new smartphone – the Honor 7i. In many ways the Honor 7i is very similar to its sister model the Honor 7. However, one major differentiator between the two models is the camera. On the 7i the Honor 7’s conventional 20MP module has been replaced with a 13MP camera unit with dual-LED flash that, thanks to a flip-out mechanism, can be used as both front and rear camera. Click through to read more at connect.dpreview.com

Articles: Digital Photography Review (dpreview.com)

 
Comments Off on Huawei’s Honor 7i comes with 13MP flip-out camera

Posted in Uncategorized


Liberty City: Inside an Urban Governmental Drone Test Complex

20 Aug

[ By WebUrbanist in Travel & Urban Exploration. ]

drone system

If you have ever wondered how and where the Department Homeland Security evaluates drones for real-world applications, this Freedom of Information Act request reveals some of the secrets behind the operations taking place at one of these rather mysterious locations. Not to be confused with its video game namesake, tracing back to Grand Theft Auto’s own digital Liberty City, this real-world test site is fascinating to learn about remotely but not somewhere you want to have an actual vehicular adventure.

artifical-street-urban-complex

For years, the government has been testing drones for everything from monitoring infrastructure and special events to patrolling harbors and supporting first responders. Run by Robotic Aircraft for Public Safety (RAPS), Liberty City and sites like it let local, regional and national governments deploy different models of drone and decide which best suit their needs. Like Gravesend in the UK (pictured above), officers and troops are also called in on the ground to interact in these remarkably complete but staged environments.

urban drone testing

Variegated urban terrains help those overseeing the tests determine a drone’s ability to identify key objects and individuals in the built environment, distinguish assailants and perpetrators in complex situations and track persons through challenging architectural landscapes. Simulations revolve around everything from ordinary robberies to hostage situations and terrorist attacks. The goal, ultimately, is to figure out what (completely or partially) autonomous vehicle technologies will work both generally and around specific purposes, for applications ranging from emergency search-and-rescue to broader everyday surveillance. While the work they are doing in these places is not classified as such, it is still highly secretive and much of it still remains undisclosed after years of inquiry.

drone testing documents_edited-1

Submitted via MuckRock, the FOIA request behind the details featured here sheds light on the reasons and methods behind these processes and places. Per Shawn Musgrave, “The broad objective of RAPS is to determine whether drones can play a practical role in a broad range of public safety deployments. Such applications include law enforcement, firefighting, disaster response, and search-and-rescue. The RAPS testing program evaluates each drone model for ease of operation, durability and performance in simulated scenarios. Reviewers compile their findings into a database for first responders nationwide to use when weighing a drone purchase.”

Share on Facebook


[ By WebUrbanist in Travel & Urban Exploration. ]

[ WebUrbanist | Archives | Galleries | Privacy | TOS ]


WebUrbanist

 
Comments Off on Liberty City: Inside an Urban Governmental Drone Test Complex

Posted in Creativity


Tips for Avoiding a Foggy Lens

20 Aug
Foggy lens article - example of clear shot taken once lens cleared

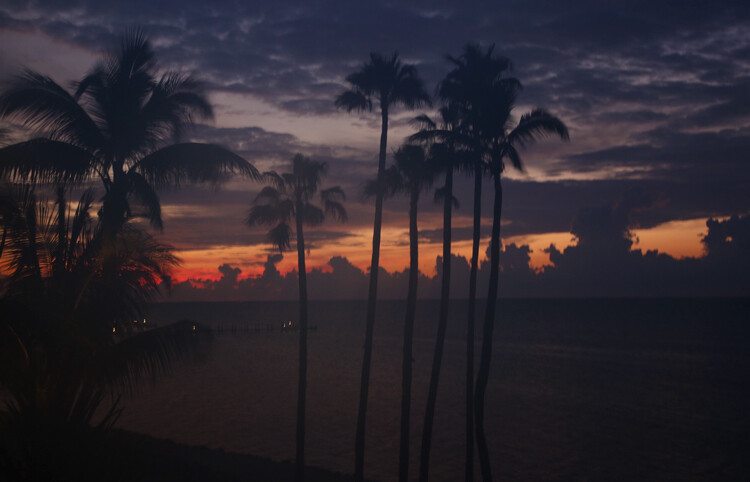
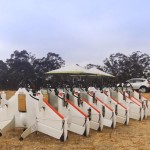
Taken at sunrise in the Florida Keys. Although this shot was okay, see below to see the similar shot taken a few minutes before with a foggy lens. I’m lucky I didn’t miss it entirely.

Has this happened to you?

  • You are on vacation at the beach. You decide to photograph the sunrise or sunset, so you grab your camera from your hotel room and head out. You get to the perfect spot to shoot, and look through the viewfinder at the beautiful sunrise/sunset – only to find that the lens is completely fogged over. You wipe away the condensation from the front of the lens, but it instantly comes right back. Every time.
  • Or perhaps you’re in your car, and you spot something you want to photograph. You pull over, hop out and set up the shot – only to find the same thing. The lens is fogged over, and every time you wipe it away, it comes right back. You miss the shot.

This happens all the time in coastal and tropical environments. Transferring the camera and lens from a cool, low-humidity location like your car or hotel room directly into a warmer, high-humidity environment causes condensation to form on the lens (on the front and back elements).

Making the problem even worse is that these humid environments are likely where you like to go on vacation/holiday, and that is when you tend to take the most pictures. So that means this problem ruins a lot of shots. It has happened to me many, many times.

Dealing with a Foggy Lens

So how do you fix this problem? Well, once it happens, there is no fix. There are a few things you can try, which will be addressed at the end of the article, but you just have to keep wiping off your lens, and waiting for it to acclimate. This can take a while. Sometimes it just takes a few minutes for the lens to acclimatize and stop fogging over, but other times it can take half an hour.

Example of picture taken with lens fogged due to condensation

Here is a similar shot to the one above, but this one was taken before the lens had a chance to acclimate to the warm, humid air outside my hotel.

Since you cannot fix it once it happens, you have to avoid the problem in the first place. How do you do that? You have to let your camera or lens acclimate ahead of time.

Obviously, you cannot just leave your camera bag laying around outside. You will need to let everything acclimate while keeping it safe. Here are some tips for decreasing the time necessary for your camera and lens to acclimate to the outside temperature and humidity while keeping it safe:

1. Keep the camera outside (but in a safe place)

If you have a secure hotel balcony, you might put your camera and lens out there to let them acclimate. You probably don’t want to leave them out there overnight though. Even putting aside any security concerns, the coastal environment is not friendly to electronics, and prolonged exposure isn’t great for your camera. You can, however, place the camera and lens out on the balcony or other secure place for a while, as you are preparing to go out. Leaving them outside for a half-hour or so ought to be sufficient.

If you are getting up early to shoot a sunrise, for example, you might place your camera and primary lens out there immediately after you wake up, and let them acclimate while you are getting ready to go. That will give them some time to acclimate.

2. Keep the camera in the trunk

When you are driving around, or heading to a place you plan to photograph, keep your camera and lenses in the trunk of your car. That will keep them out of the air conditioning, and allow them to acclimate to the outside temperature and humidity.

Sometimes, however, you want to keep your camera handy in case you come across a great shot. In that case, keep the AC off and roll the windows down. All you are doing is keeping your camera and lens out of the air conditioning so that they acclimate to the temperature and humidity outside.

3. Get them out of the bag

If you leave your camera and lens in a zipped-up camera bag, then the acclimation process will take exponentially longer. The camera bag, while certainly not air-tight, will prevent air flow and keep your camera and lens surrounded by cool, dry air. You don’t want that.

Instead, when you are acclimatizing the camera and lens – whether that be on the hotel balcony, in the trunk of your car, or some other place – keep them outside the camera bag.

Example of picture taken with lens fogged due to condensation.

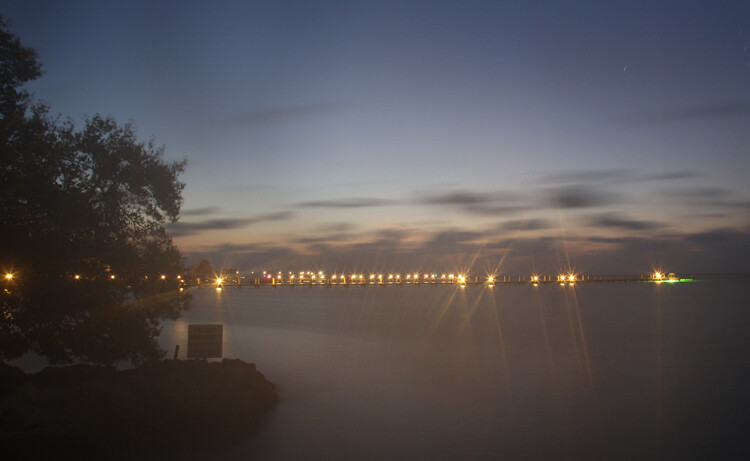
Here is another shot taken immediately upon exiting my cool, dry hotel and entering the warm, humid air along the coast in the Florida Keys.

4. Remove the caps and filters

The place where you are likely to have the biggest problem with condensation, is the front of your lens. Therefore, that is the part you should spend the most time and effort acclimating. In doing so, take off any filters or lens caps that are on your lenses. You don’t want a UV filter and a lens cap keeping the warmer, more humid air from getting to the front of your lens and acclimating it to the conditions outside.

5. Keep a micro-fibre cloth handy

Once the condensation happens, you just have to ride it out until your camera and lens acclimate. At the same time, you should periodically wipe off the front of the lens. That way you can see if the condensation is going to return. If you are not wiping it off periodically, you won’t know.

In addition, if the situation is not too severe, you can wipe off the lens and then quickly snap off a shot or two before the lens starts fogging up again. That usually works after the acclimation process has been going on for a while.

Keep a micro-fibre cloth handy for this process. If you don’t have one, you’re going to have to use whatever is available to wipe off your lens – like your shirt (and I’d like to scoff at this notion, but I’ve been forced to resort to that many times). Buy a couple of clip-on micro-fibre cloths that come in little pouches. You can just clip one to your camera strap and you’ll always have it handy. That will also keep you from having to dig through your bag to find one (they always go to the bottom in a hard-to-reach corner).

6. Fix it in post-production?

A picture with any significant fogginess due to condensation is a goner. You will not be able to save it.

If the picture only has a minor amount of fogginess, however, there are some things you can do to try to clear it up. These are by no means sure-fire cures, but they will help a minor case of fogginess. Your first thought will probably be to increase the contrast and clarity in Lightroom or ACR. Those will work a little bit. A slightly stronger move is to take the photo into the LAB colorspace and perform the basic LAB color enhancement move. A fortunate side-effect of the color enhancement move is to remove a haze from the picture. Again, none of these tactics is a magic wand, but they can help.

Foggy lens article - example of clear shot taken once the lens had acclimated

So as to conclude on a positive note, here is a shot taken the same morning as the fogged picture above. The lens cleared in time to capture a great sunrise. Yet another reason to get there early!

Conclusion

Condensation is definitely a trap for the unwary. Light conditions change fast. Optimal conditions at sunrise and sunset are fleeting. You don’t want to be standing around waiting for the condensation on your lens to disappear and miss a shot.

Take steps to avoid the problem and acclimate your camera and lens ahead of time, while at the same time keeping everything safe. Do this either ahead of time, or while you are en route. Then make sure you are wiping off the front of your lens periodically, it will keep you from missing shots when the light is optimal.

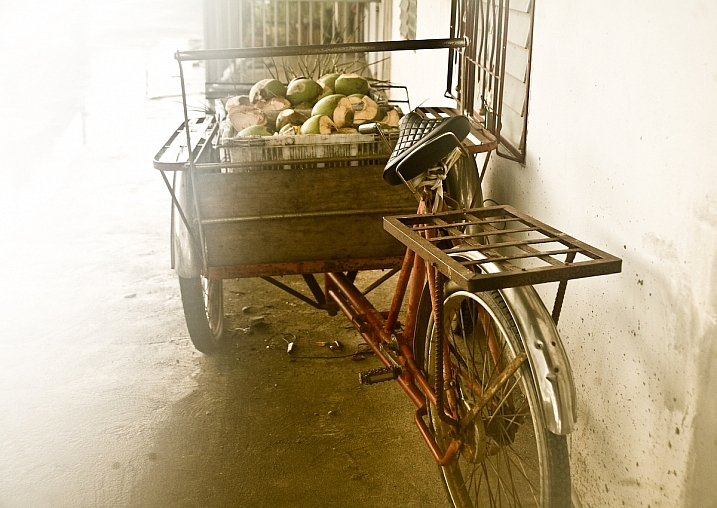
Editor’s Note: I have encountered this situation many times. In Bangkok however I found that the image I took with the fog (below) had more feeling and impact than the ones I took after it cleared. So don’t stop shooting, you never know what you’ll get!

Darlene Hildebrandt

By Darlene Hildebrandt

googletag.cmd.push(function() {
tablet_slots.push( googletag.defineSlot( “/1005424/_dPSv4_tab-all-article-bottom_(300×250)”, [300, 250], “pb-ad-78623” ).addService( googletag.pubads() ) ); } );

googletag.cmd.push(function() {
mobile_slots.push( googletag.defineSlot( “/1005424/_dPSv4_mob-all-article-bottom_(300×250)”, [300, 250], “pb-ad-78158” ).addService( googletag.pubads() ) ); } );

The post Tips for Avoiding a Foggy Lens by Jim Hamel appeared first on Digital Photography School.


Digital Photography School

 
Comments Off on Tips for Avoiding a Foggy Lens

Posted in Photography