RSS
 

Archive for July, 2015

Samyang 100mm macro lenses for stills and video photographers

07 Jul

Korean lens manufacturer Samyang has announced two versions of a new 100mm macro lens. The 100mm F2.8 ED UMC Macro is designed for stills photographers, while the 100mm T3.1 VDSLR ED UMC Macro is aimed at those shooting video. The lenses are essentially the same internally, using 15 elements in 12 groups but the VDSLR version is fitted with an uncoupled aperture ring and gears around both aperture and focus controls. Read more

Articles: Digital Photography Review (dpreview.com)

 
Comments Off on Samyang 100mm macro lenses for stills and video photographers

Posted in Uncategorized


Adding an Off-Camera Flash to Create a Winning Image

07 Jul

Star_gazers

This image, titled “Star Gazers”, won Grand Prizes at the 2015 Shoot the Hills photo competition. Held in the Hocking Hills region near Logan, Ohio, this competition takes place the 3rd weekend every April. 160 photographers from several states participated this year.

I initially came up with the idea for this shot over a year earlier, but my first attempt at the image failed miserably. (see below)

DSC_3387

What mistakes did I make?

If I would have checked the histogram I would have seen that all of the image was extremely under-exposed with all the data pushed up against the left side of the histogram.

If I had checked the histogram I would have noticed that the image was extremely under-exposed with all the data pushed up against the left side of the histogram.

  1. The image was under-exposed, because I failed to check the histogram. In the dark the image looked great on the LCD on the back of the camera!
  2. With the long exposure (30 seconds) there was no way for the subjects in the image to remain still enough to avoid blurring.

The Solutions

  1. The solution for the exposure was simple. First I turned down the brightness of the camera’s LCD screen. Then I used the histogram to determine my exposure.
  2. The length of exposure time was the main problem I had with this first attempt at capturing the image I had planned. It is nearly impossible for a live model to stand still for 30 seconds to prevent blurring. An off-camera flash was added behind the models to create the rim lighting in order to freeze their movement. Adding this flash was the major difference-maker from my earlier attempt of this image.

Other Factors to Consider

Sometimes it takes some trial and error to achieve the results you are looking for in an image. Improvisation may be required when unforeseen issues change shooting conditions. Many factors need to fall together for it to be possible to create an image such as this one. After waiting until 2 a.m. for the clouds to clear, it was finally time to capture the image I had pre-visualized nearly a year earlier.  Because the cloud cover remained near the horizon, it became necessary to change the angle of view to capture the higher, clearer sky. This adjustment also made it necessary to change the focal length from the 18mm I had planned to 50mm. One of the rules of the Shoot the Hills photo competition is that all images must be submitted straight out of the camera, so getting everything right in the camera is a must. Here are some additional factors required to capture such an image:

The Weather

  • Clear starry night – Probably the single most important factor to create this image is a clear starry night.
  • Dark sky – Find a dark sky, away from the lights of the city. There are dark sky maps on the internet.
  • Moonless night (or after the moon has set) – The light from the moon will fade out (overpower) many of the dimmer stars.

The Exposure

Histogram for the final winning. Notice how the histogram stretches back almost into the mid-tones, with a little info clear back into the highlights which is the stars and the rim lighting.

Histogram for the final winning shot. Notice how the histogram stretches back almost into the mid-tones, with a little info clear back into the highlights, which represent the stars and rim lighting.

I wanted to keep the shutter speed at 30 seconds for two reasons. First, that is the longest shutter speed most cameras allow without having to set them to bulb, and manually doing a timed exposure. Secondly, I didn’t want the stars to become extremely blurry. Using the histogram, I determined my exposure with my focal length at 50mm to be;  aperture at f/5 and ISO set to 2000, which I had predetermined was the highest ISO I could use, and still be able to minimize the amount of digital noise. As mentioned earlier, do not rely on the camera’s LED screen to determine exposure. In fact, in the dark the LED screen will look really bright when the image is actually extremely underexposed. To remedy this problem, turn the brightness down on you LED screen, if this setting is available. But always use the histogram to get the best exposure setting. If the histogram is all pushed over to the left side, the image is going to be underexposed.

Remote Triggers

Since I was also one of the subjects in the images, I used one remote to begin the exposure, and another to trigger the flash.

White Balance

After experimenting with several preset white balances I decided to set a custom white balance of 2560 Kelvin, to give the image a cool blue colored sky.

Focusing

Focusing a camera in the dark is one of the most challenging parts of creating a night shot under the stars. Here are some tips to set focus for night images:

  • Pre-focus before it gets dark. This is the easiest way to focus for a night shot, and after the focus is set, turn off the auto-focus so it doesn’t change.
  • Shine a bright flash light on the subject to allow the camera to focus, and as in the method above, after attaining focus, turn off the auto-focus.
  • Use live view to focus manually on a light.
  • Use back button focusing to preset focus

For this image I used back button focusing, and a flash light to set my focus.

The Logistics

The setup for this shot was at the top of a steep hill which came to a point. With the subjects at the very top, the camera was placed on a tripod below, and aimed upward at the subjects and the starry sky in the background. The off-camera flash was placed on a tripod on the other side of the hill and aimed upward at the subjects. The flash and tripod had to be placed low enough on other side of the hill, so that the actual flash did not show in the image.

layout

Conclusion

Henry Ford once said that “Failure is the opportunity to begin again more intelligently.”  When an image idea fails, take a look at what went wrong and then look for solutions to improve the image, return to the scenario and try it again. From my first unsuccessful attempt to capture star-gazers, the need to freeze the subjects and prevent the blurring, led me to try the off-camera flash technique. The back-lighting and a year’s experience made all the difference between a failed shot and a winner!

googletag.cmd.push(function() {
tablet_slots.push( googletag.defineSlot( “/1005424/_dPSv4_tab-all-article-bottom_(300×250)”, [300, 250], “pb-ad-78623” ).addService( googletag.pubads() ) ); } );

googletag.cmd.push(function() {
mobile_slots.push( googletag.defineSlot( “/1005424/_dPSv4_mob-all-article-bottom_(300×250)”, [300, 250], “pb-ad-78158” ).addService( googletag.pubads() ) ); } );

The post Adding an Off-Camera Flash to Create a Winning Image by Bruce Wunderlich appeared first on Digital Photography School.


Digital Photography School

 
Comments Off on Adding an Off-Camera Flash to Create a Winning Image

Posted in Photography


See a Silhouette and Snap it

07 Jul

Silhouette shots are one of those styles that seem super easy, but are honestly difficult to get “just right.”

The Phoblographer wrote about three things to keep in mind when shooting silhouette shots, and we think they’re spot-on excellent advice!

  • Highlights way up: This is best achieved in post-processing, but keep it in mind while shooting so you can adjust exposure and focal points.
  • Ship Shapes: Silhouette photos rely on visually interesting shapes rather than color contrast or subject matter. Be on the lookout for unique, but recognizable, shapes.
  • Composition: Keep a good balance of shadow and light, or create drama with slightly more of one than the other.

Check out the Phoblographer’s perfectly put article here!

Photo by Chris Gampat


© Erin for Photojojo, 2015. |
Permalink |
No comment |
Add to
del.icio.us

Post tags:


Photojojo

 
Comments Off on See a Silhouette and Snap it

Posted in Equipment


Nikon D810A: An astrophotographer’s perspective

07 Jul

We first became acquainted with Adam Woodworth when we featured his portfolio earlier this year. His photos capture the interplay between the earthly and the celestial, often framing the center of the Milky Way Galaxy in alignment with landscape formations. Recently, he’s been trying out Nikon’s D810A, the world’s first full frame camera dedicated to astrophotography. See some of his photos and find out his impressions on using it. Read more

Articles: Digital Photography Review (dpreview.com)

 
Comments Off on Nikon D810A: An astrophotographer’s perspective

Posted in Uncategorized


Canon EOS 5DS R sample gallery updated

07 Jul

We’ve just added some more images to our Canon EOS 5DS R sample gallery. While we’re working through our extensive Canon lens catalog, for this update we stuck to telephoto and portrait lenses. Check out the gallery for some additional portraits (including samples from the Zeiss Otus 85mm F1.4) and vintage race car shots. See gallery

Articles: Digital Photography Review (dpreview.com)

 
Comments Off on Canon EOS 5DS R sample gallery updated

Posted in Uncategorized


Cliff Diving: Dramatic Concrete Home & Pool Cut into Precipice

07 Jul

[ By Steph in Architecture & Houses & Residential. ]

casa brutale main

File this dramatic cliff-hanging, swimming-pool-topped home called Casa Brutale under ‘fit for a villain in every possible way.’ Practically begging to be used as a base for unsavory characters in a film, this concrete residence set into the craggy hills overlooking the Aegean Sea is surprisingly modest and spare, free of flashy luxuries.

cas brutale 6

casa brutale 2

It doesn’t need to show off, really, when its very existence in this location packs such a powerful visual impact. You enter the home from a stairway on the ground level, descending into an interior that’s shielded from the sky only by the glass-bottomed swimming pool.

casa brutale 3

casa brutale 4

casa brutal 10

Anyone who swims in the pool is instantly turned into entertainment for the people watching from below, and the watery reflections cast over every surface are the main defining characteristic of the simple, open interior spaces. The entire cliff-facing facade is also made of glass further opens the home to the shimmer of water, this time from the sea.

casa brutale 9

casa brutale 7

OPA (Open Platform for Architecture) clearly heard the cries of ‘James Bond villain lair’ when their initial drawings were released, so they’ve worked a nod or two into the new renderings, including a requisite Ferrari.

casa brutale 5

“Case Brutale is a geometrical translation of the landscape,” say the architects. “It is an unclad statement on the simplicity and harmony of contemporary architecture. It is a chameleonic living space, created to serve its owner and respect the environment… in literal groundbreaking integration, Casa Brutal penetrates the landscape.”

Share on Facebook


[ By Steph in Architecture & Houses & Residential. ]

[ WebUrbanist | Archives | Galleries | Privacy | TOS ]


WebUrbanist

 
Comments Off on Cliff Diving: Dramatic Concrete Home & Pool Cut into Precipice

Posted in Creativity


Australien: Minimal und reduziert

07 Jul

Ein älteres Gebäude vor Sternenhimmel.

Ein Beitrag von: Oliver Koch

Einzigartigkeit. Freiheit. Danach streben viele mit mehr oder weniger Erfolg.? So auch ich. Für vier Jahre lebte und arbeitete ich in Düsseldorf. Eine Stadt, die mir mit ihrer konservativen Oberflächlichkeit vieles verwehrte. Ebenso wie die Branche, in der ich arbeitete.
kwerfeldein – Fotografie Magazin | Fotocommunity

 
Comments Off on Australien: Minimal und reduziert

Posted in Equipment


The First 3 Photoshop Blend Modes You Need to Understand

07 Jul

Photoshop can be extremely intimidating to learn, but once you start to get a grasp on some of the tools it has to offer, you’ll wonder how you ever processed photographs without it. If there’s one area of Photoshop that is both extremely confusing, and yet, extremely powerful when harnessed properly, it’s got to be the collection of blend modes. While this article won’t cover all of the options available within Photoshop, it should give you a good place to start your journey into using Photoshop blend modes.

Photoshop blend modes: a few basics to get you startedphotoshopblendmodes

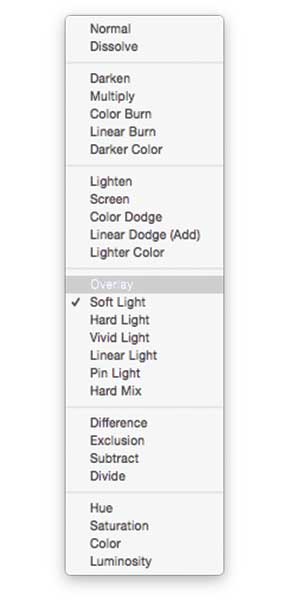
  • Photoshop blend modes are found in a drop down menu at the top of the layers panel (it defaults to “Normal”)
  • There are 27 different options to choose from, including the default “Normal” blend mode.
  • Adobe has organized these 27 blend modes into six different categories
    • Normal – Contains blend modes that don’t actually blend the layer being selected. (Normal shows the layer, and the dissolve layer essentially just removes pixels from the top layer as you reduce the opacity this effect is increased).
    • Darken – These blend modes use 100% white as a neutral, they have an overall darkening effect on images.
    • Lighten – Here Photoshop is using 100% black as a neutral, they have an overall lightening effect on images.
    • Overlay – In the Overlay mode Photoshop is blending the top layer and bottom layer together in a way that adds contrast. The effect of this changes based on the opacity of the layer, and the type of blend mode selected.
    • Difference – The difference set can be referred to as the inversion group, as these blend mode options are often used to either cancel colors of the layer below it, or to invert them.
    • Hue – Here Photoshop allows you to get very creative with the HSL of the layers in question.
  • When you apply a blend mode to a layer, it takes the effect of the given blend mode and it is applied to the layer directly below it within Photoshop.

To simplify the process of trying to learn all 27 blend modes at once below, let’s learn about the three most versatile blend modes Photoshop has to offer.

The first three Blend Modes you need to learn

In all the example photographs below I’ll be using two layers to demonstrate the different effects of each of the three blend modes. The top layer is simply a white, gray, black layer and the bottom layer is the same image placed under those three colors.

3-tones

White, gray, black layer.

Multiply Blend Mode

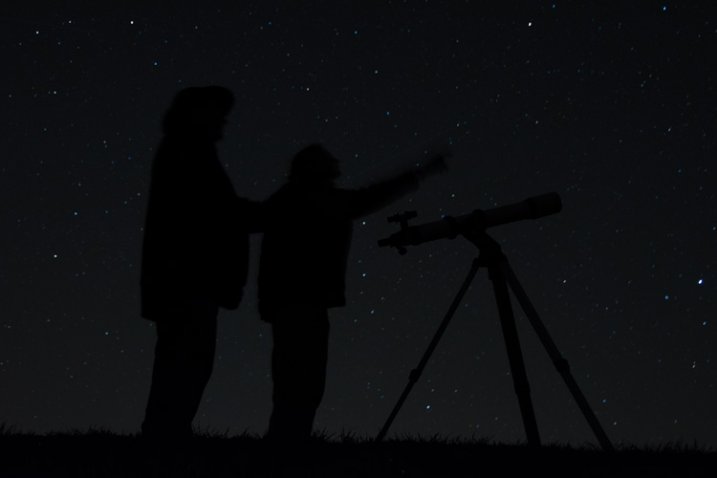
This blend mode falls within the “Darken” group and therefore it is considering 100% white a neutral. The basic math behind how this blend mode works is that the dark pixels of the background layer are multiplied with those of the foreground layer and combined. Therefore the result you end up with is an overall darkening of the image, as the dark pixels within both layers become more significant while the light pixels are essentially removed.

blend-modes-multiply


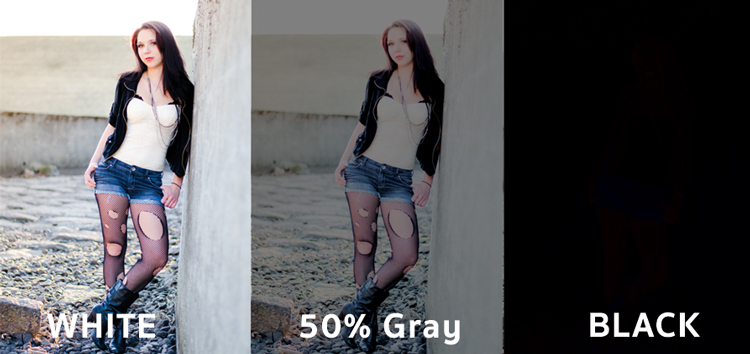
As you can see in the 50% gray layer, the darker pixels from the gray foreground layer are helping to darken the layer below it.

This blend mode is great for creating shadows or removing bright pixels from an underlying layer. It can be used in conjunction with a curves adjustment layer to add additional darkness to a layer. By effecting the dark end of the curve this can become really handy when trying to emphasize shadows, or darken an image.

Screen Blend Mode

As mentioned above, the lighten group sets black as neutral and therefore when we use the screen blend mode the black layer has no effect, 100% white stays as white and the 50% gray is somewhere in the middle.

blend-modes-screen


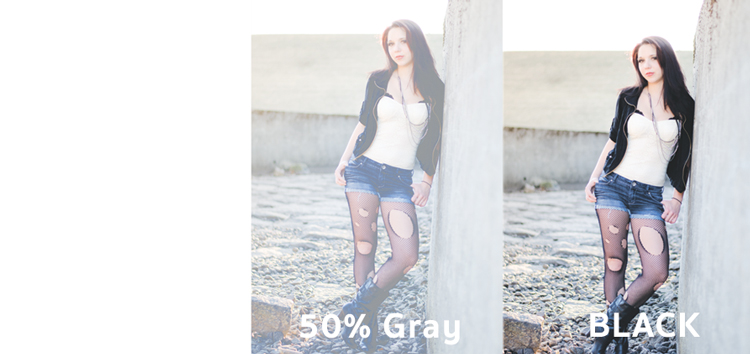
In a similar mathematical method to the Multiply blend mode the screen blend mode is multiplying the light pixels of both the foreground and background layers to achieve the final blend. As you can see in the above example, at 50% gray the light pixels are made even lighter as the bright pixels of the gray layer are multiplied with those of the layer below it.

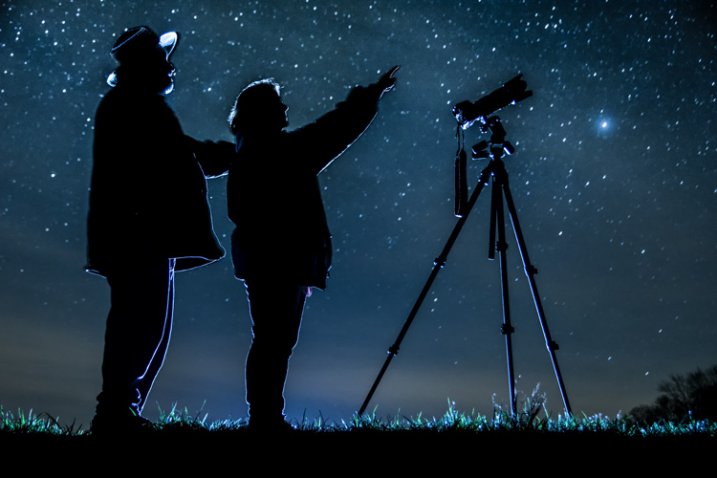
The Screen blend mode is therefore great for removing darkness from an image or can even be used to create soft glow effects around a subject.

Soft Light Blend Mode

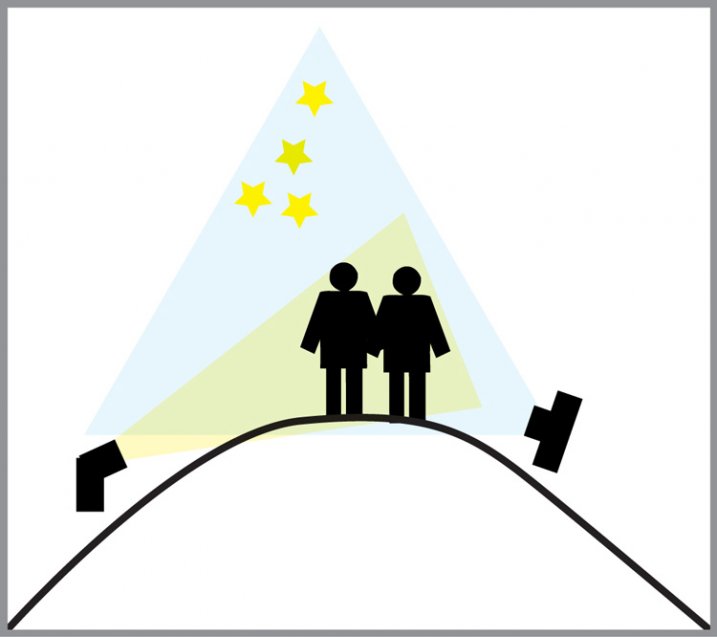
Here the formula used by Photoshop is essentially both that of the Multiply and Screen blend modes, then that effect is divided by two. What this means is that you’ll be darkening the dark pixels and lightening the light pixels, and then dividing the end result by two (or 50% of full strength). What ends up happening is an overall increase in contrast of the image

As a result, the Soft Light blend mode, is a great way to add a bit of contrast to an image. For an even stronger effect – use the Overlay blend mode.

blend-modes-softlight


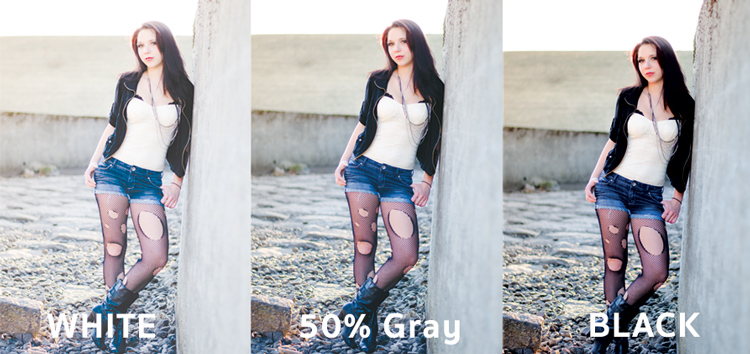
One of the best techniques for using this technique is to duplicate your layer and apply the Soft Light blend mode to that layer. You’ll se an instant increase in contrast which can then be fine tuned with the opacity slider of your duplicated layer.

An example of Photoshop blend modes in action

photoshopblendmodes1

Original – (placed as Full Size 750 x 378)

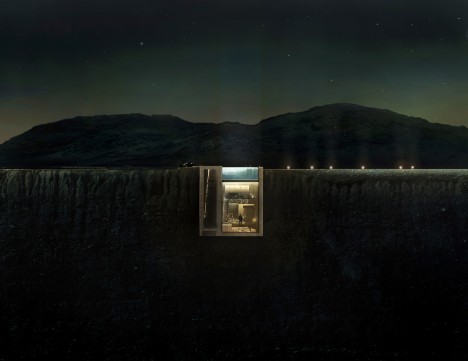
The original image was a bit on the flat side, so by duplicating this layer, and changing it Soft Light blend mode, you’ll notice an increase in contrast. This higher contrast look works well with the rocks, and graffiti wall behind the model.

photoshopblendmodes2

Duplicated with Soft Light blend mode

To take it a step further, a Curves Adjustment Layer was added above the duplicate layer and the blend mode was set to multiply. A layer mask was then applied to this Curves layer to reveal it only over the model’s upper body and face. By applying this small adjustment you’ll notice a bit more definition in the face and shadows.

photoshopblendmodes3

Curves adjustment + Multiply blend mode added to model’s face and upper torso to add definition and shadow detail.

These three Photoshop Blend modes are just the beginning, but the key to learning a program the size and depth of Photoshop, is to take it in bite sized pieces or you’ll get frustrated and give up quickly. I hope that by focusing your attention to just these three blend modes you’ll be able to digest the program a bit easier.

googletag.cmd.push(function() {
tablet_slots.push( googletag.defineSlot( “/1005424/_dPSv4_tab-all-article-bottom_(300×250)”, [300, 250], “pb-ad-78623” ).addService( googletag.pubads() ) ); } );

googletag.cmd.push(function() {
mobile_slots.push( googletag.defineSlot( “/1005424/_dPSv4_mob-all-article-bottom_(300×250)”, [300, 250], “pb-ad-78158” ).addService( googletag.pubads() ) ); } );

The post The First 3 Photoshop Blend Modes You Need to Understand by John Davenport appeared first on Digital Photography School.


Digital Photography School

 
Comments Off on The First 3 Photoshop Blend Modes You Need to Understand

Posted in Photography


Surprises in Storage: 14 Clever Compartments & Organizers

07 Jul

[ By Steph in Design & Furniture & Decor. ]

storage main

Rejecting the idea that storage furniture needs to be hyper-functional above all, these innovative bookcases, credenzas, wardrobes, tables and shelves put the focus on unusual shapes and unexpected uses. These exceptionally well-designed storage solutions stand out, whether by hiding compartments in novel places, stacking modules in new ways or making a visual statement as sculpture.

Opening in Waves

storage wave 1 storage wave 2

Why should every item of storage furniture open via drawers and doors? ‘Wave’ by Sebastian Errazuriz turns the process of retrieving and replacing your stored items into a sort of artistic display with credenzas and armoires that open in entirely unexpected ways. “I don’t know where the line is between art and design,” he says. “It’s important to me that a project consist of just a little twist, because I ultimately want people to see the obvious, the everyday differently.”

Architecture As a Cabinet

storage architecture 2 storage architecture 1

OMA’s monumental CCTV headquarters building is recreated in furniture form by designer Nathan Li, turning it into a combination bench and storage case with cutouts in the wood mimicking the structure’s gridded glass facade.

Pin Press Storage

storage pin press storage pin press 2

This pin press design by OOO My Design brings a childhood toy into full-scale as a functional item. Press the pins in any which way you want to create little pockets in custom sizes and shapes, perfectly fitting whatever objects you need to store.

Storage As a Perfectly Stacked Sculpture

storage sculpture

Everyone who’s ever packed a moving truck as full as it can possibly get or jammed a bunch of stuff into a closet knows that the problem with this carefully Tetris’ed design lies in the fact that once you take something out, getting it back the way it was is near impossible. Still, it’s an impressive example of compressing a whole lot of stuff into the smallest possible space (and is actually a sculptural installation by Michael Johansson rather than a real storage cabinet.)

Table with Secret Storage

storage secret table 2 storage secret table

Virtually every compartment built into this wooden table by Naoki Hirakoso opens in a different way, so as you feel along the visible seams trying to open them,  you’ll have to alternately push, pull, slide and lift. The seams produce abstract lines when the piece is fully closed.

Next Page – Click Below to Read More:
Surprises In Storage 14 Clever Compartments Organizers

Share on Facebook


[ By Steph in Design & Furniture & Decor. ]

[ WebUrbanist | Archives | Galleries | Privacy | TOS ]


WebUrbanist

 
Comments Off on Surprises in Storage: 14 Clever Compartments & Organizers

Posted in Creativity


GoPro HERO4 Session waterproof cube-shaped camera announced

07 Jul

GoPro has introduced the HERO4 Session, a cube-shaped waterproof camera that is half the size of and 40% lighter than its other HERO4 cameras. The HERO4 Session is waterproof to a depth of 33ft/10m without requiring a separate housing and features one-button operation. Read more

Articles: Digital Photography Review (dpreview.com)

 
Comments Off on GoPro HERO4 Session waterproof cube-shaped camera announced

Posted in Uncategorized