RSS
 

Archive for March, 2015

Sunny Disposition: Computer-Aided Skyscraper Casts No Shadow

17 Mar

[ By WebUrbanist in Architecture & Cities & Urbanism. ]

shadowless skyscraper concept design

With downtown densification usually comes a lack of light in surrounding spaces, leading one architecture firm to develop the world’s first algorithm-driven strategy to allow a tower to fully shed its shadow. Architects of NBBJ developed this set of adjacent skyscrapers that work in tandem to eliminate shade year-round in the spaces between them, proposing the pair for a prominent site in central London. As the simulation of No Shadow Tower illustrates below, considerations are made for all times of day, reflecting the passage of the sun through the sky from dawn until dusk.

computation daylight simulation

The model inputs are complex, using real sun-tracking data tied to a specific location (though easily changed) but also taking into account everything from basic physics and structural engineering to pubic spaces and programmatic functions for building users. At the same time, considerations must be made for diffusing any reflected light to avoid creating obnoxious glare or even lighting adjacent spaces, vehicles or objects on fire. Fortunately, it is easier than ever to implement a complex building shape with custom 3D-printed parts, as architects like Frank Gehry have increasingly demonstrated in recent years.

sunlight filled courtyard reflection

This proposal was inspired by the rapid growth of skyscrapers in areas like London, where 250 are currently planned or in progress, and New York City, where residents are resisting tall buildings that would cast long shadows over Central Park. Large-scale sunlight reflection can be found in built environments already, such as a mountain town in Norway found frequently or for long periods in shade during cold and dark winter months. Conversely, structures in hot climates could also be shaped to deflect sun from occupied spaces during warm summer months – shade and shadows can be shaped, in short, for different environmental conditions.

shadow free skyscraper

In this case, of course, the reflector is itself a building, which of course then casts a shadow of its own – arguably a limitation of the scheme. However, a series of structures could conceivably cancel shadows in sequence, creating multi-block solutions if designed in a coordinated fashion, the shape of each informed by the needs of the previous one in the series. Whether or not this particular pair of structures makes it past the conceptual phase, the idea behind them is powerful and the attitude could be applied more readily by light-sensitive architects down the line.

Share on Facebook


[ By WebUrbanist in Architecture & Cities & Urbanism. ]

[ WebUrbanist | Archives | Galleries | Privacy | TOS ]


WebUrbanist

 
Comments Off on Sunny Disposition: Computer-Aided Skyscraper Casts No Shadow

Posted in Creativity


16 Fun Kids Room Ideas Will Make You Want to Shrink Yourself

17 Mar

[ By Steph in Design & Furniture & Decor. ]

treehouse bedroom

Why don’t rooms for adults come with cool tent-shaped beds, oversized Legos, slides, tree houses and secret compartments? These fun and imaginative kids room ideas include furniture with built-in entertainment, fort kits, fully customized themed rooms complete with murals and even a three-story slide built into the design of the house.

Tent, Playhouse and Camper Beds

kids furniture tent beds

kids furniture playhouse beds

kids furniture caravan bed

Design firm Mathy by Bols has created a series of handmade kids beds shaped like tents, caravans and treehouses. The A-frame Cabin Tent Bed features a closable side panel and a bottom section that pulls out to offer storage or a second mattress, the Camper Bed looks like a mini teardrop trailer with a toy box mounted to one side, and the Treehouse Bunk Bed will definitely have kids fighting over who gets to sleep on top.

Fold-Up Staircase to Slide Converter

kids furniture staircase slide 1

kids furniture staircase slide 2

Any staircase turns into a slide in seconds with the ‘SlideRider,’ an extra-long foam mat with safety bumpers on the sides that stretches over stairs and then folds up neatly when it’s time to put it away.

Imaginative Wooden Kids Beds with Slides

kids furniture wooden beds 1

kids furniture wooden beds 2

kids furniture wooden beds 3

Each design in the Rhapsody collection of kids’ beds from CedarWorks is a fantasy world of its own, with a variety of play areas built in ranging from slides to ‘secret’ rooms. They offer so many opportunities for self-entertainment, you might just get a little bit of extra sleep in the morning while the kids keep themselves busy.

LEGO-Inspired Kids Furniture Collection

kids furniture lego inspired

Kids Furniture LEGO 2

The LEGO Furniture Collection for Kids by Lola Glamour uses the look of these iconic plastic brick toys to make a big visual impact in children’s rooms. The ones mounted to the bed hide drawers and cabinets, while the rest are purely decorative.

Custom Treehouse Bedroom

kids furniture treehouse bedroom

kids furniture treehouse bedroom 2

A swing, a fake tree, climbing ropes and a storage platform that doubles as a stage aren’t even the coolest things about this imaginative kids’ bedroom idea – that honor goes to the awesome miniature treehouse tucked up into the corner of the room next to windows overlooking the yard.

Next Page – Click Below to Read More:
16 Kids Room Designs Thatll Make You Want To Shrink Yourself

Share on Facebook


[ By Steph in Design & Furniture & Decor. ]

[ WebUrbanist | Archives | Galleries | Privacy | TOS ]


WebUrbanist

 
Comments Off on 16 Fun Kids Room Ideas Will Make You Want to Shrink Yourself

Posted in Creativity


16. März 2015

17 Mar

Das Bild des Tages von: Marco Bekk

Feuer und Mensch

Im Ausblick: Anna Atkins, ein Ausstellungstipp und was Fremde bedauern.
kwerfeldein – Fotografie Magazin | Fotocommunity

 
Comments Off on 16. März 2015

Posted in Equipment


Aloha! We go shooting with Samsung’s new NX500

17 Mar

The Samsung NX500 is essentially a scaled down version of Samsung’s flagship NX1. It uses the same 28MP BSI-CMOS sensor, advanced hybrid AF system, and DRIMe V processor as the NX1, with the main differences being the design (rangefinder vs SLR), burst mode (9 vs 15 fps), and viewfinder (none vs electronic). We’ve been using a production NX500 for a couple of days, and we’ve put together a gallery of real-world samples. We’ll update this gallery with some converted Raw files as soon as possible. Click through for the gallery

Articles: Digital Photography Review (dpreview.com)

 
Comments Off on Aloha! We go shooting with Samsung’s new NX500

Posted in Uncategorized


Using the Adjustment Brush in Adobe Camera Raw

17 Mar
Adjustment-Brush-title2

A before and after using the Adjustment Brush on the buildings.

What is the Adjustment Brush?

The Adjustment Brush is an editing tool in Adobe Camera Raw (known simply as ACR). This tool is possibly the equivalent of the Dodge and Burn tools in Photoshop. So what is dodging and burning? To dodge is to lighten and to burn is to darken a specific area.

What does it do?

When you make your initial global adjustments of a RAW file in ACR, more than likely, you will need to make local adjustments too. This is where the Adjustment Brush is useful for making adjustments to specific areas of your photo.

Recently, I have found I am using this tool more and more. If I am out and about just shooting for my own library, I tend to take photos slightly underexposed. This way, I can recover a lot of detail in the post editing stage. This is useful if you don’t have time for metering the shot perfectly, especially in the case where skies are involved.

How does it work?

The Adjustment Brush isolates a specific area by masking it, similar to using layer masks in Photoshop. When you click on the Adjustment Brush icon, the right panel changes to the Adjustment Brush tab. The bottom sliders modify the size of the brush and you can also determine how much feather and density (flow) you wish to apply.

When you use the Adjustment Brush on a particular part of your image, a pin icon appears to determine where your adjustment has just been made.

Adjustment-brush-zoomed-up

The Adjustment Brush is located at the top left of the dialog box.

Adjustment-Brush-and-Pin-icon

How the Adjustment Brush looks when in use and the Pin icon which determines where on the image the adjustment has been made.

Adjustment-Brush-slider

These sliders adjust the size, feather and flow of the Adjustment Brush.

I do find using the Adjustment Brush a bit cumbersome. But this tool definitely has its merits. Like most of the editing tools in ACR, Photoshop, Lightroom, etc., there is simply no one-click button that magically does it all.

You may find with a bit of practice using the Adjustment Brush that it could speed up your editing workflow. Take for example this image that I shot of some blue containers on a pier. I made the basic adjustments in ACR. I then used the Adjustment Brush in several areas: to lighten the sky; to keep the highlights on the small white boat on the left from being blown out completely. I also used the Adjustment Brush on the wood section to give it more warmth.

blue-drums

Several areas where the Adjustment Brush has been used as shown by the Pin icon.

The Graduated Filter in conjunction with the Adjustment Brush is a great combination. It behaves in a similar way to a Graduated Neutral Density filter. I use this filter on skies, then use the Adjustment Brush to mask areas that I don’t want the Graduated Filter to effect.

Pros

  • Broad local adjustments lightened or darkened.
  • Speed up your editing workflow as you may not need further adjustments in Photoshop or Lightroom.
  • Works really well in conjunction with the Graduated Filter tool.

Cons

  • Cumbersome and sometimes awkward to use.
  • More refined detail is better done in Photoshop using layer masks where you have more control.

Tip:

A fantastic feature in Photoshop CC is that Camera Raw is now a filter. However, if you are using previous versions such as CS5/6, a substitute workaround is before you open your image from within ACR to Photoshop, make sure you open it as a Smart Object. You can do this by holding the Shift key and the Open Image button changes to Open Object. Or you can have this option ticked in Workflow Options. This is a pop-up dialog box located by clicking on the link at the bottom of the ACR screen. That way you can go back into ACR by double clicking on the layer.

Harbour

By using the Adjustment Brush on just the buildings, I was able to recover a lot of detail.

googletag.cmd.push(function() {
tablet_slots.push( googletag.defineSlot( “/1005424/_dPSv4_tab-all-article-bottom_(300×250)”, [300, 250], “pb-ad-78623” ).addService( googletag.pubads() ) ); googletag.pubads().enableSingleRequest();
googletag.pubads().disableInitialLoad();
googletag.pubads().collapseEmptyDivs( true );
googletag.enableServices();
} );

googletag.cmd.push( function() { googletag.display( ‘pb-ad-78623’ ); } );

googletag.cmd.push(function() {
mobile_slots.push( googletag.defineSlot( “/1005424/_dPSv4_mob-all-article-bottom_(300×250)”, [300, 250], “pb-ad-78158” ).addService( googletag.pubads() ) ); googletag.pubads().enableSingleRequest();
googletag.pubads().disableInitialLoad();
googletag.pubads().collapseEmptyDivs( true );
googletag.enableServices();
} );

googletag.cmd.push( function() { googletag.display( ‘pb-ad-78158’ ); } );

The post Using the Adjustment Brush in Adobe Camera Raw by Sarah Hipwell appeared first on Digital Photography School.


Digital Photography School

 
Comments Off on Using the Adjustment Brush in Adobe Camera Raw

Posted in Photography


Leprechaun Approved Gear for St Patty’s Day

16 Mar

Whoo, Saint Patrick’s Day Eve, time to pour some Guinness in your Lucky Charms!

Ok … don’t actually do that. Ever.

Instead, feast your smiling eyes on these rainbow treasures, and test your Irish luck finding our gold.

See What Lies Beyond the Rainbow
(…)
Read the rest of Leprechaun Approved Gear for St Patty’s Day (5 words)


© Erin for Photojojo, 2015. |
Permalink |
No comment |
Add to
del.icio.us

Post tags:


Photojojo

 
Comments Off on Leprechaun Approved Gear for St Patty’s Day

Posted in Equipment


Full Moon Photography Using The Photographer’s Ephemeris 3.0

16 Mar

IMG_0450The latest release of The Photographer’s Ephemeris (TPE) releases even more tools to help us photographers get the shots we want. There is just too much for one article, so I am going to focus on a personal favorite subject – full moon photos.

Before handy apps like TPE, LightTrac and PhotoPills, figuring out where the moon might be on any given night took some educating. Pile on top of that the desire to know when the moon was behind, or next to, a specific feature, natural or man-made, and the calculations were beyond anyone lacking a degree in mathematics. But now, it’s all so much easier. Let me show you how I plan on getting a shot of the full moon behind Seattle’s Space Needle this May.

I’ll be using the iPad version of the app which allows for adding in a subject height. Nearly the same functionality is available with the Desktop and Android versions of the app, but the location of items may shift a little. With the desktop and Android version you will not be able to manually add in the subject height but can, using the Pythagorean theorem (and there are plenty apps for it), add in the angle you need.

Pre-planning

To get started, I have decided I want to get a shot of the full moon behind Seattle’s Space Needle. It’s a subject that lends itself well to moon photos. I had a shot in mind that I later confirmed possible after viewing Tim Durkan’s fine example from last year.

Laying out the steps before I open the app, my process will look like this:

  • Find a location where I can see the Space Needle, and one which faces mainly South or West (because of hills, I know shooting to the East is hard and the moon will not appear to the North of the Needle because of being in the Northern Hemisphere).
  • Plot out my location and the location of the Space Needle.
  • Account for elevation change and the height of the Needle.
  • Let the program do its magic.
  • Record my findings and make actual plans.

Finding your location

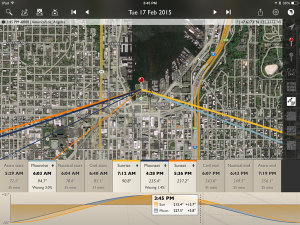
Loading the app brings up a fairly full featured screen.

IMG_0450

To center the map on your intended location, simply move the map around with your finger until the crosshairs are over your location. You can then tap on the inside of the crosshairs or tap the red observer pin that looks like this:(null)

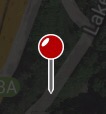
I placed the location in a park near the shore of Lake Union, a place I know with good visibility of the Needle about 3/4 of a mile away. This will give me a good apparent size relationship of moon to Needle. Many locations can be scouted by using Google Street View.

Next, mark the location of the Space Needle. TPE has a decent search feature, you can use it to quickly find many natural and man-made features around the planet. Just click on the magnifying glass in the upper left and type Space Needle.

IMG_0453

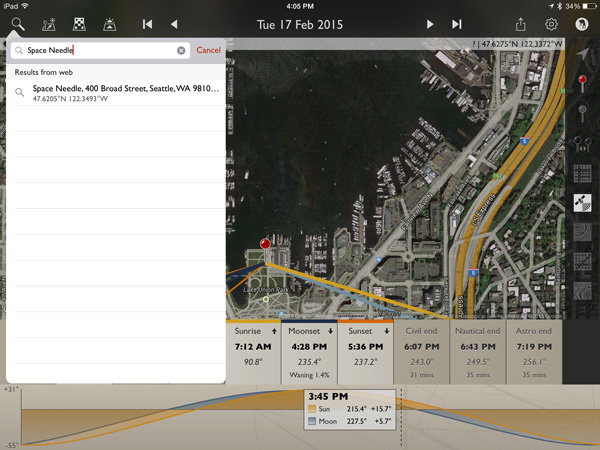
Now click the Space Needle entry itself and you’ll see three options appear.

(null)

In order from left to right, these buttons allow you to: center the map on the location as your primary location, set this location as your secondary location (the item you wish to photograph), and the third is an option to save this item as a favorite, making future recall easy without searching. You will want to click on the gray map pin to set the Space Needle as the secondary location.

(null)Using geodetic information

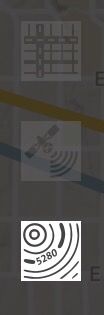
To make things easier to see, click on the Google Terrain map set – an option on the right side of the screen that looks like this (image right)

Now the map is a little cleaner and after zooming out you can see the red pin where I’ll stand and the gray pin at the location of the Space Needle. Those orange and blue lines simply show location of the sun (orange) and moon (blue) when they rise, set and current location.

IMG_0457

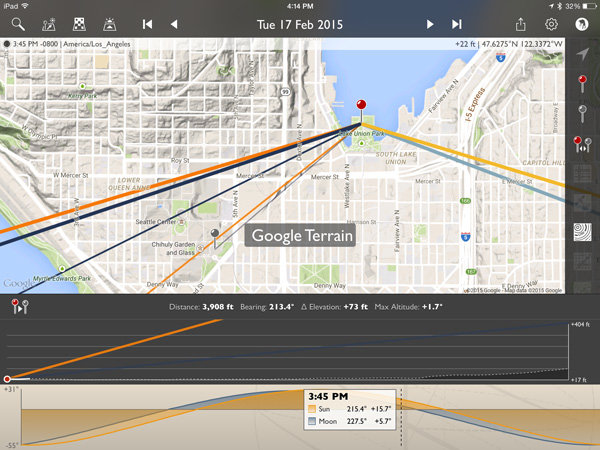
Notice that the lower display also changed? It now shows the elevation different between the two points, with distance (3,908 feet – can also be set to metric), bearing (213.4 degrees), elevation change (73 feet) and the angle at which you are looking, be it up or down (+1.7 degrees). There is also a nice plot between the points showing elevation differences.

This is great! But it only gives the elevation change at ground level. I need to add in the height of the Space Needle to position the moon properly. A quick wikipedia search tells me the Needle is 605 feet tall.

Click on the Shadow and Elevation tool at the top left of the screen, just to the right of the Search feature. Where it mentions “Secondary object height” put in 605 feet for the Space Needle.

IMG_0459

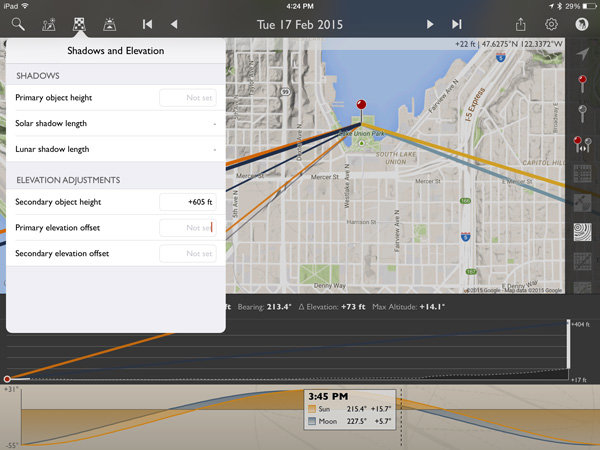
Now on the elevation plot at the bottom of the screen there is a big white bar, representing the height of the Space Needle, on the far right. Perfect!

Magic time

Now let’s have TPE do the heavy lifting and tell us when the moon will be perfectly behind the Space Needle, place the event on our calendar and go find other things to shoot!

Click on the Visual Search button, it is the one immediately to the right of the Search button on the top left. You will get a drop down that with all kinds of information. Click on the word “Moon” at the top and then “Full” and your screen will look like this:

IMG_0460

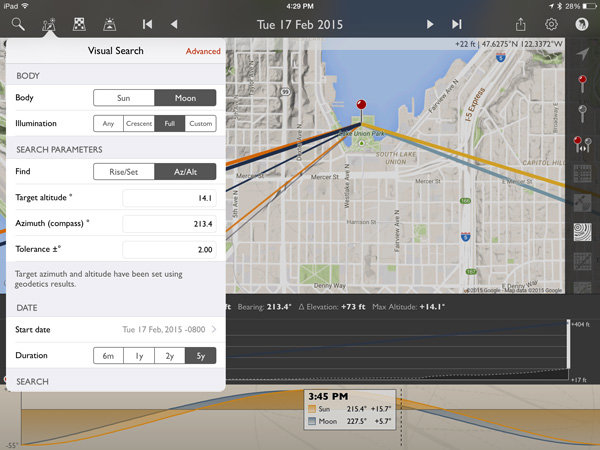
The app has filled in the target altitude (14.1 degrees), compass azimuth or bearing (213.4 degrees), and tolerance (2 degrees) for us!

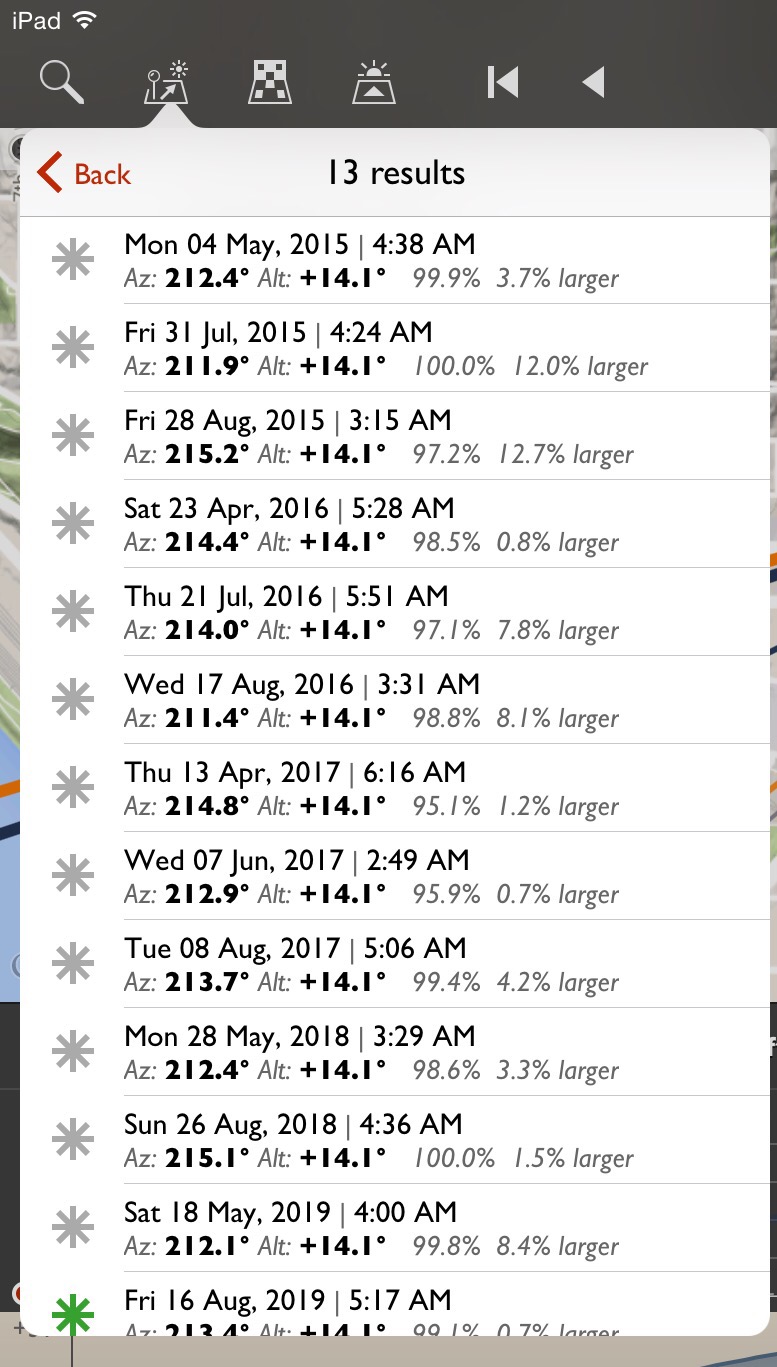
For a first run, to get a full moon centered over the top of the Space Needle, click on the Duration you would like (I picked 5 years in this example) and then Perform Search. You will see a list of results that look like this:

(null)

Saving results

What does all that mumbo-jumbo mean? Quite simply, those are all the dates and times (and exact location of the full moon and how full it will be) that fall within a two degree margin of our requested position. You will notice the one at the bottom for August 16, 2019 has a green asterisk; this simply means the moon will be within .5 degrees of the request.

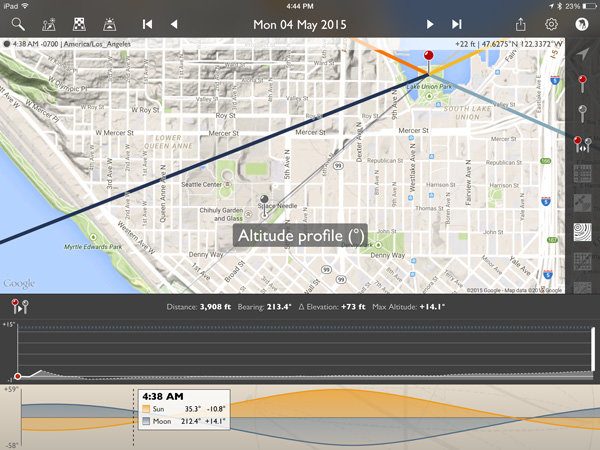
Clicking on the top item for May 4th, 2015 will make the map mimic the conditions at that exact time. Double tap the elevation profile at the bottom and it will show the Altitude Profile where you can see the full height of the Space Needle on the right (tall white bar) and the level of the moon in dotted blue.

IMG_0465

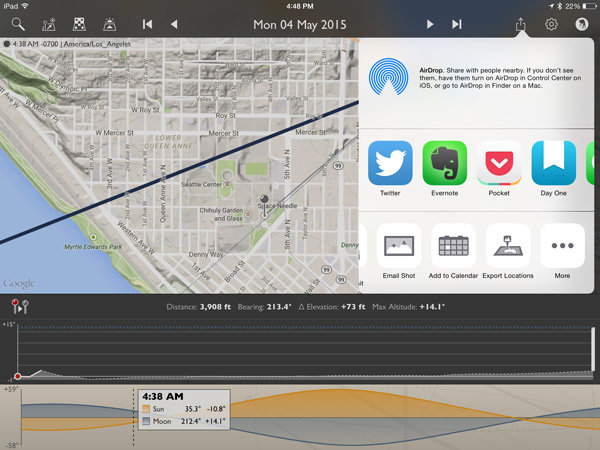
All lined up! We’re now ready to save this information on our calendar or send it to a friend if we like. Click the share button on the upper right and you will see the option for adding to calendar as well as messaging, emailing, etc.

IMG_0466

IMG_0467

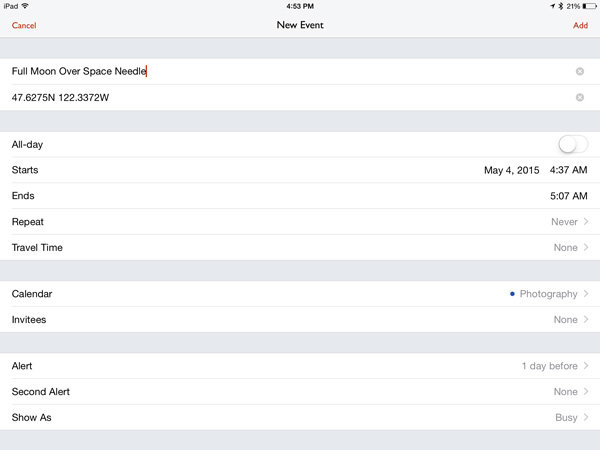
Here’s the calendar add-item screen.

The location is set to the Primary Location in the app. You may want to adjust the time so you arrive early, as it defaults to the exact moment pictured in the app.

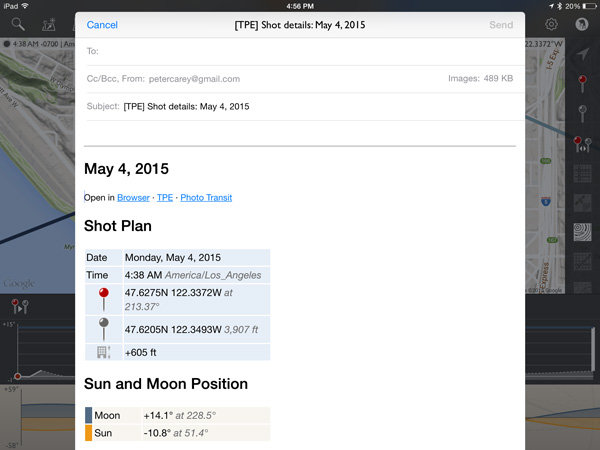
The email option includes all the pertinent information to share the details with a friend. It will attach a map and the recipient can open the information in the TPE (if they have it) or on the web browser version.

IMG_0468

Conclusion

I left a lot of information out of this article because TPE simply has too many options to describe here. At its most basic though, it is excellent for placing the moon over various subjects.

IMG_0469

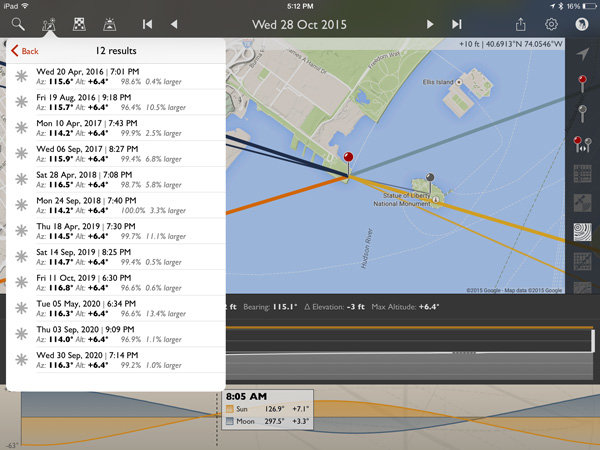
How about a full moon over the Statue of Liberty?

IMG_0470

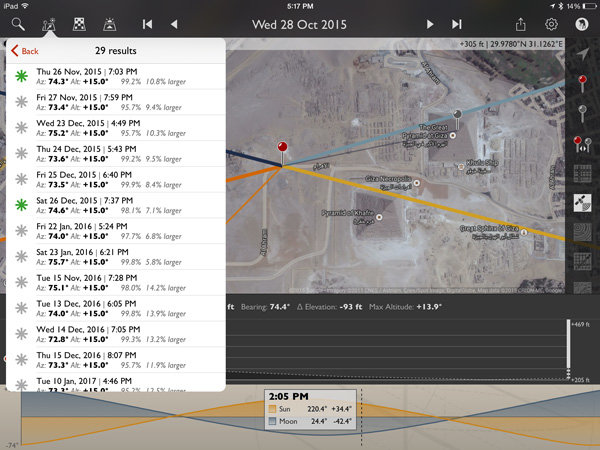
Or the Great Pyramid of Giza?

All it takes is a quick Wikipedia search for an object’s height and about two minutes in TPE to plan that moon shot you have been dreaming of!

For those wishing to explore further, TPE’s documentation is fairly complete and worth the read to unlock a wealth of photo planning power.

How can you use this tool in your photography?

googletag.cmd.push(function() {
tablet_slots.push( googletag.defineSlot( “/1005424/_dPSv4_tab-all-article-bottom_(300×250)”, [300, 250], “pb-ad-78623” ).addService( googletag.pubads() ) ); googletag.pubads().enableSingleRequest();
googletag.pubads().disableInitialLoad();
googletag.pubads().collapseEmptyDivs( true );
googletag.enableServices();
} );

googletag.cmd.push( function() { googletag.display( ‘pb-ad-78623’ ); } );

googletag.cmd.push(function() {
mobile_slots.push( googletag.defineSlot( “/1005424/_dPSv4_mob-all-article-bottom_(300×250)”, [300, 250], “pb-ad-78158” ).addService( googletag.pubads() ) ); googletag.pubads().enableSingleRequest();
googletag.pubads().disableInitialLoad();
googletag.pubads().collapseEmptyDivs( true );
googletag.enableServices();
} );

googletag.cmd.push( function() { googletag.display( ‘pb-ad-78158’ ); } );

The post Full Moon Photography Using The Photographer’s Ephemeris 3.0 by Peter West Carey appeared first on Digital Photography School.


Digital Photography School

 
Comments Off on Full Moon Photography Using The Photographer’s Ephemeris 3.0

Posted in Photography


Spring Photography Tips: Capturing the Full Bloom

16 Mar

Spring is a great season to capture different images. Here are some spring photography tips to help you capture the flowers, birds and animals for this colorful season. Spring is all about color, new life and lots of daylight. For a photographer there is nothing better than having a whole new world of landscape come alive to be captured through Continue Reading

The post Spring Photography Tips: Capturing the Full Bloom appeared first on Photodoto.


Photodoto

 
Comments Off on Spring Photography Tips: Capturing the Full Bloom

Posted in Photography


Testbericht: Sony Alpha 7 II

16 Mar

Eine verlassene Halle

Ein Beitrag von: Tilman Haerdle

Ich bin ein echter Enthusiast und Amateur. Das möchte ich an einem Beispiel aufzeigen: Als Jugendlicher bin ich im Winter häufig auf Langlaufskiern unterwegs gewesen. Meine Ausrüstung war nie älter als zwei bis drei Jahre (was auch meinem Wachstum geschuldet war) und durch entsprechendes Training war ich auch in Wettkämpfen ganz gut unterwegs.
kwerfeldein – Fotografie Magazin | Fotocommunity

 
Comments Off on Testbericht: Sony Alpha 7 II

Posted in Equipment


Cantilevered Conversion: Sleek Modern Cargo Container Office

16 Mar

[ By WebUrbanist in Architecture & Offices & Commercial. ]

cargo container office design

While many intermodal freight crate transformations turn steel boxes into comfortable spaces, this project goes a step further both by taking maximum advantage of its material origins while still making the aesthetic result more than the sum of its parts.

cantilevered office design conversion

Repurposed as an office by and for architect Patrick Bradley, this 45-foot cargo container (re)creation makes use of existing openings on either end and requires as few cuts in the surface of the sides as possible (an energy- and cost-efficient approach). Each of these openings is in turn taken advantage of, in one case to create an entry sequence and, at the other end, to facilitate a lovely little balcony extension.

cantilevered shipping container office

Further, the design leverages the strength of the container to cantilever it out over a steep-sloping cliff already on the site, saving money, time and energy landscaping the lot. Simple modular cladding manages to transform the exterior appearance with ease as well.

cargo container office design

In the end, there is little about the project that screams ‘shipping container’ at first glance, yet the overall shape and structural advantages of that core element are maintained and utilized throughout – a brilliant blend of old and new.

Share on Facebook


[ By WebUrbanist in Architecture & Offices & Commercial. ]

[ WebUrbanist | Archives | Galleries | Privacy | TOS ]


WebUrbanist

 
Comments Off on Cantilevered Conversion: Sleek Modern Cargo Container Office

Posted in Creativity