Month: December 2014

  • Woohoo! It’s Gift Guide 2


    The tree is up. Ornaments abound. It’s time to pile up the presents underneath it.

    Well, you’re in luck! This gift guide contains 6 BRAND NEW photo gifts (and stocking stuffers too).

    See Photojojo’s Gift Guide #2 of 2014
    (…)
    Read the rest of Woohoo! It’s Gift Guide 2 (0 words)


    © laurel for Photojojo, 2014. |
    Permalink |
    No comment |
    Add to
    del.icio.us

    Post tags:


    Photojojo

  • 6 Tips for Creating Leading Lines to Make Your Photos Stand Out More

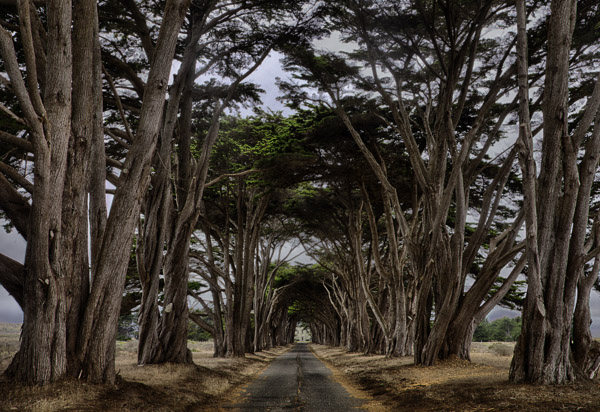
    There is perhaps no more important tool in composition than lines. The eye will virtually always follow an actual or implied line across the picture. Because of this tendency, many lines are referred to as leading lines They are actual, or implied lines that control the eye of the viewer through the frame.

    PointReyesTrees

    Some leading lines guide the viewer entirely through the frame. Some lines are the subject of the photo themselves. But others, and my favorite sort of leading lines, are the ones that draw the viewer into the picture. They add depth to your image. So today I want to focus on that particular kind of leading line, giving you some examples and ideas for how to create them.

    1.  Plan for opportunities

    Lines that you can use to lead into your viewer into the frame are everywhere, but you’ve got to look for them. In fact, it is a good idea to plan a few shots ahead of time so that you can consider what to use as a leading line. Leaving it to chance when you are out shooting will often result in the idea of leading lines being overlooked while you are focused on other things.

    When you are thinking about possible lines leading into the frame, think about roads and paths, which work great. Plus they are everywhere so you almost never have to search for them. The edges of the road will converge in the distance, thereby pointing the viewer to the center of the frame. Although certainly not as prevalent as roads, railroad tracks also work great. Finally, don’t overlook the use of shadow to create a line toward the center of the picture.

    QueensWalk

    2.  Finding and using urban opportunities

    In an urban environment, besides roads, you can use buildings and other structures. Obviously rows of buildings can work. Perspective will make the buildings appear smaller as they become more distant, resulting in lines pointing to the center of the picture. Fences are another good choice.

    Keep your eye open for rows of streetlights, which we often overlook, but which can work great. In addition, don’t forget to look up, as the natural convergence of buildings toward the center of your frame (due to the distortion of your lens) can actually work for you in this context, and create lines that point to the center of the frame.

    TubeEscalator

    3.  Opportunities in nature

    When you are out in the wild, nature often provides you with the leading lines you seek. Patterns on the ground, whether it be paved, sand, or grass, can often provide markings that lead to the center of the frame. In addition, similar to the convergence of buildings mentioned above, looking up into tall trees will create the same effect.

    Sand

    Leading lines on the ground can be difficult if not impossible to see with the naked eye though. There are times you have to walk around with the viewfinder held to your eye (or looking through your LCD with the camera in Live View) in order to see the lines on the ground. Moving water can also provide lines toward the center of the frame. Again, however, these might not be visible to you. Frequently looking at a a long exposure after the fact is the only way you can actually see these lines. Take test shots when you can.

    4.  Manufacture your own lines

    Sometimes there are no leading lines tha to use and you have to make your own. There are many ways to do this. One of my favorites is by adding streaking lights that go into the frame. Taking a long exposure of moving water will also result in lines.

    GreyWhaleRock

    5.  Stay cognizant of lines when shooting

    Once you identify leading lines to draw your viewer into the frame, you need to take your picture in such a way that it will show them. We already mentioned shutter speed, which is particularly important when you are allowing lights or water to flow through your frame to show a leading line. But you will also want to keep an eye on your aperture setting. Most of the time you will want the entire leading line sharp, along with the subject that you are leading the viewer’s eye toward. You’ll want to use a small aperture in that case, which will create a large depth of field for your shot. On occasion, however, you want to blur out the background by using a large aperture. In any case, the important thing is to have a plan for showing the leading line in the final picture.

    WiseCoRoad

    6.  Accentuate the lines in post-production

    Finding and using leading lines to draw your viewer into the picture does not end when the shutter closes. Usually you can accentuate them in post-processing. The main way is through selective brightening and darkening. Oftentimes you will want to brighten your leading line to draw the viewer’s eye to it. Sometimes you might want to darken other parts of the frame for the same reason. You also might want to increase the contrast in, and around, your leading lines since the eye is attracted to contrast.

    The best way the accomplish this selective lightening and darkening is through curves adjustment layers. Just create a curves adjustment layer (Layer – New Adjustment Layer – Curves). Then brighten the picture by pulling the middle of the curve upward bit. Use whatever selection tools you are most comfortable with to mask away the brightening everywhere you don’t want it (which will be pretty much everywhere except for your leading lines). To darken portions of the picture, just do the same thing on a new adjustment layer, but instead of pulling the curve up, pull it down. Again, mask away the effect where you don’t want it (which, this time will be areas away from your leading lines).

    NYC

    Effort and reward

    The use of leading lines to draw the viewer into the frame is a great way to add depth to your pictures. Rather than looking at the picture the viewer is looking into the picture. But it isn’t always easy. It requires thought before, during, and after the shot. But with the right pre-planning, a little attention while shooting, and some accentuation during the post-processing, you can add an element to your photos that sets them apart.

    googletag.cmd.push(function() {
    mobile_slots.push( googletag.defineSlot( “/1005424/_dPSv4_mob-all-article-bottom_(300×250)”, [300, 250], “pb-ad-78158” ).addService( googletag.pubads() ) );
    } );

    The post 6 Tips for Creating Leading Lines to Make Your Photos Stand Out More by Jim Hamel appeared first on Digital Photography School.


    Digital Photography School

  • Panasonic Lumix DMC-GM5 review-in-progress posted

    The Lumix DMC-GM5 is the newest minuscule ILC from Panasonic. It joins its sibling (the Lumix GM1) by offering nearly all of the same imaging features, including a 16MP Four Thirds sensor, while adding enthusiast-friendly features like an EVF and additional controls. We’ve been looking at how it handles in the field compared to its predecessor. Take a look at our review-in-progress, complete with studio analysis and shooting experience. Read more

    Articles: Digital Photography Review (dpreview.com)

  • F-Stop Gear’s Kashmir camera bag is designed for women

    F-Stop Gear has introduced Kashmir, a camera backpack designed specifically for women. Kashmir is billed as an ultra-light camera pack with a harness system and torso height adjusted to complement a woman’s body, something accomplished through the use of an Ultra Lite EVA-padded hip belt and what the maker says are ‘female specific S-shoulder straps’. The bag is being funded through Kickstarter. Read more

    Articles: Digital Photography Review (dpreview.com)

  • Guide to Buying Your First DSLR

    Your First DSLR

    For whatever the reason, you’re ready to buy your first DSLR. It could be that your point-and-shoot isn’t cutting it anymore in regards to features, speed, or image quality, or it could be that you’d like to turn photography into more than a rarely-touched hobby.

    Romain Ballez

    By Romain Ballez

    DSLR (Digital Single Lens Reflex) cameras are what the vast majority of professional photographers use to get the job done. Unlike point-and-shoot camera models, which record light (and therefore an image) onto an electronic sensor directly, a DSLR uses a mirror to bounce the light from a scene through an internal system and into a viewfinder or an electronic sensor, in the case of an open shutter.

    These cameras also allow for interchangeable lenses, giving you a wide array of options in regards to focal lengths and quality. There are, of course, advantages and disadvantages to DSLR systems, but at the end of the day, these cameras offer the features and quality required by advanced hobbyists and professionals.

    What You’re Looking For

    There’s no denying it, this is a big purchase for you. No, you’re not looking for a top-of-the-line, full-featured beast this go round; you need the best possible piece of equipment for a reasonable price. You need bang for your buck.

    Whether photography is a passionate hobby or a hopeful profession of the future, you are in a learning phase, and need a camera that will compliment that objective well. While current-generation point-and-shoots can be great products, DSLR’s do have a few advantages.

    Larger Sensors

    As a rule, DSLRs have a larger photo-sensitive digital sensor, which usually translates to better image quality. Please note that this has nothing to do with megapixels or resolution, neither of which are, by themselves, indicators of image quality.

    Interchangeable Lenses

    While there are some point-and-shoot systems beginning to offer interchangeable lenses, by and large, DSLR’s have the market dominated in this area. Not only do the big camera companies have their own lenses, third-party companies such as Sigma and Tamron offer great selections as well. There is a lens out there for virtually every application you can imagine.

    János Csongor Kerekes

    By János Csongor Kerekes

    A Viewfinder

    Instead of the usual LCD screen present in point-and-shoot cameras, DSLR’s collect light from the lens, direct it to the mirror, and through the viewfinder, giving you an almost exact representation of what is being captured on the sensor.

    Advanced Features and Controls

    Namely, manual controls. While point-and-shoots usually feature the ability to modify settings, DSLR’s are built from the ground up with manual control in mind. ISO ranges are higher with reflex cameras, and larger sensors combined with precise aperture controls allow for controlled depth of field in your photos.

    Speed

    DSLR’s are known for their faster shutter and system speeds, and in the world of photography, speed is usually a good thing.

    There are countless brands of equipment, but as far as DSLR’s go, there are the big three – Canon, Nikon, and Sony.

    Recently, Pentax has been gaining ground again, and there are more expensive offerings available from companies like Leica and Hasselblad. For our purposes, we’ll stick to the big three, as they are all known for offering outstanding entry-level cameras within their product lines, and can be relatively inexpensive.

    Elias Ruiz Monserrat

    By Elias Ruiz Monserrat

    What to look for when buying that all-important first SLR camera?

    Image Quality

    Image quality is usually the most important requirement of a new camera for photographers, and it’s also one of the most subjective. The quality of the photos a camera produces is dependent on several factors, including sensor size, lens quality, and the optics of the camera itself.

    Feature Set

    While almost all DSLR’s have a common set of features (such as the ability to shoot manually), some brands and models have automated some features, while others have not, or do not have those features at all. Different cameras have varying usable ISO ranges, autofocus points, and resolution (in megapixels).

    Design

    Although usually not the first thing you think of with an entry-level camera, buying a model with a solid design is still important. Some less expensive cameras have all plastic housing, whereas others may use more heavy-duty materials such as metal; others still may be weatherproof to a certain degree.

    Even at the price points we’re discussing, it’s a good idea to research that aspect of the prospective camera as well, and buy as solid a model as possible.

    Jung-nam Nam

    By Jung-nam Nam

    Cost

    We’re talking entry-level, for the scope of this article, so cost will be a factor. Obviously, the more money you’re able to spend, the more advanced system you can get. Keep in mind however, that often with entry-level models, differences between the cameras can come down to feature sets, with image quality staying more or less the same.

    Remember that the quality of the lens you’ll be attaching to the camera is more of a determining factor in the quality of the photo.

    Where to Buy

    Luckily, you have several options in this area. Gone are the days where you could only buy a camera at your local Wolf Camera (and unfortunately, gone are the Wolf Camera stores, as well). Now there are virtually limitless retail outlets and sellers online, carrying every system and component a photographer could need. You can order your camera from your living room and have it delivered to your house a few short days later, without ever leaving home.

    Amazon, B&H Photo, and Adorama are all large, respectable retailers you can shop with, and are among the most popular today.

    The Contenders

    Canon EOS Rebel T5i

    The Canon Rebel series has a long-standing tradition on solid, quality cameras at a reasonable price. While I won’t start a brand war here, it’s well-known that most photographers end up settling on either Canon, or Nikon.

    The Rebel series has come a long way from the days of the XS, and the latest generation of Rebel cameras are much closer to Canon’s midrange line than before, with better sensors, more features, and hardier construction.

    t5i_586x186

    Canon Rebel T5i

    The T5i is an 18MP (megapixel) camera, with an ISO range of 100 – 12800 (expandable to 25600). It also features a 3 inch Vari-angle Touchscreen LCD, 9 AF (autofocus) cross points, 5 fps (frames per second) continuous shooting speed, and shutter speeds up to 1/4000 second.

    As with most entry level systems, if you opt for the full kit, you’ll get the standard 18-55mm IS (image stabilization) zoom lens. While very good for learning novices, you’ll want to upgrade to a cheap prime such as the excellent Canon EF-S 50mm f/1.8 or something similar, as the cheaper build and documented chromatic aberration issues with the kit lens could leave you wanting a bit more. Note that this applies to all kit lenses on the entry-level cameras we’re discussing here.

    Nowadays, as systems get more advanced, HD video recording is becoming more of a requirement, and the T5i delivers this as well. As of this writing, the T5i kit is selling for $ 649.99.

    Nikon D3300
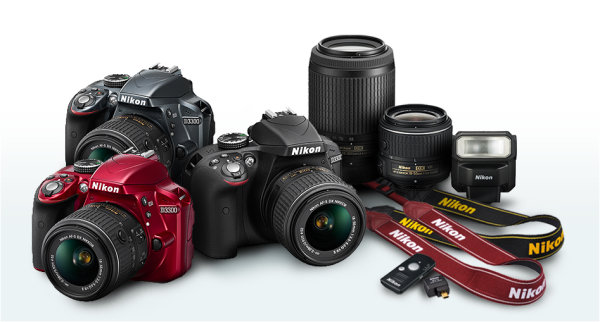
    D3300

    Image courtesy Nikon

    Nikon upped their game with the D3300, equipping the camera with a generous 24 megapixels of resolution in a solid, compact, carbon fiber enhanced body. This model gives you, the budding photographer, an ISO range up to 12,800 (expandable up to 25,600), 11 autofocus points, and 5 frames per second of continuous shooting, along with a 3″ LCD screen that matches the Canon model.

    Just as with the Canon T3i, the D3300 supports shutter speeds up to 1/4000th of a second and allows for 1080p HD video recording.  Retailing around the $ 500 mark, the body and lens bundle includes the Nikkor 18-55mm 5.6 VR II lens, a relative equivalent to Canon’s 18-55mm kit lens.

    Sony A58

    Usually considered the third wheel of the big three, Sony is known more for their other forays into the electronics world than their digital cameras, but don’t let this fool you; they know how to make a good DSLR, and the SLT-A58 is a wonderful example of that.
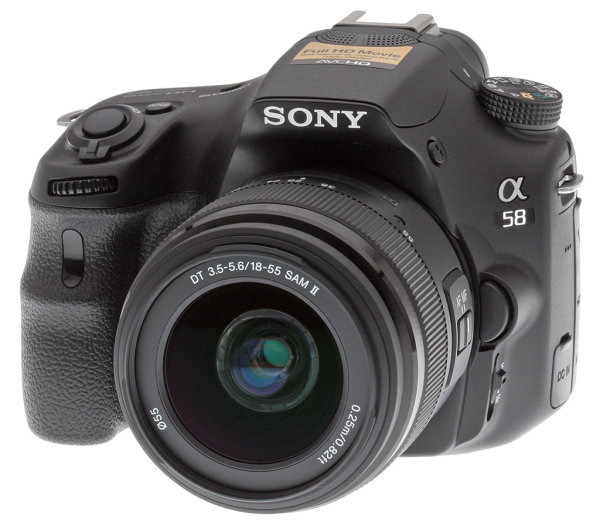
    sony-a58

    Image courtesy Sony

    Dipping even lower in price and the lowest of all three at $ 450, the A58 gives you quite a bit for that price point. This 20.1 megapixel camera offers a respectable ISO range up to 16,000, and is expandable up to 25,600. Leading the pack, this model offers 15 autofocus points, but forces you to give up a little bit with the smallish 2.7″ LCD screen.

    Battery life has been improved fairly drastically on the A58 in comparison to previous entries in the series, and for such a budget-friendly camera, it features a surprisingly big and bright viewfinder.

    Conclusion

    So which one is right for you? Any of these – or none of these. The answer lies in what you’re looking for, and what concessions you’re willing to make for the budget you have. All of these are excellent cameras, and were chosen because of what they offer for the price, but that doesn’t mean there aren’t other cameras that would serve the purpose just as well or even better.

    The prices we’ve discussed all include a kit lens to get you started, but be aware, these are usually the lowest-end optics available, and you’ll want to upgrade as soon as possible to another piece of glass. Also, in most cases you have the option of buying the camera body only, and picking out your lenses separately, which reduces your upfront cost of the DSLR itself. There are literally hundreds of lenses to choose from; just ensure they will fit your camera’s mount before purchasing.

    At the end of the day, you want a camera that will facilitate the learning process you’re going through, so choose a camera that assists in that purpose, without breaking the bank.

    Bought Your First DSLR? Here’s How to Learn How to Use it!

    Check out our Ultimate Guide to Learning How to Use Your First DSLR.

    Also check out our Photography Tips for Beginners page for lots of great photography tutorials suitable for first time DSLR buyers.

    googletag.cmd.push(function() {
    mobile_slots.push( googletag.defineSlot( “/1005424/_dPSv4_mob-all-article-bottom_(300×250)”, [300, 250], “pb-ad-78158” ).addService( googletag.pubads() ) );
    } );

    The post Guide to Buying Your First DSLR by Tim Gilbreath appeared first on Digital Photography School.


    Digital Photography School

  • 3. Türchen: Calin Kruse

    3. Türchen

    Ganz vorsichtig öffnen wir unser drittes Türchen, denn Herausgeber und Fotograf Calin Kruse hat es mit sechs Gewinnen ganz schön prall gefüllt. Heraus purzeln fünf Ausgaben der aktuellen Ausgabe des Magazins „dienacht“ sowie ein Exemplar des Buchs „Schmetterling“.

    Aber eins nach dem anderen. Das „dienacht“ – Magazin für Fotografie, Gestaltung und Subkultur – kennt Ihr vielleicht schon, denn wir sind große Fans und haben es schon öfter vorgestellt. Einzelne Beiträge aus den Magazinen wurden auch bereits mehrfach für die LeadAwards nominiert.

    In unserem Türchen liegt gleich fünf mal die aktuelle Ausgabe Nummer 15. Darin enthalten sind Künstler, Fotografen und Designer wie Sarah Sudhoff, Francesca Romeo, Tito Mouraz, Julia Sonntag, Aaron McElroy, Axel Beyer, Tatiana Tcherkezyan, David Einwaller sowie Fotobuchrezensionen und mehr.

    Jede Ausgabe ist zweisprachig (Deutsch und Englisch) und auf 1000 Exemplare limitiert. Das Magazin hat 126 Seiten, ein Format von 15 x 18 cm und kostet 7 €.

    Cover: dienacht Ausgabe 15Buchcover: Schmetterling

    Dazu legt Calin ein ganz persönliches Buch: „Schmetterling“. Es ist sein eigenes mit intimen schwarzweiß-Fotografien, das bereits in der zweiten Auflage erscheint. Mit 64 Seiten kostet es 20 €. Die Bilder daraus sind ein Fotoexperiment: Ein unbekanntes Mädchen, ein Abend, sich fallen lassen.

    Um eines der Produkte zu gewinnen, schreibe einen Kommentar mit Deinem Wunschgewinn unter bürgerlichem Namen und gültiger E-Mail-Adresse bis heute um 24 Uhr. Danach verlosen wir sie per Zufallsgenerator unter allen Kommentatoren. Die genauen Gewinnspielregeln findest Du hier. Viel Glück!


    kwerfeldein – Fotografie Magazin | Fotocommunity

  • New photo filters added to Twitter iOS and Android apps

    Twitter has launched an update to its mobile apps for iOS and Android bringing a range of new photo filters. In addition to new filter options, filter strength can now be adjusted via a slider, providing more control over the final result. Read more

    Articles: Digital Photography Review (dpreview.com)

  • Odd Offices: 13 Wacky Outside-the-Box Workspace Designs

    [ By Steph in Design & Fixtures & Interiors. ]

    odd offices google tel aviv 1

    Unless you happen to work at Google, your conventional office space is going to seem awfully boring compared to the slides, disappearing desks, submarine-inspired meeting pods, turfed running tracks and other unusual design choices at these 13 highly creative workplaces.

    Monolithic Chair-Free Office

    odd office monolithic 1

    odd office monolithic 2

    There are no chairs to be found in this faceted office space full of sloping geometric surfaces – workers have to either stand, perch on benches or lounge. Not that they’re complaining. Developed by design studio RAAAF and visual artist Barbara Visser, the workplace design is entitled ‘The End of Sitting.’ “The installation’s various affordances solicit visitors to explore different standing positions in an experimental work landscape.”

    Wave-Like ‘Superdesk’

    odd office superdesk 1

    odd office superdesk 2

    odd office superdesk 3

    One single desk surface weaves and undulates through the office for a digital creative industry like a ribbon, rising up in spots to create arched entrances to tucked-away work areas. The glossy, gleaming ‘Superdesk’ by Clive Wilkinson Architects seats all 125 employees of The Barbarian Group and transforms what would normally be considered furniture into architecture complete with roofs. The undersides of the desk offer storage, and occasionally reach heights that are tall enough to create private little alcoves.

    Shipping Container Offices

    odd offices pallotta 1

    odd offices palotta 2

    odd offices pallotta 3

    Clive Wilkinson and Associates also created an incredible shipping container-based work environment for Pallotta Teamworks in a new and entirely empty 47,000-square-foot warehouse in Los Angeles. The firm had to do the project on half the usual budget for such a space, making it difficult to even fully air-condition it, so they came up with a creative solution: seven tented villages or ‘breathing islands’ that are climate-controlled while the rest of the space is not.

    Disappearing Desks

    odd office disappearing desks 1

    odd office disappearing desks 2

    There’s no danger of overworking yourself at Amsterdam design studio Hedergroen: once office hours are up, staff desks simply disappear. Computers, paperwork and other desktop items remain in place as the desks raise up to the ceiling on steel cables. When morning comes, they drop down again, resting on rolling cabinets for stability.

    Next Page – Click Below to Read More:
    Odd Offices 13 Outside The Box Workspace Designs

    Share on Facebook


    [ By Steph in Design & Fixtures & Interiors. ]

    [ WebUrbanist | Archives | Galleries | Privacy | TOS ]


    WebUrbanist

  • Odd Offices: 13 Wacky Outside-the-Box Workspace Designs

    [ By Steph in Design & Fixtures & Interiors. ]

    odd offices google tel aviv 1

    Unless you happen to work at Google, your conventional office space is going to seem awfully boring compared to the slides, disappearing desks, submarine-inspired meeting pods, turfed running tracks and other unusual design choices at these 13 highly creative workplaces.

    Monolithic Chair-Free Office

    odd office monolithic 1

    odd office monolithic 2

    There are no chairs to be found in this faceted office space full of sloping geometric surfaces – workers have to either stand, perch on benches or lounge. Not that they’re complaining. Developed by design studio RAAAF and visual artist Barbara Visser, the workplace design is entitled ‘The End of Sitting.’ “The installation’s various affordances solicit visitors to explore different standing positions in an experimental work landscape.”

    Wave-Like ‘Superdesk’

    odd office superdesk 1

    odd office superdesk 2

    odd office superdesk 3

    One single desk surface weaves and undulates through the office for a digital creative industry like a ribbon, rising up in spots to create arched entrances to tucked-away work areas. The glossy, gleaming ‘Superdesk’ by Clive Wilkinson Architects seats all 125 employees of The Barbarian Group and transforms what would normally be considered furniture into architecture complete with roofs. The undersides of the desk offer storage, and occasionally reach heights that are tall enough to create private little alcoves.

    Shipping Container Offices

    odd offices pallotta 1

    odd offices palotta 2

    odd offices pallotta 3

    Clive Wilkinson and Associates also created an incredible shipping container-based work environment for Pallotta Teamworks in a new and entirely empty 47,000-square-foot warehouse in Los Angeles. The firm had to do the project on half the usual budget for such a space, making it difficult to even fully air-condition it, so they came up with a creative solution: seven tented villages or ‘breathing islands’ that are climate-controlled while the rest of the space is not.

    Disappearing Desks

    odd office disappearing desks 1

    odd office disappearing desks 2

    There’s no danger of overworking yourself at Amsterdam design studio Hedergroen: once office hours are up, staff desks simply disappear. Computers, paperwork and other desktop items remain in place as the desks raise up to the ceiling on steel cables. When morning comes, they drop down again, resting on rolling cabinets for stability.

    Next Page – Click Below to Read More:
    Odd Offices 13 Outside The Box Workspace Designs

    Share on Facebook


    [ By Steph in Design & Fixtures & Interiors. ]

    [ WebUrbanist | Archives | Galleries | Privacy | TOS ]


    WebUrbanist