Month: December 2014

  • Digitalfotografie: Welche Kamera soll ich kaufen?

    Ein Beitrag von: Samuel Kümmel

    Sobald man beruflich anfängt zu fotografieren, wird man – ohne es zu wollen – automatisch für viele Freunde und Bekannte zum Experten mit allumfassendem Fachwissen im Bereich der Fototechnik. Und damit zum immer darauf ansprechbaren Kaufberater. So war es auf jeden Fall bei mir.

    Glücklicherweise war ich schon immer ein großer Rechercheur vor dem Herrn. Ich liebe es, mich durch Blogs, Produkt- und Hersteller-Webseiten zu klicken und zu lesen. Bis vor wenigen Jahren habe ich auch noch Fototechnik-Zeitschriften verschlungen, aber mittlerweile bin ich fast ausschließlich online unterwegs, wenn es um Wissen über die neueste Technik im Bereich der Fotografie geht.

    Und so habe ich über die Jahre einige Beratungsgespräche und -chats geführt, in denen es vor allem um ein Thema ging: „Hallo, ich will mir jetzt eine Kamera kaufen, welche soll ich nehmen?“ In diesen Beratungen habe ich manches gelernt, das ich hier gern mit Euch teilen möchte. Vielleicht hilft es ja dem einen oder der anderen beim Einstieg in die Digitalfotografie.

    Gedanken machen

    Die erste Frage, die ich Ratsuchenden immer gestellt habe, war folgende: „Was möchtest Du denn mit der Kamera tun können?“ Die Antwort „Schöne Fotos machen!“ habe ich nicht gelten lassen und meist weiter nachgebohrt: „Was hast Du vor? Möchtest Du einfach eine schöne Reisekamera, willst Du Architektur fotografieren, Menschen, was willst Du mit der Kamera anstellen?“

    An dieser Stelle hat sich oftmals schon gezeigt, dass viele Einsteiger sich wenig Gedanken machen, was sie eigentlich wollen. Das war bei mir nicht anders. Ich habe meine allererste Kamera gekauft, weil ein Freund die gleiche hatte. Und die Fotos sahen ganz gut aus. Damals verstand ich noch nichts.

    Mittlerweile denke ich aber, dass ein Kamerakauf etwas ist, was man nicht leichtfertig machen sollte. Schließlich investiert man in ein Stück Technik, das einen die nächsten Monate (oder Jahre) begleiten soll und mit dem man zufrieden sein möchte.

    Deswegen ist es wichtig, sich das primäre Ziel am Anfang zu überlegen. Für Street- und Portrait-Fotografie empfehle ich nicht dasselbe wie für Architektur- und Landschaftsfotos. Und zum Reisen ist etwas anderes besser geeignet als für die Arbeit in einem Studio.

    Aus der Wahl des Ziels ergeben sich dann meist weitere Fragen, die damit zusammenhängen. Wie wichtig ist Dir Größe und Gewicht? Soll das Objektiv wechselbar sein? Legst Du Wert auf möglichst hohe Bildqualität?

    Und nicht zuletzt frage ich: Wie groß ist Dein Budget? Aus den Antworten auf all diese Fragen ergibt sich nach und nach ein differenziertes Bild. Und nur mit einem solchen kann ich eine fundierte Empfehlung abgeben, was der geneigte Einsteiger sich denn nun kaufen könnte.

    Ich habe die Erfahrung gemacht, dass den meisten Fotografie-Anfängern die Namen der Hersteller völlig egal sind bzw. wenig sagen. Sie haben von anderen vielleicht mal was gehört.

    Aber wirklich wissen tut man am Anfang nichts über den Unterschied zwischen Canon, Nikon, Sony, Olympus, Fuji, Panasonic, Samsung und Co. Das ist gut, denn dann kann ich vorbehaltlos eine Empfehlung abgeben, die zu den Bedürfnissen und Zielen des angehenden Fotografen passt. Marken sind Schall und Rauch.

    Wenn man Einsteiger-Kameras vergleicht, dann fällt auf, dass sich die Hersteller vor allem in Bauform, Anordnung der Bedienelemente, Menüführung und manche vielleicht noch in der Bildqualität unterscheiden. Ansonsten machen Sie alle dasselbe: Kameras bauen, die digital Fotos machen können.

    Und erst im hochpreisigen Bereich unterscheiden sie sich wesentlich voneinander. Aber ich empfehle niemandem, mit einer mehr als 1500 € kostenden Kamera das Fotografieren zu beginnen. Das verdirbt die Einstellung zur Fotografie.

    Viele denken nämlich, dass eine teure Kamera automatisch geile Fotos macht. Das mag stimmen, wenn sich das Wort „geil“ nur auf die Bildqualität und auf sonst nichts bezieht. Aber wer wirklich fotografieren lernen will – also ein Motiv auszusuchen, eine Komposition zu machen und dieses Motiv im passenden Licht festzuhalten – für den reicht meist eine Smartphone-Kamera völlig aus. Denn genau das ist damit problemlos möglich.

    Menschen, die ein Smartphone besitzen, empfehle ich mittlerweile auch keine Kompaktkameras mehr. Die Qualität heutiger Smartphone-Kameras kann mit allen Kompaktkameras problemlos mithalten. Ich weiß, ich lehne mich damit weit aus dem Fenster.

    Aber ich behaupte, der Unterschied ist (bis auf die eventuelle Möglichkeit, verlustfrei zu zoomen) marginal. Und ein Smartphone hat weitere Vorteile: Ich muss kein extra Gerät mitschleppen, keine extra Speicherkarte, die Fotos können sofort bearbeitet und versendet werden, sie haben GPS-Koordinaten (je nach Einstellung), es gibt Foto-Apps und ich kann es über WLAN mit meinem Computer verbinden.

    Aber zum Thema Smartphones vs. Kompaktkameras in einem anderen Artikel mehr.

    Testen

    Der zweite, gleichwichtige Schritt beim Einstieg in die Digitalfotografie ist das Testen der Technik im Laden oder auch in einer „Probezeit“. Fotomagazine, Blogs und auch ich mit meinem Artikel können Dir viel erzählen.

    Wenn sich das Gerät samt Objektiv in Deinen Händen nicht gut anfühlt und Du Herumtragen, Ans-Auge-Halten, Abdrücken, Zoomen, Scharfstellen etc. nicht als angenehm empfindest, wirst Du Deine Lust an dem Gerät wahrscheinlich schnell verlieren.

    Außerdem haben viele Kamerahersteller in meinen Augen unglaublich schlechte Interface-Designer, so dass man sich durch eine Menge an unübersichtlichen und nicht selbsterklärenden Menüpunkten scrollen, klicken, tippen oder switchen muss.

    Und wenn Du mit dem Menü nicht klar kommst, wirst Du Deine neue Kamera wahrscheinlich ausschließlich im grünen Standardmodus mit den Standardeinstellungen nutzen – und dafür wäre das Geld dann aus meiner Sicht eher herausgeschmissen.

    Deswegen: Teste, was das Zeug hält. Es ist nicht schlimm, wenn Du am Anfang dazu mehrmals die Bedienungsanleitung in die Hand nehmen musst. Aber durch das Testen wirst Du herausfinden, ob eine Kamera mit all ihren Bedienelementen zu Dir passt und ob ihr Freunde für länger werdet.

    Falls Du die Chance bekommst, eine oder mehrere Kameras auszuleihen (viele Händler bieten das heute an), dann kannst Du sogar die Fotos auf Deinen Rechner ziehen und schauen, ob sie Deinen Augen gefallen.

    Kaufen

    Was soll ich als Einsteiger also nun kaufen, wenn mir mein Smartphone nicht ausreicht und ich mit einer passenden Kamera das Fotografieren beginnen möchte? Hier ein paar völlig subjektive Empfehlungen (in alphabetischer Reihenfolge):

    Eine Kirche aus dem Mittelgang heraus fotografiert.

    Architekturfotografie

    Für das Fotografieren von Architektur ist wichtig, dass ich aus mittlerer Distanz möglichst viel auf das Foto bekomme. Ebenso spielen Schärfe und Detailwiedergabe eine wichtige Rolle. Zoomen muss ich nicht unbedingt, denn ich kann oft näher zum Objekt hin oder weiter weg gehen.

    Deswegen empfehle ich hierfür eine DSLR mit APS-C-Sensor und einer Weitwinkel-Festbrennweite (kleiner als 35 mm). Außerdem sind ein Stativ sowie eine Kabelfernbedienung sinnvoll, um nicht zu verwackeln. Diese Kombination ermöglicht mir vor allen Dingen, Dich anfangs nicht auf die Technik, sondern auf das Finden einer passenden Komposition zu konzentrieren.

    • Kleines Budget: Nikon D3300* / Nikon 24 mm f/2.8 D*
    • Mittleres Budget: Canon 700D* / Canon 28 mm f/1.8*
    • Großes Budget: Canon 70D* / Canon 24 mm f/2.8 IS*

    Landschaftsfotografie

    In der Natur unterwegs möchte ich vor allem etwas, was leicht zu transportieren ist und eine gute Farb- und Detailwiedergabe hat. Hier lohnt es sich, eine kleine Systemkamera zu kaufen und dann ein paar Euro mehr für ein gutes Weitwinkel-Zoom (kleiner als 50 mm) auszugeben.

    Ein Zoom-Objektiv deswegen, weil man in der Landschaft manchmal nicht die Möglichkeit hat, einen Schritt vor oder zurück zu gehen. Auch hier ist ein leichtes Carbon- oder Alu-Stativ empfehlenswert, das gut in einen Wanderrucksack passt.

    • Kleines Budget: Canon EOS M* / Canon EF-M 11 – 22 mm*
    • Mittleres Budget: Panasonic DMC-GM1* / Panasonic 12 – 32 mm*
    • Großes Budget: Fuji X-E2* / Fujinon XF 10 – 24 mm*

    Eine Blüte an einem Baumast.

    Makrofotografie

    In der Makrofotografie will ich ja ganz nah ran. Und die Gefahr, dass ich verwackle ist relativ hoch. Einsteigern rate ich deswegen, sich eine Systemkamera oder kleine DSLR zuzulegen, die ihnen die Möglichkeit bietet, ein gutes Makro-Objektiv vorn dran zu schrauben.

    In dieses würde ich dann auch investieren. Wegen der Schärfe und wegen der Möglichkeit, nah ran zu kommen. Ein Stativ ist hier fast unabdingbar: Selbst, wenn das Objektiv einen Bildstabilisator hat, kommt so doch mehr Ruhe in das Fotografieren.

    • Kleines Budget: Canon 1100D* / Canon EF-S 60 mm f/2.8*
    • Mittleres Budget: Nikon D5300* / Sigma 105 mm f/2.8 EX*
    • Großes Budget: Canon 70D* / Canon EF 100 mm f/2.8 L*

    Nachtfotografie

    Wer gern den Sternenhimmel fotografiert, braucht eine Kamera, deren Sensor ein gutes Rauschverhalten bietet und mit der man über längere Zeiten (mehr als zehn Sekunden) belichten kann. Eine Systemkamera mit lichtstarker Weitwinkel-Festbrennweite (24 mm oder weniger) sowie ein Stativ sind hier eine gute Wahl. Eine DSLR tut es auch, ist aber größer und schwerer.

    Die Festbrennweite empfehle ich, weil ich in den Nachthimmel meist nur in einer Richtung und aus einer Perspektive möglichst großflächig brauche.

    • Kleines Budget: Sony Alpha 5000 / Sony 16 mm f/2.8
    • Mittleres Budget: Canon 700D / Walimex 14 mm f/2.8
    • Großes Budget: Nikon D7100 / Sigma 15 mm f/2.8 EX

    Portrait eines Mannes im Hoodie.

    Portraitfotografie

    Bei der Portraitfotografie sind mir ein freigestellter (unscharfer) Hintergrund und eine möglichst verzerrungsfreie Wiedergabe des Gesichts wichtig. Beides erreiche ich mit einer Systemkamera oder DSLR, wenn ich eine Festbrennweite jenseits der 50 mm (eher größer) mit einer möglichst großen Offenblende benutze.

    Objektive in diesem Bereich gibt es zu Hauf, die guten eher in der nicht mehr ganz so günstigen Preisklasse. Aber wer wirklich Portraits machen möchte, sollte sich überlegen, ob ein gutes Objektiv mit Blende f/2, f/1.8 oder f/1.4 nicht eine lohnende Investition sein könnte. Die Festbrennweite fordert mich wieder dazu heraus, eine bewusste Komposition zu wählen, anstatt einfach zu zoomen.

    • Kleines Budget: Canon 1200D* / Canon 85 mm f/1.8*
    • Mittleres Budget: Sony Alpha 6000* / Sony 50 mm f/1.8*
    • Großes Budget: Olympus E-M5 OM-D* / Olympus Zuikon 75 mm f/1.8*

    Reisefotografie

    In der Reisefotografie möchte ich mit möglichst wenig Gepäck die höchste Flexibilität haben. Ich weiß ja nicht, wo ich hinkomme und was ich alles vor die Linse kriegen werde. Damit ich nicht eine große Tasche mit jeder Menge Linsenglas rumschleppen muss, empfiehlt es sich hierfür, eine kleine Systemkamera oder DSLR mit Megazoom-Objektiv zu kaufen.

    Bestimmte Hersteller bieten mittlerweile Objektive mit einem Brennweitenbereich von 16 – 300 mm und Bildstabilisator an, die absolute Flexibiltät bieten. Wer sich selbst herausfordern will, kann aber auch nur eine 24-mm- oder 35-mm-Festbrennweite mitnehmen und versuchen, damit klar zu kommen.

    Die Spitze des Eiffelturms kriegt man damit zwar nicht drauf, aber man fotografiert durch die Einschränkung dann sicherlich deutlich anders.

    • Kleines Budget: Panasonic GM1* / Panasonic 45 – 200 mm OIS*
    • Mittleres Budget: Nikon D3300* / Tamron 16 – 300 mm VC*
    • Großes Budget: Canon 70D* / Sigma 18 – 35 mm f/1.8 Art*

    Eine Frau blockt einen Volleyball übers Netz.

    Sportfotografie

    Auch in der Sportfotografie will ich meistens nah ran, stehe aber eher weit entfernt. Außerdem sind schnelle Bewegungen an der Tagesordnung. Hier ist eine schnelle DSLR mit Telezoom-Objektiv (70 mm oder größer) die beste Wahl.

    Um Bewegungen einzufrieren, würde ich darauf achten, dass die Kamera eine gute Verschlusszeit (schneller als 1/1000) bietet und möglichst viele Fotos pro Sekunde machen kann. So bekomme ich den optimalen Moment gut aufs Foto. Ein Einbein-Stativ zusätzlich kann auch nicht schaden, um das schwere Objektiv nicht die ganze Zeit mit den Armen halten zu müssen.

    Für alle, die planen, in schlecht ausgeleuchteten Sporthallen geile Sportfotos zu machen, hier eine schlechte Nachricht: Eine günstige Kamera hat meist ein schlechtes Rauschverhalten bei hohen ISO-Zahlen. Und Tele-Festbrennweiten mit hoher Lichtstärke sind für Hobbyfotografen meist unbezahlbar teuer.

    Deswegen ist Sportfotografie außerhalb von Tageslicht-Bedingungen dann doch eher etwas für Topverdiener, die noch ein Hobby suchen.

    • Kleines Budget: Nikon D5300* / Nikon AF-S 70 – 300 mm VR*
    • Mittleres Budget: Sony Alpha 77* / Sigma 150 – 500 mm OS*
    • Großes Budget: Canon 7D* / Canon EF 100 – 400 mm L*

    Straßenfotografie

    Die gerade sehr beliebte Straßenfotografie lässt sich am besten mit einer kleinen Systemkamera und Festbrennweite daran umsetzen. Ich weiß, dass die Hersteller in ihren Kamera-Kits zwar immer Zoom-Objektive mitliefern. Aber lass Dich davon nicht blenden.

    Mit einer Festbrennweite wirst Du Dir Deine Motive deutlich bewusster aussuchen und Du bleibst in Bewegung. Eine DSLR mit riesigem Objektiv ist hier eher fehl am Platz, denn diese Kombination löst doch bei den meisten Menschen auf der Straße eher Unbehagen aus.

    Mit einer kleinen, leichten und fast unsichtbaren Kamera bist Du deutlich entspannter unterwegs.

    • Kleines Budget: Canon EOS M* / Canon EF-M 22 mm f/2*
    • Mittleres Budget: Olympus E-M10 OM-D* / Olympus Zuiko 25 mm f/1.8*
    • Großes Budget: Fuji X-E2* / Fujinon 23 mm f/1.4*

    Ein Hund schaut etwas traurig in die Kamera.

    Tierfotografie

    Bei der Tierfotografie gilt Ähnliches wie bei der Sportfotografie. Wenn Safaris in fremden Ländern Dich begeistern, wirst Du um ein gutes Teleobjektiv kaum herum kommen, denn an die meisten Tiere kommt man nicht nah heran.

    Für das heimische Haustier beim Spaziergang kann aber auch eine lichtstarke Festbrennweite recht reizvoll sein. Du kannst damit wundervolle Tierportraits fotografieren, die sich vom üblichen Smartphone-Catcontent deutlich abheben.

    • Kleines Budget: Nikon D3200* / Nikon AF-S 85 mm f/1.8*
    • Mittleres Budget: Sony Alpha 77* / Sigma 120 – 400 mm*
    • Großes Budget: Canon 70D* / Canon EF 100 – 400 mm L*

    Alles in allem sind das hier sehr subjektive Empfehlungen aus meiner jahrelangen Erfahrung als Fotograf. Wer etwas Besonderes oder Verrücktes anstellen will, kann auch einfach immer genau das Gegenteil von dem kaufen, was ich empfohlen habe. Auch damit sind Fotografien möglich, nur anders!

    Ich hoffe aber, dass meine Erläuterungen einigen Einsteigern helfen, für sich eine Richtung beim Einstieg in die digitale Fototechnik zu finden. Und wer noch nicht weiß, was er will, wird ums jahrelange Ausprobieren nicht herum kommen. So haben viele Fotografen angefangen. Ich auch.

    * Das ist ein Affiliate-Link zu Amazon. Wenn Ihr darüber etwas bestellt, erhält kwerfeldein eine kleine Provision, Ihr zahlt aber keinen Cent mehr.


    kwerfeldein – Fotografie Magazin | Fotocommunity

  • Street Style: Apparel Custom-Printed with Scalable City Maps

    [ By WebUrbanist in Design & Products & Packaging. ]

    custom map skirt design

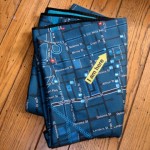
    Taking customized couture to the streets, Monochome allows you to turn any urban grid at a scale of your choice into a unique tank top, t-shirt, flare or pencil skirt.

    figure ground urban grid

    custom cool urban grid clothes

    Using OpenStreetMap, the company lets you select between a black-on-white figure/ground representation or more traditionally-gridded white-on-black map. Ordered now and these should arrive by Christmas – a perfect holiday gift to compliment some urban grid dog tags.

    example zoom custom shirt

    The user-friendly selection tool allows you to get incredibly precise with your pick, creating a composition that is both personalized and aesthetically pleasing through a combination of panning and zooming. The above set of four examples, for instance, are simply variations on the same location at different scales.

    street style map skirt

    custom shirt steps process

    street style skirt two

    A number of standard cities are presented but you can also search for your own location or address or your choice. Due to the nature of OpenStreetMap, you are encouraged to add data for any place not already in the system.

    Share on Facebook


    [ By WebUrbanist in Design & Products & Packaging. ]

    [ WebUrbanist | Archives | Galleries | Privacy | TOS ]


    WebUrbanist

  • Outcast Checkpoints: 8 Abandoned Border Crossings of Europe

    [ By WebUrbanist in Abandoned Places & Architecture. ]

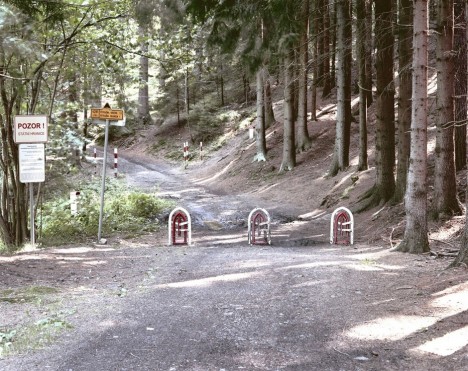
    crossroad border abandoned places

    Nearly two decades ago even short trips across Europe could involve multiple stations, guards, lines and stamps, but the open-border policies in effect today have transformed many of these once-busy hubs into miniature ghost towns.

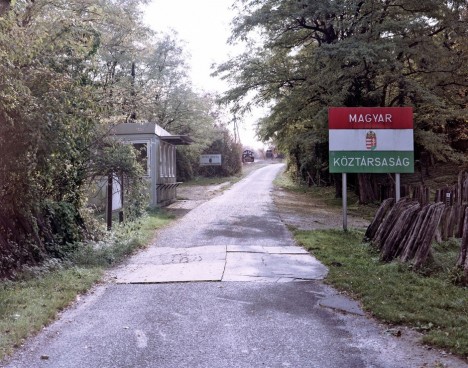
    deserted fancy border cross

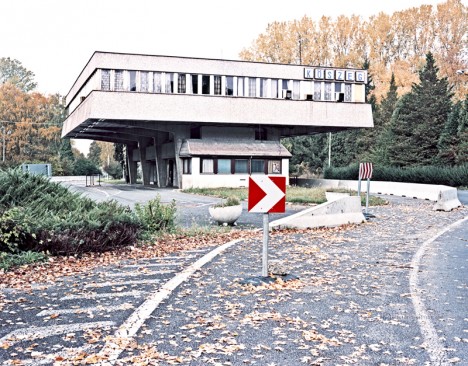
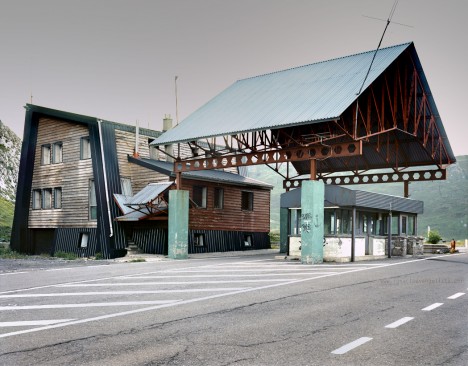
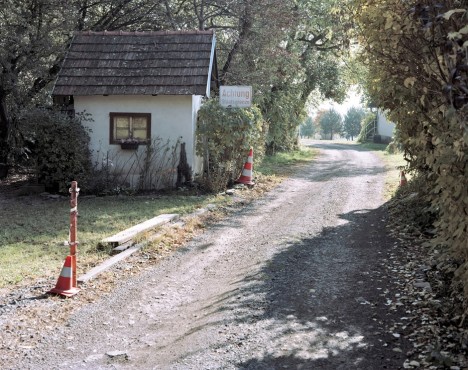
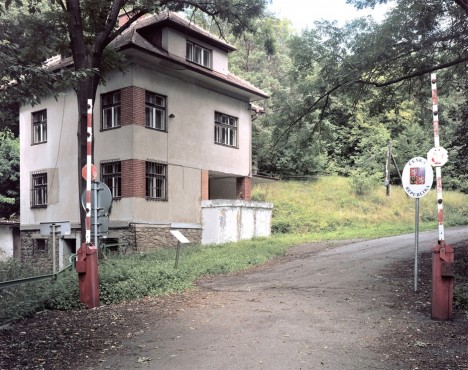
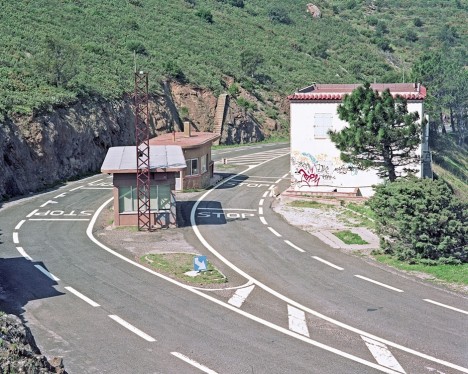
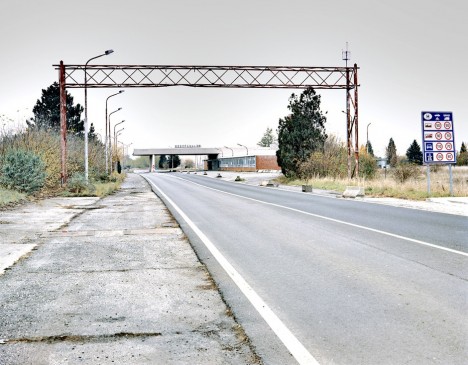
    Photographer Ignacio Evangelista has been traveling European highways and documenting the leftovers of stations found at national borders along the way, often found in various states of abandonment and disrepair.

    deserted german border crossing

    Without the choke points created by checkpoints, much of the commerce (including illicit activities like gambling and prostitution) surrounding these boundaries has dissipated.

    deserted czech republic border

    Still, instead of wiping the slates clean, most countries seem to have left the infrastructure that was there largely intact, ranging from painted road signs telling people to stop to small empty toll booths on rural roads and entire immigration-related structures alongside major freeways.

    deserted street stop sign

    Of his work on this series, the photographer writes: “Border crossings have a function of geographical boundaries, but also an coercitive role, since they prevent the free passage of people between one and another state. So, they are places that, along with a cartographic dimension, are provided with historical, economic and political reminiscences.”

    deserted immigration booth stop

    Over time, however, “these old border crossing points are slowly disappearing; some are renovated and reconverted to new uses, some are destroyed for vandals, and some other just fall down due to the passing of time. So, after some few years there will be no possibility to look at this strong signs and symbols of the recent European history.”

    deserted border marked creepy

    “When I am at the border point, I am confronted with all kinds of signs and barriers which at some point have regulated movements, itineraries, and behaviors,” Evangelista told CityLab. “Now they appear absurd and out of context.”

    deserted border covered rroad

    CityLab puts the transition and photo series in cultural and political context: “Despite the irrationality sometimes associated with national borders, the Schengen Treaty is as much an anomaly as it is an achievement. Many nations within the Schengen Area—Austria, Hungary, Poland, Czech Republic, Spain, France, and others—once represented a web of ambitious empires. The sudden abandonment of border crossings displayed in Evangelista’s work, therefore, offers a reminder that Europe is in fact enjoying an historic era of peace.”

    Share on Facebook


    [ By WebUrbanist in Abandoned Places & Architecture. ]

    [ WebUrbanist | Archives | Galleries | Privacy | TOS ]


    WebUrbanist

  • Rumored Olympus OM-D E-M5 successor may offer resolution-boosting ‘sensor shift’

    Rumors are circulating about a possible successor to the Olympus OM-D E-M5. According to rumor site 4/3rumors.com, the camera is likely to be called the Olympus E-M5II or the Olympus E-M5 Mark II and is said to feature a 16MP sensor but with a sensor shift function allowing users to boost resolution up to an equivalent 40MP. Read more (albeit not all that much more)

    Articles: Digital Photography Review (dpreview.com)

  • Casio launches EX-MR1 selfie camera with lens behind a mirror

    Casio has taken the selfie camera a logical step forward with a new design. The Casio Exilim EX-MR1 uses a lens behind a large mirror so that shooters can check their appearance as they take a picture. The camera, which the company seems to be targeting at women, is a 14MP compact camera with an extra wide angle 4x zoom that starts at 21mm equivalent – a focal length Casio says is optimal for taking self-portraits. Read more

    Articles: Digital Photography Review (dpreview.com)

  • 5 Tips to Help You Take More Natural Looking Portraits

    Writing for dPS has afforded me several opportunities, the best one being getting to converse with photographers – hobbyists to professionals and everything in between – from all over the world.

    lynseymattingly3

    Each time an article I write is published, I get the loveliest emails and comments, and I do my very best to respond to each of them. The question I get most often is one I ask other photographers all the time: How do you make your pictures look like……..that? The question may be worded differently, but ultimately it is the same:

    • How do you get your colors to pop?
    • What lens do you use?
    • How come the people all look so happy/comfortable/natural in your pictures?
    • What’s your editing process?

    When we ask another photographer these questions, we are all asking the same thing: How do you make your pictures look like that?

    When an image grabs you – makes you take an extra second to look at, to admire it, or to wonder if your own images look that great, (or throws you into a jealous rage over picture envy (please tell me I’m not the only one) – it’s as though the photographer has such a defined style, their entire message comes across in that one photo staring back at you. Since my style is candid portraiture, or lifestyle photography, or whatever the latest buzzword is we are calling it now, my subjects’ expressions and poses are what I typically get asked about most. Or maybe that’s just the only part I can explain very well, as the science and equipment piece of it is just not my cup of tea.

    lynseymattingly8

    So here are the five things I say and do during a portrait shoot that I feel make the biggest difference in the comfort level of my clients, and ultimately is the reason I occasionally strike gold. It’s these things that are the answer to how I make my pictures look like that.

    #1 Explain the process

    Before I take a single picture – whether my subjects are nine or 90 years old – I tell them exactly what to expect from the session, and what I expect from them. It nearly always goes like this: “I’m going to take some pictures. I’m going to take some pictures of just the kids, some pictures of just Mom and Dad, and some pictures of everybody. You can smile if you want to smile, but you don’t have to if you don’t want to, and at the end I’m going to give you a little prize.” This short little introduction often immediately puts my clients at ease and I am able to set the tone of the whole shoot based on their response.

    lynseymattingly6

    If I am photographing kids, I always sit down on the ground so I am closer to their level, but I say this exact thing to children and adults alike. Yes, I carry around lollipops. My gear bag has an entire area just for that, and people I have photographed before know it. A lollipop is a tiny treat and while it’s fun and funny, though not usually a huge motivator for teenagers and certain adults, you’d be surprised how far it gets me. Obviously for most, it’s not the prize itself, but rather that I am acknowledging that this is going to be a bit of work, and it’s going to have an end point. It’s an offering to them, silently asking for them to go all-in for photos and perhaps have a little patience with me.

    Also important is that I tell them they don’t have to smile. I don’t want anyone smiling because they think they have to – smiles out of obligation makes for terrible pictures. I want them to smile because we are having so much fun, they do it instinctively.

    lynseymattingly1

    #2 Strive for interaction and reactions, not poses and smiles

    If I have to choose between a picture of every face looking at me, smiling, or one of a family looking and laughing at each other, I will chose the latter every day and twice on Sunday. It is my personal and professional belief that 50 years from now, those images of people being themselves with their loved ones will be much more treasured than portrait studio shots that only show everyone together. I do my best to set-up a moment and let my subjects take it where they want. I can’t declare their reaction to something, so therefore I set the tone for funny or serious, or as I would say to a child: a loud picture or a quiet picture. I see myself as a third wheel on a great date – I’m along for the ride, I just happen to be photographing it.

    lynseymattingly5

    #3 Shoot everything

    I am a massive over-shooter. I carry more memory to a quick portrait shoot than some photographers would pack for a day-long wedding. Changing a card mid-shoot is completely normal for me. This no doubt adds to the backend of my process, as I have so much more to sort through, but this means I can feel confident enough to guarantee my clients a minimum number of images. This also means, I very rarely have a client ask: “Did you get it?”.

    I shoot looking through the viewfinder, and not. I line up the shot and then peek my head out so my subjects aren’t just staring at a black box. I make funny faces. I have a fake sneeze that can get even the most serious of baby giggling and that requires several sneezes, shots, and me not having a camera affixed to my face. I shoot an average ratio of one to 30. Meaning for every 30 images I shoot, one of them will get edited and delivered to the clients.

    This would be terrible if I shot film. To be honest sometimes it’s a little overwhelming the first time I upload all of the images from a shoot. Often it’s even a lesson in self-loathing, wondering how on earth I will ever get through them, and why do I do this to myself every – single – time. In the end, it always works out. Plus, I always have the images I was hoping I caught.

    lynseymattingly9

    #4 Be a giant cheerleader during a shoot

    I am a giant cheerleader during a shoot, to the point that it’s a bit eye-roll-inducing. If it’s dark and gloomy out, I show-up saying this is what we call perfect, even, light! If it’s bright and sunny, and miserably hot? What a perfect day for photos!

    Every single thing my clients do during a photo session is perfect and if it’s not, I tell them I’m going to fix it. I want my clients on the other side of that lens to feel beautiful, and like they are doing a perfect job. Having them feel awkward, or be in poses or positions that feel unflattering, will make for bad pictures. Being told that they are doing a great job and that the pictures are coming out perfectly, gives clients the confidence to be themselves. I’m their friend during a shoot – kids and adults alike. And if I’m not behaving in a way that people would want to hang-out with me when I am not taking photos, why would they want to hang-out with me when I am?

    lynseymattingly7

    #5 Know you are just a piece of the process

    I don’t want to get all cheesy on you or anything, but I don’t feel like any picture I have taken of someone is mine. The photo belongs to the person in it, and whomever they chose to share it with. I don’t do any printing. When someone pays for a photography session with me, they get the high resolution images as jpg files, and a release to print and use them as they would like. I honestly feel like this creates a comfort level that I didn’t see when I used to offer prints only. They know they are going to get the best of what I shoot and they aren’t going to have to pick a favorite for an expensive enlargement. They know there isn’t going to be a hard sale in a few weeks where we look at everything together. I don’t put watermarks on my images ever and I encourage them to share their pictures on social media. In fact, I often share their pictures on social media.

    lynseymattingly2

    Here’s why: if they didn’t hire me, show-up, look great, have fun, etc., I wouldn’t have the pictures to show in the first place. I’m only a piece of any picture I’ve ever taken. You may argue, what if someone steals your images? To do what? Claim them as their own? I have never run into a situation where that would truly hurt me. If there is a wild rampage of stealing other photographer’s images out there and mine are being stolen, I would honestly be a little flattered. That means they’re good! I’ve already been paid for my work. Though I would never use an image where my client hasn’t signed a release allowing my use, I don’t see how getting my images out there is anything but free advertising. I want my clients to love their photos so much they print them all in large sizes to hang up for their friends to see. I want them to talk about how fun the shoot was, how happy they are to get all of the images, and how they will hire me again and again. Those people know who took the pictures, and that’s all that really matters.

    How do you help clients feel comfortable during a photo shoot? Share your comments and suggestions with us below.

    googletag.cmd.push(function() {
    mobile_slots.push( googletag.defineSlot( “/1005424/_dPSv4_mob-all-article-bottom_(300×250)”, [300, 250], “pb-ad-78158” ).addService( googletag.pubads() ) );
    } );

    The post 5 Tips to Help You Take More Natural Looking Portraits by Lynsey Mattingly appeared first on Digital Photography School.


    Digital Photography School

  • 5 Tips for Planning a Winter Photography Excursion

    If you have seen the recent photos of the record snowfall in Buffalo, NY, you know that for much of the world winter is here and it’s coming fast, whether you like it or not.

    While your feet might be cold for the next four months, a reason to get excited is the photographic opportunities that will come from it. I am writing this to convince you to prepare now for photographing that next snowstorm because it will creep up on you, and you want to take full advantage of it.

    Tips for planning a winter photography excursion

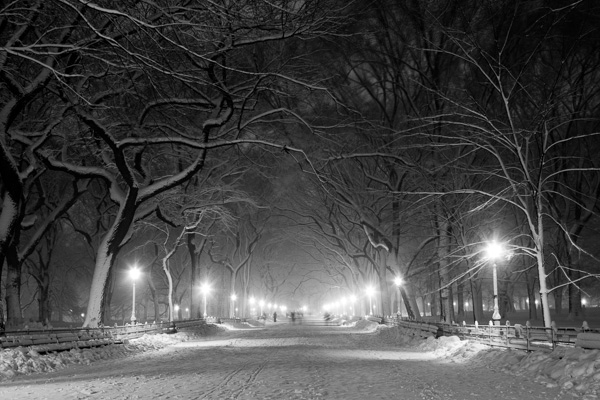
    Poets' Walk, Central Park

    Poets’ Walk, Central Park, NYC.

    1. Plan to go out in the middle of the storm

    A lot of photographers choose go out the next morning after the storm has hit, when the weather is clear and the snow is bright and crisp. You should do this as there are some fantastic photographic opportunities, however, in my opinion the best opportunities occur in the middle of the storm, when the weather is fierce and the skies are gray.

    If you are going to shoot in the middle of the storm, be careful. Make sure to be safe and that the storm will not have a chance to be severe enough to get you in trouble. Make sure you have a working and fully powered cellphone, the correct clothing, and any supplies that you might need should you get stuck for awhile. It will only be more fun with friends along but always make sure that someone who is not along on your excursion knows exactly where you are going.

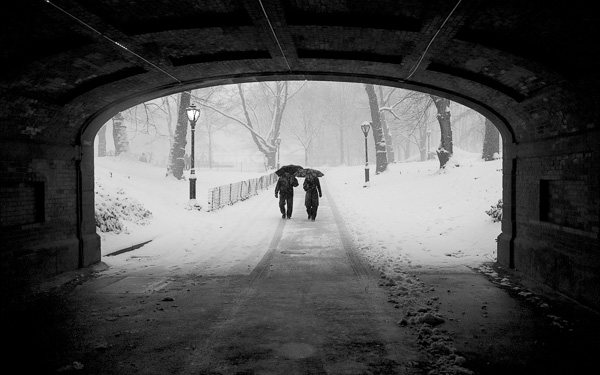
    Couple in Snowstorm, Central Park

    Couple in Snowstorm, Central Park, NYC.

    2. Scout your route

    Create your route ahead of time. You can always explore and veer off, but it will help to have a plan of action. The key to photographing snowstorms is that you are not going out to just photograph the snow, you are going out to photograph interesting places in the snow.

    Create a route with scenes that you think will look good in the snow. This could be a house, a barn, a lamppost, a main street, a park, or a scenic landscape. In addition, creating this route ahead of time will allow you to share it with someone beforehand should you get stranded.

    3. Protect your camera

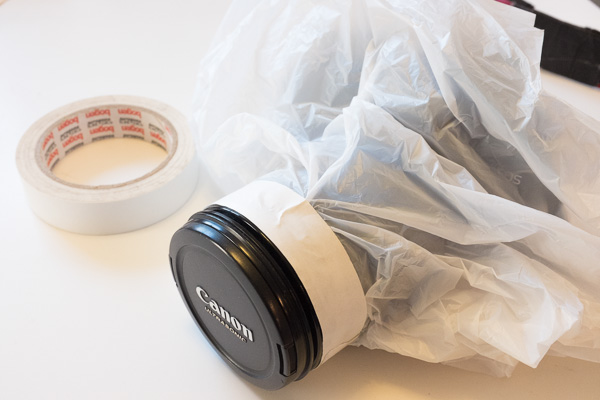
    The best camera weather protector, a small plastic bag and some tape.

    The best camera weather protection – a small plastic bag and some tape.

    Digital cameras are tough, but you still want to treat them carefully. In extremely cold and severe weather conditions you might want to take further precautions, but for most winter situations there are only a few things that you will need to do.

    Pick a lens for the day and keep it on your camera. Some people might disagree with this, but in this situation, I personally do not want to risk getting moisture inside the camera, so I will not change the lens. If anything, I will take a second camera with another lens on it, but mostly I will take either my 24-105mm or 70-200mm lens and only use one of them.

    I have tried so many rain protection devices for my Canon SLR and I have given up on every single one of them. They have all been too bulky and cumbersome to use with the camera freely in harsh weather. I have yet to find one that works better than a simple plastic bag with a hole in it, and tape to attach it to the lens or lens hood. I use the typical pharmacy plastic bags. Bring multiple bags and the roll of tape because they will have to be replaced a couple times during the day. I use this setup for shooting in the rain as well.

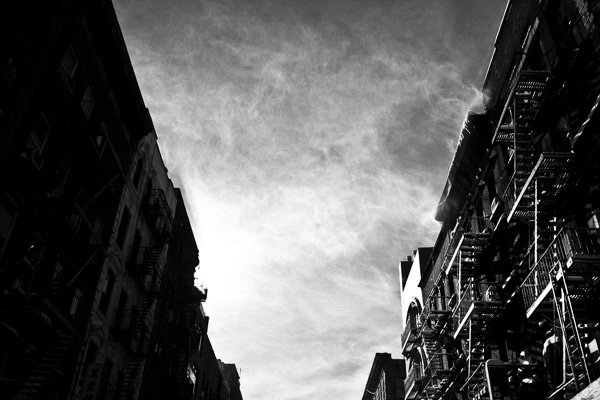
    Tenement Rooftops, Lower East Side.

    Tenement Rooftops, Lower East Side, NYC. You do not want that getting into your camera while you change lenses.

    Bring multiple hand towels and microfiber cloths to dry off the camera, and to keep the front of the lens clear from fog. A lens hood can add further protection. If the snow is light, then I will keep the camera uncovered and will often use a small umbrella, while drying off the camera frequently. When the snow gets stronger then I will use the plastic bag and sometimes I will use it in combination with the umbrella. In between shots I keep the camera covered and I always keep the front of the lens pointed down until I actually take the shot, to keep it clear of snow.

    You will also want to bring along extra batteries, since they do not work as well when they are cold.

    Finally, be careful about suddenly changing the temperatures on your camera. This is what can really hurt your camera. You do not want to go from shooting in the middle of a snowstorm to putting it by a warm fire right away. Let the camera warm up slowly in your car, garage, or in a cooler area of your house.

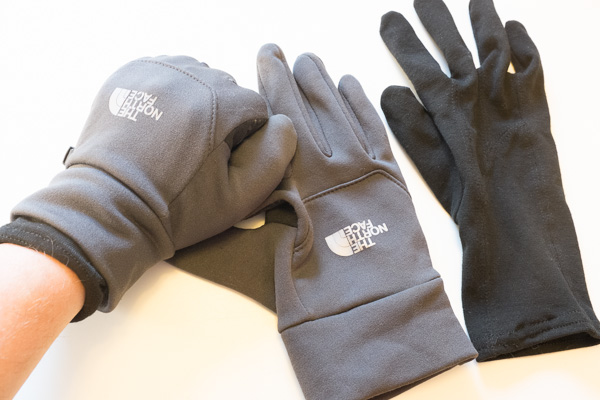
    Photography gloves.

    North Face touch screen gloves with inner linings. Still not as warm as heavy duty gloves, so not ideal for Arctic exploration, but they are much easier to work with when handling a camera.

    4. Prepare your clothing and equipment ahead of time

    Sense a theme here? Set up everything ahead of time so that when the storm hits all you have to do is get dressed and walk out the door. It is so easy to procrastinate and ultimately decide to stay in with some hot coffee. Planning and packing everything right before the shoot just adds another layer to stop you from doing it. I know this from experience. If everything is set, then the only thing that is standing between you and the outdoors is you.

    You might try to tell yourself that there will be another storm but that is never guaranteed. If the weather is perfect, then you need to take advantage of the opportunity while it is there. It could be a once in a lifetime experience.

    Use two layers of thinner gloves. Gloves are a huge problem with photography as the warmest ones are too bulky to adjust the fine controls on the camera, and the thin ones are not warm enough. I use a thin inner layer glove combined with a medium strength pair of North Face gloves. This is still not as warm as a heavy duty pair, but the mobility is a big advantage.

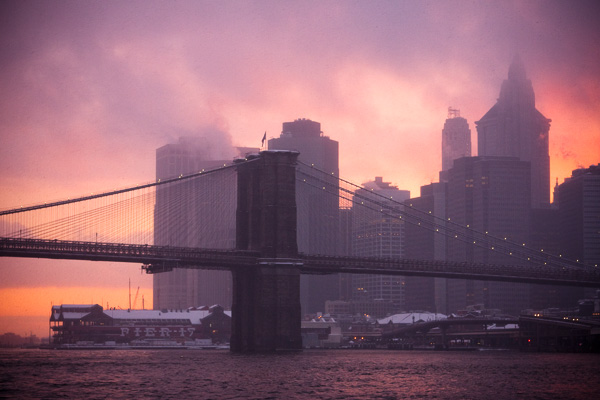
    Brooklyn Bridge in Snowstorm, at Sunset

    Brooklyn Bridge in Snowstorm, at Sunset, NYC.

    5. Plan a sunset into dusk route

    The most uncomfortable times to shoot often yield the best results. You may have heard to shoot during the golden hour, or at night, or during a snowstorm, but the real magic happens when all of these come together in one. Plan out exactly where you want to be during the golden hour and after the sun sets. If it is in the middle of a hard storm then the sunset might not shine through the fog, but everything will still get magical as it transitions to night.

    Make sure to bring a tripod for dusk. Also a strong flashlight can help for focusing, because it can be tough for the camera to lock onto dark scenes. You can also use manual focusing to select the focus distance that you want.

    Cold Spring, New York.

    Cold Spring, New York. The warm sunset light contrasted with the blue shade adds an interesting aspect of contrasting color.

    Bonus: Technical tips

    If you are not shooting in full manual, all that white snow is going to trick the camera’s light meter to make the images darker than they need to be. It is common for people to come back from a day shooting in the snow to wonder why the photos all look so gray. Raise your exposure compensation (+/-) to combat this and make the snow whiter, but make sure to not blow out the details completely.

    The opposite side of this tip is that a gray snowy scene can be fantastic, so you might not want the snow be very white. You have creative control here and can use the +/- on your camera or manual mode to achieve the exact look that you want. It is better to do this in the camera rather than in post-production.

    Also, pay attention to make sure that your focus point is correct and if you are shooting digitally then take a few shots of the same scene. Snowy and harsh conditions can make focusing tough and can make the problem of back-focus even easier to occur. Make sure the focus point is locked onto the area that you want to be the sharpest and not the area behind it.

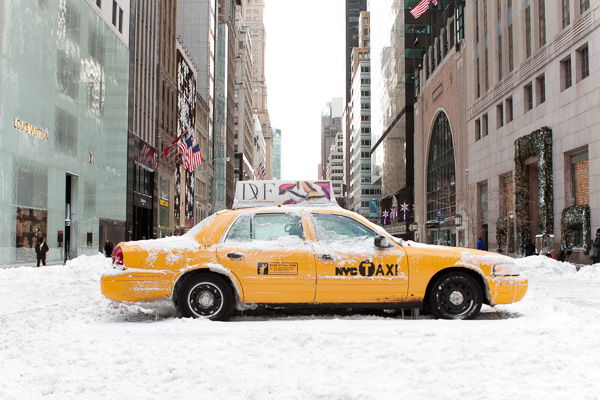
    Broken Taxi, 5th Avenue.

    Stuck Taxi, 5th Avenue, NYC.

    Be adventurous. This is not just about getting that ideal photo, it is about enjoying the process as well. The camera is a wonderful tool to force you out the door to explore gorgeous locations when you might otherwise decide to stay inside in the warmth. A camera is a gift in many ways.

    googletag.cmd.push(function() {
    mobile_slots.push( googletag.defineSlot( “/1005424/_dPSv4_mob-all-article-bottom_(300×250)”, [300, 250], “pb-ad-78158” ).addService( googletag.pubads() ) );
    } );

    The post 5 Tips for Planning a Winter Photography Excursion by James Maher appeared first on Digital Photography School.


    Digital Photography School

  • Motion Exposure: Light Art Captures the Movement of Kayaks

    [ By Steph in Art & Photography & Video. ]

    motion exposure 1

    Strange undulating patterns of colored lights seem to slink across the surface of water like living entities in this captivating series of images by Ontario-based photographer Stephen Orlando. In a variation on the art of light painting, Orlando attaches LED lights to the oars of kayaks and canoes, literally spotlighting their movements as they cut through rivers and lakes.

    motion exposure 2

    motion exposure 3

    Long exposures capture nothing but the lights as the subjects move against the backdrops, erasing the kayaks and the humans piloting them. The result is surreal, as if bioluminescent alien creatures were gliding on the surface of the water.

    motion exposure 4

    motion exposure 7

    “I’m fascinated with capturing motion through time and space into a single photograph,” says Orlando. “Using LED lights with custom color patterns and long exposure photography, I’m able to tell the story of movement.”

    motion exposure 5

    motion exposure 6

    “This technique reveals beautiful light trails created by paths of familiar objects. These light trails have not been artificially created with Photoshop and represent the actual paths of the objects.”

    spark faces

    cyclones

    Another project takes light painting to a more urban setting, with painter Diliz capturing faces in sparks. Cyclones of light also appear to break through the surface of the earth and bodies of water in stunning works by Martin Kimbell.

    Share on Facebook


    [ By Steph in Art & Photography & Video. ]

    [ WebUrbanist | Archives | Galleries | Privacy | TOS ]


    WebUrbanist

  • 4. Türchen: Mantona

    4. Türchen

    Und wieder öffnen wir unseren Adventskalender. Dieses Mal mit der Firma Mantona, die Kamerataschen, Rucksäcke und Stative im Angebot hat. Günstige und gleichzeitig schöne Kamerataschen zu finden ist oft schwer, deshalb haben wir uns sehr gefreut, als Mantona uns die Cool Bag Kameratasche für den Kalender angeboten hat.

    Denn sie ist nicht nur praktisch und sicher für die Kamera, sondern auch sehr schick. Es gibt sie in den Farbvarianten rot-schwarz und weiß-schwarz, die beide in unserem heutigen Türchen liegen.

    Zwei Kamerataschen in zwei Farbvarianten

    Im gepolsterten Inneren befinden sich drei Trennkissen, die man ganz den eigenen Bedürfnissen anpassen kann. So hat die DSLR oder eine Systemkamera inklusive Objektiv sowie einem Wechselobjektiv gut Platz. An der Vorderseite der Fototasche bietet ein weiteres Fach Stauraum für Kamerazubehör wie Akkus, Filter, Speicherkarten, Handy, Geld und so weiter.

    Der Tragegurt hat ein abnehmbares Polster, wodurch sich die Tasche bequem über die Schulter tragen lässt. Das Material ist wasserabweisend. Ein weiteres Plus bekommt sie von uns dafür, dass sie auf den ersten Blick nicht wie eine typische Kameratasche aussieht.

    Offene Kameratasche mit Zubehör

    Für alle, die heute kein Glück bei unserer Aktion haben: Die Cool Bag Kameratasche kostet 29,99 € und ist damit ein toller Posten für den persönlichen Weihnachts-Wunschzettel. Welche Farbe ist Euer Favourit?

    Um eine der beiden Taschen zu gewinnen, schreibe einen Kommentar mit Deiner Wunschfarbe unter bürgerlichem Namen und gültiger E-Mail-Adresse bis heute um 24 Uhr. Danach verlosen wir sie per Zufallsgenerator unter allen Kommentatoren. Die genauen Gewinnspielregeln findest Du hier. Viel Glück!

    kwerfeldein – Fotografie Magazin | Fotocommunity