Which high-end full-frame camera should I buy? This roundup contains the majority of current full-frame camera offerings available. Full-frame cameras have image sensors as large as a frame of 35mm film, and for good reason: larger sensors offer the potential for better image quality, low light performance, and dynamic range. If you want a drastic upgrade to the image quality of your phone, or portraits with superior subject to background separation, it’s hard to beat what full-frame offers.
Month: December 2014
-
Urban Transformer: Bus Unfolds into Mobile Fresh Food Market
[ By WebUrbanist in Technology & Vehicles & Mods. ]

Bringing healthy and organic fruits and vegetables into low-income areas of Toronto lacking grocery stores, this converted bus is much more than a normal food truck – it looks like an ordinary vehicle until it stops and deploys its colorfully-stocked shelves (images by Laura Berman).

As in many cities, there are ‘food deserts’ in Toronto in which it is hard to find fresh seasonal produce. Using a vehicle donated by the Toronto Transit Commission, LGA Architectural Planners helped convert this vehicle to address this issue.

“Even in a city as dynamic as Toronto, there remain neighbourhoods where residents are unable to access the foods essential to a healthy diet. This happens for a variety of reasons, including low-income, lack of access to public transit, and long distances to groceries and markets. Such conditions make it extremely difficult for individuals and families without access to a vehicle to find and purchase healthy foods. Senior citizens who might be less mobile are hit especially hard by this type of isolation.”

Lettuce, berries, okra, yucca, broccoli, apples and more fill the fold-out shelves extending out from the side of the Mobile Good Food Market. Inside, bins of additional veggies and fruits can be accessed by walking or wheelchair, a handy feature for cold and wet weather.

The project was commissioned by FoodShare Toronto in partnership with the City of Toronto and United Way Toronto in a joint effort to help supplement unhealthy local options in neighborhoods starved for good and fresh foods.

“The design also offered the opportunity to shop from the inside in inclement weather,” notes Dean Goodman of LGA, pointing out that as a former Wheel-Trans bus, ramps for ease of entry and exit were already in place. “Good food is beautiful when displayed well, so when we decided we wanted this to be a feature we worked out the mechanism so one person could fold out the shelves, restock as necessary and display the food so it was attractive.””
Want More? Click for Great Related Content on WebUrbanist:

Ghost Food: A Conceptual Taste of the Future of Eating
Drive around any mid-size to large city and you’re destined to find a number of food trucks. In recent years they’ve become almost as ubiquitous as …
Click Here to Read More »»

To Go, Please: 12 Coolest Food Carts and Mobile Eateries
Lip-smackin’ taste sensations are conveniently delivered right to your tongue thanks to the onset of wildly creative and cool mobile food carts.
Click Here to Read More »»

Rainbow Food Photography is Not Entirely Appetizing
These rainbow-colored meals may be pretty to look at, but would you ever eat one? This photography series puts a whole new spin on the way we look at food.
Click Here to Read More »»


[ By WebUrbanist in Technology & Vehicles & Mods. ]
[ WebUrbanist | Archives | Galleries | Privacy | TOS ]
-
DSLR versus Mirrorless: Guide to help you decide which is right for you?
Recently there has been a great deal of buzz in the photographic community regarding a few terms that might sound a little odd or strange, like “mirrorless” or “micro four thirds.” These refer to different types of cameras that might not be as popular as standard DSLR models right now, but many think are the future of photography. However, just understanding what everything means can be an exercise in frustration, especially when all you likely want to do is buy a camera you can enjoy using.
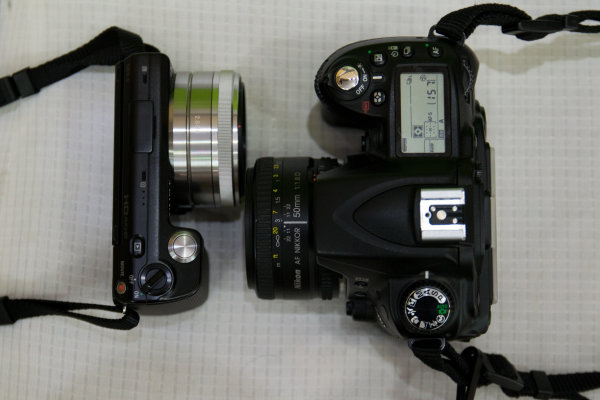
By Nadir Hashmi
To that end, I’m going to try and dispel a bit of the confusion regarding mirrorless cameras and hopefully give you some information so as to make an informed choice the next time you are in the market for a new piece of photography gear. We’ll explore some of the history of how cameras are constructed, as well as discuss some of the benefits and drawbacks to this new technology, but I’m going to stop short of making the subjective judgement call about whether mirrorless cameras are better than DSLRs. For me it’s not about which camera is better than the other, it’s about finding one that works with your style and lets you shoot the photographs you want. You can debate all this in the comment section if you like, but what I’m here to do is simply present information and try to be as unbiased as possible.
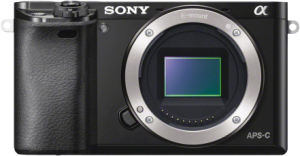
The Sony a6000 mirrorless camera has all the features of most standard DSLRs, but is much smaller and weighs far less. (Image courtesy Sony)
What is a mirrorless camera?
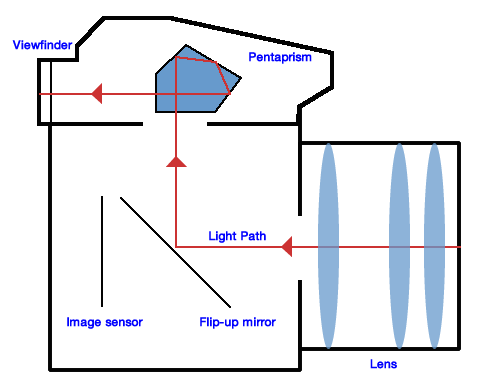
To understand the word mirrorless it helps to know a bit about the way most DSLR cameras are built. Almost all Canon, Nikon, Sony, and Pentax interchangeable-lens cameras share a similar industrial design: light enters through the lens and gets bounced off a mirror, through a special prism, to end up at the viewfinder. When you click the shutter button, the mirror flips up, which allows light to hit the actual image sensor on the camera, and voila your photograph is taken. This process might seem like a high-tech solution, but it’s actually a bit of an anachronism. Long before digital cameras existed, most of their film-based counterparts employed this same method to get light to the viewfinder, because it was a useful way to compose your photo before clicking the shutter. But thanks to advances in modern technology, this flip-up mirror method is no longer necessary, and a whole new breed of cameras is beginning to make inroads into modern digital photography. These new models have no flip-up mirror, and thus the term “mirrorless” was born.
There are many different types of mirrorless cameras on the market: some have interchangeable lenses, others offer a single built-in lens, and some with their own types of image sensors and other characteristics that are suited to more niche markets. But the one thing they all have in common is the absence of a flip-up mirror.
Believe it or not, you probably already own a mirrorless camera. All smartphone cameras are mirrorless, as are most point-and-shoot models. Instead of a tiny little viewfinder that you hold up to your eye, you can see a preview of your image right on the phone or on the back of the camera itself. And if you like shooting your DSLR in “Live View” mode, where you look at the rear LCD screen to compose your shots instead of the viewfinder, you are essentially using it as a mirrorless camera already. (The click you hear when you enter Live View is the mirror flipping up. It stays like that until you exit Live View.) In fact, many of the higher-end mirrorless cameras have even gone so far as to replicate the traditional eyepiece viewfinder, but instead of reflecting incoming light from a mirror, it simply shows a very tiny version of what would normally be displayed on the back of the camera.
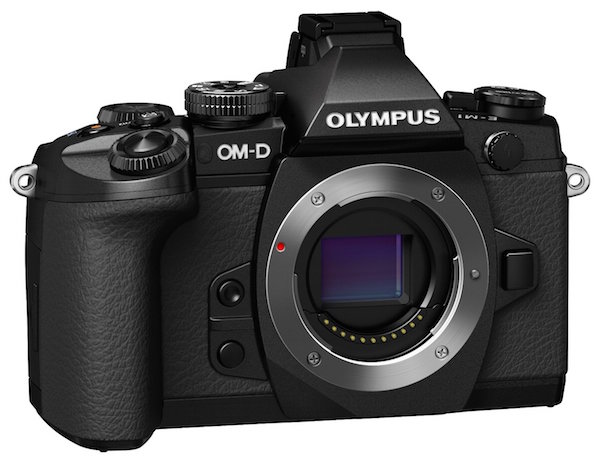
The Olympus OM-D EM-1 is a mirrorless camera that also includes a traditional-style viewfinder. (Image courtesy of Olympus)
Sensor size
Another component of mirrorless cameras that is a bit more technical in nature, but just as important to understand, is that of sensor size. In digital cameras the image sensor is essentially a piece of digital film that captures light, in much the same way actual film does. Full-frame DSLR cameras have image sensors that are the same size as a piece of 35mm film, but most consumer-grade DSLRs, and virtually all mirrorless models, are crop-sensor cameras. This means that the image sensor is smaller, which has two notable implications:
- They are not as sensitive to incoming light as full-frame cameras.
- They affect the way lenses behave when it comes to focal lengths and depth of field.
The most common format of mirrorless cameras are in a category developed by Olympus and Panasonic called Micro Four Thirds, which refers to the size and shape of the image sensor itself as well as the types of lenses that can be used on these models. Other mirrorless cameras use an APS-C sensor, which is the same size sensor used in common DSLRs such as the Canon Rebel T5i and Nikon D3200 (however, even Canon and Nikon use slightly different image sensor sizes), but there are some models such as the Sony A7R that use full-frame sensors as well.
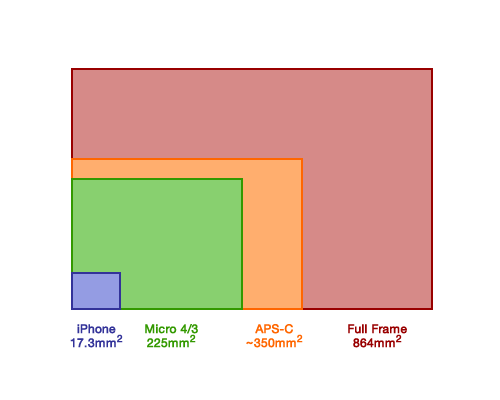
In terms of surface area, full frame image sensors reign supreme. But cameras with smaller sensors are still quite capable, and there is more to a camera than the size of its sensor.
While it’s doubtful we will see crop-sensor cameras (whether micro four thirds or APS-C) reach the same high ISO sensitivities as full-frame models, many of them today are perfectly capable of shooting at values such as 3200 or 6400 without too much degradation in image quality.
As for the lens behavior, shooting on a crop sensor camera means that your focal lengths will not look the same as on a full-frame camera. For example, on a micro four thirds camera a 30mm lens behaves similar to a 60mm full-frame lens. A 100mm lens acts like a 200mm, and so on. For most people this is fine, and they learn to adapt to the differences in lens behaviour over time. For some photographers this a significant detriment that, combined with how depth of field behaves a little different on crop versus full frame cameras, ends up being a deal breaker.
As I mentioned earlier, it’s not about finding out which type of camera is better – that question is unanswerable. Instead, it’s important to simply know the various details of micro four thirds and other mirrorless cameras, in order for you to make an informed decision if you are thinking about purchasing new gear.
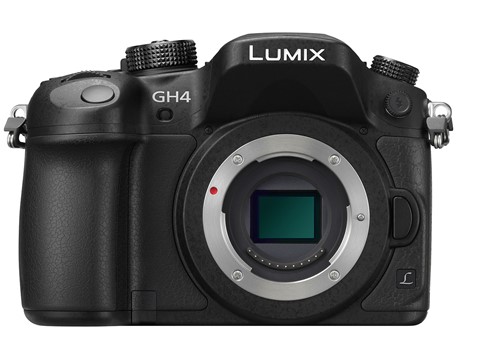
Even though the Panasonic Lumix GH4 is uses a smaller micro-four-thirds sensor, it produces photos on par with most APS-C sensors and even shoots 4K video. (Photo courtesy of Panasonic)
However, one benefit of crop sensor cameras that is important to note is their price; they are significantly cheaper than their full-frame counterparts. The cheapest full-frame camera costs around $ 1500 and they can easily cost many times that amount. On the other hand, some micro four thirds models start at a couple hundred dollars which makes them much more affordable for most people. It’s important to know that mirrorless cameras are not just for beginners, or those who like to shoot in Auto. Many photographers are buying these cameras, and some professionals have even switched entirely from heavy, expensive, DSLR models to their much lighter and more portable mirrorless counterparts.
As you can see, thanks to advances in modern technology the age-old flip-up mirror design in most cameras is not really needed anymore, but we are still a little way off from mirrorless replacing traditional DSLR designs entirely.
Benefits of mirrorless cameras
These new types of cameras offer some significant benefits over traditional DSLRs, but come with some important limitations as well. Remember, we’re not here to discuss which one is better – that’s something that only you can answer, given your unique needs as a photographer. It is important to know that mirrorless cameras do have some notable selling points, but also some drawbacks as well.
Size
By K?rlis Dambr?ns
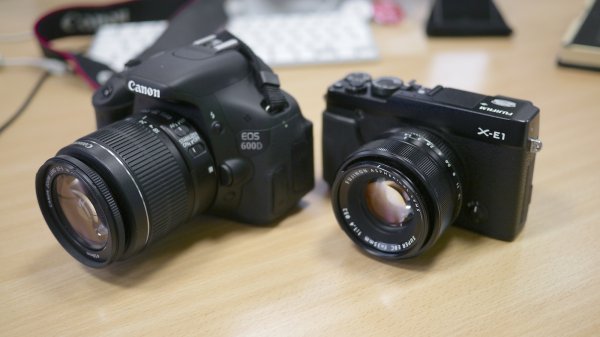
Perhaps the most significant difference between mirrorless and traditional DSLRs is their size: because the flip-up mirror mechanism, combined with the light-reflecting prism, are no longer needed these cameras are typically much smaller in size and weigh less too. This can be important if you are someone who likes to take your camera with you wherever you go, especially if the weight of your DSLR starts to drag you down after a day of shooting. It also means the lenses are smaller too, so you can fit several in your camera bag whereas before you might have only had room for one or two.
More accurate image preview in the viewfinder
Another benefit that mirrorless cameras enjoy over DSLRs, is a viewfinder that displays a more accurate representation of what your final photograph will look like. If you look through the viewfinder of your DSLR and adjust settings like ISO, aperture, and shutter speed, you might notice that the image in the viewfinder doesn’t change. It’s not until you actually take a photograph that you see what effect your alterations had on the photograph. At that point you can look at the picture on the rear screen and judge whether you need to change things for subsequent pictures. Because mirrorless cameras use electronic viewfinders, you can see in realtime the effect that things like aperture and ISO adjustments will have on your pictures before you press the shutter. This can have a dramatic effect on how you shoot, as it removes some of the guesswork with your camera settings.
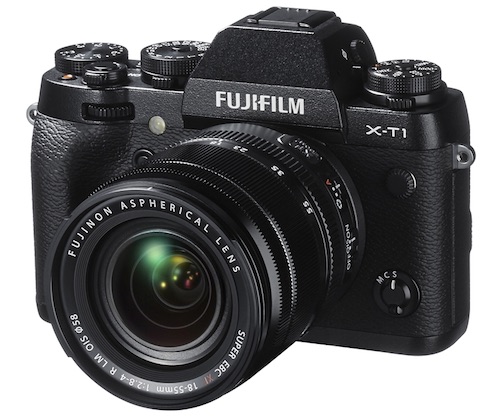
The mirrorless Fuji XT1 uses an APS-C size sensor but is much smaller than traditional DSLRs, making it a compelling option for photographers who value portability along with excellent image quality. (Photo courtesy of Fujifilm)
Focus peaking and sound
There are other benefits to mirrorless cameras as well such as focus peaking (the ability to see, when focusing manually, the exact pixels on your image that are in focus), quieter operation due to the lack of a flip-up mirror, and fewer overall moving parts which means a longer theoretical lifespan. But in order to get an accurate view of the situation, let’s take a look at some of the disadvantages as well.
Drawbacks of mirroless cameras
Things are looking quite promising over in Mirrorless Land, but it’s not all sunshine and roses just yet. There are some notable drawbacks to this technology, and if you don’t look at all the details you might end up with a camera that is ill-suited to your needs as a photographer.
Battery life
Currently one of the most significant limitations is that of battery life: they just don’t last as long. The only time a traditional DSLR draws power, when not in Live View mode, is when it is actively metering the scene or writing picture data to the memory card. No power is used at all if you hold the camera up and look through the viewfinder, and because of this it is fairly common to get up to a thousand pictures or more on a single battery charge. Power usage is a bit different on mirrorless cameras for two reasons. First, batteries are smaller because the cameras themselves are smaller, and second they essentially operate in live view mode 100% of the time. Mirrorless cameras generally get a couple hundred shots on a single battery charge, which is nothing to sneeze at, but nonetheless a significant difference between them and their old-school brethren.
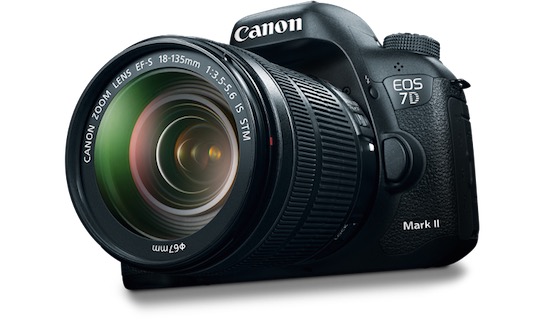
DSLRs might be based on old technology, but don’t count them out just yet. They are preferred by many photographers, and still have some advantages over mirrorless cameras. (Photo courtesy of Canon)
Focusing system
Another limitation that is worth mentioning is the focusing system. Most mirrorless cameras use a technology called contrast detection, which is simply not as fast as the traditional phase-detection method used in DSLRs. While the former gives you access to a wider area of the frame in which to focus, it simply cannot match the speed of the latter which limits the appeal of mirrorless camera for things like sports and fast-moving wildlife photography. Some manufacturers are starting to utilize phase detection in their mirrorless models, as well as hybrid systems that offer the best of both worlds, but for now it’s safe to say that standard DSLRs are generally better suited for sports, wildlife, and other types of action photography.
Other
Of course there are other limitations such as fewer lens options, LCD screen refresh rates that can’t always keep up with DSLR viewfinders, and more, but as technology advances much of this is being addressed.
Which is best for you?
Will mirrorless cameras ever reach full parity with DSLRs? Some think so, but others are not fully convinced. The important thing to remember is it’s not about what other people think; it’s about what matters to you. If you find a camera you like, and it serves your purposes as a photographer, then it really doesn’t matter whether it’s a DSLR, micro four thirds, full frame, medium format, or plain old 35mm film camera. If it can take the pictures you want to take, then it’s probably the right camera for you.
googletag.cmd.push(function() {
mobile_slots.push( googletag.defineSlot( “/1005424/_dPSv4_mob-all-article-bottom_(300×250)”, [300, 250], “pb-ad-78158” ).addService( googletag.pubads() ) );
} );The post DSLR versus Mirrorless: Guide to help you decide which is right for you? by Simon Ringsmuth appeared first on Digital Photography School.
-
All-in-one: Ona Capri bag review
Ona is known for high-end camera bags and accessories that go big on style – and price. The Capri leather tote is no exception – it’s an attractive bag with padded storage for photo gear that could easily double as a high-end purse. Can it replace a camera bag and a purse, and is it worth the price? Read our review
-
Weird and wonderful: International science photography competition open for entries
Organizers of a worldwide competition for scientific photography are calling for entries for the International Images for Science competition. Photographers are encouraged to submit visually exciting and revealing pictures of objects and concepts relating to all areas of science. The competition, which is run by the Royal Photographic Society (RPS), is free to enter, and this year will be accepting work from members and non-members alike for the first time. Read more
-
Digital Photo Editing Workflow – Better Images From Capture to Output
Better images from capture to output
A comprehensive look at the essential steps and principles in an effective photo editing workflow with highlights of key tools.
Have you ever tried to find a digital photo you know you worked on, but couldn’t remember where you saved it, or even what it’s called? Do you find yourself re-editing photos you’re sure you finished before? Or are you stuck, staring at an image you know could be made better, but not sure which adjustments to make, or even where to start?
We’ve all been there: hundreds of images to sort through. Files scattered all around your hard drives; photos missing, others duplicated in unnecessary versions, who-knows-what lurking in mysterious places with confusing names. And prints coming back from the lab looking, well, crappy. All the while, knowing you have photographic gems just waiting to be discovered and brought to life.
If you’re feeling overwhelmed by digital photography, you’re not alone. Capturing digital images has become so easy in recent years that it’s easy to get stressed, if only because of the sheer volume of pictures you’re making.
For every serious photographer, capturing an image is only the beginning of a complex process with numerous pitfalls. So how can you streamline this tangled mess? The key to keeping your digital photography fun and productive is to adopt, and adapt, an effective, consistent workflow.
Why workflow matters
The concept is simple – your photography workflow is the sequence of steps and actions you take to edit your photos, work them up to a result you consider finished, and share them with the world. Editing photos can be like baking a cake or assembling flat pack furniture. You start with raw ingredients, or loose parts, and use an ordered sequence of steps to put the thing together. In a good photography workflow, the end result is a perfectly crafted image, securely stored for future use, all with the least possible effort.
Efficiency is important. Without a good workflow, at minimum you’re wasting time. Worse, you run the very real risk of losing your most precious photos. Forever. A couple of years ago I knew a wedding photographer, then aspiring to become professional, who lost an entire wedding shoot because of relatively simple errors in her workflow. (In short, the mistakes derived from a convoluted importing method and totally inadequate backups.)
Maybe you’re only taking pictures for fun? If you’re planning to continue with photography, you still need to use an effective workflow. If you don’t, your photo archive will become a beast, very difficult to tame. And your images won’t look as good as they could. No fun.
When you’re starting out in digital photography, you need to develop good habits early. Even if you’ve been shooting for years, it’s never too late to improve your process.
Now it’s personal
You can craft your digital photography workflow to suit your own situation and preferences. But every effective workflow shares common tasks, proven techniques and best practices. These established methods have evolved with real-world use across all genres of photography. They apply equally to beginning enthusiasts and seasoned pros.
I first began editing photos in the early 1990s, working in a magazine publishing environment. Under tight deadlines and managing many thousands of digital assets, a good workflow was crucial. As a working photographer, I’ve been refining my own workflow for over a decade and I still make little tweaks now and then.
Continually finding ways to tighten the screws helps eliminate the risk of disaster, while also making the practice of photography more fun and rewarding. You can master your own photography workflow, too. You first need to understand the most common problems and tasks you’re likely to encounter. Then learn the best tools and techniques for dealing with them. A good photo editing workflow:
- Uses the fewest steps possible.
- Is non-destructive and allows you to change your mind or redo steps without losing image quality< ./li>
- Protects your images now and for the future.
- Provides the best looking photos.
So let’s review the essential parts of a practical photo editing workflow.
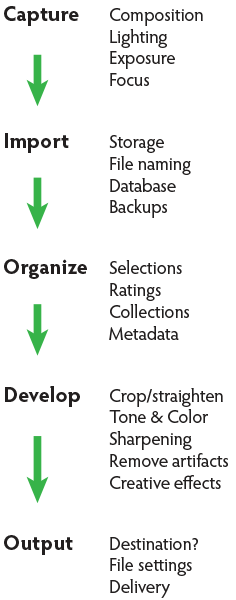
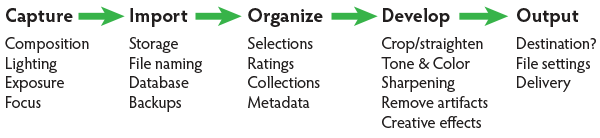
Stage 1. Capture
Whatever the end result you’re envisioning, great digital photographs begin with good data. You should always strive to make the best capture you can, and in most cases, try to finish the photo as much as possible in-camera. Work carefully to make the most accurate exposure with the ideal level of sharpness for the given scene or subject. Regardless of your capture format, you should always be working to master your camera techniques.
Stage 2. Import
Copying files from removable media onto more permanent storage is also variously called downloading, ingesting, transferring, etc., but the result is the same. Right after a shoot, copy all your images from the memory card into a new folder on at least one hard drive, then back up everything right away.
Backup. Backup. Back Up!
Every computer user knows the importance of backing up data. But too many people don’t do it, or don’t do it often enough. This isn’t a single step in the workflow; it’s something you should do frequently throughout the process. You should have your image files saved on at least three separate media sources:
- Your master working drive
- A current backup of the master drive
- A complete historical archive, preferably stored in a separate physical location from your master and working backups
(The topic of digital photo storage and backup is so important that we’ll revisit it repeatedly in the future!)
Stage 3. Organize
After your photos are copied onto your working storage media (and backed up!), sort through the pictures to separate your favorite images from the rest. The best way to do this is with ratings (e.g. stars) or other ranking methods (colors, flags, etc.).

Whichever system you prefer, keep all the photos from a single shoot together in one folder and use the ratings attributes to annotate your selections. During this stage you should also apply and enhance the metadata associated with your files. Keywords, copyright notices and contact information are just a few of the many types of textual information you can embed within a digital image.
Escaping folder hell
In the early days of digital media, it was common practice to move files from one folder to another during the editing workflow. For example, all the original images, often scans from film, would first be put into one folder. As individual photos were selected, processed and output, the files would be copied again (or moved) into other folders representing the stage of the workflow it was in. DON’T DO THIS! It creates a very unwieldy hierarchy of files and folders and makes good organization all but impossible.
Modern imaging software, and more specifically, metadata—allows you to more effectively organize files using virtual methods (such as Lightroom’s Collections and virtual copies) without the need to ever copy or move your original images on the hard drive. In an efficient workflow, there is no need to use separate folders for different types of files.
Stage 4. Develop
This is where you apply digital processing to make each image look as good as it can to fulfill your creative vision for the picture. Like Import, this stage has different names depending on who you’re talking to. Developing is the term most often used by Lightroom users. Enhancing, adjusting, post-processing, and simply editing are other common terms to describe this stage, which itself is comprised of several distinct steps.
The ideal order of operations for developing a photo depends on the characteristics of the original capture; some images will need very different enhancements than others. Still, it’s possible to define a typical sequence of steps as below.
TIP: Work global to local
Make the biggest changes first, then work your way to smaller details. In photo editing, this means first making global adjustments (those that apply to the entire image) before working on the local adjustments. And, earlier in the workflow, apply any changes relevant for large batches of images before moving on to fine tune individual photos.
Develop steps
- Crop and straighten. Since it changes the composition, cropping can be the most significant change you can make to a photograph. It’s best to do it early in the process, but you need to use a method that allows you to go back and refine the crop later if you change your mind.
- Correct distortion. Most camera lenses introduce various amounts of distortion to a picture; some more than others. Fix distortion as one of your first, regular steps.
- Adjust exposure and tones. The tonal range of an image refers to the various levels of brightness of each pixel, from pure white to solid black. Tone is independent from color. Simply setting the white and black points can have a huge impact on the overall appearance of an image, so you should normally do this before moving on to color. Tonal contrast should also be handled during this step; the variation between light and dark tones determines how much impact (or punch) a picture has. Naturally, some pictures will look best as low contrast.
- Adjust white balance and color. White balance plays the biggest role in the color of a photo. If the photo has a strong color cast — for example, an indoor photo captured using outdoor white balance settings — you should fix it before addressing tone. But for images with white balance that seems fairly accurate, set the tone before refining the white balance. After setting white balance, consider making other color adjustments, most notably saturation and vibrance, which affect how pure and vivid the colors appear. Alternatively, convert to black-and-white or apply special color effects during this step.
- Apply local adjustments. These are edits you make only to small areas of the picture. Examples are dodging and burning (lightening and darkening, respectively) and selective color adjustments. In general, you should try to make local adjustments after you’ve finished the global adjustments.
- Apply noise reduction. Noise appears in digital images as soft colored blobs or grainy speckles. Most images can be improved with varying amounts of noise reduction. Photos captured at high ISO, made in the dark, or ones that are significantly underexposed, will need more aggressive noise reduction. You’ll normally want to deal with noise reduction after you set tone and color, because those global adjustments will affect the appearance of noise. Zoom in for larger previews when adjusting noise reduction and sharpening.
- Apply sharpening. Sharpening is all about contrast. The appearance of sharpness in a digital image is based on the relative lightness or darkness of neighboring pixels along the edges of lines within the picture. More contrast along the edges equals more sharpness. As such, you shouldn’t try to refine the sharpening levels until you’ve already set the global tone range, because the overall contrast of the image will have a major effect on the appearance of sharpness. Do your sharpening a bit further into the workflow.
- Perform retouching. Many pictures contain elements that you want to remove altogether. In some cases, these are artifacts — undesirable results of digital processing or camera characteristics including noise, chromatic aberration, fringing and sensor dust spots. Other times, there’s something ugly in the frame, like a telephone pole sticking out of your mother-in-law’s head. Retouch your photos using Lightroom’s Spot Removal tool or Photoshop’s Clone Stamp and Healing Brush.Other processing can reduce or eliminate the need for retouching, so it can be a waste of time and effort to retouch photos earlier in the workflow. For example, you could spend twenty minutes removing dust spots around the edges of a photo and then decide you want to crop the picture tighter anyway.Do your retouching toward the end of the workflow.
- Apply special effects. All the previous developing steps will apply to most of your photographs. After you’ve corrected the technical issues and processed the photo to an acceptable baseline quality, consider applying further stylistic adjustments and special effects.

Stage 5. Output
After you edit photos to a level of perfection you’re happy with, think about sharing and reproducing them. In the digital realm, output generally refers to the many ways you can bring your images into the real world. To do this, from your finished master image, export derivative files, specifically for each intended purpose.
Sharing online is a great start. Most web sites have some important parameters you need to know for your images to look their best (and all web site specs are not the same). Take the time to research the best file settings for your file uploads.
High quality printed reproductions — photo books, notecards, calendars, fine art prints, etc. – also require you to follow specific parameters for exporting image files from your editing software.
TIP: About resizing photos
When you’re editing photos, you should always process your master images at their native resolution. In other words, whatever the pixel dimensions of the image as it came off your camera, do all your editing at that size. Any resizing should be done at the very end of the workflow and only on copies of the master file, each exported to the specifications for the output destination. Don’t resize your master files! (Lightroom keeps this simple – since there are no controls for resizing during the editing process, you can only do it only during an export.)
Conquer your photo editing workflow
When you don’t follow a good system, digital photography can become stressful. Losing pictures, redoing steps, and not getting the quality you’re hoping for are all side effects of an ineffective workflow. Who wants any of that?
Remember that everybody who’s mastered their personal photography workflow had to start somewhere. You’ve likely mastered some parts of the process already. Now, identify specific bottlenecks and key areas for improvement in your own photo workflow. Pick one aspect of the workflow that seems unfamiliar or challenging, and start there.
Crafting your ideal workflow doesn’t happen all at once, nor is it a purely linear process. With so many steps and potential traps, you’ll need to study and practice each of the different stages independently, then tie them together into a cohesive sequence.
TIP: The main reason Adobe Photoshop Lightroom is widely considered the best photo editing software is that it provides most of the capabilities you need to handle the complete photo workflow as describe above.
When you follow an optimized process for working with your pictures and develop a clear understanding of the principles behind your decisions, you’ll have more fun working on the things you enjoy, rather than struggling with tedious tasks.
Practicing good workflow techniques helps you make great photos – easier!
googletag.cmd.push(function() {
mobile_slots.push( googletag.defineSlot( “/1005424/_dPSv4_mob-all-article-bottom_(300×250)”, [300, 250], “pb-ad-78158” ).addService( googletag.pubads() ) );
} );The post Digital Photo Editing Workflow – Better Images From Capture to Output by Nat Coalson appeared first on Digital Photography School.
-
Luminous Endowment announces first round of grant winners
The Luminous Endowment, an charitable fund headed by Michael Reichmann, has announced its first round of grant recipients. Reichmann is the founder of Luminous Landscape, a website dedicated to fine art photography. His focus has shifted recently to the creation of the endowment, which awards merit-based grants to photographers seeking to start or complete projects, books or exhibitions. Read more
-
CamsFormer is a programmable smartphone trigger for DSLRs
The feature-rich CamsFormer, currently looking for funding through Kickstarter, is a device that plugs into your camera or flash and is controlled wirelessly from a smartphone or tablet. It can trigger up to two cameras and allows you to remotely view and change a range of shooting parameters on your camera. Read more
-
Phase One’s new photo contest rewards winner with IQ250 loan
Phase One has announced a new photo contest offering photographers a chance to win the use of a Phase One IQ250 medium format camera system for a month. The contest seeks submissions demonstrating the contest’s theme “What the world’s best __ is made of”, and will run through the rest of the month. Learn more
