Month: December 2014

  • Radiocative Chernobyl: New Aerial Drone Footage of ‘The Zone’

    [ By WebUrbanist in Abandoned Places & Architecture. ]

    gif rezided

    Satellite images and pictures from the ground tell a limited story of one of the world’s most dangerous abandoned places – this flyover footage fills in the gaps, covering the 20-mile nuclear wasteland with uncannily captivating footage.

    Postcards from Pripyat was filmed by Danny Cooke on a trip to Ukraine as part of a 60 Minutes story aired on CBS about the aftermath of the Chernobyl nuclear incident and ongoing efforts to cap the remains of the reactor. Of his adventure, he recounts: “During my stay, I met so many amazing people, one of whom was my guide Yevgen, also known as a ‘Stalker’. We spent the week together exploring Chernobyl and the nearby abandoned city of Pripyat. There was something serene, yet highly disturbing about this place. Time has stood still and there are memories of past happenings floating around us.”

    chernobyl from above

    abandoned waterfront

    abandoned ferris wheel

    The incident turned Pripyat from a city of 50,000 into a ghost town overnight, and that was just the beginning – fallout spread to neighboring countries and continues to leak out locally. Residents were told to evacuate but that they could return within a few days – a promise that could not be kept. Mice in the area have been recorded as having 10,000 times more radioactivity than normal rodents.

    abandoned interior

    abandoned pripyat

    swimming-pool-fixed

    Today, the focus is on containing the problem. “With funds from over 40 different countries, 1,400 workers are building a giant arch to cover the damaged reactor. It will be taller than the Statue of Liberty and wider than Yankee Stadium — the largest movable structure on Earth. Until the arch finally seals up that stricken reactor, and no one knows when that might be, something like that could happen again. Unlike other historic relics, Chernobyl does not belong to the past; its power will never die. Chernobyl is forever.”

    Share on Facebook


    [ By WebUrbanist in Abandoned Places & Architecture. ]

    [ WebUrbanist | Archives | Galleries | Privacy | TOS ]


    WebUrbanist

  • 16. Türchen: Prestel

    Prestel Fotobuecher

    16. Türchen

    Wir lieben Fotobücher. Das ist schon fast chronisch, denn unsere Bücherregale biegen sich unter ihrer Last, aber es ist einfach zu schön, Bilder nicht nur am Bildschirm anzusehen, sondern mit einer Tasse Tee in Ruhe auf dem Sofa durchzublättern. Deshalb freuen wir uns sehr, dass der Verlag Prestel unser heutiges Türchen gefüllt hat.

    Wir durften uns vier Fotobücher aus dem Hause Prestel aussuchen, von denen wir im heutigen Türchen jeweils ein Exemplar verlosen und hoffen, dass für jeden Geschmack etwas dabei ist. Im Folgenden stellen wir Euch unsere Auswahl kurz vor.

    Fotobuch: Magnum RevolutionFotobuch: Capa in color

    Magnum Revolution: 65 Jahre Freiheitskampf*

    65 Jahre Weltgeschichte in Bildern: Die Fotoagentur Magnum wurde 1947 gegründet und veröffentlicht zum 65-jährigen Bestehen diesen Bildband mit Dokumentationen von Magnum-Fotografen. Im Mittelpunkt des Bandes stehen vor allem die weltweiten revolutionären Umwälzungen seit den 1950er Jahren wie die kubanische Revolution, der Prager Frühling, die Nelkenrevolution in Portugal und der Sturz des Schahs im Iran. Aber auch aktuelle Aufnahmen der Arabellion unserer Tage sind im Buch zu finden. Das Hardcover ist 256 Seiten dick und kostet 49,95 €.

    Capa in Color*

    Denkt man an den Kriegsreporter Robert Capa, sieht man zunächst Schwarzweiß-Fotos in seiner Erinnerung. Dabei hat Capa auch in Farbe fotografiert. Eine Auswahl dieser Bilder findet man gesammelt im Bildband „Capa in Color“. Das Buch beinhaltet zudem Essays von Kuratorin Cynthia Young und Fotohistorikerin Sally Stein sowie Reise-Schriften von Capa selbst und Hintergrundinformationen zu verschiedenen seiner Reportagen. Der Band ist auf Englisch erschienen, hat 207 Seiten und kostet 38,23 €.

    Fotobuch: Paris im LichtFotobuch: Dennis Stock

    Christopher Thoma: Paris im Licht*
    Der Münchner Fotograf Christopher Thomas hat Paris in Polaroids festgehalten. In den frühen oder späten Stunden des Tages aufgenommen, zeigen die Aufnahmen kaum Menschen der sonst so belebten Stadt. Die alte Technik lässt die Fotos still, fast zeitlos und sehr romantisch erscheinenden. Auf 160 Seiten gibt es 80 Schwarzweißfotos zu entdecken. Das Buch kostet 39,95 €.

    Dennis Stock: Time Is On Your Side*
    Marilyn Monroe, Audrey Hepburn, Grace Kelly, James Dean und seit den 1960er Jahren vor allem in der amerikanischen Jazz-Szene – Dennis Stock hatte sie alle vor seiner Kamera und erschuf Fotos, die zum Bekanntheitsgrad der Personen selbst beigetragen haben. In diesem Fotoband sind auf 176 Seiten rund 100 Schwarzweißfotos abgebildet. Es kostet 45 €.

    Um eines der Bücher zu gewinnen, schreibe einen Kommentar mit Deinem Wunschgewinn unter bürgerlichem Namen und gültiger E-Mail-Adresse bis heute um 24 Uhr. Danach verlosen wir sie per Zufallsgenerator unter allen Kommentatoren. Die genauen Gewinnspielregeln findest Du hier. Viel Glück!


    * Das ist ein Affiliate-Link zu Amazon. Wenn Ihr darüber etwas bestellt, erhält kwerfeldein eine kleine Provision, Ihr bezahlt aber keinen Cent mehr.


    kwerfeldein – Fotografie Magazin | Fotocommunity

  • Photoluminescent Furniture: Filled Wooden Voids Glow in Dark

    [ By WebUrbanist in Art & Sculpture & Craft. ]

    glow dark wood table

    A pair of crafty carpenters have separately arrived at the same conclusion: glow-in-the-dark resin is a really neat way to fill cracks, gaps, splits and other natural or accidental voids frequently found in wood shelves and surfaces.

    glow in the dark shelf

    Whether you have a small piece that needs infill or mending or a larger project in the works, one of these approaches may well be ideal for your own do-it-yourself project – some details are provided below but full instructions on each strategy can be found via links included as well.

    glow shelf final product

    glow knot seen from below

    In the first instance, Mat Brown decided to try something other than the standard invisible-style repair to solve the problem of empty space around knots and front-facing unevenness in boards to be used as shelving.

    glow dark resin mix

    glow dark wood process

    He provides further details on the process over at his blog, but in a nutshell: he used robust tape below and on the sides then heated up the resin, mixed in the powder and poured in the results. After a second similar round he cut, sanded and finished the pieces.

    glowing infill table design

    glowing cyprus power resin

    Mike Warren has subsequently brought a similar idea to the table, creating a tutorial for filling in the naturally separation gaps found in a certain species of cyprus, livening up the surface with bright resin.

    glow dark table detail

    The full illustrated list of 25 steps for this latter version can be seen on Instructables, but in this case a similar process was used, just heavier-duty tools employed (like a drum sander) to keep the workload down. Hat tip to Chris of Colossal for finding both of these projects as well.

    Share on Facebook


    [ By WebUrbanist in Art & Sculpture & Craft. ]

    [ WebUrbanist | Archives | Galleries | Privacy | TOS ]


    WebUrbanist

  • ProGearX announces new line of GoPro accessories

    ProGearX has announced the availability of several new accessories for mounting GoPro action cameras to a variety of surfaces. Among the new accessories is an extendable pole, body mounts, and a kit for mounting the action cam on different sports boards. The accessories are available now, and ProGearX will be showcasing them during CES 2015 next month. Read more

    Articles: Digital Photography Review (dpreview.com)

  • 16. Dezember 2014

    Das Bild des Tages von: Jaques10000

    Ein Radfahrer fährt durch einen nebeligen Wald.

    Fotolinks des Tages

    1. Vom Zaun um Europa

    Der Zaun beschäftigt sich mit der Situation von Tausenden Flüchtlingen an den Grenzen Europas. Die Seite bedient sich zahlreicher (auch: fotografischer) Elemente, um visuell und auditiv zu veranschaulichen, wie es denen geht, die versuchen, aus ihrem Land zu flüchten und sich dort eine bessere Zukunft erhoffen. Unter anderem wird auch Tunesien und die Stadt Sfax vorgestellt, von der aus viele Mütter Ihre Söhne zum letzten Mal sehen – und im Extremfall auch nie wieder von ihnen hören. Der Zaun entstand in Zusammenarbeit mit der Süddeutschen Zeitung und fordert Besucher heraus, sich tatsächlich in der Tiefe mit der Sache zu beschäftigen, da es sich inhaltlich nicht um reine Klickstrecken handelt. Drüberscrollen ist nicht, und das ist auch gut so. → ansehen

    2. UNICEF-Fotos des Jahres

    UNICEF prämiert jedes Jahr Fotos und Fotoreportagen, die die Persönlichkeit und Lebensumstände von Kindern weltweit auf herausragende Weise dokumentieren. Dieses Jahr gewannen die beiden deutschen Fotografen Insa Hagemann und Stefan Finger mit ihren Bildern, die von den Folgen des Sextourismus in den Philippinen und der Situation von Kindern ausländischer Väter erzählen. Ein Interview mit den beiden Fotografen hat Spiegel Online. Auch der zweite Platz geht an einen deutschen Fotografen. Christian Werner zeigt das Schicksal der Jesiden im Irak, die von der Islamistengruppe „Islamischer Staat“ verfolgt werden. Der südafrikanische Fotograf Brent Stirton gewinnt den dritten Platz mit seiner Reportage über die blinden Geschwister Anita und Sonia, die dank einer Operation wieder sehen können. → ansehen

    3. Analysiert: Fotobücher-Listen

    Das wird den Mathematikern Spaß machen: Jörg Colberg hat sich die im Netz sehr beliebte Foto-Buch-Linkliste von Photo-Eye vorgenommen (welche 177 verschiedene Bücher enthält), und anlässlich ihres Umfangs auf Ello ein paar Statistiken herausgearbeitet. Unter anderem konnte er feststellen, welcher Verlag die meisten Bücher in allen Listen hatte, wie viel Prozent ihr Buch im Eigenverlag publizierten und warum es äußerst schwer sein wird, mit einer Publikation überhaupt in eine dieser breitgefächerten Listen zu kommen. Also auch ein Tipp für Nicht-Mathematiker. → ansehen


    kwerfeldein – Fotografie Magazin | Fotocommunity

  • 16 December, 2014 – Photograph America Newsletter


    For the last 15 years, I have been purchasing and using the Photograph America Newsletter published by Robert Hitchman.  I got turned onto this publication when I visited Big Bend National Park with some fellow photographers.  His guide was a tremendous help getting us to the best spots.  Every time I took a trip to a National Park or other popular photographic location I would check the big binder of newsletters from Robert. Now all his newsletters are available and fit on a jump drive.

    The opportunity presented itself a few months ago to visit with Robert and along with Chris I did a short interview of the man behind the Photograph America Newsletter.  This short video is now available to view and download for $ 10 USD.  I know $ 10.00, but you receive 2 PDFs with the download plus, there is also an included PDF giving details of a 25% discount on your first purchase of the Newsletter or the whole collection – printed or electronic.  Check out the details and links to this offer at Photograph America Newsletter.

    My good friend and mate Ken Duncan, from Australia, sent me a link to his Christmas Message yesterday.  Ken has an amazing landscape photography business and is one of the nicest guys I know. I’d like to share a link to this video as it contains some of Ken’s amazing landscape photography put to a classic Christmas song.  Enjoy!


    The Luminous Landscape – What’s New

  • Architectural Photography Using Layer Masking to Correct Contrast and White Balance

    Dps 2

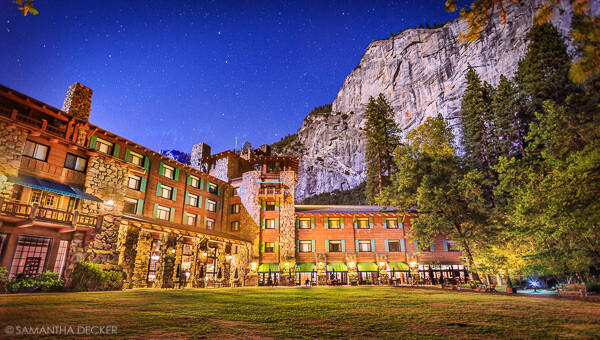
    A challenging nighttime scene was overcome with multiple exposures and layer masking.

    Blending indoors and outdoors in architectural photography can often create a compelling image. Unfortunately, however, it is often fraught with exposure and white balance issues. These issues are compounded at night, when artificial lights inside buildings coupled with the darkness of the night sky create an especially contrasty image with an unattractive colorcast created by the different light sources. Luckily, with multiple exposures and layer masking in Photoshop, you can create a photo that looks a lot like what you saw with your own eyes.

    This method is a little different than HDR, which involves taking three or more photos at different exposures, then using automated software to combine them into one image that captures the range of light in the scene. Here, you’ll be taking three or more photos and blending them manually, since HDR software often creates unpleasant artifacts and odd color blending when used in the type of situations presented in this tutorial. You can always try HDR software first, and if the colors don’t seem to bleed, you can skip down to the later part of the tutorial for dealing with the colorcasts.
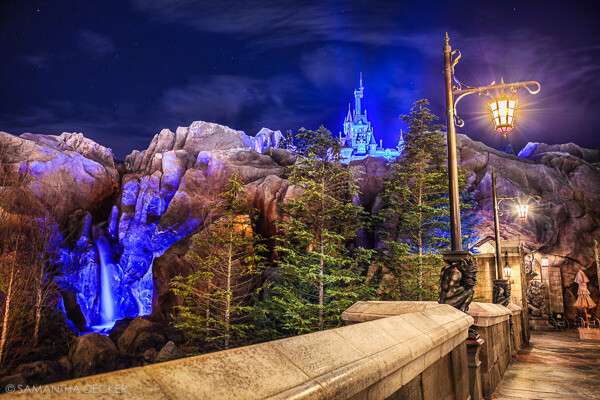
    Dps 1

    An image that required three exposures and had a color cast from the lamps.

    Shoot three or more exposures on a tripod

    You need to shoot as many photos as it takes to capture the dynamic range (the range from light to dark) in the scene. It is really important to shoot in RAW, to get as much mileage out of each photo as possible. A tripod is also necessary, since you’ll probably be taking these at night, and also because you won’t be using HDR software which aligns the images. You can use auto exposure bracketing to capture three images, but at night, exposures on the high end can often exceed 30 seconds, the longest shutter speed most cameras will let you shoot manually. It’s probably easiest to use manual mode, set your ISO to 100 or 200, stop down your aperture to f/7.1 or f/8 (if it’s really dark out, you can open it up wider), and then take a series of shots at increasingly slower shutter speeds until you’ve captured the range of light in the scene. If you need to go past 30 seconds, go into bulb mode (consult your camera’s manual for how to find it), and use a remote trigger release, holding the shutter open as long as you want. Don’t worry about white balance yet.
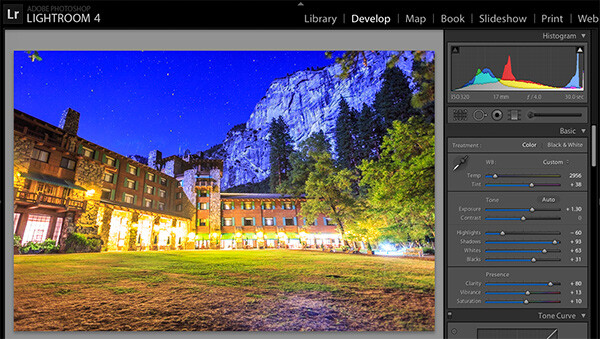
    Dps 3

    Processing one of the RAW files in Lightroom. Here you can see where just processing one RAW file wouldn’t be sufficient.

    Process each exposure in Lightroom or Camera Raw, then open as layers in Photoshop

    First, you are going to process the photos for exposure only, ignoring white balance. If you don’t have Lightroom, you can do this in Adobe Camera Raw. Since you have multiple exposures, you don’t need to go crazy trying to recover lost highlights (overblown bright spots) and shadows (dark parts that look black), but you want to recover them a little bit to give you more leverage later on in the process. There’s no magical formula for processing here. I usually apply lens profile correction, remove chromatic aberration, and do a little noise reduction before bringing down the highlights a little bit and bringing up the shadows and whites a little bit. Once you’re done processing each exposure, select them all, right click, and select “open as layers in Photoshop. Now you’ve got an image with three or more layers all ready to go, but we’re no quite ready to do the layer masking yet.
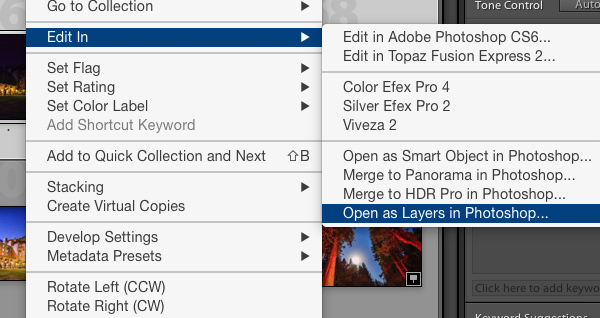
    Dps 4

    Go back and reprocess for white balance

    White balance is a setting that keeps the whites in the image white, removing any colorcasts. Different light sources have different white balance settings though, so if you have a photo with two or more different light sources (such as the night sky and an artificial light), no matter how you adjust your settings, you’ll always have a color cast somewhere on your photo. What you’re going to do here is reprocess each photo so that you’ve corrected any colorcasts. If you’re lucky, you’ll have no more than two light sources in the photo. Unfortunately, though, there can often be more.

    It’s important to note that you only have to correct for colorcasts that are in properly exposed parts of each photo. For instance, in one of your overexposed photos, don’t worry about the white balance for the overblown highlights. You’ll be discarding that part of the photo later. For one of your underexposed photos, don’t worry about correcting for the shadows, since you’ll also be discarding that. Start with your most properly exposed photo, and correct for any colorcast you see (for instance, the lights inside a building have a yellow cast).

    All you have to do to correct the white balance is slide those two sliders (one goes from blue to yellow, and the other goes from green to magenta) until the part of the photo with the colorcast looks normal. When you’re done, open that photo in Photoshop, and make it a layer in the other image you have open. Do this by hitting Ctrl-A on Windows, or Command-A on a Mac to select the photo you just opened, then Ctrl-C or Command-C to copy it. Then click on the image with the three layers, and hit Ctrl-V or Command-V to paste it in as a layer. Repeat the processing until you have corrected all colorcasts in the photo. Then, move on to the other exposures, and correct any color casts there (remember, only the properly exposed parts need to be corrected).
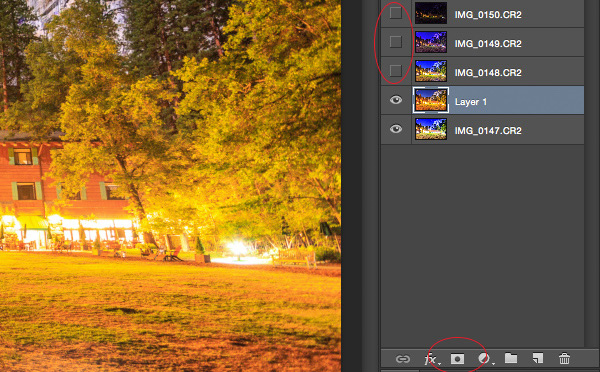
    Dps 5

    Mask in one layer at a time

    Once you’ve finally got every exposure and every colorcast accounted for as separate layers, you’re going to mask them in one by one. I start by making all but the bottom two layers invisible and masking in one layer at a time (by the way, the order of the layers does not matter, but having the most properly exposed image on the bottom will probably make things easier). Do this by clicking the little eye to the left of each layer except the bottom two. Then, with the layer one up from the bottom selected, click the layer mask icon (it’s a rectangle with a dot in the middle, found at the bottom of the layer panel). Make sure the paintbrush icon is selected as well (this can usually be found on the left hand side). You may need to adjust your brush size as you go through.

    When painting with black on the layer mask, you will cover up the parts of the layer you don’t want appearing (the improperly exposed or color cast parts of the image are what you want to cover up). When you want to go back and reveal parts because you’ve made a mistake, paint with white on the layer mask. Click X on your keyboard to toggle back and forth between black and white.

    When you’ve masked out all the parts of the layer you don’t want shown, select the layer on top of that and make it visible (click the space where the eye used to be). Then create another mask and start masking that layer. Keep revealing layers and masking them in until you’re done. In some cases, one part of the photo may be properly exposed in more than one image. In this case, keep the one that looks better to you. Once you’ve finished this process, save the photo as you would normally. If you think you might come back to this photo later and edit it, make sure to save a copy as a PSD.
    Dps 6

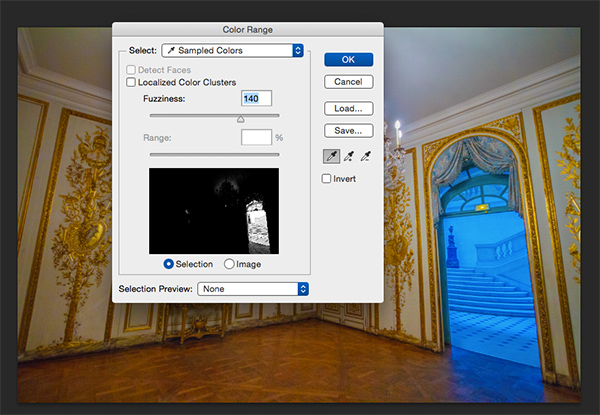
    Sometimes you get lucky, and the part of the image that’s colorcast has a very strong hue to it. If you have a colorcast that’s almost all one color, you can automate the masking process a bit for that layer. In the top pane, go to Select –> color range, then click somewhere in the colorcast. Look at the preview. You want the part of the image that’s your colorcast to be almost completely white, and the rest to look almost completely black. Adjust the fuzziness slider until this is the case, and then click ok. You actually want to select the inverse of that, so go to Select –> inverse. Now click the layer mask icon, and you’ll have a mask that hopefully masks out the colorcast. If it doesn’t look right, undo it and try it again with a different fuzziness setting. This is not a perfect fix. You will still need to do some fine-tuning, but it really helps move things along quicker.
    Dps 7

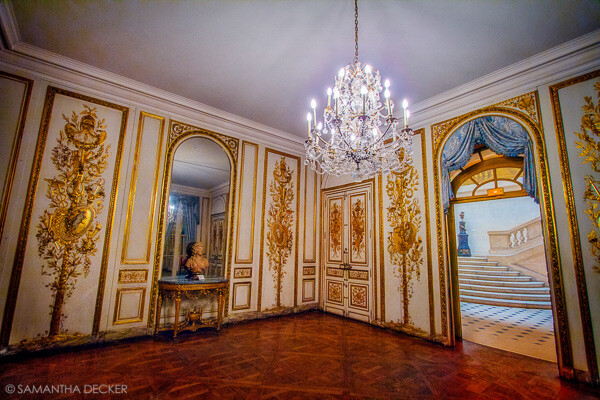
    A simple “select color range” layer mask got rid of most of the colorcast in this photo.

    Conclusion

    This is just one method of conquering the challenges brought on by nighttime architectural photography. As you start working with photos of this nature, you may find a different method that you prefer. Luckily, many photos only require some of the steps detailed in this tutorial. Sometimes you only need one exposure, but you need to process for colorcasts. Other times, the white balance is even, but you need to mask for exposure. It takes practice to master these intricate masking techniques, so don’t give up if you’re unhappy with your results at first. Start with simpler photos with fewer colorcasts and exposures needed before diving into a really complex one. In time you’ll be creating photos that look as natural as they appeared when you saw them in person.
    Dps 8

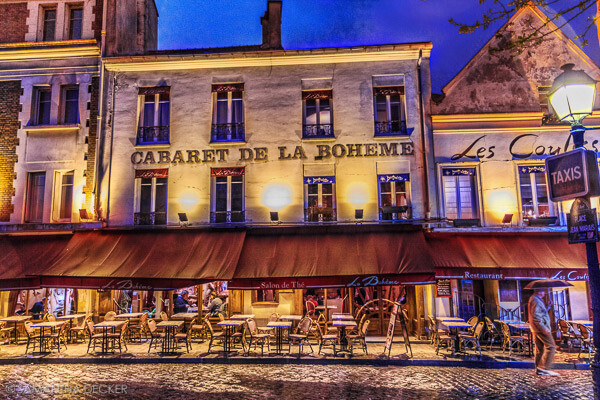
    A single exposure that required layer masking to correct colorcasts.

    Have you got any tips for doing architectural photography or using layer masking? Please share in the comments below.

    googletag.cmd.push(function() {
    tablet_slots.push( googletag.defineSlot( “/1005424/_dPSv4_tab-all-article-bottom_(300×250)”, [300, 250], “pb-ad-78623” ).addService( googletag.pubads() ) ); } );

    googletag.cmd.push(function() {
    mobile_slots.push( googletag.defineSlot( “/1005424/_dPSv4_mob-all-article-bottom_(300×250)”, [300, 250], “pb-ad-78158” ).addService( googletag.pubads() ) ); } );

    The post Architectural Photography Using Layer Masking to Correct Contrast and White Balance by Samantha Decker appeared first on Digital Photography School.


    Digital Photography School

  • Have your say: Best High-end ILC of 2014

    2014 was a good year for enthusiast photographers, and saw a range of extremely high-quality DSLRs and mirrorless cameras released from all of the major manufacturers. As well as iterative upgrades to existing cameras, we also saw brand new products from Fujifilm and Samsung, and 4K video made its first appearance in this product class. Click through for a reminder of what was released this year, and cast your vote for the best high-end ILCs of 2014.

    Articles: Digital Photography Review (dpreview.com)

  • Have your say: Best High-end Compact Camera of 2014

    This year saw a number of new cameras released in the high-end compact category, and as well as updated versions of earlier cameras, we also saw brand new products, and – increasingly – a shift to larger sensors as a major differentiator. 2014 was the year that Canon moved to the 1-inch sensor format, and Panasonic even managed to fit a Micro Four Thirds sensor into its LX100. Click through for a reminder of the high-end compacts released in 2014, and a chance to cast your vote for the best. 

    Articles: Digital Photography Review (dpreview.com)