RSS
 

Archive for September, 2014

Memo Bottle: Slim Paper-Shaped Water Canteen for Laptop Bags

14 Sep

[ By WebUrbanist in Design & Products & Packaging. ]

memo mobile flat bottle

Rectangular, skinny and designed to fit in briefcases or computer bags, his is definitely a bottle with a message: it is time to make your preferred refreshment receptacle more mobile.

memo bottle various sizees

memo flat pack bottle design

memo bottle on table

A sleek portable solution for your potables, the memobottle comes in standardized paper sizes to fit your preferred carrying case alongside books or computers, including Letter, A4 and A5 in the initial run.

memo bottle to go

memo bottle hipster kit

memo bottle design prototype

Its creators come from dry places – Melbourne, Australia and San Diego, California – and have a mission in mind that involves more than mere convenience:  “Single use bottle consumption [results in] 1,500 plastic bottles being used and discarded every second in the US.” Further, “bottled water is about 1,400 times more expensive than tap water and often less regulated.”

memo bottle stands up

memo plastic dishwasher safe

memo water bottle

memo leak proof bottle

The memobottle is a dishwasher-friendly, long-life, BPA-free water bottle that uses plastic, which its makers claim is more environmentally friendly than aluminum or stainless steel. The design definitely has its fans, with the project already over-funded by 1000% on Kickstarter with nearly one month left to go.

Share on Facebook


[ By WebUrbanist in Design & Products & Packaging. ]

[ WebUrbanist | Archives | Galleries | Privacy | TOS ]


WebUrbanist

 
Comments Off on Memo Bottle: Slim Paper-Shaped Water Canteen for Laptop Bags

Posted in Creativity


Mastering On-Camera Flash

14 Sep

You get caught off-guard with a photo assignment and you might not have time to set up additional lights or have the luxury of using a reflector. Maybe it’s an awards event in a large room and you don’t want the background to go completely dark. You see a celebrity, rock star, astronaut or maybe it’s the president of your company that you need to photograph (see image below), or maybe you just need to travel light, with a minimum of gear.

Fig 1

George Lucas: 1/180 at f/13, ISO 200

Shoe-mount flashes are very portable and you CAN use them to get a great image. The key to getting that image is controlling the balance of camera, flash, and ambient light.

TTL TYPES

The automatic advantage to shoe-mount flash units is that they use TTL metering, which stands for Through The Lens. This type of flash metering is much more accurate than the thyristor technology that precedes it, and it’s also easier to use correctly.

Sb910 d3x frt34r

Photo courtesy of Nikon

Camera manufacturers have their own versions of TTL flash and the alphabet soup of lettering can be a bit intimidating. Different types include i-TTL, P-TTL, E-TTL, etc. So what is the difference or similarity in each of these? Canon calls their flash technology E-TTL (introduced in 1995) or the newer E-TTL2 (since 2004). Firing a low power pre-flash immediately before the shutter opens, this type of Through The Lens metering is very accurate because the flash unit actually fires very quickly. This brief pre-flash determines the correct power output of the flash unit. The camera body and flash communicate together on the exposure by means of additional contact pins in the hotshoe and in the foot assembly of the flash unit.

Pentax’s P-TTL arrived in 2001 and it meters a low power flash with the lens wide open before opening the shutter. Nikon’s i-TTL has been available since 2003 and also uses a pre-flash to calculate the amount of light needed by the flash. Their TTL-BL is a separate mode for fill flash, with the idea of it giving you better balanced light, but for it to work accurately the subject needs to be darker than the background. So all of these systems are similar and no matter what brand of camera system you have, one of them will work great for you.

All of this solves the problem of getting the correct amount of light on the subject, which is weighted with the area of focus that you and your camera have selected. What about the surrounding elements in your artistic composition? You are seeing a potentially great image in the viewfinder, and whether you’re indoors or out, you want the flash to match the scene just enough to make it look right.

MATCHING THE LIGHT

Let’s take the example of photographing indoors. The best way to do this that I’ve found is to meter the ambient light in the room first. The camera can be in any exposure mode to take this reading. If for example, your exposure is 1/30 at f/5.6, ISO 800 – you would then switch the camera to Manual mode and make those your camera settings. Note that some cameras have a slow sync setting, or you could also use shutter priority to get this same balance.

Fig 2

Paula and Cayden: 1/60 at f11, ISO 200

You can leave the flash set on TTL mode and let it adjust its power output automatically. When you take the image you should have a remarkably balanced exposure. This can be further fine-tuned by adjusting the flash exposure compensation to add a little more, or a little less, fill light to the image. Flash exposure compensation can be added on the flash unit itself, or by adjusting the settings in the camera.

If you find that you need a little more depth of field to get your subjects in focus you can bump up the ISO to 1600 and lower the aperture setting to f/8. If you can use less depth of field, do the opposite by lowering the ISO to 400 and opening your aperture to f/4. There are always tradeoffs to be made, and you might not be able to handhold that particular lens at 1/30 second to get a steady image. Try using a monopod or tripod to help with that issue. For a faster shutter speed you might want to try 1/60 at f/5.6 with 1600 ISO. If you need to get your depth of field back to f/8 then you might need to be daring and go to 3200 ISO. Digital noise levels are improving all the time so don’t be afraid to try a higher ISO.

If you are photographing outdoors the opposite is true. Go to the lowest ISO to match your ambient light with your flash. There’s no way a flash can compete with the sun, so if you can select a lower ISO you will have a better chance of balancing ambient and flash at f/8 or f/11, rather than f/16 or f/22.

DIFFUSERS

Sb910 sw13hSome flash units come with diffusers and I’ve had good luck with those. These are usually plastic, and they snap on tightly in front of the flash. There are also many innovative aftermarket diffusers available. Some units are a card type that bounce the light and redirect it to a larger pattern. Some diffusers are of the softbox type with a diffusion panel that the light passes through.

Some diffusers take the plastic design to a much higher level (such as the Gary Fong brand). All of these diffusers are variations on taking a directional light, such as an on-camera flash unit, and modifying the light to lower the amount of shadow
that you would normally get from a harsh light source. My recommendation is that you try some of these for yourself and see what works best for you. Your flash, the environment you’re photographing in, and the type of photos that you take are
all factors that could determine which is the best one for you. If you have a favorite please let us know in the comments following this article.

Bounce flash is when you angle the flash head so that the light reflects off of the ceiling or a nearby wall to disperse the light. Due to light falloff less light will get to the subject, so having a low ceiling is helpful for this to work. Light falls off and can be accounted for using the Inverse Square Law – an object that is twice the distance from the flash head will receive one quarter the illumination – or two stops less light.Ttl cord

TTL CORDS

Off-camera TTL cords are another great option. I consider this to still be on-camera flash but the TTL cord allows you to be flexible with the direction of the light. Holding the camera in one hand, you can move the flash unit around with the other hand and try different variations of light on your subject. These cords are small, easy to carry with you, and they are relatively inexpensive. They’re a good item to keep in your camera bag.

FILTERS

Sb910 sz2tnFilters sometimes come with a shoe mounted flash, and they are also available from aftermarket sources. The most common filters are tungsten and fluorescent. These are a great, and often overlooked, option to match the color of light from your flash unit to the ambient light temperature of a room. Color temperature from a shoe mounted flash is similar to a daylight balance of approximately 5500 degrees Kelvin. Fluorescent lights are in the 4000K range and tungsten light is around 3200K, so using these filters will make quite a difference in the color of your final image. Give those filters a try the next time you’re in that situation.

SUMMARY

Fill flash is a matter of finding the right amount of light to make the image appear to have been taken with natural light by using just enough flash to add catch-lights to the eyes, eliminate shadows, and give a more pleasing look overall to an image. You will be able to capture this balance using just your on-camera flash. It might sound difficult, but it doesn’t have to be.

Fig 3

Lisa Marie Presley: 1/250 at f/4.5, ISO 200

The post Mastering On-Camera Flash by Jim Wise appeared first on Digital Photography School.


Digital Photography School

 
Comments Off on Mastering On-Camera Flash

Posted in Photography


Macphun’s Tonality Pro Versus Lightroom 5 for Black and White Conversion

13 Sep

Tonality Pro vs. Lightroom

MacPhun Software recently released Tonality Pro (use this link to get 20% off, for dPS readers only), a powerful black and white converter for Mac. In this article I’m going to compare it to Lightroom so you can see how the conversion process differs between the two programs.

Windows users please don’t stop reading now – I’ll look at some other black and white plug-ins at the end of the article, all of which are cross-platform.

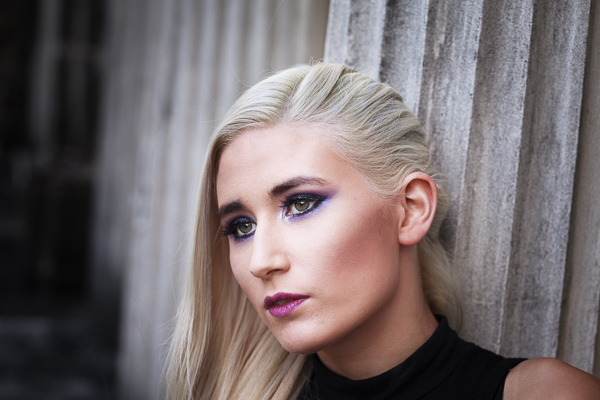
To start, here’s the colour photo that I’m going to convert to black and white.

Tonality Pro vs. Lightroom

Here’s the black and white version I created in Lightroom.

Tonality Pro vs. Lightroom

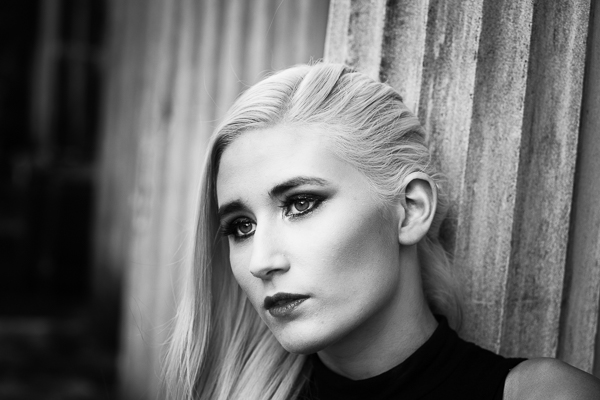
It’s a fairly straightforward conversion. I increased Clarity and Contrast, and added a vignette using the Radial Filter. I didn’t touch the Black and White Mix panel, and I didn’t add Split Toning.

All these tools will be familiar to Lightroom users. So, how does Tonality Pro differ? Let’s take a look.

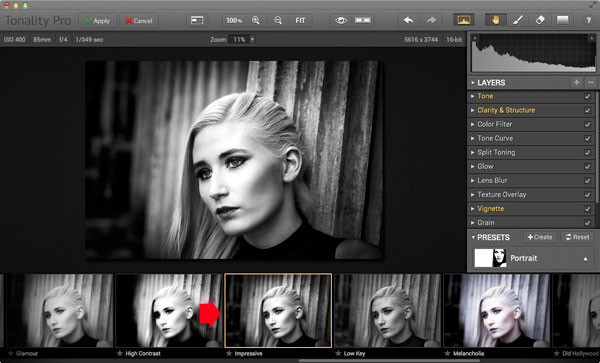
Tonality Pro uses presets

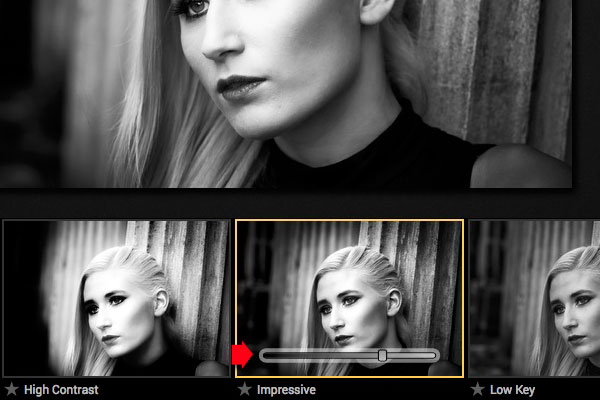
Tonality Pro’s presets give you a variety of ready made black and white conversions. Of course, not all of them will be suitable for your photo, but with over 150 to choose from, you are bound to find at least a few that do good things for your images. If you don’t like using presets, just skip them and go straight to the other panels to do your work.

Tonality Pro’s presets are similar to Lightroom’s Develop Presets. The main difference is that Tonality Pro comes supplied with a full set, while Lightroom only has a limited range of built-in monochrome presets. If you want a decent set of black and white presets for Lightroom, you will have to buy them.

Tonality Pro’s presets have two features that make them a very powerful and versatile feature.

The first is a slider that lets you adjust the strength of the preset. This is useful because the number one problem with presets of any sort is that they can be too strong. A subtle touch is better when it comes to post-processing and many presets are far from subtle. The opacity slider in Tonality Pro helps you deal with that. Let’s say you apply the Impressive preset to your photo. Here’s how it looks.

Tonality Pro vs. Lightroom

Too strong? It’s easy to reduce the strength of the effect until it looks just right.

Tonality Pro vs. Lightroom

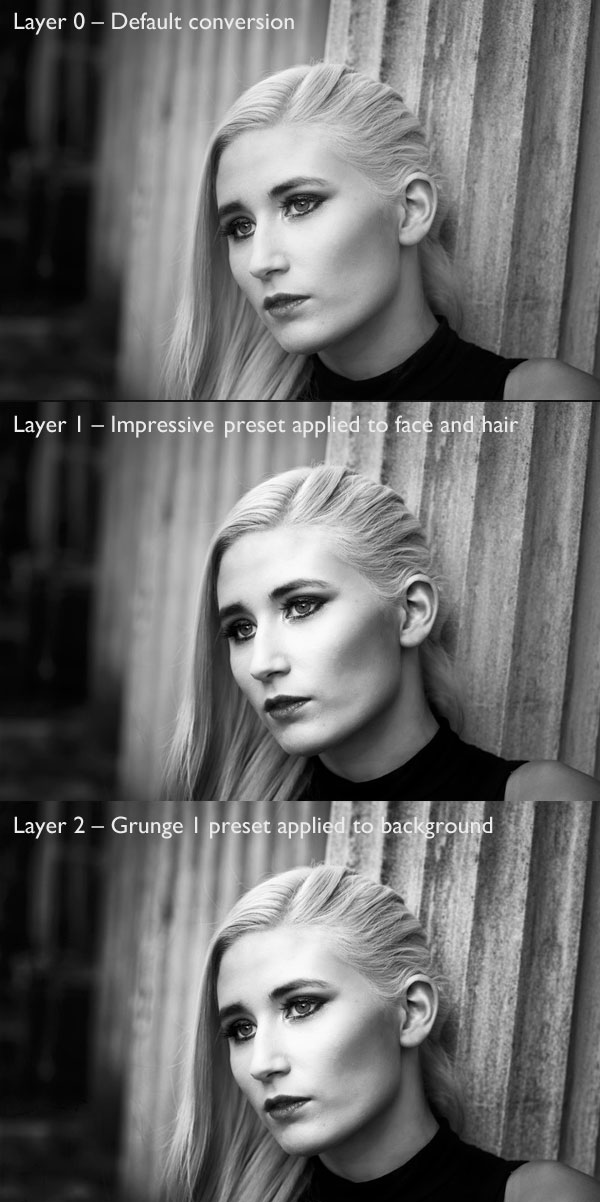
The second feature (I’m really excited about this) is that Tonality Pro has layers. With layers, you can apply a preset on a new layer, then create a mask using Brush mode so that the preset is only applied to part of your image.

Take a moment to think about what that means. For example, you could apply one preset to the subject (in this case the girl in the photo) on one layer, and another to the background on another layer. It’s got the potential to be very powerful, and it’s something that I haven’t seen in any other plug-in.

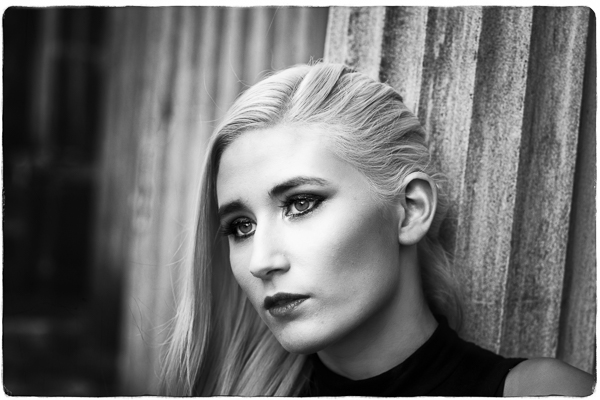
Here’s how it works. In these examples I’ve applied the Impressive preset to the model’s face, and the Grunge 1 preset to the background using layers. I used the opacity sliders to keep the effect subtle. These three images show the result.

Tonality Pro vs. Lightroom

Next I added a frame.

Tonality Pro vs. Lightroom

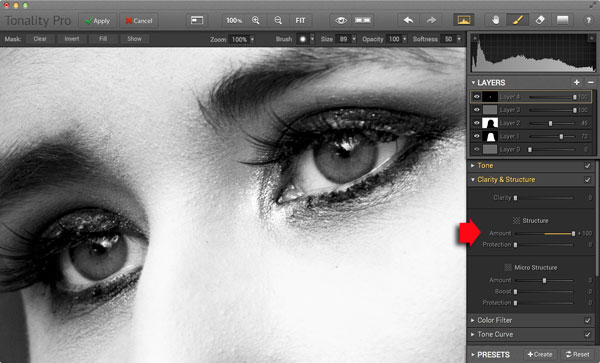
Finally I added some Structure to the eyes, and increased Adaptive Exposure a little to compensate for the way Structure tends to make things darker as well as add detail. You can achieve a similar effect in Lightroom with Clarity, but you will be interested to know that you can adjust Structure in Tonality Pro as well as Clarity (Structure is better than Clarity for bringing out detail).

Tonality Pro vs. Lightroom

Here’s the final comparison of the two versions of the photo.

Tonality Pro vs. Lightroom

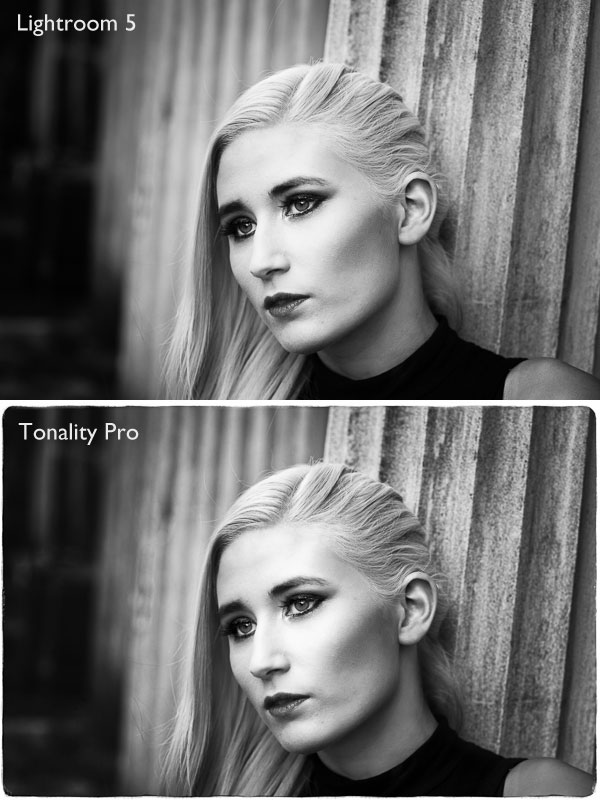
As you can see, apart from the border, most of the differences are subtle. But the way I got there, the editing process itself, was very different.

Now I’m going to show you another application of Tonality Pro that you definitely can’t do in Lightroom. Here’s the original colour photo.

Tonality Pro vs. Lightroom

Here’s the initial black and white conversion:

Tonality Pro vs. Lightroom

This is the same photo processed in Tonality Pro with a red colour filter applied to darken the sky and add drama to the distant mountains.

Tonality Pro vs. Lightroom

Here I’ve added another layer and applied the El Captain preset, reduced the opacity of the layer to 20 (to keep the effect subtle), and used a mask to apply the preset to the foreground only, not the mountains or sky.

Tonality Pro vs. Lightroom

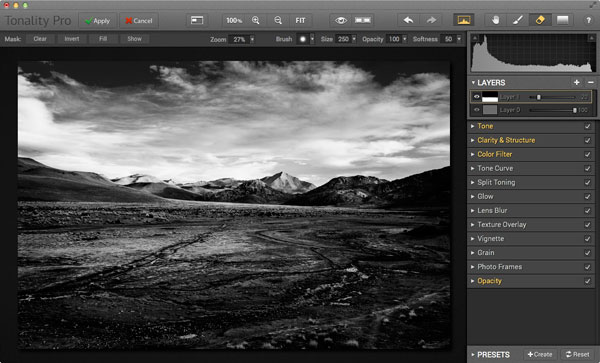
All this took just a couple of minutes to carry out.

The verdict

This is a simple demonstration but hopefully it’s given you a taste for what Tonality Pro can do, and how it compares to Lightroom.

I’ve only scratched the surface in this article, Tonality Pro has lots more interesting features. Another dPS writer,  Phillip VanNostrand has done a full review here, it covers the software in more depth, so check that out also. In the meantime, if you want to test out Tonality Pro for yourself, or learn more about the program, then you can do so at MacPhun’s website (get 20% off for dPS readers using this link).

How Tonality Pro compares to other plug-ins

Tonality Pro isn’t the only black and white plug-in out there, and you may be interested to know how it compares to some of the others. Don’t forget they all have different features and strengths, and the best one for you depends on what you want to do with your black and white images. You can download trials of all the plug-ins to help you make your mind up. Here’s a brief guide:

Silver Efex Pro 2

Until Tonality Pro came along this was the single best black and white conversion plug-in you could buy. To be honest, I haven’t used Tonality Pro enough yet to say whether it is better than Silver Efex Pro 2. But, there’s no doubt that the layers feature in Tonality Pro means that it is a versatile program that gives Silver Efex Pro 2 a good run for its money.

Silver Efex Pro 2 is more expensive (more than double the price) but it does come as part of the Nik Collection, so you do get the benefit of the other programs within it (Viveza, Color Efex Pro and so on). Silver Efex Pro 2 also has a powerful history function that Tonality Pro lacks.

Alien Skin Exposure 6

One of my favourite plug-ins, Exposure 6 is designed to give your digital photos an analog look. You can use it for both black and white and color photos, and in my opinion it’s stronger on the colour side than monochrome. But it’s still a powerful black and white converter.

It’s more expensive than Tonality Pro, but you get the advantage of being able to use it to process colour photos too. It can be used as stand-alone program as well as a plug-in (as can Tonality Pro).

Topaz Black & White Effects 2

Black & White Effects 2 is a nifty black and white plug-in. Its main benefit is an extensive range of creative presets, including several sets that imitate old processes such as cyanotype, albumen and van dyke brown. It’s also good for emphasizing detail and texture.

Perfect Black & White

onOne Software’s Perfect Photo Suite includes the Perfect Black & White module. Like Silver Efex Pro 2, you get the benefit of the other modules in the suite. But unlike Silver Efex Pro 2, all the modules work together and you can switch seamlessly from one to the other.

One of my favourite modules is Perfect Mask. I use it to blend two versions of landscape photos, one processed for the sky and the other for the foreground. Combined with Perfect Black & White it helps you create powerful and dramatic black and white landscapes. It also works as a stand-alone program.

Discussion time

In my review of MacPhun’s Intensify Pro one reader gave an opinion that photographers who use plug-ins instead of Photoshop are lazy. It’s an interesting topic for discussion, so please let us know what you think in the comments. Do you use plug-ins to process your photos? If you do, which are your favourites and why? Or do you agree with the view that plug-ins are for lazy photographers?


Mastering Lightroom: Book Three – Black & White

Masterlng Lightroom: Book Three – Black & White by Andrew S GibsonMy ebook Mastering Lightroom: Book Three – Black & White goes into the topic of black and white in depth. It explains everything you need to know to make dramatic and beautiful monochrome conversions in Lightroom, including how to use the most popular black and white plug-ins. Click the link to visit my website and learn more.

The post Macphun’s Tonality Pro Versus Lightroom 5 for Black and White Conversion by Andrew S. Gibson appeared first on Digital Photography School.


Digital Photography School

 
Comments Off on Macphun’s Tonality Pro Versus Lightroom 5 for Black and White Conversion

Posted in Photography


Stilles Australien

13 Sep

Da ist diese Stille wieder. Ich bekomme sie selten zu sehen, aber in diesen Bildern kann ich sie erkennen. Frei vom Kitsch konventioneller Landschaftsaufnahmen laden diese Bilder eines Herrn Wouter Van de Voorde ein, in ihnen zu verweilen. Es sind keine Klickstrecken-Bilder, die ich, einmal gesehen, schnell wieder vergesse. Sie prägen sich ein, jedoch sanft und leise.

Wouter Van de Voorde ist ursprünglich Belgier, doch vor sechs Jahren zog es ihn mit seiner australischen Freundin eben dort hin. Nach Australien. Ursprünglich fotografierte der studierte Maler seine Umgebung um seinen Freunden zu Hause zu zeigen, wo er nun lebte.

Doch irgendwann packte ihn die Leidenschaft, Wouter wechselte vom Digitalen zum analogen Mittelformat und hat seitdem ein großartiges Portfolio aufgebaut, das seinesgleichen sucht. Für seine Serie „Hume Landscapes” fotografierte er Pferdekoppeln, unberührte Landschaften, gelegen zwischen Autobahnen.

Blick auf einen See, der Bäume im Wasser spiegelt

Blick auf ein im Gras fressendes Pferd im Hintergrund.

Ein abgebrochener Baum liegt in einem Fluss.

Nebel über einem See am Morgen

Düstere Morgenlandschaft mit Blick auf vernebelten See

Flusslandschaft in blau-rosa Morgenlicht

Der Mond steht vor einer von Müll beladenen Landschaft

Blick auf eine dunkel-vernebelte Landschaft

Blick auf eine dunkel-vernebelte Flusslandschaft

Gestrüpp und im Hintergrund ein Wald.

Was mich zum Fotografieren antreibt ist ein starker Drang, meine Umgebung zu erkunden; obwohl ich hier schon sechs Jahre lebe ist dieser Ort immer noch sehr neu für mich.

So umreißt Wouter seine Motivation, doch das Zentrum seiner Aufmerksamkeit ist das Natürliche in seiner usprünglichsten Form.

Ich habe ein Faible für spärliche Landschaften – und es fühlt sich so an, als ob ich an solchen Orten meine eigene Erzählweise einbringen kann.

Was die Zukunft betrifft, hat Wouter Van de Voorde keinen speziellen Vorsatz, den er verfogt, außer genau das zu tun, was er jetzt gerade macht. Denn die „Fotografie ist ein Ziel an sich”. Wenn das mal kein gutes Schlusswort ist.


kwerfeldein – Fotografie Magazin | Fotocommunity

 
Comments Off on Stilles Australien

Posted in Equipment


Plastik-Pazifik

13 Sep

Auf den ersten Blick sind es spannende Wesen, Tiere Unterwasser, die in Schwärmen durch das klare Blau ziehen. Auf den zweiten Blick erkennt man aber, dass es sich um Müll handelt – kunstvoll arrangierten Plastikmüll. Die Australierin Kim Preston hat eine ästhetische Serie erschaffen, um zum Nachdenken anzuregen und auf ein sehr ernstes Problem aufmerksam zu machen.

Wenn anstelle von Fischen Plastiktüten, statt Quallen Badehauben durch die Meere schwimmen und Strohhalme und Gummihandschuhe die großen Korallenriffe ersetzen, ist es längst zu spät. Diese düstere Zukunftsvision zeigt die Fotoserie „Plastic Pacific“ von Kim Preston. Die Idee zu dieser Serie kam ihr auf Reisen durch Südost-Asien.

Plastiktüten im Meer

Auf einer kleinen Insel in Indonesien, erinnere ich mich, gab es diese riesigen Berge im Landesinneren aus Plastikflaschen, Beuteln und kaputten Plastikstühlen, welche die Rasenflächen und Straßen der Wohngegenden bedeckten. Ich wusste, dass das alles irgendwo hin muss und das dieses Wohin oft das Meer ist.

Ich reise, um zu entdecken, aber das machte mir auch das ganze Ausmaß meiner eigenen Schuld an diesem Problem bewusst. Ich wollte, ohne Panikmache zu betreiben, etwas erschaffen, das den Betrachter zu der selben Erkenntnis führt.

Plastiktüte treibt im Wasser.Badehauben im Wasser.

Täglich werden wir mit unnützem Plastikmüll konfrontiert. Im Supermarkt laufen wir an in Folie verpackten Bio-Bananen vorbei, kaufen Produkte, die doppelt und dreifach verpackt wurden und bekommen an der Kasse eine Tragetüte in die Hand gedrückt, die auf dem Heimweg schon kaputt geht und direkt in der Tonne landet. Kim macht das traurig.

Diese übertriebene Nutzung von Kunststoffen als Verpackung von Konsumgütern ist eine tägliche Quelle der Frustration für mich. So vieles davon ist völlig unnötig, aber die Folgen unserer Verschwendung sind enorm. Ich glaube, dass wir in den westlichen Gesellschaften (und darüber hinaus) zu selbstgefällig sind und dass, wir die wahren Ergebnisse unserer Handlungen in der Art, wie wir unseren Müll sammeln, nicht sehen.

Strohhalme im Wasser.

Technisch entstand die Serie mit einfachsten Mitteln. Kim fotografierte sie in ihrem Hinterhof mit einer Nikon D5000, einem 85mm f/1.8 Nikkor-Objektiv, einem Nikon SB600 Blitzgerät und einer Softbox. Die Objekte hingen von einem Kleiderständer mit verlängertem Arm und als Hintergrund diente ein blauer Stoff. Angelschnur und starkes Gewebe-Klebeband kamen zum Einsatz.

Ursprünglich wollte Kim die Serie Unterwasser in einem großen Aquarium fotografieren, aber ihr geringes Budget zwang sie kreativ zu werden. Nachträglich fügte sie dem blauen Hintergrund in Photoshop noch künstliche Pinselstriche hinzu, um die Illusion von Wasser zu erzeugen.

Einkaufstüten Im Wasser.

Wenn meine Serie jemanden zum Nachdenken anregt und zu Veränderungen veranlasst, wäre es fantastisch. Aber ich denke es ist wichtig, dass die Menschen von selbst darauf kommen. Ich möchte nicht predigen, geschweige denn vorschreiben, was zu tun ist.


kwerfeldein – Fotografie Magazin | Fotocommunity

 
Comments Off on Plastik-Pazifik

Posted in Equipment


Nikon announces SB-500 Speedlight for stills and video

13 Sep

Nikon rounds out its Photokina announcements with the SB-500 Speedlight, a compact flash with a built-in LED for use while recording video. With coverage for a 24mm lens on an FX camera or a 16mm lens on DX, the SB-500 has a guide number of 24m at ISO 100. Read more

Articles: Digital Photography Review (dpreview.com)

 
Comments Off on Nikon announces SB-500 Speedlight for stills and video

Posted in Uncategorized


Nikon announces AF-S Nikkor 20mm f/1.8G ED

13 Sep

Nikon has launched the AF-S Nikkor 20mm f/1.8G ED for FX and DX format Nikon cameras. It updates the existing AF Nikkor 20mm f/2.8, which lacked an internal focus motor for use with entry-level Nikon DSLRs. Using 13 elements in 11 groups, it features a Nano Crystal Coat and offers a minimum focus distance of 0.2m. The AF-S Nikkor 20mm f/1.8G ED will be available in September for $ 799.95. Read more

Articles: Digital Photography Review (dpreview.com)

 
Comments Off on Nikon announces AF-S Nikkor 20mm f/1.8G ED

Posted in Uncategorized


Blackmagic Design introduces PL Mount options for Production Camera 4K and Cinema Camera

13 Sep

Blackmagic Design has announced the addition of two new PL mount options to its line of professional motion picture cameras. The Production Camera 4K and Cinema Camera are now available with a PL mount, complementing existing EF and passive Micro Four Thirds models. Read more

Articles: Digital Photography Review (dpreview.com)

 
Comments Off on Blackmagic Design introduces PL Mount options for Production Camera 4K and Cinema Camera

Posted in Uncategorized


12. September 2014

13 Sep

Ein Beitrag von: Bernd

Blick in einen moosigen Wald.


kwerfeldein – Fotografie Magazin | Fotocommunity

 
Comments Off on 12. September 2014

Posted in Equipment


Sigma announces liquid-repellent filters and clear glass protectors

13 Sep

Optical manufacturer Sigma has expanded its portfolio of lens filters with the introduction of four new models, three of which feature water and oil repellent coatings. The new coatings have been applied to the company’s ultra violet and circular polariser filters, as well as a new clear-glass protector. Read more

Articles: Digital Photography Review (dpreview.com)

 
Comments Off on Sigma announces liquid-repellent filters and clear glass protectors

Posted in Uncategorized