RSS
 

Archive for June, 2014

Kirgisistan – ein Abenteuer

13 Jun

Ein Beitrag von: Andreas Jacob

Kirgi-was? Das war immer die erste Frage, die ich hörte, als ich mich kurzfristig entschlossen hatte, mit zwei Freunden auf eine Skitour und zum Bergsteigen nach Kirgisistan zu fahren.

Ja, Kirgisistan, das bergige Land zwischen Kasachstan, Usbekistan, Tadschikistan und China. Nachdem wir uns einen Dolmetscher und einen Fahrer besorgt hatten, war ich nur noch eins: Neugierig.

Das Land hat den nördlichsten Siebentausender der Welt und eine durchschnittliche Höhe von 1700 Metern über dem Meeresspiegel. Schnell kommt man bis auf 4000 Meter und muss immer den Schnee und die Lawinengefahr im Auge behalten.

Eine Straße führt durch die kirgisische Berglandschaft. Im Vordergrund weidet ein Esel.

Für unseren gemeinsamen Trip hatte ich mit meinen Freunden Bene und Fabi die beste Wahl getroffen, denn die zwei sind wirklich fit, was Ski- und Hochtouren betrifft.

Mit Turkish Airlines ging es zunächst von Salzburg nach Istanbul und von dort weiter nach Bischkek, der Hauptstadt von Kirgisistan. Bei unserer Ankunft wurden wir von Tilek, unserem Dolmetscher, und Vladimir, unserem russischen Fahrer, abgeholt.

Unsere Skier schnallten wir aufs Dach seines Mitsubishi Delica und fuhren 40 Kilometer auf der einzigen geteerten Straße in die Hauptstadt ins Gästehaus. Dort wurden wir mit frischen Pfannkuchen, Tee und Gebäck empfangen. So ist es dort üblich.

Drei Männer schauen auf eine Karte.

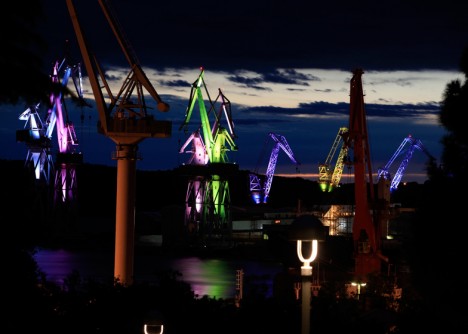
Bischkek war absolutes Neuland für mich. Obwohl die Sonne schien, kam mir diese Stadt mit ihren zahlreichen abbruchreifen Häusern grau und trostlos vor. Von den fast eine Million Einwohnern sah man kaum jemanden auf der Straße.

Als dann gegen Abend ein starker Wind den Staub aufwirbelte und die Straßen im Dämmerlicht lagen, war mein erster Eindruck gefestigt. Bei unserer späteren Rückkehr sollte sich mein Bild von Bischkek allerdings ändern.

Frauen mit kleinen Kindern stehen vor einem Reiterstandbild.

Am nächsten Tag fuhren wir in Richtung Osten zum Alabel-Pass, der auf 3184 Metern liegt. Etwa auf 2700 Metern fanden wir eine Brücke, auf der wir den Fluss überqueren konnten und schließlich einen Platz für unser Zeltlager. Bei frischen 0 °C aßen wir heiße Suppe und eine Scheibe Brot zu Abend.

Die Nacht war hingegen eher durchwachsen: Ständiger Lärm von alten LKWs, die den Pass hinauf schnauften, störte unseren Schlaf und das Thermometer fiel auf -5 °C.

Am nächsten Morgen aßen wir Müsli mit heißem Wasser zum Frühstück. Aber immerhin garnierte uns strahlender Sonnenschein die Mahlzeit. Blauer Himmel, weißer Schnee und absolute Traumhänge – Top-Bedingungen für unsere erste Tour!

Bei strahlendem Sonnenschein ist ein Mann auf Skiern durch den Schnee unterwegs.

Mit den Skiern unter den Füßen überwanden wir in zweieinhalb Stunden 1150 Höhenmeter. Unser Ziel war ein Gipfel mit 3450 Metern. Ein ordentlicher Wind machte es uns nicht besonders leicht.

Ein paar hundert Meter unter dem Gipfel deponierten wir unsere Skier und stiefelten die letzten Meter zu Fuß zum Gipfel. Die Aussicht war traumhaft und ich konnte die Freiheit fühlen.

Knackige 0 °C und der eisige Wind trieben uns jedoch schnell wieder zurück ins Lager, wo wir erst einmal damit beschäftigt waren, die Zelte für die Nacht zu sichern.

Ein Skiläufer bewegt sich über eine weite weiße Ebene.

Der am nächsten Morgen zugefrorene Fluss zeigte, dass die Temperaturen in der Nacht rapide gefallen waren. Der Schnee war wieder gut durchgefroren und wir konnten zum nächsten unbekannten Gipfel aufbrechen.

Bis dorthin waren es knapp 1000 Höhenmeter und es kamen – große Premiere für mich – sogar Steigeisen und Pickel zum Einsatz. Die Tour endete nicht wieder direkt am Auto.

Also mussten wir noch ein paar Meter auf der Straße zurücklegen. In unserer Bergsteigerkluft gaben wir für alle Vorbeifahrenden vermutlich ein seltsames Bild ab.

Zwei Männer in Bergsteigerkluft laufen durch eine Schneelandschaft eine asphaltierte Straße entlang.

Nach einem kurzen Mittagessen brachen wir die Zelte ab und fuhren weiter über den Alabel-Pass in Richtung Toktogul-See. Auf dem Weg machten wir an einem der zahlreichen Honigstände am Straßenrand halt und kauften drei Halb-Liter-Flaschen mit dem süßen Gold.

Bei unserer Ankunft im Gästehaus wurden wir mit Tee empfangen und dazu gab es etwas Fladenbrot und unseren Honig. Ein Bienenbein im Honig war ein untrügliches Merkmal dafür, dass wir ein frisches Naturprodukt aus der Region verzehrten.

Ein Jeep parkt vor einem niedrigen Haus mit Flachdach am Straßenrand.

Am nächsten Morgen wurde ich durch ein Klopfen an die Scheibe des Zimmers geweckt – Frühstückszeit! Ein ordentliches Bett für die Nacht und ein üppiges Frühstück im Sitzen waren eine wahre Wohltat.

Gestärkt machten wir uns auf den Weg zum Toktogul-See. Unterwegs kamen wir an einem kirgisischen Friedhof vorbei. Nie zuvor hatte ich so wunderbare Gräber vor solch einer beeindruckenden Kulisse gesehen.

Steingräber auf einem kirgisischen Friedhof.

Nachdem wir uns dort ein wenig umgeschaut und aufgewärmt hatten, fuhren wir zurück zum Alabel-Pass und machten uns auf die Suche nach einem ruhigen Schlafplatz. Nachts wurde es zunehmend wärmer. Der Schnee weichte durch und wurde sulzig.

Selbst in der Ebene sackten wir deshalb am nächsten Morgen mit jedem Schritt einen halben Meter ein. Wir zogen zu einer Erkundungstour los. Nach zwei Stunden und knappen 100 Höhenmetern verließ uns jedoch der Mut.

Ein Mann kraxelt einen schneebedeckten Hang hinauf.

Aufgrund der Wärme war es einfach aussichtslos, hier eine Skitour zu machen. Also gingen wir zurück zum Camp und machten uns am Tag darauf auf zum nächsten Pass, dem Karakol Ashuu.

Unsere Route verlief vom Alabel-Pass über Susamir vorbei am Mausoleum des kirgisischen Riesen Kojomkul und durch ein bezauberndes Tal in den wunderbaren Ort Kizil-Oy. Dort verbrachten wir eine gemütliche Nacht und ich wurde mit den Bildern belohnt, von denen ich geträumt hatte.

Abendhimmel über einem durch eine schneebedeckte Berglandschaft fließenden Fluss.

Bei grauem Himmel starteten wir unsere Tour, nachdem wir uns zuvor an einer Tankstelle reichlich mit Chips, Schokoriegeln, Eistee und Cola für umgerechnet weniger als zehn Euro eingedeckt hatten.

Als wir von der Passstraße abbogen, setzte sich unser Weg für die kommenden Tage fast nur noch auf Schotterpisten fort. Kurz nach Suusamir kamen wir nach Kojomkul, den nach dem kirgisischen Riesen benannten Ort.

Kojomkul lebte in der ersten Hälfte des 20. Jahrhunderts, soll 2,30 Meter groß gewesen sein und um die 160 Kilo schwer. Der Legende nach trug der Hüne sein verwundetes Pferd auf seinen Schultern zurück ins Dorf.

Portrait eines kigisischen Landbewohners.

Die Wolken, die uns an diesem Tag begleiteten, gaben dem Ort ein wirklich mystisches Flair. Dann tauchten wir ein in den Canyon, den der Fluss Kökömeren in die Landschaft gefräst hatte.

Nach einigen Fotostopps an einer verfallenen Holzbrücke und einer kleinen Ebene mit goldenem Gras und schwarzen Bäumen erreichten wir schließlich den Ort Kizil-Oy.

Zwei kirgisische Jungs spielen hinter einer Hütte.

Genau zu diesem Zeitpunkt riss der Himmel etwas auf und die tiefstehende Sonne schenkte mir bestes Fotolicht.

Der Wirt des Gästehauses bot uns eine russische Sauna an. Frisch gereinigt wurden wir dann zu Tisch gebeten, der sich unter dem Gewicht all der Leckereien wie Keksen, Gutterln, Trockenobst, Nüssen und Brot durchbog und wir bekamen ein herrliches Abendessen.

Ein wahrliches Candle-Light-Dinner, wenn auch aus eher pragmatischen Gründen. Denn Strom gibt es hier nicht immer und wenn doch, kann man sich nie sicher sein, wie lange.

Ein kleiner Junge schuat mit breitem Grinsen über eine Holzbrüstung.

Ausgeschlafen und frisch gestärkt begaben wir uns auf einen Rundgang durch Kizil-Oy. Tilek führte uns auch in eine Schule. Dort waren wir die Pausenattraktion und machten mit einigen Jungs einen Klimmzug-Wettbewerb. Und wir staunten nicht schlecht, wie fit sie sind!

Danach packten wir zusammen und reisten weiter zum Karakol-Ashuu. Solch eine Landschaft mit ihren einmaligen Farben habe ich noch nicht erlebt!

Steingräber erscheinen winzig vor einem gewaltigen Berg.

Die Dörfer wurden kleiner und ärmlicher. Nach rund fünf Stunden über teilweise haarsträubende Schotterpisten erreichten wir den Pass auf 2700 Metern Höhe. Ein großes Schneefeld machte das Weiterfahren unmöglich. So wurde die Straße unser Lagerplatz und wir bauten die Zelte auf.

Vorsichtshalber errichteten wir einen Schutzwall aus Steinen, denn unser Fahrer Vladimir meinte, es könne jederzeit ein Kirgise mit seinem Auto angerauscht kommen.

Asphaltierte Fernstraße durch eine Hochebene in Kirgisistan.

Unsere Tour auf einen knappen Viertausender war zwar nicht sonderlich schwer, wir mussten allerdings von unserem ursprünglichen Plan abrücken, da der andere Gipfel zu lawinengefährdet war.

So nutzten wir die Skier nur zum Anstieg und machten uns zuletzt zu Fuß durch Schnee und Steine auf den Weg zum Gipfel. Dieses Mal war der Wind noch heftiger und die anspruchsvolle Höhe war der Grund, warum wir uns zügig durch die Felsen zurück zum Lager arbeiteten.

Zwei Bergsteiger erklimmen einen Gipfel.

Obwohl wir an diesem Morgen mit reichlich Schnee auf dem Zelt aufwachten, war an eine Skitour nicht mehr zu denken. Wir waren einfach zu spät dran und der Winter war zu mild.

So entschieden wir uns, zum Issyk-Kul, einem warmen Salzsee, aufzubrechen. Die atemberaubende Landschaft und die Menschen, die wir auf dem Weg dorthin trafen, entschädigten die stundenlange Holperfahrt über Schotterpisten.

Ein LKW fährt eine steile Bergstraße hinauf. Die Ladefläche ist voll mit winkenden Kindern.

Der Issyk-Kul auf 1700 Metern Höhe ist nach dem Titicaca-See der zweitgrößte Alpinsee der Welt, bis zu 700 Meter tief und wird von rund 80 Gletschern gespeist.

Da er keinen Abfluss hat und das Wasser nur verdunsten kann, ist er leicht salzig. Zusätzlich wird er von unterirdischen, heißen Quellen gespeist, sodass er im Winter nie zufriert.

Vor der Kulisse einer schneebedeckten Bergkette liegt ein tiefblauer Gebirgssee.

Spät am nächsten Tag erst verging der anfängliche Regen und die Luft war unglaublich klar. Also spazierten wir mit Tilek durch den Ort und in das hiesige Sanatorium, in dem schon Juri Gagarin, der erste Kosmonaut, trainiert hatte.

Der Bau, der Park – alles war leer und wurde für den Sommer vorbereitet. Besonders wohl fühlte ich mich dort nicht.

Unsere Reise neigte sich langsam ihrem Ende zu und wir brachen nach Bischkek auf. Unterwegs machten wir jedoch noch einige Zwischenstationen.

Eine Herde steht am Hang eines grünen Hügels in der Ferne.

Die erste war der Fairy-Tale-Canyon, ein Gebiet, in dem verschiedene Erdarten vom Regen ständig neu ausgewaschen werden. Das Hinweis-Schild dorthin war mir schon auf dem Hinweg Richtung Barskoon aufgefallen.

Das Gestein dort gleicht eher einem riesigen, festen Erdhaufen, der mal ganz weiche und zwischendurch mal ganz harte Formen hervorbringt.

Gesteinsschichten zeichnen sich an einem Bergmassiv ab.

Mit genug Fantasie kann man darin verschiedene Märchenfiguren sehen. Die Landschaft präsentierte sich an diesem Tag ständig neu. Teilweise kam ich mir vor wie in Südamerika. Weite Ebenen lagen zwischen hohen, schneebedeckten Bergen.

Irgendwann bogen wir nach rechts Richtung kasachische Grenze ab. Ziel war ein kleiner, idyllischer Bergsee. Während ein Hirte seine Schafe und Pferde weiter trieb und uns den wunderbaren Platz zum Campen überließ, bauten wir unsere Zelte auf.

Zottige Schafe weiden vor einem gewaltigen Gebirgshang.

Am nächsten Tag brachen wir auf, um wieder in die uns inzwischen vertraute Hauptstadt zurückzufahren. Hatte sich Bischkek mir anfangs grau und verlassen präsentiert, so war in den vergangenen zwei Wochen alles grün geworden.

Überall spielten Kinder, Familien genossen die warmen Temperaturen und es schien, als wäre die Stadt zum Leben erwacht. Und so blieb sie mir in guter Erinnerung als wir Kirgisistan am Ende mit starken, bleibenden Eindrücken verließen.


kwerfeldein – Fotografie Magazin | Fotocommunity

 
Comments Off on Kirgisistan – ein Abenteuer

Posted in Equipment


Infrastructural Art: Colorful LEDs Lights Up Shipyard Cranes

13 Jun

[ By WebUrbanist in Art & Installation & Sound. ]

shipyard crane art

The imagination readily fastens onto the anthropomorphic figures like those found in shipyards, turning looming metal giants into huge toy beasts, origami cranes writ large.

shipyard light show art

shipyard colorful close up

Lighting designer Dean Skira takes things a step further in this public exhibition titled Lighting Giants, using nearly 100 RGB LEDs to produce an array of colorful effects at a massive scale – 16,000 different possible hues in total.

Pula, 04.05.2014 - U sklopu drugog Visualia festivala osvjetljene Uljanikove dizalice

shipyard multi colored installation

Located in a major Croatian shipyard, the show involves a shifting spectrum of illumination that ranges from pure white to wild rainbows, all directed up into the rugged frameworks of industrial monstrosities.

shipyard light up all white

shipyard light up red

The installation, funded by the ministry of tourism, was in part a response to calls for the relocation of the shipping infrastructure, seen by many as an eyesore. Instead of doing away with the cranes, a part of local industry and history, this work celebrates and highlights them.

shipyard light colorful

shipyard last image photo

About the artist: he is a “lighting designer with over twenty years of experience in designing innovative lighting solutions for urban, landscape, commercial and residential spaces. Even in his early childhood he was fascinated by light and its sources, strongly influenced by his father’s professional work in stained glass. He promotes an architectural lighting design concept that goes beyond utilitarian where lighting can have high impact on person’s emotional states.”

Share on Facebook


[ By WebUrbanist in Art & Installation & Sound. ]

[ WebUrbanist | Archives | Galleries | Privacy | TOS ]


WebUrbanist

 
Comments Off on Infrastructural Art: Colorful LEDs Lights Up Shipyard Cranes

Posted in Creativity


Almost There: Signs from the Near Future May Blow Your Mind

13 Jun

[ By WebUrbanist in Conceptual & Futuristic & Technology. ]

no synthetic biology allowed

A few are far-fetched, but most of these notices are shocking in part because they are nearly believable – some may be an accepted reality within the next few years (click to enlarge).

contact lens selfie alert

disable your holographic companion

exoskeleton scanning in progress

driver free taxi cab

Collected on signsfromthenearfuture, a Tumblr blog, their subjects range from driverless cars and solar roadways to cryogenic stations and hyperloop trains.

jetpack station future sign

oversharing cell phone alert

preconition training classroom sign

drones watching alert

Some are clearly tongue-in-cheek commentary on current social behavior and perceived threats to privacy, or based on science-fiction principles unlikely to materialize, but who knows. Others you may be seeing very soon on streets and in other public places (alas, probably not the one about jetpack rentals).

Share on Facebook


[ By WebUrbanist in Conceptual & Futuristic & Technology. ]

[ WebUrbanist | Archives | Galleries | Privacy | TOS ]


WebUrbanist

 
Comments Off on Almost There: Signs from the Near Future May Blow Your Mind

Posted in Creativity


Nikon Coolpix AW120 real-world samples gallery

13 Jun

nikonaw.jpg

Nikon’s Coolpix AW120 features a 16 megapixel sensor and is waterproof to 18m/59 ft. It offers a 24-120mm equiv. lens, along with built-in Wi-Fi and GPS. The AW120 will withstand a drop from 2m/6.6 ft and is freezeproof to -10° C/ 14° F. Among nearly all of its peers it offers the widest lens, though at F2.8-4.9 not as fast at the wide end as the Olympus TG-3’s or Ricoh WG-4’s. Take a look at what the AW120 is capable of in the real-world. See gallery

News: Digital Photography Review (dpreview.com)

 
Comments Off on Nikon Coolpix AW120 real-world samples gallery

Posted in Uncategorized


8 Reasons to Use Silver Efex Pro 2 for Your Black and White Conversions

13 Jun

Silver Efex Pro 2 review

You can convert colour photos to black and white in Photoshop and Lightroom (or your Raw conversion software of choice). But the last few years have also seen an increase in the number of plug-ins built to do nothing else, other than convert photos to monochrome.

Today I’m going to look at what many people consider to be the best black and white plug-in around – Nik Software’s Silver Efex Pro 2. Rather than provide a comprehensive review of the software, I’m going to look at some of the things you can do with it that you can’t (or would be much more difficult) in Photoshop or Lightroom.

1. Presets

Silver Efex Pro 2 has 38 presets that you can use as starting points for your processing work, including vintage looks as well as modern ones. This places the plug-in ahead of Photoshop, and probably ahead of Lightroom too. You can buy Develop Presets for Lightroom, but it will be difficult to find some that give you as many options as those in Silver Efex Pro 2.

Here’s a sample of some of the presets. The original colour photo is shown top left.

Silver Efex Pro 2 review

2. There are more tools for enhancing texture

Silver Efex Pro 2 review

The full set of Contrast and Structure sliders in Silver Efex Pro 2.

One of the elements that makes black and white photos so effective is texture. You can enhance texture in both Photoshop and Lightroom (the Contrast and Clarity sliders are my favourite tools for this) but Silver Efex Pro 2 takes it several steps further.

The Contrast sliders

Silver Efex Pro 2 has four sliders for adjusting contrast. The Contrast slider is the same as the one in Lightroom or Adobe Camera Raw. The Amplify Whites and Amplify Blacks sliders let you increase Contrast in the highlights and shadows respectively. There’s also a Soft Contrast slider that increases contrast but in a less aggressive way, almost as if there is an overlay of gaussian blur. This slider is very useful for portraits.

If you get carried away with the Contrast sliders you can lose detail in the highlights and shadows. So, in addition to the four sliders already mentioned, there are two Tonality Protection sliders used to bring back detail in clipped areas.

Silver Efex Pro 2 review

These portraits show the difference between Contrast and Soft Contrast. Soft Contrast is ideal for portraits, while Contrast is better for subjects like architecture and the landscape.

The Structure sliders

Structure slider is similar to Clarity in Lightroom and Adobe Camera Raw. But while in those programs the Clarity slider affects all the tones in the selected area, in Silver Efex Pro 2 you can choose to adjust Structure independently in the shadows, midtones and highlights. There is also a Fine Structure slider for increasing mid-tone contrast in areas of fine detail.

Silver Efex Pro 2 review

The above photo shows three close-ups of the same portrait used earlier.

Top: A neutral black and white conversion, with no increase in Clarity.

Middle: This is what happens when you increase Clarity to 100% in Lightroom (note that you wouldn’t normally push it that far for a portrait, I did it here to show you the effect). Clarity is increased uniformly across the frame, affecting the skin tones as well as the hair.

Bottom: Shadows Structure set to 100% in Silver Efex Pro 2. Only the shadows are affected, leaving the midtones and highlights alone. This brought out the detail in the model’s hair and eyes, but left her skin untouched. You would have to use a selection or a mask in Photoshop or the Adjustment Brush in Lightroom to achieve the same effect.

3. Control Points make local adjustments easy

Just like in Photoshop and Lightroom you can apply adjustments locally as well as globally, using a system called Control Points.

A Control Point is the centre of a circle within which you can make tonal adjustments. The adjustment is applied to tones similar in brightness and colour to the pixels underneath the Control Point itself. For example, if you place a Control Point over a dark tone, then increase the brightness, only the dark tones within the circle are adjusted. Light tones remain untouched.

Silver Efex Pro 2 review

The yellow and black dot marks the Control Point. Adjustments are made to pixels matching the colour and brightness of the pixels underneath it. There are seven sliders you can adjust: Brightness (Br), Contrast (Co), Structure (St), Amplify Whites (AW), Amplify Blacks (AB), Fine Structure (FS) and Selective Colorization (SC).

It may sound complicated but it only takes a little practice to understand how it works. You can use as many Control Points as you want in an image, and group them together to cover areas that don’t conform easily to a circular shape.

4. Selective colouring is easy

Selective colouring is the technique of converting an image to black and white while leaving part of it in colour. This is easy with Silver Efex Pro 2 as all you have to do is place a Control Point over the area where you want to retain colour.

I used two Control Points in the following example, one on each coloured shutter:

Silver Efex Pro 2 review

5. The History panel is excellent

Silver Efex Pro 2 has the best History panel I’ve seen in any software. Every adjustment you make to your photo is listed.

Silver Efex Pro 2 review

The History panel works together with the Compare view. The yellow tab on the left indicates the photo used for the Before view, and the entry used for the After view is displayed in yellow text. This simple method lets you compare any two entries in the History panel.

6. The Zone System

Silver Efex Pro 2 can show you where the tones in your photo fall within the eleven zones of the Zone System. One useful application of this is that you can use it to see which areas of your photo may block up in print because they are too dark or too light.

This screenshot shows the tones which fall into zone 3. They are indicated by the brown diagonal lines.

Silver Efex Pro 2 review

7. Black and White film emulation

The Film Types panel gives you a choice of 18 different black and white films. When you choose one the plug-in emulates the tonality and grain structure of the selected film. It’s an easy way to get the film look without having to shoot, develop, and scan black and white film.

8. Silver Efex Pro 2 comes bundled with other software

Silver Efex Pro 2 is part of the Nik Collection, which includes seven applications and costs $ 149. That works out to less than $ 25 a plug-in.

Note: If you’re on a tight budget, the standalone version of OnOne Software’s Perfect Photo Suite 8 represents even better value at $ 79. Click the link to learn more.

Further resources

You can learn more about Silver Efex Pro 2 at these links:

  • Silver Efex Pro 2 official page
  • Silver Efex Pro 2 tutorials
  • Silver Efex Pro 2 videos on YouTube

Your turn

What software do you use for black and white conversions? Do you prefer Photoshop, Lightroom, another Raw conversion program or a plug-in? Let us know in the comments – what would you recommend to other readers?

The post 8 Reasons to Use Silver Efex Pro 2 for Your Black and White Conversions by Andrew S. Gibson appeared first on Digital Photography School.


Digital Photography School

 
Comments Off on 8 Reasons to Use Silver Efex Pro 2 for Your Black and White Conversions

Posted in Photography


DIY: Photo Confetti

13 Jun
Extra photos for bloggers: 1, 2, 3

Nothing says it’s your party and you’ll confetti all you want to like photo confetti.

You can easily turn any photo into confetti. And yes, by any photo, we totally mean a photo with you and your friends’ faces all over it.

Because everyone deserves personalized confetti.

*Insert confetti emoji* x 1000

This way party people!

Learn How to Make Your Own Photo Confetti

(…)
Read the rest of DIY: Photo Confetti (283 words)


© Erika for Photojojo, 2014. |
Permalink |
No comment |
Add to
del.icio.us

Post tags:


Photojojo

 
Comments Off on DIY: Photo Confetti

Posted in Equipment


DxOMark Mobile report: Samsung Galaxy S5 shares top spot

13 Jun

titel.jpg

The Galaxy S5 is Samsung’s latest flagship smartphone and successor to the Galaxy S4. It comes with a 16MP BSI CMOS sensor, an F2.2 maximum aperture, 4K video capture and phase detection AF, but has to make do without an optical image stabilization system. That doesn’t hold it back much – DxOMark’s Mobile report gives its image quality full marks, making it a joint leader in their rankings with the Sony Xperia Z2. Learn more

News: Digital Photography Review (dpreview.com)

 
Comments Off on DxOMark Mobile report: Samsung Galaxy S5 shares top spot

Posted in Uncategorized


12. Juni 2014

13 Jun

Ein Beitrag von: Daniel Stark

Die Silhouetten zweier Bäume vor stürmischem Himmel.


kwerfeldein – Fotografie Magazin | Fotocommunity

 
Comments Off on 12. Juni 2014

Posted in Equipment


Sigma announces US pricing and availability of dp2 Quattro

12 Jun

TS590x442-2.jpg

Sigma has announced US pricing and availability for its latest camera the dp2 Quattro. Featuring a newly-developed ~19.6 million pixel APS-C Foveon sensor and a completely new body design, the dp2 Quattro has a 30mm F2.8 lens (45mm equivalent) and will be available in the USA in early August at a street price of $ 999. Click through for the press release.

News: Digital Photography Review (dpreview.com)

 
Comments Off on Sigma announces US pricing and availability of dp2 Quattro

Posted in Uncategorized


3 Tips on How to Approach Photography as a Hobby

12 Jun

Recently, I gave you a look inside the bag of a hobby photographer on a budget, and after reading all the comments on that post, I got to thinking about a topic that doesn’t really get all that much attention…

approachphotographyhobby-5

There are technical posts that detail things like getting sharper images and even plenty of advice on going pro, but what I have not found in my search, is any solid advice on how to approach photography as a hobby.

Sure you’ll need to learn the technical stuff in order to make quality photos, but there’s more to approaching this craft than just learning, you have to have the right mindset going in or, more than likely, your camera will be collecting dust-bunnies in your closet next month.

First what’s the difference between hobbyist and professional?

I thought about this for a while and really only two standout differences come to mind – money and time.

  • Money – The professional needs to make money from their photography – it’s how they pay bills and put food on the table. As a hobbyist, while you could still make money on the side from time to time, the vast majority of your money comes from another source (i.e. a typical desk job, the retirement fund, spouse, etc.).
  • Time – The professional, by nature, is required to invest time into photography as it directly effects how much money they will make in the end. However, as a hobbyist you’re more likely to have other priorities more important than photography and as a result will spend less time behind the camera than a professional.

Notice that quality is not one of the two differentiating factors. As a hobbyist you can certainly still make great photographs, there are many hobbyists that do just that, but it’s not something you can do overnight. Professional or not – photography is a journey.

Three steps for approaching photography as a hobby

approachphotography-4

Step one – learn to experiment

One of the best parts of being classified as a hobbyist is you don’t have anyone paying you to take their photos which means you can take your photos.

You can experiment with different styles of photography like HDR, light painting, black and white. You can photograph people or landscapes. I’ve always believed that the best way to learn how something works is to just get out and start using it. After you’ve played around with a camera a bit and done some own experimentation – the tutorials, guidebooks, and even the camera’s manual will make more sense, allowing you to learn even more.

Take action today

One of the best ways to force yourself to experiment is by joining various communities. Digital Photography School runs a weekly challenge in which you are given a theme to photograph for the week and share your result in the comments of the week’s post. It’s fun and really can get you thinking about new ideas.

approachphotography-step2

Step two – get out of your bubble

Join a community and share your work. There’s no shame in asking others for help, but it can be a bit scary to do so, especially when you’ve hit a personal breakthrough and are afraid someone might tear your photograph apart.

Making friends – both through the virtual worlds of social media and internet forums, and the real world photography club that meets in the basement of your local town hall – is a great way to gain support and keep the motivation flowing.

Take action today

dPS has a huge forum with thousands of people sharing and critiquing each other’s photography daily. Google+ and Facebook also offer groups specific to various genres of photography. If all else fails you could always start your own website and start sharing your work on a regular basis there or find a local club that will give you a more real world experience. The key is to get yourself out of the bubble.

Step three – invest in yourself

Whether you’re photographing pets or at the zoo

approachphotographyhobby-8b approachphotographyhobby-7b

Or on vacation, or in your backyard. The more you’re willing to invest the more it will show in your work.

approachphotographyhobby-3b

approachphotographyhobby-4b

Yes, this still about photography as a hobby, but it’s an expensive hobby and not just at the wallet, but in time as well – so be prepared to invest both if you want to succeed.

I’m not saying you need to buy pro gear, an entry level camera and kit lens can take you far and get you some great photographs – it may be all you ever need in terms of camera gear. But don’t forget about the accessories – tripods, filters and software are all part of the package as well.

Make sure you’re not only investing money into your hobby though, invest time. Quality gear and software will not fix a lack of experience, so get out and start taking photographs by following step one. Stay motivated by sharing your work and asking for critique by following step two. Then, as finances and time allow, invest both into improvement and you’ll have a winning recipe for success.

Take action today

Block out some time this weekend and try and complete the weekly challenge here on DPS.  Start a ‘photography fund’ even if it’s only five or ten dollars a month. This will go a long way in allowing you to invest in better accessories and new gear which, can’t make you better alone, can certainly improve your images when you combine them with the more experience behind the camera.

How have you approached photography as a hobby?

Finally, I’d love to open this post up for discussion. How have you approached your own photography as a hobby? Or how would you recommend others approach theirs?

The post 3 Tips on How to Approach Photography as a Hobby by John Davenport appeared first on Digital Photography School.


Digital Photography School

 
Comments Off on 3 Tips on How to Approach Photography as a Hobby

Posted in Photography