RSS
 

Archive for April, 2014

Olympus sued for $273 million over accounting scandal

11 Apr

shared:Olympus.png

Reuters reports six Japanese trust banks have filed a lawsuit against Olympus for ¥27.9bn (around $ 273 million) in damages relating to the company’s false financial statements. According to the report this is the fifth publicly recognized lawsuit stemming from a 2011 accounting scandal. Olympus said it would set aside ¥17bn ($ 166.49m) to settle three of those five suits. Learn more

News: Digital Photography Review (dpreview.com)

 
Comments Off on Olympus sued for $273 million over accounting scandal

Posted in Uncategorized


Animated Still Lifes: 7 Relaxing Cinemagraphic Illustrations

11 Apr

[ By WebUrbanist in Art & Drawing & Digital. ]

animated bedroom fan gif

Reclining in the space between the extremes of sped-up, movie-style GIF files and traditional, immobile paintings, this artist brings lazy scenes of everyday reality to life.

animated-window-tree-view

animated-train-ride-gif

Rebecca Mockam is a Brooklyn-based illustrator and comic artist whose cinemagraphs move only as much as needed, a different kind of visual artist’s takes on medium most often associated with photography.

animated gif magazine cover

Note that these reduced-sized examples don’t do justice to the detail and seamlessness of her originals, so it is worth looking more closely at her portfolio for these and more.

animated tabletop phone gif

Her work is peaceful and contemplative, lending itself to a lot of potential comparisons, including Edward Hopper and Norman Rockwell. At the same time, much of the subject matters is definitively contemporary, including all-too-familiar ringing phones and tablet swipes. Still-life Americana revisited, this approach (in the age of portable computers, tablets and phones) uses a medium that makes sense with its era.

animated-pitchers-mound-gif

animated-street-scene-gif

Mockam has worked on everything from art exhibits and comic covers and is currently drawing a graphic novel titled Four Points, set to be released in 2015. She uses a Wacom tablet for most of her illustration work, sketches with a pencil and ink with various brush pens, and a nib & ink when it comes to drawing comics.

Share on Facebook


[ By WebUrbanist in Art & Drawing & Digital. ]

[ WebUrbanist | Archives | Galleries | Privacy | TOS ]


WebUrbanist

 
Comments Off on Animated Still Lifes: 7 Relaxing Cinemagraphic Illustrations

Posted in Creativity


Teach Your Dog To Take A Selfie

11 Apr
Extra photos for bloggers: 1, 2, 3

Ever wonder what Fido gets up to while you’re away?

Teach your pup to selfie, and all you’ll have to do is follow Mr. Muffins on Instagram to keep tabs.

Yes, your dog can take selfies!

Our Pal Anna Jane of NYC’s School for The Dogs has been teaching dogs this skill (her pooch Amos is quite a pro). She’s kindly agreed to to let you in on just how it’s done.

Convincing your furball to update their Instagram on the regs, is up to you.

How To Teach Your Dog to Selfie

p.s. Help! Anna Jane’s School for the Dogs’ building burned down. So she is raising funds to give the doggies of New York a new place to go for training (and fun). Throw her a (metaphorical) bone, wouldya? Visit her fundraising site.

(…)
Read the rest of Teach Your Dog To Take A Selfie (384 words)


© laurel for Photojojo, 2014. |
Permalink |
No comment |
Add to
del.icio.us

Post tags:


Photojojo

 
Comments Off on Teach Your Dog To Take A Selfie

Posted in Equipment


The Triangle of Color Adjustments in Lightroom

11 Apr

In digital photography, just like exposure, colors too have a triangle of their own.

3 Color correction triangle

Color adjustment triangle

The triangle of color adjustments in Lightroom. The three attributes that form the triangle are shown above, now let’s see how they affect the colors of an image.

Exposure

This attribute controls the brightness level of all the pixels that constitute an image. Whenever the brightness level of the pixel is altered, the color value too gets changed. You can easily identify this effect in a photograph of a landscape. Apply a Graduated Filter on the sky area with a value of -2.00 on the exposure slider and then take a look at the sky area. You will immediately notice that the blue color has become richer. You would do well to remember that you didn’t change any other value in that sky area except the exposure.

Let’s look at some examples of exposure adjustments and how it affects the color:

1 with nothing applied

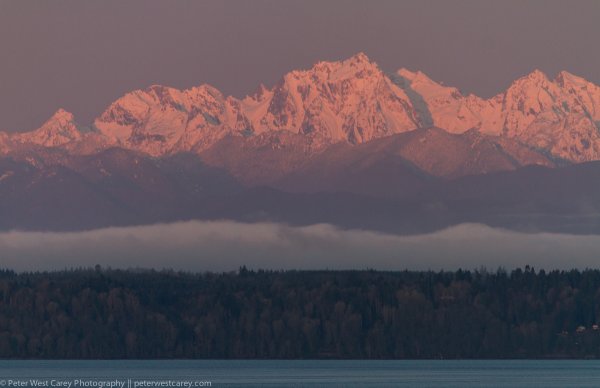
No adjustments applied on graduated filter

2 EV minus 1

-1.0 stop exposure adjustment applied

2 EV minus 1 5 applied

-1.5 stop exposure adjustment applied

2c EV minus 2 applied

-2.0 stop exposure adjustment applied

Saturation

This attribute controls the intensity of all colors in all of the pixels that constitute an image. Since the effect of this tool is global, it needs to be used with caution; otherwise it is guaranteed that the picture will end up looking artificial. To check the effect of this tool, keep the same graduated filter applied and active, reset the exposure values by double clicking the exposure slider (or the word Effect), then move the saturation slider towards the right; you will notice the changes that are wrought in the sky area.

4a Sat minus 50

Saturation set to -50

4b Sat minus 100

Saturation set to -100

4c Sat plus 50

Saturation set to +50

4d Sat plus 100

Saturation set to +100

There is another tool called Vibrance, just above the saturation slider. I have considered this as part of saturation tool. It plays only with the less intense colors, one of the smartest tools in Lightroom (Note: this tool can be found only in the Basic Deveolop panel not in the Graduated Filter or any other local correction tools).

White balance

This is one of the most discussed topics in the internet. What white balance exactly does is to change all of the color values of all the pixels in the photograph; yes I mean all three RGB values of a pixel. When you move the White Balance slider towards the right the photograph gets warmer, specifically towards yellow side. When you move it towards the left, the photograph gets cooler, specifically towards blue side. (Note: this tool is at its full power when the image is captured in RAW format) To check this effect, reset the previous graduated filter and move the White Balance slider either way to see for yourself.

3a WB 50

White Balance adjustment made to -50

3b WB minus 100

White Balance adjustment made to -100

3c plus 50 WB

White Balance adjustment made to +50

3d plus 100 WB

White Balance adjustment made to +100

There is another tool below White Balance called tint, it is part of adjust the white balance. This tool needs to be used cautiously, as the name suggests the tool can be used to add or remove the tint primarily green or magenta in color, and mostly helps to bring out the real colors. If this tool is used carefully, it will help you to remove the color cast from your photograph if any.

Putting it all together

Now that you know how all three major tools control the colors in a photograph, the question is how to apply this knowledge. There is no universal prescription, and each photograph demands its own treatment. Understanding how all these tools work, and developing your skill by practicing on a few photographs, will make you so much better in visualizing and bringing out the colors in any given photograph.

5a all 3 components applied

Graduated Filter all sliders applied

Now, you know the major tools controlling the colors in an image and how they are being applied on this sample image (see screen shot above) but I still felt something was missing in the sky region. So I applied a slight color tint from the color picker tool (see image below).

5b small colour tint used  balance

Graduated filter slider adjustments plus a color tint added, see red circle

Some photographs might be underexposed, whereas others might be under saturated to some extent. Remember RAW images tend to be less saturated, lower in contrast, and less sharpened. In some photographs a little adjustment to the White Balance slider may fix almost all the problems.

Final image

Here is a look at the sliders in all the panels used to produce the final image.

6a Global adjustments

Basic panel slider adjustments

6c Detail panel adjustments

Detail panel slider adjustments

6b adjustments Tone curve panel

Tone curve panel adjustments

6d Lens correction panel adjustments

Lens correction panel adjustments

6e mild vignetting

Post-crop vignette added

After using almost all the panels in Develop module here are the before and after photographs.

1 As shot

As shot right out of camera

2 Final image

Final image after all corrections have been applied

All said, you are the creator of your photograph. You have to decide which tool needs to be used and in what proportion with other tools, to give you the results you hoped for when you pressed the shutter button. Hope this article helps you make more beautiful photographs.

If you have any other Lightroom color adjustment tips of tricks please share with us in the comments below.

The post The Triangle of Color Adjustments in Lightroom by Navan Viswa appeared first on Digital Photography School.


Digital Photography School

 
Comments Off on The Triangle of Color Adjustments in Lightroom

Posted in Photography


Fully loaded: Pentax K-3 review

10 Apr

k-3-beauty-shot.jpg

Pentax cameras have always been innovative, and Ricoh has upped the ante with the K-3. Its image stabilization system not only reduces shake, but it can also simulate an anti-aliasing filter. The K-3 marks the latest evolution of one of the best-handling DSLRs in its class. It features a new autofocus system, 24 megapixel CMOS sensor, 8.3 fps continuous shooting, and USB 3.0 support. Has Ricoh put together a top-notch DSLR in the K-3? Read our review to find out

News: Digital Photography Review (dpreview.com)

 
Comments Off on Fully loaded: Pentax K-3 review

Posted in Uncategorized


Life is too Short to be Taking Photos of Great Subjects in Bad Light

10 Apr

Sometimes the lessons are so basic, they are overlooked. This is one I feel needs to be repeated for new photographers as well as a gentle reminder for those of us with decades of shooting experience.

Peter-West-Carey-_MG_5589

Photography is the process of recording light. It is the same with your eyes, every waking moment of every day you use them. You see subjects around you and mentally are so busy classifying and figuring them out (“What a beautiful red Ferrari! Is it slowing down for a right hand turn?”) that when it comes time to lift a camera to your eye, you forget to stop and think about what is really going on.

You make pictures of light first

Of what are you really taking photos? You are taking photos first and foremost of light. Most of the time it is light reflected off of a subject but sometimes it is of the light source itself (e.g. sunsets, light painting, fireworks, etc.). In the case of the former, you need to remember the subject itself might be interesting, but if the light is ‘bad’ then the subject doesn’t stand a chance.

Let me illustrate by example. These images are of the Olympic Mountain Range in Washington State, where I live part of the time. They are beautiful this time of year, when it’s not raining so much we can’t see them, and when they still have a full coating of snow for contrast. I took the pictures at different times of day of the exact same subject, but the results are different each time.

Sunrise 6:12AM

Sunrise 6:12 a.m.

After Sunrise 7:04AM

After Sunrise 7:04 a.m.

Nearing Mid Day 10:28AM

Nearing Mid Day 10:28 a.m.

An Hour Before Sunset 6:10PM

An Hour Before Sunset 6:10 p.m.

The Morning Before At Sunrise 5:59AM

The Morning Before At Sunrise 5:59 a.m.

Light changes throughout the day

The images were all processed exactly the same and while the color balance naturally changed, what is most dramatic is the change in light and effect it has on the impact of the image.

A great photographer always thinks about light, even when she or he doesn’t have a camera up to their eye. It is light that makes the photo. The great thing about it is there is no ‘perfect’ that need be obtained in this regard. There is simply different light which will impart a different feel to the subject and whether or not you like that light.

What if the light is bad?

Sometimes it is the tone of the light, or the angle, or the intensity, or the temperature. The best practice for taking the best picture possible of a given subject, in my mind, goes something like this, “Wow, that’s a beautiful subject! Does the light work right now?”

This process has stopped me from taking more bad pictures than I can count. This is because I have reviewed thousands of my own crappy images with bad light, but great subjects, that this process has been cemented into my mind.

The next time you are enamored by a fabulous subject, ask yourself, “Is this the best light for this subject?” If not, your photos will be lackluster. If the light is not right, find a time or place where it will be better. If the situation won’t allow for great light, set your camera down and just admire the subject that caught your attention in the first place.

Life is too short to be taking photos of great subjects in bad light.

The post Life is too Short to be Taking Photos of Great Subjects in Bad Light by Peter West Carey appeared first on Digital Photography School.


Digital Photography School

 
Comments Off on Life is too Short to be Taking Photos of Great Subjects in Bad Light

Posted in Photography


10. April 2014

10 Apr

Ein Beitrag von: Philipp Hilpert

Birds and such in the morning © Philipp Hilpert


kwerfeldein – Fotografie Magazin | Fotocommunity

 
Comments Off on 10. April 2014

Posted in Equipment


Nikon adds underwater housing and flash to 1 System

10 Apr

pic_140410_01_02.png

For those who want to take a swim with Nikon’s latest 1 System mirrorless camera – the J4 – the company is also releasing both an underwater housing and speedlight. The WP-N3 housing lets you take the camera up to 45m underwater and supports several 1 System kit lenses. It also has a port for connecting to a strobe, such as the new SB-N10, which has a maximum depth of 100m and works with the already waterproof AW1, as well.

News: Digital Photography Review (dpreview.com)

 
Comments Off on Nikon adds underwater housing and flash to 1 System

Posted in Uncategorized


Bodyscapes

10 Apr

Carl Warners Landschaften sind einzigartig. In seiner Welt gibt es das Schienbein-Knie-Tal und die Wüste der Rücken. Körper formen Berge und Täler und man kommt aus dem Staunen kaum heraus, denn die Idee ist so simpel wie großartig.

Jedes Bild zeigt nur einen Körper. Manchmal aus einem, manchmal aus mehreren Blickwinkeln. Über jedem Körper sind zarte Wolken eingearbeitet. Sie wirken wie Federn und vervollständigen die Landschaften perfekt.

Cut Throat Valley © Carl Warner

Desert of Sleeping Men © Carl Warner

Elbow Point © Carl Warner

Headless Horizon © Carl Warner

Fingers Cave © Carl WarnerTwin Peaks © Carl Warner

Pectoral Dunes © Carl Warner

Shin Knee Valley © Carl Warner

The Cave of Abdo-Men © Carl Warner

The Sleeper © Carl Warner

The Valley Of the Reclining Woman © Carl Warner

Auf die Idee zu dieser Serie kam Carl durch seine Landschaften aus Lebensmitteln. Die Arbeit für „Bodyscapes“ war jedoch nicht einfacher und natürlich viel intimer, verrät der britische Fotograf.


kwerfeldein – Fotografie Magazin | Fotocommunity

 
Comments Off on Bodyscapes

Posted in Equipment


Nikon debuts lighter 18-300mm F3.5-6.3 to DX lens lineup

10 Apr

AFS_DX_18_300_3.5_6.3G.png

Nikon has unveiled the AF-S DX NIKKOR 18-300mm F/3.5-6.3 ED VR (27-450mm equivalent). It doesn’t replace the company’s existing 18-300mm lens – rather it’s 1/3-stop slower at the long end and 30% lighter, weighing 19.4 ounces. The new 18-300mm has Nikon’s Vibration Reduction system, which can reduce shake by up to 4 stops. Built with three Extra-low Dispersion (ED) glass elements and Nikon’s Silent Wave Motor for quieter focusing, the 18-300mm F3.5-6.3 will be available in May for $ 899.95.

News: Digital Photography Review (dpreview.com)

 
Comments Off on Nikon debuts lighter 18-300mm F3.5-6.3 to DX lens lineup

Posted in Uncategorized