Month: December 2013

  • Puzzle Facade: Play a Building Like a Giant Rubik’s Cube

    [ By Steph in Art & Installation & Sound. ]

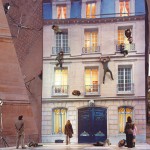
    Rubiks Cube Architecture Project 1
    The entire facade of the Ars Electronic Building in Linz, Austria has become the world’s largest playable Rubik’s cube thanks to a color-changing illuminated facade controlled by a 3D-printed device. Anyone who wants to try their hand at the ‘Puzzle Facade‘ manipulates the hand-held interface-cube like they would an ordinary Rubik’s cube, and their movements are translated to the building.

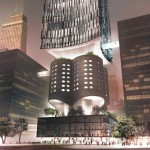
    Rubiks Cube Architecture Project 2

    The interactive display, by Spanish artist and designer Javier Lloret, uses bluetooth to connect the cube to a software program that converts the information into color and light. Only being able to see two sides of the building increases the difficulty factor.

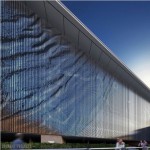
    Rubiks Cube Architecture Project 3

    Of course, if you think you’re skilled enough to try to crack a Rubik’s cube this big, you’d better be pretty confident, because your handiwork is going to be on citywide display. Watch it in action above.

    Share on Facebook


    [ By Steph in Art & Installation & Sound. ]

    [ WebUrbanist | Archives | Galleries | Privacy | TOS ]


    WebUrbanist

  • Our 21 Most Viral Photography Tutorials This Week

    This week has been a busy week on our social media accounts with unprecedented amounts of sharing of dPS articles. In fact the last couple of weeks have seen us smash our previous traffic records.

    So we thought it might be fun to do a wrap up of the most viral dPS photography tutorials being shared on our different accounts. As you’ll see the lists are quite different depending upon which social media account you follow!

    Top 7 FaceBook Shares – Follow dPS on Facebook

    Facebook-logo-ICON-02

    1. 21 Settings, Techniques and Rules All New Camera Owners Should Know
    2. 17 Forced Perspective Technique Examples
    3. Five Photography Bad Habits to Quit Today
    4. Beauty and Portraits on a Budget
    5. 9 Crazy Cross Eye 3D Photography Images and How to Make Them
    6. 10 Tips to Take Great Family Portraits
    7. 30 Popular DSLR Lenses Among Our Readers [November 2013]

    Top 7 Pinterest Shares – Follow dPS on Pinterest

    Pinterest-Logo-Vector-by-Jon-Bennallick-02

    1. Posing Guide: 21 Sample Poses to Get You Started with Photographing Couples
    2. The Ultimate Guide to Learning how to use Your first DSLR
    3. Advanced Tips for Tack Sharp Images
    4. DIY Lighting Hacks for Digital Photographers
    5. Three Lenses Every Photographer Should Own
    6. 6 Techniques for Avoiding Camera Shake
    7. How to Photograph Snowflakes

    Top 7 Twitter Shares – Follow dPS on Twitter

    Twitter-Logo-Icon-by-Jon-Bennallick-02

    1. 3 Lightroom History Tips
    2. 10 MORE Quick Composition Tips
    3. 16 Digital Photography Tips for Christmas
    4. Start To See Photographically In Six Easy Steps
    5. 3 Ways to Improve Your Images With Composition
    6. “Does my butt look big in this?” – What Clothes to Wear in Portraits
    7. 5 Tips for Building Your Photography Portfolio

    I hope you enjoyed this quick round up of what’s being shared around the web from dPS. Thanks to everyone for your engagement and shares!

    The post Our 21 Most Viral Photography Tutorials This Week by Darren Rowse appeared first on Digital Photography School.


    Digital Photography School

  • Photoshop Tips – Using the Blend If Feature

    blendif_opener_alt

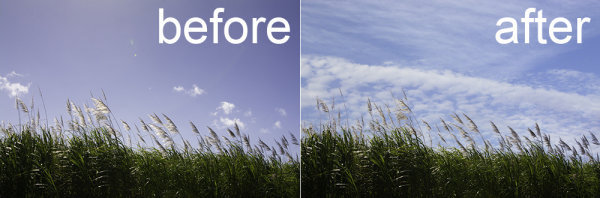
    The Blend If feature in Photoshop blends one layer into another based on the content of either of the two layers. It can be used, for example, to replace a sky by making it easy for you to knock out the blue sky without having to make a complex selection.

    In this article, you’ll learn some Photoshop tips on how to use Blend If to replace a sky.

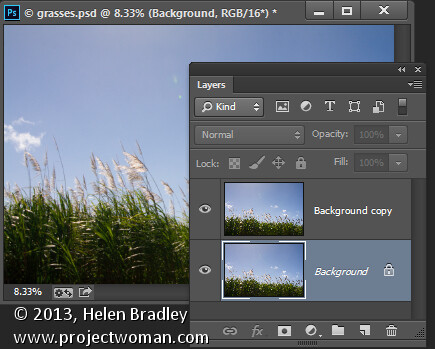
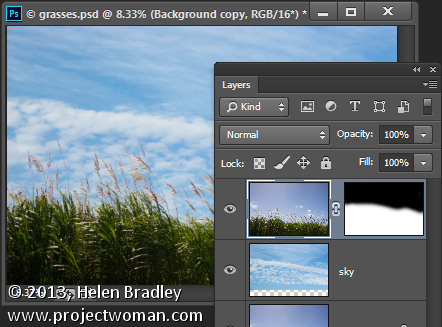
    Start by opening an image such as the one shown here. Right click on the background layer and choose Duplicate Layer to make a second copy (keyboard shortcut is “command/control + J”). You now have two layers with the same content.

    using the "blend if" feature in Photoshop

    Make a duplicate layer

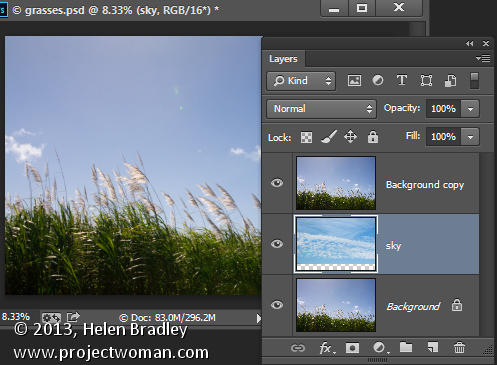
    Open an image with good sky. Choose Select > All and then Edit >Copy. Click on the main image and choose Edit > Paste. Drag the sky layer between the two image layers. Size the sky layer, if necessary, so it is big enough to replace the unwanted sky in the original image. Alternately you can use File>Place to choose the new image, and Photoshop will automatically add it as a layer and make it a Smart Object (so it can be resized without any quality loss).

    blendif_2

    Put the layer of the new sky in between the other two

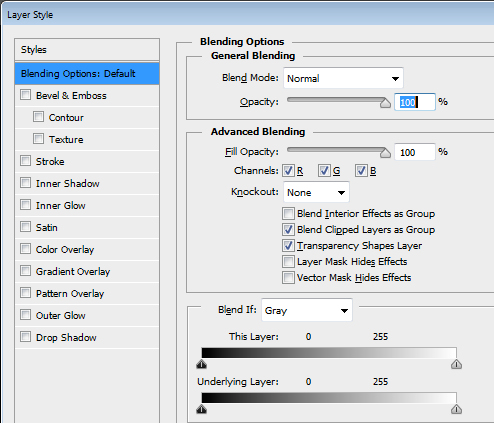
    Target the top layer, click the Add Layer Style icon (fx)at the foot of the Layers palette and click Blending Options to open the Layer Style dialog box (see below).

    blendif_3

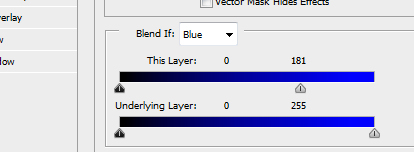
    The Blend If sliders and channel selector are at the foot of this dialog. To start, you will choose the channel to use. The Gray channel is the luminance channel so it lets you make your adjustment based on the lightness/darkness of either the image layer or the layer below. If you choose Red, Green or Blue you’ll be using that channel as the basis for your blending.

    blendif_4

    The layer underneath the current layer contains the sky that we want to use. So you will use the sliders called This Layer to remove the existing sky, to be able see through to the sky underneath. If we were to select the Gray channel we won’t be able to make the selection very easily because both the sky and the grasses have similar luminosity or lightness values.

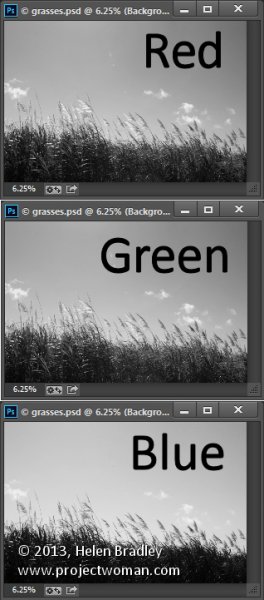
    However if you exit this dialog for a minute and take a look at the individual channels in the image, you may find one where there is plenty of contrast between the area you are seeking to hide (the blue sky) and the areas you want to keep (the grasses).

    To do this close the dialog box temporarily, choose Window > Channels and click on the Red, Blue, and Green channels in turn to view them.

    In this case the Blue channel displays the sky as a lighter tone than the grasses, which are darker. This channel has the most contrast in the area we are interested in so it will be a good one to use.

    Select the RGB channel again before you leave the Channels palette. Return to the Layers palette and target the top most layer again. Display the Blending Options dialog again and choose the Blue channel in the Blend If pull down.

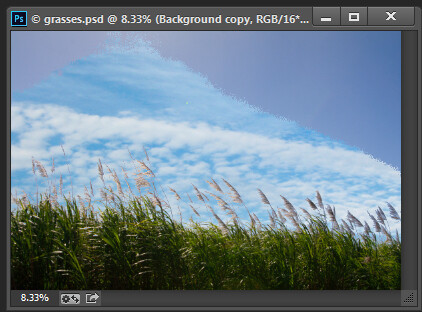
    Drag the right most slider in the This Layer area to the left. As you do so, the lighter blue areas will disappear and you will see through to the sky layer underneath.

    Blendif_5a

    Pull the right slider for “This Layer” to the left

    Blendif_5b

    The result is the the layer below will start to appear, but the transition is not smooth

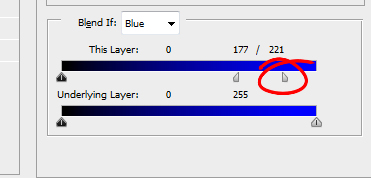
    To smooth out the transition between the area being removed and the area which remains, break the slider in two. You do this by holding the Alt key (Option on a Mac) and drag half of the slider away from the other half.

    The rightmost half of the slider indicates the point at which the blending effect is fully impacting the image. So pixels which have a value greater than the value indicated by this slider will be fully transparent. The left half of this slider controls the point at which the blending ceases. Any values in the blue channel that are smaller than the value indicated by this slider will be fully opaque. Pixels which have values in the blue channel that match the values between the two sliders are partially transparent.

    blendif_6

    For some images you may get better results by combining multiple channels. So you might use the blue and the red channels but use the rightmost slider on the blue channel and the leftmost slider on the red channel. You’ll need to experiment to see what works for your image. When you have a good result click Ok.

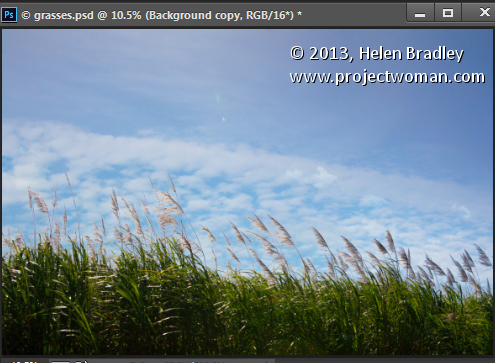
    In a perfect world you’ll be able to fully remove the unwanted sky with just this adjustment. Chances are your results will be less than perfect! Mine certainly are, see below.

    blendif_7

    If this is the case, make sure that the Blend If adjustment gives you the best results in the area that would require you to make a complex selection. For me that is where the grass meets the sky. Selecting around the grass would be a big job so I want the Blend If results to be good in this area. That it doesn’t get rid of the rest of the sky is just fine – that it is easy to get rid of manually.

    Target the top layer and click the Add Layer Mask icon at the foot of the Layers palette. Target the mask by clicking on it. Choose a soft round brush and paint using black over the mask to hide the remainder of the sky. Using a soft brush (0% Hardness) will ensure you get a seamless transition between the original image and the new sky.

    blendif_8

    Problems elsewhere

    Occasionally you will find that using the Blend If sliders to remove the sky also results in some unwanted transparency appearing elsewhere in the image. If this occurs you can use content from the background layer to fill the transparent areas.

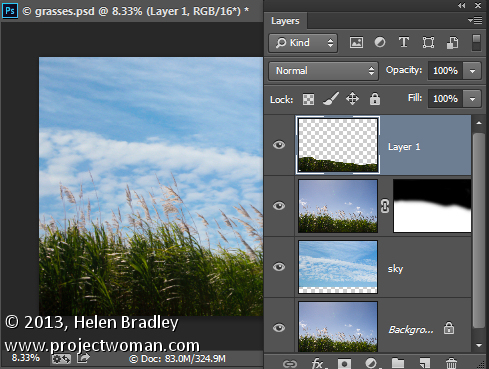
    Make a selection over the area to fix, click on the Background layer to target it and choose Layer > New > Layer via Copy. Drag this layer to the top of the image and it will cover the areas that were made transparent.

    Although this wasn’t a problem with this image, this is what the layer stack might look like if you do need to fix some transparency appearing elsewhere in the image.

    blendif_9

    The Blend If sliders are a useful way to blend layers without needing to make complex selections. You can make even better use of these sliders when you use the channel data as a guide to determine which channels to use for your blending.

    Post originally from: Digital Photography Tips.

    Check out our more Photography Tips at Photography Tips for Beginners, Portrait Photography Tips and Wedding Photography Tips.

    Photoshop Tips – Using the Blend If Feature

    The post Photoshop Tips – Using the Blend If Feature by Helen Bradley appeared first on Digital Photography School.


    Digital Photography School

  • 12 December, 2013 – The World’s Finest Sensor Meets the World’s Best Lenses

    The new Sony A7r has, arguably, the finest 35mm format sensor ever made. Leica’s M lenses are, again arguably, the best 35mm format lenses ever made.

    What happens with they mate? Indeed – what could go wrong?

    Find out in our latest review.


    You can win an all-expenses paid photographic expedition to Antarctica, along with air fare from anywhere in the world. The value of this prize is $ 15,000.

    The Luminous Landscape wants you to try any of our more than 60 training or travel videos and our new free video player. Each purchase is an entry, and an annual subscription that includes all previous as well as new videos counts as six entries. The winner of a free lifetime subscription is also chosen from each month’s entries.

    Find Out More 


    The Luminous Landscape – What’s New

  • Tide

    Ein Beitrag von: Antony Sojka

    Die Idee für meine Arbeit war, anhand von Bildern eine Geschichte über Menschen zu erzählen, die abseits der Norm leben. Dabei war es mir wichtig, einen für so eine Geschichte geeigneten Ort in Deutschland zu finden.

    Bei meiner Recherche stieß ich auf die Halligen. Ich merkte sehr schnell, dass es zwar viele Fotos von diesem Ort gibt, sich in den letzten Jahrzehnten jedoch niemand mit den Bewohnern fotografisch auseinandergesetzt hatte.

    Eine wunderbare Arbeit über diesen Ort stammt von Albert Renger-Patzsch. Die Veröffentlichung liegt allerdings schon sehr lange zurück (Die Halligen, Albertus-Verlag, Berlin, 1927). Also dachte ich, es wäre an der Zeit, das Thema einmal neu aufzugreifen.

    Tide © Antony Sojka

    Tide © Antony Sojka

    Meine ersten Reisen zu den Halligen waren nicht sehr erfolgreich. Häufig musste ich mir von den Bewohnern anhören, sie hätten keine Lust, sich fotografieren zu lassen. Weniger des Fotografierens wegen, sondern viel mehr, weil sie in der Vergangenheit schlechte Erfahrungen, zumeist mit Filmteams, gemacht hätten.

    Trotzdem blieb ich dran, bin sehr oft zurückgekehrt und habe immer das Gespräch gesucht. Irgendwann merkte ich, dass das Fotografieren für mich zweitrangig geworden war.

    Viel mehr mochte ich es, den Geschichten der Menschen dort zuzuhören, zu sehen wie sie leben, wie ihr Alltag strukturiert ist. Die Fotografien entstanden dann fast nebenbei.

    Tide © Antony Sojka

    Tide © Antony Sojka

    Auch die Landschaft war sehr wichtig für meine Arbeit. Da man aber nicht besonders viel Spielraum für die Komposition hat, wenn das Land flach ist, kam ich auf die Idee, ebenso flache Bilder zu machen.

    Ich stellte die Kamera senkrecht zum Boden und fotografierte Strukturen. Vor allem solche Stellen, an denen sich Wasser und Erde trafen. Es ist faszinierend, was man alles entdeckt, wenn man mal etwas genauer auf den Boden schaut, auf dem man sonst bloß läuft.

    Tide © Antony Sojka

    Tide © Antony Sojka

    Das Schwierigste war, fand ich, während der Arbeit nicht dem Kitsch zu verfallen. Ich habe es bewusst vermieden, die dort lebende Tierwelt zu fotografieren, weil ich sie für die Geschichte nicht interessant fand.

    Irgendwann ging ich aber einen Kompromiss ein, das Thema der Tierwelt kurz aufzugreifen, als ich vor einem Haus auf einen umherkreisenden Schwarm von Brutgänsen traf.

    Tide © Antony Sojka

    Des Öfteren wurde ich schon gefragt, wie es mir gelungen sei, so nah an den Schwarm heranzukommen. Ich habe mich sehr vorsichtig angenähert und hatte bei jedem Schritt die Kamera für den Fall der Fälle fertig positioniert. Nach über drei Stunden langsamen Annäherns habe ich drei Bilder schießen können, bevor alles vorbei war.

    Die Arbeit habe ich mit der Mittelformat-Kamera Hasselblad 501 C/M auf Kodak Portra Farbnegativfilm fotografiert. Auch, wenn die Bilder die Abschlussarbeit meines Fotostudiums sind, ist das Projekt für mich persönlich noch nicht abgeschlossen. Ich habe mich entschlossen, im nächsten Jahr weiter daran zu arbeiten.

    Tide © Antony Sojka

    Tide © Antony Sojka

    Es gibt so viele tolle Menschen dort, die meine Freunde wurden und die ich unbedingt noch fotografieren möchte. Zudem will ich gern die Entwicklung der Halligen weiterverfolgen.


    kwerfeldein – Fotografie Magazin

  • Haunted Highlands: 7 Abandoned Wonders of Scotland

    [ By Steph in 7 Wonders Series & Global. ]

    Abandoned Scotland Main

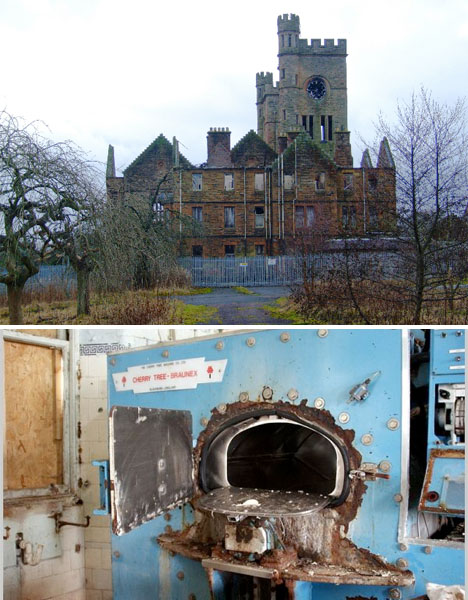
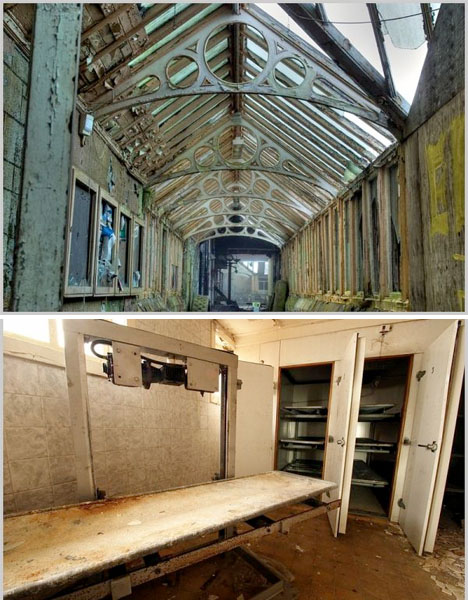
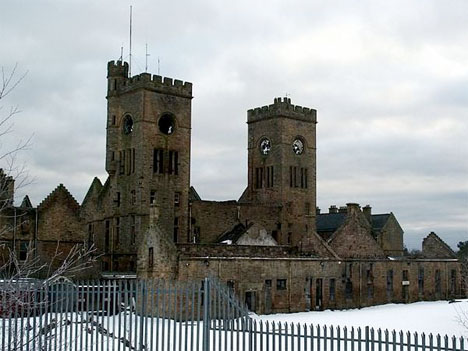
    Perhaps there’s something special in the Scottish temperament that explains the presence of such an unusual number of stunning castle-like abandoned hospitals. A certain appreciation for history cloaked in moss, ivy, and – inevitably – graffiti, which is a jarring sight on the crumbling stone walls of rural Gothic mansions. Scotland is home to abandoned insane asylums, railway stations, seminaries, luxury residences and more than one isolated island ghost town.

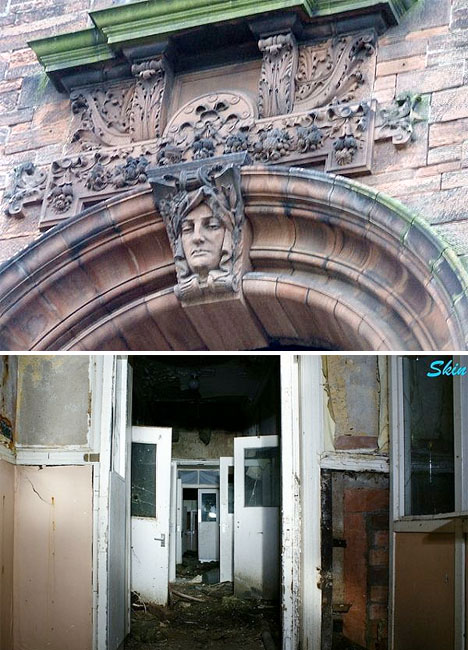
    Gartloch Insane Asylum, Glasgow

    Abandoned Scotland Gartloch Insane Asylum 1

    Abandoned Scotland Gartloch Insane Asylum 2

    (images via: skin_ubx)

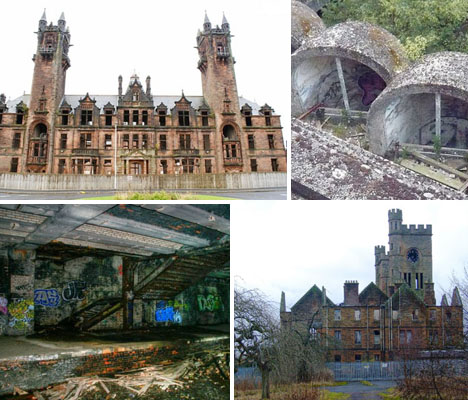
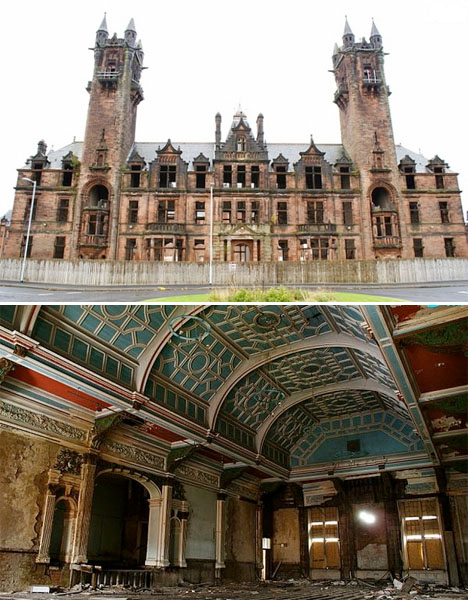
    Situated on the eastern edge of Glasgow, Gartloch Hospital opened in 1896 as an asylum for poor people who were mentally ill (not that the put it that way at the time – the patients were referred to as ‘pauper lunatics.’) By 1904 it had 830 beds, and at the end of World War II, Gartloch was transformed into a medical services hospital, with psychiatric patients transferred elsewhere. The hospital closed for good in 1996 and in 2003, its incredible castle-like ruins were partially prepared for conversion to luxury apartments. Most of it was demolished, with many of the remaining architectural elements turned into private residences, but some buildings, like the dining and recreation hall, are still on Scotland’s list of buildings at risk.

    Botanic Gardens Railway Station, Glasgow

    Abandoned Scotland Botanic Gardens Station 2

    Abandoned Scotland Botanic Gardens Station 1

    (images via: wikimedia commons, gj_thewhite)

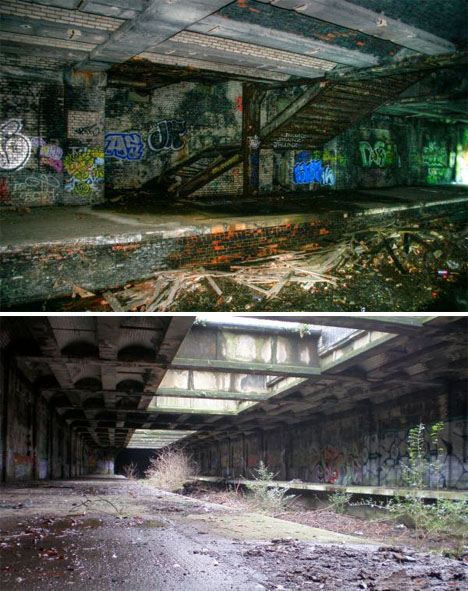
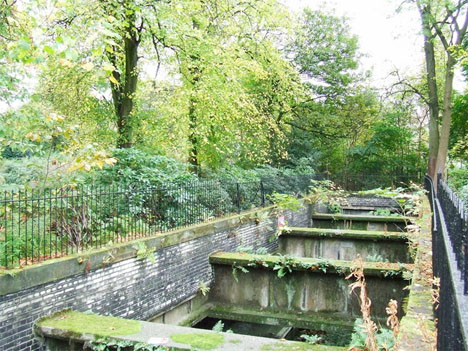
    Deep beneath Glasgow’s famed Botanic Gardens is a mostly-forgotten railway station with two underground platforms that have spent the last 70 years decaying, becoming overrun by weeds and plastered in graffiti. The station opened in 1896 to much praise as it managed to bring heavy transportation to a well-used location without disturbing the picturesque setting. The red brick Victorian station closed permanently to passengers in 1939, and was destroyed by a fire in 1970. There’s no hint of the subterranean station at ground level other than a few moss-covered ventilation shafts, offering potential urban explorers a tantalizing peek at the abandoned tunnels below. There are currently no plans to redevelop the site.

    St. Peter’s Seminary, Cardross

    Abandoned Scotland Brutalist Seminary 1

    Abandoned Scotland Brutalist Seminary 2

    (images via: wikimedia commons)

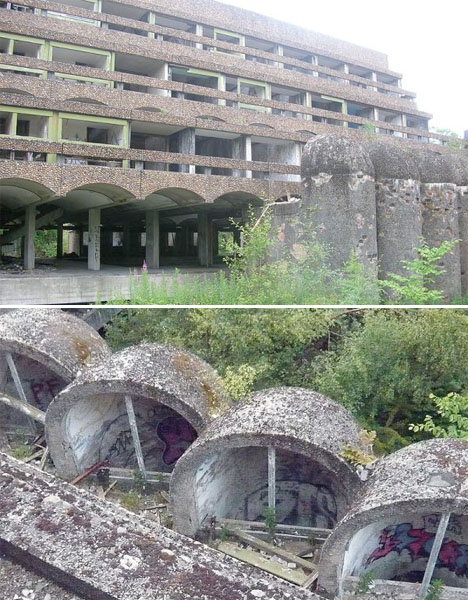
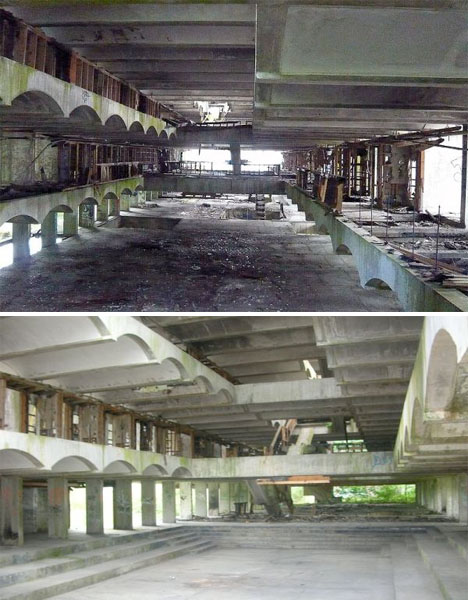
    A striking example of Brutalist architecture has become even more noteworthy as it slowly erodes into a skeletal concrete monument hidden in an overgrown forest. St. Peter’s Seminary has been described as one of Europe’s greatest modernist buildings, but since its abandonment by the Catholic church in 1980, it has decayed into “Scotland’s creepiest building.” Architecture students who want to get a look often have trouble even finding it in the 140-acre wood. The structure opened in 1966 but was almost immediately obsolete as the Catholic church had decided in 1966 that priests should be schooled in the urban churches of Europe rather than secluded rural locations, so it was never fully occupied. It briefly became a drug rehabilitation center before closing for good. A new movement to turn it into an arts college and transform the surrounding area into a public space may spell hope for its future.

    Hartwood Mental Hospital

    Abandoned Scotland Hartwood Hospital 1

    Abandoned Scotland Hartwood Hospital 2

    Abandoned Scotland Hartwood Hospital 3

    (images via: wikimedia commons)

    Another properly creepy abandoned hospital was built in a location specifically chosen for how isolated it was, in the small village of Hartwood. Consisting of a number of buildings as well as its own power plant, water reservoir, farm, gardens, cemetery and railway line, the hospital opened in 1895 and quickly gained a reputation as a cutting-edge treatment facility for mental illness where patients underwent then-unheard-of therapies like electric shock treatment and lobotomies. As with many other hospitals in the area, it closed in the 1990s after a new law focusing on community-based therapy and long-term mental health care was enacted. The last two wards weren’t closed until 2010, but the facility already looks as if it’s been abandoned for decades, and several fires have destroyed the ballroom, kitchen block and admin space. It’s still owned by the health board and there’s no word of redevelopment.

    Next Page – Click Below to Read More:
    Haunted Highlands 7 Abandoned Wonders Of Scotland

    Share on Facebook


    [ By Steph in 7 Wonders Series & Global. ]

    [ WebUrbanist | Archives | Galleries | Privacy | TOS ]


    WebUrbanist

  • Improve Your Black-and-White Photography Skills

    In today’s world of digital, taking pictures in black-and-white is something of a lost art form. Color is the dominant way to go, which is something of a pity. While color photography naturally provides a far wider range of shade, a big portion of the appeal of black-and-white photography is the relatively subdued monochromatic character. Still seen as the purest Continue Reading

    The post Improve Your Black-and-White Photography Skills appeared first on Photodoto.


    Photodoto

  • Maximizing Sharpness with a Telephoto Lens

    Telephoto lenses are perhaps one of the first people buy to add to their kit, as they are useful in many genres of photography.  The reach that a telephoto lens can offer is crucial for a lot of sports, wildlife or other ‘action’ photography. However, it is that same reach that can introduce the problems that prevent people getting sharp results.  Here are six tips to help you perfect the technique of maximizing sharpness with a telephoto lens.Maximising Sharpness when shooting with a telephoto lens

    1. Shutter Speed Selection

    One of the biggest hurdles to overcome when shooting with a telephoto lens is camera shake – softness introduced by not being able to hold the camera steady for the duration of the exposure.  One of the easiest ways to overcome this is to make sure that the shutter speed you select is faster than the reciprocal of the focal length. For example, in order to minimize the effect of camera shake with a 300 mm lens, a shutter speed faster than 1/300th second is recommended.

    To take this one step further, it is best to consider the “effective focal length” (EFL) of the lens by taking the crop factor of your sensor into account.  If you are not shooting with a full frame camera, you are most likely shooting with a crop sensor (or APS-C) camera.  The sensors within these cameras are smaller than full frame sensors and, as such, give the result of multiplying the focal length of any lens put on the camera (see Crop Factor Explained for further explanation).  The result is, when you are using a 300 mm lens, on a camera with a 1.5x crop factor, the effective focal length is 450 mm. Thus meaning you need to be looking to use a shutter speed quicker than 1/450th second.

    So just make sure you are aware of the crop factor of your camera, so that you can quickly approximate the required shutter speed, if shooting handheld.
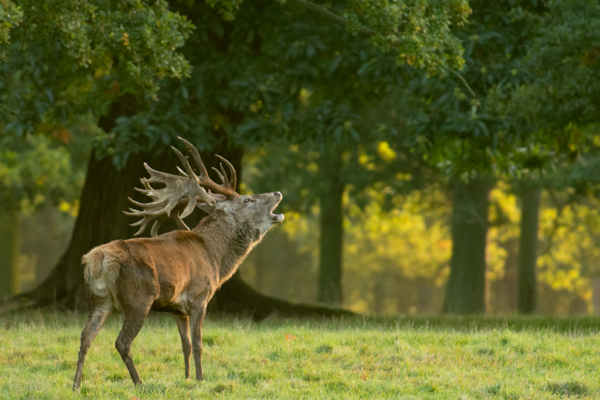
    Maximising sharpness when shooting with a telephoto lens

    Shot at 340 mm (510 mm EFL), f/5.6, ISO2500 using 1/320th second shutter speed. Use of a tripod here meant that I could be confident that the resulting images of this Red Deer stag would be sharp, even though shot only at 1/320th second.

    2. Use a Tripod

    Another very simple way to overcome image softness due to camera shake is to use a tripod.  Not everyone enjoys carrying or using a tripod at all times. However, it is a really quick and simple way to help minimize camera shake and to give you more flexibility in using slower shutter speeds, compared to shooting handheld (i.e. not a necessity to stay at “1/EFL”, though still recommended where possible).

    There a numerous tripod heads available that have the freedom of movement that is often needed when shooting sports or wildlife. You can also be safe in the knowledge that even at the end of a long day of shooting, when your arms would usually be tired, the tripod will continue to hold the camera steady.

    A lot of larger lenses come with a tripod collar which mounts the lens to the tripod, rather than the camera. Most of the smaller, lower budget (but still very long, in terms of focal length) telephoto zoom lenses do not have one, meaning that the camera is mounted to the tripod and the lenses are left dangling off of the camera, susceptible for small vibrations.  Some tripod manufacturers make special brackets to overcome such situations, allowing smaller telephoto zoom lenses to be tripod mounted and become more stable (see image below).
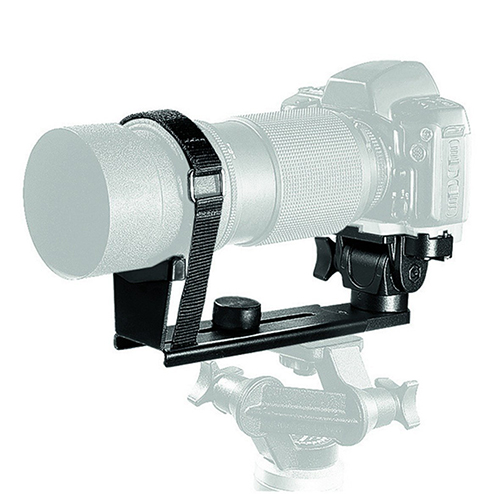
    Maximising sharpness using a telephoto lens

    Consider tripod mounting your telephoto lens to improve stability when shooting at extreme focal lengths.  Pictured: a Manfrotto 293 telephoto lens support.

    3. Image Stabilization

    Obviously if shooting handheld, image stabilization (IS or VR) can again help overcome camera shake.  Though you will want to avoid this if you are opting to shoot on a tripod, as image stabilization will actually introduce movement in that situation.

    4. Aperture Selection

    Shutter speed selection, as mentioned above, was all about considering shutter speed in relation to freezing motion. Aperture selection, however, is two-fold:

    a) Diffraction – this is generally a rule for all, but the top of the range telephoto lenses, but shooting at the widest aperture (smallest f/ number) your lens allows will often result in image softness due to diffraction.  This is where light entering the camera is diffracted before hitting the sensor, resulting in the appearance of soft focus throughout the frame (though generally far more noticeable in the corners).  Therefore, if you choose a slightly smaller aperture, e.g. from f/5.6 to 6.3 or 7.1 (known as stopping down) you will minimize the diffraction and see an increase in the sharpness of the resulting images.

    b) Ensuring you have enough depth of field – a key component of wildlife and action photography is depth of field.  Often, you shoot as wide an aperture (small f/ number) as possible, to try and isolate the subject and give a soft diffuse background.  However, at long focal lengths, with a close subject, the depth of field (i.e. the region of the image which will be captured in sharp focus) can be as small as a few millimetres, meaning that tiny errors in focusing accuracy will mean that the crucial part of your wildlife shot that needed to be in focus, will be soft.  There are plenty of mobile apps or websites that help you calculate the depth of field for your given camera, aperture and focal length, so make sure you have an awareness how small an aperture you actually need in order have enough depth of field.
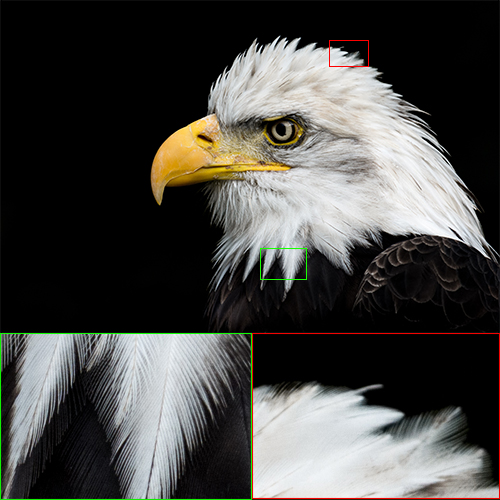
    Maximising sharpness using a telephoto lens

    Here, even though shot at f/9.0, you can see that there was not sufficient depth of field to render all of the head feathers of this bald eagle, completely sharp.

    5. Bump the ISO

    Don’t be afraid to boost the ISO on your camera.  Wildlife and sports photography is a constant compromise between shutter speed and aperture to ensure that you are using a quick enough shutter speed to freeze motion and overcome camera shake, and a suitable aperture to give you enough depth of field and avoid diffraction.  To alleviate this, you can increase the sensitivity of your sensor by increasing the ISO.  This will let you use quicker shutter speeds for the same given aperture and exposure.  Increasing the ISO will introduce more noise into the final image, but it’s better to have a sharp, yet noisy photo, than to have missed whatever fleeting moment you were trying to capture by not being able to use a fast enough shutter speed.

    6. Teleconverters

    Often available in 1.4x or 2x magnifications, teleconverters are great for extending the focal length of your lenses on a budget.  The increase in focal length does come at a cost however, as they increase the maximum aperture of your lens by one or two stops respectively.  Most consumer DSLRs do not allow autofocus with lenses with a smaller aperture than f/8.0 (i.e. f/5.6 + one stop) so you are limited in what teleconverter/lens combinations you can use. You need a fairly fast lens to begin with, i.e. a wide maximum aperture of f/2.8 or f/4.0, to make the most of a teleconverter.  Once the teleconverter is attached, autofocus will generally be slower (less light to play with) and any flaws of your current lens will be magnified – so stopping down, as per in point #4 above, becomes even more important.
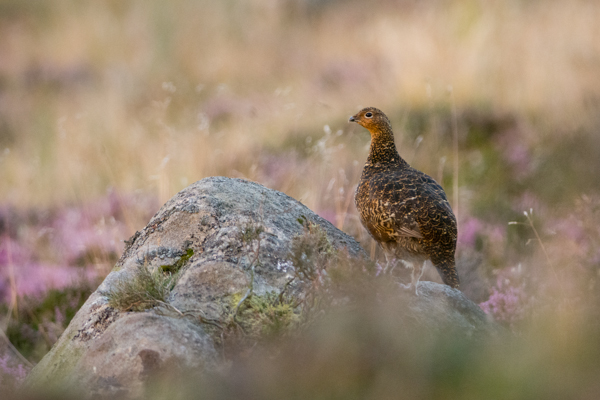
    Maximising sharpness when shooting with telephoto lenses

    Red grouse at sunset. This is a shot of compromises: 300mm (450mm EFL), f/5, ISO4000, 1/125th second, tripod mounted. Even at ISO4000, the shutter speed was still only 1/125th of a second, but mounted on a tripod the results were nice and sharp.

    Summary

    Overall, the above tips are just a few considerations for maximizing performance of your telephoto lenses. It’s easy to get carried away thinking that you need more focal length, just to get that little bit closer to your subject. However, it is important to understand the complications of working with such lenses and learn the techniques you can use to overcome the difficulties introduced by such long focal lengths.

    Do you have any other techniques that you frequently use to help ensure sharp images when shooting with your telephoto lenses?  Please share them in the comments below.

    Post originally from: Digital Photography Tips.

    Check out our more Photography Tips at Photography Tips for Beginners, Portrait Photography Tips and Wedding Photography Tips.

    Maximizing Sharpness with a Telephoto Lens

    The post Maximizing Sharpness with a Telephoto Lens by Elliot Hook appeared first on Digital Photography School.


    Digital Photography School

  • 11. Türchen: Robert Herrmann

    11. Türchen

    Wie auch im letzten Jahr haben wir uns in der Redaktion von kwerfeldein selbst umgehört, ob nicht jemand etwas Persönliches in eines unserer Kalendertürchen legen möchte. Immerhin machen wir selbst auch Fotos und daraus wiederum Bücher, Abzüge und andere schöne Dinge.

    Im letzten Jahr hat Euch unsere Redakteurin Marit das Heft „monotony“ von Robert vorgestellt, das er ihr in einer schummerigen Lokalität über den Tisch schob. Und richtig, drei Exemplare dieses Heftes von Redakteur Robert Herrmann liegen unter anderem nun in diesem Türchen für Euch bereit.

    monotony © Robert Herrmann

    monotony

    Seiten: 24
    Abbildungen: 17 Schwarzweißfotografien
    Sprache: Englisch
    Druck: Digitaldruck
    Softcover
    Auflage: 50 Stück
    Jedes Exemplar ist nummeriert und handsigniert

    Aber das ist nicht alles!

    Hinzu gesellen sich noch fünf Exemplare seines weiteren Büchleins „Der Atem der Straße“, erschienen anlässlich der gleichnamigen Ausstellung in der Fotogalerie Friedrichshain im Jahr 2011.


    Ebenfalls auf 50 Stück limitiert, kann eines davon nun Euch gehören. Bestückt mit Gedichten und wunderbaren Straßenaufnahmen aus Tibet, Vietnam, Deutschland, China, Italien, Dänemark und dem Baltikum, die, als sie unser Herausgeber Martin Gommel wiederum das erste Mal sah, mit einem „Ohhhh“ und „Ahhhh“ quittiert wurden.
    Der Fokus liegt hier auf den Bewohnern der uns fremden und bekannten Städte. 48 Abbildungen beleuchten die Stille und Hektik verschiedener Metropolen und lassen uns für einen Moment daran teilhaben, als wären wir selbst auf Reisen.

    Um eines der acht Hefte zu gewinnen, schreibe einen Kommentar mit Deinem Wunschgewinn unter bürgerlichem Namen und gültiger E-Mail-Adresse bis heute um 24 Uhr. Danach verlosen wir sie per Zufallsgenerator unter allen Kommentatoren. Die genauen Gewinnspielregeln findest Du hier. Viel Glück!


    kwerfeldein – Fotografie Magazin