Ein Beitrag von: Maximilian Zimmermann

Ein Beitrag von: Nikolas Brummer
In den drei Jahren, in denen ich mich jetzt der Fotografie gewidmet habe, hat sich für mich eines deutlich herausgestellt: Kein Modell auf der Welt wird die Gedanken, die ich fühle und denke so ausdrücken können, wie ich sie einfangen möchte.
Vielleicht kratzen sie haarscharf am Ziel vorbei und geben insgesamt ein authentisches Bild. Aber wenn ich da stehe, vor der Kamera, und mir in den Kopf rufe, um was es mir eigentlich geht, automatisiert sich der ganze Prozess und die Sache kommt so, wie sie auch in echt ist. Wie ich sie auch wirklich meine.
Nun, es ist plausibel; jemand modelt für sich selbst, verständlich. Aber welche Frage mir in letzter Zeit häufig gestellt wurde, ist: Warum fotografiere ich mich mehrmals in einem Bild?

Damit bin ich wohl auch nicht der einzige. Große Fotografen und auch viele aus dem Genre „Jugendlich + Facebookfanpage“ versuchen sich an dieser Darstellung einer multiplen Persönlichkeit. Marwane Pallas hat ein paar sehr gelungene Versuche.
Der Eindruck ist surreal. Irgendwie muss dieses Bild im Nachhinein bearbeitet worden sein oder die Person hat zufällig vier identisch aussehende Geschwister.
Der Ausdruck hingegen ist eigentlich offensichtlich: Hier geht es um die Relation eines Menschen zu sich selbst. Es geht nicht um den Bezug zur Außenwelt, zur Gesellschaft, zu einer realen Person, sondern einfach nur darum, in welchen Beziehungen und auf welche Art und Weise wir zu uns selbst stehen.
Meinen ersten plakativen Versuch an der Thematik hatte ich mit den Bildern „inner voices“ und „in peace“ getan, die in direkter Verbindung und somit im Kontrast zueinander stehen.

Der Gedanke war, zwei Selbstportraits zu machen. Was mir dabei aber auffiel – und vor allem zu dieser Zeit war das verstärkter: – ich kann mich gar nicht nur einmal darstellen. Meine Stimmungen und vor allem mein Selbstbild überschlagen sich so in ihrer Vielfalt, dass sich das eigentliche „Ich“ ja daraus ergeben müsste.
Also machte ich Fotos von zwei Extremen: Der „vollendeten Zufriedenheit“ und dem „totalen Chaos“. An letzterem lässt sich dann gut beschreiben, was dieses Sich-selbst-mehrmals-Fotografieren bewirkt: Selbsthass, Selbstverletzung, der Wunsch, vor sich selbst zu fliehen, der Drang, sich selbst zu vergessen – all das konnte ich in einem Bild vereinen.
Menschen sind alles andere als einseitig. Die ausdruckstärksten Portraits wirken dadurch, dass sie dem Menschen Facetten geben. Natürlich bricht jene Technik diese Regel, weil sie die Facetten eines Menschen einzeln darstellt und in einem Bild vereint, ohne ein klassisches Portrait zu bleiben.

Aber wie schon zuvor gesagt: Es ist nicht nur die eigentliche Facette, die angesprochen wird. Es ist auch ein Ausdruck dessen, wie wir zu uns selbst stehen.
In den letzten Monaten kristallisierte sich für mich eines meiner größten Probleme und Freuden zugleich heraus: Egal, was ich tun und machen würde, wie eine zweite Person würde ich mich dabei beobachten, Schlüsse ziehen, Urteile fällen.
Selbstreflexion führt einen weiter, hat mir mal ein Freund gesagt, aber sie kann einen auch ziemlich verwirren. Irgendwann verschwimmt dann die Linie zwischen der eigentlichen Intention und dem Anspruch, diese fiktive zweite Person zufriedenzustellen.

Und da ich ein ungesundes Interesse daran habe, das darzustellen, was mich am meisten runterzieht, um es dann noch glasklarer vor mir stehen zu haben, packte ich mich ein zweites Mal in ein Bild mit rein. Beim Rauchen, im Garten … und die Serie ist noch längst nicht vollendet. Sie könnte praktisch endlos weiterlaufen.
Denn das ist der Punkt: Egal, was man tut, was man macht, so ist es für mich und wohl viele andere Menschen. Die Möglichkeit, sich dabei Gesellschaft zu leisten, ist immer da. Die einzige Beziehung, an der wir wirklich immer arbeiten, ist die Beziehung zu uns selbst. Ob das nun gut oder schlecht ist, ist etwas anderes. Auf jeden Fall fühle ich mich nicht einsam.
There’s truly nothing like visiting a location for the first time – I absolutely love it and I strive to always photograph at least one new location a month.
When I started on my photography journey this wasn’t a hard challenge to meet as even my own backyard was new to me and my camera, but as time went on things got a bit more difficult. New locations became ‘go-to’ spots and there came a point where I was only photographing at places that I had previously visited.
While I’d love to travel the world on a whim I just don’t have the means or time to do so which severely limits the range of my ‘new locations’ to places within driving distance from my house. As a result I’ve developed this list of useful techniques for getting the most out of my local area and I hope that it will help you do the same!
#1 – Stuck on Earth
While Google Maps, Google Earth and Google’s Street View tools are great for getting location data, one of the best tools that I’ve used to find locations to photograph is the amazing app created by the people at Stuck in Customs called Stuck on Earth.

It works by fusing Flickr location data with a beautiful map to give you an amazing resource of not only useful locations, but the photographs other photographers have taken at those locations.
On top of searching random locations for photographs that have been tagged in various locations around the world, they have top location lists that have been curated by actual photographers to showcase the best photographs in cities around the world. There’s a bunch of other cool features as well and I highly recommend it as a resource (after all it is free).
You can find out more about it here.
#2 – Join a Photo Club
I’d have to say that one of the best ways to get out and find new locations is by meeting new people local to your area. Even if you’ve lived there your entire life odds are someone else has found interesting locations you haven’t – or better yet – has been able to find a new perspective on a location you thought you’ve picked clean.
Photography clubs often will also hold photo walks which will help you get out to different locations many of which might become your new ‘go-to’ spot when you’re in a pinch to get on location before sunset. It’s a great experience and I highly recommend trying it if you haven’t done so yet.
Have you ever gone on a photowalk? Tell us about the experience in the comments!
#3 – Make an Old Place New By Going At Night
One trick that I’ve done is not necessarily to find a new location, but instead to photograph the same location in the middle of the night.
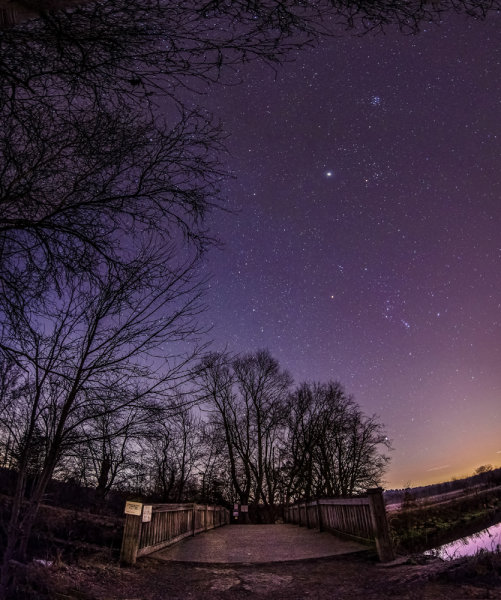
Night changes the way we perceive the world and will more than likely change the way you see a familiar location. It opens up a whole new set of challenges and pushes your camera to its limits of low light image capture, but in my opinion it’s one of the most fun types of photography there is.
Read more about photographing at night here.
#4 – Buy a Guide Book to Your Local State
Guide books might seem dated these days with instant access to so many great tools online, but there’s something to be said about a good guide book that has a friendly voice guiding you to the spots, telling you what to expect, where to park and when the best time to visit is.
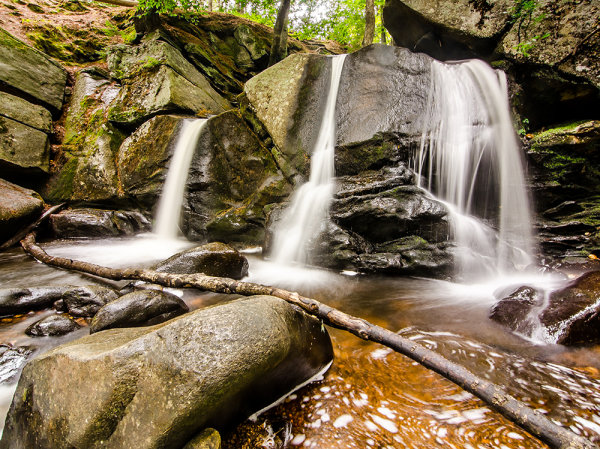
I never would have found out about Trap Falls (pictured above) if I hadn’t gotten a guide book detailing the hundreds of waterfalls and cascades that New England has to offer. It’s amazing the detail that the book goes into about not only where the waterfalls are, but how difficult the hikes are, and how picturesque the fall is.
There are tons of great guide books on Amazon and other bookstores and many of them can be downloaded as eBooks right to your phone or eReader so you can take it with you on your trip!
#5 – Fill up your tank and just drive
Finally, if all else fails, just fill up you tank and drive. One of my favorite things to do is pick a highway and a direction and tell myself, “I’m driving for 50 miles and taking the first exit I see after that”. What I end up doing is putting myself into an unknown town with all sorts of new things to see. I like to bring a friend along for the ride to keep me company as well as a second pair of eyes so that I can be sure to see potential photography opportunities.
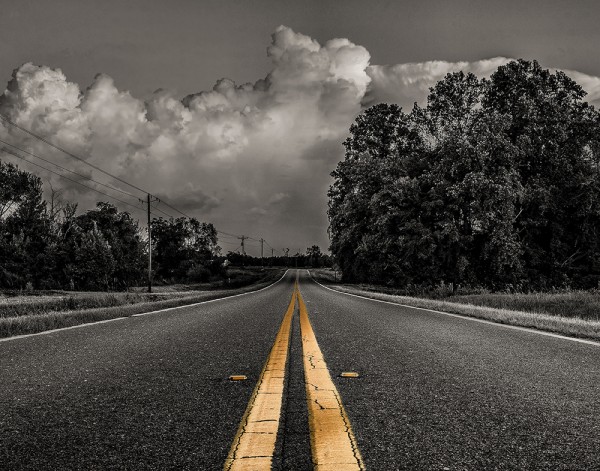
Of course it’s not a fool proof plan and driving around aimlessly can be a bit tricky. While it’s certainly possible that you’ll find a location you might otherwise have overlooked – it’s nearly just as likely that you’ll spend your day driving around with nothing to show for the effort, time and gas you burned.
Okay now it’s your turn to help build upon this list – I’d love to hear what techniques you use to continue to discover new locations – leave a comment below and let us know!
Post originally from: Digital Photography Tips.
Check out our more Photography Tips at Photography Tips for Beginners, Portrait Photography Tips and Wedding Photography Tips.
5 Creative Ways to Find New Locations to Photograph
The post 5 Creative Ways to Find New Locations to Photograph appeared first on Digital Photography School.
 Over the last couple of weeks we’ve published a few posts that touch on the topic of photographing kids – so we thought that this week it might be fun to focus our weekly challenge upon the topic of photographing children.
Feel free to photograph kids in any setting. To help you – check out these recent posts.
Also check out our Kids Photography eBook for a comprehensive guide to the topic.
Once you’ve taken your ‘Kids’ shots, upload your best ones to your favourite photo sharing site either share a link to them even better – embed them in the comments below (look for the little camera icon in the Disqus comments section as pictured below).

If you tag your photos on Flickr, Instagram, Twitter or other sites with Tagging tag them as #DPSKIDS to help others find them. Linking back to this page might also help others know what you’re doing so that they can share in the fun.
Also – don’t forget to check out some of the great shots posted in last weeks Backlight challenge – there were some great shots submitted.
Post originally from: Digital Photography Tips.
Check out our more Photography Tips at Photography Tips for Beginners, Portrait Photography Tips and Wedding Photography Tips.
KIDS: Weekly Photography Challenge
The post KIDS: Weekly Photography Challenge appeared first on Digital Photography School.

We’ve been fans of Aaron Johnson’s comic strip ‘What the Duck’ for years. ‘WTD’ is one of the best satirical comic strips in the world, and it’s published here every week, as well as being included in our weekly newsletter. Barbed, topical and always amusing, we hope you enjoy WTD as much as we do.
I teach a kids photography class (ages 11-15), and this week we started talking about composition. I don’t require a specific type or level of camera, so I have students shooting with DSLRs, as well as students with simple point-&-shoot models. Because of the wide range of cameras, I make this class a little less about the technical and a little more about how they see the world around them. I strive to make sure they understand the elements of exposure, the principles of lighting, and all of the other aspects of the craft that come into play when they push the button and capture a moment in time. Regardless of make and model, though, the one thing they all share is a viewfinder– a frame in which to compose and arrange those moments in time. The way that each of these young photographers grasps the concepts and applies them to their own world view is incredibly enlightening and fun to watch.
So, in class this week I explained that composition guides the viewer through the frame and answers the question, “What are you trying to say?” Put another way– “This is why I stopped and took this photo.” Now that they are armed with another set of photographic fundamentals, I’m giving them a week or two to get comfortable with photographing the same subject different ways before giving them one of my favorite assignments of the semester– “A Frame Within a Frame.”
If the frame is your window on the world, composition is where you point it. The FWAF exercise basically pushes them to find boundaries within boundaries. On the one hand, that sounds pretty restrictive, and I suppose it can be. The flip-side, however, is that pushing them to compose within certain confines now will help unleash vast waves of creativity later. I tell them every chance I get that the rules of photography were made to be broken, but first they have to know what they are. Speaking of rules, the FWAF challenge has only one– no actual frames. That’s right– no posing your subject in the middle of a wheat field, along the railroad tracks, or any other overly cliche setting, while holding a big empty frame in front of them. I try, whenever possible, to shoot the assignments I give my students, and just about all of the images in this article were part of Frame Within a Frame exercises.
One of my favorite FWAF shots was one of those happy accidents where you don’t even realize what you’ve got until it’s off the camera and up on a bigger screen. I knew that mama lion had been pretty close, keeping a watchful eye over one of her growing cubs, but it wasn’t until I’d downloaded the images that I realized that I’d caught her attentive gaze perfectly framed between Junior’s two front legs.

See where I’m going with this? No literal frames were harmed in the creation of these photos. Anything that creates additional boundaries within the images effectively creates an additional frame, which then directs the viewer’s attention much more precisely where you want it to go.
This next image is a great example, not only of a frame within a frame, but of repetition as an interesting compositional element. A tighter crop of the artist at work would have been okay, I guess. We’d be able to make certain assumptions about what’s not in the photo– namely, the subject of her piece. By including it in my background, however, I not only created the additional frame, but also lead the viewer through the image from right to left, taking in the artist, her canvas, and her inspiration.

Once you get in the habit of looking for these extra frames you’ll start noticing them in all sorts of places. These boxers, for instance, are framed perfectly within the ropes of the ring. As a compositional tool, the added frame not only directs the viewer’s attention, but it also helps to minimize any distracting or non-essential elements from the photo.

Obviously, the frame within a frame is much more interpretive than literal. Doorways, windows, and mirrors– elements with clearly defined lines– can create great effects, but I enjoy seeing what my students do with the assignment when they are comfortable enough to ignore the obvious and go for something much more organic.

One of my favorite photography quotes comes from National Geographic photographer Jim Richardson, who says that “If you want to be a better photographer, stand in front of more interesting stuff.” One of the things that fascinates me about composition and exercises like this is how we push ourselves to not only stand in front of more interesting stuff, but to also photograph more interesting stuff in a more interesting way.
Try the Frame Within a Frame challenge and share your links in the comments section.
Post originally from: Digital Photography Tips.
Check out our more Photography Tips at Photography Tips for Beginners, Portrait Photography Tips and Wedding Photography Tips.
Composition Exercise: Frame Within a Frame
The post Composition Exercise: Frame Within a Frame appeared first on Digital Photography School.

What’s in your camera bag? A camera (hopefully) and maybe a lens or two, but that’s probably not everything that you need. In this article we’ll be looking at ten items that deserve a place in every photographer’s kit bag, whatever sort of photography you enjoy doing. Click through for the list.
[ By Steph in Abandoned Places & Architecture. ]
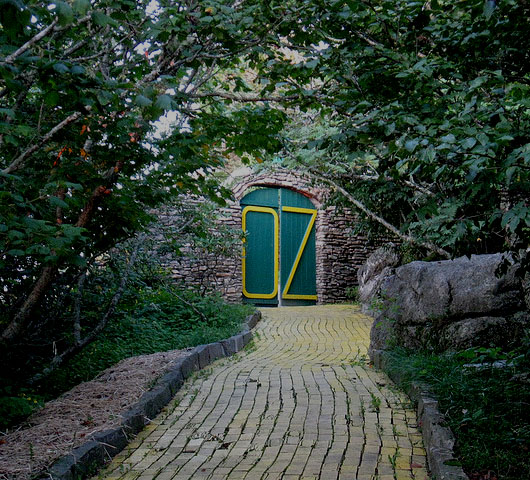
At the top of a mountain, a crumbling Yellow Brick Road winds around forests filled with creepy anthropomorphic trees, Dorothy’s dilapidated house and an Emerald Castle made of stone. The Land of Oz has been abandoned for thirty-three years, and it hasn’t seen much restoration during that time, but it opens to the public October 5th for an annual event called ‘Autumn at Oz,’ enabling visitors to see it in all its sad, derelict glory.


Located at Beech Mountain, a ski resort in Western North Carolina, the Land of Oz saw over 20,000 visitors on its opening day in 1970. A ski lift was modified to resemble a balloon ride, taking guests on an aerial tour of the park with views of the mountain scenery. The park design was based on the book rather than the film, and the visitor was intended to experience it from Dorothy’s point of view.


Despite a 1975 fire that destroyed some artifacts, including the dress worn by Judy Garland in the movie, the Land of Oz was fully operational until 1980. Once it was closed, many items were stolen, vandalized or destroyed, and those that weren’t were given over to the elements. A few pieces remain in storage at Appalachian State University.

The park was partially restored in 1990, and Former employees started Autumn at Oz as a reunion three years later. Now it’s an annual event, opening the doors to the outside world just two days every year. Proceeds from the event go to the (apparently minimal) upkeep of the park.


[ WebUrbanist | Archives | Galleries | Privacy | TOS ]

     |
A full-frame DSLR is perhaps the most desired bit of kit any photographer could ever dream of having. This is the 5D Mark III or the D700, each an awesome camera that pretty much deliver the goods every time. But is the full frame better than the crop? Do you need it? As they’re so much more expensive than the Continue Reading
The post Let’s Get Ready to Rumble: APS-C vs Full Frame appeared first on Photodoto.
