RSS
 

Archive for March, 2013

Just posted: Hands-on preview of the Canon EOS 100D/SL1

21 Mar

IMG_1872v21.jpg

We’ve just posted a hands-on preview of the Canon EOS 100D/Rebel SL1. Distinguished by its impressively small form factor, the 100D’s 18MP CMOS sensor, 3″ touchscreen LCD and 1080p30 video resolution will be familiar to followers of the Rebel series. Canon’s hybrid phase/contrast detect AF system has been tweaked, however, to provide much greater scene coverage. Has Canon managed to maintain its customary handling experience in the smallest DSLR it has ever made? Click through to read our preview and find out.

News: Digital Photography Review (dpreview.com)

 
Comments Off on Just posted: Hands-on preview of the Canon EOS 100D/SL1

Posted in Uncategorized


Doing it Wrong: Funny Photo-Edited Urban Improbabilities

21 Mar

[ By WebUrbanist in Art & Photography & Video. ]

improbable crosswalk

It would be entirely right and wrong at the same time to call this body of work realistic. On the one hand, the results look like pictures (which form the basis of these manipulations) – on the other hand, while not impossible, the reality they present is dramatically improbable.

improbable urban landscape photos

This series by Robert Rickhoff is titled Out of Place and features all kinds of ordinary spaces and situations, from swing sets, crosswalks and roundabouts to railroad tracks, swimming pools and public bathrooms.

improbable swing sets pool

Yet in (almost) each case, there is something not quite right … or drastically wrong. It takes a little while to notice in each case, though, until you get the hang of it and start looking for the odd-man-out element right away.

improbable urban speed bumps

Still, it is fun to imagine what would happen to people taking a speed-bump ramp, or encountering a raised crosswalk – certainly a surreal experience in reality, and at least something to trigger the urban imagination in photographic form.

Share on Facebook


[ By WebUrbanist in Art & Photography & Video. ]

[ WebUrbanist | Archives | Galleries | Privacy | TOS ]


WebUrbanist

 
Comments Off on Doing it Wrong: Funny Photo-Edited Urban Improbabilities

Posted in Creativity


Samsung Galaxy Review

21 Mar

GALAXY Camera_6.jpg

As a fan of the Mac I find it hard to avoid news of the constant sniping, litigation and general blazing that is going on between Apple and Samsung over alleged patent infringements, new developments, new products and amazing improvements to existing iDevices.

However, in a way, I see the Apple vs Samsung barney as a good thing, with the eventual outcomes arriving as radical new devices and/or useful advances in many products.

So, it is in this environment that I am reviewing a newcomer from the Dark Side! Move over Microsoft, there’s a new boy in town.

GALAXY Camera_4.jpg

GALAXY Camera_3.jpg

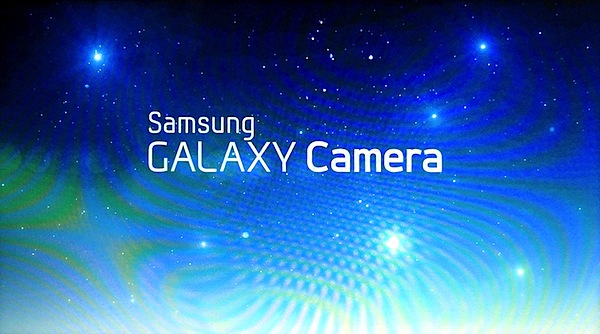
As Samsung says: This is the first Galaxy Camera, featuring Wi-Fi connectivity and Android 4.1 (Jelly Bean) software. It combines high performance photography with mobile technology ….

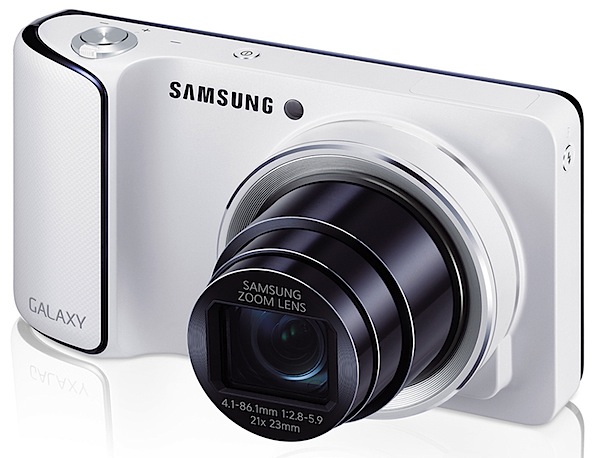
Straight out of the box, the camera is simply gorgeous in its all-white livery, with dramatic relief as you turn it around to show the enormous 12.2cm rear screen in black (with power off!). Very Apple!

Whilst it’s pocketable, it is much larger than many compact digicams.

GALAXY Camera_2.jpg

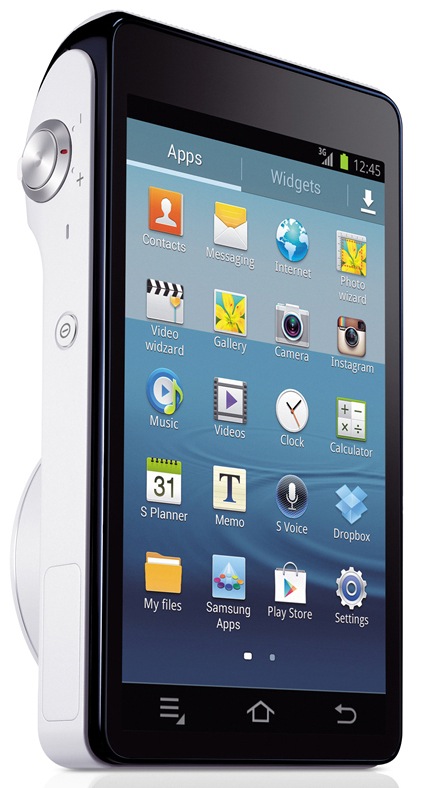
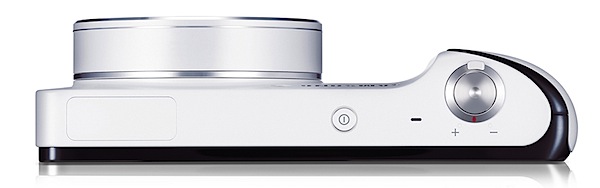
If you’re not a patient screen tapper you may find the comprehensive touch screen interface a bit of a challenge at first: you go nowhere unless you tap! External controls are minimal: tiny power button on top, nearby is the shutter button and zoom lever; left edge is where you tap a button to raise the onboard flash cell.

Flash.jpg

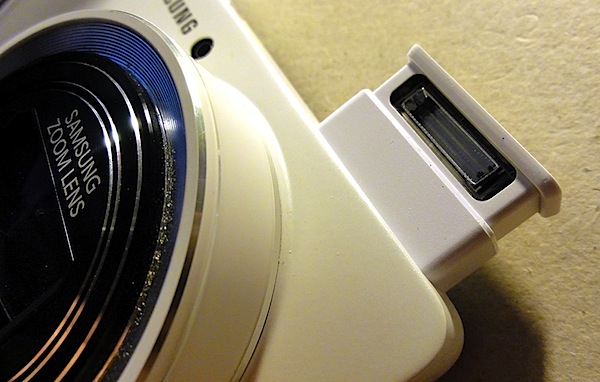
The camera’s right edge houses a mini HDMI port; beneath the camera is a latch which, when raised gives access to the battery, memory card and SIM card.

Re the touch screen: once familiar with it I found life to be trés trés easy and much better than many cameras’ convoluted menus.

To begin with, you must encounter the main screen which has icons for virtually all your needs: apps such as Paper Artist, Instagram and Photo Wizard can be triggered here.

I immediately went to Camera which took me to the exposure options I needed to run the camera.

Three on screen options: Auto, Mode and Video.

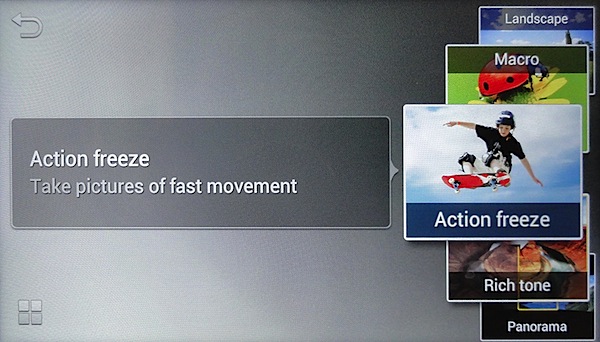
Mode was my next stop; in this department I could select Auto (again), Smart and Expert. Smart gave me on screen visual examples of image treatments that could impart such effects as Beauty Face, Continuous (a burst of shots), Macro, Rich tone, Light Trace, Panorama etc.
Expert 1.jpg

Expert 2.jpg

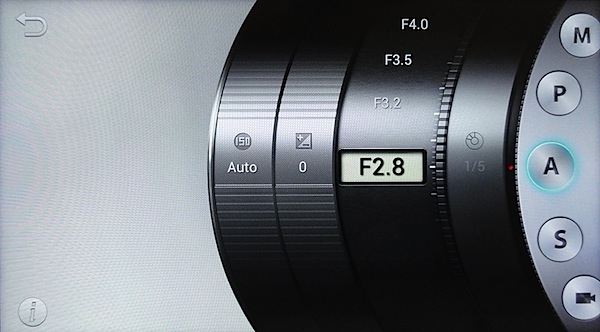
The Expert option was obviously my next stop if I was to raise my skills above auto shooting: here I could choose Program AE, shutter or aperture priority, manual exposure and video (again). An interesting display: a lens barrel showing choices of ISO setting, exposure compensation and aperture selection.
Car park full wide 3.JPG

Car park full tele 3.JPG

Samsung Galaxy Features

The maximum lens aperture is f2.8, which shrinks to f5.9 when the 21x zoom is extended to its ultimate 35 SLR equivalent of 481mm.

Maximum image size is 4068×3456 pixels, leading to a print size of 34x29cm
Shop manikin head 1.JPG

Sunflowers 2.JPG

Video can be shot in MPEG4 at 1920×1080 or 720×480 res. I found the Galaxy camera to be excellent as a video camera: it smoothly helped auto focus to sharpen up on subjects as I moved around; the large screen, even held at waist height, made it an excellent viewfinder when on the move.

There’s a whole heap of fun awaiting for you when you get into the software side of the camera: users can browse the Web and download applications from Google Play or the Samsung Apps stores.

Voice commands.jpg

Built in voice control allows you to tell the camera what to do! What a party starter! Simply call out Smile! Shoot! Zoom in! and other commands to get the camera to perform under your control. And it works!

I did discover that settings such as voice operation on/off, lens aperture setting and ISO and are cancelled after a restart.

Startup Time

About 23 seconds before I could fire off the first shot. This possibly because it’s booting the Android operating system.

Distortion

No problems at the wide and the tele end of the zoom.
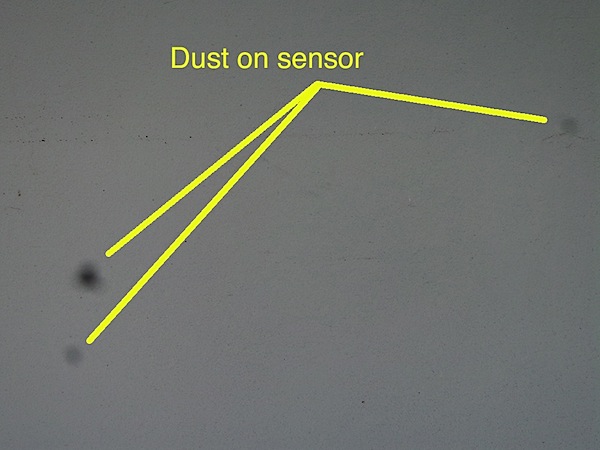
Dust on sensor.JPG

Dust Spots

Hopefully, it was only this camera, but I did find that dust spots appeared when the lens was set at full tele.
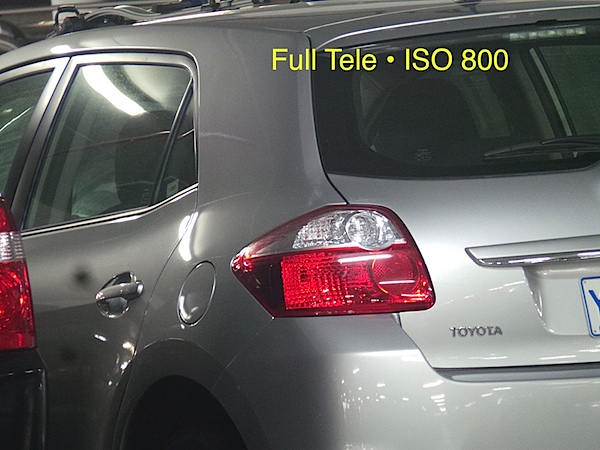
ISO Speeds

Samsung Galaxy ISO 100.JPG

Samsung Galaxy ISO 400.JPG

Samsung Galaxy ISO 800.JPG

Samsung Galaxy ISO 1600.JPG

Samsung Galaxy ISO 3200.JPG

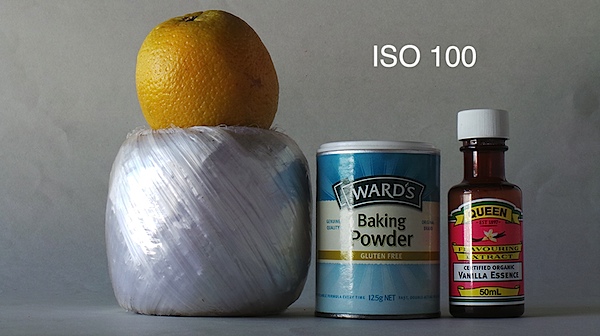
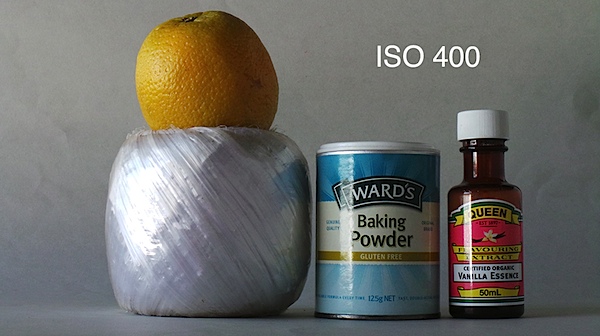
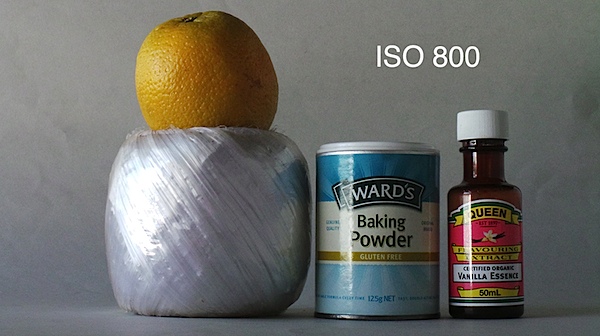
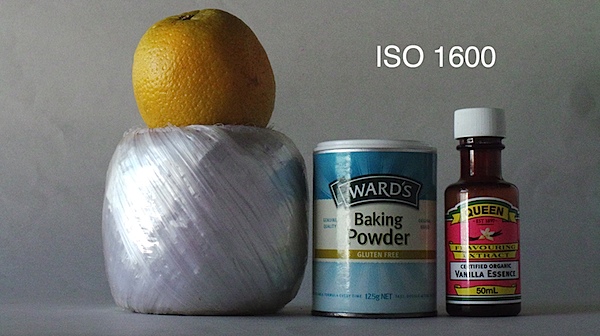
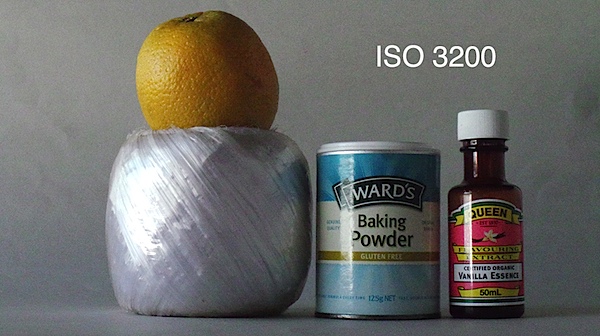
At ISO 400 a drop in sharpness and a lift in noise is apparent; by ISO 800 these are even worse; by ISO 3200 these problems make the image unusable.

Samsung Galaxy Review Verdict

Quality: about average; no more.
Why you would buy the Samsung Galaxy: it’s the latest iDevice.
Why you wouldn’t: expensive for a camera; despite its glamorous Android and Wi-Fi trappings it’s no more than a point-and-shoot digicam; you hate touch screens.

My experience with the Galaxy camera was a positive one. Thrown upon the seeming ‘rocks’ of a totally touch screen menu with no external controls left me with no scars … in fact, it gave me a glimpse of a possible future for digicams totally equipped this way: large screens, no external controls, touch screen operation.

A few hangups:

Startup 1.jpg

Startup 2.jpg

From a cold start, the camera seemed to take an eternity to get to operational readiness: as I’ve already mentioned, it took about 23 seconds to get going, after a series of glam startup screens.

The leaflet tucked into the camera box is totally inadequate; go to www.samsung.com/us/support/owners/product/EK-GC100ZWAATT to download a useful 134 page PDF manual.

Be careful you don’t load a memory card into the SIM slot by accident; it can be difficult to remove.

If you have difficulty saving images to the memory card, try re-formatting the card. It saved my day!

Let the fun continue!

Also in black.

Samsung Galaxy Specifications

Image Sensor: 16.3 million effective pixels.
Sensor Size: 11mm CMOS.
Lens: f2.8-5.9/4.1-86.1mm (23-481mm as 35 SLR equivalent).
Image Stabiliser: Optical.
Metering: Multi, centre-weighted, face detection.
Shutter Speed: (Auto) 1/8 to 1/2000; (Manual) 16 to 1/2000 second.
Continuous Shooting: 20 shots at 3.8 fps.
Memory: micro SD, micro SDHC, micro SDXC cards plus 8GB internal memory.
GPS Location Tagging: Yes.
Image Sizes (pixels): 4068×3456 to 1024×768.
Movies: 1920×1080 and 1280×720 (both 30fps); 640×480 (30 and 60fps) and 320×240 (30fps) and 768×512 (slo mo 120fps).
Viewfinder: 12.2cm LCD.
File Formats: JPEG, MPEG4, AAC, WAV etc.
ISO Sensitivity: Auto, 100 to 3200.
Interface: USB 2.0, HDMI mini, Wi-Fi, GPS equipped, DC.
Power: Rechargeable lithium ion.
Dimensions:129x71x19 WHDmm.
Weight: Approx. 305 g (inc battery).
Price: Get a price on the Samsung Galaxy Camera on Amazon.

Post originally from: Digital Photography Tips.

Check out our more Photography Tips at Photography Tips for Beginners, Portrait Photography Tips and Wedding Photography Tips.

Samsung Galaxy Review


Digital Photography School

 
Comments Off on Samsung Galaxy Review

Posted in Photography


The Pro Photographers Guide to Black & White Vs Colour

21 Mar

Setting the tone of an image is arguable, the most important part of any photograph. As the photographer, this choice can help to define your overall style; making your work instantly recognisable purely by the tone of your chosen medium. You have to consider the composition, exposure and all those other technicalities. But it is how the subject is portrayed Continue Reading

The post The Pro Photographers Guide to Black & White Vs Colour appeared first on Photodoto.


Photodoto

 
Comments Off on The Pro Photographers Guide to Black & White Vs Colour

Posted in Photography


Photographer’s copyright suit lists his subject as defendant

21 Mar

desmond-howard-ann-arbor.jpg

US photographer Brian Masck has filed suit against several parties over unauthorized and unpaid use of a photograph he shot 22 years ago that has since become an iconic image recognizable to almost any US sport fan. Among the defendants is the subject of the photo himself, Desmond Howard, who used the image on his own website.

News: Digital Photography Review (dpreview.com)

 
Comments Off on Photographer’s copyright suit lists his subject as defendant

Posted in Uncategorized


Stop Shops: Virtual Store Shelves in Subway & Bus Stations

20 Mar

[ By WebUrbanist in Conceptual & Futuristic & Technology. ]

virtual shopping

If you are going to have to wait for a ride anyway, why not do some shopping? No, not on your laptop or that tiny screen of your smartphone – right there on the wall, via virtual aisles on a life-scaled billboard full of products.

First in South Korea thanks to Tesco, and now popping up in Australia and other countries, it works something like this: a range of popular everyday products is displayed on the wall; scan the QR codes of the ones you want and your purchase will be added to a digital shopping cart.

virtual shopping south korea

In many cases, your purchases will arrive the next day – in some, they will be waiting for you when you get home, saving you that side trip to the corner store or local supermarket.

virtual shopping australia stations

If nothing else, this presents an interesting technology-bridging mechanism for those reluctant to shop online. They choose from real products, presented at actual size, in a potentially more familiar mode of browsing than via the internet.

Share on Facebook


[ By WebUrbanist in Conceptual & Futuristic & Technology. ]

[ WebUrbanist | Archives | Galleries | Privacy | TOS ]


WebUrbanist

 
Comments Off on Stop Shops: Virtual Store Shelves in Subway & Bus Stations

Posted in Creativity


Behind the scenes of the Hasselblad H5D advertising campaign

20 Mar

Hasselblad_underwater.png

Photographer Henrik Sorensen has uploaded an interesting behind-the-scenes YouTube video of his recent ‘submerged fairy’ shoot for the advertising campaign for Hasselblad’s H5D digital medium format camera. Taking inspiration from Danish folklore and its royal history he opted to use a submerged castle interior as the backdrop. Click through to watch the video (via FStoppers)

News: Digital Photography Review (dpreview.com)

 
Comments Off on Behind the scenes of the Hasselblad H5D advertising campaign

Posted in Uncategorized


How I Got The Shot: Desert Road

20 Mar
This is the final image I created from a single shot, processed twice.  Taken with the Canon EOS-1D X, EF 24mm f/1.4L II.  Exposure 15 seconds, f/1.4, ISO 800.

This is the final image I created from a single shot, processed twice. Taken with the Canon EOS-1D X, EF 24mm f/1.4L II. Exposure 15 seconds, f/1.4, ISO 800.

Some exposure situations become difficult to handle in-camera without a little post processing later on.  A perfect example is this shot of a desert road in Valley of Fire State Park, Nevada, that I took a week or so ago.  There was no moon, which made it a great night for capturing the stars, but an awful night for capturing the road surface in the foreground.

First, I needed an exposure for the stars.  I started with my usual base exposure for that, 15 seconds, ISO 800, f/1.4.  That gave me exactly what I wanted on the stars, but the foreground was too dark.  I was prepared for this, having brought an LED flashlight with me to “paint” the foreground.  So, during the next 15 second exposure, I held the flashlight on for five seconds, shining it indirectly down the road.  I did not aim it straight at the road, I simply aimed it down the road, allowing the light to skim along the road.  This avoided any hot spots. The 5 second exposure with the flashlight was the result of some experimentation with time. The entire 15 seconds created overexposure on the foreground, so I scaled it back to 5 seconds, and was pretty happy with that.

In the screen shot on the left, I adjusted the white balance to render the sky the way I wanted it- that deep indigo we normally see.  In the shot on the right, I adjusted the white balance so the road looked the way I remembered it.

In the screen shot on the left, I adjusted the white balance to render the sky the way I wanted it- that deep indigo we normally see. To do this, I simply adjusted the color temperature to 3000°K. In the shot on the right, I adjusted the white balance so the road looked the way I remembered it. Again, I used the color temperature setting and adjusted it to 5400°K.

I always shoot RAW when shooting landscapes.  There are several reasons for that, but one of the biggest for me is that I can adjust my white balance for creative purposes in post processing.  As you can see, if I tried to adjust for the sky, correcting that yellow cast that came from the glow of a distant city, the road became a deep blue area.  But if I corrected for the road, the sky became this garish orange.

There are two ways this could have been fixed. The first one could have been done in camera.  By taking a color correction gel, commonly called a CTO gel (Color to Orange), I could have warmed up the light on the road and then as I adjusted the white balance for the sky, the road would have fallen into place.  However, I did not have a CTO gel handy.  So I made the adjustments in Photoshop ACR.

When I adjust the white balance like this, during RAW processing, I tend to avoid the presets such as “Daylight” or “Shadow” or “Tungsten”.  I find I have much finer control by using the color temperature slider, which allows me very fine control over the color tone of the image.  I opened the file in Adobe Camera Raw, and adjusted the white balance for the sky, as shown above on the left, to 3000°K.   Then I opened that image in Photoshop.  I then reopened the image in ACR, and adjusted the white balance again, but this time for the road, as shown above on the right, to 5400°K.  I then duplicated the layer of the properly white balanced road, onto the layer with the properly white balanced sky.  I created a layer mask on the top layer, of the road, and masked out the orange sky, allowing the blue sky to show through.  The distant mountains silhouetted against the sky gave a perfect delineation for the layer mask, making it an easy blend.  After I got the layers the way I wanted them, I simply flattened them, did a few saturation and contrast adjustments, and had my final image.

This image shows the two layers stacked, with the layer mask.  The mask has only partially been painted in.  After adding the layer mask to the layer, you use black or white and paint over the layer.  Black hides the layer, while white reveals the layer.

This image shows the two layers stacked, with the layer mask. The mask has only partially been painted in. After adding the layer mask to the layer, you use black or white and paint over the layer. Black hides the layer, while white reveals the layer.

Post originally from: Digital Photography Tips.

Check out our more Photography Tips at Photography Tips for Beginners, Portrait Photography Tips and Wedding Photography Tips.

How I Got The Shot: Desert Road


Digital Photography School

 
Comments Off on How I Got The Shot: Desert Road

Posted in Photography


20. März 2013

20 Mar

Ein Beitrag von: wie? gand!

8559594540_8ca8d6a98e_b


kwerfeldein – Fotografie Magazin

 
Comments Off on 20. März 2013

Posted in Equipment


Männerfantasien

20 Mar

Wie wird der Mann eigentlich in der Fotografie dargestellt? Ist er Hauptakteur, schmückendes Beiwerk oder Viele und Einer im Selbstportrait? Ist er muskulös, breitbeinig samen-produzierend oder androgyn und eine Parfumschleuder? Ist er sexuelles Lustobjekt oder Herrscher über Seil und wogende Brüstemeere?

Und warum eigentlich immer ein und, oder oder und?

In ihrer Abschlussarbeit „Subjects of Desire“ für die Neue Schule für Fotografie ist Zorana Musikic dem auf der Spur. Oder noch besser, sie spielt damit. Überspitzt, dreht um und erstaunt den einen oder anderen Betrachter.

Als Frau schmunzelt man, zieht die Augenbraue hoch, wiegt den Kopf hin und her. Kann man sich doch all die Inszenierungen ganz einfach auch und vor allem an Frauen vorstellen.

©musikic_sod_01 ©musikic_sod_02

Überspitzung ist immer ein Mittel zur Selbstreflexion. Plötzlich werden einem die Grenzen der eigenen Dämlichkeit bewusst. Das ist es, was die Bilder schaffen – nicht konsumieren, sondern denken, nachdenken, Vorurteile bewusst machen, hinterfragen.

Angefangen hatte es mit Fotos ihres Freundes. Wie stellt man Männlichkeit dar, was ist Männlichkeit? Und warum werden oft eher Frauen fotografiert? – Frauen von Frauen, Frauen von Männern, wohin man blickt. Wer fotografiert Männer und warum und wie? Und warum immer so Stereotype, festgefahren, verankert im Geflecht der Selbstüberschätzung?

Aus den Fragen entwickelte sie ihre Serie. Sie fragte Ex-Freunde, Freunde von Freunden, Mitbewohner von Freunden. Sie gab ihnen Raum zum Ausprobieren. Eine ungefähre Idee im Kopf, Requisiten in die Hand gedrückt, aber was letztendlich gezeigt wird, das entschieden immer beide während der Aufnahmen und danach.

©musikic_sod_06 ©musikic_sod_07

Für die Männer war der Raum die Bühne, die Requisiten boten Schutz. Sie waren Schauspieler und doch sie selbst, ließen sich fallen und manch einer zeigte im Spiel viel mehr Weichheit als bewusst gespielte Männlichkeit.

Da gab es beispielsweise diesen ausgeleierten Gymnastikanzug. Sie dachte an ihren Ex-Freund, der einst Leistungsturner war – warum nicht beide zusammenbringen? Sie mietete sich in einem Stundenhotel ein und schaute zu, was Ex-Freund und Gymnastikanzug miteinander trieben.

Ihre Bilder entblößen aber nicht. Schnell kann die Grenze zur Clownerie überschritten werden, doch hier scheint mir, ist es geglückt. Die Männer wirken entrückt oder wie in einer Filmszene eingeforen.

©musikic_sod_11 ©musikic_sod_08

In vielen fühlt man auch das Spiel und die Freude, wie beim Mann, der mit Engelsflügeln springend und jauchzend über das Winterfeld hüpft. Übrigens war die Idee dazu eine ganz andere. In Zoranas Kopf spielte sich eher eine melancholische Szene ab. Ein Mann, der schwer geschultert, vom Schicksal zermürbt, über das Feld humpelt.

Ihre Bilder entstanden dabei alle auf Film. Zwar war auch die Digitale mit dabei, aber eher als Belichtungsmesser und zur Sicherheit, falls auf dem Film nix drauf ist. Aber diese Angst bestätigte sich nie. Immer waren es die Bilder auf Film, die besser waren.

©musikic_sod_09 ©musikic_sod_10

Licht und Farben wurden bewusst gesetzt. Die Negative hinterher gescannt und digital bearbeitet. Zwei bis vier Filme verwendete sie für ein Setting, einen Mann, eine Idee. Aus den Filmen wählte sie dann die Bilder aus und manchmal war es auch nur eines, das überzeugte.

Die nächste Schwierigkeit war die Hängung der Bilder. Wie sollten sie zueinander wirken? Sie wollte Brüche erzeugen, zum Denken anregen. Und so ist es ihr geglückt, den Betrachter ein wenig an die Hand zu nehmen, zu leiten und zu fordern, sich seinen eigenen Reim auf das zu Sehende zu machen.

~

Die ganze Serie ist noch bis zum 21. April 2013, Mittwoch bis Sonntag von 13-18 Uhr in der Galerie der Neuen Schule für Fotografie in der Brunnenstr. 188 – 190, 10119 Berlin, zu sehen.


kwerfeldein – Fotografie Magazin

 
Comments Off on Männerfantasien

Posted in Equipment