RSS
 

Archive for February, 2013

Nikon D3s hands on review video

03 Feb

Ben Brain, Digital Camera’s Deputy Editor, takes a look at Nikon’s new flagship D-SLR, the D3s, a direct update to the popular D3, released back in 2007. The D3s gives a high response and light sensitivity which is perfectly suited for sports, wildlife and press photographers. Watch the video to find out the main features and advantages of this professional level D-SLR are and see how it performs in different conditions.
Video Rating: 4 / 5

Nikon SB-600 Camera Flash Unboxing


How to Match Exposures when Stitching Panoramas in Photoshop

03 Feb

Since the introduction of Photoshop CS2, Adobe’s image editing software has shipped with the ability to easily merge a series of photographs into a panorama.  Often, it is incredibly simple: once you have the images you want to stitch together, it only takes a few clicks to produce the blended panorama.  However, whilst Photoshop may be able to seamlessly merge your images 90% of the time, on occasion it may struggle to perfectly match the exposures across the input images resulting in a final panorama with obvious joins between the individual photographs.

To see what I mean, have a look at the image below.  This is a 7 shot panorama, straight out of Photomerge, and you can see obvious banding in the water of the lake, as the exposure/colour tone subtly change between images.

panorama_exposure_match_image-3

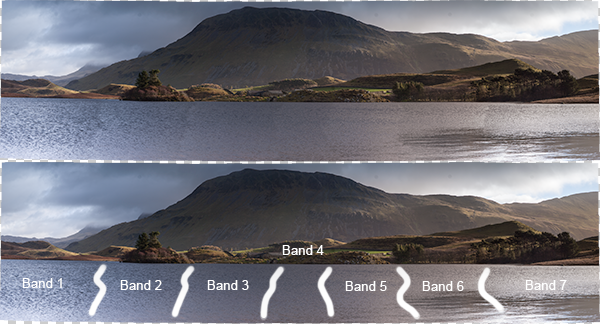
Top: The panorama fresh out of Photomerge. Bottom: I've highlighted the joins between the individual input images where the blending of exposures was not sufficient

This article walks through a series of fairly simple steps to edit the above panorama to remove the obvious joins and give a perfectly blended panoramic image  (note: I am only going to discuss processing the panorama once it has been stitched by Photomerge.  For tips on how to take the images, prepare them for stitching and on use of Photoshop to stitch them, see this recent article by Jason Weddington).

It is worth mentioning that the images I started with were a challenge to shoot for a panorama as the exposure differed greatly between the far left of the image, where I was shooting away from the sun, and to the far right, where I was shooting towards the sun.  Therefore, before blending the images into the panorama, the individual images were processed in Adobe Lightroom to try and match the exposures as closely as possible first.  Once complete, the selected images were exported to Photoshop to ‘merge as a panorama’, using the ‘auto’ setting.

On to the steps…

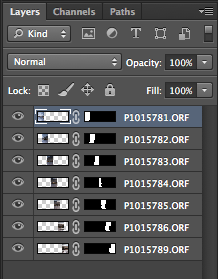
1.  Once the images have been merged, the output image will consist of several layers (one for each input image, in this case 7) with a mask applied to each layer.  In many cases, these layers can be flattened at this point to give the final panorama, however, we’re going to make a few edits first.

panorama_exposure_match_image-2

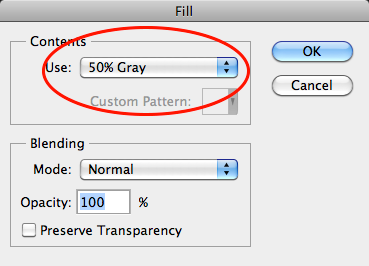
2.  Create a new layer, on top of all other layers.  Fill the layer (Edit > Fill) with 50% grey:

panorama_exposure_match_image-4

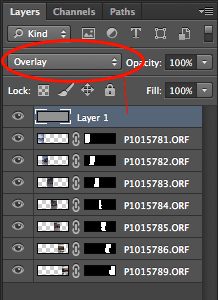
3.  Set the blending mode of the ‘grey layer’ to ‘overlay’.  When set to overlay, a 50% grey layer will appear transparent, so initially this layer will make no difference:

panorama_exposure_match_image-5

4.  Find one of the joins where the exposure needs to be tweaked, for example, below, there is an obvious join between the two images.  The left hand image needs to be a little lighter and the right hand image needs to be a little darker.  Let’s address the left hand image first.

panorama_exposure_match_image-6

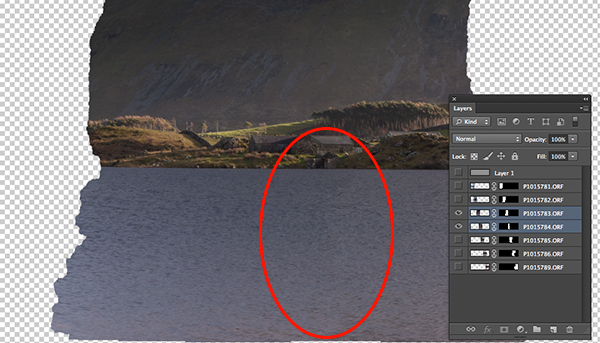
Only the two layers of interest are selected here. The left hand image needs to be lightened, whilst the right hand image needs to be darkened

5.  If we ctrl+click/cmd+click the mask of the appropriate layer (i.e. click on the black/white rectangle in the layer bar), we will bring the portion of the image to be edited into an active selection (we only want to edit inside of that selection for the time being).

6.  Ensure the ‘grey layer’ is highlighted

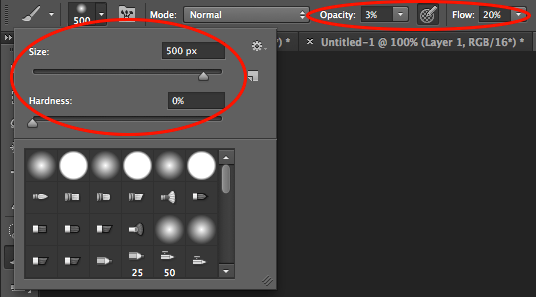
7.  Select the brush tool.  You will want a large, soft brush so set the size to be a few hundred pixels (I used 500 px in this instance, but the size is relative to the size of your panorama) and set the hardness to 0%.  Set the opacity to 3% and the flow to 20%:

panorama_exposure_match_image-7

8.  To lighten the layer we want to select the colour white (if we wanted to darken the layer, we would select black).

9.  Using the brush, liberally brush over the join and back towards the centre of the image.  This will paint white onto the grey layer, but only within the current selection.  As the brush is very soft the edits should be subtle, but as you brush you should be able to see the area under where you have painted white gradually begin to get lighter.

panorama_exposure_match_image-8

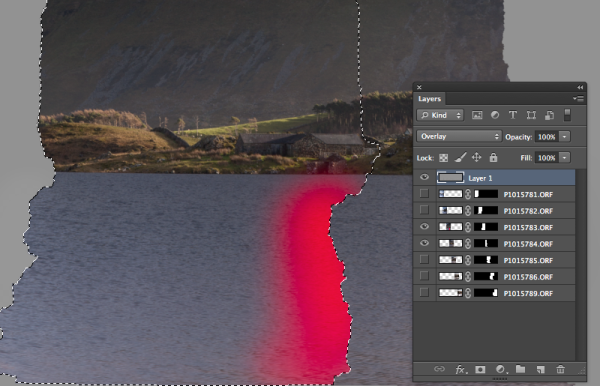
An active selection of the mask of the left hand image is required so that any edits are only applied within that selection. The idea is to paint white onto the 'grey layer' in the region highlighted by red in the above image.

10.  In order to get seamless joins, I find that is is a compromise between lightening one image and darkening the other in order to maintain a smooth transition of tone/exposure across each image.  Therefore to edit the right hand image, you repeat steps 5 to 9, but ensure that the right hand image is within your active selection, and that the colour black has been selected for your brush.

Initially it is a slow process that involves carefully modifying each image at the join in order to match the exposure, however once you get a feeling for the brush it can become quite quick.

If we change the blend mode of our ‘grey layer’ back to ‘normal’ you will be left with something similar to the middle image below, where you can see the result of the white/black brush strokes on the grey layer and the difference it makes to the actual join.

panorama_exposure_blending_9

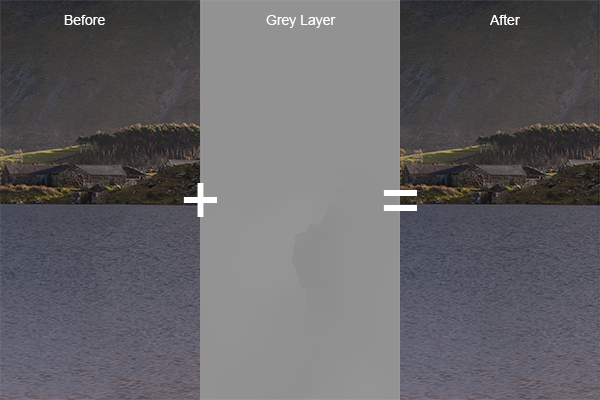
A composite showing the starting image, the modified 'grey layer' and the final image, when the 'grey layer' is set to 'overlay'.

If you repeat that for each join across the panorama, you will end up with grey layer that looks like the image below (with the blend mode set to ‘normal’).

panorama_exposure_match_image-10

The 'grey layer' for the entire panorama showing the white/black brush strokes around each join

Once you set the blending mode back to ‘overlay’, all of the joins should disappear, and you should be left with a perfectly blended panorama with no tell tale signs of the joins:

panorama_exposure_match_image-11

The entire panorama when the 'grey layer' is set to 'overlay'. The joins between the images are no longer visible in the water of the lake

As the edits have been made to the ‘grey layer’ no permanent edits have yet been made to the actual images, so any mistakes are easily rectified or any further modifications can easily be made.  Once you are happy with the blending of the individual images, you can flatten the layers to produce your final panorama and make any further finishing touches:

panorama_exposure_match_image-12

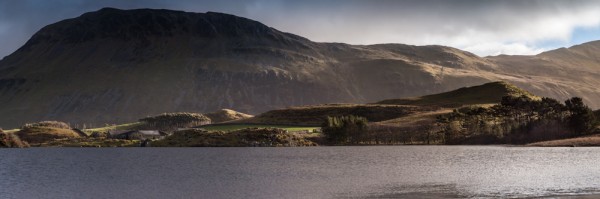
The final panorama: Llyn Cregennen, North Wales, UK

I hope those steps were easy enough to follow.  Ultimately, this is just one application of a the use of a 50% grey layer, set to ‘overlay’, in order to modify the exposure of an image in a non-destructive manner (until the layers are flattened, that is).  So if you try to blend a panorama in Photoshop but didn’t quite get the results you were after, you dont have to jump for the clone brush straight away or send the image to the trash.  Give these steps a try and see if you can manually match your exposures where Photoshop can’t.

Please let me know if you have any feedback, I welcome any comments and, as always, I’ll try to respond when I can.


Post originally from: Digital Photography Tips.

Check out our more Photography Tips at Photography Tips for Beginners, Portrait Photography Tips and Wedding Photography Tips.

How to Match Exposures when Stitching Panoramas in Photoshop


Digital Photography School

 
Comments Off on How to Match Exposures when Stitching Panoramas in Photoshop

Posted in Photography


Southern Worthersee 2011

03 Feb

SoWo 2011 takes place every year in Helen, GA. This thrown together movie was all filmed on a GoPro HD and a Nikon d5000… The song is “Watchin’ Closely?” by Neuratik
Video Rating: 4 / 5

The Black-billed Streamertail of Jamaica is our Golden Bird for this episode. www.facebook.com The Bird is the Word!


How To Keep Your Memory Cards Healthy

03 Feb

In this post, Steve Berardi from PhotoNaturalist explains how to keep your memory cards healthy.

Memcard

Memory cards are one of the most often neglected parts of digital photography. But, they’re extremely important because they’re responsible for safely storing your photos until you get them to your computer.

So, it’s important to take care of them properly. Here are a few tips for keeping them healthy:

1. Format new cards as soon as you get them

Many memory cards are advertised as “pre-formatted” and “ready to use,” but it’s always a good idea to reformat the card again when you receive it, since some cameras have special requirements for the file system of memory cards. Formatting the card with the camera you’ll be using it with will ensure that the card is in a format that the camera recognizes.

2. Never fill your cards completely

Most cameras have some kind of indicator on the LCD screen that tells you how many more photos you can shoot before filling the card. Keep an eye on this number and make sure you never get too close to filling the card, because if you happen to shoot a photo when the card is already full, there’s a chance your camera will still try to write part of the photo to the card (and potentially triggering a write error).

3. Never let your batteries drain completely

It’s also important to never let your batteries drain completely, because if your camera runs out of energy at the exact moment that it’s trying to write a photo to the memory card, then there’s a good chance that the camera will only write part of the file (which could corrupt the rest of the card).

4. Reformat your cards instead of deleting all the photos

Instead of deleting the photos on the card from your computer, always reformat the card from within the camera. This will ensure the card is in a format that the camera expects.

5. Use good quality memory cards

With all those camera bodies and lenses being so expensive, it’s tempting to save some money by getting inexpensive off-brand memory cards. But, remember the importance of these cards: they’re responsible for safely storing your photos. It’s worth a few dollars more to ensure your photos arrive safely at your computer :) Two brands that I can personally recommend are SanDisk and Lexar (if you’ve had good experience with another brand, please let us know by leaving a comment!).

Steveb2About the Author: Steve Berardi is a nature photographer and software engineer. You can usually find him hiking in the beautiful mountains and deserts of southern California.

Read more of his articles on nature photography at PhotoNaturalist.

Post originally from: Digital Photography Tips.

Check out our more Photography Tips at Photography Tips for Beginners, Portrait Photography Tips and Wedding Photography Tips.

How To Keep Your Memory Cards Healthy


Digital Photography School

 
Comments Off on How To Keep Your Memory Cards Healthy

Posted in Photography


Miss FD – Enter The Void – Official Music Video

03 Feb

Download from iTunes: itunes.apple.com (c) Quantum Release Records 2010 Directed by Danny Rendo, Enter the Void is the first official music video from Miss FD’s full length studio album, Monsters in the Industry. Monsters in the Industry is available through: Amazon.com www.amazon.com iTunes itunes.apple.com and Miss FD’s official website www.MissFD.com
Video Rating: 4 / 5


Sony NEX 5N Video Sample – Night Time (high iso / low light)

03 Feb

Went for a quick stroll in the neighbourhood to test out the night time / low light performance. One thing i noticed is that the LCD is much more grainy than the actual video, which is incredibly clean at iso1600 and even 3200. I didnt have to go to iso3200, but with a slower lens, it would have been no problem to do so. I also have a BW circ. polariser on front, which takes back about 1.5 stops. Settings: – 1080p30, 24mbps – 1/60, iso800-1600, 24mm, f1.4, 0ev, BW Circ. Polarizer (-1.5 stop) – Sony NEX-5N, ECM-SST1, Nikkor 24/1.4G, cheapo tripod


tim lincecum pitching ~ 2011 spring training practice

03 Feb

monday february 21, 2011 scottsdale stadium ~ scottsdale, arizona tim lincecum pitching on one of the back practice fields at scottsdale stadium. he pitched for around 10 minutes. this was shot towards the end of it.
Video Rating: 5 / 5


Sigma 8-16mm Lens Review and Photo Examination – Part 1 of 2

03 Feb

www.artoftheimage.com – Sigma 8-16mm Lens Review and Photo Examination – Part 1 of 2 Check out the new Art of the Image Recommended Photography Gear List at http PS If you have kids or know someone with kids, check out my latest online book, “Diary of a Nerd King” at www.nerdkingdiary.com. It’s funny and it’s FREE! Please pass it along… thanks! PSS If you have toddlers or small children, check out http for my children’s ebooks for Kindle, iPad, iPod, iPhone, laptops, etc! Please pass it along… thanks!


Woods sounds, fall 2011

03 Feb

leaves crunching, insects (locusts mostly)

Diablo 3 beta. Wizard encounters a near death experience. Check out our Diablo 3 site in danish: www.diablo3x.dk

 
Comments Off on Woods sounds, fall 2011

Posted in Nikon Videos


RuneScape – Evolution of Combat Boss Solos Pt. 1

03 Feb

Several days after the release of EoC to RuneScape, I thought it would be nice to make a compilation of boss monsters soloing once more. Like, Comment, Fav, and subscribe for more videos like this! 🙂 My comments regarding some boss monsters in this video: – Chaos Elemental: Lvl 138; Life points: 17250; Weakness: Bolts With the removal of PK Skulls, the wilderness is now even much more dangerous and high-risk, as you will drop all of your items at death (with the exception of 1 item if you have Item Protect). What you will face is the Chaos Ele will randomly teleport you around (usually away from); you can resolve this by using an ability on your actionbar, assuming you have the boss targeted. The Ele can also disarm you if you have inventory space. This is dangerous when you are peforming an ability that channels. As shown in the video, I was using Snipe, but then I got disarmed, so snipe did not work as damage calculation only triggers if I have a ranged weapon equipped. While re-equipping your armour or weapon, you will suffer a 2-second cooldown for all abilities. Dagannoth Kings: Lvl 156’s; Life points: 37400 Weaknesses: Prime: Arrows; Rex: Fire; Supreme: Stab These bad boys are by far the hardest to solo, you cannot bind Dagannoth Rex (even if the spell hits) as he is immune to stuns (including many other bosses). I’m hoping Jagex decides to fix this particular error. Even if you were trying to kill Supreme first with Magic Protection prayer, you will get destroyed

Video Rating: 0 / 5