Ein Beitrag von: Benjamin Schubert

kwerfeldein – Fotografie Magazin

It is day two at the Mobile World Congress in Barcelona and the team at connect.dpreview.com are there, covering the newest in smartphone and tablet camera technology. We’ve visited the stands of LG, Samsung, ZTE, Asus and Huawei to cover their latest products and as well as news and commentary we’ve published several brief hands-on articles with the latest new gear. Click through for links to the latest content at connect.dpreview.com.
News: Digital Photography Review (dpreview.com)
 Years ago a cinematographer friend told me of a dinner he once had in Paris with a Mr Cooke. Mr Cooke of the famed British optical firm Cooke, Taylor and Hobson.
During the meal Mr Cooke explained that he spent most of his waking and working hours designing lenses to perform with maximum sharpness and minimum degrees of aberration to achieve the perfect capture of the photographic image. In spite of these heroic efforts he spoke with some level of bitterness that certain cinematographers persisted in covering his carefully crafted lenses with all sorts of rubbish, grease and diffusers to degrade, soften and generally muck up the performance of these precisely manufactured optics … all in the pursuit of artistic expression!
Just as the plastic cameras described in this book do today!
Author Gatcum is of the opinion that digital photography and the associated image editing software has made it so much easier to produce perfect shots … but there are many enthusiasts out there who don’t necessarily want ‘perfect shots’. It’s at this point in the argument that plastic cameras and their ‘lo-fi’ aesthetic enter the discussion.
You have only to flip through the images in the book to enjoy the thrills and spills that plastic cameras can create! Images with severe vignetting, extreme aberrations, uneven sharpness across the frame, colour that shows that things are definitely not right in the lenses’ colour capture. For not right, read very right in the vocab of the adventurous photographer!
From my own experiences with early Diana cameras and more recent LOMO replicas you have to take a chance, sometimes succeeding with a shot that stuns! Or that doesn’t! Perfection is not on the menu! Chance is the name of the game!

The story really starts with the original Diana, made by the Great Wall Plastics factory in Hong Kong in the 1960s and first sold for about a dollar. By the 1970s the resourceful and wise out there quickly saw the Diana’s potential and snapped them up from junk shops to began using them for creative photography. These days the original $ 1.00 Dianas sell on eBay for $ 50 plus.
By 2007 the Lomography company saw an opportunity and cleverly re-manufactured the Diana and its sub models, selling them for prices approaching $ 100, complete with all their imperfections.
These days we’re spoilt for choice. The book lists dozens of crazy models, all available from companies such as Lomo and the like.
Like the magnificent 120 format Holga and its variations. These include the Holga 120 TLR, the Holgaroid, the Holga 120 3D, Holga PC pinhole camera. Also in 35mm: Holga 135 TLR.
Lomo of course markets a wide variety of models: the 35mm based LC-A, the Lomo Smerna duet of models, with one sporting a flash socket. Plus many, many more.
And a long list from other makers: Blackbird; Recesky TLR; Halina Panorama; Twinkle 2; Split-Cam; Robot 3; Action 4; Agat 18k; Ikinimo 110 … the list goes on.
Then the game got clever: you can now buy Holga lenses that fit current DSLR models such as Olympus and Panasonic Four Thirds format models.
There are even apps that digitally replicate the look and feel of plastic cameras!
The book is a ball of fun and even if you never buy a plastic camera to pursue the path of erratic photographic capture you will enjoy the ride as you thumb through its pages.
Footnote: these days the name Cooke appears on high level lenses used still in feature film and TV series photography. They’re highly regarded and no doubt are frequently plastered with layers of Vaseline, parachute silk, ripstop nylon etc!
Author: G Gatcum.
Publisher: Ammonite Press.
Distributor: Capricorn Link.
Length: 192 pages.
ISBN: 978 1 90770 840 4.
Price: “Get a price on Plastic Cameras at Amazon (currently 22% off)
Post originally from: Digital Photography Tips.
Check out our more Photography Tips at Photography Tips for Beginners, Portrait Photography Tips and Wedding Photography Tips.
Plastic Cameras: Lo-Fi Photography in the Digital Age [Book Review]
Choosing the right photographer for your special day can be a real concern for some, you want to have beautiful photos of the day that you can treasure forever. So it makes sense to do your homework before deciding on a photographer.
Here are some things you should be aware of before hiring your photographer to ensure your day goes as smoothly as possible.
While the vast majority of photographers these days have made the switch to digital, there are some photographers who prefer to keep it traditional and use film. It is down to personal choice and budget as to which method you choose, bear in mind using film will be more expensive due to the process of developing the prints afterwards. The drawback of film is that it is not quite so easy to make changes to your prints, even switching a colour print to black and white. With digital, there is no danger of over-exposure and the photographer can literally take thousands of shots at no extra cost to you.
Today’s digital photography offers sharp, clear, bright photographs with great clarity. What’s more, digital film allows the photographer to quickly and easily edit the photographs, put them onto DVD and email the shots to the client. This means you can share your photographs with family and friends without waiting weeks after the event.
No photographer is alike; they have their own individual style which reflects in their work. Depending on the occasion in which you want the photographer for, you need to check out their portfolio. For example, a wedding photographer should have an extensive range of photographs in different conditions, outside, indoor, candid, formal and more classic shots. Businesses and corporations may wish to use a commercial photographer. Make sure the photographer you select has adequate experience in photographing most events such as weddings, christenings and graduations etc. Check out their colour and black and white work as there can be variations on both styles.
A sign of a good photographer is one that is prepared to listen to what you want and work closely with you to get the best results, a good photographer will never dismiss your ideas and tell you that he/she knows best, they will want you to be happy with their work and though they may offer their opinion the final decision should always rest with the customer. Also evaluate how they work with other people. A family photographer, particularly working with children should be patient and accommodating.
How long have they been in the business for? Do they have experience in working at many different events? Make sure they have at least a few years’ experience under their belt before hiring them for an important event. This will ensure that there are no tears when looking at the images of the day. Check out testimonials and ask around for references of your chosen photographer.
Before signing on the dotted line, make sure the photographer is upfront about all of the costs involved. And don’t be afraid to ask. Be wary of photographers that offer a very low fee initially as you can get caught out when purchasing the prints as they most likely charge extremely high prices to buy the prints.
Get a full written and signed contract of what you are paying for, the hours, the location/s, the date/s of the event etc. Does the photographer have a cancellation policy? What about copyright?
By following these guidelines will assure that you will have a permanent record of your special day for many years to come.
–
This post was written by the team at Beck Photographic – the premier Northampton wedding photographers.
There is nothing about flash in this post, except for "pre-flashing," and that is not what you think.
Every time I adjust the exposure slider in a raw converter or tweak the tonal curve into a subtle S-shape, I think back to how we used to do some pretty insane stuff—very improbably—with film, subtle tweaks of light and a witches-brew of chemistry.
If you are under 40, most of this is gonna be brand new. If you are older than that and used to shoot night sports for a newspaper, see how your experience matches up… Read more »
Strobist
[ By WebUrbanist in Design & Products & Packaging. ]

From color-your-own and converted-umbrella dresses to hoodies-turned-tote-bags and color-scanning sewing machines, a simple, clever and clearly-executed design concept can be as brilliant as the most fashion forward runway piece. See some cool and colorful prototypes first, or skip ahead to learn simple tricks and tips to turn your most ordinary, disused and abused clothes into one-of-a-kind wonders.

Consider Berber Soepboer, who started with the most obvious of blank slates: a black-and-white base made to be filled in by the wearer with colored markers.

From that baseline, she has gone on to incorporate buttons, snaps and folds that allow each outfit to convert on the fly.

For those afraid they might color outside of the lines, Fernando Brizio has an even simpler alternative. A series of simple pockets in these modest white outfits provide the basis for custom color schemes.
You can choose how to arrange the results by deciding which colors to slot in where, and watching them bleed outward to form patterns … then wash them out and start again.

But what about your existing wardrobe? It turns out there is lot to be done on that front as well, like this series of old baggy shirts turned into stellar new tops and dresses by Mari Santos.

Step by step, she takes clothing items that would normally be destined for the dumpster (or at best: the thrift store) and makes dynamic new outfits from them.
![]()


[ WebUrbanist | Archives | Galleries | Privacy | TOS ]
![]()
 |
 |
I have been a beta tester for Leica for several years, but the timing of the availablity of beta cameras this winter coincided with my being in Mexico, and therefore I was unable to take delivery of a testing sample of the new Leica M due to Mexican customs’ Byzantine restrictions.
But my friend and colleague Sean Reid has been testing the as-yet unreleased camera for a couple of months now, and today provides us with some insights on what we can expect from the new M.
I will do my own hands-on field review in the weeks ahead once I have access to a full production review sample.
Adobe Labs has released updates to Lightroom and Camera Raw with new camera support, including completely revised support for Fuji X-Trans sensor cameras. Great news for Fuji fans.

"Every time I go back to a module I had already seen, I learn additional things. I have never seen tutorials that have the excellent mix of what the features are,
how to use them, enough of the under-the-hood information
and concepts so that I can utilize the features creatively and efficiently,
and just enough humor to keep the motivation level high. Wow!"
…
The Luminous Landscape – What’s New
An important element of landscape photography is ensuring that all of the key elements within your composition are sharp. This can often include foreground objects that are a matter of meters from your camera as well as background elements that can be kilometres away. Therefore, to achieve this, you need to ensure your depth of field is large enough to render everything of interest, suitably sharp.
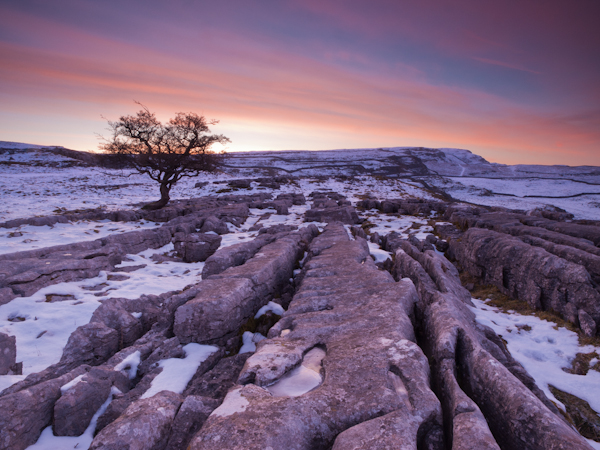
In this scene it was important to capture everything from the frozen puddle in the foreground, to the hills in the background, in sharp focus
When you focus on an individual point within your landscape, you are in fact creating a plane of focus that lies parallel to the sensor. Everything in front of, and behind, that plane is technically not in focus, however there is a region within which objects will appear acceptably sharp – that is the depth of field. For instance, in the scene below the camera has been focussed on a rock. Therefore, the plane of focus lies parallel to the sensor across that rock and the limits of acceptable sharpness, that form the bounds of the depth of field, lie in front of, and behind, that plane.

A theoretical example showing the depth of field for a given focal length, aperture and point of focus. The depth of field will always extend one third of the distance in front of the focal plane, and two thirds of the distance behind it.
In the diagram above, the depth of field is not sufficient to capture all of the trees within the range of acceptable sharpness, i.e. they will appear out of focus. However, the depth of field can be easily manipulated to extend as far as you wish as it is controlled by a number of factors, namely: focal length, aperture and distance to the focal point. (I’m not going to include sensor size here as, after the purchase of your camera, it is not subject to user control; however it does not hurt to appreciate that the depth of field is inversely proportional to sensor size meaning that different cameras have different capabilities with respect to achievable depth of field). The relationship that these factors have with depth of field is given below:
One way to ensure that the entire frame is in focus (well, ‘acceptably sharp’) is to ensure that the depth of field extends from the foreground to infinity. To do this, you need to focus at the ‘hyperfocal distance’: for a given focal length and aperture, there will be a distance where setting your point of focus will result in the entire scene being within the depth of field.

By focussing at the hyperfocal distance, the entire scene (and more beyond) will fall within the depth of field
So theoretically, by selecting the correct aperture and moving the point of focus to the hyperfocal distance (assuming the composition and therefore focal length remain unchanged) it would be possible to render the entire scene in focus. A point worth noting is that when focussing at the hyperfocal distance, the near acceptable limit is always half of the hyperfocal distance.
The calculation to determine the hyperfocal distance isn’t trivial, so there are numerous sites or apps to help you when out in the field. However by frequent application, it isn’t long until you gain an appreciation of where to set your point of focus, for a given aperture at your commonly used focal lengths.
For any focal plane, the depth of field extends 1/3rd in front and 2/3rd behind the point of focus. Therefore, an easy, but potentially flawed, application of hyperfocal focussing is to select a very small aperture, e.g. f/22 or f/18, and to focus 1/3rd of the way into the scene from the bottom of the frame. It’s not a bad assumption, as often you will achieve the desired depth of field, however in choosing such a small aperture, you may well be losing any benefits of infinite focus due to decreased image sharpness as a result of diffraction.
For example, the image below shows a comparison of the same scene, shot at f/8 (left) and f/16 (right).
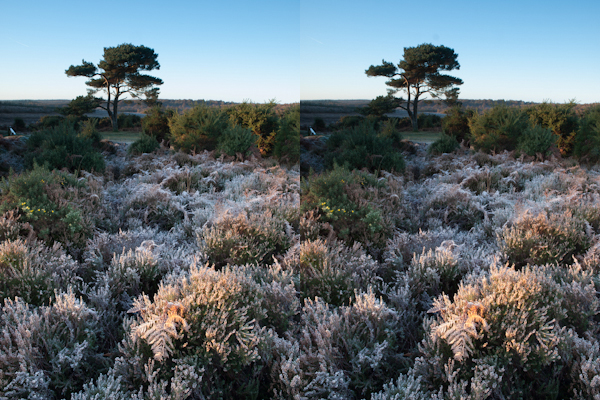
The frosty fern leaf in the centre of the frame at the bottom of the image, was an important part of the foreground interest here. Even though both images look perfectly sharp, the 100% zoom for each image below shows the difference in sharpness for between using f/8 and f/16, even though both apertures result in a depth of field that extends from before the fern leaf to infinity:

The sharpness of the fern leaf at f/8 (left) vs. f/16 (right). Even though the lens was stopped down from f/22 to f/16, the resulting image could still be captured with greater sharpness throughout, by using a wider aperture of f/8, and focussing at the hyperfocal distance
Diffraction becomes an issue all lenses as the aperture gets smaller, especially at the edges of the image, and will be more pronounced on inexpensive lenses. Typically, the sweet spot, in terms of lens performance, will be somewhere between f/8 and f/11. Therefore, use of the smallest ‘diffraction limited’ aperture that can still achieve the required depth of field becomes important.
So, hopefully, you will see that it is worth being aware of the hyperfocal distance for your commonly used focal lengths, especially for the apertures that result in optimum lens performance. With the tools available to us today, it isn’t difficult to work it out, even when out in the field, so why not give it a go the next time you are out photographing landscapes.
Post originally from: Digital Photography Tips.
Check out our more Photography Tips at Photography Tips for Beginners, Portrait Photography Tips and Wedding Photography Tips.
Getting Landscapes Sharp: Hyperfocal Distances and Aperture Selection
Ein Beitrag von: Christian Hamann
Noch nie habe ich so gefroren und mich gleichzeitig so wohl gefühlt. Wie jedes Jahr bin ich im Winter wieder in Chicago unterwegs. Windy City, Chi-Town, Heart of America, Second Home. Für mich ist keine Stadt der USA so einladend und mit Heimatgefühlen verbunden wie die große Stadt am See.
Kalte Winter sind mir nicht fremd, doch die Winter in Chicago sind eine Art Lotterie. Im späten November kann man noch mit einem eiskalten Kaffee am Millenium Park sitzen und die Sonne genießen, um einen Tag später zu bemerken, dass man vielleicht doch den Polarparka hätte einpacken sollen.
Dieser Tag ist anders, er ist einfach perfekt. Kühl aber nicht kalt, sonnendurchflutete Straßenschluchten und schattige Hinterhöfe. Und so wandere ich ohne Ziel durch das Herz von Chicago-Downtown, dem Stadtteil mit den weltbekannten, überirdischen Subways – The Loop.


Chicago hat diesen unbeschreiblichen Charme. Patina wohin man schaut. Flugrost an den Trassen der Subway, vergilbte Schilder als Zeugen der alten Zeit von Schlachthöfen, Al Capone und den Filmerinnerungen an die Blues Brothers.
In Gedanken versunken wandere ich also über die South Wabash Avenue in Richtung Norden und stromere durch die vielen namenlosen Verbindungsgassen. Das Sonnenlicht als Kompass und die Kamera immer in der Hand.
Verlaufen kann man sich eigentlich gar nicht und wenn man doch mal Hilfe braucht: Chicagoer sind absolute Lokalpatrioten und helfen mit einem Lächeln und ein paar guten Tipps.


Innerhalb der Loop befindet sich das Finanzzentrum der Stadt. Banken und Börsen neben Starbucks und Shoppingmall. Ein buntes Treiben um mich herum und gleichzeitig so surreal. Alles hetzt von Termin zu Termin, während ich ohne Ziel einfach nur die Stadt in mich aufzusaugen versuche.
Nach vielen Blocks und Gassen schmerzen die Füsse und der Magen knurrt. Ich springe in die Subway und lasse mich einmal um den Stadtteil fahren.

Jetzt habe ich ein Ziel: Das alte Exchequer, Stammlokal von Al Capone mit der weltbekannten Deep Dish Pizza. Im Exchequer scheint die Zeit stehen geblieben zu sein. Wären da nicht Bilder von Michael Jordans großen Siegen mit den Bulls an der Wand, man würde sich in der Zeit zurückversetzt fühlen und Big Al jeden Moment erwarten.

Und so sitze ich zum Abschluss meines freien Tages in dem alten Schuppen, trinke ein Bier, esse meine Pizza, gehe meine Bilder auf der Kamera durch und staune, wohin mich meine Füße an diesem perfekten Wintertag in Chicago trugen.
kwerfeldein – Fotografie Magazin
[ By Steph in Gadgets & Geekery & Technology. ]
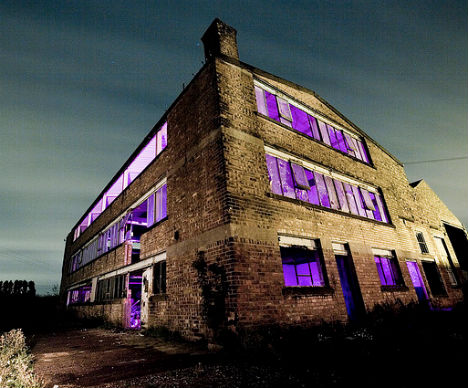
Half the fun of exploring abandoned places is the hunt – stumbling upon obscure sites, or determining the precise location of better-known ones with a collection of vague clues from previous urban explorers. It’s not a great idea to have hordes of curious people descending upon crumbling ruins and dilapidated structures for obvious reasons, ranging from trespassing laws to dangerous conditions. But for abandoned places aficionados who’d rather cut to the chase, the ‘Abandoned’ iPhone app by THE FORM pinpoints locations on a map.

The community-based app relies on user input to determine where abandoned sites are located. And beyond mere maps, the app allows you to post photos and stories of your own adventures. Not only does this help fill out the lore of interesting places, it can help people avoid dangerous areas or give precise instructions for easy access.
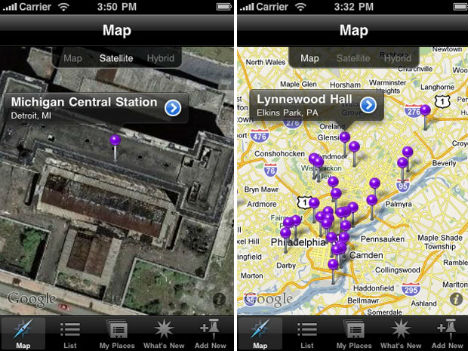
GPS mapping automatically locates and displays abandoned sites near you, and you can store a private log of your own locations if you don’t want to share with others. Rate sites from one to five stars, share your comments and contribute to locations submitted by others.
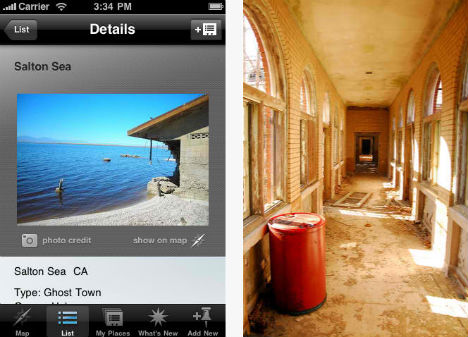
Urban exploration has long relied upon word-of-mouth. In many cases, people in the know share information about certain sites only with others who can be trusted not to damage the site, call attention to themselves, or take risks that could result in injuries. For that reason, this app might receive mixed response from dedicated urban explorers, and those interested in keeping certain sites secret from the public at large. But on the other hand, a lot of abandoned sites are in serious need of attention, and the sooner they’re saved, the more of their history can be preserved. Get it at iTunes.
via Pop Up City; top image via nocturne
![]()
[ WebUrbanist | Archives | Galleries | Privacy | TOS ]
![]()
|
|
You must be logged in to post a comment.