RSS
 

Archive for August, 2012

Transit of Venus – June 5, 2012

01 Aug

Yesterday afternoon it was impossible to resist photographing the very rare transit of Venus across the sun. Seeing that I didn’t want to wait another 105 years to photograph it I made the most of the opportunity. If you missed seeing it I highly recommend scrolling down to see the NASA video of the event as seen through an extreme ultraviolet wave length.

Transit of Venus – June 5, 2012 – Canon 5D Mark II, Canon 800 f/5.6 + 2x +2x teleconverter combo for net focal length of 3200mm

Transit of Venus – June 5, 2012 – Canon 5D Mark II, Canon 800 f/5.6 + 2x +1.4x teleconverter combo for net focal length of 2240mm

Canon 800mm f/5.6 lens provided by Borrowlenses.com

Copyright Jim M. Goldstein, All Rights Reserved

Transit of Venus – June 5, 2012

flattr this!


JMG-Galleries – Jim M. Goldstein Photography

 
Comments Off on Transit of Venus – June 5, 2012

Posted in Equipment


Announcing the JMG Mobile App Store

01 Aug

Today I’m happy to announce that I’ve added a mobile app store to my web site JMG-Galleries.com. Now in the top navigation of JMG-Galleries.com you’ll find a link to my new app store. The store contains hundreds of apps, spanning multiple platforms including iOS (for iPhone & iPad), OS X (desktop), Android, Windows, HTML5 and Facebook. I’ve done my best to find the best apps I’ve used over the years and will be adding more so be sure to check in often. If you have an app that you’d like me to add that I’ve missed be sure to submit your app recommendation.

Announcing the JMG Mobile App Store for iOS, Android, HTML5, Facebook, OS X and Windows

Note: My new app store is replacing my old list Jim’s iPhone/iPad App List found on my blog. Everything previously in this list and much more  is now found with in my app store.

Enjoy!

Copyright Jim M. Goldstein, All Rights Reserved

Announcing the JMG Mobile App Store

flattr this!


JMG-Galleries – Jim M. Goldstein Photography

 
Comments Off on Announcing the JMG Mobile App Store

Posted in Equipment


On Assignment: Mathieu Young – Harvest

01 Aug

Often, photographers will learn a new lighting technique or other photographic trick and look for a subject on which to try it out. Generally, this is a misguided approach.

Lighting (or any photographic technique, really) is a specific form of expression. And in an ideal world, form follows function.

In the example above, photojournalist Mathieu Young's lighting is dictated by a need to both add texture to the scene and to protect the anonimity of the worker. Rather than a pre-conception, the lighting style is the last in a conscious series of steps and decisions.

Step one: Gain full access—with your cameras and lighting gear—to an illegal cannabis farm… Read more »


Strobist

 
Comments Off on On Assignment: Mathieu Young – Harvest

Posted in Uncategorized


What Photography Gear To Take for a Year Long Trip Around the World

01 Aug

A Guest Post by Adam Brill.

It was around two years ago, shortly after we were married, that my wife and I seriously started wondering: “What would our lives be like if we quit our jobs and set out to travel the world for a year?”.

1_Adam and Mandy Top Gear Style.jpg

Once the idea was in our heads, we couldn’t get it out, so we started started socking away as much money as possible. Then, on the same day we both reluctantly walked away from our successful Silicon Valley careers with one-way tickets to the Philippines and backpacks full of photography gear. I had put an inordinate amount of time into deciding what gear to bring and now that we are five months into the trip, I thought it might be helpful to share my initial decisions and lessons learned with those that might be considering a long-term photographic adventure.

The Most Important Decision

There turned out to be one decision on which everything else hinged: “What type of luggage should we bring?” From wheelie bags and hard shell cases, to duffel bags, backpacks, hybrid packs, and day backs, there is a huge amount of choices when it comes to travel luggage and we couldn’t’ started choosing the rest of our gear until we knew how much room we would have. I had read and heard a lot of advice to pack as light as possible, but I decided to ignore that advice for the sake of versatility.

Packing light means making compromises, and while compromises are great in a lot of situations, I didn’t want to have to make them when confronted with once-in-a-lifetime photographic opportunities. After all, who knows when I would be back to a sulfuric acid volcano on Java?

2_Toxic photography.jpg

I wanted a packing system that would allow me to have the appropriate gear for any given situation. So in the end, I decided to bring one large (80L) backpack , and one smallish daypack. The large backpack would serve as the mothership and then I could choose the appropriate gear to carry in my daypack for a given situation. I wanted to bring a normal outdoor backpack (as opposed to a photography specific pack) so that I could remain as discreet as possible. I didn’t want people to know that I was carrying around all of this expensive gear, especially in regions where burglary was rampant. And although the overall load was heavy, I was very rarely carrying both backpacks. When we would arrive at an airport, I could throw the big bag on a trolley, take it to the bus or taxi, then leave it in the hotel or guesthouse for the majority of the time.

The Gear and The Packing

When choosing the photographic gear for this trip I followed one philosophy: “Don’t be average.” Sure I could have taken a lot of nice shots with a compact camera or even an iPhone, but because these devices are so common, the field of view and overall aesthetic would have been very similar to a lot of other shots. I wanted to be able to take the shots that nobody else was taking. In an ideal world, somebody would invent an affordable 10-1000mm f/1.0, but until that happens, I tried to select a few lenses that would cover as many situations as possible. With my two bag setup, I would put the fragile gear in my daypack for flights or buses, then transfer everything to the big bag for storage when we arrived at our guesthouse or hotel. Then I could pick and choose the gear to load into the daypack for that day’s adventure.

Photography Specifics

  • Manfrotto 4 section Carbon Fiber Tripod: The carbon fiber was a bit more expensive than aluminum but was shaved a few pounds off the weight and was invaluable in cold weather situations.
  • Canon 5D Mark II: Before this trip, I shot with a 40D (which I loved). But the increased weather proofing and ability to get clean shots at 3200 ISO made the upgrade worth it.
  • 16-35mm f/2.8L II USM: This is my go to lens for architecture and the 2.8 speed makes it great for hand-holding in dimly lit interiors.

3_Punakha Dzong Jump.jpg

  • 50mm f/1.4 USM: This lens takes beautiful environmental portraits and food shots, and the light weight and fast speed make it a good lens to take if we are walking around at night.

4_Furukawa Matsuri.jpg

  • 70-300mm f/4-5.6L IS USM: This was probably the hardest choice. I knew that I wanted a telephoto for wildlife, architecture details, and landscapes but there was no clear winner on which lens to choose. In the end I choose this over the 70-200 f/2.8 because of the lighter weight and additional reach. And I choose it over the 100-400mm, because of the IS and lighter weight. I think any of those lenses would have been good though.

5_Tsminda Sameba.jpg

  • 580 EXII Speedlight: I was tempted to bring two lights, but I guessed that I would rarely be in situations where I would have time to set them both up and this turned out to be true. The speedlight has come in handy for some food shots at night and some environmental portraits. I’m actually using it a lot less than I expected (less than 1% of my “keepers”), but I find that it’s better to have it and not need it than need it and not have it.
  • Stofen Omnibounce: This lightweight piece of plastic pretty much stays on my flash to help diffuse the light.
  • Lumiquest LtP Softbox: This turned out to be a bit of overkill. I have only used it once (but I did take some great portraits for anAirBnB.com host with it). Still, since it takes up almost no space and can make a big difference in the quality of light coming out of the speedlight, I just leave it folded up under my clothes for those rare occasions when I need it.
  • Remote Flash Triggers: Essential for getting the speedlight off of the camera. Again, I’m using these less than I expected to, but for those occasions that call for them, they make a distinct difference.
  • SLR-Zoom Gorillapod: These miniature flexible tripods come in a lot of different sizes and this size is sturdy enough to hold my setup. I generally prefer to bring the full tripod so that I have more control about where to position the lens. For example because the gorilla pod is so short, it is pretty much useless when it doesn’t reach over the tall grass in a field and there are no trees to attach it to. However, I do bring it along to places where a full tripod just isn’t practical.
  • Canon S95: This compact camera provides full manual control and takes some great images. Generally my wife carries it around to get additional detail shots that I may miss, and to restaurants and places where in SLR is impractical. But it really shines when it is placed inside of a waterproof housing (see below).
  • Canon WP-DC38 Waterproof Housing: The combo of the S95 and the underwater housing gives us a lot of flexibility. This case has been fantastic for getting shots while we are snorkeling and scuba diving. It also useful for situations like kayaking or hiking near waterfalls.

6_Whale Shark Diving in Oslob.jpg

  • Remote Shutter Release: Helps make sure that those tripod shots are as sharp as they can be. Also essential for using the camera’s bulb function when an exposure needs to be longer than 30s. This occurs most frequently for the underexposed shot in an HDR sequence or when using an ND filter.
  • 82mm Hoya Pro1 NDx32 filter: Great for giving waterfalls, rivers and clouds that “cotton candy” look. This can also be used to remove the tourists from a shot by taking a really long exposure.
  • 58mm Hoya Circular Polarizer
  • 67mm B+W Circular Polarizer
  • Mountainsmith Kit Cube lens insert: This is actually one of my favorite pieces of gear. It is a padded compartment that can be inserted into any bag to turn it into a camera bag. This way, my normal dingy daypack doesn’t scream “photography gear.” It can fit both lenses that aren’t on my camera, the flash and most of the accessories; then it just slides into the bottom of my daypack. The interior of the Kit Cube is bright yellow which makes it easy to find what you are looking for in a dark bag.
  • Think Tank Digital Holster 20: I keep my camera in here and leave it unzipped. Then I slide it into the top of my daypack above the Kit Cube. That way, the camera is protected but I can easily grab it by just unzipping the daypack.
  • Giotto Rocket Air Blaster: Good removing dirt from lenses and blowing any straw dust off of the sensor.
  • Lens Pen: After the Rocketblower, I use this to give a more thorough cleaning to the lenses.
  • Assorted microfiber cleaning cloths.
  • Spare batteries and memory cards.

Helpful Gadgets

  • Eneloop batteries and charger: These batteries are amazing. My flash and the remote triggers use AA’s so I keep of few of these on hand and they have maintained capacity for years. It’s nice to know I won’t be stranded without batteries in remote locations.
  • Universal AC adapter and transformer: One thing that I was surprised to see was that nearly all of my electronics can accept a voltage between 100V and 240V. This makes the transformer part an unnecessary bulk, but always check your devices before plugging them in without a transformer!
  • Macbook Air 13″: Pretty much the perfect computer for editing and uploading photos on the road. A lot of people like the 11″, but the 13″ fit perfectly in my daypack and the increased resolution, longer battery life, and faster processor made the extra two inches worthwhile for me. The only downside is that there is no ethernet port which leads to…
  • Logitec (not to be confused with Logitech) USB powered router: This little device is about the size of a large book of matches and let’s you use any any ethernet cable to create a wifi hotspot. Great for uploading photos in countries where wifi isn’t big (like Japan).
  • Backup hard drive(s). I’m not really picky about specific brands but the USB 3.0 and Thunderbolt port on the Air make backups really speedy.

Postprocessing and Burnout Prevention

7_Cow Near Kazbegi.jpg

When you are traveling constantly, you tend to accumulate an enormous amount of images. In the five months that I have been on the road, I have taken more than ten thousand images. If I waited until I returned home to do the editing, I knew that the task would seem insurmountable so I wanted to make the editing a continuous process.

27_Lone Monk in Paro.jpg

At first, every night, I tried to go through all of the day’s images, and tweak the settings of each one in Lightroom. I soon found that I was spending several hours per night on the computer and not spending enough time enjoying the trip. I quickly realized that my process would need to change before burnout set in.

22_Banh Mi.jpg

So now, I wait until a memory card is full before importing to Lightoom (about once per week). Then I make one pass through all of the images and mark the obviously bad ones for removal, and mark the potential keepers for review. Then I just go through the 5-10 best images and give them the full treatment in Photoshop and Lightroom. After switching to this process, I was only spending a few hours per week on the computer, I was continually inspired by the images that I had decided to keep.

8_Yudunaka Snow Monkey.jpg

Final Thoughts

I can’t say that all of my decisions have been perfect, but when I look the stats in Lightroom, I see that my best shots are pretty evenly distributed among the different lenses:

  • 16-35mm f/2.8L II USM — 34.8 %
  • 50mm f/1.4 USM — 9.6%
  • 70-300mm f/4-5.6L IS USM — 22.2%
  • S95 — 32.4%

So far this trip has exceeded all of our expectations, and I love that photography gives me the ability to share the sense of adventure and wonder that travel provides. I hope that I will continue to learn and grow on this trip, and I look forward to reading any tips and suggestions in the comments.

11_So happy in Nikko.jpg

Adam Brill is a software engineer and professional travel photographer. He used to be based in San Francisco but is currently living a nomadic lifestyle with his wife while they pursue their dream to see the world.

Post originally from: Digital Photography Tips.

Check out our more Photography Tips at Photography Tips for Beginners, Portrait Photography Tips and Wedding Photography Tips.

What Photography Gear To Take for a Year Long Trip Around the World


Digital Photography School

 
Comments Off on What Photography Gear To Take for a Year Long Trip Around the World

Posted in Uncategorized


Putting the Post in Post-Processing

01 Aug

When I switched over to digital photography from film there was a lot of discussion on new approaches and changing mindsets required to get good photographs (ex. Shooting or Exposing to the Right). While most photographers focused on techniques that could only go as far as the software or hardware of the time I always looked to the future. Never being satisfied with the current state of software or hardware I always knew that the technology powering the digital photography movement would catch up to what I had in mind. Much of what I was striving to accomplish revolved around improved image processing and higher resolution images. In a nutshell I knew that if I was using an 8 megapixel camera I’d be able to stitch multiple images together to make a 100 or 1000 megapixel image and so I started gathering images during my travels for giant digital panoramic photos. The same was true of images that might have been difficult or impossible to process to expectation with early raw converters. I took and sought after those challenging photos knowing I’d make them into something I had envisioned when the time was right. In both of these cases I knew that over time the software would improve and computers would get more powerful. While I held great optimism the technology would catch up over time I had to live with the fact that many of my images would have to sit idle for sometime. The gap between taking my photos and processing them would range from few months and to several years.

When I upgrade to new software, as was the case with my move to Lightroom 4, I like to revisit older photos to see what impact the new software can have on them.  I’m almost always wowed by the improvements I see across each upgrade for Lightroom and Photoshop, but the changes to Lightroom 4’s RAW converter (and Adobe Raw 7) has especially impressed me.  It’s truly astonishing to see how much more latitude there is in working with images that are not ideally exposed or contain a great deal of digital noise. Below are a couple of recent examples of images taken with my Canon 1D Mark II back in 2006. While these images aren’t particularly extreme to highlight how much Lightroom 4 or Adobe Raw 7 can do, they do work to highlight the general philosophy: take photos to satisfy what you envision, versus what you feel you can work with given existing post-processing limitations. The “post” in post-production has no time limit so always look back to your older work to see how newer technology can breath new life into your photographs. You might just rediscover a lost gem.

Example 1:
Canon 1D Mark II, Canon 70-200mm f/2.8, ISO 400, f/3.5, 1/2000 sec
Processed with Adobe Lightroom 4

Before Edits: Na Pali Coast and Surf

After Edits: Na Pali Coast and Surf

Example 2:
Canon 1D Mark II, Canon 70-200mm f/2.8, ISO 400, f/3.2, 1/2000 sec
Processed with Adobe Lightroom 4

Before Edits: Na Pali Coast Spire Detail

After Edits: Na Pali Coast Spire Detail

Note: Both images were taken from a boat in choppy surf hence the super fast shutter speeds

Copyright Jim M. Goldstein, All Rights Reserved

Putting the Post in Post-Processing

flattr this!


JMG-Galleries – Jim M. Goldstein Photography

 
Comments Off on Putting the Post in Post-Processing

Posted in Equipment


Milky Way Above Yosemite National Park

01 Aug

One Day in Yosemite – Milky Way Above Half Dome, Yosemite

Earlier this week I had the great fortune of being part of “One Day in Yosemite”. The goal, have 25+ photographers and videographers document everything and anything happening in Yosemite: morning hang gliders, rock climbers, hikers on well known landmarks, amazing sights, wildlife encounters, behind the scenes at hotels, campground activities, ranger programs, interviews of employees & visitors and more. Shooting was from midnight to midnight to capture a full 24 hours of everything Yosemite. I’m looking forward to seeing a sample of what was captured in an up coming episode of the Nature Notes video series released by the National Park Service and the Yosemite Conservancy. In the future the producer, the very talented Steve Bumgardner (@yosemitesteve), is working to release a longer documentary comprised of the days shoot. Based on the footage I saw from the many talented photographers/videographers taking part the end result should be amazing. Stay tuned!

Copyright Jim M. Goldstein, All Rights Reserved

Milky Way Above Yosemite National Park

flattr this!


JMG-Galleries – Jim M. Goldstein Photography

 
Comments Off on Milky Way Above Yosemite National Park

Posted in Equipment


Nikon Coolpix L810 Review

01 Aug

As far as I can recall, this is Nikon’s longest range maxi-zoom compact. Previously there was the L20, with a 21x zoom — but nothing at this 26x level.

Full wide 1.JPG

Full tele 1.JPG

There is a demand for such cameras. And, as I’ve said before, if you want long zooms, the last thing you want is to lug a heavy DSLR with a pricey and heavy lens … if you could find a DSLR zoom with a 20x plus range!

Nikon Coolpix L810.jpg

Nikon Coolpix L810 back.jpg

The price you pay of course, with such a compact digicam, is a small sensor, usually around 11mm in diagonal. But the benefit with such a small sensor is a comparatively small lens. For the photographer willing to accept the compromise, it’s a win, win situation.

Of course, you lose a few advantages: JPEG is the only still image capture (aside from 3D); while metering is accomplished in matrix, centre-weight and spot modes, there is only an auto exposure mode.

Nikon Coolpix L810 Features

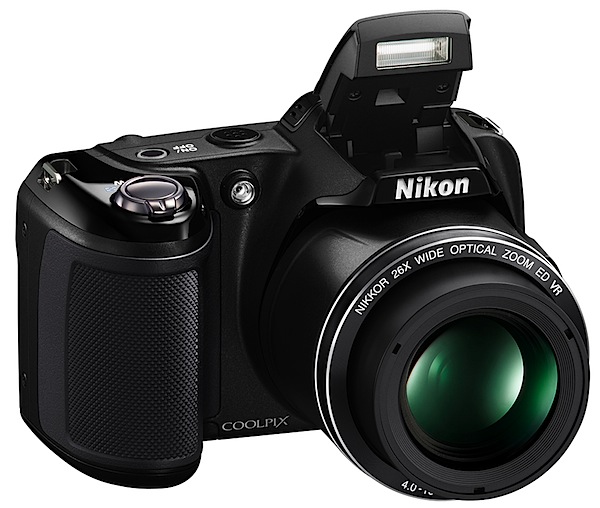
The L810 is a delight to hold, thanks to a substantial, textured speed grip and its light weight. Controls are grouped around the shutter button, so a thumb and forefinger can usually drive all the buttons. I have to say the camera has a marvelous ‘hold me’ appeal!
A surprisingly attractive and useful feature is a second zoom control, built into the zoom barrel’s left side, which allows firmer two-handed operation of the camera.

Menu.jpg

The camera’s CCD can hold 16.1 million pixels, with a maximum image size of 4068×3456 pixels, sufficient to make a 34x29cm print. Movies are recorded at a maximum res of only 1280×720 pixels, which seems pretty mean to me, when there are other digicams around the same price level that can shoot Full HD.

Batteries.jpg

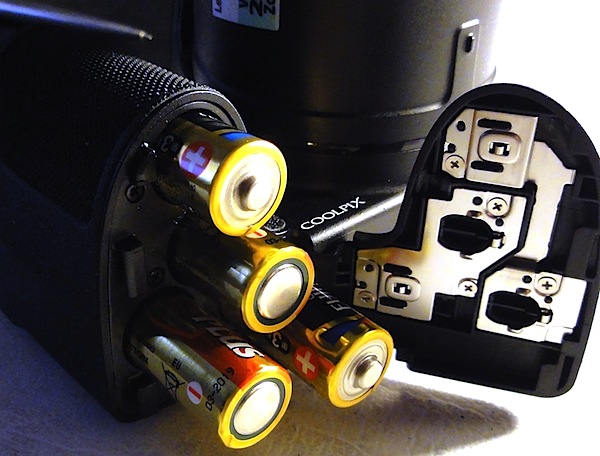
Many will find one rare feature with dramatic appeal, especially if you travel outside the usual spheres of commerce: the power supply is a quartet of AA batteries: you can either single use alkaline or lithium, as well as rechargeable NiCad cells. If you’re up the Limpopo river, with or without a paddle, you will doubtless have more chance of picking up a bundle of alkalines than an opportunity of plugging your charger into mains power!

Market.JPG

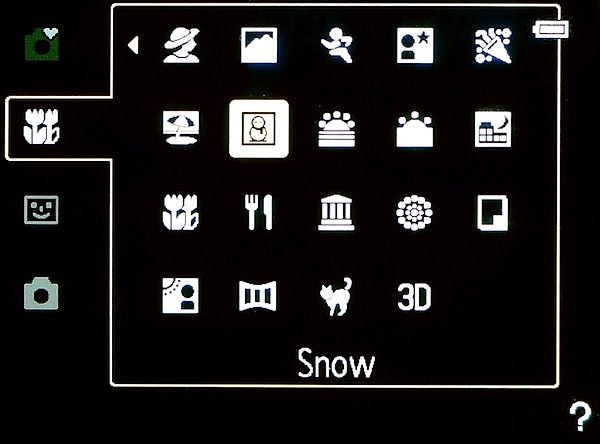
While auto exposure is the main ‘go’, there is a large bundle of scene modes which can help the raw amateur make huge leaps in ability: among these are portrait, night landscape, fireworks, panorama and so on. There’s also a 3D shooting facility, with the result viewable on suitable 3D TV sets.

Startup Time

In two seconds from startup, the camera was ready to shoot; each subsequent shot took two seconds to capture.
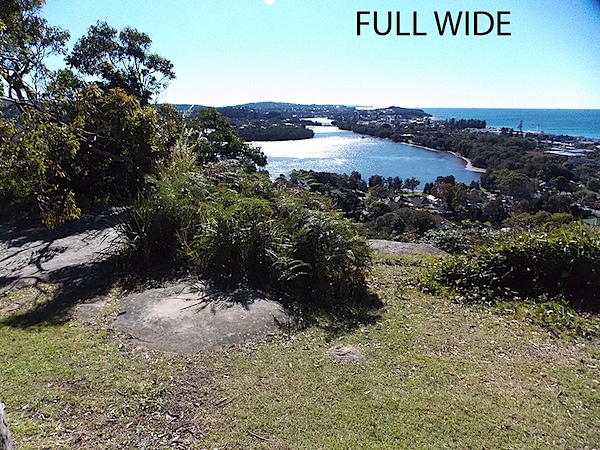
Distortion

A very slight indication of barrel distortion at the wide end of the zoom; no sign of any problems at the tele end.

Nikon Coolpix L810 ISO Speeds

Nikon Coolpix L810 ISO 80.JPG

Nikon Coolpix L810 ISO 400.JPG

Nikon Coolpix L810 ISO 800.JPG

Nikon Coolpix L810 ISO 1600.JPG

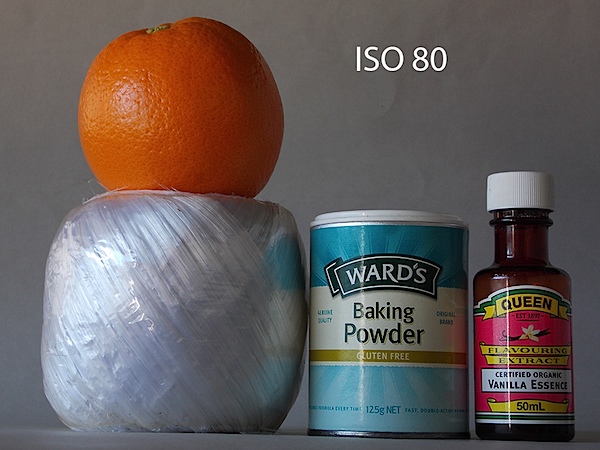
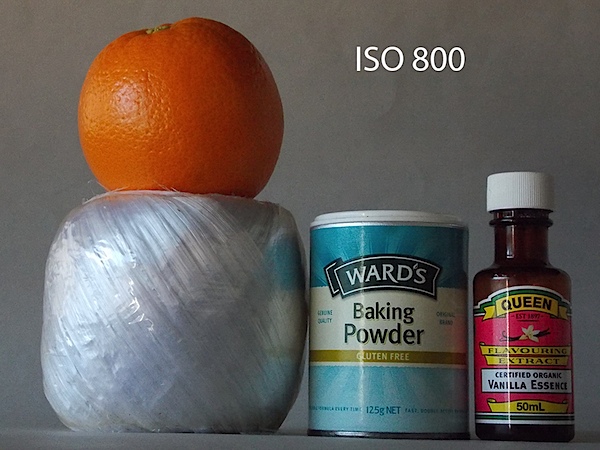
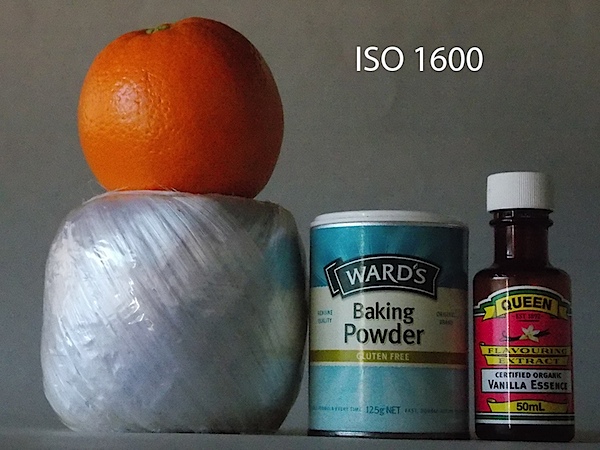
Up to ISO 800 all seems to be ship-shape, but I figure ISO 1600 is not useable due to an increase in noise and a drop in resolution.

Nikon Coolpix L810 Verdict

Quality: about average.

Why you would buy it: longish zoom range; good balance in the hand.

Why you wouldn’t: no Full HD video capture; limited exposure options; poor ISO performance; .

The battery compartment is notoriously hard to open; I never did manage to feel comfortable with it.

The camera is available in three colours: black, red and blue.

Nikon Coolpix L810 Specifications

Image Sensor: 16.1 million effective pixels.
Sensor Size: 11mm CCD.
Lens: Nikkor f3.5-5.9/4.0-104mm (22.5-585mm as 35 SLR equivalent).
Metering: Matrix, centre-weighted, spot.
Shutter Speed: 4 to 1/1500 second.
Continuous Shooting: 4fps.
Memory: SD, SDHC, SDXC cards plus 50MB internal memory.
Image Sizes (pixels): 4068×3456 to 640×480. Movies: 1280x720p, 640×480 pixels.
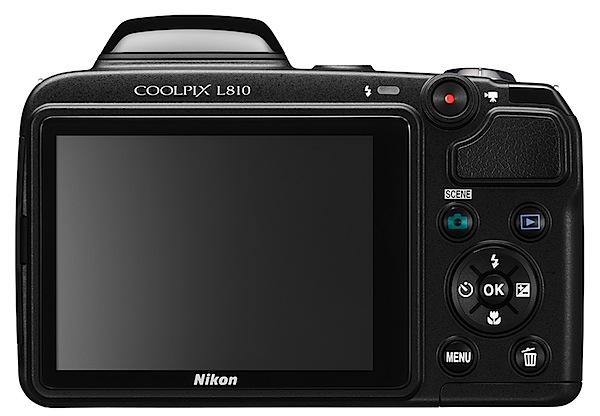
Viewfinder: 7.5cm LCD (921,000 pixels).
File Formats: JPEG, MPEG4, MPO.
ISO Sensitivity: Auto, 80 to 1600.
Interface: USB 2.0, HDMI mini, AV, DC.
Power: Four AA alkaline or lithium batteries, DC input.
Dimensions:111.1×76.3×83.1 WHDmm.
Weight: Approx. 430 g (inc batteries and card).
Price: Get a price on the Nikon Coolpix L810 at Amazon.

Post originally from: Digital Photography Tips.

Check out our more Photography Tips at Photography Tips for Beginners, Portrait Photography Tips and Wedding Photography Tips.

Nikon Coolpix L810 Review


Digital Photography School

 
Comments Off on Nikon Coolpix L810 Review

Posted in Uncategorized


Underwater Photography: Tips and Tricks for Everybody

01 Aug

Taking photos underwater is a great fun. Here you’ll find a few underwater photography tips anyone can use to capture better shots.
Photodoto

 
Comments Off on Underwater Photography: Tips and Tricks for Everybody

Posted in Uncategorized


31. Juli 2012

01 Aug

ausblick


kwerfeldein – Fotografie Magazin

 
Comments Off on 31. Juli 2012

Posted in Equipment


Sometime, Somewhere Again by Christian Hutter

01 Aug

I was out shooting a few days ago. If I don’t know where I want to go I take the next train to Zurich main-station. I get so much inspiration in Zurich city. There are so many different people, from different countries, with different interests its amazing.

I walk by the streets and discover a poor homeless man, asking for some money. I went over to him and asked him to take a photo from him. First I wanted to take a picture shows how he is asking for money. But as I looked into his eyes I saw so many emotions and feelings. I decided to take a portrait.

sometime-somewhere-again-christian-hutter

© Christian Hutter


I had my 50mm 1.4 lens on, so the bokeh on this one is amazing. I missed a bit of focus on the eyes but its not that bad I think. I gave him some money and went straight back home. I wanted a Black and white Image, because it says much more than a coloured one. His eyes are so amazing, sometimes, if I close my eyes I see his eyes projected into my head. I hope to meet this man sometime, somewhere again.

Christian Hutter is 17 year old Photographer from Switzerland. Loves to take Images of everything.
Website: www.facebook.com/pages/Christian-Hutter-Photography/326072827413932

dslrBlog

 
Comments Off on Sometime, Somewhere Again by Christian Hutter

Posted in Uncategorized