UPDATE: The flash is en route back to China and a second copy will be in my hands … in an undetermained amount of time. Will report back then.
__________
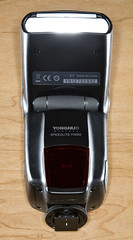 After months of rumor-fueled anticipation, I finally got my grubby little hands on a production model YN-560 speedlight.
The new, (!) flash has two important features which potentially potentially make it an good addition to a lighting photographer’s bag: A built-in slave and an external sync jack.
Any shoe-mount flash with that kind of bling deserves a look.
First impressions, after the jump.
__________
The flash I ordered was a standard production unit. I had seen reports around the web from pre-production versions, but this review is from a unit purchased directly from Yongnuo via the US eBay site.
There are lots of different people selling them on eBay. But Yongnuo was offering a one-year warranty, which made them the obvious choice. Your mileage may vary with other retailers, who may offer a warranty anywhere from one year down to nothing.
There has been a lot of talk of the YN-560 as a lower-priced alternative to the 0 LumoPro LP160. Let’s see how it stacks up.
Build Quality / Warranty
 Yongnuo is an up-and-comer. Their quality continues to improve, and I have been very happy with my Yongnuo 10m TTL cord. Similarly, this flash gets triple aces on build quality — it is very solid. Like, surprisingly so.
It feels like a much more expensive flash, aping the lines of the similarly named Canon EX-580 II. The battery door is captive and hinged (a plus over the LP160) and very well-designed. The battery polarity sticker is a nice touch for guys like me who are putting off getting bifocals. (That bell tolls for me in three weeks — I am officially old.)
The batts themselves drop right in, whereas the LP160 housing can be a little tight on some of the rechargeable batts that sometimes are a little bigger than the alkaline versions.
The PC jack and high-voltage jack (don’t get too excited about the latter yet) are covered by a rubber door — another nice touch. Unlike the metal foot on the LP160, Yongnuo chose to use a plastic foot on the ‘560. I would not consider this a problem, as it appears to be solid.
Like the ‘160, it has a screw-down lock collar, but also adds a lock pin. In practice, the screw-down collar should suffice. Short answer, both models have reliable feet.
Weight-wise, it measures up about the same as an LP160 — maybe even a tad heavier, judging with one in each hand. Both of these models are well-built.
So, build quality is great. Which is not to say that quality control necessarily is on the ‘560. As I said, this was a production model. But nonetheless, mine had some problems.
The recycle beep function did not work on my flash, which is a minor annoyance from an otherwise helpful feature. The LP 160 does not include a ready beep, but does include a ready light on both the front and the back. Call it a wash — well, if the ready beep worked on the ‘560.
Far more frustrating was the fact that my flash had a non-working zoom-head motor.
Argh.
I so wanted to love you, YN-560. Now you hit me with a second, non-working feature. The absence of which essentially makes the flash unusable for me, necessitating a round-trip return to China.
On the one hand, this is why I strongly suggest buying direct. On the other hand, I would also suggest that Yongnuo join LumoPro in hand-checking each unit before it goes out. It is only a wasted effort if your quality control is hitting 100%. And you are not there yet, Yongnuo.
It’s 30 seconds of prevention to insure against a few weeks’ wait for the customer if problems arise later. Especially until Yongnuo gets the early production bugs worked out.
Slave and Sync
Kudos to Yongnuo for including both a slave and an external sync jack, although I would have loved to see a 1/8″ jack alongside the PC version. Having to buy overpriced PC cords over the life of the flash is a hidden tax when compared to flashes that sync with a 1/8″ jack. Advantage: LP160.
From my early testing, the slave appears to be very capable, and on par with that of the LP160. I would have liked to see more rotation on the flash head, which goes 180-left and 90-right. This leaves one quadrant uncovered for times when you need to point the flash head one way and the slave another.
The LP160 goes 180-right and 150-left, meaning click stops every 30 degrees around the circle. This difference will not seem important to you until you need to point the slave in a certain direction to get a good sync. Advantage, LP160.
Control Interface
What can I say. I found the 560’s controls to be both fantastic and maddening.
On the plus side, you get a 1/1 – 1/128 power range. This is unheard of in the sub-0 price range, but they go and include eight steps of variability between each stop. Amazing in theory, but in practice the flash’s consistency tops out in the ~1/3-stop range. In other words, it ain’t a Profoto D1, but I really like where they are aiming. You have to give them major props for that little trick. Advantage: YN-560.
That was the spoonful of sugar. Now here’s the medicine.
The flash uses a row of 8 LEDs across the back display to give the following info:
1. Zoom head angle: This is the only function that is actually labelled, and a tad ironically so for me given that my zoom motor did not work.
2. Power range, from 1/1 to 1/128: When adjusting the power with the left/right buttons, the dot scale represents overall flash power — but is not labelled as such. You have to count the dots. That’s a dumb miss — what were they thinking?
3. Intra-stop power range: When using the up/down buttons, this adjusts the power between stops. Again, no labels, and going for the third indicator from the same set of LEDs gets problematic when it comes to labeling.
I applaud the effort to get as much mileage as possible out of the LEDs, but I personally found the interface to be completely non-intuitive bordering on pretty annoying.
On the other hand, the LP160 has two rows of LEDs signaling both zoom head setting and power setting. So, while the LP160 lacks intra-stop adjustments and a 1/128th power setting, I still strongly prefer its interface — faster and more intuitive.
Modes
Both flashes feature manual mode and two slave modes — straight and pre-flash. They are pretty self-explanatory, although I do not know exactly how each handles the pre-flashes. But there is some mechanism for adding slaved manual flash to your TTL flashes, if that is your thing.
The YN560 offers a power saving mode, which will idle the flash after 3 mins. The instruction manual says you can wake it back up from its slumber by pressing the test button or the power button. Presumably, the test circuit could also be activated by a hard trigger at the PC jack, but probably not via the slave. After 15 mins of being dormant, the flash will turn itself off. If you are in either slave mode, the flash will extend the dormancy period to 30 mins.
That’s pretty cool, but here’s where it goes off the rails. If you turn off the power-saving mode, the flash will still shut down after 30 mins of non-firing (60 mins in slave modes).
Maybe it is just me, but if I turn off the power-saving mode, I would want the flash not to go to sleep. So if you pre-set flashes before an event, you’d better remember to pop them occasionally while you wait for the event to start. This is just dumb programming, and I would strongly suggest changing this on the next product run.
If I am not in power-saving mode, it is because I want the flash to stay on. If I drain the batts, it’s on me.
Power
Other testers have reported power levels to be similar to the Nikon and Canon flagship flashes. Just a tad below, to be specific, for both the ‘560 and the ‘160 — and I have no reason to doubt them. In short, plenty of power.
I’d confirm it, but I do not even know what zoom setting my flash is stuck at. It’s something wide as far as I can tell. Barring that info, comparative readings would be useless.
Recycle Time
Nice surprise here — the YN-560 recycles fast. As in less than 2 seconds for NiMH’s, and ~4 secs for alkalines. Remember, 1.2 NiMH batts deliver current faster than their higher-voltage alkaline cousins, and that’s what counts.
But with great power comes great responsibility, dragonfly. After just ten full-power pops at the speed at which the internal NiMH AA’s will recycle it, the ‘560 will drop into thermal protection mode for several minutes.
So back off, Rambo, unless you want a three-minute time-out. My advice would be to back off the recycle time just a tad so we could make use of it for more than ten pops at a time. Or, add in a little better heat sink and let us make use of this fast cycling.
Oddly (given the above) the YN-560 includes a high-power jack which appears to be a Canon model jack. Why would you do this on a flash that can overheat itself in ten full-power pops using just NiMH AA’s?
This I do not know. If you get a YN-560, my advice is to ignore the hi-power batts. The inability of this flash to quickly dissipate heat would make it not very useful.
Accessories
Unlike the LP160, the ‘560 does not come with a sync cord, but it does come with a case. Both flashes come with a foot/stand, and the ‘560’s has a metal 1/4×20 insert. Nice.
And, oddly, my ‘560 came with a Sto-Fen -type dome, but it was outside the box. So I do not know if every YN-560 comes with a dome, or if I was just lucky. Add in the variable of other dealers, and who knows.
There is a pull-up/fold-over wide-angle panel, and a pull-out bounce card — nice. The panel is pretty stiff, and without a lot of lip to grab. If you are a fingernail biter, you’ll probably have to pull out a credit card or driver’s license to get it out. But still, nice touch. The LP-160 has a slip-on diffuser panel. No nails needed, but you could lose it.
Advantage: Depends on what accessories are more important to you.
Where to Buy
No brainer — get it direct from the factory on eBay. Why? Well, there’s the one-year warranty for starters. It’s not as long as the LP160 (2 years) but still very good. Alas, if you have problems with it as I did, it will require a round-trip back to China. But at least there should be no passing the buck on who is to blame for the problem.
And don’t be confused by the Nikon version vs. the Canon version vs. the Pentax version, etc., on eBay. As far as I can tell, they are all the same. Just keywording to try to catch more bidders.
So that’s the quick test drive. If you are using a YN-560, hit us in the comments with your experiences.


You must be logged in to post a comment.