Editor’s note: There are enough questions coming in via the comments that I am prepping a slave-related Q&A for later this week. If you have a question that has not yet been asked, please get it into the comments ASAP. Thanks.
__________
 In part one, we talked about the differences in optical slaves, and why internal slaves were usually better solutions.
In this post, we’ll look at the practical side — how do you get the best performance out of your slaves?
__________
#$!%! Thing Didn’t Fire!
Slaves are a little like radio remotes in that they are not 100% perfect and reliable. (But the good ones are damn close.)
And unless I am working in an environment alongside other photographers, I almost always use a hard cord or a PocketWizard on one flash (which becomes a “master” flash) and optically slave the others. It’s generally very reliable, and a fast way to work.
So, which flash to use as a master and which to slave? The answer might be different than you think.
Power vs. Angle of Coverage
Say you have a key light firing at 1/2 power, and three more accents set at 1/64th power. Try using your most powerful flash as a master and slaving the accent lights. If that main light is gonna be bouncing off of all sorts of things, so much the better.
But if you are running flashes at only modest power levels, you might try using the flash with the widest beam spread as the master flash. Often, beam spread trumps power level as the reason for a flash to be the master. The reason is simple — the other flashes have to be able to see the light from the master to fire.
For example:
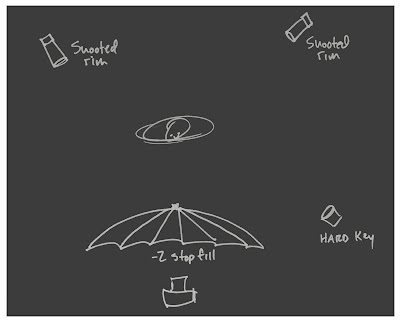
In this instance I would use the umbrella fill flash as a master, even though it is gonna be at a lower power than the key light. Reason being, the umbrella light will go out in all directions and the other flashes will see it better than if I master sync’d the key light at bottom right.
On the other hand, if I used one of the other flashes as a master, the umbrella flash might not fire. This could happen either because of the limited beam spread of the other flashes, or because the umbrella itself was shading this flash and reducing the intensity of the light from the master flash before it reached the slave.
The More, The Merrier
Realistically, with as many flashes in a photo as in the above example, they will usually all fire no matter what.

As long as at least one slaved flash can see the master, it will likely set off at least one other slaved flash, and so on. This cascading effect means that it is actually easier to fire off of a room full of 50 slaved flashes than it is to fire, say, two.
In the Usual Suspects -style photo above (more here) there was a 2-stop down umbrella right at the camera, acting as an on-axis fill. Those slaved, low-powered accent lights were fired by the umbrella. And if they weren’t, one of the many other accent lights took care of the problem for us.
Be Like McNally
Knowing how to choose your master/slave flashes correctly is a good skill to have for those of you who use Nikon CLS or Canon eTTL syncing methods, too.
One trick Joe uses for complicated setups is to use an off-camera TTL cord and hang that master flash out somewhere where all of the remote/slave flashes can better see it. There is usually a spot that will get the job done — and often that spot is not right on top of your camera.
But you can think that way for manual-flash slave setups, too.

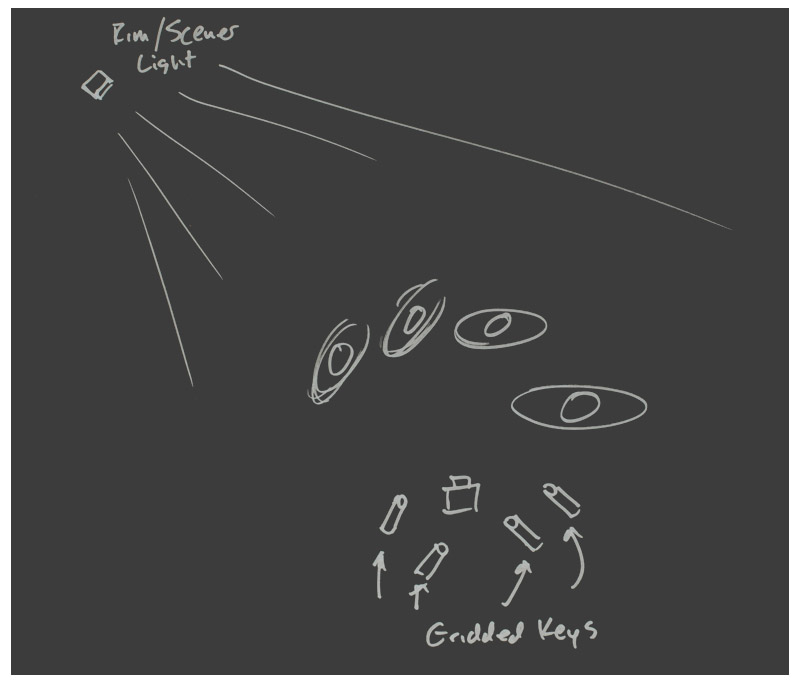
For instance, if you had one PW and several slaved flashes that were gonna be used as gridded key lights, you might remote-/hard-sync a background/scener/rim light (upper left) that all of the gridded flashes’ slaves could see. Problem solved.
And this is an instance where the slaved flashes’ rotating heads would come in handy, too. You can point the heads at your subjects and rotate the bodies of the flashes so the slaves can see the master flash. (That is why near-360-degree rotation on flash heads is so useful.)
Hiding the Sun
Sometimes the problem is that the ambient light level is very bright, causing difficulty for the slave. It has to see that pulse of light to fire your flash. And if the slave eye can actually see the sun, too, that’s a lot of competition.
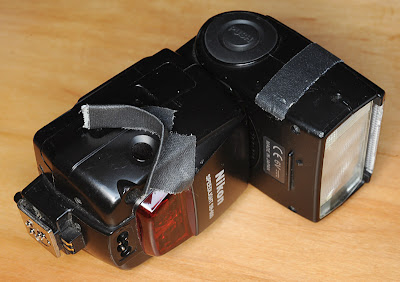
Shading your flash eye with a little gaffer’s tape will make a big difference in the range of your slaves in daylight. Just make sure you shade the sun while leaving a clean line of sight to the master flash.
It’s Firing By Itself
If your slave is so sensitive it is getting false fires (assuming it is not a total piece of crap that would false fire inside of a dark closet) that is an easy problem to fix, too.
You can “dumb down” a slave by partially covering the eye with tape until the offending false positive trigger is canceled but your master will still fire the slave. With “super” and “ultra” slaves, you might have to do this more often than you would expect. No big mystery — they are just that good.
What’s Your Favorite Slave Tip?
Do you have a favorite slave tip I left out? Do you know a great slave that doesn’t break the bank?
Hit us with a comment (and/or a URL to a picture that proves how good your “giant killer” cheap slave is) in the comments.

Strobist