Category: Uncategorized

  • an ode to the normals

    Ah, the humble normal lens… in a day and age where all the glory goes to the 70-200/2.8s and the ultrawides, it is easy to overlook the humble elegance of the unassuming normal.  Traditionally the 50mm in 35mm terms, but may vary depending on format.

    The normal is small, light, fast, sharp and versatile.

    It does portraits, it does landscapes, it does street, event, low light…

    Need to get in closer? take a step forward.  Need to get  wider? take a step back.   Unlike many other focal lengths the normal is almost chameleon-like in it’s ability to adapt itself to different situations, rendering tightly framed shots as well as “wider” with equal aplomb.  (yes I know the actual focal length and field of view don’t change, I refer only to it’s apparent versatility in framing).

    In fact, I would estimate probably 75% of my shots overall are taken with a normal lens (50mm on my Nikon, 20mm on my gf1, 75mm on my Mamiya).

    The normal lens has a long and influential life in the history of photography.  Many of the seminal images of the 20th century were made with the 50mm.

    There is a kind of “Zen Like” simplicity to shooting with a normal as well – maybe it has something to do with the fact that it approximates the normal human field of view, but previsualizing the shot becomes almost unconscious.  As if one of the barriers between concept and image just falls away…

    And then there’s the beautiful, beautiful depth of field.  Opening up to f/1.4 (or more!) just creates a whole new world of depth of field effects.

    Of course the normal is not a *replacement* for your zoom – especially a telephoto or ultrawide, but if you’re a zoom shooter primarily, give it a shot – spend a couple of weeks with just a normal on your camera.  You might just find it addictive…

    Tweet This Post Stumble This Post


    ed | zawadzki

  • This Is Canoeing DVD Directed by Justine Curgenven

    After producing 4 parts of TITS (This is the Sea 1, 2, 3, 4) series devoted to sea kayaking, Justine Curgenven delivers This is canoeing.

    “THIS IS CANOEING” is a 2-disc celebration of canoeing, showcasing top single-blade paddlers in their pursuit of remote wilderness journeys or challenging white water. Multi-award winning film maker, Justine Curgenven captures the essence of canoeing in 12 short films. From open canoe slalom races to 1,000 mile birchbark expeditions, Justine provides insights into the diversity of the sport and the influential people who tell it’s story. Immerse yourself in this globe-trotting 3 hours of adventure to world class canoeing destinations in Canada, the United States, Scotland & Wales.

    I just ordered my copy from Amazon.

    One of the first on-line reviews comes from Simon Willis:

    Despite the title, this DVD is not about canoeing, it’s about canoeists, the people who canoe.

    A major part of Justine Curgenven’s documentary-making skill has been to find the right characters and these chosen individuals are relaxed, quirky, interesting and utterly captivated by their chosen sport.

    It’s obvious Justine likes them and they both like and trust her. The results are quality documentary making.

    It’s not so much a DVD as a film-festival in a box


    paddling with a camera

  • On Assignment: Caleb Jones


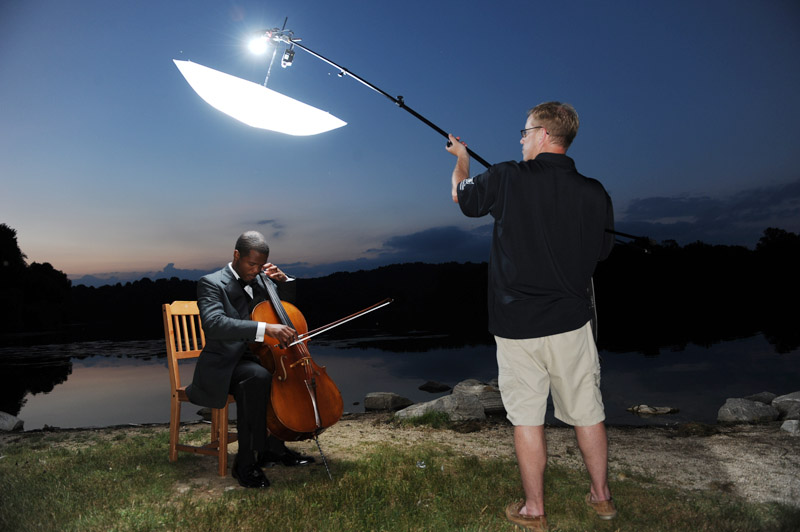
    Here’s the scene: You’re at the shore of a beautiful lake on a summer’s evening, with live cello music set against a backdrop of twinkling fireflies.

    The ground, alas, is covered in goose crap. And that’s where you are — on your belly — because that’s where the best shooting angle is.

    Such was the case for our HCAC shoot of cellist Caleb Jones.
    __________

    Caleb was the winner of the 2010 Howard County Rising Stars competition, in which 10 very talented young artists compete live onstage for a ,000.00 prize. The winner is by audience vote, and the evening is part of a gala which raises money for local arts in all forms.

    Suffice to say that our background music for the shoot was very, very good.

    We started off near sunset, shooting tight headshots through the quickly changing light. After sunset, it usually takes about 15-20 minutes before the color starts to get really interesting. But at that point it is also changing very quickly, and it can be an advantage to be working with a minimal amount of gear. Typically, you get to spend a decent amount of time preparing but then have to work quickly to make your photos while the light is good.

    One Light for Shape; The Other for Detail.

    I used to use a single flash in an umbrella against sunset light for an easy, reliable look. But I have since moved to using to flashes, which gives me lots more flexibility.

    If you are using one umbrella (or one light in any mod) your key light angle will usually be a compromise between position vs. detail. Frequently, the best position for your key light to define your subject may be one that also leaves too much of the subject in the shadows. Which means that you may have to move your key closer that you want to the camera to preserve more detail.

    But with two lights you can choose to light your subject from any angle with your key. And you can use the second light (in this case, a speedlight in an Orbis) to control your level of detail in the shadows.

    The two-light combo is such a sweet spot in the curve. It gives you lots of options, in addition to being a backup in the event one of your flashes goes down.

    In this case, I wanted to light Caleb soft and from the top, which would have left his face in very dark shadow without the fill. Since he had dark skin (not to mention an awesome-but-dark vintage tux) I used the ring fill and dialed it up a little more than normal. It’s probably a stop down from the key, maybe a stop and change.


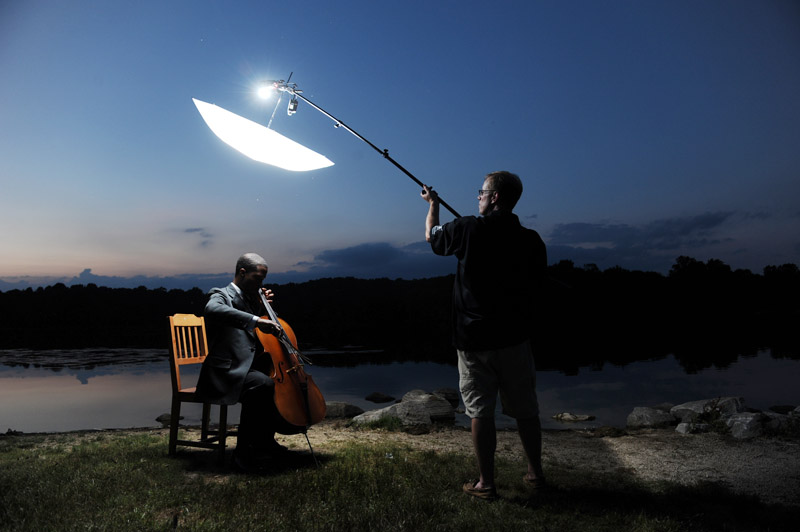
    The key light was from a shoot-through umbrella overhead, courtesy Dave Kile as the voice-activated boom. You can see it at left, and can also see what the fill would have looked like if it were dialed down a bit. This is because I moved back to pop the setup shot, and didn’t crank the ring up enough to compensate.

    Remember — when you are working with ring fill in manual you have to compensate the power level if you move closer or further away from your subject. Or, you can not make that adjustment and think of it as an added feature — an auto-bracketing fill light. Just sayin’.

    At first, it almost doesn’t look like there is any fill on Caleb at all in the above frame until you realize that there has to be something lighting Dave. It’s not until you take the fill away that you see how much it is contributing even at that relatively low level:


    See what I mean? The detail goes away completely without the fill.

    Also, there is something interesting going on here with the umbrella. See the edge of the umbrella light happening on the other side of Dave and Caleb? That’s raw spill going past the shoot-through. Usually, it ruins a shot but here it kinda helps bring up that background area a little. I’ll take it.

    More and more, I find that if I am gonna use an umbrella as a key I am coming in from high overhead. It just looks a little more atypical and interesting to me. But that’s not gonna help me if I totally lose Caleb’s face against the background.


    But shoot when he is looking up, and it’s another story altogether. To me, the top light all by itself works well here. But it’s very close to not working, too. IMO, the eyelids catching the light makes it okay for much of his face to be in shadow. Lose the eyelids and I’d have more trouble with it. (Kinda hard to see at 400px — click the pic for a bigger view.)

    Also, the B&W conversion helps, too. Two totally different photos — one built on shape and texture, the other on pure graphic form.

    These finished pics are done with the same key light and two extremes of fill — a lot and none at all. But there are a lot of different looks to be had between those two extremes, and it gives you an idea of how much control you have by varying the fill intensity.
    __________

    Goose crap and all, it was a wonderful evening. Caleb played most of the way through the shoot, so people on the hiking path around the lake were surprised by a soundtrack that even included some of his original cello compositions. He’d finish a piece and applause would spread around the lake. Very cool.

    Assistant Erik Couse was covertly shooting a video of us with his iPhone, conveniently making himself a felon in the State of Maryland in the process. We are gonna wait until the next time he pisses us off to press charges.

    And the fact that it was almost nighttime accounts for the production quality, which is about three notches below that of Faces of Death 6. But still, I am pretty sure the felony charges will stick.

    The first couple minutes are from the headshots at the beginning. Then all the light goes away and we shoot the photos seen above. But it does show a that modest amount of strobe can transform a tiny amount of ambient light into something cool.


    Strobist

  • Buy Awesome Photos and Help Haiti

    4278689547_68297df5e8If you want to get some awesome new art for your walls and help the relief efforts in Haiti at the same time, check out these photo auctions:

    Switch Cities

    Erin Lassahn

    Simply bid on a photo you like, if you have the highest bid you get the photo and your money goes to help Haiti.

    Photo by IFRC


    Photodoto

  • Test Drive: Yongnuo YN-560

    UPDATE: The flash is en route back to China and a second copy will be in my hands … in an undetermained amount of time. Will report back then.
    __________
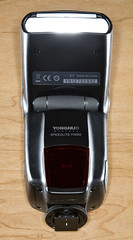
    After months of rumor-fueled anticipation, I finally got my grubby little hands on a production model YN-560 speedlight.

    The new, (!) flash has two important features which potentially potentially make it an good addition to a lighting photographer’s bag: A built-in slave and an external sync jack.

    Any shoe-mount flash with that kind of bling deserves a look.

    First impressions, after the jump.
    __________

    The flash I ordered was a standard production unit. I had seen reports around the web from pre-production versions, but this review is from a unit purchased directly from Yongnuo via the US eBay site.

    There are lots of different people selling them on eBay. But Yongnuo was offering a one-year warranty, which made them the obvious choice. Your mileage may vary with other retailers, who may offer a warranty anywhere from one year down to nothing.

    There has been a lot of talk of the YN-560 as a lower-priced alternative to the 0 LumoPro LP160. Let’s see how it stacks up.

    Build Quality / Warranty

    Yongnuo is an up-and-comer. Their quality continues to improve, and I have been very happy with my Yongnuo 10m TTL cord. Similarly, this flash gets triple aces on build quality — it is very solid. Like, surprisingly so.

    It feels like a much more expensive flash, aping the lines of the similarly named Canon EX-580 II. The battery door is captive and hinged (a plus over the LP160) and very well-designed. The battery polarity sticker is a nice touch for guys like me who are putting off getting bifocals. (That bell tolls for me in three weeks — I am officially old.)

    The batts themselves drop right in, whereas the LP160 housing can be a little tight on some of the rechargeable batts that sometimes are a little bigger than the alkaline versions.

    The PC jack and high-voltage jack (don’t get too excited about the latter yet) are covered by a rubber door — another nice touch. Unlike the metal foot on the LP160, Yongnuo chose to use a plastic foot on the ‘560. I would not consider this a problem, as it appears to be solid.

    Like the ‘160, it has a screw-down lock collar, but also adds a lock pin. In practice, the screw-down collar should suffice. Short answer, both models have reliable feet.

    Weight-wise, it measures up about the same as an LP160 — maybe even a tad heavier, judging with one in each hand. Both of these models are well-built.

    So, build quality is great. Which is not to say that quality control necessarily is on the ‘560. As I said, this was a production model. But nonetheless, mine had some problems.

    The recycle beep function did not work on my flash, which is a minor annoyance from an otherwise helpful feature. The LP 160 does not include a ready beep, but does include a ready light on both the front and the back. Call it a wash — well, if the ready beep worked on the ‘560.

    Far more frustrating was the fact that my flash had a non-working zoom-head motor.

    Argh.

    I so wanted to love you, YN-560. Now you hit me with a second, non-working feature. The absence of which essentially makes the flash unusable for me, necessitating a round-trip return to China.

    On the one hand, this is why I strongly suggest buying direct. On the other hand, I would also suggest that Yongnuo join LumoPro in hand-checking each unit before it goes out. It is only a wasted effort if your quality control is hitting 100%. And you are not there yet, Yongnuo.

    It’s 30 seconds of prevention to insure against a few weeks’ wait for the customer if problems arise later. Especially until Yongnuo gets the early production bugs worked out.

    Slave and Sync

    Kudos to Yongnuo for including both a slave and an external sync jack, although I would have loved to see a 1/8″ jack alongside the PC version. Having to buy overpriced PC cords over the life of the flash is a hidden tax when compared to flashes that sync with a 1/8″ jack. Advantage: LP160.

    From my early testing, the slave appears to be very capable, and on par with that of the LP160. I would have liked to see more rotation on the flash head, which goes 180-left and 90-right. This leaves one quadrant uncovered for times when you need to point the flash head one way and the slave another.

    The LP160 goes 180-right and 150-left, meaning click stops every 30 degrees around the circle. This difference will not seem important to you until you need to point the slave in a certain direction to get a good sync. Advantage, LP160.

    Control Interface

    What can I say. I found the 560’s controls to be both fantastic and maddening.

    On the plus side, you get a 1/1 – 1/128 power range. This is unheard of in the sub-0 price range, but they go and include eight steps of variability between each stop. Amazing in theory, but in practice the flash’s consistency tops out in the ~1/3-stop range. In other words, it ain’t a Profoto D1, but I really like where they are aiming. You have to give them major props for that little trick. Advantage: YN-560.

    That was the spoonful of sugar. Now here’s the medicine.

    The flash uses a row of 8 LEDs across the back display to give the following info:

    1. Zoom head angle: This is the only function that is actually labelled, and a tad ironically so for me given that my zoom motor did not work.

    2. Power range, from 1/1 to 1/128: When adjusting the power with the left/right buttons, the dot scale represents overall flash power — but is not labelled as such. You have to count the dots. That’s a dumb miss — what were they thinking?

    3. Intra-stop power range: When using the up/down buttons, this adjusts the power between stops. Again, no labels, and going for the third indicator from the same set of LEDs gets problematic when it comes to labeling.

    I applaud the effort to get as much mileage as possible out of the LEDs, but I personally found the interface to be completely non-intuitive bordering on pretty annoying.

    On the other hand, the LP160 has two rows of LEDs signaling both zoom head setting and power setting. So, while the LP160 lacks intra-stop adjustments and a 1/128th power setting, I still strongly prefer its interface — faster and more intuitive.

    Modes

    Both flashes feature manual mode and two slave modes — straight and pre-flash. They are pretty self-explanatory, although I do not know exactly how each handles the pre-flashes. But there is some mechanism for adding slaved manual flash to your TTL flashes, if that is your thing.

    The YN560 offers a power saving mode, which will idle the flash after 3 mins. The instruction manual says you can wake it back up from its slumber by pressing the test button or the power button. Presumably, the test circuit could also be activated by a hard trigger at the PC jack, but probably not via the slave. After 15 mins of being dormant, the flash will turn itself off. If you are in either slave mode, the flash will extend the dormancy period to 30 mins.

    That’s pretty cool, but here’s where it goes off the rails. If you turn off the power-saving mode, the flash will still shut down after 30 mins of non-firing (60 mins in slave modes).

    Maybe it is just me, but if I turn off the power-saving mode, I would want the flash not to go to sleep. So if you pre-set flashes before an event, you’d better remember to pop them occasionally while you wait for the event to start. This is just dumb programming, and I would strongly suggest changing this on the next product run.

    If I am not in power-saving mode, it is because I want the flash to stay on. If I drain the batts, it’s on me.

    Power

    Other testers have reported power levels to be similar to the Nikon and Canon flagship flashes. Just a tad below, to be specific, for both the ‘560 and the ‘160 — and I have no reason to doubt them. In short, plenty of power.

    I’d confirm it, but I do not even know what zoom setting my flash is stuck at. It’s something wide as far as I can tell. Barring that info, comparative readings would be useless.

    Recycle Time

    Nice surprise here — the YN-560 recycles fast. As in less than 2 seconds for NiMH’s, and ~4 secs for alkalines. Remember, 1.2 NiMH batts deliver current faster than their higher-voltage alkaline cousins, and that’s what counts.

    But with great power comes great responsibility, dragonfly. After just ten full-power pops at the speed at which the internal NiMH AA’s will recycle it, the ‘560 will drop into thermal protection mode for several minutes.

    So back off, Rambo, unless you want a three-minute time-out. My advice would be to back off the recycle time just a tad so we could make use of it for more than ten pops at a time. Or, add in a little better heat sink and let us make use of this fast cycling.

    Oddly (given the above) the YN-560 includes a high-power jack which appears to be a Canon model jack. Why would you do this on a flash that can overheat itself in ten full-power pops using just NiMH AA’s?

    This I do not know. If you get a YN-560, my advice is to ignore the hi-power batts. The inability of this flash to quickly dissipate heat would make it not very useful.

    Accessories

    Unlike the LP160, the ‘560 does not come with a sync cord, but it does come with a case. Both flashes come with a foot/stand, and the ‘560’s has a metal 1/4×20 insert. Nice.

    And, oddly, my ‘560 came with a Sto-Fen -type dome, but it was outside the box. So I do not know if every YN-560 comes with a dome, or if I was just lucky. Add in the variable of other dealers, and who knows.

    There is a pull-up/fold-over wide-angle panel, and a pull-out bounce card — nice. The panel is pretty stiff, and without a lot of lip to grab. If you are a fingernail biter, you’ll probably have to pull out a credit card or driver’s license to get it out. But still, nice touch. The LP-160 has a slip-on diffuser panel. No nails needed, but you could lose it.

    Advantage: Depends on what accessories are more important to you.

    Where to Buy

    No brainer — get it direct from the factory on eBay. Why? Well, there’s the one-year warranty for starters. It’s not as long as the LP160 (2 years) but still very good. Alas, if you have problems with it as I did, it will require a round-trip back to China. But at least there should be no passing the buck on who is to blame for the problem.

    And don’t be confused by the Nikon version vs. the Canon version vs. the Pentax version, etc., on eBay. As far as I can tell, they are all the same. Just keywording to try to catch more bidders.

    So that’s the quick test drive. If you are using a YN-560, hit us in the comments with your experiences.


    Strobist

  • hand coloring in lightroom

    I’ve always loved hand-colored photos.   They have such a great look, very unique, very interesting.  For those who don’t know, “hand coloring” refers to any process where a photographer uses pigment, dye or paint of some sort to manually add color to a black and white photo.   Historically this was done in the 1800s by photographers using pigment and gum arabic on daguerreotypes!  The technique persisted in one  form or another throughout the years until it was supplanted by actual color photography.  Of course, just because it is no longer necessary to get color in such a way doesn’t mean it can’t be used for asthetic effect.

    I shoot a lot of black and white film, which I generally scan and process in lightroom rather than wet printing.  Now if you’ve used lightroom, you are probably familiar with the brush tools for things like exposure, clarity or even skin smoothing.  However, the oft overlooked “tint” option can be used to easily paint in color to a black and white image for a “hand colored” effect.

    let’s take this image.

    This was shot on film (with a holga!) during a vintage pin-up shoot.  In other words, there is no actual color information in the file etc…

    Now I’m going to hand color it to approximate the actual colors of the scene.  First we start by going into the lightroom brush tools.  Make sure all the adjustment sliders are set to zero (we are just painting on color here, not adjusting the photo itself)   Click on the tint box at the bottom right to bring up the color picker.

    A little trick with the color picker is that if you hold the mouse button down you can drag the eyedropper out of the little selection window and  sample color from *anything* on screen.  One useful trick with this is to have a “reference photo” open separately and sample your colors for hand coloring from that.

    Since the couch in this shot was a green color, I grab a nice rich green and begin painting my mask.  I find it more accurate to paint with the red overlay on (click “O” to toggle the overlay on or off).  You’ll want to use a separate mask for each area of color.  Here’s the green mask for the couch all done.

    yeah, it’s not perfect, but close enough :-)

    I then do separate masks for her shirt (pink) and her skin.   With hand coloring, I like to leave a portion of the image uncolored which gives it it’s signature b/w+color look, different from “selective coloring”

    and the final result:

    Now this may be kind of a “niche” technique, and certainly not suited for all photos but it’s quick and easy and yields a very unique effect.  Overall it’s a nice trick to have in one’s toolbox.

    Tweet This Post Stumble This Post


    ed | zawadzki

  • DSLR 101 – White Balance

    251693960_23f2711016We’re continuing with our DSLR 101 this week and today we’re explaining white balance.
    What?
    White balance is responsible for keeping your photos the correct temperature. A low colour temperature creates more red, a higher colour temperature more blue. Digital cameras create the correct colour temperature by picking the part of the photo that it thinks should be white and filtering the light to make that area white.

    Why?
    If you want natural looking photos you need the correct white balance. In other words having the correct white balance prevents your photos from looking too cold (blue) or too warm (red). Although your camera will have an Automatic White Balance (AWB) setting digital cameras are not as good at detecting which part of the photo should be white as you are.

    You can get a more accurate white balance by choosing a manual setting for the white balance or creating a custom white balance of your own.

    How?
    Most DSLRs will let you choose a white balance from within the menu. The choices are likely to include daylight, shade, cloudy/twilight, tungsten, fluorescent light, and flash. Using these setting is a good start and can improve your photos greatly, especially those taken in the more extremes light (such as fluorescent light or twilight).

    To get the most accurate white balance you can set a custom white balance. You can buy a grey card from most photography stores to help you do this, or you can find a white object in your shot and use that instead. Fill the viewfinder with the grey card, or the white object, and shoot using manual focus. The exact method of setting this as the white balance varies from camera to camera, you may have to press the white balance button before you take the shot or after. Check the manual of your camera to find out how yours works.

    Extra Tip
    For most situations AWB or one of the manual settings will do just fine but it’s worth learning how to set the custom white balance, especially if you do a lot of shooting indoors.

    Photo by:

    http://www.flickr.com/photos/brunogirin/ / CC BY-SA 2.0


    Photodoto

  • Icy Horsetooth Reservoir – Opening Lake Paddling Season

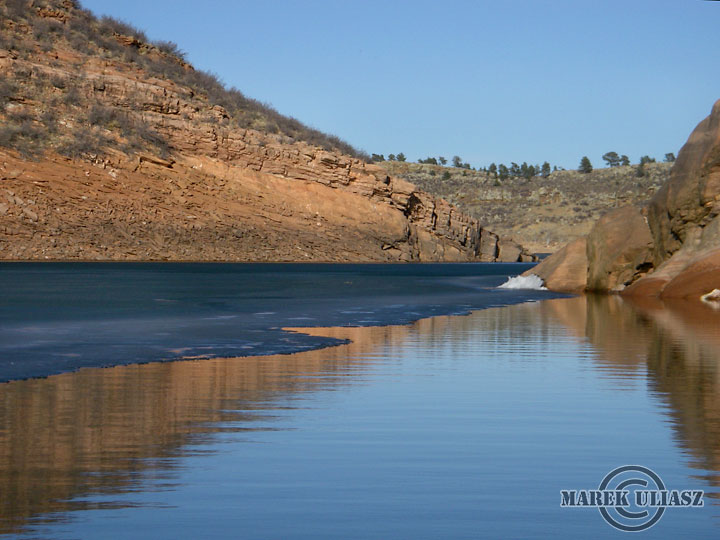
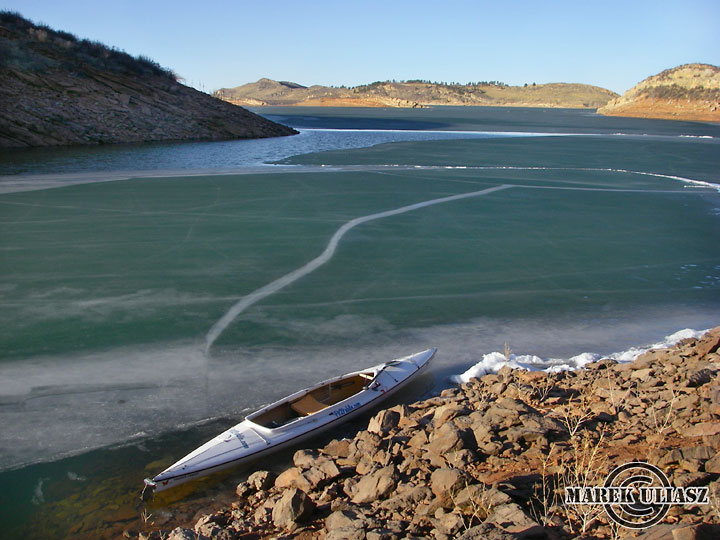
    March 16, 2010. My lake paddling season in Colorado is opened!

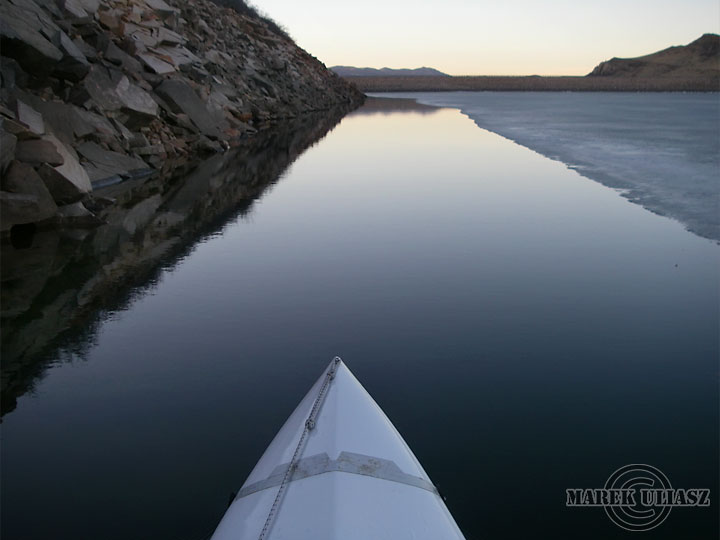
    I took Sea Wind Canoe for a short paddling on the Horsetooth Reservoir. I started at Satanka Cove next to the dam and managed to go to the South Eltuck Cove. Ice was melting along shores creating a narrow channel of free water. However, wind was shifting ice and some passages were closed making necessary to drag or push my boat over ice.

    All the way I stayed next to the shore, so my round trip got pretty long – 6 miles. Ice canoe racing was coming to my mind. Now, I need a little bit of snow to enhance my pictures.


    horsetooth-011610-3

    horsetooth-011610-2

    horsetooth-011610-4

    horsetooth-011610-5


    paddling with a camera

  • Sharing a favorite photo – just for the heck of it

    I was looking at this photo as a possible magazine submission the other day and thought – I should just share it. I love the contrast between traditional and modern.

    danzer_021262

    Contrasts: A dani man wears traditional body paint and decorations along with his sunglasses at the Baliem Festival.  Held every August in the Papuan highlands, the festival is a celebration of dani culture involving dances, competitions, and mock battles.

    DSLRBLOG – Photography Business Blog