Category: Uncategorized

  • Sun, Snow and Wind on the North Platte River in Wyoming

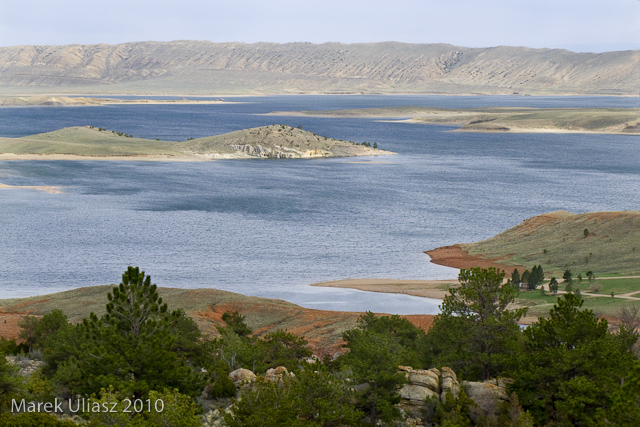
    Seminoe Reservoir in Wyoming

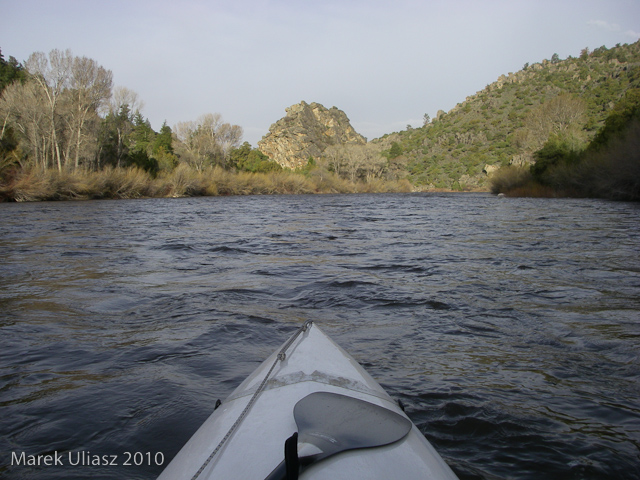
    Since Wyoming Outback Challenge (annual 44 miles paddling race) is gone, we decided to make a longer training run on the North Platte River this year (May 22-23). We means me with Pixel, Rob Bean and two Kruger canoes.

    On Friday, May 21 we run a shuttle between Seminoe State Park and Bennett Peak campground which we reached at sunset after a stop at Saratoga. Saturday was a full day of paddling starting around 7:00 am and stopping for a night 12+ hours later between Dugway and the Seminoe Reservoir. On Sunday, we paddled the last few miles of the river and then a lake to the North Red Hills campground and boat ramp. We finished paddling around 4 pm, took a look at the dam, drove to Saratoga for a dinner, and recovered our second car from the Bennett Peak campground at sunset. The Snowy Range road was still closed, so we returned to Fort Collins through Walden and Cameron Pass.

    n-platte-river-may2010-18

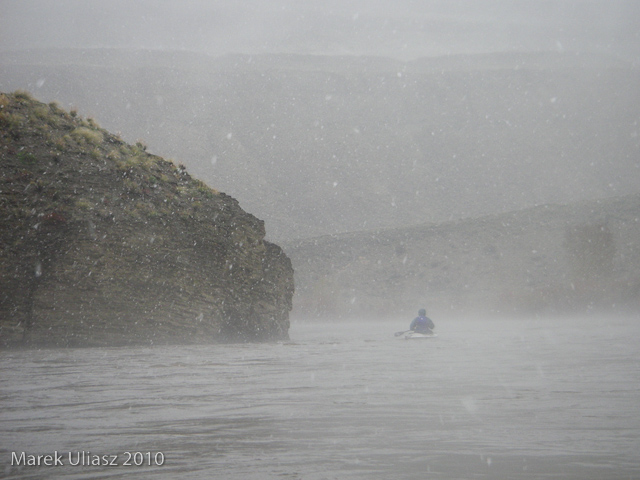
    We experienced every possible weather Wyoming can offer: a very warm night and morning at the Bennett Peak campground, winter conditions (rain, snow, wind) during the second half of out first day, chilly night in tents covered by frost, sunny second day: calm and turning windy in the afternoon.

    Wildlife: one moose, plenty of deer, proghorns, bald eagles, pelicans, and a lot of other birds.

    I covered almost the entire course of our trip before, but in shorter separate segments paddled at different times. I didn’t paddle before the river from Dugway to the middle of the Seminoe Reservoir (Sand Mountain). I visited the Seminoe Reservoir only once years ago. It was in August of 2000 with my CLC Patuxent kayak: there is still a short report from that trip at Mountain Wayfarer. It looks really ancient …

    GPS odometer: 114.5 miles, 16:58 hours of moving time, 3:34 stopping time (not counting our overnight camping), 6.7 mph average moving speed, 11.7 mph max speed.

    River flow: 7000-8000 cfs at Dugway above Seminoe Reservoir, the reservoir was filled to 70% of full capacity.


    The above slide show is a new setup created with Adobe Lightroom 2 and SlideShowPro. Recently, I am using Lightroom to manage all my pictures both paddling and stock images. I created slide shows with Lightroom before (see, e.g., Colorado River Race or Dismal River 2009). However, this time I used also SlideShowPro which adds more functionality. Please let me know how do you like it, and whether you had any problem watching it. I am going to post more slide shows in a similar format.

    Most pictures were shot with waterproof Pentax Optio W30, a few with Canon 5D/II (camping), and Canon PowerShot G11 (the Seminoe Reservoir and Dam).

    Rob posted his pictures from the trip on facebook.


    Some related posts:
    Bennett Peak to Pick Bridge on the North Platte River, Wyoming
    North Platte River Kayak Racing – 2009 Wyoming Outback Challenge
    44 Miles of the North Platte River in 2 Minutes
    44 Miles on Big Water - 2008 Wyoming Outback Challenge Results
    7 Landmarks and Highlights of the 2008 Wyoming Outback Challenge
    2007 Wyoming Outback Challenge on North Platte River- Results and Pictures
    3 Days on the North Platte River in Wyoming: from Treasure Island to Fort Steele
    Wyoming Outback Challenge on the North Platte River - Strong Current and Head Wind
    North Platte River in Wyoming - Eagle Nest Rapid
    n-platte-river-may2010-2
    Other resources:
    The Floater's Guide to Wyoming Rivers: Paddle and Portage
    Wyoming Atlas & Gazettee
    map of public access areas by Wyoming Game and Fish Department
    North Platte River flow: Northgate, CO | Ft Steele/Dugway
    Wyoming Introduces Fee for Paddling and Boating


    paddling with a camera

  • Grey Gardens + Video

    Genlux Spring Editorial and Video

    Genlux Spring 1

    Got a call from Stephen in January asking me if I wanted to shoot for the Spring issue of Genlux. The theme was Royal. I’ve had this idea in my head that would need a set designer. I wanted to have someone  build a room from scratch to emulate the attic room from “The Little Princess”, a novel written in 1904 by Frances Hogdson Burnett. I read the story when I was a kid and the imagery described in the novel left an impression on my imagination. Of course I didn’t know when I read the novel at 9 that I would be producing a fashion shoot around the story some 35 years later!!!  But immediately when Stephen said “the theme is Royal”, my mind went straight to the story of The Little Princess. The first thing I did was contact a set designer to see if he was available to do the shoot and if he wanted to work on it with me. Jamie Dean agreed to meet with me at my house so I could show him some visuals and we could talk about the kind of set I wanted built and the props I wanted to use. He brought his laptop and showed me his inventory of props while we went through images that I had collected before our meeting that depicted the mood I wanted to recreate for my shoot. Once he agreed to work on the shoot with me, I collected all the images together from his props to the images I had collected and we narrowed the look down so I could create a mood board to send to Stephen.

    Watch the Video

    I shot this editorial at Out of Frame Studio in the middle of Hollywood. You gotta’ love their blog title: “Fashion Forward Meets Punk Rock”. Yep, you know I totally dig that one! The guys that run Out of Frame are just real nice people!  And their studio is this big huge space you can just go in and create in. It’s conveniently located right next door to Calumet, so last minute gear rentals are really easy.  The evening before the shoot, Out of Frame let  Jamie and I come in to start building the room out. It was a lot of fun to watch Jamie put together this room that came in 6 pieces! I got to decide which wall the windows would go in, and how many. I got to pick the color of walls and where they would go. He brought in most of the large pieces of furniture and I plotted out a shot list as I watched him put the walls up. I left  about an hour after meeting Jamie there and he, along with his two assistants, continued building the set. By the time we arrived in the morning for the 9 AM call time, the room was done!!

    GenluxSpring4

    John Waiblinger was kind enough to come down for a second week in a row of my editorial shoots and do a Behind the Scenes video. Oh how I am so camera shy!!! I don’t know what it is about having a camera pointed at me, but it drives me crazy. Probably why I’m not much of a “screamer at the models” type photographer. It’s like, “Yeah, I get it….it’s weird getting your picture taken!” Haha…No…I’m not that laid back about it, but my camera shyness is definitely something I’ve noticed about myself lately, as there have been a few of these videos being done now on my shoots. Oh well, I do them for you. So I hope you’re  enjoying them! I can’t imagine doing a reality TV series. I would have panic attacks with cameras in my face all the time. I’d LOSE it!

    _img2418-edit

    The model was from Photogenics. Lovely little Zinta. She was pretty shy herself, in fact she was so shy she barely said a word the whole day. I thought she was from Europe or Russia and couldn’t speak English very well. Come to find out, she’s from the Valley. And just pretty quiet. Hair was done by Jason Stanton, a very well dressed English man who does rockin’ hair, I must say. And Sally Wang did the make up. She also killed it! Amazing job they BOTH did. Jason and Sally are both from Cloutier Remix Agency. Styling was by Kelvin Seah, my oft mentioned favorite stylist with the impeccable taste and fantastic eye. I might also add he’s incredibly nice!  Kelvin is with AIM Artists here in LA. We rented a fog machine from Out of Frame so it was at the studio when we arrived in the morning. After grabbing more coffee (why do we always drink so much coffee when we’re shooting??) Tyler Mitchell, my rad 1st assistant (I’m using the word RAD lately, and I’m sticking to it for awhile) and another assistant started setting up my lighting the way I wanted it. We put a huge chimera soft box right on the other side of the  window so we could blast light into the “room”.  We blasted about a total of 600 Watts through one head on that side, so not a lot. To the left we put up my beauty dish, white dish, for a key light on the model. It was up rather high, actually. I think we were about even on the watts on that head as well. I shot with my D2x. Nothing fancy. Same workhorse of a camera, same love affair with Nikon since day one. This Love will never fade. Although I did work with a Hassy yesterday on a shoot that I will blog about in about 4 months when the editorial is out. I have to say, while I was looking through the images shot on the Hassy this morning, man, I think I really want to own one. SO AMAZING of a CAMERA. ; )

    GenluxSpring2

    But back to this shoot! Besides “The Little Princess” book as my inspiration, the music of Proyecto Oniric is so hauntingly beautiful it literally took my breath away the first time I heard it. Every time I hear his music, I go into my head to revel in imaginative narratives and fantasies. When a book or a song or a band can take you to those places, you’ve found a rare and wonderful tool, so they are a keeper. The first night I found Proyecto’s music was when we all were still on myspace. Ha…yeah, the golden years. I stumbled on his profile by accident, listened to every song on his profile, wrote him immediately and asked him where I could buy his music. Back then, it was unavailable. Today, he has a website and his music is available through iTunes. His music is tremendously powerful to me. I definitely recommend at least listening to his music. So…we basically had a great day shooting! I mean, what can I say? The pre-production was all done and when you work with the best, you get the best results. There were no dramas, no hassles, as there shouldn’t be. There were no tech issues, which can’t be helped sometimes, but I don’t recall having any bumps that day. The clothes were brilliant, the team was the best, the studio was perfect, the set was amazing. I’m trying to see if I have forgotten anything? I shot mostly wide, so I used my old analog 24 MM lens. I shot wide because I wanted to see the set we were in. I wanted the smoke and the gritty feel of an attic apartment that has seen better days. But the girl is still a princess living in that squalor. So here’s the images and the video that John did. Hope you enjoy! Now I’m off to wrap up yesterday’s shoot, prep Tuesday’s shoot and somewhere in middle of all this work, figure out when I can find the time to train a new person that I’m hiring to join my crazy world soon! I Facebooked about needing to hire another me! No one has applied for the position yet. (That’s a joke, please don’t send me an email applying for the job!)  Oh and if you live or are near Orlando, Florida you must come to SNAP! Orlando May 20th through the 23rd. There’s an exhibition with some of the world’s most renowned  photographers like Douglas Kirkland (you MUST check out his work if you don’t know it) There are also some pretty informative lectures going on that weekend as well.  I’m doing one on Saturday May 22nd at 1:30 PM. I’ll be speaking about the business of Fashion Photography. Come introduce yourself!  After SNAP! Orlando is finished, we’re heading over to the middle of Florida to visit our friend, Suzanne Sturgill. She’s planning on taking David and I on her boat down some alligator infested river to this spot that has the best Mai Tai’s in the South. Honestly, I think Suzanne organizes these trips because her and her friends just get the biggest laugh over watching us “City Folks” trip out over the smallest things. Some of David’s and my favorite memories are sitting on Suzanne’s big porch under the moon, eating chicken they smoked themselves, drinking Crown Royals, listening to the crickets and watching the Spanish Moss swing in the breeze.  We talk about those nights all the time and tell all our jaded Hollywood friends about it constantly. Suzanne shoots horses. In other words, she is hired to shoot Champion Horses. Like the kind that sell for ,000, 000.00. Yeah, that’s 4 million. You read that right. And she’s an incredible shooter. She’s also a woman that I admire tremendously. Go check out her work. Her and I couldn’t be from two entirely different worlds than each others but man, I love her to pieces!! She’s genuine. And I have to say, that goes far in my book.  Okay, seriously now, I gotta’ run. See you soon!

    Additional Images

    _img2670-edit

    Genlux Spring 5

    _img2878-edit

    GenluxSpring3All Images ©2010 Melissa Rodwell Photography


    Fashion Photography Blog – A Resource for Fashion Photographers, Created by One.

  • How to Price Assignments: Price High and Give Your Clients an Experience

    Unlike my usual posts, this is an off-the-cuff post spurred by a recent experience with some clients. We did a shoot with a young lady, an equestrian, along with her horse. We worked hard to make it not just a photo shoot, but an experience. They loved it, and loved the photos, and never blinked about the price. In interacting with the clients afterward, I realized what a unique and special experience it was for them.

    Pricing is often one of the hardest areas of the business for photographers. New photographers are sensitive about their lack of experience, afraid they don’t merit a large fee and can’t compete with more established professionals. But even for established professionals, a certain sense of guilt is common when it comes to talking price. Many professionals are almost apologetic when quoting a price, and are much to willing to come down.

    I’m no exception.

    I recently had a revelation that has helped me a great deal with the psychological aspect of pricing. It has to do with the difference between how photographers and clients perceive any given photo shoot. What many photographers, enthusiasts and pros, often forget is that a photo shoot is a rare and big event for a client. While we do shoots every week, most people might do a professional photo shoot a few times in their lives. A FEW TIMES IN THEIR LIVES.

    If you charge cheap, cut corners, or otherwise short-change your clients, you really are depriving them of something special. You are depriving them of the opportunity they may only have a few times to experience a professional photo shoot – to be the center of attention during the shoot, the recipients of small gestures that make them feel like valued clients, and ultimately the recipients of truly beautiful professional images.

    Instead of skimping on the price, go ahead and price high. And then make it worth it. GIVE YOUR CLIENTS THE UNIQUE AND MEMORABLE EXPERIENCE OF WORKING WITH A TRULY PROFESSIONAL PHOTOGRAPHER. Dress like a pro, act like a pro, project confidence. Do your homework before the shoot. Go the extra mile to make your clients feel valued before, during, and after. Do everything necessary to create the ambiance of an idealized “photo shoot” as well as produce great images.

    Think of yourself as selling an EXPERIENCE, not just a set of photos. If you can do that, I guarantee your clients will be happy to pay for your services. And they’ll remember the experience for a long time to come.

    DSLRBLOG – Photography Business Blog
  • Q&A: Feathering a Soft Box

    After the Monday’s OA post on Betty Allison, reader ?ukasz Kruk asked about feathering the small LumiQuest soft box that was used as a key light:

    I understand how this works with directional light (e.g., a bare speedlight) – but doesn’t the softbox’s flat white panel send the light in all the directions more-or-less equally, thus rendering feathering more or less impossible? Can you feather a shoot-through umbrella — and how?

    (a) No, (b) sort of — and (c) lemme explain…
    __________

    First off, the light in question here is a speedlight in a LumiQuest Soft Box III, but feathering will work with any soft box.

    Light coming of of a soft box panel does not have a defined beam like a small light source inside a reflector would, but it still has some shape. Think of in terms of how much of the soft box panel you can see from different positions around the light.

    If you are directly in front of it, you will see the full face of the soft box, and the intensity of the light you receive will be a function of how far away you are. But as you move around toward the side of the soft box, you will see less apparent surface area because of your angle of view.

    You can use this “edge” of the light to control how light falls across your subject, as in this close-up portrait (more here) that I did with the same light source.

    In that example, instead of pointing the light right at his face it was rotated around away from him (towards me) and also pointed further up than you would expect. This placed his face in the area where the intensity of the light is falling off, which is what gives you that nice gradient towards the camera-left ear and down his torso.

    (If you need to get even more of an edge to a small soft box, that’s an easy mod, too.)

    The light is less than a foot from his face, and hand-held. That way, it is easy to look at the image popping up on the back of the camera and adjust the angle as you shoot. Kind of the ultimate voice-activated light stand, ’cause it’s you at both ends.

    Umbrellas (speaking of shoot-through versions here) are a different animal, because they present themselves as almost hemispherical — sending the light out in almost a 180-degree pattern.

    You can’t really feather a shoot-through umbrella per se, but you can control the spill by partially gobo’ing it.

    The photo at left is a good example — more details and a diagram here.


    Strobist

  • baselining your strobe for quick exposures

    Digital cameras have been a great boon to photographers working with off-camera lights.  The ability to review an image instantly on an LCD (with histogram!) has obviated the need for tedious polaroiding and exhaustive metering of every inch of a scene to ensure correct light ratios and eliminate unwanted shadows.    So much so, in fact, that many photographers have begun to eschew the use of a flash meter entirely – relying on the LCD and histogram via trial and error to set their lights correctly.   Now while quick and easy, this method has it’s drawbacks, particularly for young photographers.   The question that frequently arises is:

    “well, I’m essentially just guessing what power to set my flash on then chimping the exposure and adjusting accordingly but how do I know *where* to start with my flash”

    Essentially this comes down to a combination of making an educated guess about the exposure and *knowing how much light your flash will put out*.

    The beauty of light is that it is predictable.  Whether from the sun, a lightbulb, or a flash, given the same source and conditions, you will always get the same light.    We can use this to our advantage!

    When working with flash, we have fundamentally 2 variable that we control to determine how much light falls on our subject – power and distance.   Power meaning how much actual light our flash is outputting and distance meaning how far away it is from the subject (remember that light falls off predictably according the inverse square law).    Since we know that light always behaves the same, we can be certain that at a given power and a given distance from our subject our flash will give the same result every time.

    Now also remember that light from a flash behaves linearly – going from 1/4 power to 1/2 power is doubling the amount of light that it puts out and vica versa.  Thus if our flash exposes properly at f/8 at 1/8 power, it will give us f/11 at 1/4 power, f/5.6 at 1/16 and so forth (given the same distance to the subject).

    Armed with this knowledge, we can quickly and easily estimate a “starting point” for exposure in almost any situation.  We do this by establishing a “reference point” at which we *know* the exposure of our flash, and can calculate from there.  I like to call this “baselining” the flash.  To do this:

    1. start with the flash on a medium power, which gives room to adjust up or down.  1/8 power is a good starting place
    2. now we need to ensure that we can replicate a consistent flash->subject distance.  You could carry around a tape measure but a fantastic trick I learned from the inimitable Don Giannatti is to measure using your outstretched arms.  Given that the average (male) photographer is probably between 5’5″ and 6′something, your outstretched armspan or “wingspan” is somewhere around 6′, which is a comfortable working distance for lights.   This also has the advantage of being quickly and easily reproducable “on set” – you simply stretch our your arms from subject and place the light at the end.
    3. Meter your light at your set power, at “wingspan”  – if you don’t have a flash meter, you can approximate by photographing an 18% greycard till the histogram spikes dead center and recording the appropriate aperture.
    4. adjust your light till you get a “comfortable” baseline.   Let’s assume that at “wingspan” we find our flash gives us f/8 at 1/8 power.   This is our baseline – we write it down (or just remember it).

    Now lets put this info to use!

    Let’s say we’re in the studio.   We want to do a shot with a key and fill light in a 2:1 ratio.   We want to shoot at f/11 to give  good depth of field for our subject.  What do we do?  We place our lights in the desired position, both at “wingspan”.   We know that each of them gives f/8 at 1/8 power at that distance.  f/11 is one stop up from f/8, so we set our main light to 1/4 power (one stop more power).  Our main light is now already double the light of our second, so we have our ratio right there – the second light stays at 1/8.   We shoot at f/11,  and our main light should be spot on with the second 1 stop under.   now if we want to “blow out the background” we simply add another light on the background at 1/2 power, giving us an exposure of f/16 – one stop over main. Of course this is not as “exact” as using a meter, but this gives us our starting place and we can adjust the lights from there based on the histogram.

    It’s that easy!

    This technique becomes particularly powerful when balancing ambient and flash outside.   Combined with the sunny/16 rule, we can use our baseline to roughly estimate the combined exposure of flash and ambient without chimping a single frame!

    consider the common situation:  We are shooting outside and want to drop the ambient by 1 stop.  We see that it is mildly overcast – the sunny/16 rule says that our exposure should be approximately f/11@1/100 sec.   Again, we know our flash give f/8 at 1/8 power, so we set it at arms length from our subject.  In order to drop our ambient by a stop we increase our shutter speed to 1/200 (still at f/11) and adjust our flash up one stop to 1/4 power to give us f/11.    Done and Done.  Chimp, and adjust as needed.  If we are in situation where we can’t drop the ambient by shutter speed (already at sync limit), we can simply adjust the flash power to compensate.   Assume the same situation (ambient is f/11).   to keep the shutter speed the same and still drop the ambient by 1 stop, we need to shoot at f/16.   Again, knowing our flash gives f/8 at 1/8 we simply bump it up 2 stops to 1/2 power (f/8->f/11->f/16 = 1/8->1/4->1/2)

    This may sound complicated, but once you  are comfortable estimating these exposure, it becomes almost second nature.  by using your baseline you will find yourself able to get exposure dead on within 1 or 2 “chimping” shots.

    Tweet This Post Stumble This Post


    ed | zawadzki

  • The Top 10 Best Photography Business Blogs

    Since readers of this blog are obviously interested in what makes a successful photography business, I thought I’d share what I consider to be some of the best photography business blogs on the web. Of course, the DSLRBlog Photography Business Blog would make the list, as would the business section of Photocrati’s photography blog. But since I run both of those, I can’t very well include them here, can I :) .

    Outside of these, here is a list of great blogs that I regularly read and find to have the excellent information for aspiring professionals thinking about building their businesses.

    Dan Heller’s Photography Business Blog

    This is a very well-known photography business blog. Heller offers up a richer and more detailed set of writing on running a photography business than almost anyone else. Indeed, many parts of his “blog” read more like book chapters (some are). Heller is also an authority in the area of model releases – much of the information from his book on the subject can also be found on his website. He has great information on the stock photography business as well. The articles are uncommonly long and and sometimes excruciatingly detailed. danheller.blogspot.com

    Photopreneur

    This is a well-established blog about starting and running a photography business. The authors offer great tips in down-to-earth language that’s easy to understand. They comment on a wide array of different topics, and include a good number of articles that are just fun articles about photography, and not as much about the photography business. Compared to Heller’s blog, the articles here are shorter and easier to read, but with less detail (the same can be said for most of the rest of the blogs here). blogs.photopreneur.com

    Black Star Rising

    This is another group blog with well over a dozen contributors. It’s affiliated with Black Star the photojournalism / stock company, and most of the contributors are Black Star photographers. Black Star Rising is not an exclusively business-oriented blog, but much of the the content is. Unlike many other business-related blog, this one has a photojournalism emphasis. I find this blog to be fresh – it’s less fluffy than Photopreneur and less detailed than Dan Heller’s blog. rising.blackstar.com

    Stock Photo Talk

    A great blog on the stock photography business by Andy Goetze. If you are interested in stock photography, I would consider this blog a must-read. You won’t find a lot of highly targeted advice about running your own business, but you will find a wealth of up-to-date information about what’s happening in the world of stock photography. www.stockphototalk.com

    Photo Lovecat

    Photo Lovecat is a blog, again by multiple photographers, dedicated to photography business issues. This is a great blog for aspiring photographers. It’s fresh, has a ton of good business related content, and its very easy on the eyes. You’ll find articles on everything from working with clients to registering a photography business to using social media. photolovecat.blogspot.com

    Strategy Avenue Blog

    The Strategy Avenue blog, by Laura and John Novak, is the blogging arm of their consulting and training business for photographers (Strategy Avenue). You’ll find well written articles on various aspects of running and improving a successful photography business. Laura’s work consulting with photographers has given here a good grasp of the common problems aspiring photographers face. strategyavenue.typepad.com

    A Photo Editor

    This is a great blog by Rob Haggart. It’s not exclusively about running a photography business, but there are plenty of great business-oriented tips in the mix. Haggart’s perspective is particularly useful because of his long-time experience as an editor. To read his blog is to temporarily see things more from the perspective of an editor. www.aphotoeditor.com

    Photo Business News and Forum

    This is a great blog dedicated to photography business issues by John Harrington. It’s a blend of nuts and bolts advice on running a photo business, on the one hand, and commentary on trends in the photography industry, on the other. John Harrington is also the author of the well-selling book, Best Business Practices for Photographers. photobusinessforum.blogspot.com

    ASMP Strictly Business Blog

    This is a semi-official blog of the American Society of Media Photographers. It’s written by a dozen ASMP members. I like group blogs since they offer a more diverse array of viewpoints on any given issue, and that’s an advantage here. Obviously, the fact that this blog is written by one of the major photography associations gives the views of the authors credibitlity. On the downside, while this blog has great potential, but it’s relatively new and the content is still notably thin. Either that or they just don’t have very good navigation to their archives of articles. www.asmp.org/strictlybusiness

    ProPhotoLife.com

    A blog targeted at advanced enthusiasts and pro photographers by Jim Talkington. This blog focuses a lot on photographic technique and general photography tips, but you’ll still find a wealth of articles on the nuts and bolts of running a photography business. www.prophotolife.com

    Of course, the blogging world is vast, so no doubt there are other photography business blogs that probably content for a spot on the list. If you know of any, feel free to mention them below.

    DSLRBLOG – Photography Business Blog

  • How to View Your Non-Reciprocating Contacts in Flickr

    I CANNOT believe you don't have me marked as a FRIEND drama'

    th.omas giveth what flickr taketh away.

    About 20 months ago, when Flickr rolled out their new “contacts” pages, they crippled a key part of the software that had been requested by many users — the ability to see who your non-reciprocating contacts were. At present Flickr will show you who calls you a contact. And they will show you who you call a contact. And they will show you who calls you a contact that you don’t back.

    But they won’t let you see who *you* call a contact but who does *not* call you one back (or maybe who *used* to call you a contact but who has since dropped you when you weren’t looking).

    Apparently the ability to view non-reciprocal contacts was built into the beta version of Flickr’s contact screens, but was removed when Flickr staff felt that it caused too much “drama.”

    From Flickr Staffer Dunstan Orchard:

    th.omas: “A missing feature I’d like to see is a list of all my contacts who do not call me one of their own…”

    That was in the original build, but in beta testing threw up all kinds of “I CANNOT believe you don’t have me marked as a FRIEND!!” drama. It was quite amazing.

    After a while we all agreed it was a feature that did more harm than good, so it got the chop.

    (As a minimum we try to have new features on Flickr not cause actual crying and yelling. I think that’s an acceptable baseline to work from.)

    Well if you want this data from your contacts screen there is now an easy way to get it. Just install th.omas’ alpha version of the Flickr Non-Reciprocal Contacts Finder greasemonkey script. You can get the script here.

    The script didn’t work for me on Chrome when I tested it out. But it seemed to work flawlessly using Firefox. Basically it takes your current contacts screens and turns anyone who is not reciprocating red.

    Non-Reciprocal Contacts Appear in Red'

    Why is this important you might ask? Well one reason why is that Flickr currently limits you to 3,000 non-reciprocating contacts. After this you can no longer add any more. So if you’ve reached that limit (or want to manage staying under it) it may be helpful to be able to easily review and identify who these people are that flickr is currently hiding from you to protect you from the “drama” and all.

    Or you just may want to know which of your so called friends really love you and which ones secretly hate you or your photography. ;)

    Anyways it’s nice to see a work around out that gets around Flickr’s limitation here. Beware though. They always could kill the ability for this script to work. So if you want to go through your contacts and identify which are non-reciprocal ones, you might want to do it sooner rather than later.

    .

    Thomas Hawk Digital Connection

  • 9 Steps to Start (or Jumpstart) Your Photography Business

    If you’re an advanced enthusiast serious about making it as a pro, here are nine practical steps you can take to start the transition. These steps will help you break inertia, make your first sales, and establish a solid foundation on which to build.

    1. Find your niche and start shooting in it.

    Most enthusiasts shoot what they want, where there at, without any overarching logic. They produce a haphazard collection of different images. Then they try to sell the resulting images. Shoot first and then find a market. Pros do just the opposite: they know their market, and then shoot for it. They specialize, get to know buyers in their niches, and shoot deliberately and strategically to deepen their portfolio in their chosen areas. Starting tomorrow, spend some time figuring out where you want to specialize, and from now on spend your precious shooting time in those areas. Unless you live in Kansas and are determined to have your niche be Central American travel photography, it’s not that hard to build a solid portfolio. Just give yourself a highly targeted list of assignments. Do some at-home product shoots, or portrait or engagement sessions with family or friends. Assign yourself to cover at least 10 mammal species at the local zoo, or spend some time at some local wild areas. Take it seriously – learn about the animals or natural areas you’re covering. As long as your niche is something close to home, you can build a portfolio relatively quickly.

    2. Develop your website.

    In the digital age, you must have a website and it must be a good one. A website is your online portfolio and your most effective marketing tool. A well-designed site gives you credibility and provide a point of interaction with clients and buyers. Like a storefront, it is a place to which you can direct people, and a way for others to stumble into you while searching the web. Indeed, many people today find photographers today by doing Google searches. If you don’t have a website, you won’t even be found or considered. Beyond that, web sites provide a platform for selling prints and stock photos directly, and for offering blogs, reviews, and other important content that adds value for your potential clients. Over the next week, either develop your site yourself, or find someone to develop it for you. Read my best photography website template series for reviews of photography website templates you can use to create great sites fast.

    3. Develop a list of buyers in your target market.

    Once you know your niche and start developing your site, you need to begin defining your target market. Who are you shooting for? If you are selling to magazines or publishers, go to the book store and buy copies of your target magazines, and find the names of publishers in your field. Register at Photosource International, and pay for a list of buyer contacts in your niche. Go through Photographer’s Market, and list those buyers in your field. If you want to do commercial assignments, make a list of local companies in the industries in which you specialize. If you are going to do weddings, figure out what the best mediums are in your region for advertising to engaged couples. Over the next two weeks, consolidate your list of potential clients, with contact information, in one place.

    4. Send out three submissions.

    From your list of potential clients, choose the top three—those that are the most attractive to you but also the most likely buyers. Focus on those that offer the best fit with your work in terms of content, style, and quality. Send high quality submissions to these three buyers (I’ll post on how to do a high quality submission shortly). If you do this right, there’s a good chance you will make your first sale. If not, you will have taken the first step to building a relationship with what will be an important client for you in the future.

    5. Sign up for photo buyer requests.

    In addition to initiating contact with your target buyers, you should also sign up to receive image requests from photo buyers. First, when you contact Photosource International to obtain contact information for buyers in your niche, you should sign up to receive their weekly and daily buyer requests. You will need to apply and be approved to receive the daily list, with more competitive and higher paying clients. You should also go to Photographer’s Direct, and apply to receive their photo buyer requests. As with the daily list at Photosource International, you will need to submit an online link to your portfolio to be accepted.

    6. Join a Stock Agency.

    You know your niche and your market, have a growing portfolio, and have started marketing directly to buyers. Now it’s time to reach out and put your images on file with a stock agency. If you are really new, or don’t have a deep and coherent portfolio of images, then you can go right now to Alamy, and start the process of signing up with them. As long as your images meet minimum standards of size and quality, Alamy will provide you with a marketplace. You will learn how the stock universe works, and when your portfolio is deeper, you can take the next step. If you already have a strong image library, you may be ready to go immediately to a more specialized and competitive agency. Choose a smaller agency that closely matches your photography in content, style, and quality. I cannot overemphasize that last point – you’ll make your life much easier, get accepted, and make sales by choosing a smaller specialized agency that sells the kind of images you make. Do some online research, peruse the Photographer’s Market, and make a list of five agencies that are attractive and match your style. Find their submission guidelines, and follow them closely. For more ideas, see How to Choose a Stock Agency.

    7. Start advertising for assignments.

    You’ve started marketing directly to buyers, and started the process of putting your images with a stock agency. The next step is to start looking for paid assignments. If you are just starting, then start with family and friends. Let them know what you are doing, and that you are available to start shooting wedding or other important events. (Note: If you have not done weddings before, you should read and prepare thoroughly before doing one. It’s an important event, and you need to provide high quality images. See my list of recommended Wedding Photography books in the side bar.) You may want to do the first 1-2 events at low rates, or even free. Your friends are giving the opportunity to get started, and you are giving them the gift of your valuable photography time. Use the resulting images as a basis for your initial wedding / event portfolio. If you are more are more experienced, then you can develop a wedding website, and start advertising at local shops or online usin Google Adwords (see article on Google Adwords).

    8. Get a local shop to display your images.

    You’ve started marketing directly to photo buyers, starting working with a stock agency, and started looking for assignments. Now you can take advantage of one more avenue to sell your photos: selling prints. Start paying attention, and you’ll notice that many local shops, coffee houses, and cafes display artwork, often from local artists. (Even if your local shops don’t, talk to the owners and they might be willing to start.) Using an online print lab or your local lab, print large mounted prints of your 10 favorite images, take them with you, and ask shop owners if you can display your images.

    9. Order some great photography books and learn more.

    Even if you manage to read every article on my site, you will only be getting the tip of the iceberg in terms of the information available to help you make it as a photographer. Because there are so many books on the topic, and because I believe strongly in continual learning, I’ve compiled a list of what I consider to be the best books in different areas. If you are serious about making as a photographer, order some now and read them over the next month. They will provide the foundational knowledge you need to start thinking like a professional photographer. As a starting point, you can see a list of recommended books to the right in my sidebar.

    Any other thoughts for very immediate actions steps you’d recommend?

    DSLRBLOG – Photography Business Blog