Category: Uncategorized

  • I think most “creatives” can relate:

    A great quote from Sebastian Marshall:

    I don’t differentiate between work and play. I think my time is spent in either excellent, good, okay, or bad fashion. If too much of my time is just “okay” or “bad” – I’m doing something wrong

    I think most freelance photographers, painters, writer, and pretty much anyone in a non-”standard” 9-5 job can relate.  Kinda reframes the whole “wasting time” thing – instead of trying to stop wasting time, just aim to increase the amount of time spent in excellent fashion!

    Tweet This Post Stumble This Post


    F/1.0

  • Buy Awesome Photos and Help Haiti

    4278689547_68297df5e8If you want to get some awesome new art for your walls and help the relief efforts in Haiti at the same time, check out these photo auctions:

    Switch Cities

    Erin Lassahn

    Simply bid on a photo you like, if you have the highest bid you get the photo and your money goes to help Haiti.

    Photo by IFRC

    http://www.flickr.com/photos/ifrc/ / CC BY-NC-SA 2.0


    Photodoto

  • DSLR 101 – White Balance

    251693960_23f2711016We’re continuing with our DSLR 101 this week and today we’re explaining white balance.

    What?
    White balance is responsible for keeping your photos the correct temperature. A low colour temperature creates more red, a higher colour temperature more blue. Digital cameras create the correct colour temperature by picking the part of the photo that it thinks should be white and filtering the light to make that area white.

    Why?
    If you want natural looking photos you need the correct white balance. In other words having the correct white balance prevents your photos from looking too cold (blue) or too warm (red). Although your camera will have an Automatic White Balance (AWB) setting digital cameras are not as good at detecting which part of the photo should be white as you are.

    You can get a more accurate white balance by choosing a manual setting for the white balance or creating a custom white balance of your own.

    How?
    Most DSLRs will let you choose a white balance from within the menu. The choices are likely to include daylight, shade, cloudy/twilight, tungsten, fluorescent light, and flash. Using these setting is a good start and can improve your photos greatly, especially those taken in the more extremes light (such as fluorescent light or twilight).

    To get the most accurate white balance you can set a custom white balance. You can buy a grey card from most photography stores to help you do this, or you can find a white object in your shot and use that instead. Fill the viewfinder with the grey card, or the white object, and shoot using manual focus. The exact method of setting this as the white balance varies from camera to camera, you may have to press the white balance button before you take the shot or after. Check the manual of your camera to find out how yours works.

    Extra Tip
    For most situations AWB or one of the manual settings will do just fine but it’s worth learning how to set the custom white balance, especially if you do a lot of shooting indoors.

    Photo by:

    http://www.flickr.com/photos/brunogirin/ / CC BY-SA 2.0


    Photodoto

  • The Problem With The Focus-Recompose Method

    This post was written as a follow up to my last article on using Single Point AF. In the comment section of that article there was a bit of debate over which focus point to use and when. One camp was stating that there was really no point in using anything other than the center focus point. A lot of people thought it was silly to use anything else because the other focus points aren’t as accurate. Some examples of comments for this argument include…

    • Just use the center focus point and recompose. After all, how often do you shoot action shots anyways?
    • Focus-Recompose is so much easier than messing around with changing focus point. Why risk missing the shot?
    • Nice tip but it’s much easier to just use the center focus point, keep your finger down, then recompose the scene before shooting
    • Center focus point only. Recompose. Always.

    So, is there any truth or accuracy in these statement? Well for one, any time your subject is moving that could be considered an action shot. So I shoot action all the time. As far as the focus-recompose debate goes, I strongly disagree with the focus-recompose method and in this article I’m going to present my case against it. This debate may not start a flame war or anything like that (well, maybe), but I do think it’s a good idea to dive deeper into this topic and find out which technique is better. Center point focus and recompose….or full access to all your camera’s focus points? Let’s go.

    Why The Focus-Recompose Method Often Fails

    I think you’ll agree that I’m pretty awesome at drawing stick figures with my Wacom Tablet, so I thought it might be easier to explain why focus-recompose often fails by creating a little diagram and then explaining this diagram in steps. So here we go…

    In the diagram above, ‘A‘ represents pointing the camera up towards the subjects face and placing the center AF point over the subjects eye to achieve focus. Most photographers using the focus-recompose method know that nobody wants to see an eye or face right smack dab in the middle of the frame, so they then recompose the scene by moving the camera down to get the entire body in the frame or to simply move the subjects face off center. This new camera angle is represented by ‘B‘ in the diagram.

    I’m certainly not a mathematician but one of the few things I remember from geometry is the Pythagorean Theorem and the common sense that the length of A is longer than the length of B, and that if you were to lay the A line down on top of the B line, you would see the difference in length between the two.

    If you stand 4 feet from your subject and point the camera up at the subjects face, then you are no longer 4 feet away from what you’re focusing on. If the length from your camera to your subjects chest is 4 feet and the length from your subjects chest to their eye is 2 feet, then the length from your subjects eye to your camera is 4.5 feet. Are you getting this!? That means that if you focus on your subjects eye, move the camera down to their chest to recompose, then your focal plane is now half a foot behind your subject!  The difference between the two lengths is show in figure ‘E‘ in the diagram, with ‘C‘ being the actual focal length when recomposed and ‘D‘ being actual distance to the subject.

    So What’s The Big Deal With Half A Foot?

    Some readers out there might just be wondering what the big deal is about 6 inches. So here’s a screenshot from an app I’ve got on my iPhone called Depth of Field Calculator. This app will calculate your depth of field based on the settings and information you provide. If you can’t quite see the screenshot just click on it to see a bigger version.

    The app lets us know that if we are 4 feet from our subject with a 50mm prime wide open at f/1.4, then our depth of field is only 0.16 inches. In other words, our focal plane will begin at 3.92 feet away from the subject and focal will end at 4.06 feet. Now if you remember from the diagram above, if we focus on the eye and recompose to where the center of the camera is pointed at the subjects chest with their head in the top third, then our 0.16 ft plane of focus is actually 4.5 feet behind our subject. Therefore, we have an out of focus image. Want proof? I thought you’d never ask!

    The Proof

    The demonstrate my point, I slapped a 50mm prime onto my 5DMII and went over to the dart board in my office. With my camera on a tripod I placed the center focus point over the ’20′ on the dartboard, achieved perfect focus and then took one picture. Without changing anything I recomposed the scene by moving the camera down until the center focus point was over the center of the dartboard and took one more shot.

    Camera info: Canon 5DMII with Canon 50mm lens, f/1.4, Shutter Speed 1/125th, ISO 250

    Here are the resulting images…

    And here are both images zoomed in to 100% to see if they are sharp….

    Conclusion

    Focus-Recompose is easy, intuitive, quick and self-defeating. While this method will work in some situations, there’s no way to know how well it will work without calculating your depth of field before each shot to see if you have any wiggle room with your depth of field. So don’t be afraid to use your other focus points to avoid focusing and recomposing. I won’t disagree that the center point is the most accurate but the other focus points are hands down a better option than recomposing without refocusing.

    Agree or Disagree? Let me know in the comments, but do your best to keep it civil. There are people trying to learn here and we don’t need another article turning into a Canon/Nikon debate!

    Are You On Google+?

    I know this is off topic, but man have I fallen for Google+. If you’re still in need of an invite code, use this link to get in. If I run out of invites from that link I may still be able to get you in by email. Once you’re in be sure to add my profile to one of your circles and drop me a line. Maybe we can get some people together for a G+ hangout/discussion over this topic. Cheers!

    Post from: Digital Photography School’s Photography Tips. Check out our resources on Portrait Photography Tips, Travel Photography Tips and Understanding Digital Cameras.

    NYIP_DPschool468x60.jpeg

    The Problem With The Focus-Recompose Method


    Digital Photography School

  • Will Google+ Become Another Flickr-stlye Feeding Ground For Photo Theft?

    Two month-old Google+ has already broken a number of records in adoption (and likely desertion) for a social networking site and is growing like no other. One of the groups most prolific on the new site are photographers. As you may have read here on DPS and other sites, photographers have found great results in regard to interaction and connection through the site.

    And with good reason. Unlike individual blogs, where you connect with one photographer at a time, Google+ lumps your favorites into one place. Not only that, the size and presentation of photographs has made it a haven for those wishing to browse quality images. In the Photos tab/module/dohicky on the site, there is an endless stream of new images coming in from your circles.

    For those who have spent time browsing the Photos section on Google+, you will know what a time sink it can be. Depending on who you are following and the quality of their images, it’s not uncommon to notice a half hour has flown by as you constantly scroll your mouse wheel lower and lower, heading backward in time to see more great (and some not so great) photos. For those not familiar, the service runs much like Google’s current image search on google.com, but only shows images people in your chosen circles have shared with you directly or publicly. It’s a narrower focus (pun intended) and you can fine tune it by circling or uncircling folks.

    As with Flickr, the ability exists for unscrupulous people to download photos without the owner’s permission. As Google+ does not, as of yet, offer Creative Commons license abilities as Flickr does, unless a photographer specifically states the images are free to be used, all rights to copy the image, outside of use on Google+ (which is covered by the terms and conditions, as outlined in this post by Jim Goldstein) are reserved by the photographer. While it is true any image displayed on a screen can be copied via a screen capture, having the ability to simply right click and save an image makes theft easier for the casual, often ignorant, photo thief. (note: you may need to turn off the ‘normal’ ability for Picasa web album viewers to download your photos as well.)

    Will Google+ become a haven for stealing photos as Flickr has become? And will that stop you from posting photos on the site (assuming you are there now)? I’d love to hear your input in the comments section below.

    Find the DPS writers currently using Google+:

    Darren Rowse
    James Brandon
    Jim Goldstein
    Matt Dutile
    Peter West Carey
    Neil Creek
    Simon Pollock
    Helen Bradley
    Christina Dickson
    Anna Gay

    Special Google+ photo note: By default Picasa Albums (which is what Google+’s albums run off of) turn on the ability to sell your photos when you create a Google+ account. If you do not want people to purchase your images, you need to turn off this ability with these instructions.

    Post from: Digital Photography School’s Photography Tips. Check out our resources on Portrait Photography Tips, Travel Photography Tips and Understanding Digital Cameras.

    NYIP_DPschool468x60.jpeg

    Will Google+ Become Another Flickr-stlye Feeding Ground For Photo Theft?


    Digital Photography School

  • Inspiration

    2613289179_fb36cb595b_mIf you’re following along with DSLR-101, if you’re a more experienced amateur, or even if you don’t own a camera and just like to look at pretty pictures check out this website for some inspiring interviews with professional photographers. I’m going to call it inspiration Tuesday. Enjoy. Be inspired. Go play with your camera.


    Photo by:

    http://www.flickr.com/photos/wfiupublicradio/ / CC BY-NC 2.0


    Photodoto

  • Earn Money With Digital Photography—Promote Your Skills

    This guest post was written by Laura Charon. Laura is an avid photographer who has been taking pictures for years–first with an old brownie camera and more recently with a Canon Digital Rebel XTi. You can read more of Laura’s posts at Beyond Megapixels. Contact me if you are interested in guest writing for Photodoto. -John

    Congratulations! You’re ready to take the next step with your digital photography, and start earning some money with it! There are two avenues you can pursue — you can sell the photographs that you take, or you can provide your photography skills as a service to other people. Either way you go, earning money with your photography is challenging and rewarding in this highly competitive field.

    lineup2 by Snerkology

    In this article we’re going to talk about promoting your photography skills.

    Create a portfolio — The first important step in selling your photographs is to establish a portfolio. Create a collection of the work that you are the most proud of, or that is the most applicable to the type of photography you will be performing (portraits, product photography, interiors, etc.). Click here for an an article I have written on how to develop a portfolio.

    Establish rates — Next you need to figure out how much you’re going to charge people. This can be tricky — charge too little and your work is undervalued; charge too much and you’ll be passed over for a photographer who is less expensive. Conduct some research into what kind of rates the industry currently supports. Review the rates of your local competition or photographers in your type of genre, and weigh their rates against how much you need to make per hour, per project, per photo, etc.

    Get business cards — When people see you with a camera, they tend to be interested in your work. Most of my “advertisement’ has come from people who have attended the events and venues that I am photographing. They ask me who I am and what I do, and I am able to produce a business card that has all of my contact information and website URL. Word of mouth is a powerful tool in the photography industry, so make sure you’re prepared at a moment’s notice to get your name out there!

    Volunteer your services for free — Experience and practice and vital to garnering customers for your photography business. You don’t want to go in cold to your first “gig’, so gather some experience by volunteering for some photography projects for free. This will allow you to gain the experience you need, bulk up your portfolio, and establish potential future paying customers. Ask friends and family members to pose for portraits. Attend events and venues similar to those whose business you’d like to receive. Offer free examples of your work on CD’s or in print to showcase your talents.

    Buy some basic gear — In order to be sure that you’ll be ready for whatever requirements come your way during your photo shoots, be sure that you have some basic gear to get you by. A good prime lens, a fast telephoto lens, a quality wide angle lens, and a quality macro lens are a good starting collection. Also consider a softbox for portable lighting, neutral colored drapes or drop-cloths for backgrounds, a tripod, a remote shutter release, and a remote off-camera flash.

    Get the word out — The final concern is how to get the word out about your photographs. You can’t sell anything if people don’t know about your work, right? Consider printing and framing some of your photos — put them in your own home for your friends and family to see, or give them as gifts to friends and family members, so that they will be seen by their own visitors. Approach local establishments (businesses, restaurants, libraries, etc.), and ask them if they will allow you to hang your work on their walls. Often, if it’s of no cost to them, a business owner will be happy to showcase quality work and decorate their store or office. Be sure you leave some method of contact – a business card tucked inside the frame, for instance – and make it clear that the photos on the walls are for sale, and that there’s plenty more where they came from!

    Photo credits (all): Snerkology Media, http://snerkologymedia.com/


    Photodoto

  • Sea Wind Canoe on the Loveland Pass

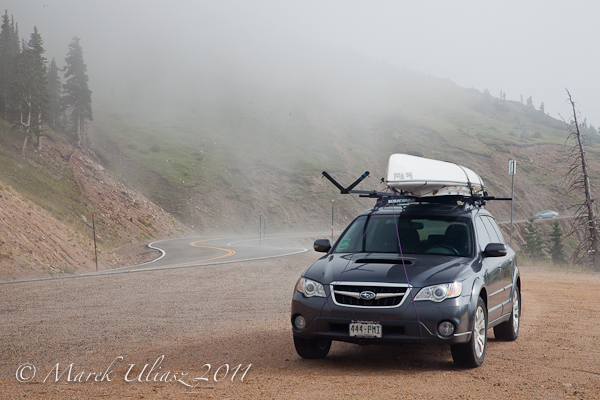
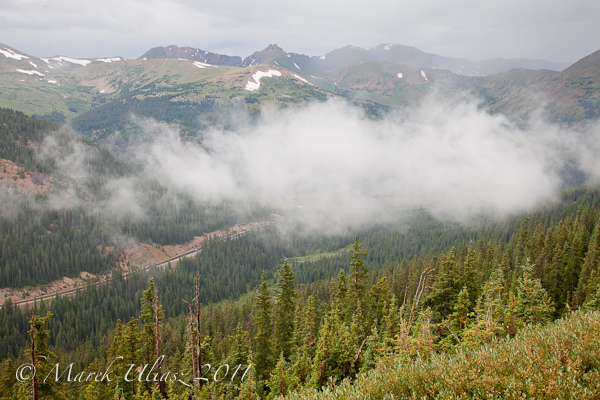
    Last Sunday, when returning from the Colorado River Race in Glenwood Canyon, I drove over the Loveland Pass to avoid delays in the Eisenhower Tunnel. It didn’t help much. I was still stuck in a traffic below the tunnel. However, I enjoyed a few stops at highway 6 at and below the Loveland Pass. It was foggy, cloudy and mysterious. Time to time I could see the slow traffic on the Interstate 25 below.

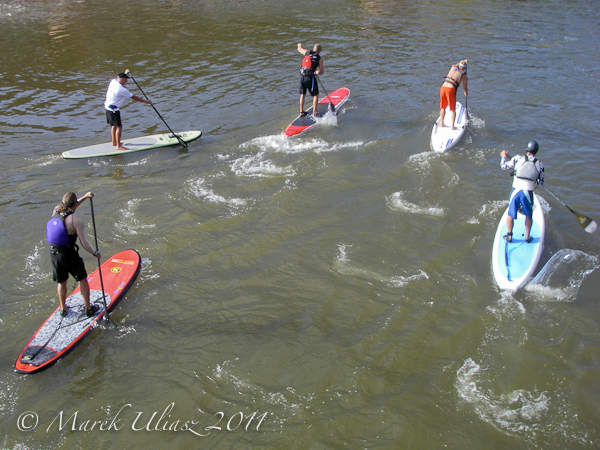
    This year, I paddled my Sea Wind Canoe in the Colorado River Race. I got a really good workout there. The race was dominated by SUPs (stand-up paddlers). You can find some pictures from the race and more commentary on the Fitness Paddling blog.

    Loveland Pass

    Loveland Pass


    ch_client = “mmuliasz”;
    ch_type = “mpu”;
    ch_width = 550;
    ch_height = 120;
    ch_color_title = “3c78a7”;
    ch_color_site_link = “3c78a7″;
    ch_non_contextual = 4;
    ch_vertical =”premium”;
    ch_sid = “Chitika Premium”;
    var ch_queries = new Array( );
    var ch_selected=Math.floor((Math.random()*ch_queries.length));
    if ( ch_selected < ch_queries.length ) { ch_query = ch_queries[ch_selected]; }

    Related posts:
    Colorado River 2011 Race Dominated by SUPs (Stand-Up Paddlers)
    Slide show: Colorado River Race
    10 Mile River Race in 60 Seconds – Thunderbolt Kayak in the Glenwood Canyon

    Colorado River Race - SUP start


    paddling with a camera

  • Chris Waind’s Epic NZSO Compositions

    Photos ©Chris Waind. Click on any pic to embiggen.

    Wellington, New Zealand-based photographer/illustrator Chris Waind used a motley crew of inexpensive lights — along with some Photoshop and a lot of creativity — to create a visual campaign for the New Zealand Symphony Orchestra.

    The goal: to lower the age demo of the audience and raise ticket sales. When the dust had settled, ticket sales were up 20% during a recession.

    Keep reading for sketches, final images, a BTS vid and a full interview with Chris. Read more »


    Strobist