
Category: Uncategorized
-
Earn Money With Digital Photography—Promote Your Skills
This guest post was written by Laura Charon. Laura is an avid photographer who has been taking pictures for years–first with an old brownie camera and more recently with a Canon Digital Rebel XTi. You can read more of Laura’s posts at Beyond Megapixels. Contact me if you are interested in guest writing for Photodoto. -John
Congratulations! You’re ready to take the next step with your digital photography, and start earning some money with it! There are two avenues you can pursue — you can sell the photographs that you take, or you can provide your photography skills as a service to other people. Either way you go, earning money with your photography is challenging and rewarding in this highly competitive field.

In this article we’re going to talk about promoting your photography skills.
Create a portfolio — The first important step in selling your photographs is to establish a portfolio. Create a collection of the work that you are the most proud of, or that is the most applicable to the type of photography you will be performing (portraits, product photography, interiors, etc.). Click here for an an article I have written on how to develop a portfolio.
Establish rates — Next you need to figure out how much you’re going to charge people. This can be tricky — charge too little and your work is undervalued; charge too much and you’ll be passed over for a photographer who is less expensive. Conduct some research into what kind of rates the industry currently supports. Review the rates of your local competition or photographers in your type of genre, and weigh their rates against how much you need to make per hour, per project, per photo, etc.

Get business cards — When people see you with a camera, they tend to be interested in your work. Most of my “advertisement’ has come from people who have attended the events and venues that I am photographing. They ask me who I am and what I do, and I am able to produce a business card that has all of my contact information and website URL. Word of mouth is a powerful tool in the photography industry, so make sure you’re prepared at a moment’s notice to get your name out there!
Volunteer your services for free — Experience and practice and vital to garnering customers for your photography business. You don’t want to go in cold to your first “gig’, so gather some experience by volunteering for some photography projects for free. This will allow you to gain the experience you need, bulk up your portfolio, and establish potential future paying customers. Ask friends and family members to pose for portraits. Attend events and venues similar to those whose business you’d like to receive. Offer free examples of your work on CD’s or in print to showcase your talents.

Buy some basic gear — In order to be sure that you’ll be ready for whatever requirements come your way during your photo shoots, be sure that you have some basic gear to get you by. A good prime lens, a fast telephoto lens, a quality wide angle lens, and a quality macro lens are a good starting collection. Also consider a softbox for portable lighting, neutral colored drapes or drop-cloths for backgrounds, a tripod, a remote shutter release, and a remote off-camera flash.
Get the word out — The final concern is how to get the word out about your photographs. You can’t sell anything if people don’t know about your work, right? Consider printing and framing some of your photos — put them in your own home for your friends and family to see, or give them as gifts to friends and family members, so that they will be seen by their own visitors. Approach local establishments (businesses, restaurants, libraries, etc.), and ask them if they will allow you to hang your work on their walls. Often, if it’s of no cost to them, a business owner will be happy to showcase quality work and decorate their store or office. Be sure you leave some method of contact – a business card tucked inside the frame, for instance – and make it clear that the photos on the walls are for sale, and that there’s plenty more where they came from!
Photo credits (all): Snerkology Media, http://snerkologymedia.com/
-
Five Reasons Why Google is Winning the War in Photosharing
“What is more pleasant than the benevolent notice other people take of us, what is more agreeable than their compassionate empathy? What inspires us more than addressing ears flushed with excitement, what captivates us more than exercising our own power of fascination? What is more thrilling than an entire hall of expectant eyes, what more overwhelming than applause surging up to us? What, lastly, equals the enchantment sparked off by the delighted attention we receive from those who profoundly delight ourselves? – Attention by other people is the most irresistible of drugs. To receive it outshines receiving any other kind of income. This is why glory surpasses power and why wealth is overshadowed by prominence.”
Caterina Fake, 2005
Yesterday my good friend Trey Ratcliff did an experiment. Granted, this is *TOTALLY* and *COMPLETELY* unscientific. His experiment was he posted one of his photos on two sites — the identical photo at the identical time. The two sites were Google+ and Facebook. Trey was trying to measure the difference in engagement between the two. Below are his results:
Results
Google+: 1193 +1s, 66 shares, 367 comments.
Facebook: 89 likes, ? shares, 40 comments.Trey has more to say and mentions some interesting variables, but suffice it to say that Google+ is the *hottest* thing in the photo sharing space right now. I’ve been thinking alot about that and wanted to articulate some of the things that Google is doing right and why I feel that this is the case.
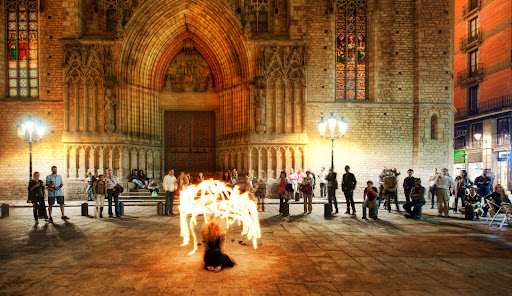
Firedancer, Barcelona Spain, by Trey Ratcliff1. Images look great. Right out of the gate Google+ has gotten image presentation down. We get gorgeous, luscious, huge, oversized thumbnails in our streams that when you click on them almost instantaneously burst into the best looking lightbox on the web right now. Facebook by contrast gives us these tiny, stingy, little etsy weenie, microscopic thumbnails that when you click through present you with a smaller cluttered lightbox complete with all kinds of distracting material including advertisements. Flickr’s lightbox is ok, but its clunky and slow and when I click off of it it doesn’t always return me back to the photo page.
On Facebook photographs seem tolerated. On Google+ photographs seem celebrated. Our world is so visual. Google gets this in a big way.

Ferry Building, San Francisco, by Chris Chabot2. The Google Photos team, well hell, everyone at Google is really excited, enthused and involved in the Google+ product — all day long! I’ve never quite seen anything like this. Literally *hundreds* of Googlers interacting like an army with all of us users. I think I know two people total who work for facebook and I haven’t spoken with either of them in years. I’ve traded some fun barbs with Daniel Bogan over at Flickr on Twitter, but my contact with anyone at Flickr ended years ago. (did I mention I’m permanently banned from the forum where there staff hangs out?)
I don’t think that this is an accident. I think Google is experimenting with one of the boldest experiments in customer service and evangelism of all time. I think it’s a culture thing and I think it comes from the top. In fact I know it comes from the top. Google has empowered their employees to become their PR machine.
We’re doing a great photowalk next Thursday at UC Berkeley — SIGN UP HERE. Who’s organizing it with me? Chris Chabot who works for Google — a super guy who I’ve gotten to know and consider a friend. When was the last time you saw someone from Flickr or Facebook leading a photowalk? Googlers were everywhere at Trey’s photowalk at Stanford a few weeks back.
I have never seen any company empower its employees to be so free and open with PR and communication channels. I totally credit all the individual Googlers who are making this happen, but I also credit leadership at Google for allowing this sort of a culture to thrive and flourish. It’s the exact opposite of the top secret controlled environment message ala Steve Jobs and Apple.

If My Sky Should Fall, by Lotus Carroll3. The engagement just can’t be beat. As Trey’s experiment shows, you just get so much more engagement on every post at Google+ over what you post on Facebook and Flickr. Not just a little bit more — ALOT more.
I’ve heard some people who claim that they still get more on Facebook and Flickr, but they haven’t really engaged on Google+ yet. Everybody I’ve known who has actively engaged on Google+ agrees that you just get so much more engagement.
Yesterday in Trey’s post, Byron DL wrote “Thomas Hawk pronounced the death of Flickr. Millions of people just share photos to share them and don’t measure the stats or use them to get more followers are friends and influence. These numbers are like comparing the drawer full of polaroids at my mom’s house to another’s moms house.”
Byron may have a point. Maybe alot of the people on Flickr don’t really care about engagement (faves, comments, views, etc.), maybe photos are just a drawer full of polaroids after all — but I think he’s wrong. Even if people don’t want to admit it, they all do.
Caterina’s quote at the top of this article was the foundation of what made Flickr the success that it was.
We all want attention. Sure we want a place to just share photos with our friends and family — but the attention is the real drug, even if we’re too proud to admit it.
Before Flickr people *already* had a site to share photos with friends and family. It was called Webshots. Hell, CNET paid twice for Webshots what Yahoo paid for Flickr. Webshots is still a fine place to share photos with friends and family — the greeting card people bought the company I think. Likewise Flickr will be an ok place to share photos with friends and family too, but all the real action in photo sharing will move over to Google.

Some of My Favorites, by helen sotiriadis4. The culture is positive. I’ve been super active in Flickr groups pretty much ever since Flickr started them. I’ve administered many. I’m not exaggerating when I say that I’ve spent thousands of hours literally in Flickr Groups.
Yesterday I quit the last Flickr group I was active in administering. A group with about 6,000 members. Why? Mostly because of the negativity.
Flickr groups are overrun by anonymous trolls and griefers. The IRL personal harassment and stalking that has come out of Flickr groups has convinced me to stay away from them. Even the people who aren’t harassing other people are frequently petty, negative haters — so much back bitting, pessimism, jealously and stupid crap.
By contrast the culture the culture at Google+ is incredibly positive. People helping each other. Talking about photography and cameras and lenses again. It’s like night and day. In part I think this culture is framed by Googlers setting such a positive tone to the network as it’s been rolled out. But I think there are design elements too.
It seems harder for people to set up 20 troll accounts and attack. If someone misbehaves they are quickly removed from circles and marginalized. I don’t know how it’s happening exactly, but it’s a nice change.
Robert Scoble says that Google+ is working because Google has focused on the interest graph and has allowed strangers to meet around common interests. I definitely see that with photography. I’ve met so many amazing new friends in the past six weeks on Google+ around photography that I never knew from any other social network. There’s wayyyy too many to name, and I love you all, but here’s talking about you Kelli Seeger Kim.


Wave Photos, by Eric Nelson5. Photographers promoting other photographers. One of the most exciting things I see on Google+ is photographers promoting other photographers. I love it when this happens. I get to find somebody new and super cool to follow and it just makes me feel good inside.
I promote a lot of other people too. I love seeing great photographers get recognized. I can’t recognize everyone for sure, and hope I don’t offend people who I don’t recognize, but I love highlighting great work sometimes when I see it and it seems like alot of other people on Google+ do as well.
I’ve blogged a ton about Google+ over the past few weeks. Some people have said that they are tired of it — but this is what I do. I’m like a hungry seagull — when I’ve found the greatest dinner on the beach I have to squawk and squawk and squawk to get all the other seagulls to see what a great thing I’ve found. I evangelized Flickr just as hard back in the day (back when they seemed to care) and have been a big proponent of Twitter, Friendfeed, Google Buzz, and other interesting social media tech as it’s emerged.
I’ve never seen anything quite like Google+. Everyday it seems like another great Flickr/Facebook account is moving over and it makes me happy seeing more and more of my favorite friends hoping on board.
If you want to follow my work on Google+ you can circle me here.

(function() {
var po = document.createElement(‘script’); po.type = ‘text/javascript’; po.async = true;
po.src = ‘https://apis.google.com/js/plusone.js’;
var s = document.getElementsByTagName(‘script’)[0]; s.parentNode.insertBefore(po, s);
})(); -
TTV Photos
 I’ve mentioned before that I’m often inspired by this blog and yesterday’s post was a TTV photo, which inspired me to tell you, dear Photodoto readers, how to create TTV photos. Luckily for you it’s very simple, in principle.
TTV stands for “Through the Viewfinder” and to create one of these photos you need two cameras. Basically you set up your digital camera to shoot through the viewfinder of another camera. It sounds simple but requires quite a bit of patience to get it set up correctly. The best advice is to give it a try and practice until you get the hang of it. Also, try placing something dark coloured around the gap between the two lenses to keep out extra light.
Oh, and check out the Through the Viewfinder group on Flickr for some more TTV inspiration.
Photo credit:
http://www.flickr.com/photos/crowolf/ / CC BY-NC-SA 2.0 -
BC3 Assignment #3: Think Big
 The subject for assignment #2 was nice and small in size; very manageable. This will not be the case for assignment #3.
In fact, the subject for this assignment will almost certainly be too big to light completely with your small flashes. Read more »
-
TTV Photos
I’ve mentioned before that I’m often inspired by this blog and yesterday’s post was a TTV photo, which inspired me to tell you, dear Photodoto readers, how to create TTV photos. Luckily for you it’s very simple, in principle.TTV stands for “Through the Viewfinder” and to create one of these photos you need two cameras. Basically you set up your digital camera to shoot through the viewfinder of another camera. It sounds simple but requires quite a bit of patience to get it set up correctly. The best advice is to give it a try and practice until you get the hang of it. Also, try placing something dark coloured around the gap between the two lenses to keep out extra light.
Oh, and check out the Through the Viewfinder group on Flickr for some more TTV inspiration.
Photo credit:
http://www.flickr.com/photos/crowolf/ / CC BY-NC-SA 2.0 -
This Is Your Brain, On Light
Lest anyone doubt the ability of lighting to manipulate our minds, here’s a quick little illusion to scramble your brain. I read the full explanation on the YouTube page (you’ll have to click ‘show more’ under the video there) and I think I understand it. Maybe.
But my brain is still a little scrambled by the fact that what looks like a shadow in the checkerboard isn’t actually a shadow. It’s a tone.
-30-
[BrussPup via Giz]
-
Creating and Lighting a Scene on a Home Depot Lighting Budget
I have gotten rather tired of setting up and breaking down equipment with each set of tutorials that we record. So, this past week I have been wanting to setup an actual area in our studio for recording tutorials for slrlounge.com. Since most of our 3,000 square foot studio is already accounted for, my partners Justin and Chris laughed sarcastically as they said, “well, I guess that leaves you with the back garage door entrance for your little recording studio.”
So, with a very limited scene, and a budget of about $ 150 for lighting gear (which pretty much limits us to Home Depot or Lowes lighting), I began putting my scene together. This tutorial is the written version of the behind the scenes video on the SLR Lounge YouTube Channel. Enjoy!
Don’t Fight the Scene While Finding the Vision
Whenever I am setting up a new scene for a shoot, regardless of it being still shots or video, I am always doing the same thing. The first thing I look for are the existing strengths of the scene, or in other words what can I actually use in my shots. If I am shooting in a warehouse, but I need it to look like a garden, well, then I need to bring in a lot of extra props, lighting and gear to pull of that effect. The less I need to change, the easier my setup will be. So, I always try to use the existing scene rather than fight it.
I think an industrial warehouse background would work very well for these photography and shooting tutorials, so I am going to play to the scenes strengths. I love the fact that I have daylight coming through that window right above the door. I plan on using it as a rim light on my subject, as well as using the daylight to create a nice color graduation from the other tungsten lights. The goal is to create a controlled mixed temperature environment to enhance the drab colors of the scene which you see below.

1. Setting Up the Background
I felt like the old palettes sitting against the right wall would make a great addition to spicing up my background, which is going to be the garage door. So I moved six of them into place, 3 sitting on top of each other on the right, and 3 leaning against the garage door to the left.

2. Placing the Subject’s Chair
To allow me to build the lights for the scene, I needed to know where my subject would be positioned. So, I placed the subjects chair in the scene where I approximately wanted him/her.

3. Adding a Background Light
For our first light, I am placing a 500 Watt Workforce Halogen Work Light ($ 15 at Home Depot) right behind the palettes pointing directly up to back light the palettes as well as create a nice bit of directional light on the background.

4. Adding the Left Side Tungsten Rim Light
For my second light, I am hanging a 250 Watt Workforce Halogen Work Light ($ 10 at Home Depot) right on the chain hanging to the left of the palettes. These lights come equipped with clamps, making them quite easy to hang on their own. I am going to use this light as a rim light on the subjects left side.

5. Adding the Key or Main Light
For my key light, I am using a modeling light as a place holder light. When I created this tutorial, I ran out of work lights and didn’t want to make another trip to Home Depot. So, I used a modeling light as a place holder. However, for the final in camear image that you see, I did actually go get another 500 Watt Workforce Halogen light to replace the modeling light.
In front of that light, I placed a scrim simply to act as a soft box. Without the scrim, the light was a little hard causing the subject’s skin to appear more oily.

6. Adding the Right Side Rim Light
As previously mentioned, I want that daylight coming through the right side to add a nice mixed temperature look to our scene. It is going to help in adding color into this rather boring scene. So, this time I picked up a Husky Daylight Balanced Work Light ($ 50 at Home Depot) to add to the strength of that window light.
Normally, I would just open the door to add additional window light. However, because there are trucks and cars outside of our warehouse area, it would have been too loud to record with the door open. In addition, the Husky work lights will allow us to continue recording regardless of time of day, we would just need to add one extra Husky to get the exact same effect during a night time shoot.

7. Finishing Touches
To make sure the back left tungsten rim light doesn’t move, I taped the chain to the wall. In addition, I purchased a little Duct Connector ($ 10 at Home Depot) to act as a little snoot in directing the light more towards the subject and away from the walls.

8. Room Lights Off, Ready to Record
I now turned off the warehouses fleurescent ambient lights, and here is our final setup. Our lighting gear including the scrim cost less than $ 125 in total (remember, the model light was replaced with another 500 watt work light). We are now ready to record.

9. Final Shot in Camera
Here is a frame from our final video showing what our scene looks like in camera. Notice how the daylight rim light on the right of the subject, as well as the daylight colors hitting the back right of the background add a really nice color mixture to a scene that otherwise would have just been pure tungsten.

Not bad considering what we had to work with, and considering the fact we used Home Depot work lights for everything. Hope you guys enjoyed!
To watch this full behind the scenes video, please go to SLR Lounge.
– Pye
Post from: Digital Photography School’s Photography Tips. Check out our resources on Portrait Photography Tips, Travel Photography Tips and Understanding Digital Cameras.

Creating and Lighting a Scene on a Home Depot Lighting Budget
-
Sony Cyber-Shot DSC-HX9V REVIEW
As mentioned elsewhere, I bought this camera’s predecessor — the HX5V — about a year ago for family use. And enjoyed every still and video pixel it shot!

Sony Cyber-Shot DSC-HX9V Features
So what do we get with the new boy?
We can now enjoy a 16x optical zoom, (24-384mm on a 35 SLR). In 16:9 HD movie mode the zoom range resembles 25-400mm.
The 10fps burst rate continues in this model and, frankly, 10 full size JPEGs should keep everybody happy — but note this gives you a total of only 10 shots in each burst. No more.
Sweep panorama is an amazing feature and possibly limited by the choice of ideal subject matter, your own shooting skill and access to a large format printer.
The specs indicate that a sweep pano of 42.9MB can be captured with the final image size running to 10,480×4096 pixels. As a print: 88.7×34.6cm at 300 dpi.

This parking station shot was taken by panning in the direction of the car, which shows some of the genius in the pano mode. I count 30 plus segments.
You can shoot vertical or horizontal panoramas, tilting or panning in up/down or left to right/right to left directions.
As an adjunct to this function you can also shoot 3D image pairs, captured in 15 images at different angles and then compiled into one image, viewable on compatible TV sets. The PR blurb claims you can view these images “in simulated 3D on the camera’s LCD screen” by tilting the camera back and forth. I failed miserably to see 3D!
Full HD resolution of 1920×1080 is maintained in AVCHD capture and video capture is vastly improved in the bit rate figures: top rate (PS) is 28 Mbps, moving down to 9 Mbps (HQ).
MPEG4 capture at 1440×1080/1280×720/640480 pixels, rendered at rates of 12/6/3 Mbps.
The new camera can also capture smallish stills (2304×1296) while shooting video.


And More
Maximum image size is 4608×3456 pixels, or 39x29cm as a print.
The HX9V has GPS and a compass feature inbuilt so you can log your position after shooting an image or even find true North if you are trudging through the bush!

Newbies will like the in-camera guide. Sure helps when you’re on the road and need a hand up!
I had an issue with the instruction manual: too brief at 30 pages. There is an HTML guide but this is not searchable and, with the HX9V’s many complex features, the camera deserves better.
There is one factor missing from the HX9V. The HX5V had 45MB of internal memory … the new feller has none.

Movies
I had high hopes in this department.
To begin with, the new camera’s movie mode has fixed one of my major objections to the HX5V: the zoom’s wide angle end no longer has pronounced barrel distortion.
I then ran a comparison of the HX5V and HX9V, strapping the cameras together and shooting a walk through. Frankly, I could not pick a distinct advantage with either in smoothness; it depended on your own movement, with the stabiliser cushioning any violent movement.
However, the highest bit rate setting (PS) produced considerably less image noise.
When importing the clips into editing software the story became more interesting …
I could import all four quality levels (PS/FX/FH/HQ) into Adobe Premiere 5.0. However, my attempts to import the clips into Mac’s iMovie software were slightly less successful … all except the PS clip could be imported.
My advice? Go into the editing situation carefully before you buy the camera.
To see some incredibly good, professionally captured footage with this camera go to:
www.dslrnewsshooter.com/2011/06/19/sony-hx9v-tested-for-run-and-gun-by-johnnie-behiri/


ISO Tests
I was frankly surprised to find the camera’s rendition: quite good in resolution and noise all the way up to ISO 1600. Only at ISO 3200 was there was any (slight) sign of a problem … but in fact this setting could quite satisfactorily be used for non-critical photography IMHO. A very good performance.
Layout
The HX9V has been slightly redesigned and some control points moved around. For me, there was not a lot of difference, as I had found the HX5V’s layout to be quite OK.
The 10 position mode dial gives access to auto camera operation as well as Program AE, manual exposure, scene modes, movie mode, iSweep plus a High Dynamic Range mode that relies on two identical exposures to maximise image quality. There is a mysterious one called MR for Memory Recall which gives a status display. A useful one if you shoot a lot portraits may be Background Defocus, but I couldn’t get it to work for me.
The flash is now a pop up job but still gives about the same output power as the predecessor.
Now there’s a new comfort pad on the camera’s back just beneath the shutter button; the speed grip is also textured.Startup Time
Two seconds after I hit the power button I took my first picture, with follow-ons coming in at about a second each.
Distortion
The still image and video modes showed no distortion at the zoom’s wide or tele end.

Sony Cyber-Shot DSC-HX9V Review Verdict
Quality: excellent in all my shots. This one of the skateboarder is an enlargement from about a quarter of the full image. Not bad!
Why you would buy this camera: biggish zoom; fast burst rate; sweep panorama function; Full HD with high bit rates; GPS feature.
Why you wouldn’t: you want a simpler, de-featured camera!For me — a phenomenal camera.
Sony Cyber-Shot DSC-HX9V Specifications
Image Sensor: 16.2 million effective pixels.
Sensor Type: CMOS.
Metering: Multi-zone, centre-weighted; spot.
Sensor Size: 11mm.
Lens: Sony G f3.3-5.9/4.28-68.48mm (31-496mm as 35 SLR equivalent).
Shutter Speed: 30 to 1/1600 second.
Continuous: 10 fps.
Memory: MemoryStick Duo/Pro Duo/PRO-HG, SD, SDHC, SDXC.
Image Sizes (pixels): 4608×3456 to 640×480. Movies: AVCHD 1920×1080, 1440×1080 at 50/60i + 50/60p. MPEG4 1440×1080, 1280×720, 640×480.
File Formats: JPEG, AVCHD, MPEG4.
ISO Sensitivity: Auto, 100 to 3200.
LCD Screen: 7.5cm (921,600 pixels)
Interface: USB 2.0, AV, mini HDMI, and DC input.
Power: Rechargeable lithium ion battery.
Dimensions: 104.8x59x33.9 WHDmm.
Weight: Approx. 245 g (inc battery, card).
Price: Get a price on the Sony Cyber-shot DSC-HX9V at Amazon or at B&H Photo and Video.Post from: Digital Photography School’s Photography Tips. Check out our resources on Portrait Photography Tips, Travel Photography Tips and Understanding Digital Cameras.
Sony Cyber-Shot DSC-HX9V REVIEW


