Category: Uncategorized

  • Tyler Stableford: Dispatches From the Underground


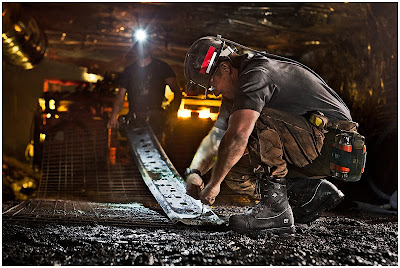
    Aspen, Colorado-based photographer Tyler Stableford generally shoots action and adventure, most of it aboveground. But this shoot for Timberland PRO would send him a half-mile deep into the earth.

    That far down, before adding light it is absolutely pitch black. As in, you cannot see your hand in front of your face. And the lights the miners use while extracting coal there aren't much friendlier — low-level, and a mix of tungsten and fluorescents.

    So Stableford shot the entire campaign working on the edge of the quality envelope, and lighting with only a few speedlights. Read more »


    Strobist

  • Poser: Achieve Perfect Portrait Expression

    We’ve all heard it from clients before. “I don’t like formally posed pictures of myself. I always look so stiff. Can we get pictures without being formally set up?”

    portrait-posing-expression.jpg
    Fortunately for our clients – and for us – the world of formal portrait and people photography is now coming to a new era: Portrait Photojournalism.

    Stiff, unrealistic, unnatural portraiture is no longer a Photographer’s only option.

    A technique used by internationally acclaimed wedding photographers of Poser Image, Jim Garnier and Jerry Ghionis, Portrait Photojournalism combines the techniques of formal portraiture and photojournalism.

    The Photographer will “set up the shot” by formally posing the subject[s], to include location, poses, etc. Then, in a seeming irrational move, the Photographer will either coach the subject through expressions by pulling out emotions through dialogue, or leave them to interact with one another.

    Sound too simple? Don’t take my word for it. Organize your shoot with the following steps and you’ll find a technique that will revolutionize the way you take portraits – and your results.

    1. Location. Location. Location.

    Just as you would in a formal shoot, find a few locations that will facilitate the look and feel you want to achieve. This location should match the subjects personality, and be creatively stimulating [Read more about finding locations here].

    2. Consider your Lighting

    Watch your location for the kind and quality of available light. Is it harsh and contrasty, lending to a dramatic feel? Is it soft and subdued, more conducive to a nostalgic mood? If the available light isn’t sufficient to create the portrait you want, be sure to add light with a reflector, or an off/on camera flash [Read more about using flash in on-location photography here].

    3. Set up your Scene

    Place your subject within the context of your entire setting. Remember, you aren’t taking only mid and detail shots of your subject; with the photojournalism aspect, you are shooting to tell a story. The story of your subject will include their place and involvement in the scene, and the mood you are creating.

    4. Pose your Subject

    You don’t have to pose your subject in a complicated manner. At the least, pay attention to the placement of your subjects feet, knees, and shoulders. So long as you pose to achieve variance and levels of these joints, you will be set [More on posing here].

    5. “Break” the Shot

    Think everything is perfect? Now is the time to make it all natural. Tell your subject to “relax”. Allow them to settle into the pose by drawing them into conversation, or allow them to interact with one another. Achieve authentic expressions, natural posing, and artistic portraits by letting go the expectation of “perfection”. After all, nothing in life is perfect. The key to perfect portrait photojournalism is controlling which elements are broken.

    6. Take the Shot

    Watch for that “After moment” and “Spontaneous moment”. Oftentimes the most beautiful moments happen just after you take the camera away from your eye. Allow your subject to believe you are done with that set up, and take the shot that they are most natural and relaxed – pulling a hat down, tucking hair back, the cute shoulder shrug. You truly never know what you will be able to achieve.

    Post originally from: Digital Photography Tips.

    Check out our more Photography Tips at Photography Tips for Beginners, Portrait Photography Tips and Wedding Photography Tips.

    Poser: Achieve Perfect Portrait Expression


    Digital Photography School

  • Giovanni Savino

    I am not vegetarian.

    I occasionally eat meat, although it has never been one of my favorite meals and, for personal health reasons I try to limit as much as possible its consumption.

    Anyway, this book is not about my alimentary habits but rather about my personal, visual meditation on the condition of living beings, people and animals, a meditation about life and death.

    I shot these photos in a rather primitive slaughterhouse in the south of the Dominican Republic, where, perhaps due to the lack of strong social movements against cruelty to animals, a photographer is still being allowed to enter such place and freely document it.

    Despite a lack of all those humanitarian implications that such a place would provoke in “the modern world”, here, the only concern in letting me photograph the slaughterhouse was the obvious lack of hygiene, which could jeopardize business even in the Dominican Republic, should these photos be published locally.

    My reassurance that it was not my intention to do so, quickly gave me access all areas to photograph “business as usual” in the slaughterhouse.

    All along, while shooting, and later, while editing these photos, a question was in my mind: who is suffering more and longer over here? The animals or the people? The killers or their victims?

    Of course these cows and these pigs are being killed in a very violent and inhuman way, a knife shoved into their heart to then let them bleed till they die, but what about the killers? In this pre-industrial world they don’t even wear the rubber boots, the face mask, the gloves and the white apron their American colleagues are issued (as per FDA rules) in order to preserve a certain degree of hygiene and as a pretence for a more professional and perhaps detached approach to their license to kill.

    No, here the killers walk barefoot in the blood of their victims, they plunge their bodies inside the carcasses to extract their innards, they struggle, man versus pig, sweating, screaming as loud as the pig, while searching for the deadly spot, right above the heart, to give a painful, yet almost instant death.

    And while the animal dies, they don’t. They continue to live in this gory theater of guts and blood and screams, killing animals day after day. In a paradoxical way, the life sentence to the executioner can be perceived as crueler than the death sentence of the victim.

    And then you think: how can they do it?

    They kill to earn a living.


    Giovanni Savino is a photographer based in New York City and in the Dominican Republic, specialized in editorial, documentary and portrait photography. See more: 

    http://magneticpic.com/
    http://magneticpic.posterous.com/?
    http://about.me/magneticpic?
    http://www.flickr.com/photos/magneticart/

    dslrBlog

  • Shooting in the Snow

    For years now, I’ve had this concept of a shoot at night, under the streetlamps with snow coming down… dramatic light and environment… the whole nine yards

    Unfortunately I live in Philly, and the only “snow” we get here is usually slush, rain, and more slush…

    Course this week was different… practically couldn’t have asked for better conditions.   It was coming down pretty hard, and I think I put the weather sealing on my gear to the test (watching piles of snow accumulate on your lights is a little disconcerting…)  By the time we finished my camera bag on the ground was merely a small white lump.  Luckily no gear casualties though, and some great shots came out…

    snowshoot (1 of 7) snowshoot (2 of 7) snowshoot (3 of 7) snowshoot (4 of 7) snowshoot (5 of 7) snowshoot (6 of 7) snowshoot (7 of 7)

    Tweet This Post Stumble This Post


    F/1.0

  • Silent Night Nothing’s Right

    A tremendous greeting to you! I want to share with you a photograph that has special meaning to me, and the reason why I shot it. Roughly, one year ago I was asked, to participate in a project known as “Silent Night Nothing’s Right”. The scope of this project was to display the beauty of our world despite all the negativity that it contains. In summary, “if people take the time to look around them and see how beautiful our world really is, it may just change your perspective”.

    I refer to this photo as, “Evening Shot of the Grand Island Bridge” for obvious reasons. The photo was a low light, long exposure photo, which put my skills and patience to the test. On the eve of the shoot, our weather here in Western New York was typical of a November evening. With the wind whipping and the temps falling, I knew at this point, the task at hand would not be easy.

    After choosing the location, I set up my tripod and mounted the camera. A long exposure photo would require a solid platform to shoot from, so particular attention was being paid to the wind and how it was affecting my setup. After using my camera’s on board light meter, it was determined that a good starting point to capture this image was a fifteen second exposure with an aperture setting of f-18. After my first shot, I was disappointed with the results. This prompted me to go to full manual mode, and disregard my cameras built in light meter. To be clear on the matter, the location we shot from was dark, and the available light was in fact coming from the other side of the Niagara River and this was confusing the light meter.

    After some experimentation and a few test shots, I felt I had the camera dialed in, and prepared to take my finished photo. You can tell by the shot, that sometimes you have to go with your instincts in order to make the photo. Here are the settings. I used a Tamron 18 to 270mm lens, mounted on a Canon camera, with a focal range of 200mm. There was no image stabilization used, as the tripod was in use. The camera settings; ISO 200, with a thirty second exposure and an aperture of f-22. In addition I allowed the camera to use it’s built in auto-focus feature, but used a 2 sec delay on the shutter release to avoid any shake by pressing the shutter.

    Please tell me what you think of the photo. As always I look forward to hearing your comments and reactions.

    Michael Sargent is a top wildlife/outdoor photographer in the eastern United States. See more: 

    Website: www.mrsargent.com
    Facebook: https://www.facebook.com/M.SargentPhotography
    Twitter: https://twitter.com/#!/msargentphoto
    Blog: http://msargentphotography.wordpress.com

    dslrBlog

  • QA: Down the Phase One Rabbit Hole

    There were a few misconceptions (and a LOT of questions) that popped up in the comments after I wrote about ditching the D4 for a used Phase One camera and back.

    Videos, answers to Q's and some specific things that convinced me to make the jump, inside. Read more »


    Strobist

  • How to Crop to Fixed Ratio in Photoshop

    Photoshop_crop_image_to_fixed_ratio_before_after.jpg

    If you’ve ever tried to crop an image to a fixed ratio in Photoshop you may have run up against an issue. There is, it appears, no option for cropping to a fixed ratio such as 4 x 6, 5 x 7 or even 1 x 1. You can crop to fixed sizes like 4in x 6in and you can set a resolution for the image but you can’t on the face of it just crop to a simple 1 x 1 without specifying a unit of measure. Here I’ll show you how to do this, but first things first…

    The risk you run if you don’t watch how your settings are configured and if you don’t watch what you enter in the dialogs, is that Photoshop will not only crop, but also determine the units of measure and resample the image for you.

    Default Settings
    The default units of measure and the default resampling method are set in the program preferences which you can locate by choosing Edit > Preferences > General (Photoshop > Preferences > General) and then read the image interpolation method being used. In this set up it is set to Bicubic:

    Photoshop_crop_image_to_fixed_ratio_1.jpg

    The default units of measure are set in the Units & Rulers options or the Panel options for the Info Palette as the ruler measurements:

    Photoshop_crop_image_to_fixed_ratio_2.jpg

    If you type a number in the Width and Height boxes when you select the Crop tool in Photoshop then the default units of measure are used unless you also type the desired units of measure. This might not sound like it is a problem but if the default units of measure are pixels and you type 6 x 4 and have the Resolution set to 300 dpi you might end up with a very small size image indeed!

    It is not possible to type a number in the Width or Height box for the Crop tool without a unit of measure being applied to it. So, what do you do if you want a 1 x 1 ratio crop not a 1 in x 1 in image?

    The solution is to type 1in or 1cm in each the Width and Height boxes and ignore the units of measure. Then, remove anything from the Resolution box. When Photoshop is told to crop to a fixed size/ratio and is not told the Resolution to use it crops to the size requested, it doesn’t resample the image, and it simply adjusts the Resolution of the final image to suit the image. It might sound weird but it works to let you crop to a fixed ratio. The problem is of course, that the resulting resolution can be very large indeed.

    Here I cropped this image to 1 in x 1 in with no resolution set:

    Photoshop_crop_image_to_fixed_ratio_3.jpg

    Here are the final image dimensions – the size is 1 x 1 but the resolution is very large:

    Photoshop_crop_image_to_fixed_ratio_4.jpg

    Change Resolution but not Size
    If the resolution of the image is important to you then you can change it by choosing Image > Image Size, disable the Resample checkbox and set the desired Resolution and click Ok to adjust this. This resizes the image to the chosen resolution but does not resample it in the process.

    Photoshop_crop_image_to_fixed_ratio_5.jpg

    Crop and Resample
    On the other hand, if you set a width and height for the image in the Crop tool options and if you set a resolution, Photoshop will crop the image to that size and resolution.

    If the image is very large and the desired size is comparatively small then Photoshop will downsize the image and in the process resample the image. If there are insufficient pixels in the image to crop to the desired size and resolution, Photoshop will upsize the image resampling it as it does so.

    Photoshop_crop_image_to_fixed_ratio_6.jpg

    An Alternate Method
    There is an alternative method that lets you crop to a fixed ratio without altering image resolution. It is a little longer but it works well and is bypasses the crop tool entirely. Instead, target the Rectangular Marquee tool and select Fixed Ratio from the Style list and then set the Width and Height as values without measurements. Select the area to keep – if necessary, hold the Space Bar as you are drawing the shape to move it to a new position.

    Photoshop_crop_image_to_fixed_ratio_7.jpg

    When you ‘re done choose Image > Crop to crop it.

    Photoshop_crop_image_to_fixed_ratio_8.jpg

    Next time you need to crop to a fixed aspect ratio, one of these methods will ensure you get the result you expect.

    Post originally from: Digital Photography Tips.

    Check out our more Photography Tips at Photography Tips for Beginners, Portrait Photography Tips and Wedding Photography Tips.

    How to Crop to Fixed Ratio in Photoshop


    Digital Photography School

  • 1,500 Kick Ass Photographers on Google+

    1,500"/

    Over the last three days I’ve posted three circles of 500 each of all of the photographers that I’m currently following on Google+. For the most part these are active, engaged photographes on Google+ and represent some of the people that you may want to get to know if you want to participate more in the Photo Community that has emerged on Google+.

    The Google+ Photography Community is the most active, engaged, positive group of photographers I’ve ever seen anywhere on the web. I’m constantly blown away and humbled by the quality of the work that people post there day in and day out. More than just the work, the photographers that I’ve met on there, that I’ve hung out with on there, that I’ve hung out in real life with on there (HIRL), are such amazing people that I’ve been so fortunate to have gotten to know.

    Alot of people ask me how they might get more involved with Google+. I’d say that you can start with checking out these folks and I think you’ll find most of them are pretty easy to get along with and interact with. You can check out these circles here:

    1,500 Kick Ass Photographers on Google+ (A-G, Part 1 of 3)
    1,500 Kick Ass Photographers on Google+ (G-O, Part 2 of 3)
    1,500 Kick Ass Photographers on Google+ (P-Z, Part 3 of 3)

    Thanks to each and every photographer that I’ve gotten to know at Google+!


    Thomas Hawk Digital Connection

  • Top 10 Places Where I Find Great Photographers On Google+

    Are You on Google+ Yet?  If So Please Post a Link to Your Google+ URL Here

    Earlier today I shared 1,500 kick ass photographers that I follow on G+ and that post got a lot of response. Ken Zuk posted a comment asking how I find the photographers to follow on Google Plus and what my criteria is for following other photographers. I started writing out a long comment as a response, but it felt more like a blog post so I thought I’d write one up here and then share it as a link response to Ken’s question.

    The Google+ Photography Community is absolutely the most active, engaged, positive group of photographers I’ve ever seen anywhere on the web. It is rich and vibrant and active and full of amazing art. Over the past 7 months or so I’ve added tons of great photographers who I get to enjoy work by every single day.

    So… where do I find these people?

    1.) Probably the number one place I find photographers from on Google+ is reshares. Usually when someone reshares a photo it’s a pretty high quality photo. When I see these (if i like the work) I’ll click through to the photographer who was shared and explore more of their work. If I like it and they meet my criteria (see below) I’ll start following them.

    2.) Comments — and not just comments on my photos. I’m frequently reading the comments on Google+ — on my photos, but even more on other people’s photos. If I see two active photographers who seem interesting and engaging and who are chatting with each other, I just might check them out. I like following active, engaged photographers and so if I like their stuff I’ll usually add them. Go Wolfpack.

    3.) Outside resources. Jarek Klimek’s Photo Extract is AWESOME! Each day he puts up some of the best photographs on Google+ in huge full sized glory. Definitely check out his site and you will be blown away by some of the quality of photos showing up on Google+. GROUP/AS is another fantastic resource to find tons and tons of photographers currently posting to Google+.

    4.) Contact diving. I love diving into other people’s contacts. Both who they are circling as well as who are circling them. It’s nice because if you click on that window it already shows you all the people you are already following. So if you are not following someone you can cmd-click on a link to their posting page and check them out to see if you like what they are doing.

    5.) #hashtags. There are a lot of special hashtags that people use on Google+. There are different themed photography projects that are curated — #TuesDecay, #MacroMonday, #WeAreParents, #GrassTuesday, the list goes on and on. Frequently I’ll click on these hashtags that Google+ hyperlinks and explore the work of other photographers there. If I like them, then I’ll add them.

    6.) Real life contacts. I’ve hosted hundreds of photowalks over the past decade. I’ve also participated in a number of group photography trips. Alot of times through photowalks and trips you end up getting to know people super well.

    Some of my best friends today have come through real life photography meetups. I met my good Pal Robert Scoble almost 10 years ago at a meetup that he hosted at Barney’s Burgers in Noe Valley in San Francisco. Other times though the photowalks are short and big and hard to get to know everyone — but I always do try to go back after these walks and trips and check out people’s work (again through hashtags). #Yosemite2011, #DV2011, #FordNAIAS, #SJPhoto2011, etc.

    I find alot of the people that I end up following through these walks/trips/walk tags/etc.

    7.) Hangouts. I’m pretty active with hangouts — both mine and other people. Hangouts are a great way to meet people and how I’ve gotten to know alot of people better. So many of my great photographer contacts have come from hanging out.

    8.) Popular Posts on Google+. It’s harder to find new talent here, but I’ll frequently check out the most popular posts on Google+ in the past hour over at SocialStatistics. Inevitably alot of the most popular posts are great photographs. I’m already following a lot of the people posted there, but every now and again I find someone new who I am not following yet.

    9.) Other people’s shared circles. I’m constantly checking out other people’s shared circles. Here is how I manage that process and do it most efficiently. Usually if I trust someone’s opinion I’ll add the entire circle that they shared — but… I *WON’T* mix it in with my other contacts — instead I just keep it labeled as “their” circle.

    After I’ve added their circle, I’ll browse through that stream and cherry pick people out of to integrate into *my* other circles that I like. I might do this for an hour. I might just let the circle set there for a week and get to it over time. After I feel like I’ve adequately examined the circle, I’ll just delete it. The best photographers I found in it I’ve integrated into my own and the rest of those who I’m not as crazy about from there get dropped.

    10.) Other social networks. I like to spread the good word about G+ so I’ll frequently post about it on other sites — on Flickr, on Twitter, on Facebook. The other day I posted on Flickr asking which of my flickr contacts were on Google+. Alot of people responded with links to their G+ page. When they did I went and checked them out on G+. If I liked their stuff I added them there too. :)

    So… as you can see I find people to follow on Google+ from a lot of different places.

    Now… as far the criteria for what I’m looking for when I follow someone on Google+

    1) Non-watermarker/signature photographers. I hate watermarks and signatures. They drive me bonkers. Nothing personal, it’s just a pet peeve of mine. My eye is drawn to the watermark almost every time. I can’t enjoy the photo. I get agitated. They usually look big and ugly and like something a low rent cheap hack wedding photographer would use. The bigger the signature/watermark the worse. Some people hide them so well that I don’t see them. I’m ok with that — but… if I see them…. GAWD! AWK!

    Unless I know you really well and am willing to overlook it because I’m in love with you, then I’m probably not going to follow someone that is using watermarks.

    2) Photographers who mostly post their own photographs. I want photographers in my circle who mostly post photos. It’s ok if they post other things sparingly — a post here or there about a photographic subject, a shared photo of someone else’s, a circle, a rant about whatever they had for breakfast (sparingly is the key here) — but… if a photographer is mostly posting what I consider noise (bad gifs, too much resharing of texty sort of articles, too much stupid stuff, etc.) then it’s hard for me to want to follow them — at least in my photographers circle. I may follow them in a different circle (like the stupid gif circle) that I never check, but I don’t really want super noisy people in my photographers circle.

    Again, there are exceptions to all of these rules if I love you enough.

    3) Photographers who are active. If the last time you posted a photograph on Google+ was last November, I probably am not following you. I want to see work by current, active photographers who post every week.

    4) Good photography. It sort of goes without saying, but I want to see work that is aesthetically pleasing to me — interesting, creative, inspiring work.

    5) Someone who is positive and not a hater/stalker/harasser/etc. Nothing turns me off more than seeing someone who tears apart others. I’m not just talking about my own work here. If I see someone say something awful to someone else, especially someone else that I respect, I’ll probably drop them. If it’s bad enough I might even block them. The online photosharing world unfortunately has a very small minority who are petty, jealous haters — fortunately for us on Google+ there is a very robust block tool which can keep them away from us most of the time. :)

    You can follow me on Google+ here.


    Thomas Hawk Digital Connection