Category: Uncategorized

  • Photo Talk Plus, Episode 9, With Special Guest Carlos Miller

    Lotus Carroll and I had a fantastic time interviewing Carlos Miller of the famed Photography is Not a Crime blog for Episode 9 of Photo Talk Plus. Interestingly enough Carlos had just been arrested 24 hours earlier for photographing an Occupy Miami protest. This was Carlos’ third arrest for his photography (he beat the rap on the first two). Carlos has championed photographers rights since starting his blog which covers all sorts of photographer rights issues online.

    In our interview with Carlos, he talks about the arrest and the fact that the police deleted his video footage of his arrest after arresting him. Unfortunately for the Miami PD, Carlos was able to retrieve the video footage that was deleted. (see below). In the recovered footage it clearly shows that there were other individuals filming the police activity and what appears to be Carlos’ being singled out for an arrest simply for participating in his Constitutionally protected 1st Amendment right to videotape the police.

    In addition to our interview with Carlos we talked about some of the top weekly photography related stories from Google+ include Joe Azure’s spectacular 15 minute photograph of the Golden Gate Bridge, Google+’s unofficial 100 million user number projected by Paul Allen, Billy Wilson’s most interactive people on Google+ Circle. and an update on Ivan Makarov’s Plus One Collection book.

    This episode’s panelists included Denise Ho from Google Photos, Eric James Leflar, Amy Heiden, Keith Barrett, and Peter Tsai.

    Thanks as always to our sponsors SmugMug and Drobo. Be sure to check them out at http://smugmug.com and http://drobo.com!

    Video of Carlos Miller’s arrest while covering an Occupy Miami protest


    Thomas Hawk Digital Connection

  • Q&A: Dealing with Glare from Dark Wood Backgrounds

    Reader Jefferson, from California in the US, asked via Twitter:

    "How do you deal with glare on dark wood in background for portraits? Is this covered in Lighting 101 or 102?"

    Actually, it is covered in L102, if a little obliquely. And yes, pretty much any time you light into dark wood as a background you are gonna get some blowback.

    But rather than look at this as a problem, I prefer to think of it as a feature… Read more »


    Strobist

  • Core Knowledge: Working With Remotes

    There are two things you should always remember about radio remotes:

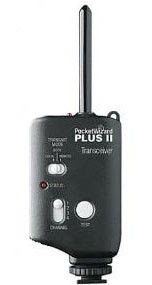
    One, radio can be fickle. This is true whether you are using your time-honored PocketWizards or a brand new Chinese offering.

    Two, radio waves — and success with your remotes — are all about the physics. So a little knowledge can go a long way toward ensuring good range and reliability.

    Some basics that every lighting photographer should know, inside. Read more »


    Strobist

  • 10 Minute Double Suction Cup Camera Mount for a Kayak Deck

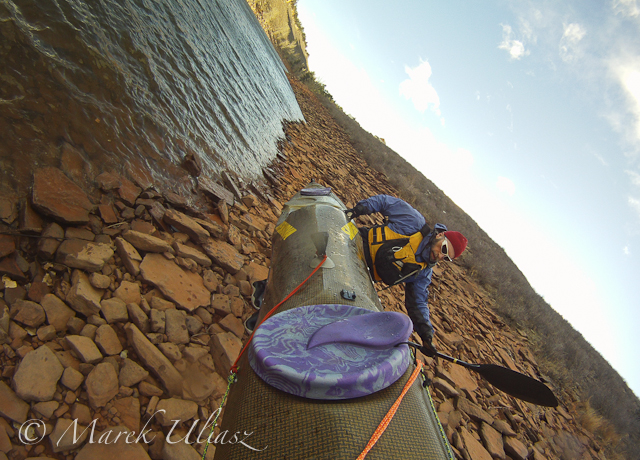
    I discussed applications of suction cups from Sticky Pod in numerous posts in this blog – mounting different cameras or GPS units on a kayak deck. A single suction cup works usually pretty good for small waterproof cameras like GoPro Hero or Pentax Optio. However, things are getting a little bit awkward if your kayak has a steep deck with a ridge in the middle. It is the case of JKK Supernova kayak where it is not so easy to level and center a camera on a front deck. I also wanted to set up the camera a little bit above the deck.

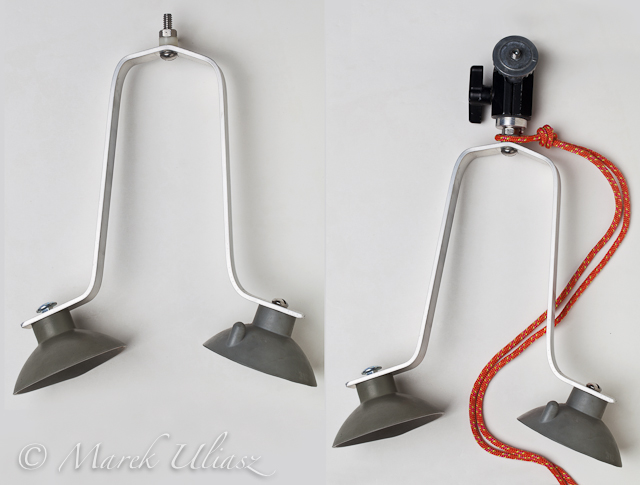
    The problem was solved with the two suction cup mount. I used the following basic ingredients:
    – two suction cups (you can order then directly from Sticky Pod or from Amazon.com, for about $ 3 each)
    – aluminum flat bar (1/8″ thick, 1″ wide) from your local hard store, the length depends on your design
    – three 3/8″ bolts, two 3/4″ long and one 1/2″ (or you may need some spacers) and one nut
    – a piece of some cord for a tether
    It took me about 10 minutes to cut the aluminum bar, drill 3 holes, smooth sharp edges and bend it to a shape.

    sticky-pad-mount-2x

    I added a small knuckle (ball head) to my mount. It provides easy way to control the camera position and is really useful for Pentax Optio or a similar camera. I needed a tripod mount adapter for the GoPro Hero. The knuckle is really not necessary in this case since a hinge allows for up and down camera adjustment, but it is still helpful. The picture shows the knuckle from Sticky Pod. I am also using a smaller and cheaper one made by Giotto.

    sticky-pad-mount-2x
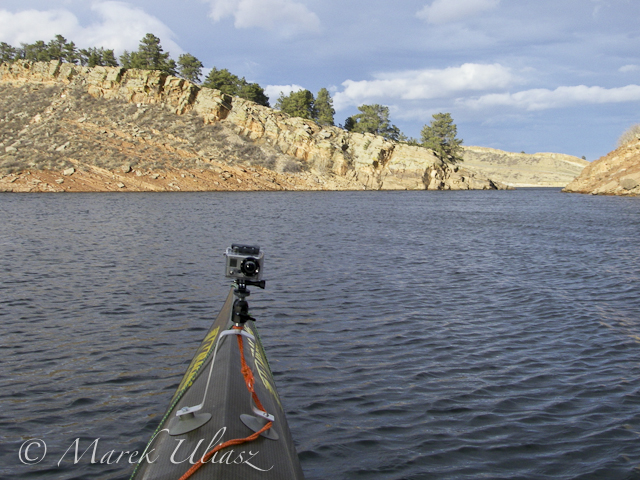
    Here is the GoPro Hero camera mounted on the front deck of JKK Supernova kayak (shot from a cockpit with Pentax Optio W30) and some pictures from a January paddling on the Horsetooth Reservoir. The mount worked fine in very windy conditions. The camera mounted about 12″ above the deck is less likely to be hit by water splashes from my paddle.

    DCIM100GOPRO
    DCIM100GOPRO

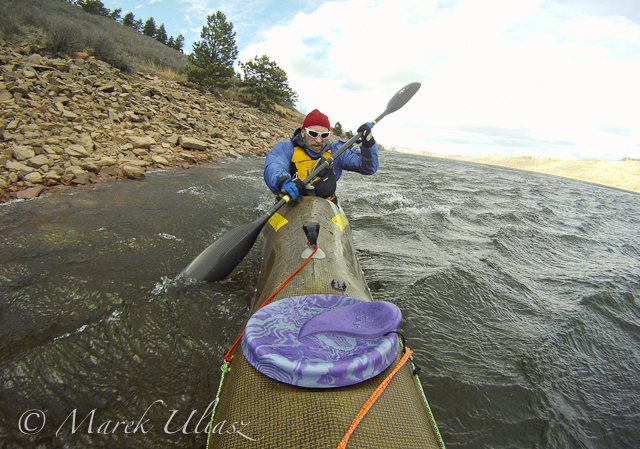
    During another paddling workout on the Horsetooth I set up the GoPro Hero a little closer to the cockpit, see picture examples here and here.


    ch_client = “mmuliasz”;
    ch_type = “mpu”;
    ch_width = 550;
    ch_height = 120;
    ch_color_title = “3c78a7”;
    ch_color_site_link = “3c78a7″;
    ch_non_contextual = 4;
    ch_vertical =”premium”;
    ch_sid = “Chitika Premium”;
    var ch_queries = new Array( );
    var ch_selected=Math.floor((Math.random()*ch_queries.length));
    if ( ch_selected < ch_queries.length ) { ch_query = ch_queries[ch_selected]; }

    Related posts:
    A Bird’s-Eye View of Kayaking with GoPro Hero Camera
    Kayak Video Camera Mast – Sticky Pod Combined with Monopod
    Paddling with Canon PowerShot G11 Camera on a Monopod Mast
    A New Shooting Angle – Camera Video Mast on Thunderbolt Kayak
    Sticky Pod Review – A Suction Cup Camera Mount for Kayak Photography
    South Platte River with GoPro Hero HD Camera and Thunderbolt Kayak
    A Simple Suction Cup Mount for Garmin Forerunner 305 GPS


    paddling with a camera

  • How To Shoot 360 Degree Panoramas While On The Road – With Audrey Scott And Daniel Noll Of Uncornered Market

    It’s worth your while to click on the image above to be taken to the full sized 360 view of the Shah-é-Chéragh Mosque taken by Audrey Scott and Daniel Noll of Uncornered Market.com. As DPS evolves, we’ll be adding in the ability to see these immersion style Shockwave files on the blog, but for now, take a look at this example before diving into this post.

    Daniel And Audrey have been creating these wonderful images for years. I’ve been a bit addicted to the far-flung locations they show and the amount of detail they can pack into a full spherical image (which looks fabulous in full screen mode). I recently contacted them to find out how they capture their images as I wanted to present my panoramas (not full 360) in the same manner. This post will explore how they capture what they do and will point you to some resources you can use to do the same.

    In an upcoming post, I will dive a bit deeper into a slightly different style I currently use to create similar images.  But for now, on to the Q & A!

    NOTE: I suggest subscribing to their blog as they post one of these images from around the world every week. Plus they have other great photography and travel stories on their site I think you will enjoy.

    1 ) Starting with the photo shoot, list for us the equipment you use to capture your scenes.

    Photo Shoot:

    • Camera body (e.g., Nikon D300)
    • Circular fisheye lens (e.g., Sigma 8mm f/3.5 EX DG Circular Fisheye Lens)
    • Monopod Velbon RUP-43 (optional, we carry one)
    • Panoramic tripod head (optional, we do not carry one)

     Post-processing:

    • Your favorite photo editing software (e.g., Photoshop)
    • Spherical panorama stitching software (e.g., Autopano Giga)
    • Spherical panorama tour software (e.g., Panotour Pro)

    2 ) You’ve captured hundreds of 360 panorama images while traveling almost full time. Can we get some technique tips that will help those learning the technique shorten their learning curve, please?

    For the purposes of this Q&A, we’ll assume you are shooting with an 8mm circular fisheye lens.

     The shots: You will shoot in RAW format at least five images in portrait orientation – four images each at 90-degree angles to one another (think around a single axis), then a fifth shot overhead to be sure you’ve captured the entire sky or ceiling. If you are not shooting with a lens at least as wide as 8mm, you may need to take more images to be sure you’ve covered everything from a 360-degree perspective.

    We take virtually all our panoramic photos without a monopod, tripod heads or other aids. After you’ve taken enough photos, you get a feel for properly aligning with the ground and horizon. An alignment trick: tie a string around a coin (or heavy item) and hang this from your lens so that you can be sure you are shooting at the same angle around the axis.

    Exposure and focus: To ensure a consistent exposure, be sure you are in fully manual mode. As a general rule (there are exceptions), you’ll want to expose for the sky. Also make certain your lens is set to infinity focus. (There are exceptions to the infinity rule if the bulk of your subject and surroundings are close up, say inside a bus for example.)

     Subject area: Having some people or objects in the foreground can be useful to provide action or perspective. Because you are working with an 8mm lens, objects in the distance (e.g., mountain ranges) will appear especially far away, so they may not be as engaging in a spherical panorama as they might appear to the naked eye.

     3 ) After you have the images, run us through your workflow (on a high level as this isn’t a complete tutorial).

    The workflow consists of two parts: 1) image stitching, and 2) creating the 360-degree tour.

     The stitch:

    • Be sure that software settings are properly set at spherical panorama.
    • Drop the five RAW images from the scene into a stitching software program in order to detect the control point (overlaps) between images.
    • Examine the draft stitch. Adjust variables such as roll, pitch and yaw in order to correct for distortion and camera body angle.
    • Render the stitched photos into a panorama. The output will be a flat .jpg file.
    • Post-process the resulting .jpg file in your favorite photo editing software to tune exposure, contrast, saturation, etc.
    • Use pixel clone/stamp to fill in the black/empty area at the bottom of the image.

    Creating the tour:

    • Take the post-processed flat panorama .jpg and drop the file into a 360-degree panorama “tour” software. We use Panotour Pro to create the flash-based tours you see on our website.
    • Set your preferences, including logo/watermarks and button/user interface options (e.g., full screen) you’d like available on your tour.
    • Render the flash tour. The resulting output will be a .swf file that you can upload to your website or blog’s media manager. More information on this Panotour wiki on how to format. WordPress users can also use PanoPress.

    4 ) Which step is the hardest to master in this entire sequence?

    Equally, subject selection and the actual shooting process. Not only are you concentrating to ensure that the photographs are properly exposed and aligned, but you must pay attention to people/cars/animals/etc. coming in and out of view. These can be wonderful in terms of showing action, but if they move too quickly, they may create “ghosts” (where heads, feet or body segments are missing) in the resulting stitched image.

    5 ) Have you found any resources particularly useful while learning to create these shots?

    We first became involved in 360-degree panoramas thanks to 360cities.net. The site has a tutorial for people getting started in panoramic photography, it offers inspiration in its collections, and it features the ability to host and serve panoramas.

    6) What particular challenges have you had to face while creating these images while still on the road?

    We have one camera body to shoot photos for panoramic photography (with our 8mm Sigma lens) and two-dimensional photos. Often, we’ll be in the midst of a scene that is wonderful for both types of shots, but we have to make a quick decision to shoot one over the other if the scene is quickly evolving. Many of our best panoramas have also been shot in less-than-ideal physical conditions including dust, snow, heat, moisture, so we have to continually mind the camera sensor as we swap out lenses.

    7 ) Including shooting and editing time, how long would you say it takes you to produce one solid 360?

    If all goes perfectly, the process can take as little as 20 minutes: 5 minutes for the shoot, 10 minutes for rendering/photo editing, and 5 minutes to create & test the stitched 360-degree panorama and .swf file tour.

    8 ) For beginners who love to travel, which three areas of the world would you suggest as havens for producing 360 panoramas?

    1) India – so much color, activity, wonderful markets and temples. Good for interiors and exteriors.

    2) Andean South America – surreal landscapes (e.g., Salar de Uyuni salt flats in Bolivia), mountains, active indigenous markets

    3) Middle East and Central Asia – for Islamic art interiors, bustling spice markets.

    4 Favorite panoramas:

    a) Disco Ball Mosque, Iran (awesome interior)

    b) Petra By Night, Jordan (night, possibly our most popular panorama)

    c) Udaipur Market (market action)

    d) Crossing Thorong La Pass, Annapurna Circuit, Nepal (landscape)

    Bonus Panorama in time for Valentine’s Day: Petronas Towers Fun (panoramic trickery)

    Bio:

    Daniel Noll and Audrey Scott are the husband-and-wife storytelling and photography team behind the around-the-world travel blog, Uncornered Market. More than five years and 70 countries later, they are still exploring the world, still taking panoramic photos…and still married. You can follow along with their adventures via Twitter, Facebook, Google + and by subscribing to their blog.

    Post originally from: Digital Photography Tips.

    Check out our more Photography Tips at Photography Tips for Beginners, Portrait Photography Tips and Wedding Photography Tips.

    How To Shoot 360 Degree Panoramas While On The Road – With Audrey Scott And Daniel Noll Of Uncornered Market


    Digital Photography School

  • I Love New York

    I

    I thought today would be a good day to post a photo of New York City. I took this photo in the dead of winter while it was raining/snowing in Central Park.

    Tonight’s Episode of Photo Talk Plus with my cohost Lotus Carroll will include five New Yorkers talking about photography — our special guest, New York Professional Photographer Daniel Krieger, along with our New Yorker panelists Alan Shapiro Leanne Staples Vivienne Gucwa (this is her first public hangout) and Google’s Titus Winters.

    The New York G+ Photo Crew have hosted many photowalks there in NYC now and promise to give us some great tips about shooting in one of the most urban environments in the United States. Don’t miss this great episode tonight at 8PM PST right here in my G+ stream and on Keith Barrett’s Vidcast Network at http://vidcastnetwork.com at 8PM PST.


    Thomas Hawk Digital Connection

  • The Incomplete List of the Top 20 +1ers Who Share the Love on Google+

    Yesterday Louis Gray shared an interesting post based on a discussion kicked off by Thomas Morrfew and Thomas Tenkely. The post showed how to find out how many +1s you’ve handed out on Google+. I reshared the post here. So did my good Pal Robert Scoble here.

    I thought it would be interesting to go around to the various posts and put together a list of the top 20 people who +1 on Google+. This list is wildly inaccurate in that it only includes the people who responded to these posts, but I thought it would be an interesting list of folks nonetheless.

    I love +1ing on G+. It’s like handing out little pieces of candy for everything that I like. Some people have asked for a list of their +1s. Personally I hope that if Google gives us this list that they give us the option of making it public or private. I don’t like my favorites on flickr being stalked by people and would prefer to keep my +1s private.

    Anyways, that’s neither here nor there, but here are the top 20 +1ers that I was able to sort of sort together based on these posts. Thanks to everyone who +1′s on Google+ and shares the love!

    1. Kev Isabeth, 112,161

    2. Dirk Talamasca, 98,240

    3. Mark Esguerra, 61,072

    4. Kerry Murphy, 56215

    5. Billy Wilson, 51,602

    6. Lotus Carroll, 46,196

    7. Chelsea Leland, 44,823

    8. Sandra Parlow, 40,541

    9. Daniel Chen, 36,000

    10. Louis Gray, 33,000

    11. Rachel Blum, 33,000

    12. Jaana Nyström, 32,239

    13. Kol Tregaskes, 30,592

    14. Jenn Kirkland, 25439

    15. Lars Clausen, 25,251

    16. Turtle Qiu, 24,270

    17. Cameron Siguenza, 24,198

    18. Celine Chamberlin, 23,184

    19. Brian Kemper, 20,650

    20. Mihailo Radi?evi?, 20.000

    You can find out how many +1′s you’ve handed out by going and checking here. Lots of other interesting Google analytical information here too. I’ve done 45,802! Whew!


    Thomas Hawk Digital Connection

  • Former Flickr Staffer Blasts Yahoo/Flickr Over Yesterday’s Layoffs

    Twitter was a buzz yesterday with tweets from current and former Flickr staffers regarding a round of layoffs that took place at the popular photo sharing site yesterday. One of the most upset seemed to be former Flickr engineer Nolan Caudill who wrote a scathing post calling Yahoo/Flickr out over the firings.

    “Flickr lost several good people today. If you had me name the top 10 Flickr employees that loved the site the most, half of them got handed pink slips today,” wrote Caudill. “Yahoo made a major mistake today and there’s no other way to interpret it. I’m mad and this is my soapbox.”

    Equally troubling, Caudill seems to indicate that the layoffs were merely a symptom of a larger problem of Yahoo suits being out of touch with what is one of their most beloved properties by users. “Flickr-the-site will be fine but Flickr-the-culture took a huge hit today and those suits in Sunnyvale balancing some column or doing their thousandth “re-org” are completely to blame. I bet they don’t even know what they’ve done and that’s probably the worst part of the whole thing,” Caudill continued.

    It’s interesting that layoffs at Flickr would be one of the first moves made by Yahoo’s new CEO Scott Thompson. I wrote an open letter to Thompson shortly after his appointment as CEO suggesting that Flickr represented one of Yahoo’s best chances for success with social. Flickr has been losing unique visitors (according to compete.com) over the past 6 months as competitors like Google+, Smugmug, Instagram, 500px and even Facebook continue to pull some of the best users away from the site — by the way, facebook is currently in the process of redesigning their photos page (it looks an awful lot like they are copying Google Photos here) and employees have been reaching out to popular photographers, promoting them on their new suggested user list, etc.

    After flubbing a new product release (some sort of unusual chat with other users while you doodle on photos thing) that Flickr killed four months after launch, you have to wonder if laying off what are perceived as some of their best Flickr employees really makes the most sense as Flickr Chief Markus Spiering tries to push forward with the promised innovation that he blogged about earlier this month. On the other hand, sometimes in order to effect significant change you need to clear house. Sometimes a culture needs to be broken before it can be rebuilt and maybe this is partly what this is about as well. Perhaps this is more of a rebuilding to allow Flickr to clear the deck so to speak to build something better and stronger.

    Still, if Flickr is planning on coming up with something better, it had better move quickly. It seems like post after post on Google+ these days are about how much users LOVE Google+ for photos/community and how many photographers are not renewing their paid Flickr Pro subscriptions due to a superior community culture at Google.

    It is telling to me that newly appointed CEO Scott Thompson still does not appear to have even bothered to set up a Flickr account. By not having a Flickr account Thompson is publicly showing how little regard he has for the popular Yahoo property. It takes 2 minutes to tell an administrative assistant to set up a PR oriented public account and post a few old vacation photos on it.

    That Thompson can not even be bothered to do that much makes me wonder not only what sort of message this sends to the day to day employees working on Flickr, but if Caudill might just in fact be right about the suits down in Sunnyvale having no possible clue about what they even have with Flickr. Former Yahoo CEO Carol Bartz never could be bothered to set up a Flickr account either.

    By contrast, Google cofounder Sergey Brin is not only sharing his photos on Google+, he even showed up for a hangout that I was on with popular photographer Trey Ratcliff last week to personally talk live about some of his photos and his favorite photos by others. I’m surprised that a billionaire founder of one of the most successful tech companies of all time seems to have to the time to publicly support the photo sharing aspects of his product while the new CEO of Yahoo can’t be bothered.

    Update: More comments here.

    Ex-Yahoo Jaisen Mathai writes an open letter to flickrenos laid off asking them to consider working on his Open Photo project.

    Update #2: BetaBeat’s coverage. Thread on Flickr Central. Graphic made by Flickr employee identifying some of those laid off. Andy Baio suggests Flickr management was blindsided by these layoffs.


    Thomas Hawk Digital Connection

  • Flickr Raises and Lowers the Cost of a Pro Account

    Flickr mucked around with the pricing on their Pro accounts today. The one year option stays the same price at $ 24.95. They reduced the 2 year option by $ 1.50 per year from $ 47.95 to $ 44.95 and they raised the price of a year of Pro $ 2.85 per year for those wanting to pay quarterly to $ 6.95 per quarter ($ 27.80 per year).

    They also announced said that going forward your account would be set up on auto-renewal.

    I did think the blog post on the pricing change was a little misleading where it says “We’re also dropping the price of a 2 year subscription to $ 44.95 (a savings of $ 10.95 off the 3 months at a time price).” This makes it sound like Flickr reduced their 2 year account by $ 11 when in fact they really reduced it by $ 3 from their previous pricing but now compare it with the more expensive quarterly payment option — but I guess that’s marketingspeak for you.

    As far as the cost of a Pro account, it is still a screaming good deal for a photographer like me. Where else could I store 67,000+ full high res photos online for $ 22.48/year (I do the 2 year option)? Plus I’m participating in the Flickr/Getty stock photography deal that paid me over $ 500 last month so really it’s like Flickr is paying me, not like I’m paying them.

    For many photographers though I think Flickr Pro is looking like a worse and worse deal. Google+ will host an unlimited number of photos for you for free now. Flickr’s free account only will let you access your 200 most recent photos and even worse if you don’t reup for a Pro account they hold the rest of your photos hostage on their site until you do renew.

    I don’t think today’s pricing really is much of an announcement at all — and I think you’ll continue to see causal photographers letting their Pro accounts at Flickr lapse while they move to other cheaper alternatives like Google+. I also think that the higher end of the photography market is also increasingly moving away to sites like Smugmug (disclosure, they are a sponsor for our Photo Talk Plus show) which are more geared as high end galleries to actually sell your photos. Flickr doesn’t allow you to sell your photos on the site yourself.

    Are you on Flickr? And if so will you renew your Pro account when it comes due? And if you do what option would you choose as far as paying for it?


    Thomas Hawk Digital Connection

  • Download and Test Lightroom 4 for Free

    Over the last week, with the launch of our brand new Guide to Post Processing eBook, there’s been a lot of discussion around dPS around post processing – particularly about software and tools.

    One of the common threads of conversation that I’ve been hearing is around the expense of some of the better post processing software tools and a hesitancy to spend so much on a tool when one doesn’t know if it suits you.

    I can relate to that feeling. I still remember the first time I looked at Photoshop and considered purchasing it but balked at the price. It seemed a big risk to invest in something that I wasn’t completely sure would suit my needs.

    Things have progressed a lot since those days – now many software tools give you trials before you buy. One of the exciting trials currently on offer is the ability to test the brand new beta of Lightroom 4.

    201201301527.jpg

    Lightroom has been a product that many photographers of all levels have adopted as their preferred option and it has evolved in its first 3 versions into a very useful tool. It’s how I manage and edit my own images and I’m pumped to see them releasing Lightroom 4 soon.

    In the lead up to the full launch Adobe are allowing everyone to download and trial Lightroom 4 for free. Download it today and you get to use it until the trial ends on March 31 2012. That’s over 2 months of free use of one of the most popular post processing tools on the planet! More than enough time to see if it’s right for you and the perfect time to take your post processing stills up a notch with our new Post Processing Guide.

    So what are you waiting for? Download the free beta of Lightroom 4 today and tell us what you think!

    Update: Worth noting are the system requirements for using Lightroom 4 beta:

    The minimum system requirements for Lightroom 4 beta are as follows:

    Windows
    Intel® Pentium® 4 or AMD Athlon® 64 processor
    Microsoft® Windows Vista® with Service Pack 2 or Windows 7 with Service Pack 1
    2GB of RAM
    1GB of available hard-disk space
    1024×768 display
    DVD-ROM drive
    Internet connection required for Internet-based services*

    Mac OS
    Multicore Intel processor with 64-bit support
    Mac OS X v10.6.8 or v10.7
    2GB of RAM
    1GB of available hard-disk space
    1024×768 display
    DVD-ROM drive
    Internet connection required for Internet-based services*

    Post originally from: Digital Photography Tips.

    Check out our more Photography Tips at Photography Tips for Beginners, Portrait Photography Tips and Wedding Photography Tips.

    Download and Test Lightroom 4 for Free


    Digital Photography School