Category: Photography

  • Where Does a Former National Geographic Photographer and Current Yahoo Exec in Charge of Flickr Share His Photos? Yep, You Guessed it Google+

    Late last week over at All Things Digital, Kara Swisher reported on the appointment of the latest high profile Yahoo exec, Adam Cahan. In addition to reporting directly into Marissa Mayer and overseeing mobile for Yahoo (super important!) it was also announced that Cahan would be put in charge of Flickr, the photo sharing site that so many of us love.

    On the surface this is great news. The fact that the guy who is now overseeing Flickr reports directly into Mayer may mean that Flickr’s profile is moving up internally at Yahoo. After a few years of Flickr layoffs and shrinking, it looks like Yahoo once again is staffing up in photo sharing!

    In addition to staffing up, over the past year Yahoo has probably improved Flickr more than any other year in its existence. They’ve added a really nice new justified page layout for your contact’s photos and favorites (hopefully coming to search, photostreams and sets soon!), they added a new meet up page where they are getting active with photowalks again (check out this shot from their Austin photowalk this past weekend), they created a new liquid photo format that expands photos to the size of your monitor (slick!), they also increased the maximum size for photos for paid accounts to 50MB! (Facebook and Google+ downsize your photos).

    So my question is, why with so much excitement going on around Flickr, why don’t Yahoo employees use or care more about the service?

    A lesser known thing about Adam Cahan, the new Yahoo exec in charge of Flickr, is that according to the San Jose business Journal he’s a former National Geographic wildlife photographer. So here’s the guy who is in charge of Flickr, definitely talented with a camera, and where is he choosing to share *his* photographs? Yep, you guessed it Google+! Here’s a photo he posted earlier this year there for the 75th Anniversary of the Golden Gate Bridge.

    Of course, Cahan is just following by example really here, his boss Marissa Mayer chooses to post her own photos over at Instagram instead of Flickr.

    Why is Flickr such a pariah that Yahoo’s own executives (even the one directly in charge of Flickr) won’t dare to use it personally?

    Certainly Google and Facebook employees share their photos on Google+ and Facebook. So why aren’t Yahoo executives doing the same thing?

    I believe that leadership is done by example. I also believe that every company should encourage dogfooding and should encourage their employees to use their own products. I think this sends a better message to users when you feel like people who work for the company use it too.

    The message that Mayer and Cahen send when they shun Flickr and instead post their photos on competing photo sharing sites is that those sites are better than Flickr. The exact message that they should be trying to change if they really care about Flickr.

    Now I’m all for Yahoo executives testing out the competition. Actually I think that’s smart. They *should* have accounts on Instagram and Google+ and Facebook and all that — but they should *also* have accounts at Flickr and they should be acting as Flickr’s biggest cheerleaders in the same way that Vic Gundotra does for Google+ over there.

    There is a current conversation going on over at Flickr in their highest profile discussion group that Flickr is dying. Yahoo should care about discussions like this. Yahoo employees should actually be involved in them and trying to convince people that Flickr is not dying, that a comeback is just around the corner — but in order to be involved in conversations like this Yahoo employees need to actually, you know, have an actual Flickr account.

    It’s not hard, really, you can even use your Facebook or Google+ account to sign into Flickr these days. Directly from the Flickr sign up page: “It takes less than a minute to create your free account & start sharing! Have a Google or Facebook account? You can use them to sign in!”

    Flickr’s tagline is “almost certainly the best online photo management and sharing application in the world.” That’s been it’s tagline for years now. So if this is true, why don’t Yahoo execs want to use it to manage and share their photos? If that tagline isn’t true anymore maybe Yahoo execs should think about changing it to “almost certainly *was* the best online photo management and sharing application in the world.”

    I was thinking yesterday back to all the excitement that was around Flickr back in the olden days. Natural disasters tend to be things that galvanize social sharing, and especially photos. Back in 2005 when Katrina hit, Flickr was the go to place for people to post photos online about the disaster. Not only were the best user generated photos flowing into Flickr, they were flowing in fast and furious. Flickr was recognized for the Katrina photos in the national press. A group was started on Flickr to do a print auction to raise funds for Katrina survivors. The very next year Time Magazine named Flickr co-Founders Stewart Butterfield and Caterina Fake as two of the 100 most influential people in the world! Butterfield and Fake both had Flickr accounts by the way.

    More recently hurricane Sandy hit New York. Was Flickr the go to place this time for photos? No. Everywhere you went in the national press it was 24/7 Instagram. It’s telling that Time Magazine — the very same Time Magazine that recognized Flickr and their founders/managers after Hurricane Katrina — recruited five professional photographers this time around to cover hurricane Sandy for them on… Instagram, the same photo sharing site where Yahoo CEO Marissa Mayer shares her photos.

    By the way, photos taken after Oct 15th tagged Sandy on Flickr? 36,000. Photos tagged Sandy on Instagram? Over 800,000. Now just today Instagram announced photos on the web.

    On a personal level, my photos at Facebook and Google+ get far more views and engagement than they do on Flickr — not just a little more, a lot more — as in hundreds of times more. I’m still rooting for Flickr though. They were the photo sharing service that I started out with back in 2004. They still have the best photo organizational tools on the web and at $ 25 for over 70,000 full high res photos of mine they are a bargain. Competition in the photo sharing space is good for all of us. It benefits the user. I just wish I felt like Yahoo actually wanted to win more with Flickr. Maybe this will change though and some day soon I’ll be able to add Mayer and Cahan as contacts of mine on Flickr. I bet as a former National Geographic pro Cahan has got some great shots. :)

    Comments on this post at Google+.


    Thomas Hawk Digital Connection

  • Speedliter’s Handbook – A Book Review

    Syl Arena, Man with colourful hair and workshop leading extroidinaire has a couple of books, the one I’m telling you about today is “Speedliter’s Handbook” which is a book about how to light using the Canon speedlight system. You can find out more about Syl via his website, PixSylated.com

    Speedliter’s Handbook: Learning to Craft Light with Canon Speedlites

    The first thing that struck me about Syl’s book was how easy it was to understand – I am still learning how to light with strobes etc, I love to dabble and experiment, but after a little sit down and a cup of coffee later, I had cleared up seriously about twenty questions I had in my head!

    The Speedliter’s Handbook isn’t really a book you would sit and read cover to cover, it’s more a ‘pick a bit and go through it, and through it again’ What I did was made a list of five things I wanted to know more about, then used the book to research them. The book has something for everyone, and whilst it is about the Canon Speedlight, there’s absolutely no reason why someone with any other type of flash shouldn’t pick it up and check it out – there’s something about everything in there.

    From how to get our of ‘the green box – auto mode’ to using various modifiers, positioning of the light source, how to choose the right sized umbrella to ganging flashes… There is SO much in this book.

    Syl talks about how he’s a photographer and not a photoshop artist, so the book looks like the work of a photographer, rather than a digital artist which I found very refreshing – you don’t open the book and see these crazy polished images straight outta CS6, you see real photographs – whilst there’s nothing wrong with those crazy polished images, for me, the content of Syl’s book doesn’t scare me away from the outset… Despite Syl’s 40 years as a photographer, it gave me the feeling that I could achieve what he was teaching – bravo.

    For those of you that prefer Android to iPhone (wait, did I say that out loud?) there’s a section on modding your light rather than just using what it came with. Syl shows what can be done when using a veritable myriad of random attachments to shape the light into what you want, and a great quote by the ‘Original Strobist’ David Hobby… “You have to ask yourself which you have more of; Time or Money. If you have more money than time, buy it, if you have more time than money, do it yourself.”

    I’m not going to go through this book and tell you something about every single chapter (of which there are 25, over about 375 pages) The book has great visual explainations and simple tips that anyone (yep, even me!) can understand.

    If you’re just starting out, start at the beginning, if you’re a master in your own lunchbox, pick a chapter – there’s something for everyone in this book…

    As a Canon Speedlight user, this would be the best (if I paid for it, as it was provided gratis for this review) $ 25 I’d spent on learning to light. Eleven stars!

    Post originally from: Digital Photography Tips.

    Check out our more Photography Tips at Photography Tips for Beginners, Portrait Photography Tips and Wedding Photography Tips.

    Speedliter’s Handbook – A Book Review


    Digital Photography School

  • Self-Taught via Self-Portrait: How to Turn the Lens on Yourself

    Editor's Note: Need a willing victim for photos? Today, Sara Lando wraps up her series on portraiture, with an idea-filled look at how to turn the lens on the most available subject there is: yourself.

    Also, be sure to check out the link to Sara's latest project at the end of the post. Read more »


    Strobist

  • Catching The Action: Photographing Youth Sports

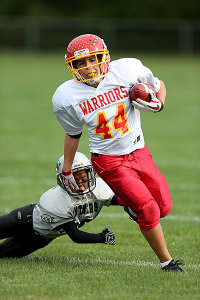
    The action is almost always more dramatic when it is coming towards the photographer.

     One of the most popular subjects people photograph is their children.  Everyone is always showing off photos of their little ones.  And when those little ones grow bigger, we photograph their activities. One of the more challenging children’s activities to photograph is youth sports.

    With a few exceptions, sports tend to take place on large fields, where a photographer will have limited ability to get close to his subject. Couple that fact with a lack of control over lighting, and sports of any level can be a challenge to photograph.

    The biggest issue most beginners seem to have with sports is stopping action.  Motion blur, caused by using too slow a shutter speed, frustrates many new sports photographers.  The bottom line here is very simple: a minimum shutter speed of 1/500 is needed to freeze action.  The longer the lens, the faster the shutter speed needs to be.  So while 1/500 is the minimum, if your focal length is 600mm, you will need a shutter speed of at least 1/640. Faster is better.

    Using a faster shutter speed ensures stopping the motion of the ball as it hits the bat.

    The next issue to contend with is the backgrounds.  Youth sporting events take place in parks, at schools, or in other places where the background is less than pleasing.  It could be a parking lot, a building, or you may just have  a lot of spectators in the background that can cause your subject to get lost in the mess. Photographers have two options here.  The first is to move to an area where the backgrounds are cleaner.  Since that may not be an option, the second becomes much more important.  Shoot your images at the widest aperture possible with the lens you are using.

    Pro sports photographers typically use wide aperture lenses with apertures of f/2.8 and f/4 for a variety of reasons.  One reason is because they allow  more light into the camera, thus allowing for faster shutter speeds. The second reason is that a wide aperture creates a shallow depth of field- meaning while your subject will be sharp, the background will be nicely blurred, eliminating distractions.

    Lens choice is another important part of the equation when shooting sports.  Not everyone will have access to a 400mm f/2.8 lens, but great sports shots can be captured with a variety of lenses- not just the big telephotos.  A 70-300mm zoom lens, which is typically one of the more popular telephoto lenses available, makes a great choice for shooting you sports.  While not as fast as a lens with an f/2.8 aperture, as long as the light is good enough to get a fast shutter speed, these lenses do just fine.  The 300mm focal length will get you enough reach to get closer to the action, but remember to stay disciplined.  Let the action come to you. Shooting across the field will simply result in lots of pictures where the athletes don’t fill the frame, and the dramatic impact is greatly diminished.  For on-field action, typically a lens with a focal length of at least 300mm will be needed. Most pros use anything from 300mm f/2.8 up to a 600mm f/4.

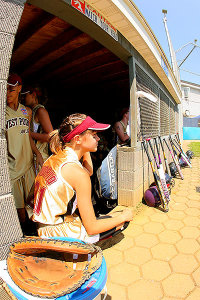
    A wide angle lens is useful for situations where you want to show the complete context of where the athlete is. In this case, a fisheye lens shows the entire dugout as well as the player sitting on the steps.

    Most people don’t think of wide angle lenses as good sports lenses, but there are several times where a wide angle can be the perfect lens.  Generally, wide angles work well when the photographer can be close to the athletes, be it for a team huddle on the sidelines, a post-game handshake, or a portrait taken on the bench with spectators in the background.   For those who can get access and don’t mind putting their gear at risk, a soccer or hockey “net cam” is a great use for a wide angle lens.  When pros do this they use a protective housing for the camera. It is NOT recommended that a photographer mount their camera in a goal without being protected.  The effort can be worth it.  Some of the most dramatic soccer and hockey photos come from cameras mounted in the goal with a wide angle lens.

    When shooting action on the field, working with the available light becomes incredibly important.  Most of these outdoor games take place in midday sun, which is often harsh.  Add in helmets, hats, or other headgear which can cast shadows over faces, and you’ve got a lighting nightmare. With sports such as football or baseball, with hats and helmets on the athletes,  use of exposure compensation can be helpful in opening up the shadows on faces.  A setting of +1/3 or +2/3 is a good starting point.  For later afternoon or early morning games, shooting backlit can add a bit of drama to the lighting, with the sunlight creating a nice rim light on the athletes.  Exposure compensation can help open up the shadows again to maintain detail in the faces.

    For indoor sports, the use of flash can be problematic.  Always be sure the use of flash is permitted, first and foremost.  In many sports, such as gymnastics, use of flash is strictly forbidden.  If the available light allows, it’s best to try to shoot without flash. This is where today’s extreme high ISOs and the outstanding noise performance of today’s DSLR’s is especially handy. Photographers often find themselves in school gyms with ISOs set to 3200, 6400, or higher.  Fast lenses with apertures of f/2.8 or larger are also useful in these situations. The same rule for stopping action applies, using a shutter speed of at least 1/500 or faster.


    Sideline portraits can sometimes be more impactful that the action on the field. Don't be afraid to turn away from the action and photograph the intensity on the sidelines.

    Athletes tend to move quickly, so you’ll want to make sure your autofocus is set to Servo or Continuous (dependent on what brand of camera you use). This allows the camera to refocus as the athlete moves towards or away from the camera.  Setting the drive to continuous will also allow the camera to take multiple photos by holding down the shutter button, ensuring that peak action is captured.

    Today’s cameras offer a variety of AF arrays, from 9 or 11 AF points on entry level models, all the way up to 61 AF points on high end models.  Generally speaking, it is easiest to select one AF point and keep it on your subject, though some cameras are especially good at using all available AF points to track a moving subject. Photographers should experiment and practice to find which settings work best for them.

    Sports offer a variety of photo opportunities aside from the action on the field.  The sidelines are great for shots of players interacting with each other, coaches instructing players, and sideline portraits.  With all the ups and downs of competition, the emotion on the sidelines makes a great subject all by itself.  Don’t be afraid to turn away from the action during the moments to catch the emotion in the bench area.

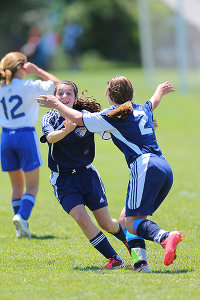
    Jubilation shots can be some of the most rewarding and sought after shots. It takes discipline to remember to continue shooting even after the play has ended.

    In addition, the pomp and circumstance that goes with many youth sporting events also make for great photo ops.  Watch for the halftime performances of cheerleaders and bands at various school sports.  The more devoted “fans” in the stands also make for great opportunities.

    Telephoto lenses with wide apertures blur the background nicely, eliminating anything unsightly or distracting in the background.

    Knowing where to stand is one of the most important parts of sports photography.  Each sport is different and the games have their own flow of action.  Photographers want to be where the action is going, not where it has been.  Each sport generally offers a ton of options as far as where a photographer can stand.

    Personal knowledge of the sport, as well as the teams being photographed is especially helpful.  Photographic knowledge is only half of the battle when shooting sports.  When a photographer knows a team’s tendencies, and even individual athlete’s tendencies, he can anticipate the play, as well as reactions and get something special from it.   Shooting the same team repeatedly makes this easier.  The added bonus is that the team also gets to know the photographer, making them more comfortable and willing to be open in front of the camera, in much the same way people open up to their friends.


    Post originally from: Digital Photography Tips.

    Check out our more Photography Tips at Photography Tips for Beginners, Portrait Photography Tips and Wedding Photography Tips.

    Catching The Action: Photographing Youth Sports


    Digital Photography School

  • What Makes You A Professional Photographer?

    Seattle's Pike Place Market | Seattle, Washington | James Brandon Photography

    There are quite a few hot photography debates floating around the internet. Whether it’s HDR, watermarks, Nikon vs. Canon, Mac vs. PC, straight out of the camera vs. post processing; there’s certainly no shortage. One of the newer ones I’ve seen pop up recently is this big fuss over what makes a photographer a professional. This is a debate that I feel truly does have a black and white answer and shouldn’t be a debate at all. So let me explain and then let’s see if you agree…

    When In Doubt, Use A Dictionary

    First things first, let’s get the definition of professional and amateur and settle this debate real quick, then I’ll expound on it a bit.

    professional

    adjective

    1 [ attrib. ] of, relating to, or connected with a profession: young professional people | the professional schools of Yale and Harvard.

    2 (of a person) engaged in a specified activity as one’s main paid occupation rather than as a pastime: a professional boxer.

    amateur

    noun

    1 a person who engages in a pursuit, esp. a sport, on an unpaid basis.

    2 engaging or engaged in without payment; nonprofessional: an amateur archaeologist | amateur athletics.

    Ok, thanks for reading!

    Hehe, just kidding. But that really does settle this whole debate right? A professional photographer is someone who’s paid occupation is photography. An amateur is someone who engages in photography without payment just for the love it. So what’s wrong with that?

    Nobody Wants To Be An Amateur

    Well, almost nobody. I’ve found that most amateurs who have never been professionals want to be professionals. But many professionals miss being amateurs and the purity that came with it. When you get money and clients involved, the purity of creating art seems to get tainted to some extent, especially when you’re creating images to suit your clients needs instead of clients hiring you for your creativity and giving you freedom over the images. See the difference there? Being a professional has nothing to do with quality of work. There are amateurs that are better photographers than I am. There are amateurs that are better photographers than you are.

    There are professional photographers out there who:

    • Have been making a living for 30 years with their grip-n-grin, hand under your chin, head slightly tilted, perma-smile, muslin backdrop in a studio type images.
    • Shoot weddings and charge $ 800 for 6 hours in JPG mode and burn the images straight out of camera to a disk, yet they make good money because they are so cheap and shoot so many weddings.
    • Run travel photography workshops around the world with a litany of sponsors and followers. Yet their images are plagued with halos and over saturation. Good marketing can take anyone a long way.

    On the flip side, there are amateurs who:

    • Take far better images than most professionals, but just do photography for the love of it.
    • Have full time jobs and make enough money from their photography to buy new gear regularly.
    • Have full time jobs yet are more connected and intertwined in the photography community than a lot of professionals.
    • Make great money through photography but still work somewhere else to have steady income, health care, pensions, etc.
    • Take and create award winning photographs worthy of any gallery.
    • Make more money part time than some professionals make full time.

    So why is being an amazing and unbelievably talented photographer not enough? Why do we also want to be considered a professional when our work shines above (what we feel is) the rest? I think it’s just the general disconnect around the two words and the secondary meanings that they have formed over recent years. I mean, think about this:

    A teenager who goes out and races his car at a drag strip every single weekend, who lives and breathes racing, who works on his car every day after school, isn’t considered a professional. It’s his hobby, even though it takes up a very large portion of his every day life. Yet a NASCAR driver who hasn’t won a race in three years is still considered a professional race car driver. Why? Because that’s what he does for a living and he earns a paycheck for it!

    My wife loves to cook. She’s a foodie to the core. She can take just about any recipe she sees on the Food Network and recreate it and make it her own. It’s amazing. But she isn’t a professional chef is she? Yet the guy that works at the burger joint up the street and runs the kitchen is considered a (professional) chef because that’s his living and his main source of income.

    So why is photography any different? I really don’t understand…

    Conclusion

    Well, in this case, the conclusion is really up to you. Do you agree? Disagree? Voice your opinion in the comments below and let me know what you think. Or hit me up on twitter (@jamesdbrandon) and let me know there.  Be sure to use the hashtag #DPSdebate


    Post originally from: Digital Photography Tips.

    Check out our more Photography Tips at Photography Tips for Beginners, Portrait Photography Tips and Wedding Photography Tips.

    What Makes You A Professional Photographer?


    Digital Photography School

  • Practical White Balance and Why You Should Learn It!

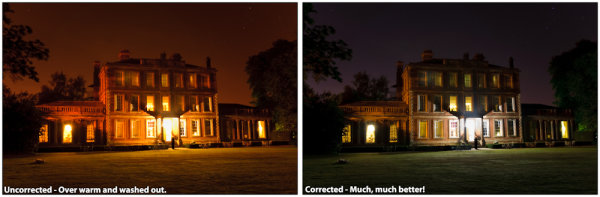
    Why are Oranges … Orange ?

    White balance can be a tricky subject to master and as a beginner I found both the concept and application difficult. Getting to grips with white balance was a landmark in my early learning, gone were the days of funky looking indoor shots and chilly looking portraits, from then on the world of warm sunsets and natural skin tones lay at my feet. It’s amazing how different an image can look with and without white balance correction applied and consequently the impact on your images can be profound. The basics of white balance adjustment are relatively simple, what takes more time is training your eye to know when you’ve got it right. In doing this you will not only improve the quality of your images but will also save a whole load of time. Here to help you is a basic run down of practical white balance.

    What is White Balance?

    Despite what we see the actual colour of light is hugely variable. The fact that we generally don’t perceive these shifts in daylight colour is testament to the incredible job the human eye and brain does in adjusting how we see. Our cameras on the other hand are at best dumb instruments and need to be told what colour the light we are shooting is. Ever take a shot of a landscape, but was disappointed to find that the final scene looked orange? Ever used some fill flash for a portrait only to discover the subject to has a blue cast? All of these problems can be fixed using good white balance correction.

    Who is this Kelvin Dude?

    The colour (sometimes called the ‘temperature’) of light is measured using the ‘Kelvin Scale’. The scale itself was discovered using clever physics experiments, which looked at the wavelengths of light produced by heating black objects to different temperatures. Its definitely useful to know that there is a scale for measuring white balance but all you really need to remember is that the lower numbers equal warmer or redder light with higher the numbers relating to cooler or blue light. Importantly you shouldn’t worry about remembering any of this, its useful knowledge to have but to date I have never needed to know the exact white balance setting of my camera so I doubt you will do either.

    See the difference?

    In Camera White Balance

    The exact method for setting white balance varies from camera to camera but generally the fastest way to do this is by using one of the standard preset values. Simply dial in the white balance correction and hey presto your camera is instantly seeing in a different colour light.

    You can pretty much set any specific white balance value you like however in the vast majority of situations the presets are more than adequate. Given that you can fix pretty much anything in post processing why bother doing anything in camera at all? You might be tempted to place your trust in your cameras ‘Auto White Balance’ feature and whilst its tempting, the applied white balance can shift noticeably from shot to shot and wont necessarily get it 100% right either. Imagine having to adjust the white balance on your whole set of holiday snaps, not great.

    So now you’re convinced, here to help you is a run down of the major presets and when to use them:

    • Auto White Balance – Basically handing over the white balance correction to the computer in your camera.  In the main pretty good but is set each shot so can change from picture to picture.  Good to use if you are in a hurry.
    • Daylight – A nice mid temperature setting for use in normal daylight.  
    • Cloudy/Indoors – For use in slightly cooler conditions (e.g. an overcast day), has the effect of warming the image up just a bit.
    • Shade – For coller light than the cloudy setting (e.g. dusk or early mornings), warms up the image much more than either daylight or cloudy.  Can also be good for adding extra warmth to normal conditions.
    • Incandescent – Great for indoor shots under artificial lights (e.g. from non flourescent bulbs which can be very warm).  Cools down the image.
    • Fluorescent – For use under strip light conditions, will warm up the image to compensate for the cold and slightly green light produced by these sources.
    • Flash – Warms up light from flash guns which is cool but more blue than flourescent light.

    Post Processing

    The ability to accurately apply white balance correction is one the major advantages of shooting in RAW format. If you don’t know about or don’t shoot in RAW format, don’t worry you can still make adjustments to other image types albeit not with quite as much flexibility.

    For RAW images you have the option to either select one of the available preset values (which will be the same as those available in your camera) or if you wish make a manual adjustment.

    Manual White Balance Adjustments

    Learning to manually adjust white balance is a great skill to practice as it’s probably the best way to train your eye to recognize the ‘right’ white balance value. The actual adjustment is fairly simple and uses only two controls (although the method for adjusting these will vary according to your post processing software):

    • Temperature – How warm or cold the image is, think of this as adding orange or blue to the shot.
    • Tint – Basically how much green or pink is in the image.

    Here is a three step recommendation for manually adjusting white balance. Don’t forget you can select a preset value first and then ‘fine tune’ the result manually afterwards.

    1. Adjust the temperature of the shot, ask yourself is the image too warm or too cold and increase/decrease the temperature value accordingly.
    2. Adjust the image tint, does it look took green or too pink? Look for objects in the image to help you judge this. Good references are skin tones which can either look a bit flush or green round the gills if not corrected properly.
    3. Compare the before and after image (most software will let you turn the white balance correction on and off). Repeat if necessary.

    Don’t forget there is no such thing as a right or wrong white balance, if the shot looks how you want it to then that’s good enough.

    Generally white balance corrections can also be applied in batches so if you find a setting which works well and all the shots have been taken in the same light using the same settings you can save a lot of time by applying corrections in bulk.

    Conclusion

    No matter how you do it, making sure you pay attention and manage the final white balance of your shots is an incredibly powerful way to improve the feel and look of your photos. So much of the mood and drama of a photo is conveyed through the colour and quality of light captured and therefore taking those extra few moments to get it right is well worth the trouble. Despite what you may have been told you, getting this right either in camera or postproduction needn’t be a trauma. Hopefully the few hints and tips in this post should point you in the right direction and could make the difference between your next shot leaving you red faced or feeling blue.

    Post originally from: Digital Photography Tips.

    Check out our more Photography Tips at Photography Tips for Beginners, Portrait Photography Tips and Wedding Photography Tips.

    Practical White Balance and Why You Should Learn It!


    Digital Photography School

  • North Atlantic Monolith

    Since the release of the James Cameron blockbuster film Titanic, photographers, tourists, and adventurers have been migrating to the eastern coast of Canada in a quest to view and photograph icebergs. Most all will return home never having seen one of these icy monoliths and that is a shame; with a minimum amount of research it is possible to fill hard drives with pictures rather than pockets with postcards.

    Newfoundland and Labrador, Canada’s easternmost province, continues to be the most easily accessible location in the world to photograph icebergs. Yet, the birth and journey of a North-Atlantic iceberg began approximately 12,000 – 3000 years earlier along the western coast of Greenland, and its 100 or so glaciers.

    As the glacier reaches its terminus along the shores of the West Greenland Sea, the continual scrubbing and scouring of waves and tidal action will break off huge slabs of the glacier in a process known as calving and ultimately result with the birth of an iceberg. From the major glaciers between the Jakobshavn and Humbolt ice fields it is estimated that upwards of 30,000 icebergs will be calved annually, yet slightly less than 500 icebergs will eventually reach the Grand Banks off eastern Newfoundland. It is also important to understand that nearly all of the icebergs that reach the Atlantic Ocean will have been calved along the west coast of Greenland and generally follow the same briny route.

    Once the newborn iceberg settles into the West Greenland Current it will be edged westward toward Baffin Bay, south through the Davis Strait and into the open waters of the Labrador Sea. The counter-clockwise estuarine circulation of the frigid Labrador Sea will push the southward bound iceberg past Baffin Island and along the shores of mainland Labrador until it eventually reaches the St. Anthony area and the northern coast of Newfoundland. It is somewhat ironic that the incubation of an iceberg has taken a minimum of 3000 years, the journey south to Newfoundland about three years, and its death mere months—if not weeks—once it journeys south of 48 degrees north latitude.

    Each degree of latitude translates to 60 nautical miles, and by reviewing the iceberg activity chart available from Environment Canada a little more closely, we will see that St. John’s, Newfoundland’s capital city, lies at about 47° 40’ (or 20 miles south of the 48th parallel). Therefore we can ascertain that our search for bergs should traverse no further south than this self-proclaimed oldest city in North America. Should we continue studying the chart we will notice that St. Anthony lies approximately four degrees further to the north, or about 240 nautical miles. Although this distance might appear at first glance to be quite insignificant, it is a huge leap in improving the likelihood of iceberg sightings.

    While I consider St. Anthony to be the best location to photograph icebergs it does require some effort to get there. The village of Twillingate, on the other hand, can be equally as profitable and unquestionably the most easily accessible. Located slightly more than a one-hour drive north of the central Newfoundland town of Gander, the village has several tour boat operators who specialize in iceberg watching. Twillingate is a small fishing town with several hotels and unique Bed & Breakfast accommodations whose proprietors are quite familiar and responsive to a photographer’s (unusual) requirements. In addition, Gander is the home of an international airport with connecting flights to a wide variety of air carriers, and the usual deluge of car rental companies. Consequently it is possible to be in contact with a tour boat operator in Twillingate one day and be there making photographs the next from anywhere in North America.

    Like most things in life, given the opportunity to rehearse and practice we should eventually get the task done properly. However, icebergs don’t offer many opportunities—relatively speaking—and for many photographers it is a one-shot deal. Therefore it would be prudent to study the photographs of icebergs that appeal to us to learn what the quality of that particular image is. The act of making the picture should then be an exercise of learned skill and not mere luck.

    Think of an iceberg as a building. Should you photograph that building and its vertical rise in the generally preferred light of early morning and late afternoon the image will be somewhat ‘flat’ due to the lack of shadows rendered from frontal lighting. Conversely, if you were to re-photograph the same scene between mid-morning and mid-afternoon when the sun was higher in the sky, shadows should be thrown across the building façade and thereby create textural detail. The iceberg is no different, and this same approach will render an image with the desired blueness and textural crispness that sends the message of coldness and purity that brings oooh’s and aaah’s at any AV show.

    Do your research and by having the necessary flexibility to get north when the icebergs are moving through, you too should have that euphoric experience of seeing and successfully photographing your first iceberg.

    URL Resources:

    Marine charts: http://ice-glaces.ec.gc.ca

    Satellite imagery: http://www.icebergfinder.com

    Post originally from: Digital Photography Tips.

    Check out our more Photography Tips at Photography Tips for Beginners, Portrait Photography Tips and Wedding Photography Tips.

    North Atlantic Monolith


    Digital Photography School

  • Vote For Your Favourites – Halloween Photo Contest !

    Today starts the voting stage for our Halloween Photo Contest! We won’t boast hundreds of submissions. Actually there were not so many – but that has a bright side – it will be easier for you to decide on the winner 🙂 So choose the one that you consider to be the coolest and give your vote at the end Continue Reading
    Photodoto

  • Nikon Coolpix P7700 Review

    There is certainly room for a easily pocketable, high-specced, magnesium alloy bodied compact digicam as represented by the Coolpix P7700, which succeeds the P7100 model.

    P7700 front34ron

    The lens is an f2.0 Nikkor, with a 35 SLR equivalent of 28-200mm.

    The 7.5cm LCD screen is a vari-angle that swings 180 degrees laterally and vertically, making it an ideal finder for movie shooting, with the camera held at waist level.

    P7700 LCD6

    P7700 SLupfrt34r

    P7700 back2

    Maximum still image size is 4000×3000 pixels, or 34x25cm as a print.

    Movies at 1920×1080 pixels can be shot in MPEG4.

    Nikon Coolpix P7700 Features

    I immediately liked the rubberised speed grip on the camera, then quickly fell into sync with it simply by looking at the top deck: at left is a small dial and central button that takes you into image quality settings, ISO figure, white balance, auto bracketting, My Menu and picture control.

    Fence 4.JPG

    At right of the top deck is the main mode dial, offering entrée to auto shooting, PASM, movie record, CSM (custom movie settings), scene modes (portrait, sports, beach etc), effects (mono, cross processing, soften, etc), U1 to U3 (user settings).

    Further right is the zoom lever and shutter button, plus the exposure compensation dial, Function 2 button and power on/off. The Function 1 button is located on the camera’s front.

    As I said, I fell easily into sync because I could simply look at the latter set of controls and assess exactly where the camera was, settings-wise. Just like a film camera!

    The camera’s rear is reasonably full with more controls: surrounding the four way rotating selector dial as well as buttons for replay, erase, menu, AE/AF lock and display options.

    Unusually, there is no movie record button: you set the mode dial to movie, then press the shutter button. Makes sense to me! But of course, this means you can’t captures stills while recording video.

    Usefully, there is a virtual horizon display for both vertical and horizontal photography.

    Nikon Coolpix P7700 ISO Tests

    Nikon P7700 ISO 80.JPG

    Nikon P7700 ISO 400.jpg

    Nikon P7700 ISO 800.JPG

    Nikon P7700 ISO 1600.JPG

    Nikon P7700 ISO 3200.JPG

    Nikon P7700 ISO 6400 equiv.JPG

    The camera performed surprisingly well, right up to ISO 3200, with a loss of definition noticeable in the latter. By ISO 6400 equivalent the noise and definition loss were far too high.

    Nikon Coolpix P7700 Startup Time

    One to two seconds after startup I could shoot my first shot; subsequent shots came in at 1-2 seconds apart.

    Distortion

    I was surprised to find there was a noticeable amount of barrel and pincushion distortion at the wide and tele ends of the zoom range, respectively.

    Tree 1.JPG

    Wine glasses.JPG

    Nikon Coolpix P7700 Verdict

    Quality: above average, with natural colour noticeable.

    Why you would buy it: enjoyable, external photo controls; light too.

    Why you wouldn’t: nothing to report.

    I found out one novel feature when dealing with the P7700 in the early minutes of reviewership: if the LCD screen is closed, screen inwards, the camera will not start up. I guess it’s to avoid accidental battery drain. Nice touch!

    For me, this is one of the more desirable compacts on the market, with many useful features. It would particularly suit the more experienced photographer but, in contrast, could easily be deployed as the family snapshot camera.

    Nikon Coolpix P7700 Specifications

    Image Sensor: 12.2 million effective pixels.
    Metering: Matrix, centre-weighted and spot.
    Sensor: 15mm CMOS.
    Lens: f2-4/6.0-42.8mm (28-200mm as 35 SLR equivalent).
    Exposure Modes: Auto, Program AE, shutter and aperture priority, manual.
    Shutter Speed: 60 to 1/4000 second.
    Continuous Speed: 3, 8fps.
    Memory: SD/SDHC/SDXC cards plus 86MB internal memory.
    Image Sizes (pixels): 4000×3000 to 640×480. Movies: 1920×1080, 1280×720, 640×480 at 30fps.
    Viewfinder: 7.5cm LCD (921,000 pixels).
    File Formats: JPEG, NRW (RAW), MPO (3D), WAV, MPEG4
    ISO Sensitivity: Auto, 80 to 6400.
    Interface: USB 3.0, AV, HDMI mini, DC input, external stereo mic, accessory terminal.
    Power: Rechargeable lithium ion battery, AC adaptor.
    Dimensions: 118.5×72.5×50.4 WHDmm.
    Weight: 392 g (inc battery and SD card).
    Price: Get a price on the Nikon Coolpix P7700 at Amazon.

    Post originally from: Digital Photography Tips.

    Check out our more Photography Tips at Photography Tips for Beginners, Portrait Photography Tips and Wedding Photography Tips.

    Nikon Coolpix P7700 Review


    Digital Photography School

  • My Favorite Gear: Weekly Photography Challenge

    Kodak Brownie Starlet, 1957 - my first cameraThis week your photographic challenge is a little different to normal – we’d like you to photograph your favourite piece of photographic gear and to share a few words on why you like it.

    In some ways it is a little less of a ‘photographic technique’ challenge and more an opportunity to see the gear that the dPS community loves the most (and photographing products is a good challenge too).

    Feel free to share a photo of your camera, a lens, a lighting accessory, a camera bag or any other photographic gear or accessory that you can’t envisage your photography without. It could be new or old gear, you can shoot it in any situation (including with you in the shot as a self portrait) – it is totally up to you!

    Once you’ve taken and selected the ‘favourite gear’ image that you’d like to share – upload it to your favourite photo sharing site or blog and either share a link to it or – embed them in the comments using our embed tool to do so.

    If you tag your photos on Flickr, Instagram, Twitter or other sites with Tagging tag them as #DPSGEARILOVE to help others find them. Linking back to this page might also help others know what you’re doing so that they can share in the fun.

    Also – don’t forget to check out some of the great shots posted in last weeks challenge – Incomplete challenge where there were some great shots submitted.

    Post originally from: Digital Photography Tips.

    Check out our more Photography Tips at Photography Tips for Beginners, Portrait Photography Tips and Wedding Photography Tips.

    My Favorite Gear: Weekly Photography Challenge


    Digital Photography School