Category: Photography

  • Sparrowhawk by Kurien Koshy Yohannan

    A Wildlife photographer learns something new every day – be it about the behaviour of the subjects one photographs or the technique one uses to capture that unique image.

    Wildlife photography, for most part, involves investing a large amount of time and energy – both on and off the field – in studying about the subject you want to photograph, identifying the best habitats to photograph your subject in and then waiting and waiting and waiting…

    But then again, once in a while, your subject may just present itself right in front of you when you least expect it. A case in point is this Sparrowhawk that I managed to photograph the other day. There was a thunderstorm brewing and I was standing in my living room looking up into the sky hoping to capture a lightning bolt. I had the Canon 70-200mm lens mounted on my Canon 50D and was expectantly waiting for a lightning bolt to strike when, out of the blue, I see a bird of prey land on a fence right in front of me. At first I was not sure of what species the bird was except that it was a bird of prey. It was only after I locked focus on it did I realise that it was a Sparrowhawk. A good friend of mine, and photography buddy, had told me that there was a Sparrowhawk in the area and I’d kept an eye out for it but never managed to spot it and here it was sitting right in front of me, when I least expected it. I fired off a few shots, one of which can be seen below:

    Sparrowhawk1

    © Kurien Koshy Yohannan

    She looked like she was not going anywhere and so I took a calculated chance of changing my lens to the Sigma 50-500mm to try to capture a few close up images (as can be seen below). I could not have asked for a more willing subject.

    The one thing I have learnt in my very short time as a Wildlife photographer, and from this particular incident, is the fact that one’s got to be ready to capture a shot at any time. When an opportunity presents itself, one’s got to try to grasp it tight with both hands.

    Links:

    Website: www.igallopfree.com
    Facebook: http://facebook.com/BlackStallionPhotography


    dslrBlog

  • Why You Might Want To Consider A Full Frame Fisheye Lens Even If You Have A Crop Sensor Camera

    There are few things better in life than having something go wrong that leads to the discovery of something even better.

    Such is the case with my plan to test out a Canon 8-15mm fisheye lens courtesy of BorrowLenses.com. My intent with the lens was to take it with me to the wilds of Arches and Canyonlands National Parks in Utah for some crazy, circular images. The problem is I lack a full frame Canon camera, but would be traveling with Michael Riffle, who owns a Canon 5D Mark III. He accepted the challenge to test the lens, being familiar with fisheyes himself.

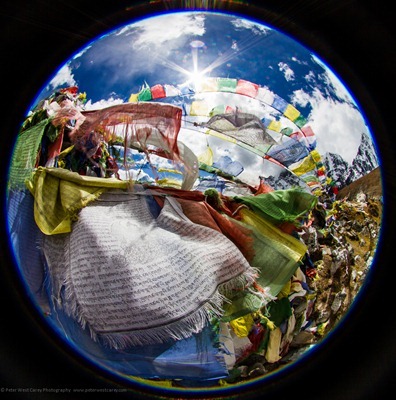
    One thing led to another and we never got around to testing the lens on his camera. Instead, I often found myself using the lens on my Canon 7D, a crop sensor camera. The Canon 8-15mm is intended to fit a full frame sensor and produce, at 8mm, a fully circular image, much like this example from a Sigma 4.5mm on a crop sensor camera.

    PeterWestCarey-Nepal2011-1008-9891

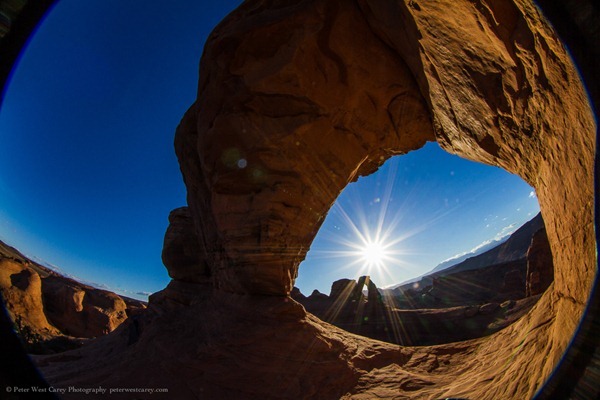
    What happened instead was a cross between this full circle and a more traditional 15mm on a crop sensor. The 8-15mm lens will show edges of the circle when below 10mm but will otherwise fully cover the sensor from 10mm-15mm. A major difference from a non-fisheye lens, though, is the curving in the image.

    For instance, here are two shots, both taken at 10mm. The difference: the first lens is a non-fisheye Canon EF 10-22mm lens and the second is the Canon 8-15mm fisheye.

    PeterWestCarey-Utah2012-1021-7193

    PeterWestCarey-Utah2012-1021-7187

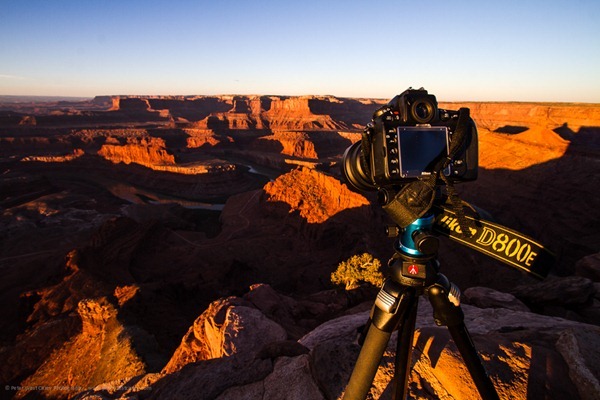
    Both shots are taken from nearly the same perspective (the fisheye is taken from the position of the Nikon D800E in the first image) but the fisheye gives a different feel. I only made slight clarity and level adjustments in the photos and did not crop them, so this is what you can expect at 10mm.

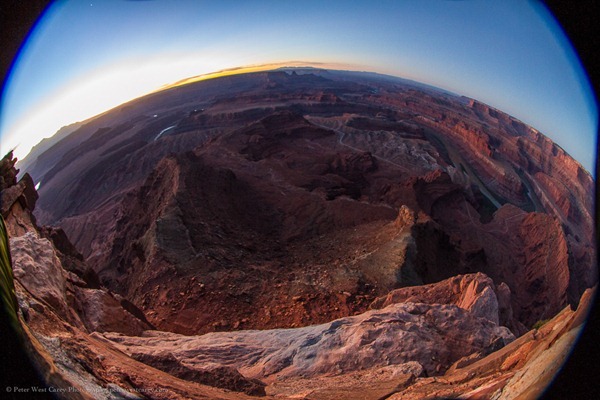
    Below 10mm the black edge of the area outside the fisheye is seen. How bad is it? It depends.

    At first it annoyed me to have the incomplete image. Neither full fisheye nor filled frame. Like this:

    Peter-West-Carey-Utah2012-1021-7155

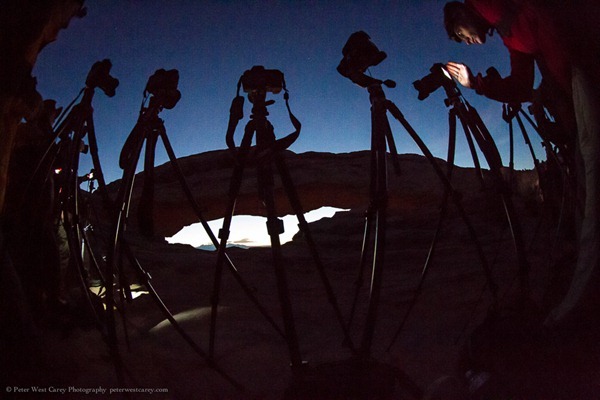
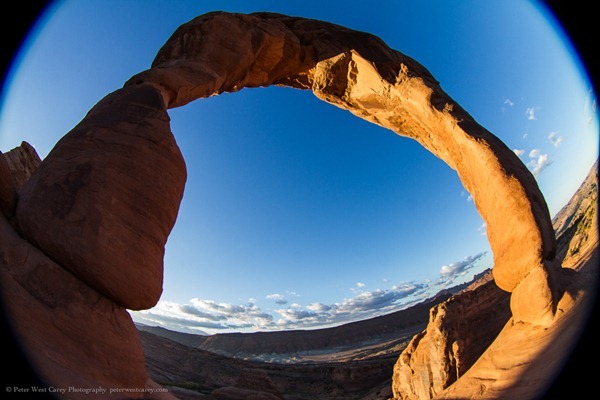
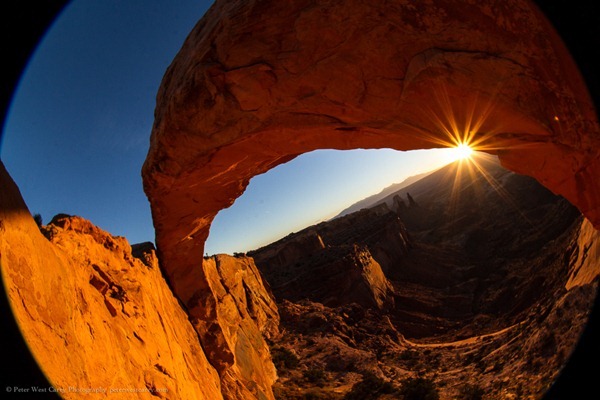
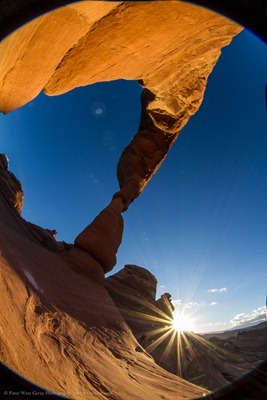
    But then I started finding instances where it worked well. The arches found in these parks lent themselves naturally to the form factor. The more I experimented, the more I enjoyed the effect.

    I realize not everyone will like this look. By the time you read this, there might be a dozen notes in the comment section below stating how horrible it is. But this is photography and it is art, so it doesn’t really matter what I like or the commenters like. It matters what you like.

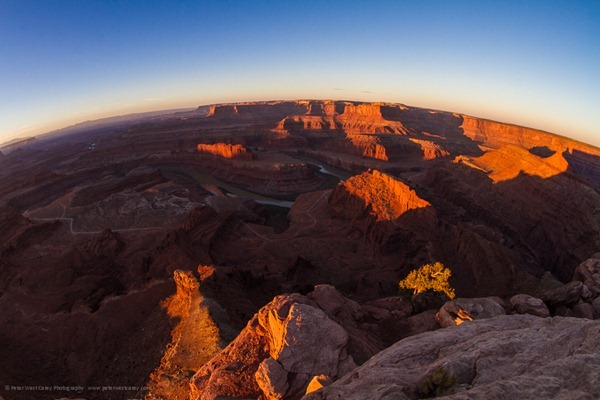
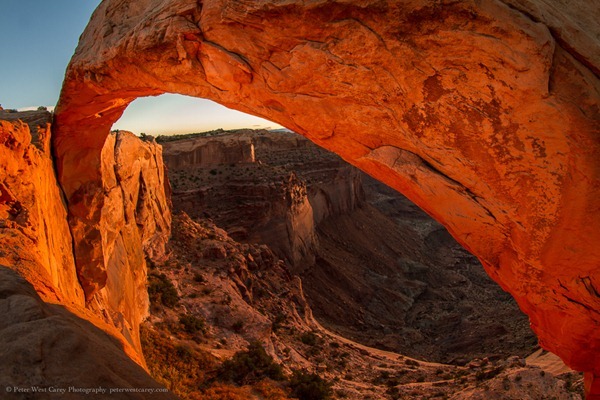
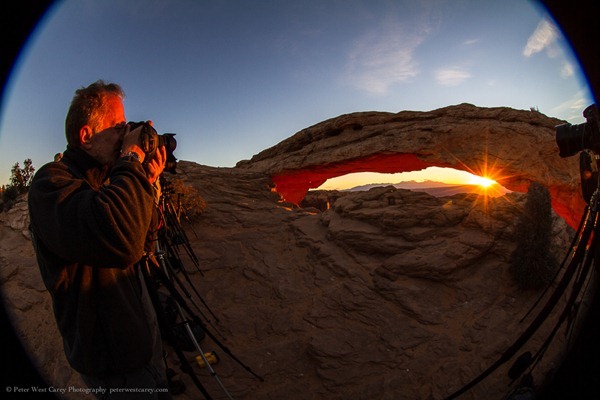
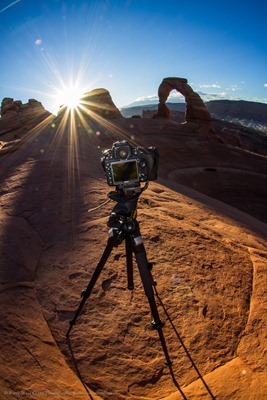
    Below are more examples from my short trip. If they intrigue you to give the lens a try, all the better. Some have the corners blacked out and some are zoomed in slightly. Experiment, play, have fun.

    (Click on an image for a 1000px version)

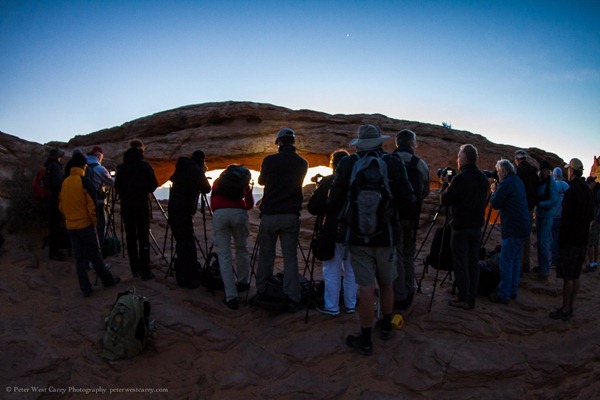
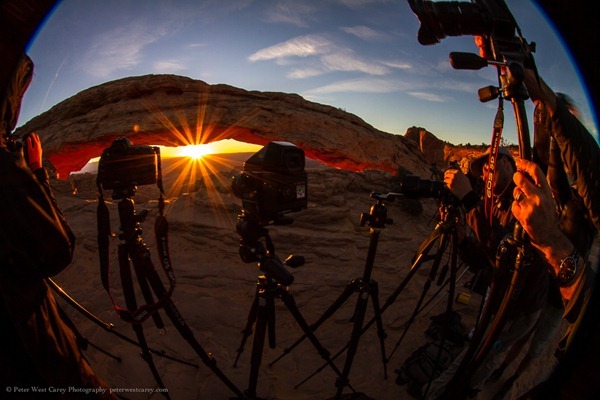
    The first set of images are from Mesa Arch in Canyonlands NP at sunrise which was packed with 20 or more photographers. The second set is from Delicate Arch in Arches NP at sunrise with absolutely no one else around.

    Peter-West-Carey-Utah2012-1022-7348

    Peter-West-Carey-Utah2012-1022-7392

    Peter-West-Carey-Utah2012-1022-7445

    Peter-West-Carey-Utah2012-1022-7451

    Peter-West-Carey-Utah2012-1022-7456

    Peter-West-Carey-Utah2012-1022-7500

    Peter-West-Carey-Utah2012-1023-7955

    Peter-West-Carey-Utah2012-1023-7961

    Peter-West-Carey-Utah2012-1023-8001

    Peter-West-Carey-Utah2012-1023-8010

    A special thank you to BorrowLenses.com for giving me the chance to play with the lens.

    Post originally from: Digital Photography Tips.

    Check out our more Photography Tips at Photography Tips for Beginners, Portrait Photography Tips and Wedding Photography Tips.

    Why You Might Want To Consider A Full Frame Fisheye Lens Even If You Have A Crop Sensor Camera


    Digital Photography School

  • One Light Portraits: Simple Elegance

    In this case, a reflector was used at camera left, but a neutral colored wall would work just as well. The flash bounces off the reflector, the rear wall picks up some light, and the ceiling picks up some more, illuminating the top of the hair.

    Everyone who ever picks up a camera at one point or another finds themselves pointing it at another person.  But unless you walk around with a lighting kit in your back pocket, you have to make do with what you have.  If you’re lucky that means you have a speedlite in your bag.  If not, there are other ways to light your subjects and get a pleasing portrait.

    Let’s start with the best case scenario- you have a speedlite on your camera with a swivel head. This gives you the flexibility of TTL exposure, as well as the ability to bounce the flash and avoid the ugliness of direct flash.  Bouncing flash simply means that the flash head is aimed at a surface and the light is reflected back onto your subject.  This softens the light coming from the flash head, and makes it a much more pleasing light source.  The ability to bounce the flash is huge, because a variety of looks can be achieved simply by repositioning the flash head and the surface the light is bouncing off of.  Walls and ceilings are generally pretty easy to bounce off of, but something smaller, such as a reflector, or a piece of white oak tag will work equally well.  The important thing about the surface being used for bouncing is that the color be neutral, such as white or gray.

    Positioning the subject in a corner of the room will allow you to use one light to create multiple light sources.  The flash can be aimed at the wall to the side, and angled up to the ceiling to provide a hair light. In addition, the wall being used as the background will provide some back lighting. This will create soft shadows on the unlit side of your subject. It’s important to be sure your subject’s face is turned towards the bouncing surface so they are properly illuminated by the light.

    Placing a reflector at waist level and bouncing the flash into the ceiling creates a soft glamor lighting effect. It’s actually a double bounce: once off the ceiling, and then off the reflector.

    Another variation on this setup that works well for women and creates a glamor lighting look, is to place a reflector at your subject’s waist.  Bounce the flash directly off the ceiling and have the reflector kick light back up into the subject’s face.

    Postioning the softbox to camera left created a soft light that flattered Mary’s facial structure. I positioned her in the shade of a tree, so the flash was sure to be the main light on her, while the background was lit by sunlight.

    The next step with a flash is to get it off camera.  All of the major SLR makers offer some sort of wireless flash control. Again, a bare flash tends to not be the best light source. Flash in general is a harsh, unflattering light source.  To soften the light, a modifier is needed.

    There are all kinds of modifiers available on the market.  Softboxes are great for portraits because the light is softened, directional, and there is no spill. Umbrellas are great for softening and directing the light, but you get more spill, meaning it’s harder to control what the light does and does not hit.  The basic rule of thumb is, the larger the light source, the softer the light.  So a larger soft box will nicely soften the light and wrap it around your subject, creating soft shadows as well.

    The important thing when lighting with a softbox is that the light must hit the mask of the face, either from the softbox or via a reflector. If the face is in shadow, or if features of the face cast unflattering shadows, the portrait is going to be unsuccessful. Generally, positioning the light slightly above and off to the side of the subject will produce the best light.

    A softbox positioned behind and to the side of the subject, while a reflector is positioned directly opposite to create a two-light effect.

    If you happen to be outdoors, the available daylight works wonders for filling the background as you mix available light with flash.  Position your subject in shade, and light them with a flash and modifier of choice, such as a softbox.  Allow the available light to fill the background, and even create a hairlight.  Indoors, you can create dramatic low-key lighting using one light in a softbox.  Add a reflector, and now you have a two light setup.  The softbox as the main light can be used as a rim light or hair light, and position the reflector so that it bounces light back into your subject’s face.  You’re simply playing angles here, so watch where the light hits and bounce it back to your subject’s face.

    This portrait was made using a household lamp with a 75 watt bulb, with a sheer curtain to soften the light. It’s important when using a household lamp to adjust your white balance properly, as the bulbs can range in color from more greenish to yellow.

    Now, what if you’re caught without a flash? Simple. Any light source will do.  With today’s DSLRs, higher ISO’s mean greater flexibility in terms of light.  A simple household lamp with a shade can even be a good portrait light.  The important thing again is to watch how the light is falling on your subject.  You may need to manipulate the lamp’s position, or the subject’s position in relation to the lamp.  If the shade dims the light too much, remove the shade, and find another way to modify the light.  It could be as simple as rigging a sheer curtain in front of the lamp to create a scrim.

    A single softbox will create more dramatic lighting. In this case, a large, 50 inch softbox was used creating a soft, dramatic light.

    The bottom line is, no matter what, as long as you have light, you have the ability to make a great photo.  The key is simply being able to see the light, play the angles, and think outside the box when necessary.


    Post originally from: Digital Photography Tips.

    Check out our more Photography Tips at Photography Tips for Beginners, Portrait Photography Tips and Wedding Photography Tips.

    One Light Portraits: Simple Elegance


    Digital Photography School

  • How to Create a Black & White High-Contrast and Filmic Image in Lightroom 4

    Introduction

    This tutorial is a demonstration of the SLR Lounge Lightroom 4 Preset System. With over 200 presets, the LR4 Preset System has been critically acclaimed as the most powerful and intuitive preset system available for Lightroom 4, click the link above to learn more/purchase. DPS users can get 10% off by using the DPS10 coupon code.

    Overview

    This is a step-by-step tutorial that will show you how to take a portrait and create to create a high contrast black and white portrait, as well as a film-like black and white portrait.

    Lightroom 4 Preset System Mixology

    If you own the SLR Lounge Lightroom 4 Preset System, this effect can be achieved in around 10 seconds. If you don’t own the preset system, please skip to Step 1 to learn how to do it manually.

    High-Contrast Black & White Portrait
    1. MY MIXOLOGY > 00 Standard Import
    2. MY MIXOLOGY > 13 Standard B&W (Soft | Portrait)
    3. BASE ADJUSTMENTS > 45 Medium Darken (Blacks)

    Filmic Black & White Portrait
    1. MY MIXOLOGY > 00 Standard Import
    2. MY MIXOLOGY > 13 Standard B&W (Soft | Portrait)
    3. ANTIQUE CURVES > 41 B&W (Vintage Punch)
    4. BASE ADJUSTMENTS > 42 Neutral (Blacks)
    5. BASE ADJUSTMENTS > 33 Light Boost (Contrast)
    6. SPECIAL EFFECTS > 23 Medium (Film Grain)

    The Original Image
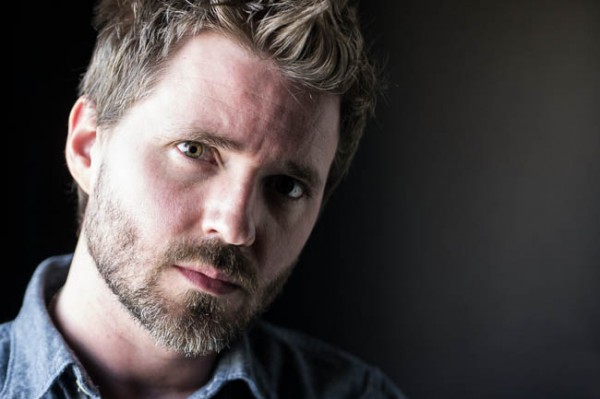
    Fotosiamo_Original SLR Lounge

    Step 1. Removing Dust and Particles from Our Image

    Whenever we are preparing images for printing, we always run a Dust Correction Curve check to make sure that we don’t have any noticeable dust on our image. The great thing about this curve is that it is also useful in detecting dandruff on dark clothing in addition to any other distracting dust or flecks in the scene. We do this by applying the 82 Advanced Dust Correction Curve temporarily.

    For those that don’t have the Lightroom 4 Preset System, here is what the curve looks like.
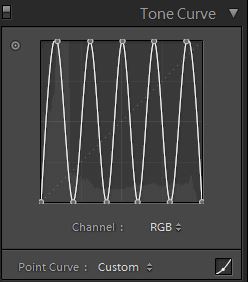
    Fotosiamo_Dust Correction Curves SLR Lounge

    The spikes and troughs on the curve creates a super high contrast (and frankly quite wonky) look to our image which helps in detecting hard to see spots, dust, flecks and anything else that might be distracting as you can see below:
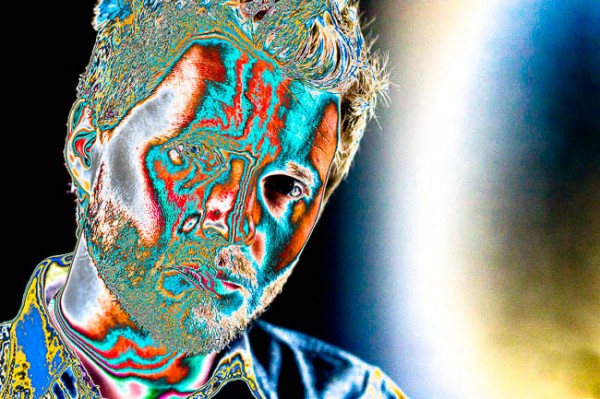
    SLR Lounge Dust Correction Curve

    From here, we will select the Spot Removal Tool (Q) to remove any distracting elements.
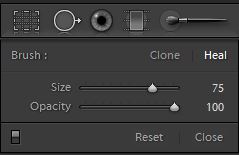
    Spot Heal Brush

    Once we have finished, we will simply reset the Curve (without resetting the Spot Removal adjustments that we just made).

    Step 2. Applying Our Basic Adjustments

    At this point, we need to first convert our image to Black and White by hitting “V”. Since this is a portrait, we will want to smooth out highlights on our skin tones, add contrast, and make other Basic Panel adjustments necessary for our Portrait. We are going to smooth skin tone highlights by decreasing our Highlights and Whites, while adding additional contrast by reducing our Shadows and Blacks. In addition, to further boost contrast, we will also adjust the Contrast slider. Finally, to further smooth the skin, let’s decrease Clarity. Your final Basic Panel adjustments should mirror the following:
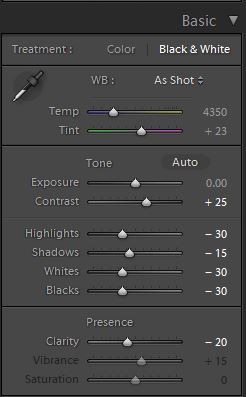
    01b SLR Lounge HiB&W Basic

    Your image should now look like the following:
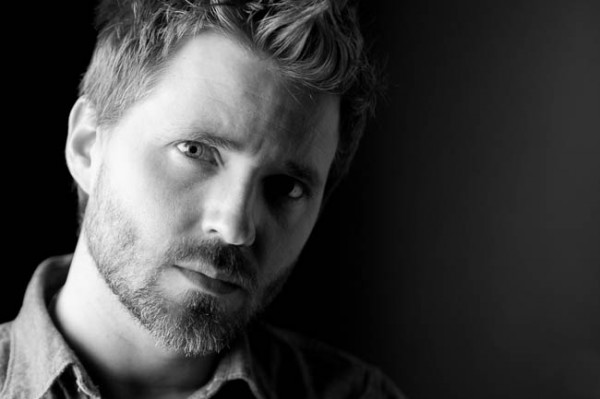
    SLR Lounge HiB&W Basic

    Step 3. Adding Additional Contrast via Curves

    The adjustments made to smooth out our highlights are leaving our image just a bit flat. Rather than adding additional contrast with the Contrast slider, we are going to do so with the Tone Curve so that we have more control over where the contrast is added.

    Make sure that you are using the Point Curve mode by clicking on the Curve icon at the bottom-right of the panel.

    Using a custom Tone Curve, we will dial in a subtle contrast boosting “S” curve that looks like the following:
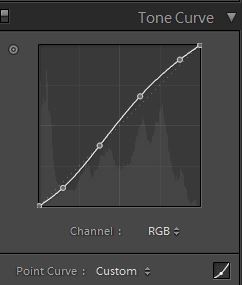
    SLR Lounge HiB&W Tone Curve

    This adjustment is quite subtle, so let’s move on to the next step.

    Step 4. Sharpening and Noise Reduction

    Normally, if you are using the SLR Lounge Preset System, the Sharpening are automatically applied. Here is what we typically apply to our image:
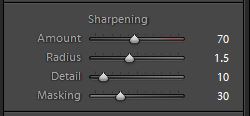
    We also want to add Noise Reduction because we may have added some noise when we opened up the Shadows and Blacks. The key here is to balance out Noise Reduction and Sharpness so you can smooth out the skin while retaining the fine details in the hair and eyes. We use this setting for Noise Reduction:
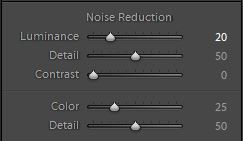
    SLR Lounge B&W-Noise-Reduction

    Finally, let’s add some Lens Vignetting at +30 Amount and +30 Midpoint simply to even out edge to edge brightness.
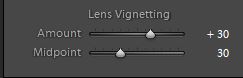
    SLR Lounge B&W-Soft-Portrait-Lens-Vignetting

    That is all the settings that we use to create our High-Contrast Black and White Portrait. Your image should look similar to the image below:

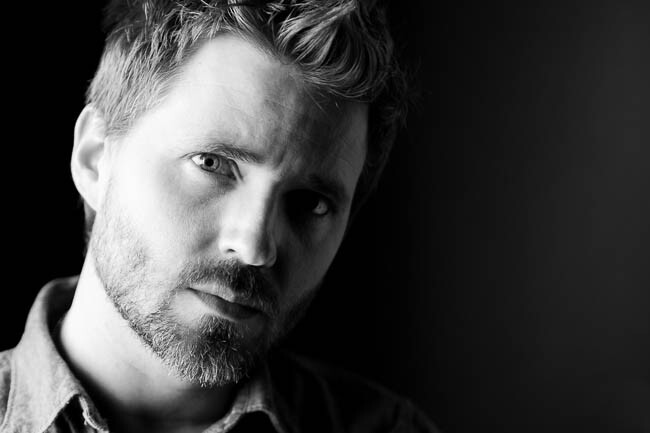
    Fotosiamo_HiB&W Finished SLR Lounge

    Now we are going to create a black and white image with a filmic look. At this point, let’s create a Virtual Copy of our image so we can retain both black and white versions by hitting CTRL+’ on Windows and CMD+’ on Mac.

    Step 4. Applying Our Basic Adjustments

    Compared to the High-Contrast Black and White Portrait, the filmic black and white portrait is going to have less contrast. Additionally, the blacks are lifted by zeroing out Blacks and Shadows. The Highlights, White, and Clarity are still lowered in order to smooth out the skin tone. We also want to keep Contrast at +25 in order to retain contrast across the tonal range.

    Your Basic Panel adjustment should look like this:
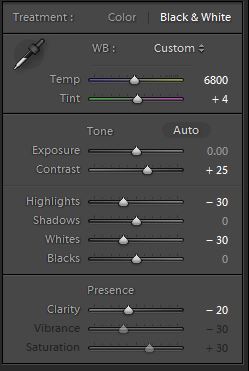
    SLR Lounge FilmicBW Basic

    Your image should look like the following:
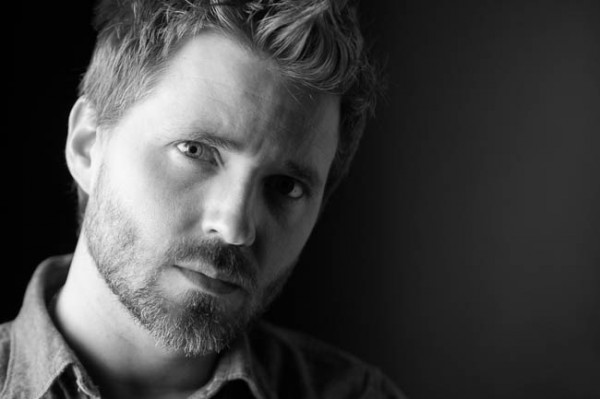
    SLR Lounge FilmicBW Basic

    Step 5. Clipping The Blacks & Whites with Curves

    The Tone Curve is the key to achieving the filmic look that we are looking for. In order to limit the dynamic range on both the blacks and whites, we are going to clip both ends. Additionally, we are going to increase the shape of the ”S” curve in order to push the contrast outward towards the shadows and highlights. This will also compress the highlights and the shadows, as well. Your Tone Curve should look similar to this:
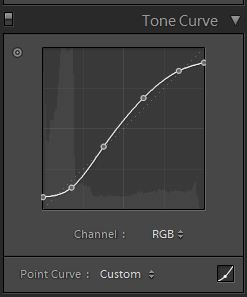
    SLR Lounge FilmicBW Tone Curve

    And your image should look like the following:
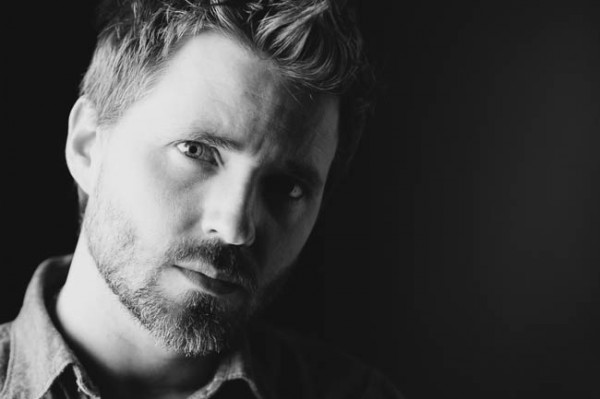
    SLR Lounge FilmicBW Tone Curve

    Step 6. Sharpening and Noise Reduction

    The Sharpening and Noise Reduction remain the same as the High-Contrast Black and White image, so your settings should look like the following:
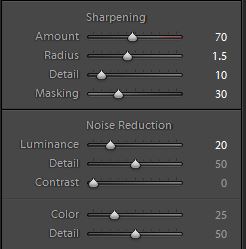
    SLR Lounge FilmicBW Detail

    Step 7. Darkening the Edges with Vignette

    Instead of opening up the edges by adding a lighter Lens Vignette like we did with the High-Contrast Black and White, we are going to darken them instead. We are only darkening the edges subtly, so your Vignette should like this:
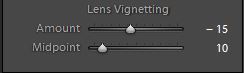
    SLR Lounge FilmicBW Vignette

    Step 8. Adding Film Grain

    Finally, to achieve the filmic look for our Black and White portrait, we are going to add a medium amount of Grain to the image.
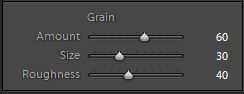
    SLR Lounge FilmicBW Grain

    Here is the final image after we add the Film Grain:
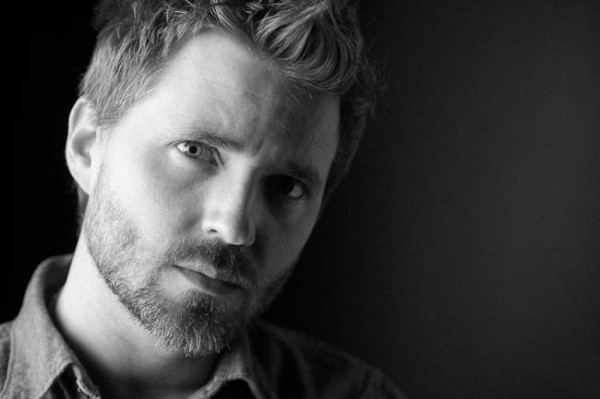
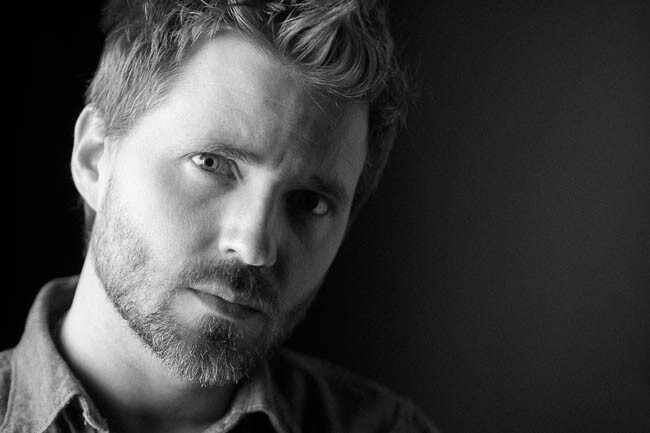
    Fotosiamo_FilmicBW Final SLR Lounge

    Final Before and After Images

    Here are the before and after images comparing the original image against the High-Contrast Black and White image and the Filmic Black and White image that are created using the SLR Lounge Lightroom 4 Preset System.
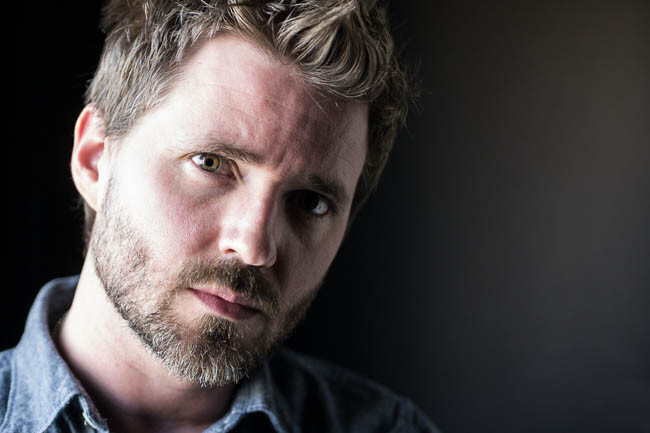
    Fotosiamo_Original SLR Lounge
    Original

    04 Fotosiamo_HiB&W Finished SLR Lounge
    High Contrast Black and White

    09 Fotosiamo_FilmicBW Final SLR Lounge
    Filmic Black and White

    The Lightroom 4 Preset System

    The SLR Lounge Lightroom 4 Preset System is designed to enable users to achieve virtually any look and effect within 3-5 simple clicks. From basic color correction, vintage fades, black & white effects, tilt-shift effects, faux HDR, retouching, detail enhancing, and so much more. The sky is the limit with what has been dubbed the most powerful and intuitive preset system available. Click the link above to learn more/purchase.

    Post originally from: Digital Photography Tips.

    Check out our more Photography Tips at Photography Tips for Beginners, Portrait Photography Tips and Wedding Photography Tips.

    How to Create a Black & White High-Contrast and Filmic Image in Lightroom 4


    Digital Photography School

  • Mike Kelley’s Leap of Faith

    It's a truism that creative growth is nonlinear.

    Which is to say that, while we (hopefully) do improve steadily over time, meaningful growth happens in fits and starts. You have an experience of some sort, and after you come out of it you realize you will never be the same photographer again.

    Now, while you certainly can wait for someone to hand you that experience on a platter, doing so is putting the ball in someone else's hands. Which is fine if you are both patient and lucky.

    Or, you can do what architectural photographer Mike Kelley did, and decide to make it happen on your own. Read more »


    Strobist

  • Deleting is Good for You!

    This is where your bad images belong!

    The Most Powerful Keyboard Shortcut You Never Knew

    So you’ve got some skills, can take a decent photo and know a bit about how to post process.  The best thing you can do now is keep on shooting and make as many pictures as you possibly can?  Probably, however just as beneficial as taking lots of images is the habit of deleting some as well.  It might sound counter intuitive but pressing the delete key after a shoot is a great way to give your photography an all round boost.

    Deleting is Good

    One of the best things about digital photography is the ability to take lots of shots and experiment.   Having the ability to take all these images is great however how what is even more useful is the ability to look back and critique your own work.

    Soon after starting to shoot seriously I became very aware of my growing image collection, however it took me a long time to realize that most of this was just dead hard disk space.  It’s a tough fact to accept but getting comfortable with getting rid of the dead wood can be beneficial in a number of ways.  Here is how I go about reviewing and deleting my images and a few reasons why I do.

    What I Do

    Reviewing your own image library needn’t be a big deal, I keep it to three simple steps:

    1. Right after I import my images from the camera, I do a quick review and straight away delete any of the obvious rejects (blurry, wonky etc).
    2. Second step is to do all my post processing, again rejecting any obvious duds.  This is a great stage to save time by discarding any images which need more processing than reasonable.
    3. Lastly (and most difficult), I review my completed images.  This is where I make the difficult choices.  I’m a big fan of scoring and I use the 5 star rating system in Lightroom (my preferred post processing software) as a means of making sure I only keep the very best images.  Anything, which scores less than 3 out of 5, is a gonner!

    Ultimately you will have to decide how best to go about this but as a rule of thumb I try my best to keep only those shots which feel like they work visually and delete any which could be considered to duplicates or similar to other images from the shoot.

    Benefits:

    Deleting your old images can be beneficial in a number of ways:

    • It frees up hard disk space – Any image which once its taken is never viewed again, printed or posted is a waste of resources.  Think of how many good images you could put in their place.
    • It saves you time – Ever spent time trying to ‘rescue’ dud pictures in post?  Save this time for the good images or failing that getting better at taking them in the first place.
    • It tells you how good you are – Knowing how many you’ve deleted lets you know what your strike rate is and more importantly knowing why you’re deleting them tells you what you need to do to get better.
    • It makes sure others know how good you are – If you can’t see your weaker shots then neither can anyone else, get rid of them and make your portfolio the best it can be.

    Summary

    It might be a tough thing at first, but using your delete key can be a great way to become a better, more efficient photographer.   In the long run it will save you time, hard disk space and make your portfolio stronger.  Treat deleting your images like the photographic version of natural selection, cull your weakest images and make sure only your strongest survive!

    Post originally from: Digital Photography Tips.

    Check out our more Photography Tips at Photography Tips for Beginners, Portrait Photography Tips and Wedding Photography Tips.

    Deleting is Good for You!


    Digital Photography School
  • The Importance of Communication in Wedding Photography

    For a couple embarking upon their numerous wedding plans, excitement and curiosity filled with budget considerations will drive question upon question for their potential photographer. Photographers who know the wedding circuit already, will notice that the same questions will be repeated by most clients. There are a number of reasons for this. Not only do wedding magazines point brides in Continue Reading

    The post The Importance of Communication in Wedding Photography appeared first on Photodoto.


    Photodoto

  • The Best Camera Is The One You Have With You (Mobile Photography TIPS)


    All photographers go through a lifecycle; those distinct stages from new photographer through to seasoned shutter bug. It definitely happened to me and, looking back, my one embarrassing stage was the camera kit snob stage. I’m not going to dwell on it, but suffice to say, it was a pretty cringeworthy stage for me personally. Now I am not too proud to miss an opportunity just because I don’t have my main camera on me. 

    Years ago I stumbled upon Chase Jarvis who is, I think, a massively creative photographer. He came up with a common sense mantra, the title of this article. The premise is that we should all embrace the camera we have on us and, hopefully a safe punt, that is going to be your cell/mobile phone.


    If you are reading this article, chances are you don’t carry around an ageing Ericsson or Nokia from the late 90s. Personally I use iPhone, but I figured out early on with a few must-do tips, you can come up with some impressive images using just the camera in your phone.

    All the images in this article were captured, hand held, with a Nokia 808 Pureview. All image editing was performed in Photoshop CS5 and, apart from black and white conversion, very basic – really, 3 minutes load through to save basic.

    Shooting: Composition


    Always think about the composition and what you are trying to capture. I’m willing to bet, with SLR and tripod, you put a great deal of thought into your shot, so why should it be different with your phone.

  • Rule of Thirds. Except for symmetrical compositions, like shooting down a tunnel, avoid centering subjects and horizons in the frame.
  • Reduce poor skies to the smaller portion of the frame.
  • The eye will follow leading Lines into the frame and distance. This is something you can control, like a winding road that will lead the eyes across the beautiful landscape in the frame.
  • Light is the biggest factor that will make or break a good photo. This is especially true for camera phones and their small sensors – they love the light. Early morning and late afternoon light (golden hour) will enhance everyone’s images! Try and move to compose where the light falls on your subject; faces, buildings, statues, etc.
  • Decisive moments make for strong compositions. See a great scene? Set up for the shot and then wait for something to occur. In Florence, on a recent trip, I waited on a bridge, with a great view into the distance, for… people on Segways! They’re a rare site in the UK, so I thought it would make a great juxtaposition.
  • Check out Christina Dickson’s most useful article, breaking down composition into geometric areas.

    Shooting: Steady


    As with an SLR and tripod, I always try to find a rest or surface to remain steady for the shot. Window frames, lamp posts, benches, trees, girlfriend’s head, etc. It will make such a difference to the resolving power of the pea sized lens on your phone’s camera.

    Shooting: Straight


    I do edit and publish on the move, so getting it right in shot will get the highest quality up front. Each app you use to edit shots will degrade and potentially resize your images all the more. You have a big LCD, so take a moment to line up and level before pressing the shutter.

    Editing: Color and contrast


    I don’t think twice that Photoshop will be editing this image for an SLR shot, so the same usually goes for my camera phone shots. It is rare if I do more than boost color and contrast, but it does make for a significant improvement.

    Editing: Straighten, Crop


    Someone out there always tells me if my images are not meticulously level, so I’ll recheck in Photoshop. If need be, I will crop too – too much sky, half a bird, etc.

    Editing: Sharpen, Resize


    Use your image editor to make the full size image sharp and then resize down for the internet. I will use a High Pass filter technique in Photoshop.

    Camera phone images don’t need to be terrible snaps and with these tips, equally important for compact cameras too, you can definitely open the eyes of those firmly entrenched in the ‘SLR is best’ camp!

    Want to learn more about mobile photography? Check out our iPhone Photography eBook.

    Post originally from: Digital Photography Tips.

    Check out our more Photography Tips at Photography Tips for Beginners, Portrait Photography Tips and Wedding Photography Tips.

    The Best Camera Is The One You Have With You (Mobile Photography TIPS)


    Digital Photography School
  • Focus on Chris Porsz ~ It’s All About The People

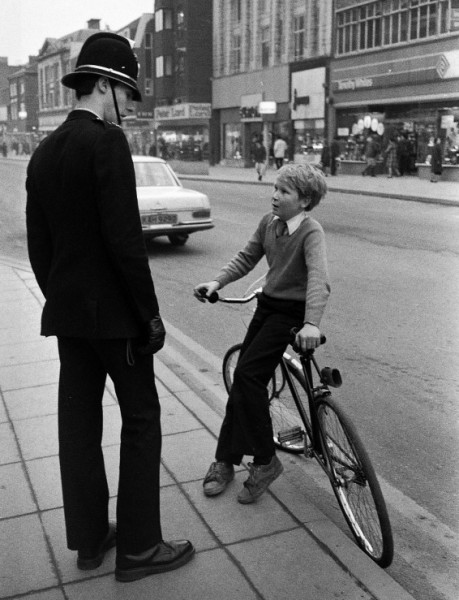
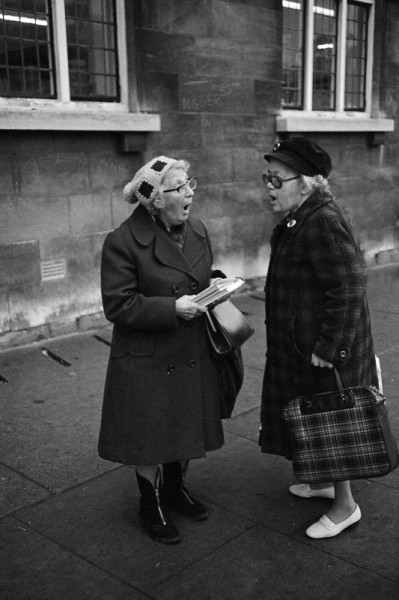
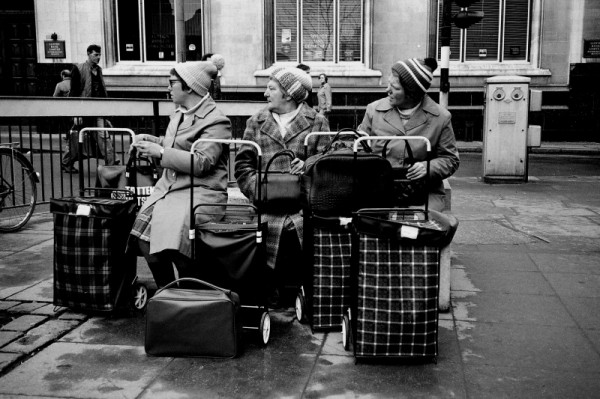
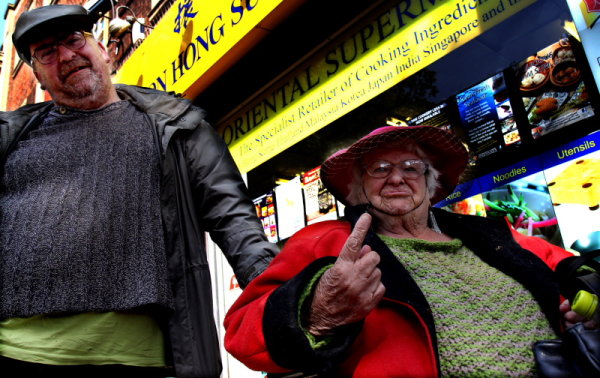
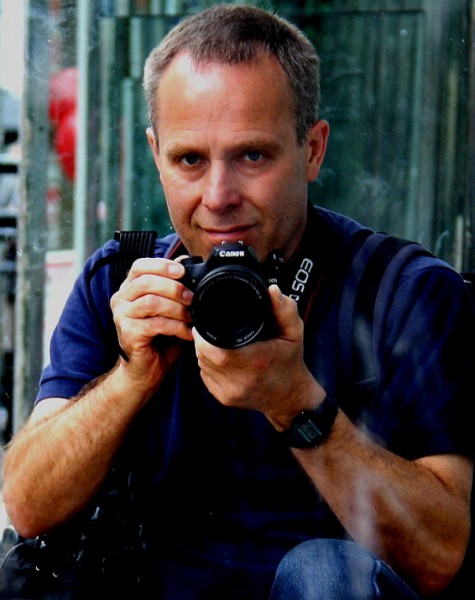
    I’ve had the pleasure to shoot with UK street photographer Chris Porsz in London and, more recently, in Paris. He met up with my group during my week long Paris photo workshop last month and enjoyed sharing his love for street photography with my students. Chris has a true passion for people and for capturing the moment . He can roam the streets of any city tirelessly for days with his camera. Paramedic by day (or night), street photographer the rest of the time, let me introduce you to Chris Prosz.

    1- When and why did you start photographing people in the streets?

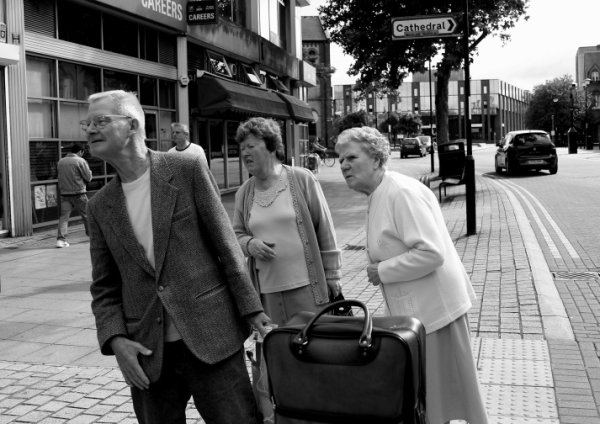
    Over three decades ago some creative urge drove me to roam the streets of my city, recording everyday life. I cannot draw or paint but found it very easy to a press a button and, by some magical process, capture posterity in a fleeting expression on a face.  I am not technical and not good at formal studio work with flash and posing people so I like  the blank canvas of the streets. I set my stage and wait for the right characters to walk on. You will rarely see a picture of mine devoid of people as buildings bore me on their own while people bring them alive and give a sense of scale.  I was a university dropout who became a hospital porter and found this a very satisfying and relaxing outlet. For over twenty years I have been a paramedic which involves approaching total strangers, engaging and reassuring them. Ideal for street photography.

    2- You spend hours every week walking the streets of your hometown, how do you keep things ‘fresh’?

    I think the very nature of street photography ensures that it stays’ fresh.’ I love the total unpredictability and spontaneity of people and never knowing what is around the next corner. You walk for miles and get average shots but just occasionally you capture something special. I am always looking out for someone unusual who stands out from the crowd, pink hair or the elderly battling against the elements with a Zimmer frame. I look out for situations with people interacting and wait to see what develops.

    3- What other cities have inspired you the most photographically and why? 

    Out of my comfort zone I visited many large English cities to be inspired and I was overwhelmed by the potential. I also wanted a more international flavour so I made a trip to New York City. It was also wonderful to be involved in Valerie Jardin’s Paris photo workshop. Amsterdam, Berlin and Prague are on the list to capture. Every city has its iconic buildings but the challenge is to capture them in a unique way and for me that has to be through its people.

    4- What was your most memorable experience as a street photographer and have you had any close-calls, such as people becoming aggressive, etc.? 

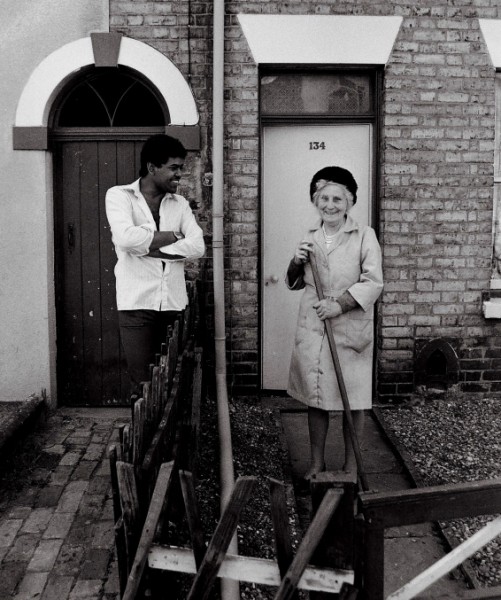
    I think it was at 2:00 am when a man called an emergency ambulance for help and, through his oxygen mask, he told me I had taken his picture over thirty years ago. This led to one of my reunion pictures which can be quite emotional and immensely satisfying.

    A man in his seventies who looked like Santa Claus was sitting in an armchair in the middle of our Cathedral Square when he spotted me and my camera. Wearing only a white bath robe, boots and a red bobble hat he chased me down the road. What a picture and fortunately no one was around to take it.

    In 1980 a recluse was murdered and the only picture available was one I took of him walking the streets. It helped to capture his assailants.

    I have occasionally been threatened by drunks and accused of all sorts but usually a smile and an explanation go a long way.

    5- Is there one shot you absolutely want to get and will continue hunting for until it’s in your memory card? 

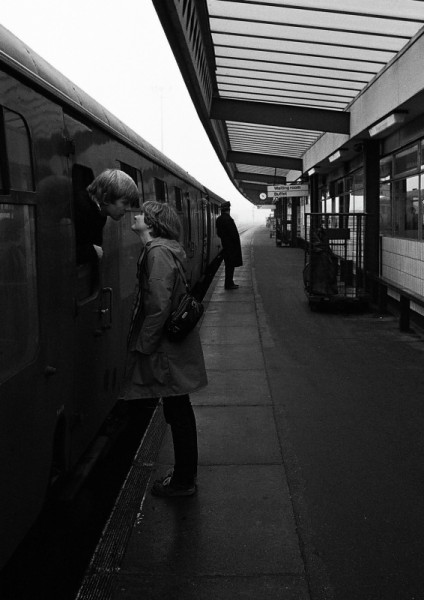
    I have my railway kiss picture but I am still searching for that Doisneau lovers’ embrace on say the escalators. Or some exclusive photo journalist type dramatic image. So always carry a camera and keep it primed ready. Nothing worse than capturing a great moment that is blurred and out of focus.

    6- What #1 tip would you give someone starting out as a street photographer?

    Take Robert Capa’s advice and “If your photographs are not good enough then you are not close enough.” I have ditched the artificial compression of telephoto and almost exclusively use a wide angle where the viewer feels part of the picture.

    I also try to follow Dave Beckerman’s maxim “Street photography is 90% perspiration and 10% inspiration.” So walk miles, take plenty, be very self critical and post just the best. Back up your images three times as I have learned the hard way and lost precious memories.

    7- You’ve exhibited your work in various galleries in Peterborough, England. What is your next project? 

    My book New England is out this month and contains my favourite images from the seventies and eighties, many which have never been seen before. It reflects a typical English city of that era. I have been invited to record the life of a large country Park through its staff and visitors during the four seasons. I will employ my street style but with beautiful backdrops instead.

    8- Which photographers have inspired you the most?

    The list is endless but one of my heroes is Don Mc Cullin a modest, compassionate, brave, honest photographer with his haunting Vietnam images. I was a lousy printer and ruined many but his dark, rich, gritty monochrome printing influenced me.

    His colleagues too, Eddie Adams and Phillip Jones Griffiths The ‘gentle eye’ of Jane Bown and the reportage of Chris Steele-Perkins

    Over the pond the humour of Elliot Erwitt and Vivian Maier’s newly discovered treasure trove. Jo Wigfall, Dave Beckerman, James Mayer and Eric Kim. They are generous with their time, support and encouragement. Thank you too Valerie for kindly helping me and now sharing my work with your readers.

    Find out more about Chris and his work by visiting his website.

    Chris Porsz


    Post originally from: Digital Photography Tips.

    Check out our more Photography Tips at Photography Tips for Beginners, Portrait Photography Tips and Wedding Photography Tips.

    Focus on Chris Porsz ~ It’s All About The People


    Digital Photography School
  • onOne Perfect Photo Suite 7 Review and Giveaway

    Well, it’s here! Version 7 of onOne’s Perfect Photo Suite has got to be the most anticipated release from onOne in this review we’ll see if it lives up to the hype. One rule I have for reviews is that I won’t review stuff that I don’t use on a regular basis. Well, I’ve been using onOne Software since I got my first copy of Photoshop (CS3 I believe) so I’d say I use it pretty regularly! I should note that I don’t get paid for doing these reviews, I do them purely because I want to review things that I use and and want to pass that on to you the reader if you’re trying to make a choice to buy something to advance your photography. So with all that said, let’s get to the review. And at the end we will do a giveaway. Yeehoo!
    Where onOne Software Has Been And Where It’s Going

    onOne used to cater exclusively to Photoshop users. They made Photoshop plugins and they were even great back then. If you didn’t have Photoshop, you were out of luck for the most part. That wasn’t uncommon, pretty much all software companies for photographers existed as plugins to Photoshop. Over the past couple of years however, onOne has started to slowly pull away from exclusivity with Photoshop and has now blown the doors wide open for Lightroom and Aperture users and even people who have none of the above. Not all of us can buy every new camera that comes out, have a bag full of L series lenses or own every new and groundbreaking piece of software that comes out. A lot of photographers do this stuff part time. Some photographers have full time jobs that have nothing to do with photography so buying every piece of software out there really isn’t a big priority. Some photographers simply are short on cash and can’t afford everything that’s available.

    When onOne announced Perfect Layers, they quite literally turned the photography industry upside down. Not only is Perfect Layers included in their Perfect Photo Suite, it’s also free for anybody to use! It’s a free program that give us access to things like layers, masking, brushes, filters and more without having to buy an expensive program like Photoshop. When you combine Perfect Layers with the other programs that onOne offers, the pot really starts to get sweeter. Perfect Layers ties all of onOne’s products together in one nice program and it really becomes a one stop shop for just about all your editing needs. In a lot of cases, it can completely replace programs like Photoshop and Lightroom. If you don’t have $ 700 for Photoshop, if you don’t shoot thousands of images a week and need Lightroom for cataloging everything, then onOne’s Perfect Photo Suite 7 might just be the best option for you. If you have $ 700 and are ready to spend it, then I’d still suggest buying Lightroom and onOne’s PPS7 every time. You’ll even have some money left over (about $ 250 as a matter of fact) to pay bills. On top of all that, they just added a new and long awaited program into the mix with the release of Perfect Black & White. It’s easy to see that onOne is becoming a serious competitor in the photography industry as not just a supplement to other programs but as a stand alone software program that is much more powerful than some people realize.

    What’s New In Perfect Photo Suite 7?

    Well first of all, if you haven’t taken a look at onOne in a while, the price for the entire suite dropped significantly about a year ago. Their pricing actually used to closely resemble Photoshop but they decided to drastically drop their pricing to make their products available to more people, realizing that not everyone has $ 700 to drop on software. If you buy each product included in the Perfect Photo Suite a la carte, that’s about what you’ll spend. But if you buy the suite you’ll only pay $ 299.95. That’s pretty cheap considering all the different programs included. There are a lot of new features in PPS7 and if you want a whole list you can visit onOne’s website, but here are the ones that stuck out to me the most.

    New Interface and Options

    I wasn’t a huge fan of the interface in PPS6. It wasn’t terrible by any means, it just wasn’t as sleek as it could have been. I think they really improved things in PPS7 both in looks and functionality. Where PPS6 was clunky and bulky, PPS7 is smooth and versatile. Instead of having to import every single photo into the suite, you now have access to all your computers files on the left side. You can scroll through any folder or use the search bar to type in a specific file. This feature alone should save a LOT of time and makes the program that much more of a standalone solution.
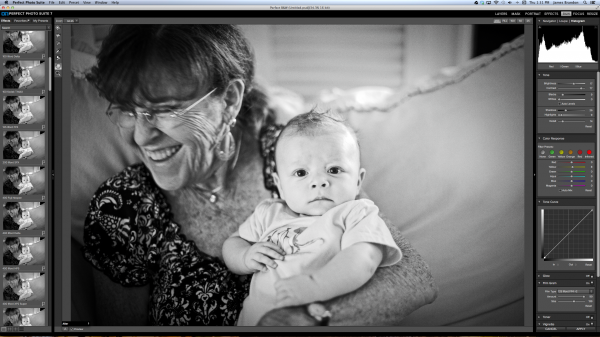
    Moving between modules is quick and painless. In past versions there was a lot more waiting around so things have definitely improved in the speed department. Preset image previews used to run along the bottom and seemed to be a bit of a distraction. They used stock images from various photographers to show what a preset did and if you wanted to see a preview with your image, you’d have to hover over the preset and wait for it to pop up. Now the presets run along the left side in the same place as the the files and there’s no more stock images. In PPS7, your image is used for each preset automatically so no more need to hover and wait.

    Perfect Black and White

    I’ve been waiting for onOne to come out with a Black & White program for quite a while now. So I was pretty happy to see it included in PPS7. I wouldn’t necessarily say that Perfect B&W is drastically different or more powerful than any other Black & White program. After all, converting an image to monochrome can only be so complicated, right? But there are things you can do in Perfect B&W that you can’t do in Lightroom or Photoshop alone. For example, in Perfect B&W you can add borders to your images (a remnant of the late Photo Frame software) without having to switch modules or export the photo anywhere (not available in LR or PS). You can add a blend mode on top of the image and then reduce its brightness (not available in LR). You can split tone the image like in LR but Perfect B&W also has presets readily available right in the toner drop down. And if you’re feeling really creative, you can simply take the photo into another onOne program like Focal Point with just one click. See how many clicks that takes in LR or PS! Here’s a quick video of Perfect B&W in action..

    Improved and Expanded Presets Library

    Using and creating presets in Perfect B&W (or Perfect Effects) couldn’t be easier. For the record, I love presets. To create a new preset once you have an image where you want it, just hit “shift > command > s” or go to the menu bar and choose “Presets > Save Preset” and a dialogue will pop up to walk you through the rest. Unlike Lightroom, in PPS7 you can add a creator and description to each preset which really comes in handy if you want to sell your presets online or give them out. Having presets readily available is great. You can always go back to ones you love to maintain a consistent look to your images, or you can use one preset and apply it to an entire photo shoot or series to really tie it all together. It’s good to see that onOne loves presets as much as I do. The litany of presets included in the PPS7 is exhaustive to say the least. That’s a good thing though. There are more presets, textures, brushes, borders and frames than I think I’ll ever fully know what to do with and that’s a lot better than having too few.

    Say Goodbye To PhotoFrame

    Yep, it’s true. PhotoFrame had a good run. It was the first onOne program that I ever purchased and now it’s been absorbed into the suite. You’ll find its remnants in Perfect Effects, Perfect Layers and Perfect B&W. It’s sad to see it go but that’s the way technology goes…

    Start To Finish Video of Perfect Photo Suite 7 In Action

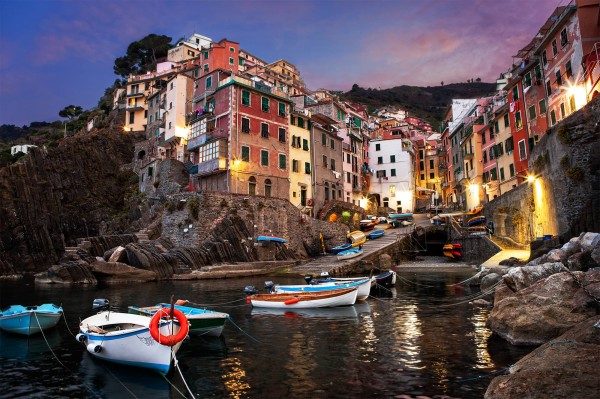
    Here’s an in-depth video (about 45 minutes) of me editing an image from Italy using Lightroom, Perfect Photo Suite 7 and Photoshop. This is a long one, from start to finish, but if you want to see how I work through an image (unscripted) and see how seamless it is to work between these programs this should be an interesting watch for you. To watch even more videos on PPS7, be sure to visit onOne’s website and check out the Perfect Inspiration series from by good bud Brian Matiash or the countless videos available at any time at the onOne University.

    Finished Image

    Conclusion And Giveaway

    I seriously am in love with this software. It’s incredibly versatile and it helps me out in so many ways from day to day. Whether it’s using Perfect Resize to prepare all of my gallery and fine art prints, dropping a photo into Focal Point to add some sweet blur or jumping into Perfect Mask when precision is needed; onOne’s Perfect Photo Suite has taken up permanent residence in my post processing workflow.

    For a chance at winning a free copy onOne’s Perfect Photo Suite 7, here’s what you need to do: Leave a comment below telling us why/how you’d benefit from having PPS7. That’s it! And bonus point for following us all on Twitter!

    We’ll choose the winner in one week from this post going live – midnight on 17 November US Eastern time.

    @jamesdbrandon
    @digitalps
    @ononesoftware 

    Post originally from: Digital Photography Tips.

    Check out our more Photography Tips at Photography Tips for Beginners, Portrait Photography Tips and Wedding Photography Tips.

    onOne Perfect Photo Suite 7 Review and Giveaway


    Digital Photography School