Category: Photography

  • 12 Ways to Inspire the Creative Photographer Inside You: Part II

    A Guest Post by Andrew Gibson

    Note: Andrew Gibson is currently offering his 5 popular eBooks for under $ 20 on SnapnDeals.

    0707.jpg

    In the first part of this article I came up with six ideas that you can use to break out of a creative rut. I’ve been there myself, when it seems as if there is nothing around to photograph and no subject seems appealing.

    The idea behind these articles is to give you some inspiration for those times when creativity seems hard to come by. Here are the rest of the ideas:

    7. Try a new Genre

    Part of the fascination of photography is that there are so many genres and techniques to try out. That’s part of the fun. Even professional photographers have a comfort zone of subjects and techniques that they are familiar with. Anybody can learn a lot by trying a new genre.

    For example, if you’ve never photographed a stranger before then why don’t you look for a model on a website like Model Mayhem? The whole exercise of finding a suitable model and coming up with the concept of a shoot and taking the photos will be challenging and educational.

    08

    I tried some steel wool spinning photos last week for the first time. Great fun, and a new way to use a local location for photos.

    8. Build a photoblog or a website

    What do you do with your photos after you’ve taken them? Uploading to Facebook, Flickr or 500px is one thing, but an interesting challenge is to set up your own website or photoblog.

    If you have no idea how to do this, don’t panic – it’s fairly easy once you know how. You can use WordPress or Pixelpost to set up a photoblog with an absolute minimum of programming knowledge. The instructions for both are easy to follow. And if you don’t want to buy your own domain name and a hosting plan (essential in order to have your own website) then Blogger, WordPress.com or Tumblr may be the answer. The important thing here is to create your own personalised space on the web for publishing your photos.

    The best approach is to be critical of your work and only post your best images. Online portfolios are usually judged by the strength your weakest images. Weed those out to improve your portfolio.

    A website or photoblog can work well if you have a long-term project to publicise. Check out Bill Wadman’s 365 portraits as an example.

    An added bonus, if you’ve never done this before, is that learning to create a website or blog may be a useful skill to add to your CV.

    09
    I created the photo gallery on my website using photo blogging software Pixel Post.

    9. Create a Photo Book

    Do you print your photos? I printed some of my favourites out a few years ago on a borrowed A3 printer and most of them are still stored in a wardrobe. I framed a few, but not the rest. This is a problem for me when it comes to making prints – what to do with them afterwards?

    One answer is to create a photo book instead. Blurb is perhaps the most well known photo book service but there are plenty of others. The quality from the best companies is extremely high.

    Designing a photo book is not just a matter of placing photos on pages. It will force you to edit your images, look for themes, juxtapose images on the same spread and learn about graphic design. If you have a long-term project a photo book could be a great end product and a nice reward for the hard work you put it in.

    Another reason I like the concept of photo books is for the legacy. Books are easier to give out to friends and relatives than prints. You can create a meaningful collection of your best images that people can look at for many decades to come.

    10. Make the most of the Light

    Are you lazy with light? One of the quickest ways to improve your photos is shoot in the best light. If the light is beautiful, this will inspire you to take better photos.

    Here are three types of light that I like:

    The golden hour

    This is the hour around sunset and sunrise when the sun is low in the sky and casting low, raking light over the landscape. Ideal for landscapes, seascapes, architecture and portraits.

    The blue hour

    This is the period from after sunset to night when the natural colour of the ambient light is deep blue. This is a beautiful time for taking landscapes and seascapes. If you take photos by the sea, as long as you have a tripod you can take photos until it is nearly dark. The water reflects the light left in the sky so that you don’t end up with large black areas in the image.

    Shade

    For portraits my favourite type of lighting is shade. The light is soft, flattering and beautiful. On a bright sunny day any light bouncing off nearby sunlit areas brings a real glow to the model’s face.

    It’s important to make the most of the light. It requires effort to make sure that you’re in position when the light is at its best for your subject. But you’ll be rewarded with stronger images.

    Now, reverse that idea. Why not try different types of light? For instance, is it possible to take photos of the landscape in strong midday light? I’ve seen it done – one solution is to convert to black and white to take advantage of graphic shapes and shadows created by the direct light.

    And what about portraits? Shade is beautiful, but what if the subject is backlit? Or in the midday sun? How can you make this light work? A technique to try in midday light is to use portable flash to fill in the shadows or overpower the light from the sun.

    10

    One of a series of photos shot on the beach in the middle of day in the summer. I used portable flash to light my model and counter the harsh light of the sun.

    11. Shoot in Black and White

    I love black and white photography. In black and white there is no colour and the image requires a strong composition using elements such as shape, line and tonal contrast to succeed. It takes time to learn how to see in monochrome. Here’s an easy way to get started.

    Set the camera to its black and white mode (check your camera’s instruction manual if you don’t know how to do this). Set the filter colour to red or orange and increase the contrast. Now, when you take photos, the image is displayed on the LCD screen in black and white. This gives you immediate feedback on how well the composition works in black and white.

    The image is displayed in black and white even if you set the file format to Raw. The beauty of shooting in Raw is that you have a full colour file that you can do anything with afterwards. That includes converting to black and white in software that gives a better result than the black and white mode on your camera.

    11
    You may not think of photographing colourful subjects like flowers in black and white. It’s a different approach to a common subject that can work really well.

    12. Work in Colour

    Here’s another way to look at things in a fresh way. Why not set a colour project? Spend the day just taking photos of things that are red. Or blue, yellow or green…whatever colour inspires you.

    An alternative is to work with a more subtle colour such as brown or grey. This can really challenge your creativity as you look for ways to make interesting photos from subtle colour palettes.

    14

    A selection of photos utilising the colour red. Not all taken on one day – but it shows how effective it can be to group photos together that share a strong visual element such as colour. Going back through your old photos and arranging them by colour may give you a new way to present your work – or inspire you to take more colour based photos.

    Andrew Gibson currently is offering a bundle of 5 of his amazing eBooks for sale for under $ 20 on SnapnDeals. You’ll get eBooks on Understanding Lenses, Understanding Exposure, Understanding DPP and square format photograph. Check them out here.

    Post originally from: Digital Photography Tips.

    Check out our more Photography Tips at Photography Tips for Beginners, Portrait Photography Tips and Wedding Photography Tips.

    12 Ways to Inspire the Creative Photographer Inside You: Part II


    Digital Photography School

  • Are You Making these 5 Common Mistakes with Your Photography

    A clever person learns from their mistakes. A wiser person learns from the mistakes others make. This article will identify the most common photography mistakes for you. It’s based on hundreds of hours teaching beginners through to professionals; do you still do any of these? I’m assuming you understand the essentials of photography; grab your copy of Photography: The Few Things You Need To Know if anything’s unclear.
    ?Photo1 0715

    1. Giving Up Too Early

    So many people do this. They’ve invested in an amazing camera, they’ve studied the essential techniques and then they’ve travelled to a great location; but as soon as they’re a little bit tired, hungry or bored – off they go. Even more common is not exploring the scene enough, perhaps assuming that the first photo will be the best. Experience says you’ll get better photos by taking the time to find all of the perspectives that the scene has to offer.

    On my workshops, I’m always the last person out photographing before meeting up with the others in the bar. The best light isn’t necessarily before the sun goes down! When you consider that there are billions of photographs on Facebook alone, it’s wise to do a little bit more to ensure your photos stand out from the crowd. If taking a certain photograph is inconvenient and a little stressful, you can be sure a lot of photographers would give up. Keep going a little bit longer than them and you’ll be rewarded with better photographs.
    ?

    2. Using a Wide-Angle Lens for Portraits

    When you turn on a compact camera, the lens will be at its widest setting. A dSLR lens is generally at its widest when it’s contracted to fit in your bag. A wide-angle is therefore normally a default setting for most photographers. But for portraits, its distorting effect can be incredibly unflattering, especially if you’re very close. To avoid creating a caricature of your subject (and ensure they enjoy being photographed!) zoom in to the telephoto end of your lens. This will flatten the perspective, making for much more attractive portraits. If your compact camera has a digital zoom (a little line when you’re zooming in), turn it off as it only reduces image quality.
    ??Photo2

    3. Getting Shaky, Motion-Blurred Photos

    This is one we’re probably all guilty of at times; I certainly am! At slow shutter speeds such as 1/8th and even 1/80th second, the camera will show any camera movement in the photos. Beginners don’t realise, and professionals often assume they’ll be okay and don’t want to raise the ISO. Unless it’s deliberate, camera shake can be distracting, and many competitions and magazines won’t use motion blurred pictures.

    The main way to get sharp photos is to keep the camera still, and one of the best methods is to use a tripod. But you don’t want to carry one of these, nor maybe even invest the money necessary to get a decent one. That’s fine. Modern lenses often have technology to reduce camera shake and modern cameras are very good at high ISO sensitivities (so you can use faster shutter speeds). To avoid this common mistake, ensure you’re as still as possible for the split second when you take the picture. Don’t be afraid to use a higher ISO sensitivity if your shutter speed is too slow. And try and find some sort of support to help keep the camera still.
    ?
    ?Photo3

    4. Photographing Buildings From Too Close

    To get it in, you point the camera up. This causes the vertical lines of the buildings to converge; to appear to slope inwards in the photo. This is made more obvious when you use a wide-angle lens; which will probably be necessary if the building is big and you’re right next to it. Ideally, you want the parallel lines in architecture to be parallel in your photographs. How can you achieve this? In theory, you need to be in line with the centre of the building. This is fully explained by the Pyramid Technique I teach on my courses.

    This normally puts the ideal camera position way above our heads. And unless there’s a convenient window opposite our building at the right height for us to use, we’ll have to compromise. Minimise the angle at which you photograph the building by getting back as far as possible. To minimise distortion, use a longer telephoto lens from further away instead of a wide-angle lens up close. Often trees and lampposts will get in the way, so use common sense and get back as far as possible without including too many distractions in the final photograph.
    ???Photo4

    5. No Clear Subject in the Photo

    Last but definitely not least, the majority of photographs will never be award-winning because it’s either not obvious what the photographer is showing us, or because there are too many distractions from the main subject. This common tendency is due to the difference between how we see the world and how the camera captures it. Specifically, we generalise what we see, highlight what’s important to us and ignore what’s not. I covered this in my article on DPS, Benefit From How You See The World. There are several fixes you can try to help overcome this. The main one, and probably the most famous, is just to get closer. Often, people want to capture the whole scene so use the widest possible lens from far away. But this makes the subject seem small, and because the images are probably only going to be seen a few inches high on a screen, a lot of impact is lost. Likewise, photographing people and animals often prompts a fear of getting too close. Do it anyway; get closer. Also, experiment with ways to make your subject stand out using colour and lighting ratios. Check for distractions in your background. And make sure you know what you’re photographing!
    ??Photo5

    That’s it! These are the five most common mistakes that photographers make. Check to see which ones you’ve been doing without knowing it. Ask a friend if you want a second opinion. Hopefully my ‘hard and fast rules’ will prove useful. As always, take them as guidelines only; ultimately only you can know if you’re happy with the photograph or not. And in case you haven’t already done so, remember to get your copy of my book Photography: The Few Things You Need To Know, priced for less than an espresso HERE NOW to ensure you get the most value from these articles. If you’re already enjoying your copy, tell your friends where to get it – www.GreatBigBear.com!??Ben Evans is an English Photographer in Barcelona who works internationally. Ben teaches photography classes in Barcelona and keeps a photoblog of ‘fine art street’ photos of Barcelona at www.i-Barcelona.com.
    Ben is the author of best-selling book, Photography: The Few Things You Need To Know, available now at www.GreatBigBear.com. He is working on two photography teaching projects, Better Than 90 Percent and Holistic Photography.

    He shoots Nikon, Hasselblad, Apple (iPad 3) and those little throwaway waterproof film cameras with the plastic lenses.

    Post originally from: Digital Photography Tips.

    Check out our more Photography Tips at Photography Tips for Beginners, Portrait Photography Tips and Wedding Photography Tips.

    Are You Making these 5 Common Mistakes with Your Photography


    Digital Photography School

  • Correcting Perspective in Photoshop and Photoshop Elements

    Photoshop perspective correction opener

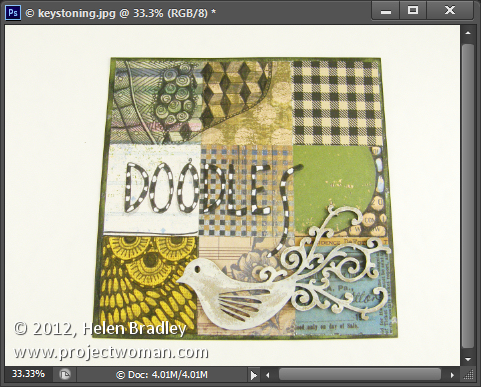
    Sometimes you’ll capture an image that should be rectangular but is anything but. In this example I shot an image of a 6 x 6 inch sheet of paper for a project. The aim at the time was to have a reference image before the project was shipped.

    Photoshop perspective correction step1

    Later I found I need to do more with the image and because it had been shot so casually the proportions were all wrong and the image does not look like a square sheet of paper. I also no longer have the project so reshooting is out of the question.

    Luckily Photoshop and Photoshop Elements both share a similar tool for adjusting perspective which will go a long way towards fixing an image like this.

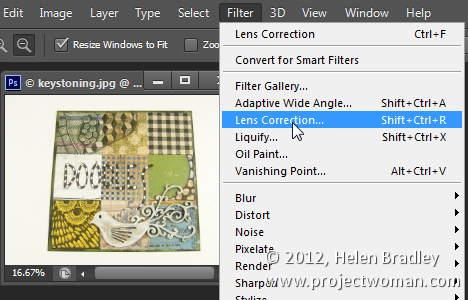
    To do this choose Filter > Lens Correction in Photoshop and then click the Custom tab to access the custom tools. In Photoshop Elements choose Filter > Correct Camera Distortion.

    Photoshop perspective correction step2

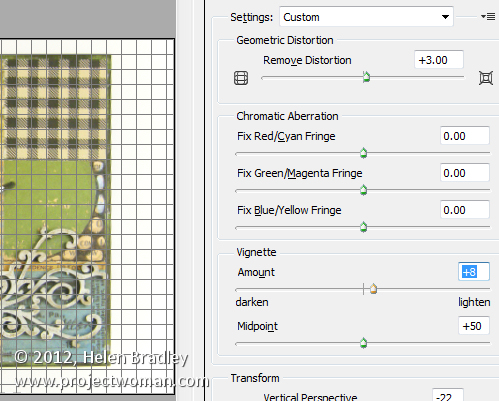
    Make sure the Show Grid option is checked and you may want to adjust the grid size so it is useful for determining the straightness of the edges in the image.

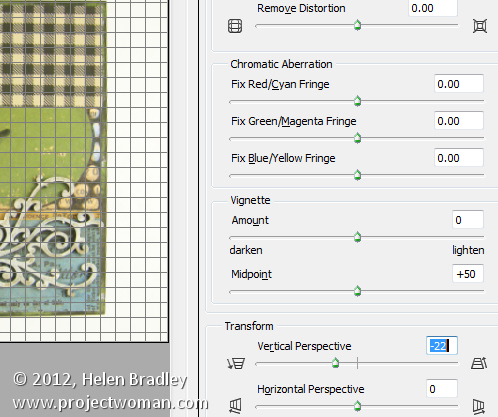
    The Vertical Perspective adjustment will fix this image’s perspective problems so drag it to the left to increase the width at the top of the image to adjust for the incorrect perspective.

    Photoshop perspective correction step3

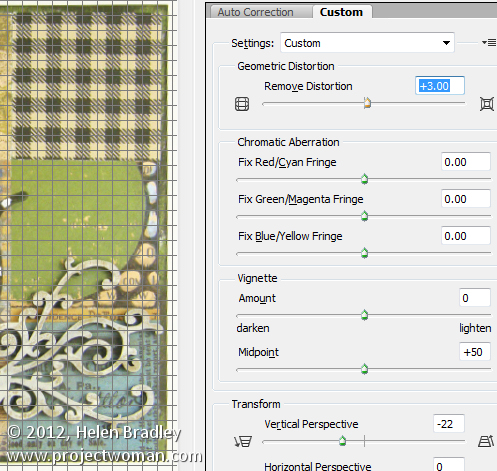
    When you do this you may notice that the image has some geometric distortion. In this case it’s barrel distortion and the edges of the subject are billowed out.

    To remove this adjust the Remove Distortion slider to counteract the distortion. It won’t be possible to get it perfect but it will be possible to reduce it to acceptable levels.

    Photoshop perspective correction step4

    In this same dialog you may occasionally want to adjust the Vignetting slider if your lens causes dark vignettes in the corners of the image. In most cases you will drag to the right to slightly lighten the edges of the image.

    Photoshop perspective correction step5

    Once you’re done click Ok to return to Photoshop.

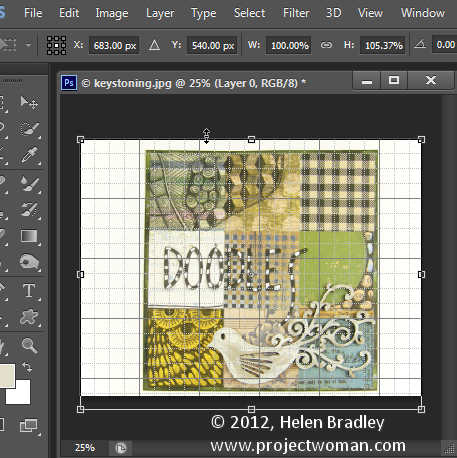
    The only problem that cannot be fixed in the lens correction filter is the one that would stretch the image so the subject looks closer to its original proportions which are of a 6 x 6 inch page.

    For this you’ll need to click the Move tool and drag up or down on the image to stretch it.

    If you need to stretch the image beyond the current image canvas dimensions, do so and confirm the change. Then choose Image > Reveal All to reveal the area of the image off the side of the canvas. While the final image isn’t perfect it looks a lot better than the original.

    Photoshop perspective correction step6

    This same tool can be used to adjust perspective on buildings which show a keystoning effect where the building appears to be narrower at the top than at its base.

    Post originally from: Digital Photography Tips.

    Check out our more Photography Tips at Photography Tips for Beginners, Portrait Photography Tips and Wedding Photography Tips.

    Correcting Perspective in Photoshop and Photoshop Elements


    Digital Photography School

  • Canon Powershot SX50 HS Review

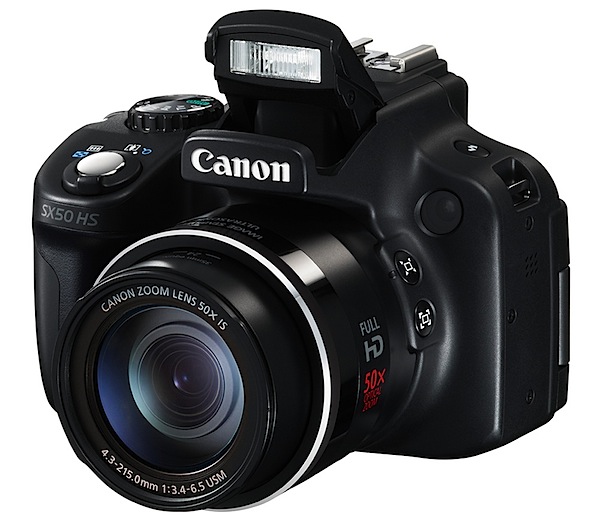
    Canon Powershot SX50 HS.jpg

    Camera companies love ‘world’s best’ labels, no matter whether they truly are ‘world’s best’ or merely biggest, smallest, longest, widest, quickest, smartest … or whackiest!

    However, it’s hard to ignore Canon and its description of the PowerShot SX50 HS as possessing the ‘world’s largest optical zoom range in a compact camera.’ Simply because, at time of writing, it is!

    Think of it this way: if you owned a 35mm SLR film camera, wouldn’t you simply love to clip on a zoom lens that ranged from an enjoyably wide 24mm to a fearfully long 1200mm? I know I would!

    But, get real, and theorise about the physical practicality of such a 35mm film lens! It would weigh a ton, stick far out from the camera and probably constitute a wind hazard! And forget handholding it.

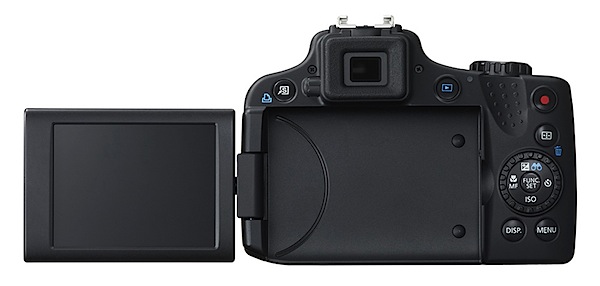
    Canon Powershot SX50 Review SX50 HS back.jpg

    In reality, the new Canon Powershot SX50 HS compact weighs just a little over half a kilo and is no larger than most compacts. Not pocketable but easy to carry, this new maxi zoom camera looks no larger than Canon’s first long zoom compact, the SX30 of two years ago.

    How do they do it? Don’t ask me!

    Canon Powershot SX50 HS Features

    Aside from the 12.1 megapixels packed into the CMOS the maximum image size is 4000×3000 pixels, or 34x25cm as a print. True, the 12.1 figure is lower than many other digicams out there but you stand a better chance of avoiding noise in the Canon’s slightly larger pixels.

    Movies? 1920×1080 Full HD.

    First up, you notice that the tiltable LCD screen is a little larger than many recent cameras, at 7.1cm and has lower resolution. However, there is the turret viewfinder which is ideal for bright light shooting. I found it useful, to a certain degree, quite low in resolution but helpful in pointing the camera!

    Many will be grateful that the array of external controls is limited.

    Bark 2.JPG

    The camera feels good in the hand and is well-balanced; you could operate it solely with the right hand with the lens at full wide …if you had to!

    Top deck: at left is the button to release the flash; to the right are the shutter button and zoom lever sited on top of the prominent speed grip; back a bit is the on/off button and mode dial where can be found positions for auto, Program AE, aperture and shutter priority, scene modes, custom settings etc.

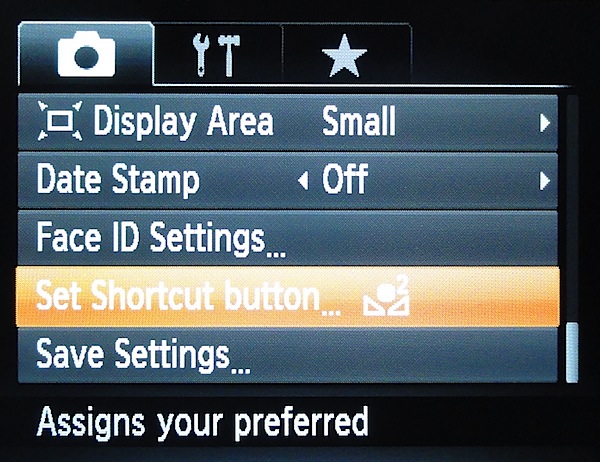
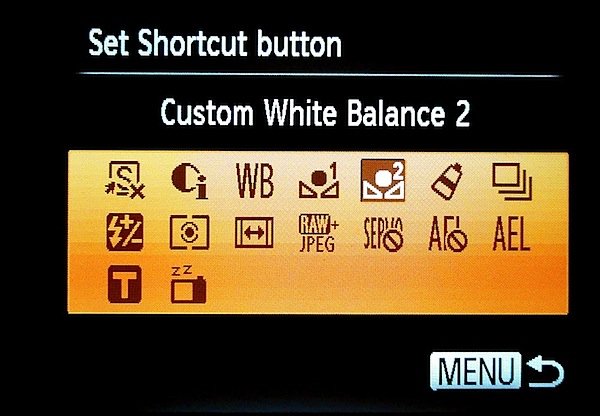
    At rear: a shortcut button is at far left … this gives two avenues to assign a function; to the right is replay, the four way rocker to access macro, timer, ISO setting and exposure compensation; lower is a button for the display options, including access to the turret finder and then the menu button.

    Framing Assist 2.jpg

    The viewfinder menu layout is less complex than many seen in recent months, a factor I suspect will be appreciated by many.

    Framing Assist 1.jpg

    There are two front mounted framing assist buttons which will considerably assist the use of the long zoom: if you’re zoomed in at any distance, the button temporarily whizzes the zoom back to full wide to let you know where you are, with a white outline indicating where you were (in tele)!

    Canon Powershot SX50 Distortion

    Slight barrel distortion was evident at the wide end of the zoom, along with slight pincushion distortion at the tele end.

    Canon Powershot SX50 HS ISO Tests

    Canon SX50 HS ISO 80.JPG

    Canon SX50 HS ISO 400.JPG

    Canon SX50 HS ISO 800.JPG

    Canon SX50 HS ISO 1600.JPG

    Canon SX50 HS ISO 3200.JPG

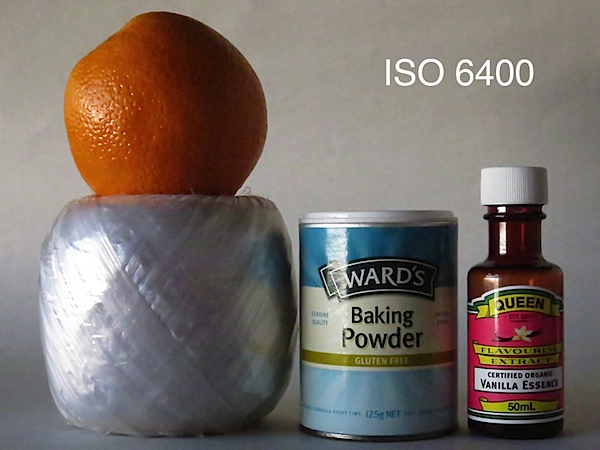
    Canon SX50 HS ISO 6400.JPG

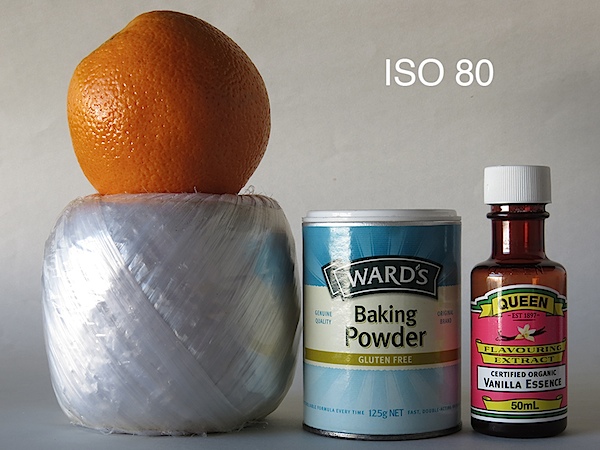
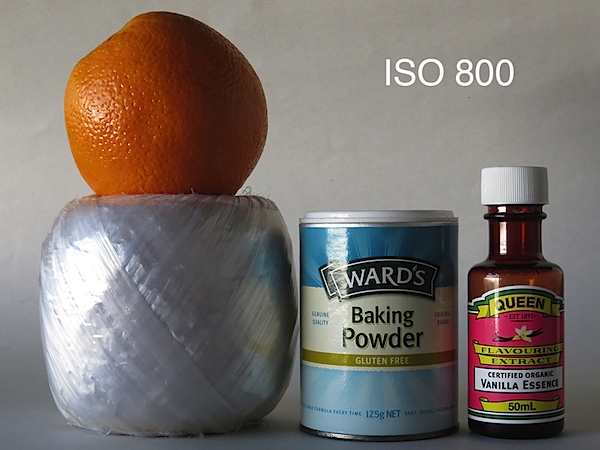
    A good performance right up to ISO 1600; at ISO 3200 sharpness began to drop off; by ISO 6400 sharpness was well gone but surprisingly noise was not objectionable.

    Narrabeen lagoon wide 1.JPG

    Narrabeen lagoon tele 1.JPG

    Canon Powershot SX50 HS Review Verdict

    Quality: above average. Bear in mind, using the tele end of the zoom will see you face off atmospheric haze. In this shot the bridge capture by the tele end was actually 1.8km or just over a mile away.

    Why you’d buy the Canon Powershot SX50: the 50x zoom!

    Why you wouldn’t buy the Canon Powershot SX50: the 50x zoom! Too hard to deal with, you need some patience, a decent tripod and suitable subject matter to use it satisfactorily.

    Take note: if you plan to do any amount of long lens shooting, go get yourself a decent tripod; try out the camera in the store before you buy and avoid wobbly legs!

    Canon Powershot SX50 Specifications

    Image Sensor: 12.1 million effective pixels.
    Sensor: 11mm CMOS.
    Metering: Evaluative, centre-weighted, spot.
    Lens: f3.4-6.5/4.3-215mm (24-1200mm as 35 SLR equivalent)
    Exposure Modes: Auto, Program AE, shutter and aperture priority, manual.
    Shutter Speed: 15-1/2000 second.
    Memory: SD/SDHC/SDXC.
    Image Sizes (pixels): Stills: 4000×3000 to 640×480.
    Movies: 1920×1080, 1280×720, 640×480.
    Viewfinder: Turret and 7.1cm LCD screen (461,000).
    File Formats: JPEG, MPEG4.
    Colour Space: sRGB.
    ISO Sensitivity: Auto, 80 to 6400.
    Interface: USB 2.0, HDMI mini, DC input.
    Power: Rechargeable lithium ion battery.
    Dimensions: 112.5×87.5×105.5 WHDmm.
    Weight: 551 g (body only).
    Price: get a price on the Canon PowerShot SX50 HS at Amazon.

    Post originally from: Digital Photography Tips.

    Check out our more Photography Tips at Photography Tips for Beginners, Portrait Photography Tips and Wedding Photography Tips.

    Canon Powershot SX50 HS Review


    Digital Photography School

  • 5 Tips for a Faster Lightroom Workflow

    At a recent workshop I joined, several of the attending photographers expressed frustration with the slowness of Lightroom, and were surprised to see how quickly I am able to process my photos in Lightroom. So I thought I’d share some of the workflow tricks that I’ve picked up over the last few years that have helped me get faster in Lightroom.

    In addition to specific workflow practices, there are also some important configuration changes you can make to optimize Lightroom performance. However, in this post I will focus on workflow technique, not application configuration. Check out this post for more information on configuring Lightroom for optimal performance.

    Note: The tips and screenshots in this article are from Lightroom 4.2, but most of these ideas are also applicable to older versions of Lightroom.

    Let’s get on to the tips.

    1. Start with Spot Removal, and use the 2003 process

    As you begin to stack up edits in Lightroom, some of the tools get slower and slower. This is the nature of nondestructive editing. None of your edits have changed the underlying image data, so the more you do with an image, the more work your computer has to do to update the preview of your image in real time as you move sliders or work with other controls.

    I’ve found this phenomenon to be the most annoying when using the Spot Removal tool to retouch portions of an image. Using the Spot Removal tool at the end of your workflow can be painfully slow. To address this, I’ve formed the habit of always doing spot removal first, before applying any other edits to an image. This is much faster, and there is also a creative advantage to removing the small distractions, before you go on to more serious editing work.

    To further improve the performance of the Spot Removal tool, you can change to the “2003 Process.” This is especially helpful if you have an older computer. The process version is the algorithm that Lightroom uses to decode your Raw image file and display it in the Develop Module. Different process versions give you different options in the Development Module, with significant improvements in the later versions. The 2003 Process is the most basic, and therefore the fastest. The 2012 Process gives you much more flexibility, but is more resource intensive and forces your computer to work harder.

    Check out this post for more information on process versions.

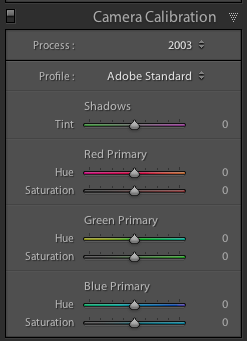
    The process version setting is in the Camera Calibration section of the Develop Module:

    screenshot showing Lightroom Camera Calibration Settings

    In my own workflow, especially for portrait retouching were I use the Spot Removal tool extensively, I start by changing to the 2003 process, doing only spot removal, and then changing back to the 2012 process for the rest of my edits.

    CAUTION: since the process versions are very different, some controls get zeroed out when you move between process versions. Avoid making adjustments like contrast, tone curve, noise reduction, sharpening, etc while you’re in the 2003 process as you might lose some of those settings when you return to the 2012 process. Just do your spot removal in the 2003 process, and then go back to 2012 process for the rest of your editing work. Doing this at the very beginning of your workflow saves time and makes for a happier, snappier, spot removal experience.

    2. Learn (and use) keyboard shortcuts

    There’s a lot going on in the Lightroom interface. Using just your mouse or trackpad to get from place to place can really slow you down. Use keyboard shortcuts to jump straight to the tool you need.

    Lightroom has a help screen that will show you the keyboard shortcuts for the module you’re currently in. Look under Help > Lightroom Module Shortcuts, or use this keyboard shortcut:

    Mac: CMD /
    Windows: CTRL /

    screenshot of the Lightroom Keyboard Shortcut help screen

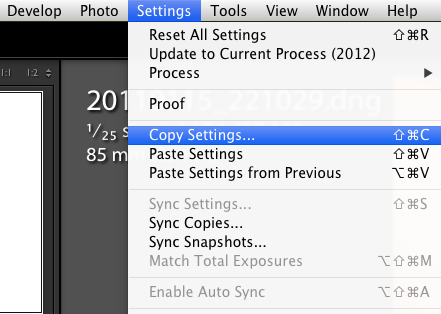
    In additional to consulting this screen, I also recommend learning the shortcuts as you go. As you navigate a menu for a certain control, take note of the keyboard shortcut and try to use it next time:

    screenshot showing one of the menus in Lightroom

    “Note to self, press SHIFT CMD C next time!”

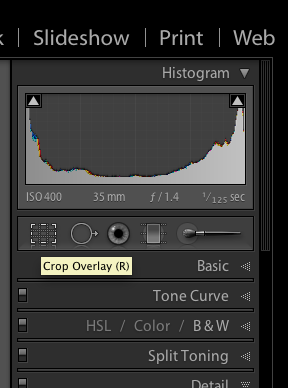
    Or when you reach for your mouse to access a tool in the interface, like the crop tool for example, hover over the tool and take note of the keyboard shortcut, then try to remember it for next time.

    Screenshot showing a tooltip in Lightroom

    “Note to self, press R next time!”

    This is a good way to teach yourself the keyboard shortcuts that are most useful for you in your own workflow. You’ll be learning them in the order that is most useful for you personally.

    There are lots of keyboard shortcuts in Lightroom, but here are the ones I use the most:

    Changing Modules and Views

    E – Enter Loupe View
    D – Enter Develop Module
    G – Enter Grid View

    Develop Module Shortcuts:

    \ – Toggle before / after view
    Q – Enter Spot Removal Mode
    M – Enter Graduated Filter Mode
    K – Enter Adjustment Brush Mode
    V – Toggle between Black and White and Color
    W – White Balance Selector
    R – Enter Crop Mode
    Shift CMD C (Shift CTRL C on Windows) – copy develop settings
    Shift CMD V (Shift CTRL V on Windows) – past develop settings

    3. Enable Lens Correction at the end of your processing workflow

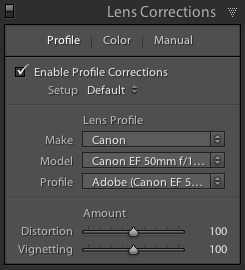
    Lightroom includes lens profiles for many common lenses. Lens Correction works well to remove distortion and vignetting, especially from wide angle lenses. Sometimes this improves the image, sometimes it doesn’t.

    If you choose to enable lens correction for a particular photo, enable it near the end of your workflow after you’ve made your other adjustments. Many of the controls in Lightroom, especially the Spot Removal tool and the Adjustment Brush, run more slowly with Lens Correction turned on.

    screenshot showing Lightroom Lens Corrections Settings

    4. Create Develop Presets for commonly used settings

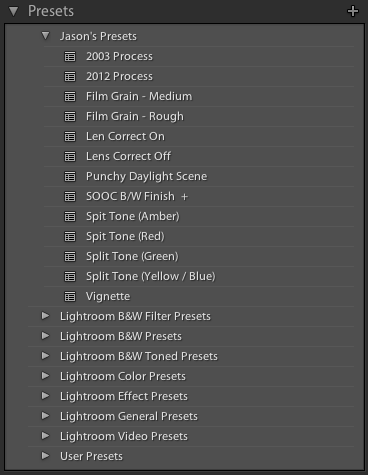
    In addition to using develop presets to quickly apply a desired visual effect, I also use them to reduce the number of mouse clicks required to access certain controls in the GUI, for which there is no keyboard shortcut. This is particularly useful for changing process versions quickly, as mentioned in #1 above, or for toggling lens corrections on or off.

    screenshot showing Lightroom Develop Presets

    I’m basically using develop presets to pull some commonly used controls to the top of the GUI. It’s like creating a custom button.

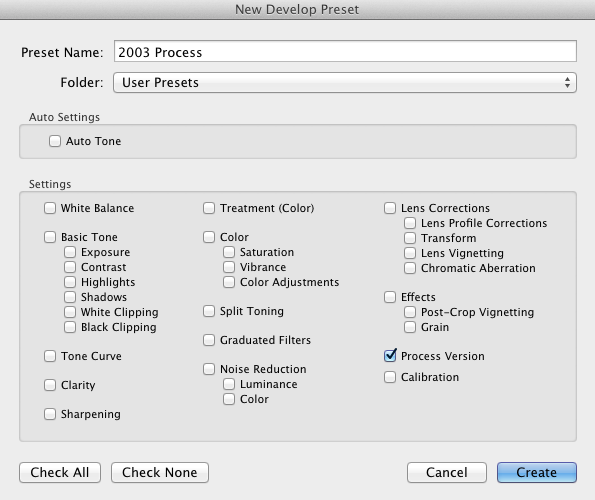
    To create a Develop Preset:
    1. Apply some settings to a photo in the develop module.
    2. Navigate to the Develop menu and select “New Preset…”
    3. Check the box next to the settings you want captured in the new Develop Preset

    screenshot showing how to create a Lightroom Develop Preset

    5. Shoot smaller files

    This is not for everyone, and not for every situation, but there are times when you don’t need that full 18, or 22, or 36 megapixel Raw file. Depending on the project at hand, a 10mp file may be more than enough, and shooting smaller files are much faster to work with on the computer. Personally, I have a hard time letting go – when I shoot smaller files I always worry that I’m missing something. But it’s worth considering a smaller file size from time to time. What are you going to do with the photo? If you have a specific usage in mind and you know that you don’t need the full resolution your camera can capture, try shooting a smaller size.

    I hope this article has been helpful, and that you’ve found at least one trick that you can use to get a little faster in Lightroom. Studying and processing your photos improves your creative vision, which over time impacts your shooting decisions. So a solid post-processing workflow is essential to developing yourself as a photographer.

    Post originally from: Digital Photography Tips.

    Check out our more Photography Tips at Photography Tips for Beginners, Portrait Photography Tips and Wedding Photography Tips.

    5 Tips for a Faster Lightroom Workflow


    Digital Photography School

  • Portraits with Props: Weekly Photography Challenge

    Szúrópróba

    As a followup to our recent post on Adding Interest to your Portraits with Props we thought it might be fun to do one of our weekly challenges on the topic.

    So this week your challenge is to take and share a portrait photo that has some kind of ‘prop’. Really it can be any kind of prop (subtle or not) that you like whether it be some element of clothing (a hat, scarf etc), an accessory (sunglasses), having your subject hold something (flowers, balloons, an umbrella) or do something (type on a computer, blow a bubble with gum, ride a bike) or anything else.

    Have some fun with it!

    Once you’ve taken and selected the ‘Portrait with Props’ image that you’d like to share – upload it to your favourite photo sharing site or blog and either share a link to it or – embed them in the comments using our embed tool to do so.

    If you tag your photos on Flickr, Instagram, Twitter or other sites with Tagging tag them as #DPSPROP to help others find them. Linking back to this page might also help others know what you’re doing so that they can share in the fun.

    Also – don’t forget to check out some of the great shots posted in last weeks challenge – Backyard challenge where there were some great shots submitted.

    Post originally from: Digital Photography Tips.

    Check out our more Photography Tips at Photography Tips for Beginners, Portrait Photography Tips and Wedding Photography Tips.

    Portraits with Props: Weekly Photography Challenge


    Digital Photography School

  • 365 Days of Alex Stoddart

    Most of Alex’s works are self-portraits, but one can’t notice a shade of narcissism or self-admiration. Here Alex-model and Alex-photographer are joined in an ideal creative tandem, where participants literally can understand each other without words. Daily I’m watching Flickr of Alex, to see what will take my breath away today. In every photo you can find things that are Continue Reading

    The post 365 Days of Alex Stoddart appeared first on Photodoto.


    Photodoto

  • Expression Over Perfection – Living With Limits

    Subject First, Technique Second

    I have been taking pictures on a serious basis for approximately three years now, and I would say that about two years of this have been consumed with learning about gear and technique.  So much of the material you will read and be exposed to revolves around the need to get the right equipment and learn the right techniques. This is certainly a great place to start and pretty fundamental in being able to take decent pictures.   There is however a point at which it comes time to put away the camera catalogs and start thinking about the mental tools and techniques needed to really take things to the next level.

    “Pixel Peepers” will utterly hate the whole concept of a quality photo being dependent on something which cannot be assessed in terms of its physical performance, but I guarantee that an image which perfectly captures the moment will out shine a technically perfect shot which doesn’t.  In essence a great image is not absolutely dependent on gear and to illustrate I’d like to share with you a picture and a story.

    Taking the Shot

    This is a photo from a friends wedding which I took of the bride and groom as they left at the end of the night.  In truth I wasn’t planning on taking any pictures that day, however the father of the bride asked if I would, how could I possibly say no?  Having left all the ‘right’ gear at home and having no idea as to what would be happening or when, I have to say I was slightly stressed as I didn’t want to disappoint but was pretty sure I would struggle.

    The end of the party came and the happy couple started to make their way out of the venue.  It was hopelessly dark and I knew that a decent exposure would be difficult.  The only light available was from the sparklers and to make matters worse the lack of direct lighting meant that the autofocus was hit or miss.  I quickly decided to shoot to the limits of the situation by shooting in aperture priority and dialing in a F stop which I knew would give me a reasonably forgiving depth of field without being too restrictive.  I cranked up the ISO to 2000 (as high as I dared go) and flicked on the high-speed continuous shooting mode.  The result was a shutter speed of about 1/30 which I know from experience I can just about hand hold.

    I knew that I needed to shoot low as I wanted to frame the couple against the reception venue.  I also needed time to get focused whilst doing all I could to ensure sure I had a clear shot.  The action lasted less than a minute and I have to say I was fairly pushy with anyone straying into my line of sight.  I would completely believe it if more than a few people wondered who the guy with the camera thought he was.  Never the less I clicked away taking as many shots as I possibly could.

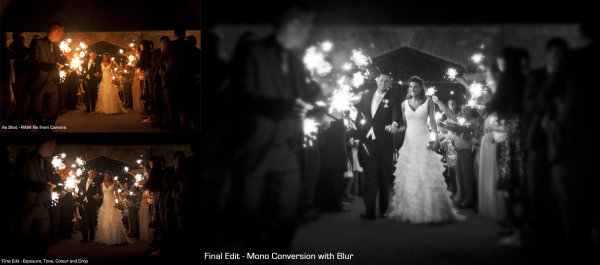
    Straight out of the camera the images were grainy because of the high ISO and slightly out of focus because of the poor light.  I have to say that when I first got the files off the camera my heart sank but on closer inspection, the bride has a fantastic expression and looks fabulous in her dress.  The fact that groom is not completely in focus doesn’t detract from the story of the image and in fact adds to the sense of drama.  With a little effort in post I thought it might be possible to get something decent.  I won’t go into the full details but processing mainly consisted of correcting the basics (white balance, exposure and cropping) plus conversion to mono using Lightroom before using Photoshop to apply some curve corrections before finally adding a blurry vignette for additional focus.  The image below shows the RAW image plus the major steps.

    Crappy Shot, Beautiful Photo

    Expression Trumps Perfection

    I’ll leave it to you to decide if this is successful shot or not.  When I showed this to the bride, she loved it but that said maybe she was being polite.

    Personally I think that the mono conversion helps to compliment the noise and grittiness of the exposure and that the story combined with the beautiful expression on the brides face overcomes the technical shortcomings of the final image.  The experience of taking this picture underlines the importance of “Expression over Perfection”, by shooting to the limits of the situation I was able to concentrate on the other more important aspects of composition, timing and telling the story of the moment.

    Next time you are struggling with the technical aspects of a shoot or if you find yourself in a situation which is less than ideal, remember this saying, set your camera to the best possible settings and if it all goes really wrong .. there’s always Photoshop!

    Post originally from: Digital Photography Tips.

    Check out our more Photography Tips at Photography Tips for Beginners, Portrait Photography Tips and Wedding Photography Tips.

    Expression Over Perfection – Living With Limits


    Digital Photography School

  • How To Photograph Reflections In Water

    One of my favourite things to do when I travel is to go on a quest to find a body of water that has a reflection of a landmark.

    Photographing a reflection creates a unique image of an often photographed subject by adding interest and depth to your photograph.

    The next time you travel add these to your shot list and come home with a set of dynamic images to show off your trip.

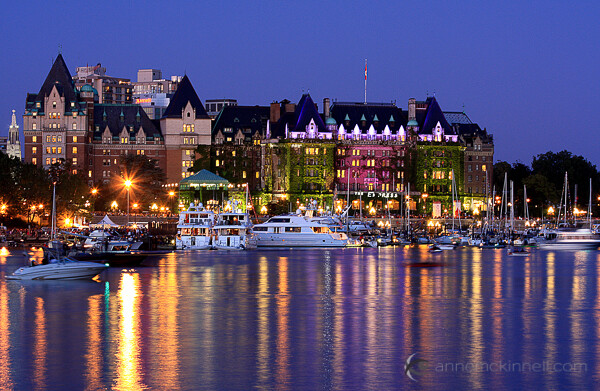
    City Lights at Twilight

    When the sky is that cobalt blue colour before night arrives, and lights from nearby buildings reflect off the water, magic happens.

    Take this example of a waterfront hotel on a summer evening when the marina in the foreground was full of boats. Just after sunset the coloured lights on the exterior of the hotel reflected off the cobalt blue water making a very energetic image.

    The Empress Hotel, Victoria, British Columbia, Canada

    The Empress Hotel, Victoria, British Columbia, Canada

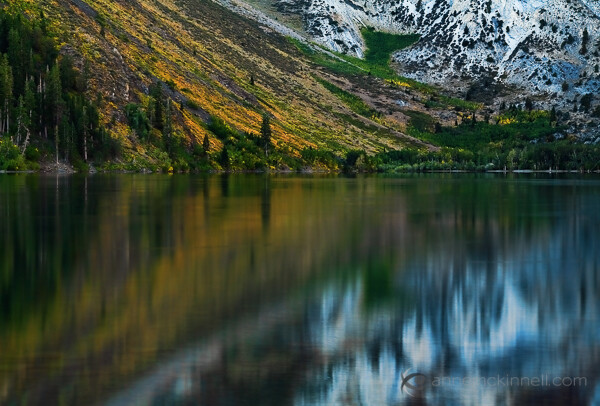
    Calm Lake in the Morning

    When you get up early in the morning water on a lake will often be flat calm making a perfect reflection. Capturing a perfect reflection is harder than it sounds because any amount of wind at all will cause ripples and blur the surface of the water.

    If you can find a lake in the mountains there will be a better chance of finding still waters in the morning. Your shot will be even better if the morning’s first rays light up the peaks of the mountain which is reflected in the lake.

    When you scout your location, take a compass so you can find a subject in the west that will light up when the sun rises. Then put some water between you and that subject and you have the ingredients for a great shot.

    Convict Lake, California

    Convict Lake, California

    The calm lake shot is a good opportunity to break the rule of thirds and go for perfect symmetry in your image. Put the horizon line in the middle of the frame and include the same amount of subject and reflection.

    You want to avoid direct light on the water because that causes glare. The best situation is when you have a colourful object that is has direct light on it and that subject is reflected in water which is in the shade. Then the reflection will contain saturated colours and no glare.

    Not So Calm Lake

    Ripples in the water are not necessarily bad. It just produces a different effect. You can get this effect by waiting for the wind to come up a little or just by using a longer exposure which allows time for the water to move while the shutter is open. Either way it will create a more abstract feel by adding texture to the water.

    Convict Lake, California

    Convict Lake, California

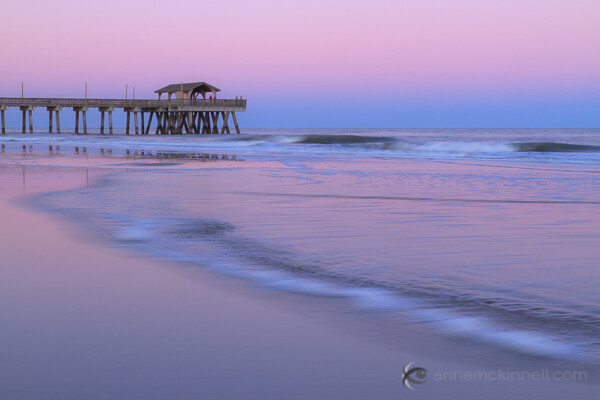
    The Ocean at Sunrise or Sunset

    Obviously you will not get a perfect reflection when you photograph the ocean because the water is always moving. But it will still reflect the colour of the sky and if you get a sunrise or sunset with great colour you can multiply that effect by including the reflected light in your composition.

    Tybee Island, near Savannah, Georgia

    Tybee Island, near Savannah, Georgia

    Birds

    Woodstork at the Ding Darling Wildlife Refuge, Florida.

    Woodstork at the Ding Darling Wildlife Refuge, Florida.

    I love capturing perfect bird reflections. They can be hard to pull off because you need a number of things to come together to make the image work.

    • First, there can be no wind at all.
    • Second, you need great light (as always).
    • Third, you need a bird (ok that was pretty obvious but easier said than done).

    To make this image of a woodstork I had to go back to the location before sunrise three mornings in a row before I got still water. Then I had to find a position first, remain very still, and hope a bird would come. If the bird is there first, and you try to approach, it doesn’t usually work out.

    I like images where the bird is moving a bit so there are little ripples around its legs that define the surface of the water.

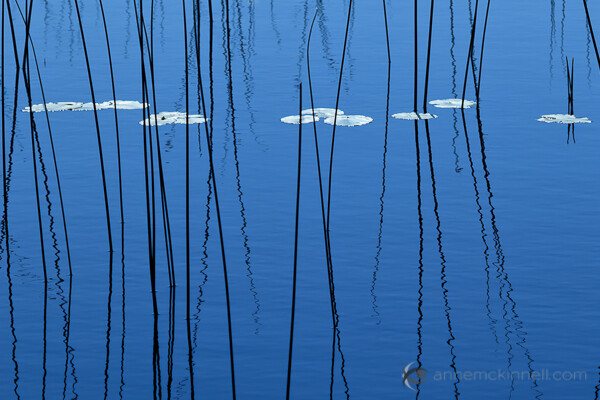
    Reeds

    Look for reeds or other grasses sticking out of the water that can make a great abstract image. If it were not for the lilly pads in this image, it might be hard to tell where the surface of the water is.

    Green Point Pond, Gros Morne National Park, Newfoundland, Canada

    Green Point Pond, Gros Morne National Park, Newfoundland, Canada

    Just the Reflection

    The subject receiving the direct light does not necessarily need to be in the frame. Interesting compositions can be found if you leave the main subject out of the frame and only include the reflection in the shot.

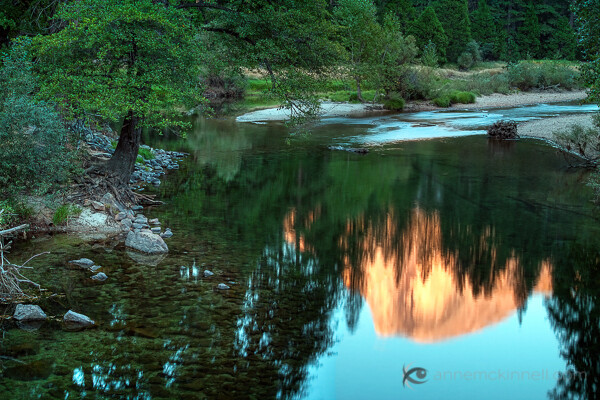
    In this image of Half Dome in Yosemite National Park, the direct light falling on the dome was very harsh so I decided to leave it out of the frame and only include the reflection to create a more abstract impressionist feel.

    Reflection of Half Dome, Yosemite National Park, California

    Reflection of Half Dome, Yosemite National Park, California

    To go even more abstract, find reflections of colourful subjects in rippled water. Don’t worry if you cannot identify what the main subject is.

    Kayak Reflection

    Kayak Reflection

    This image is reflections from a stack of kayaks on a dock at a marina. The ripples are caused by fish swimming under the surface.

    Fall Foliage in New Hamshire

    Fall Foliage in New Hamshire

    This image was made in New Hampshire during the very colourful display of fall foliage.

    It was a windy day, so photographing the trees wasn’t working out very well. I decided to go for the abstract look by photographing the reflection of the trees in the water which was rippled from the high winds.

    Tips

    Remember your choices: the subject and its reflection; just the reflection; still water; and blurred water.

    Direct light on water creates glare – you want the direct light to fall on your subject which is then reflected in water which is in the shade. If there is glare, you can use a polarizing filter to reduce or even remove it.

    Try using a graduated neutral density filter. Usually the reflection is a couple of stops darker than the main subject so you can use a graduated neutral density filter to even things out. If you don’t’ have one, you can always try the digital equivalent in Lightroom or Photoshop. But remember the reflection part of the image should still be slightly darker. If you make it as bright as the main subject the image will not look right.

    Use a low angle to maximize the amount of reflection in the frame.

    Post originally from: Digital Photography Tips.

    Check out our more Photography Tips at Photography Tips for Beginners, Portrait Photography Tips and Wedding Photography Tips.

    How To Photograph Reflections In Water


    Digital Photography School

  • Google+, The Nicer Social Network for Photographers

    Are You on Google+ Yet?  If So Please Post a Link to Your Google+ URL Here

    For the last few weeks I’ve been thinking a lot about online conversations. It feels like I’m constantly in one somewhere on some site.

    More and more for me these are happening on Google+. I used to spend almost all of my social time online in Flickr group discussion threads. I stopped visiting Flickr groups for a while due to personal harassment — but you know what, it wasn’t just me who left, the velocity of quality conversations in Flickr groups have gone wayyyy down more broadly speaking in the past year.

    This is not just a subjective thing — it’s easily measured ojbectively as well. Flickr Central is one of the oldest/largest/most active groups on Flickr. Over there years (as counted by threads) 11,503 conversations that have gone on there. Some are very successful, some are not.

    If you look at Flickr Central today you’ll see that the time stamp for discussions on the first page goes back two weeks. This was not always the case. It used to be that the entire first page of discussions in Flickr Central were from the past 48 hours. Clearly the velocity of conversations in this Flickr group has gone way down. I suspect the same goes for other groups as well. Many of the groups recommended to me as “groups that Flickr has noticed” on the groups page haven’t had conversations in months, in some cases even years.

    Meanwhile, over at Google+, in the past year I’ve been involved in some of the best conversations that I ever remember happening anywhere on the web. Interesting conversations about photography and art and meetups and hangouts and all kinds of fun things. it seems like there is always some great conversation somewhere on Google+ to jump into.

    Over the course of the past few weeks I’ve jumped back into a few Flickr conversations to see what it feels like. What I’ve noticed is that the tone of conversations on Google+ feels so much more positive than it does at Flickr. There’s so much less snark and bitterness and negativity overall. I hadn’t seen the difference so dramatically before, but after having been gone awhile it felt more evident.

    This made me think about what Google+ was doing right for community that Flickr is not.

    When I first joined Google+ one of the things that I noticed is that some of the more hostile individuals from many of the old Flickr groups showed up. Some personal attacks took place, they aired their gripes about different things, typical BS hater stuff — but you know what? These people were quickly marginalized and moved out of the way to create a more positive environment. I blocked many of these people and so did so many other photographers on G+.

    A few weeks went by and these people were just as hostile and negative but they were basically shouting to an empty room. The majority of positive forward thinking photographers on G+ had tuned them out with the tools that we were given. What we were left with was a more positive filtered G+ experience. I went back a few days ago to look at a few of the accounts of people that I blocked and you know what — they are gone. They quit G+. By empowering a mostly positive oriented community these people found no audience to bitch at and they left. Meanwhile, more constructive social photographers on G+ carry on.

    Now, one worry with filtering out criticism is that it hurts meaningful conversation because all conversation is not always puppy dogs and roses, but that also hasn’t happened on Google+. Lots of criticism has gone on in tons of threads. The difference is though that the criticism feels much more respectful than some of what I’ve experienced in Flickr groups. People disagree on Google+ they just do it respectfully.

    By giving users more powerful blocking tools on G+ Google has built a nicer community. A nicer community feels so much more enjoyable.

    Every so often I’ll find someone new who comes along and leaves some sort of assholish comment in a thread on Google+. It’s almost delightful at how easy it is to block them and make them invisible.

    In poking around Flickr Groups over the past week I did find what felt like some high quality conversations to me, I read them, I lurked — but I didn’t participate. The reason why I didn’t participate was that I noticed some of the toxic types that I’d run into previously on Flickr or G+. I’m sure I would have jumped into these conversations if I hadn’t seen them there, but what’s the point of jumping into a conversation about fine art photography when you know someone is just going to be a jerk?


    Thomas Hawk Digital Connection