Category: Photography

  • Photoshop Masks 101

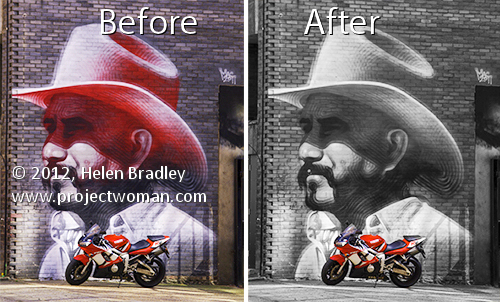
    Photoshop masks 101 before after

    When it comes to fixing images in Photoshop or Photoshop Elements the ability to use masks to do your edits is invaluable. By using a mask instead of, for example, the Eraser you get an edit which can be changed or even removed any time in the future.

    However masks aren’t easy to use or even understand when you first get started. In fact they can be downright scary. To help you get started here is a quick and easy technique that can be achieved using masks. Doing it will show you a situation in which a mask is a good editing choice. You will see how to add a mask to a layer and how to use it to edit the image. By the end of the process you will be on your way to understanding how to use masks in your photo editing workflow.

    The effect that I’ll be creating is one that you see in a lot of wedding albums and advertisements. It is an element of color in an otherwise black and white image. It can be achieved using masks and that’s what we’ll do here.

    Start by opening an image that has some colorful element of interest that you can show in color while you turn the remainder of the image into black and white. Here I’ll turn this graffiti image black and white and leave the bike in color.

    Photoshop masks 101 step1

    Make sure your Layers palette is visible. If not, choose Window > Layers to display it.

    Photoshop masks 101 step2

    Right click the Background layer in the Layers palette and choose Duplicate Layer and click Ok. This makes a duplicate of the image layer.
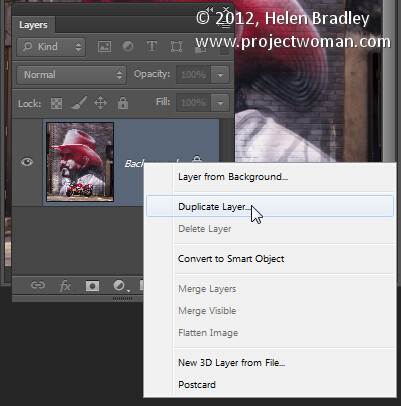
    Photoshop masks 101 step3

    With this layer selected, choose Image > Adjustments > Desaturate to turn the image into black and white.

    Photoshop masks 101 step4

    Notice that the Layer palette contains a black and white layer and a color layer. The black and white layer is at the top of the stack which is why you are seeing a black and white image.

    At this point we’ll add the mask so we can use it to bring back the color in a specific are of the image. To do this with the Background Copy layer still selected choose Layer > Layer Mask > Reveal All.

    Photoshop masks 101 step5

    This adds a white filled layer mask to the layer – notice the white box which appears in the layer palette next to the image thumbnail – that’s the mask.

    Photoshop masks 101 step6

    A word about masks

    Right now all you need to know about masks is that you can paint on them with black, white or shades of gray.

    When you paint with white on a mask you reveal any content on the current layer – in our case that is the black and white layer.

    If you paint with black you’ll reveal the content on the layer below the current layer – in this case the color layer. You might like to think of it as poking a hole in the top layer so that you can see part of the layer below.

    If you paint with a shade of gray you’ll be seeing part of the layer below and part of the current layer. The hole that you’re punching through the top layer will be semitransparent.

    Bring back the color

    To work on this image, select the brush tool and select a small brush with a hardness of around 75%. Make sure black is set as the foreground color and click on the white mask thumbnail in the Layers palette to target the mask. It should have a border around it as in this image:

    Photoshop masks 101 step7

    Now paint on the photo over the areas that you want to bring back color in. Instead of seeing black paint on your image as you might expect to see, you will see the color coming back.

    Photoshop masks 101 step8

    Look at the mask thumbnail in the Layers palette and notice it has some black markings in it where you painted on the image.

    If you make a mistake and paint back too much color, switch the paint color so that you are painting with white and paint out the areas that you want to return to black and white.

    Oops!

    If you are working with a mask and find that the brush is painting black or white paint on your image it is because the image thumbnail is selected in the Layers palette and not the mask thumbnail. When you select the mask thumbnail it will have a small white border around it so you can tell it is active and selected.

    The benefit of using a mask for this type of effect is that you can paint the effect on or off the image as desired. This gives you a lot more flexibility in editing your image. While this is a very simple example it does give you a starting point for learning to use masks in your photo editing.

    When you save this photo, save it as a psd format file if you want to be able to come back later and adjust the mask – the psd format saves layers and layer masks.

    If you are familiar with using Adjustment Layers in Photoshop you could apply this effect using an adjustment layer to desaturate the image and paint on the Adjustment Layer’s mask to bring the detail back. If you are not familiar with using Adjustment Layers then the process that I have outlined will give you the same results but just a different way of achieving it.

    Post originally from: Digital Photography Tips.

    Check out our more Photography Tips at Photography Tips for Beginners, Portrait Photography Tips and Wedding Photography Tips.

    Photoshop Masks 101


    Digital Photography School

  • How To Experience Rapid Growth As A Photographer

    Growth is a direct result of being outside your comfort zone. But being outside your comfort zone can be wonderful thing and it can also be your worst nightmare. The trick is in striking the perfect balance between doing what you know how to do well and doing what you have no idea about. Let’s say someone asks you to Continue Reading

    The post How To Experience Rapid Growth As A Photographer appeared first on Photodoto.


    Photodoto

  • Winter Reads: Winters Reads

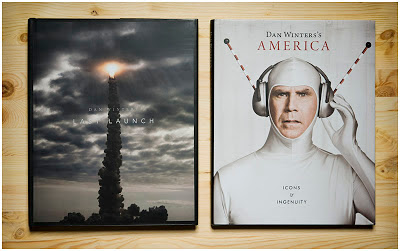
    What's better than a new book from Dan Winters? Try two new books from Dan Winters.

    Both are gorgeous; both are limited press runs. So if you delayed getting your copy of his Periodicals book before it went out of print, don't miss out this time.

    Short version: Last Launch is a love letter to the recently closed space shuttle program; Dan Winters's America is like having a one-man exhibition on your coffee table.

    More, and pics, inside. Read more »


    Strobist

  • Getting Down Low in Wildlife Photography

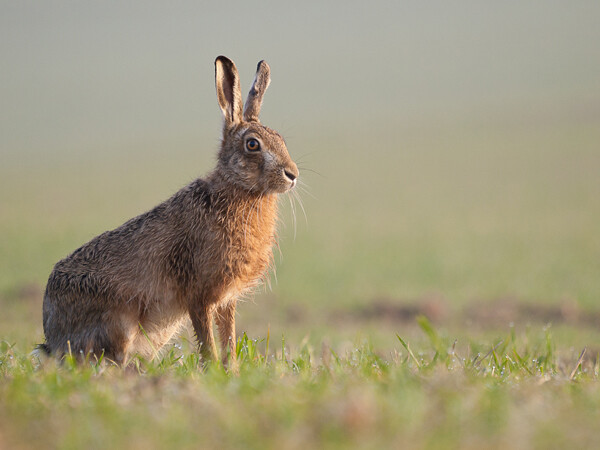
    When photographing wildlife, the images that most resonate with the viewer are those that evoke emotion and offer an insight into the world of a particular animal.  There are numerous tips and pieces of advice that can be given to help improve your wildlife photography but the one tip that is the easiest to implement, and will show immediate benefit, is to get down low when taking your wildlife images.

    Brown Hare (Lepus europaeus)

    Brown Hare (Lepus europaeus)

    Here are three reasons to persuade you to try it next time you are out taking photos of wildlife:

    1. Getting closer

    If you are shooting wild animals, as soon as they become aware of your presence, they will often retreat in the opposite direction.  You typically can’t just walk up to wildlife and expect it to pose for you and getting down low is only part of the good field craft required to get closer to wild animals.  By lying down, you will be far less noticeable than by standing upright or crouching, allowing you to crawl much closer to your subjects before they either become aware of you, or feel threatened.  Often, good field craft is better than the longest telephoto lens for capturing frame-filling shots.

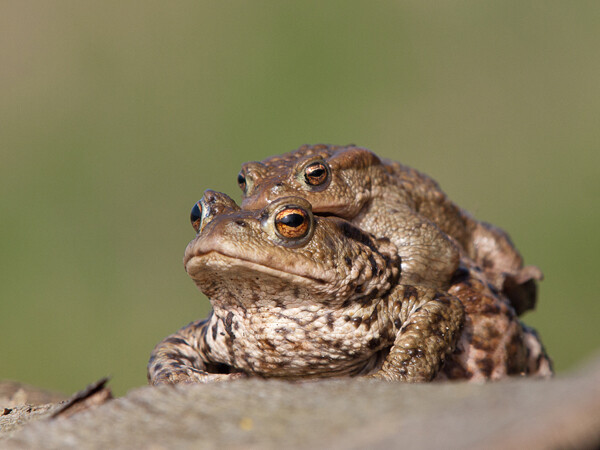
    European toad (Bufo bufo)

    European toads (Bufo bufo)

    2. Isolating your subject

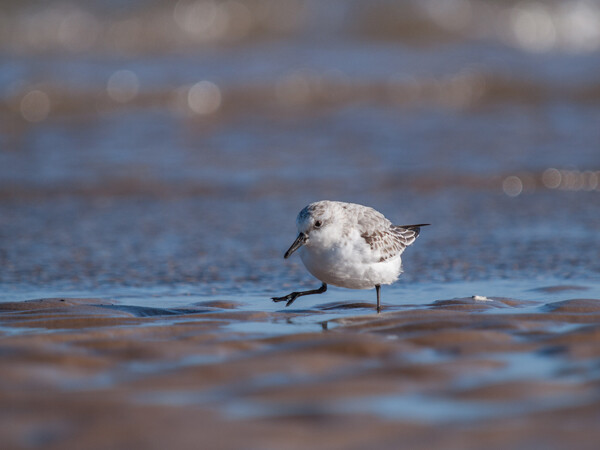
    If shooting an animal at ground level from a standing position, you will be looking down on it, meaning that the ground or plants behind it will form the immediate background of the shot.  As this background isn’t very far away, it will be difficult to render it out-of-focus, even with the largest aperture, causing the background to distract the attention of the viewer away form the subject, in the final image.  Getting down low will often result in the background of the shot being much further away, meaning that you can capture the entire subject in sharp focus whilst ensuring that both the foreground and background are soft and blurred, isolating your subject in a fine plane of focus.

    Sanderling (Calidris alba)

    Sanderling (Calidris alba)

    3. Eye level

    By getting down low, you can take photos of animals at their eye level.  Typically in wildlife photography, if the face of the animal has been captured, it is key for the eyes to be the point of focus as that is where the eyes of the viewer will immediately be drawn.  If the eyes are soft or out of focus, you will lose the viewers attention, however if the eyes are sharp you create a relationship between the subject and the viewer.  This relationship is made all the more intimate by being down at eye level with the subject as the viewer feels like they are looking at the animal from within its world.  If you take a photograph looking down on an animal, the perspective gives the animal a sense of vulnerability (which can be used creatively in some circumstances) however by getting down low this is easily avoided, and much more powerful portraits an be captured.

    You may find that you initially feel awkward crawling around on your front after wildlife and that you get much muddier than if you stay on our feet, but once you start doing it and see the results, you won’t be able to stop.

    Post originally from: Digital Photography Tips.

    Check out our more Photography Tips at Photography Tips for Beginners, Portrait Photography Tips and Wedding Photography Tips.

    Getting Down Low in Wildlife Photography


    Digital Photography School

  • dPS: Now with 1 MILLION Subscribers [CAMERA BAG GIVEAWAY]

    Note: we’re giving away some great photography bags below. Read on to find out how to win.

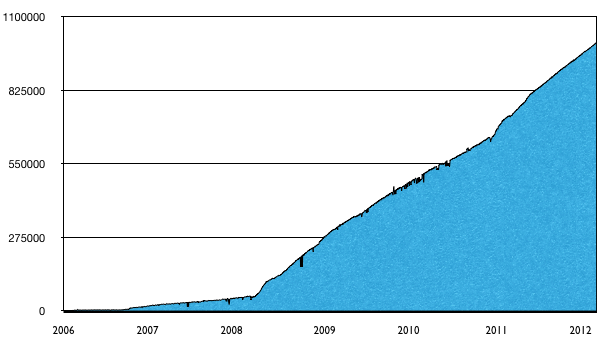
    In April 2006 dPS launched as a site where I started to collate the things I’d been learning about digital photography.

    As ‘that guy’ who always got asked to photograph his friends weddings, kids parties, conferences and other events I was also the guy that friends came to to ask for advice about how to use cameras better. So instead of telling friends the same tips over and over again I decided to write them down in a blog.

    At the time of launching dPS I wasn’t sure what the future had in store for the site. I was passionate about the topic but dPS had no posts and no readers.

    Fast forward six and a half years and I can hardly believe some days that dPS has grown into what it has become. Not only is it now a business that feeds my family and employs a team of people to run it – this week we passed a milestone – 1 million subscribers!

    Screen Shot 2012 11 13 at 11 47 01 AM

    Who would have thought!?

    Note: That figure is made up of people who subscribe either to our weekly newsletter or our RSS feed (if you’re not subscribed yet you can learn about the options here).

    My Heartfelt Thanks

    What does one say or do at a time like this?

    I’ve been wondering what to say for a month or so now (as the milestone has approached) and apart from pinching myself I’m not really sure what to do except to say thank you because the growth of dPS has been something that is more to do with others than myself.

    Firstly thanks to our team. Working behind the scenes here at dPS are a number of dedicated core team members who look after customer service, community management, the production and marketing of our eBooks, the selling of ads. They help to make the site more useful and sustainable.

    Secondly thanks to our writers – both those who create our daily tutorials (we’ve published almost 3500 since 2006) and to pure eBook authors (we have 11 now).

    Thirdly thanks to our volunteer team. Much of what happens here at dPS is done by volunteers. Writers and forum moderators – without whom the site could not run.

    Lastly thank to our readers and community – you. Without you visiting, subscribing, reading, sharing, commenting and interacting with one another we’d not be what we’ve become today. I’m grateful to you for your continued support and look forward to continuing to grow dPS together.

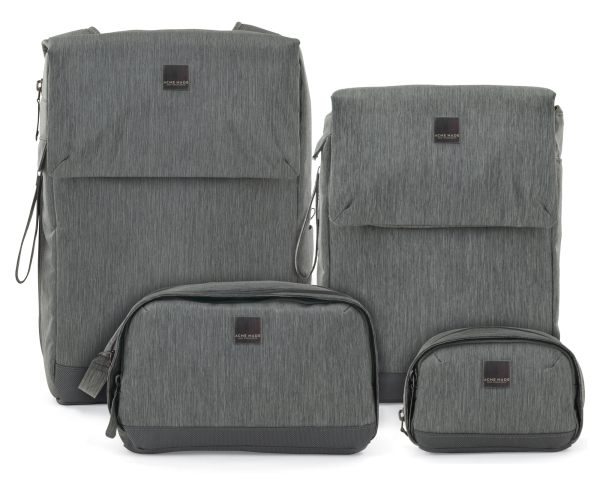
    Win 1 of 4 Camera Bags from Acme Made

    To celebrate our million subscriber milestone we asked one of our sponsors – Acme Made – if they would like to give a few of their camera bags away. They said yes – in fact they’ve given us 4 to give away from their Montgomery Street Collection!

    These bags are stylish, versatile, and protective. The Montgomery Street Collection is made up of a Case, Kit Bag, Courier and Backpack. Each provides a unique solution to hold not just a camera, but other digital devices and essential accessories. The all-new FlexFold System provides a quick and easy way to collapse or expand the internal space for added versatility.

    How to Win
    Check out the Montgomery Street Collection and let us know in comments below which bag you like the most and why.

    Four of you will be picked at random and will win the bag you like most!

    This competition is open to our global audience – we’ll make sure the bag you win gets to you wherever you are!

    The winners will be chosen randomly in 8 days time (at Midday on November 23nd – Melbourne Australia time).

    Post originally from: Digital Photography Tips.

    Check out our more Photography Tips at Photography Tips for Beginners, Portrait Photography Tips and Wedding Photography Tips.

    dPS: Now with 1 MILLION Subscribers [CAMERA BAG GIVEAWAY]


    Digital Photography School

  • 12 Ways to Inspire the Creative Photographer Inside You: Part I

    A Guest Post by Andrew Gibson

    Note: Andrew Gibson is currently offering his 5 popular eBooks for under $ 20 on SnapnDeals.

    01

    Have you ever had the feeling of being stuck in a rut with your photography? It happens to all of us at one time or another. Sometimes it’s difficult to find inspiration or to think of new subjects to photograph.

    Here are some ideas to get your creative juices flowing again. Pick one or two that interest you and take the opportunity to learn some new skills and challenge yourself. Afterwards, you can look back at what you’ve achieved with a renewed sense of accomplishment and satisfaction.

    1. Read a Photography Book

    The photography book (both printed book and ebook) publication industry is booming and there is no shortage of inspiration. You don’t have to buy a new book either – your local library should have plenty in stock.

    Try reading a photography book written by an author you’re unfamiliar with or who is writing about a genre you’ve never tried before. Then go out and put some of what you’ve read into practice. The great thing about the best photography books is that they have both beautiful photos to inspire you and the practical information you need to try out the same techniques.

    Don’t limit yourself to photography books. I spent time yesterday looking at Jamie Oliver’s latest cookbook. The quality of photography is breathtaking and makes me want to try out food photography for myself (as well as the recipes).

    02

    I learnt the toning technique used in this photo from a book about black and white photography.

    2. Use a New Lens

    Buy (or borrow) a new lens – then use it. Or you may have a lens in your kit that you haven’t used for a while. Lenses are the eye to your camera’s system and using a new lens (or rediscovering one you have’t used for some time) can give you a new way of seeing.

    Try this. If you normally use a wide-angle lens, then try a telephoto lens instead. Or if you normally use a telephoto, try a wide-angle. If you usually use a zoom lens, then how about a prime? You get the picture. It’s all about using a new lens to force yourself to take a fresh approach.

    New lenses don’t have to be expensive. There are plenty of inexpensive wide-angle and normal prime lenses around. Another option is to buy a Holga lens for your digital camera (they are available for all the major camera manufacturers at Holga Direct). These are inexpensive and great fun.

    03

    A simple image taken with a Holga lens on an EOS 40D.

    3. Take a Photo Holiday

    Sometimes all that is needed to re-energise your creative self is a trip to somewhere new. Even a short trip for a day or a weekend can help. What’s important is that you dedicate it to photography. That way you can concentrate on exploring the most photogenic locations and making sure you are then when the light is best.

    You don’t necessarily have to travel far. But it helps if you’ve never been there for a while so you see it with fresh eyes. It should also be visually exciting and inspiring.

    04

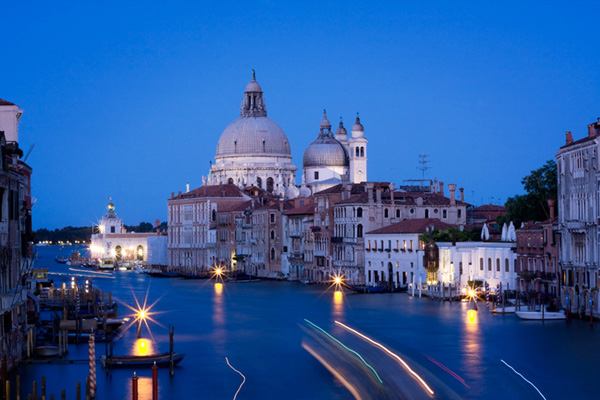
    Who could fail to be inspired by a trip to Venice? But any trip to somewhere new has the power to re-energise your creative vision.

    4. Be more Critical

    Look at your work through fresh eyes. What are your favourite images? What photography and post-processing techniques do you like to use? How can you improve?

    Editing your photos ruthlessly. What are the ten best photos that you have taken in the past 12 months? Don’t be afraid to ask someone else’s opinion. It’s often difficult to be objective about your own work. Does a style emerge when you look at your best images? Does this suggest fresh ideas for future projects?

    Imagine that an art director or magazine editor is looking at your portfolio. What might they say about your photos? What are your strengths and weaknesses? Don’t be over critical. It’s just a thought exercise that may help you obtain a clear idea of your strengths and the skills you’d like to develop.

    Here’s an idea. Once you’ve selected your best photos why not send them to a photography magazine? They may be published, earning you some money or a prize. Seeing your images in print is always a good feeling, especially the first time.

    05

    Photos of mine used in a spread in EOS magazine.

    5. Enter a photography Competition

    There are plenty out there. Just beware of competitions that are rights grabs (there is a list of approved photography competitions here). Most competitions have tight briefs that can inspire and focus you. The prizes can be pretty good too.

    6. Set a photographic project

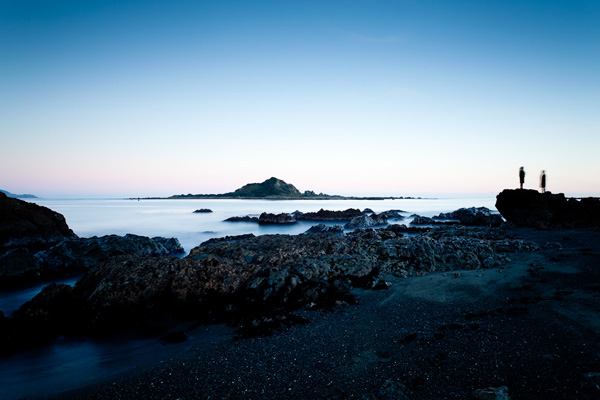
    Set a project, something you can return to again throughout the year. Projects give you direction. For example, this year I’ve been experimenting with long exposure photography. This new way of taking photos has encouraged me to view my local area with new eyes, evaluating different locations for their photographic potential.

    Projects are good because they give you chance to develop your skills in a certain area. The photos taken at the end of the project will be better than the ones taken at the beginning. You’ll also need a good variety of images to create a cohesive set of photos. Thinking long term gives you time to think up ideas and execute them.

    06

    A long exposure photo taken a few minutes walk from my front door. Choosing a project that you can carry out close to home can save you time and motivate you to complete the project.

    Have you ever been stuck in a creative rut? How did you get out of it? Leave your comments below, I’m sure we will see some good ideas.

    The next six ideas will be published in part II of this article.

    Andrew Gibson currently is offering a bundle of 5 of his amazing eBooks for sale for under $ 20 on SnapnDeals. You’ll get eBooks on Understanding Lenses, Understanding Exposure, Understanding DPP and square format photograph. Check them out here.

    Post originally from: Digital Photography Tips.

    Check out our more Photography Tips at Photography Tips for Beginners, Portrait Photography Tips and Wedding Photography Tips.

    12 Ways to Inspire the Creative Photographer Inside You: Part I


    Digital Photography School

  • Olympus Stylus XZ-2 Review

    Stylus is back! Where did it go? Dunno!

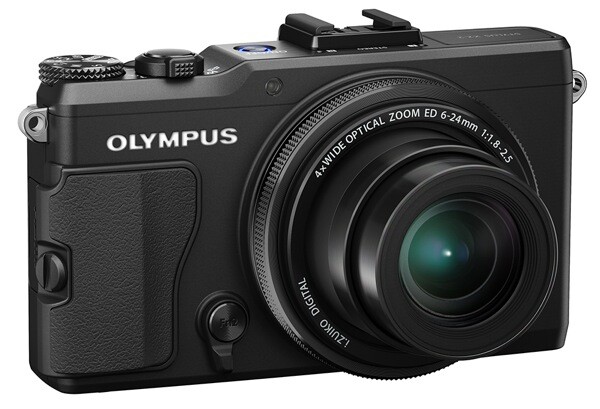
    For a while there, Olympus branded its cameras solely by model number but since the launch of the PEN line it seems the company needed a more visible delineation, so it has engraved ‘STYLUS’ very faintly on the flash housing of this new camera.

    Olympus Stylus XZ 2

    Olympus Stylus XZ 2 back

    At first sight, the Olympus Stylus XZ-2 looks impressive, very compact, solid, with a rapid lens extension when powered up.

    Scene modes

    Art Filter

    External controls are minimal: the mode dial has positions for auto, PASM, two custom settings, scene modes and the Art Filter selection (11 in all for stills and video shooting); the power button is surrounded by the zoom lever.

    At rear is the four way rocker to access flash, AF, self timer, single or continuous shooting and exposure compensation; close by there is a menu button, display control and a Function control.

    Then the big surprise, at last for me: at front, just beneath and to one side of the lens is a lever which takes you into manual control, the setting displayed on screen. It is possibly the best manual focus arrangement I’ve seen on a compact digicam. This front of camera control is fully programmable and can be used as focus ring, aperture control, shutter speed control and shooting mode selector, amongst other custom functions.

    Menu

    Some may find the menu system endless, with multiple sub menus; to be honest, the setting out of camera menus has never been an Olympus strong point.

    Added to all of this is the easy to use tilting LCD screen which can be tilted 80 upwards and 50 degrees downwards … but it does not unfortunately swing sideways.

    Overall, the XZ-2 is a delight to use, compact and easily controlled. From power up to first shot took only a second, with follow on shots coming in as fast as I could tap the shutter.

    A nice touch is the switchable speed grip which can be moved to either side of the camera: southpaws please apply!

    Yachts 14.jpg

    Olympus Stylus XZ-2 Features

    The good news is that the lens is a Zuiko with a maximum aperture of f1.8 … that’s fast! And, when fully zoomed in to its 4x tele end the aperture is still a rapid f2.5. All of which sets the XZ-2 above much of the pack in compact digicams.

    Canoes.jpg

    In the distortion department the wide and tele ends of the zoom show little or no aberrations. A good performance.

    The 12.0 million pixel CMOS can account for a maximum image size of 3986×2976 pixels, so expect to make a 34x25cm print.

    Movies can be shot in Full HD at 1920×1080 pixels resolution, saved in the MPEG4 format and accompanied by stereo sound. Whilst the auto focus appears to monitor the shot throughout recording, you cannot take stills mid-video.

    Olympus Stylus XZ-2 ISO Tests

    Olympus XZ-2 ISO 100.JPG

    Olympus XZ-2 ISO 400.JPG

    Olympus XZ-2 ISO 800.JPG

    Olympus XZ-2 ISO 1600.JPG

    Olympus XZ-2 ISO 3200.JPG

    Olympus XZ-2 ISO 6400.JPG

    Olympus XZ-2 ISO 12800.JPG

    At ISO 1600 there are signs of noise in the image. By ISO 3200 the noise is even more apparent in even grey areas. At ISO 6400 the noise is still there (obviously) but definition is starting to fall. At ISO 12800 noise is up and definition is down but IMHO the setting is still suitable for some subjects.

    Yachts 5.jpg Yachts 9.jpg

    Olympus Stylus XZ-2 Review Verdict

    Quality: well above average.

    Why you’d buy the Olympus Stylus XZ-2: compact body, fast lens, minimal external controls.

    Why you wouldn’t buy the Olympus Stylus XZ-2: complex, cascading viewfinder menu array.

    In this market the camera is a little pricey, when compared to models with maxi zooms … but I guess you have to pay for upper level lens quality.

    Extra note: external accessories, developed for PEN cameras, such as the digital eye-level viewfinder (VF-2 or VF-3) can be attached to the XZ-2 for ADDED functionality. The built-in pop-up flash can also wirelessly control Olympus flash units such as the FL-600R and 300R strobes. Plus: the new Stylus XZ-2 fully supports wireless connectivity via the new FlashAir mobile connectivity SD card.

    A camera for the beginner and ambitious as well!

    Olympus Stylus XZ-2 Specifications

    Image Sensor: 12.0 million effective pixels.
    Sensor: 15mm CMOS.
    Metering: Multi segment, centre-weighted, spot.
    Lens: f1.8-2.5/28-112mm as 35 SLR equivalent.
    Exposure Modes: Auto, Program AE, shutter and aperture priority, manual.
    Shutter Speed: 60 to 1/2000 second.
    Memory: SD/SDHC/SDXC.
    Continuous Shooting: 5 fps at full resolution and 60 fps at 3 megapixel resolution.
    Image Sizes (pixels): Stills: 3986×2976 to 640×480.
    Movies: 1920×1080, 1280×720 at 30 fps.
    Viewfinder: 7.6cm LCD screen (921,000).
    File Formats: JPEG, RAW, MPEG4.
    Colour Space: sRGB, Adobe RGB.
    ISO Sensitivity: Auto, 100 to 12,800.
    Interface: USB 2.0, HDMI mini, Eye-Fi, DC input.
    Power: Rechargeable lithium ion battery.
    Dimensions: 113x65x48 WHDmm.
    Weight: 346 g (inc battery).
    Price: Get a price on the Olympus Stylus XZ-2 at Amazon.

    Post originally from: Digital Photography Tips.

    Check out our more Photography Tips at Photography Tips for Beginners, Portrait Photography Tips and Wedding Photography Tips.

    Olympus Stylus XZ-2 Review


    Digital Photography School

  • Stand Up Paddling the South Platte River below Denver


    SUP on South Platte River

    November 3, 2012. Paddling Bark Expedition SUP on the South Platte River near Kersey, Colorado. Camera: GoPro Hero.

    It was my first time with SUP on a river – a short, but intense upstream / downstream workout starting at the Kersey bridge. A nice weather and good river flow. You can find more picture from that paddling in Fitness Paddling blog.

    I will be back on the South Platte with SUP or other boat. The winter paddling season is open.

    Related posts:
    SUP on the South Platte River – Opening Winter Paddling Season
    South Platte River below Denver, Colorado GPS/photo river guide
    Daily Paddling Picture Gallery


    paddling with a camera

  • 5 Things to Know About Photoshop Brushes

    5 things to know about photoshop brushes opener

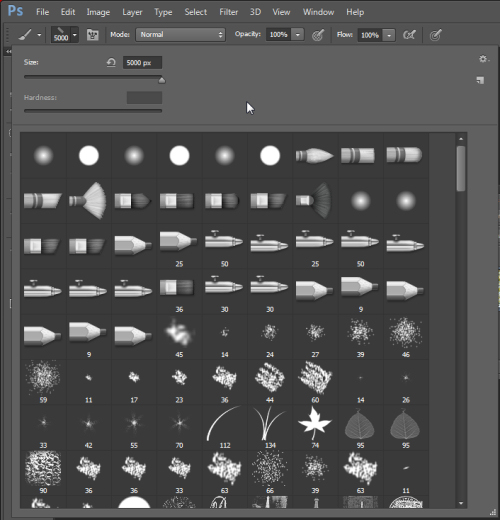
    Brushes are used a lot in photo editing from removing blemishes and smoothing skin to dodging and burning and painting on masks. Here are five important features of the brush tool in Photoshop.

    1. Adjust Size, Opacity and Hardness from the Keyboard

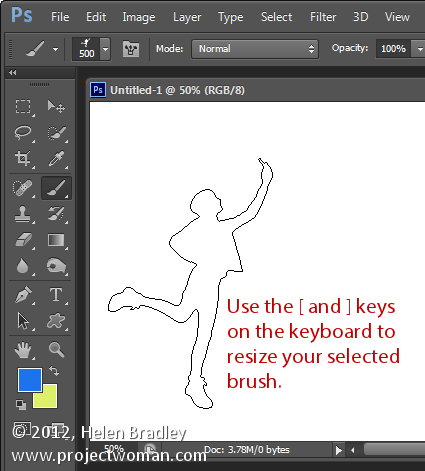
    When a brush is selected you can adjust its size without having to open the Brushes palette by clicking the [ and ] keys on your keyboard.

    Provided a brush is selected you can change its Opacity by typing a number. For example, type 5 to set Opacity to 50%, type 1 for 10% and 0 for 100%.

    To adjust the hardness of the brush hold the Shift key as you tap either the [ or ] keys on the keyboard. Each tap increases or decreases the hardness by 25% in the range 0%-100%. The results of doing this are harder to see as there is no hardness indicator on the tool options bar. However, if you have the Painting Cursor set to Normal Brush Tip in preferences you will see a difference in the brush size as you do so

    5 things to know about photoshop brushes 1

    2. Save the Brush

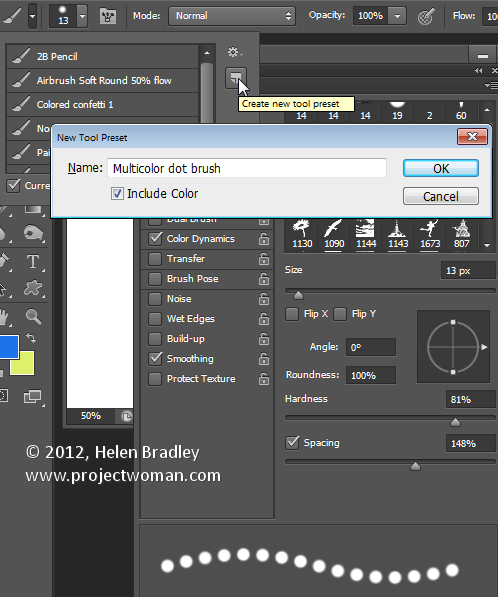
    When you have a brush configured with your preferred settings, save it as a Tool preset. To do this from the Brush Preset list in the top left of the screen click the Create New Tool Preset button and type a name for the preset. Click Ok.

    In future you can select this saved preset from the list and just start painting with it.

    5 things to know about photoshop brushes 2

    3. Disappearing Brushes

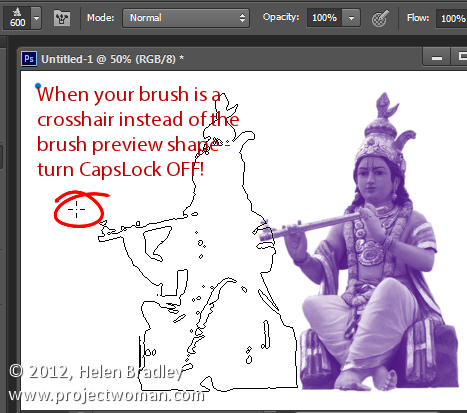
    One of the very annoying things that will happen to most of us at one time or another is to have the brush appear to disappear. Instead of the regular brush cursor which shows the size and style of the brush you will see a crosshair cursor.

    The issue is not with the brushes themselves but is with the Caps Lock key. If you disable Caps Lock on your keyboard the more visual brush cursor will reappear.

    5 things to know about photoshop brushes 3

    4. Paint a Straight Line

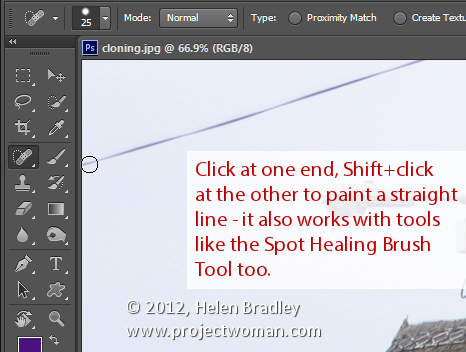
    To paint in a straight line, click at one end of the line, hold the Shift key and click at the other end of the line. This draws a continuous brushstroke between both points.

    If you adjust the spacing of your brush by using the Brush panel Spacing option to make it more than 100% you can create a line of dots this way.

    This can also be used to remove power lines with the Spot Healing Brush Tool. Click at one end of the power line, Shift + Click at the other end to paint a straight line over the power line and it will be removed automatically.

    5 things to know about photoshop brushes 4

    5. Quickly Show the Brush Panel

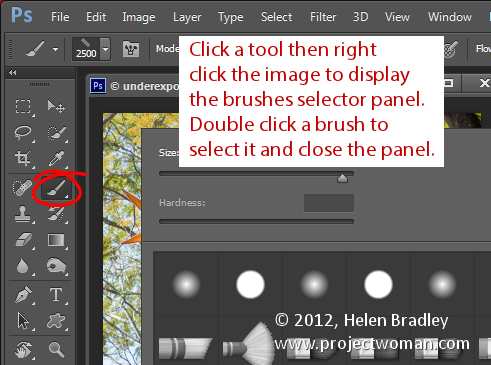
    You can quickly show the Brush panel so you can choose a brush to use by first selecting a tool that uses a brush such as the Brush Tool, Dodge, Burn, Eraser tool and so on.

    Then right click on the image and the brush panel appears automatically. To select a brush and exit the panel in one step, double click the brush to use.

    5 things to know about photoshop brushes 5

    And now it is over to you. What other features of Brushes do you think are valuable for photographers to know?

    Post originally from: Digital Photography Tips.

    Check out our more Photography Tips at Photography Tips for Beginners, Portrait Photography Tips and Wedding Photography Tips.

    5 Things to Know About Photoshop Brushes


    Digital Photography School

  • How to Become a Photographer: The Natural Way

    So you want to become a photographer, huh? Then just forget it, you’ll never be one! And even if you will – you won’t be a good one anyway… What’s the catch? I’ll tell you. But first I want to share a little story from my own life. The “Wannabe” Syndrome For the past 10 years or so I’ve had Continue Reading

    The post How to Become a Photographer: The Natural Way appeared first on Photodoto.


    Photodoto