Category: Photography

  • Could On Air Hangouts Be Coming to Flickr?

    An interesting article over on TechCrunch about Yahoo buying a company called OnTheAir. The company makes a hangout app similar to Google+’s hangouts that lets people interact via video voice and chat. The OntheAir team is coming to work on mobile at Yahoo under Adam Cahan — the same Adam Cahan who is also the Yahoo exec in charge of Flickr (and who just went public with his own personal Flickr account this weekend — welcome to Flickr Adam!).

    Google Hangouts have been one of the killer features for community as far as photographers go on Google+. Many photographers have produced hangout based shows — but more than anything they are a place where photographers who kinda/sorta get to know each other on the web and through commenting on each other’s photos, can get to know each other much better live. Earlier this week I wrote an article about photographers Brian Matiash and Nicole S. Young who actually met on a Google+ Hangout and ended up married.

    Google+ Hangouts are powerful tools for community building most of all. There’s something about spending time with someone in video/voice that strengthens the resulting online bonds around a website after the fact. While community has been growing at Google+, community has been slipping at Flickr. The real hardcore community on Flickr mostly takes place in Flickr groups which feel like they are dying. Most groups on Flickr are far less active than they were two years ago.

    Flickr would seem to me like an ideal place for Yahoo to build out hangouts. They tried a horrible feature called Photo Session where two people could go into a chat room and doodle on photos while they chatted together last year that they subsequently cancelled, but that feature was nowhere near the experience that a Google Hangout is. It makes me wonder if Yahoo couldn’t seed some of the initial push towards a hangout product through some of the key remaining groups on Flickr to see if they couldn’t get some traction with this product there.

    Getting people more connected around a website is a powerful tool to making them stickier more impassioned users. The other thing that video chat does is it causes people to be nicer to each other. One of Flickr’s current problems with their groups is that there are a lot of jerks in them. People in Flickr groups seem to pride themselves on being mean, or snide or snarky. This drives people away. Allowing people in groups to block each other would help a ton with this problem, but getting people to see each other as real human beings through video chat sessions is also helpful. I’m always amazed at how much nicer people are to each other on Flickr once they’ve actually met in real life.


    Thomas Hawk Digital Connection

  • How to shoot Black Objects on Black Backgrounds

    In my last post, I talked about using a DIY blue gel to add interest to a portrait by lighting the background. This time I’ve added a DIY orange gel, and used the same Gary Fong Powersnoot for some product photography. This is a three-light setup.

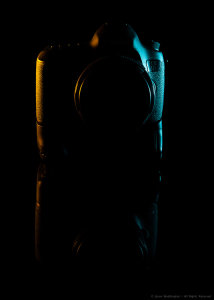
    Photo of a Canon EOS 5D MkIII on a black background

    Exposure: 1/200, f/14, ISO 100
    Camera: Canon EOS 5D MkII
    Lens: Canon EF24-70mm f/2.8L @ 60mm

    When shooting a dark colored object against a dark background, one challenge is that the edges of the object tend to get lost in the background. Here are two ways to deal with this:

    1. Light the background to add separation. This it the technique I used in my last post.

    2. Use rim lighting to clearly define the edges of the object, as shown in the photo above.

    The key to this kind of rim lighting is hard, directional light, so that the light goes exactly where you want it, and nowhere else. Good lighting is often about what not to light, as much as it is about what to light.

    Set Diagram

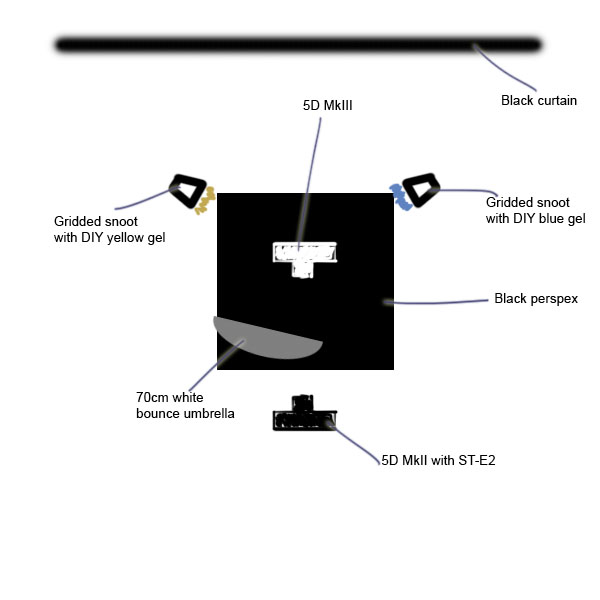
    Photo lighting diagram

    Main Light: Canon 430EX II @ 1/2 power into 70cm white bounce umbrella just outside the frame to camera left

    Rim Lights: 2 x Canon 430EX II @ 1/2 power into Gary Fong Powersnoots with grids a back left and right

    I triggered the flashes with the Canon ST-E2.

    Gary Fong Powersnoot with DIY orange gel

    Background: Black curtain about 1.5 meters behind the camera. The distance is important. If the background is too close, it will pick up some light from the main source and not appear totally black. Get your background cloth as far away as possible if you’re going for a pure black background.

    The camera is sitting on a small square of black plexiglass (aka perspex) that I picked up at a local home improvement store.

    Start With the Rim Light

    To get the orange and blue highlights and the reflection right, I started with the gridded snoots. I shot a few frames and made small adjustments until I was happy with the look. Then I added the main light. It helps to build your lighting set up piece by piece.

    Setup photo showing only the rim light

    Once I was happy with the rim lighting, I added the main flash, in the 70cm umbrella. Here I was looking for two things. First I wanted a nice catchlight on the lens. Second, I wanted enough light on the 5D logo on the top right side of the camera body. The umbrella is located just outside the frame on the left side, a little above, and angled down toward the 5D MkIII.

    You don’t need a lot of space for a shot like this – I made this photo in my living room. The perspex is sitting on the coffee table, and the black curtain is draped over our TV.

    I hope this article has given you a few useful ideas for lighting black objects against black backgrounds. I’d love you hear your comments, and as always, feel free to contact me on Facebook or Google+.

    Post originally from: Digital Photography Tips.

    Check out our more Photography Tips at Photography Tips for Beginners, Portrait Photography Tips and Wedding Photography Tips.

    How to shoot Black Objects on Black Backgrounds


    Digital Photography School

  • How to Take Extraordinary Photos by Thinking Creatively

    A Guest Post by Piper Mackay from www.pipermackayphotography.com.

    The creativity in your photographs is what will make your imagery stand out. Most of us, if we commit the time, can technically master the craft of photography. Capturing a compelling image can be much more difficult especially when you are excited, experiencing something for the first time, and are visually overloaded.

    You begin pointing and shooting at everything you see. You arrive home, look at your photographs, and see that you have captured extraordinary subjects or a beautiful location, but the images are somewhat mediocre. Taking an extraordinary photograph of and extraordinary subject is what you want to strive for.

    I want to share with you a few tips that can quickly help elevate the creativity in your photography and help you to focus on the artistic side of photography; without the creative process, you are really only turning dials and pushing buttons.

    Portraits

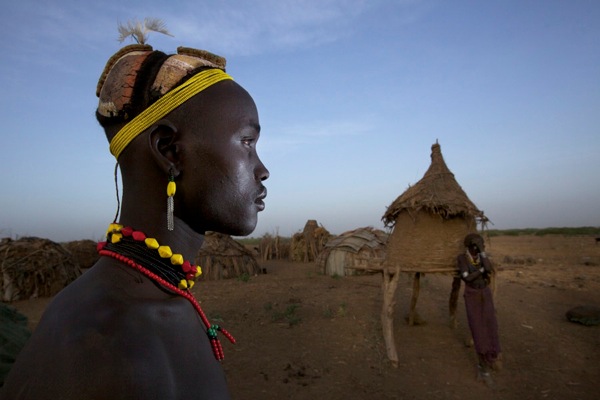
    Thinking creativelyThe eyes are the windows to the soul. If you are going to place your subject in the center, get close, fill the frame and deeply connect with your subject.
    ?
    Thinking creatively 1

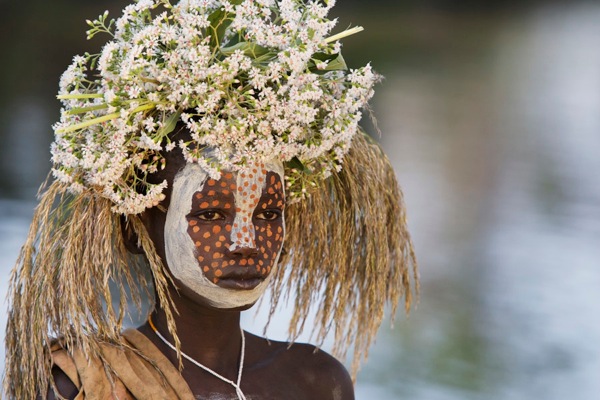
    A more interesting portrait composition is to place your subject off center, looking into the frame at a slight angle, with a blurred out or clean background.

    Thinking creatively 2

    Now up your game and add layers of impact by adding a simple, but beautiful background.

    Thinking creatively 3

    Take it one step further by adding a second person to draw the viewer more deeply into the frame.

    Drawing the Eye

    Thinking creatively 4

    One of the basic rules of composition is leading lines, but if there is more than one, it can be more effective in keeping the viewer in the photograph longer. In this image there is a leading line from the bottom right to the top left and another one that leads the viewer back across the photograph.

    Thinking creatively 5

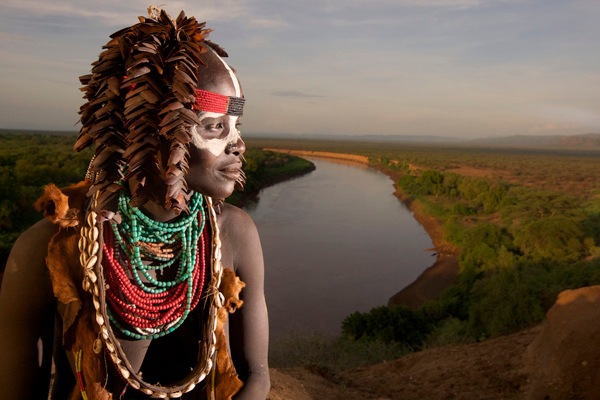
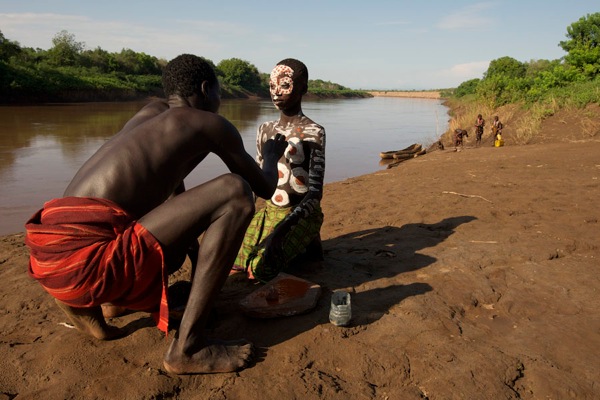
    Using layers of impact makes for a very powerful image. When photographing people I love to use a wide-angle lens, getting up close to my main subject with something interesting in the background to draw the view into the photograph. Here my main subjects are interesting, positioned in front of a beautiful background along the Omo River that curves and leads to the women in the distance, creating layers of impact and depth in the image.

    Thinking creatively 6

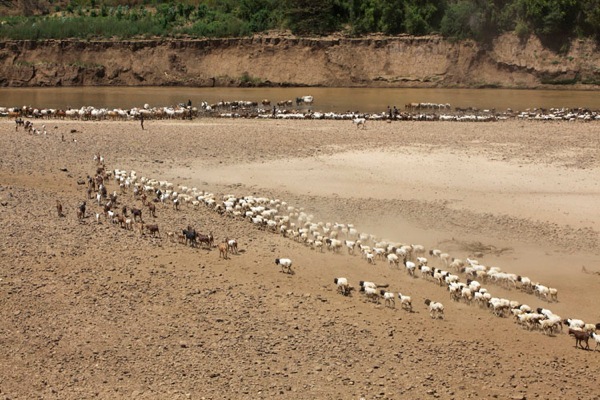
    I love using selective focus to draw the viewer’s eye exactly were I want it. This usually works best with repeating patterns and groups of items such as: spices or vegetables, crafts at a local market, flowers in a field or a herd of animals, as a few examples.

    Change your Perspective

    ?
    Thinking creatively 7

    Being at eye level with your subject makes for a more dynamic image. So, if your subject is down on the ground, hit the dirt and get dirty. Picture in your mind how this photograph would look if you stood and shot down on these subjects. This angle makes the viewer feel as though they are there.

    Thinking creatively 8

    Most people would have just taken this photograph from the shore with a zoom lens but I wanted something more powerful. I planned to be in this area during the dry season, suffering in 110+ heat when the river would be at its lowest. I got into the river with my wide-angle lens and photographed this at eye level with the canoe. There were a lot of challenges, watching out for crocs was one of them, and although I did not get the photograph I had envisioned, I knew I and a unique perspective.

    Thinking creatively 9

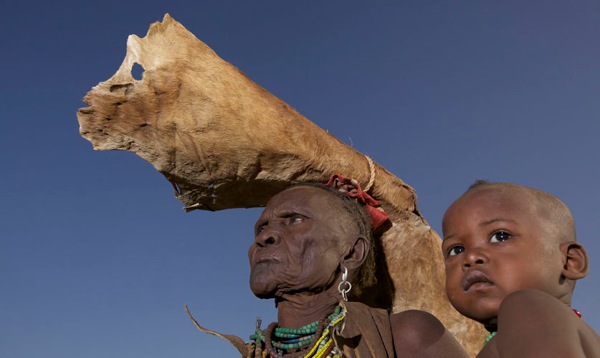
    Shoot from a different angle. Getting lower than your subject adds drama and power. The opposite can work as well—get above your subject and shoot down on them.

    Most importantly, it does not have to be new; it has to be you. We all see things differently and express them differently. This is the reason many of us picked up the camera, to seek out places for ourselves that we have already viewed through someone else’s eyes. We want to experience it for ourselves, capturing our own vision. The way you express your unique view through the lens is what makes it new and interesting.

    Piper Mackay is a professional travel and wildlife photographer whose work is heavily based in Eastern Africa. She is currently leading both wildlife and cultural safaris in Kenya, Tanzania, Rwanda and Ethiopia. Her work is represented by Getty images and she is and instructor for the Travel and Editorial track at Calumet. View her work at www.pipermackayphotography.com.

    Post originally from: Digital Photography Tips.

    Check out our more Photography Tips at Photography Tips for Beginners, Portrait Photography Tips and Wedding Photography Tips.

    How to Take Extraordinary Photos by Thinking Creatively


    Digital Photography School

  • 10 Amazing Photography Deals [9 Days Only]

    Today I’m excited to announce the return of dPS’s famous 12 Days of Christmas sale with the special return of all last years amazing deals for the next 9 days only.

    Every year here on dPS we have a huge end of year sale where over the 12 days before Christmas we release a deal for photographers each day that lasts just 24 hours. The deals are on a mix of dPS products and offers from other photography brands that you know and love.

    Each year the sale has grown both in terms of readers giving us positive feedback but also in terms of the discounts and deals we’ve had on offer.

    Last year was so huge in the lead up to this years 12 Deals (which will kick off on 13th December) we’ve decided to bring 10 of last years deals back for those of you who missed one of them.

    These 10 deals are all available for you to snap up now on last years 12 days of Christmas page but here’s a quick summary of what is on offer!

    Deal 1 – 48% off the Photo NewImageNuts 3 eBook Bundle

    This deal includes 3 of dPS’s most popular eBooks covering everything

    • from understanding and gaining control over your camera
    • to creative photographic technique through
    • to post production
    • It’s the perfect introduction to photography for anyone starting out.

      As a bonus you’ll also get an hour of video tutorials and 2 handy pocket guides.

      Grab the PhotoNuts eBooks here

      Deal 2 – 6 Ed Verosky eBooks (plus bonus mini book) at just $ 29.95

      NewImageGet this amazing library of 6 eBooks for under $ 30 from photographer Ed Verosky.

      It includes:

    • two eBooks on portraiture
    • one eBook on flash photography
    • one eBook on Boudoir photography
    • an eBook on understanding DSLRs
    • an eBook with 15 Photo Projects

    It’s got some great information in it and it was VERY popular last year.

    Get this deal here

    Deal 3 – 40% Off Photography NewImageConcentrate eBooks and tutorials

    The team at Photography Concentrate have 4 fantastics resources for you to choose from including:

    • one on wedding photography
    • another on photo editing
    • another on getting control of your camera
    • one on creating beautiful albums

    Take advantage of this HOT offer here

    Deal 4 – 10% off NewImagePhotoJoJo 2 great Products

    PhotoJoJo always have some quirky photographic products in their range and in this deal are offering a couple of fun ones at 10% off

    • Chromonaut Camera Bag
    • Universal Flash Filter Kit

    You can buy just one or pick them both up.

    Check them out here.

    Deal 5 – 55% off our Travel and Color Photography eBooks

    NewImageWritten by award winning travel photographer Mitchell Kanashkevich – these two eBooks are not only packed with useful teaching – but they’re also full of inspirational images.

    They are yours through this deal at under half the normal price and will help you to drastically improve both your travel photography but also your normal shooting as you understand the importance and how to utilise colour in your work.

    Get your eBooks here

    Deal 6 – 30% off Trey Radcliff’s HDR Video Tutorial

    NewImageTrey Radcliff is known as one of the world’s most famous HDR photographers and so we can’t think of anyone better to teach you how to use HDR to take amazing images.

    This deal gives you over 11 hours of step by step video instruction on HDR, an eBook, access to a forum area, over 130 RAW working files and a load of actionable information that will help you see a dramatic improvement in your photography.

    Save 20% off on these teaching here.

    Deal 7 – 20% off Topaz Labs Post Processing Software

    NewImageThe post processing software offered by Topaz has always been hugely popular with our audience and this gives you opportunity to pick up a great toolbox of post production software that will help you achieve a vast array of different types of effects and techniques.

    The software is easy to use and comes with some great training.

    Grab this hugely popular deal from last year here.

    Deal 8 – Save 30% on the 2012 Craft and Vision Collection

    NewImageDavid DuChemin’s Craft and Vision eBooks are an absolute steal at the best of times with most of them priced at just $ 5 each – but in this dPS exclusive you can pick up the 12 eBooks that they’ve released since last year for just $ 45!

    That’s just $ 3.75 per eBook and a CRAZY deal.

    The topics covered in these eBook range from strobe lighting techniques, to macro photography, to long exposure photography, landscape photography, printing images and much more.

    Grab it here.

    Deal 9 – 55% off our Portraits eBook Pack

    NewImageThis was another very popular deal last year and includes two dPS eBooks:

    • the best selling ‘Essential Guide to Portrait Photography’
    • Anna Gay’s ‘The Art of Self-Portraiture’

    Portraiture is something we almost all do so we know these eBooks will be useful to many of you.

    Get them bundled together for under half price here.

    Deal 10 – 50% off our Going Pro Kit

    NewImageEver thought about making money from your photography? Our ‘Going Pro’ Kit is the perfect place to start.

    Written as an introduction to the topic of profiting from your passion for photography it includes a great eBook, 2 hours of Audio interviews with Pro Photographers and a bonus guide to getting published in photography magazines.

    Best of all in this deal it is 50% off. Grab it here.

    10 Deals for 9 Days Only

    These 10 deals are available for a limited time only – we’ll be closing them off on December 13th just before we kick off the first of the 2012 12 Deals of Christmas (in which we’ve got some even bigger and better deals lined up for you!

    Post originally from: Digital Photography Tips.

    Check out our more Photography Tips at Photography Tips for Beginners, Portrait Photography Tips and Wedding Photography Tips.

    10 Amazing Photography Deals [9 Days Only]


    Digital Photography School
  • Fixing Images with Contrast Masks in Photoshop

    contrast_masking.opener.jpg

    Many of the fixes we commonly apply to images come from darkroom processes. Contrast masking is one of those fixes and it can be used to fix an image which is under or over exposed.

    Contrast masking is a relatively simple process and it can work wonders with your images. I like it because it generally doesn’t require you to make selections and there is a lot to like about fixes that don’t involve selections.

    Here’s how to use Contrast Masking to fix an under exposed image:

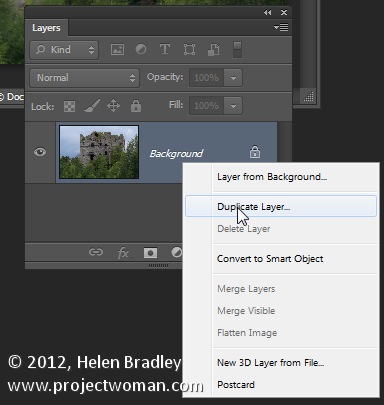
    Open your image and duplicate the background layer. Target this duplicate layer in the Layers palette.

    contrast_masking_1.jpg

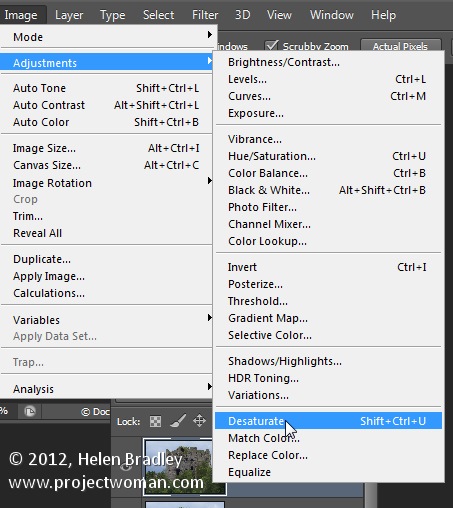
    Desaturate this layer by choosing Image > Adjustments > Desaturate. Right now the default convert to black and white is just fine.

    contrast_masking_2.jpg

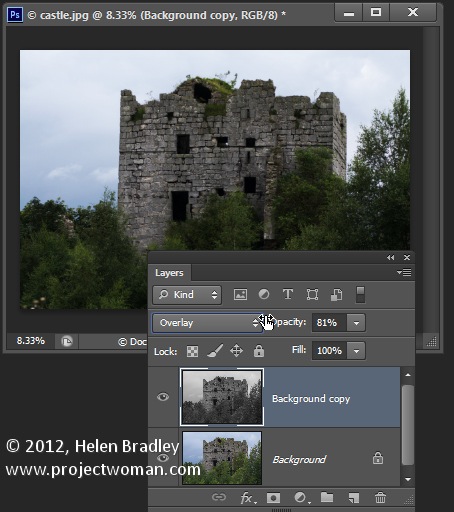
    Alter the blend mode of this layer to Overlay.

    contrast_masking_3.jpg

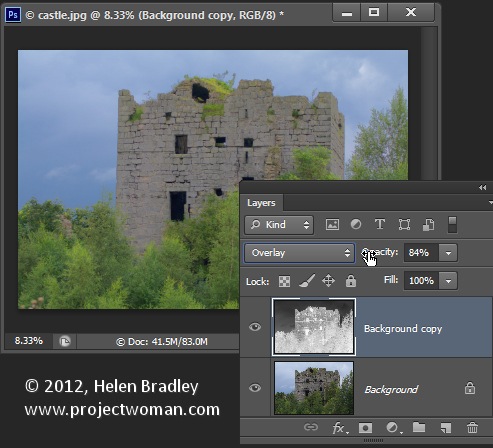
    To invert this black and white layer choose Image > Adjustments > Invert – this gives a negative of the image.

    Adjust the layer opacity to suit.

    contrast_masking_4.jpg

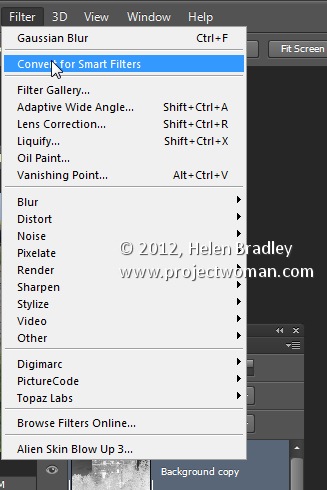
    Convert the top layer to a Smart Object by choosing Filter > Convert for Smart Filters.

    contrast_masking_5.jpg

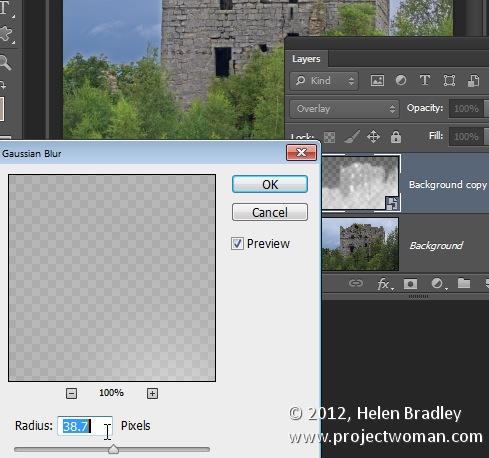
    Now blur this layer by choosing Filter > Blur > Gaussian Blur. Adjust the Radius to adds some sharpening back to the image. Check the preview to get the best result for the image.

    contrast_masking_6.jpg

    Post originally from: Digital Photography Tips.

    Check out our more Photography Tips at Photography Tips for Beginners, Portrait Photography Tips and Wedding Photography Tips.

    Fixing Images with Contrast Masks in Photoshop


    Digital Photography School

  • Photography SEO And The Power Of Local Link Building

    For photography SEO, there is one extremely effective tactic that can get your website to the top of search engines. Link building is the process of generating links on external websites, facing your yours.

    For instance, a link from DSLRBlog to your photography website, would be link building.

    photography seo local link building

    The best way to go about link building is by guest posting on photography websites. However, I want to talk about local link building.

    Now being in such a niche category, link building for photography SEO is tricky. Commenting for links doesn’t work anymore, so what is there to do?

    Photography SEO & Local Link Building

    If your photography business is local based, and not a full-time traveler, then there is a really good method to try. Create a section on your website where you discuss partners, venues, etc. Reach out to venues that often host events where you are photographing. Write a very personal email explaining that you would like to partner by recommending each other to potential customers. The partnership requires an exchange in links. No money is to change hands, as it is an agreement between companies to increase business.

    You can also exchange links with other photographers. If you are a New York City wedding photographer and never photograph an event in Las Vegas, then partner with a Nevada wedding photographer in the Las Vegas area and recommend him/her for potential clients.

    Other local businesses you can partner with:

    • Bands
    • DJs
    • Florists
    • Bakers
    • Caterers

    Local link building is not only great for photography SEO, but also for relationship building, business and it is also a lot of fun.

    Do you have additional local partners you would like to see added to the list? Comment below and we will add them.

    Thanks for reading,

    Scott

    dslrBlog

  • Leash and Cuff by Peak Design

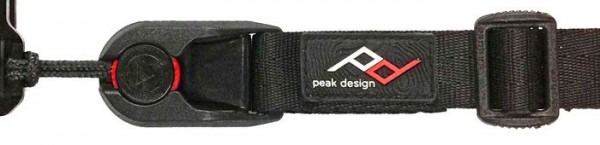
    A while back I wrote about the Capture Camera Clip System by those crazy guys over at Peak Design. The guys started their company with KickStarter, which I’m certain you’ve all heard about? Well, one of the feedback items they received on the Capture device (which I still use every time I shoot) was that maybe some people would feel more secure using it if they had some sort of strap attached, like a safety belt that you could also use as a neck strap, wrist strap and a sling strap. The criteria for Peter and his ping pong winning team was that the strap had to be versatile, quick connecting and most of all it had to add a great deal of ‘safe’ for your camera. Well, they’ve only gone and done it!

    Peak Design bring you the new Leash and Cuff!

    I was lucky enough to play ping pong with Adam of Peak Design just yesterday – he thrashed me! – but as sweet consolation, he also let me bring home the prototype unit to try out. This strap does everything it says on the label, so to speak! It’s inexpensive and sturdy and will be along with me for a ride when I shoot a wedding in Kyneton tomorrow.

    The best thing about my timing of this post is that you can still jump on their KickStarter project for the leash and cuff, and get yourself one at less than retail (I think it’s about close to half of what they’re going to cost you when they hit the streets!)

    Here’s the KickStarter video for your information, and there’s a great video on their KickStarter page with more info, too.

    Check it out on their Kick Starter page!

    We will have a full review for you in the coming weeks, but initial impressions and judging by the uptake on their KickStarter page, I’d say get one – quick.

    Sime

    Post originally from: Digital Photography Tips.

    Check out our more Photography Tips at Photography Tips for Beginners, Portrait Photography Tips and Wedding Photography Tips.

    Leash and Cuff by Peak Design


    Digital Photography School

  • An Introduction to Lightroom Smart Collections

    Lightroom smart collections opener

    Lightroom has two types of collections: regular Collections and Smart Collections. Smart Collections are live and they are created as a result of filtering your photos according to rules that you write. You cannot add an image to a Smart Collection by dragging and dropping it into the collection. You can’t remove an image from a Smart Collection just because you don’t want it in there – it can only be removed if it fails to meet the criteria you set up for the collection.

    Smart collections are a handy way to create collections and to manage your photos and here I’ll show you how to make use of them.

    Shipped Smart Collections

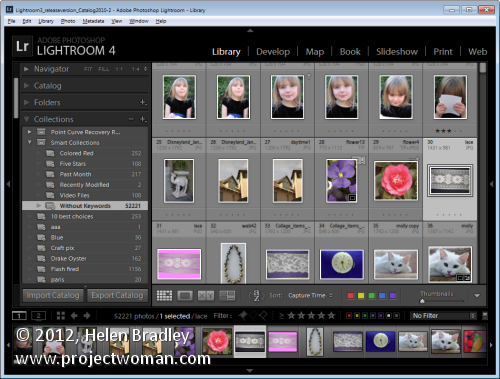
    There are a few Smart Collections which ship with Lightroom. To find these, click the Collections panel in Lightroom and click on the Smart Collection Set. Click the Smart collection called Without Keywords. As its name suggests, this collection shows you all the images in your Lightroom catalog that do not have keywords associated with them.

    If you’re like me you’ll want to close this one pretty quickly – it can be scary to see just how many images aren’t keyworded!

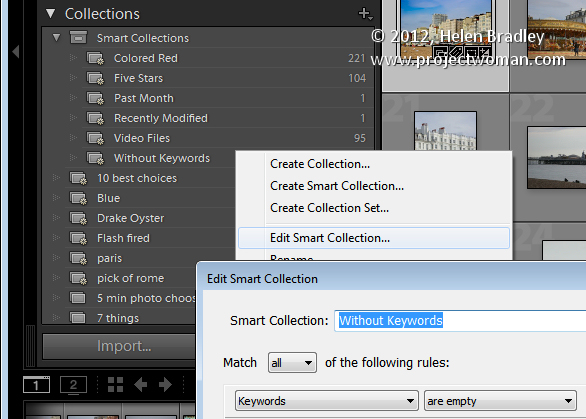
    You can learn more about this collection by right clicking its name and choose Edit Smart Collection. You’ll see that the Smart Collection is configured to contain all those images for which the Keywords property is empty.

    Lightroom smart collections 1

    There are other collections which are shipped with Lightroom including Recently Modified which is a collection of images that have been edited recently.

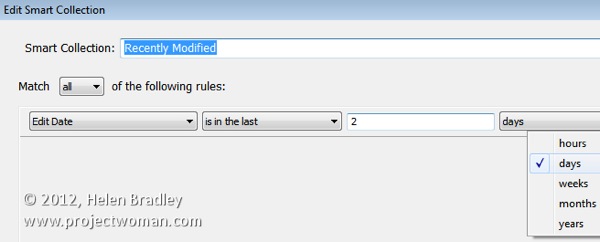
    You can, if desired, change the Recently Modified Smart Collection to span a different number of days. Click this collection , right click and choose Edit Smart Collection. You can see that the collection criteria is set to be Edit Date > Is in the last

    When you do so, Lightroom checks the images in your catalog to determine which images meet this criteria and it displays these in this Smart Collection.

    Lightroom smart collections 2

    Make your own Smart Collections

    In addition to those shipped with Lightroom you can create your own Smart Collections. For example, if you color your images red meaning a certain thing you can create a Smart Collection that contains all the images which are colored red.

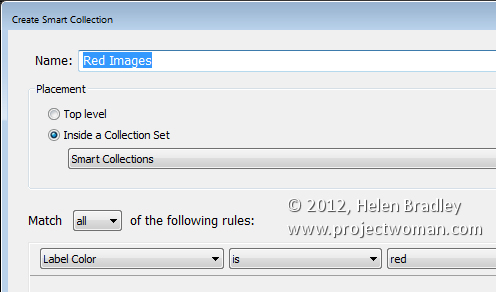
    To do this, click to open the Collections panel, click the plus symbol and choose Create Smart Collection. Type a name for it such as Red Images, click Inside a Collection Set and choose to add it to the Smart Collections set. From the options below select Label color is red.

    Click Create to create the collection – it will contain all images in your collection which have the red label color associated with them.

    Lightroom smart collections 3

    Remove an Image from a Smart Collection

    The only way you can remove an image from a Smart Collection is to configure it so it no longer meets the criteria for the Smart Collection. For example an image will no longer appear in the Without Keywords collection if you add a keyword to it.

    You can remove an image from the Red Images collection if you remove or change its color label. When it no longer has the red color label associated with it, it will no longer appear in the collection.

    Similarly, if you apply the red color label to an image in Lightroom it will be automatically added to the Red Images Smart Collection.

    One of the benefits of Smart Collections is that they’re continually updated by Lightroom. So Lightroom ensures that all the images which match the criteria you use to define the Smart Collection are in that collection.

    How Smart Collections Differ from Regular Collections

    Smart Collections behave differently to Regular Collections in a few key ways. One difference is that you cannot arrange images in a Smart Collection into your own custom order.

    The collection order can only be set to one of the Lightroom default Sort Order options; Capture Time, Edit Order, Edit Time, Edit Count, Rating, Pick, Label Text, Label Color, File Name, File Extension, File Type and Aspect Ratio. Regular collections, on the other hand, can be sorted into User Order which is useful for slideshows and web pages for example.

    You also cannot set a Smart Collection as the Target Collection because you cannot add images to a Smart Collection manually. It can only be added if it matches the criteria which describes that collection.

    Over to you… Do you use Smart Collections in Lightroom and, if so, how do you use them? Do you use the shipped collections or make your own?

    Post originally from: Digital Photography Tips.

    Check out our more Photography Tips at Photography Tips for Beginners, Portrait Photography Tips and Wedding Photography Tips.

    An Introduction to Lightroom Smart Collections


    Digital Photography School

  • Rock ‘n Roll: Jaleel King

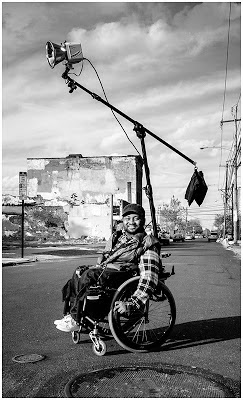
    Anything worth accomplishing is going to include hurdles and barriers to overcome. You can treat them as the reasons you can't do something, or you can simply refuse to acknowledge that the barriers exist and plow through them.

    This is Jaleel King, and this is how he rolls. Read more »


    Strobist

  • Photographers Nicole S. Young and Brian Matiash Meet on Google+ and Get Married


    Photo from Nicole S. Young’s G+ stream.

    One way you can judge the health of a social network is by the relationships that come out of it. There has probably been no more vibrant social network for photographers this past year than Google+. Google+ attracted the most social of photographers early on last year when they launched and they’ve succeed in capturing the soul of social networking for photographers since. There are many sites where you can post photos, Flickr, Facebook, Instagram, 500px, but none have quite the social magic that Google+ has in quite the same way right now.

    I remember when Flickr first launched back in the day, back when they seemed to have a simliar magic. One of the first things you saw coming out of Flickr were romantic relationships — many people were meeting on Flickr, getting involved and in some cases even getting married. Google+ is only a year and a half old at this point, but today I saw the first photographer marriage coming out of the network that I’ve noticed so far, photographers Nicole S. Young and Brian Matiash announced that they tied the knot.

    For those of you who don’t know Nicole and Brian, they are wonderful photographers and contributors to G+. Nicole is a photographer and author who specializes in stock and food photography and Brian works for photo processing company onOne Software and like me loves to shoot abandoned and urbex type photography.

    From Nicole:

    “Every once in a while something that is seemingly small comes along that makes a difference in your life, and other times it changes your life completely. In the summer of 2011 Google+ was brought to life, and with that the beginning of Hangouts and a swarm of amazing people from all over the world. This community here on Google+ has impacted my life so wonderfully and drastically, and in the process I’ve made many life-long friends and connected with people I barely knew before, but through the popularity of Hangouts I was able to actually interact with.

    One of those people was +Brian Matiash, and just a few months ago we officially tied the knot!

    Yes, it’s true. He got down on one knee and asked me to marry him, and I said YES!!! We had a simple ceremony on what we call “Marriage Day”

    My good Pal Trey Ratcliff got the assist for helping to introduce them to each other on, yep, you guessed it, a Google+ hangout.

    Congratulations to Brian and Nicole both on this excellent news! I’m curious as to whether or not they’ll be registering at B&H or Adorama.

    And for the rest of you, before you pony up for that match.com or eHarmony account next month, you just might want to reconsider and head on over and check out Google+ instead. My money’s on Scott Jarvie being next, btw. ;)


    Thomas Hawk Digital Connection