Category: Photography

  • Make Your Last Shot Your Best Shot

    Lately I’ve noticed a common occurrence when I review my images from a photo shoot. More often than not the very best frame is the last one.

    I think it’s because I’ve been pushing myself further than I used to by consciously carving out my vision of the subject.

    For example, when I was in Charleston, South Carolina, I scouted out a beach location that had a lovely pier and faced east. Perfect for sunrise. I got up extremely early, while it was still dark outside, went to my location flashlight in hand and got set up for the morning’s first rays.

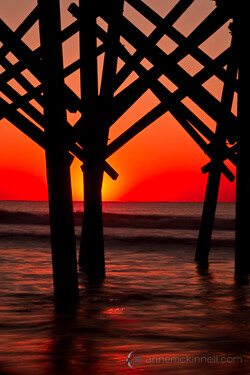
    When the sun came up it didn’t take me long at all to get the shot I had envisioned. Here it is.

    Pier at Folly Beach, Charleston, South Carolina.

    There were a couple of other photographers on the beach that morning too. They had come down from the nearby swanky beachfront hotels and made images that were probably very much like the one I made. Then they went back.

    I bet they were just in time for breakfast. My mouth watered a bit as I imagined what they were in for. Mmmm, yummy bacon, croissants still warm from the oven, a cheesy omelet. I looked back towards the hotels and paused for just a moment before my conscience told me “NO! FOCUS!” and when I looked back the light had changed just a bit and I smiled knowing I was going to make images that were even better than my initial vision.

    When I am at a scene, I always try to focus on whatever attracted my attention in the first place. In this case it was the pier. Sure, the beach was lovely and the sky was lovely, but it was the pier that made this place different from any other beach.

    I moved closer and closer to the pier, simplifying the composition, using a different point of view and different lenses to arrange the elements of the scene until I got these two images, neither of which I had envisioned before the shoot.

    Pier at Folly Beach, Charleston, South Carolina.Pier at Folly Beach, Charleston, South Carolina.

    I carved out my vision of the subject and removed elements from the scene until I was left with only a small portion of what was in my initial image.

    A similar thing happened when I was at Green Point in Gros Morne National Park in Newfoundland, Canada. I went down to an east facing beach for a sunrise shoot and made this image.

    Green Point Beach, Gros Morne National Park, Newfoundland, Canada.

    There was a very similar scene looking at the beach in the other direction.

    Green Point Beach, Gros Morne National Park, Newfoundland, Canada.

    But after that, then what? The thing that was different about this beach than any other I had been on were the pinkish granite stones the size of footballs. And I couldn’t help but give them my attention since they were extremely difficult to walk on. They were wet, each one moved as I stepped on it, and when the powerful atlantic waves came in I had to grab my tripod and rush up the beach for fear of being swept away. It was the stones that were the attracting feature.

    So I changed my point of view by getting down low, used my wide angle lens to get in close, and removed all other elements from the scene to make this image.

    Green Point Beach, Gros Morne National Park, Newfoundland, Canada.

    The next time you go on a photo shoot think about carving out your vision of the subject and being conscious of what you want to express in your image by answering these questions:

    • What is your photograph about?
    • How can you arrange the elements of the scene to bring out your subject’s best quality?
    • What elements are best left out?
    • What is the true subject?
    • What kind of effect do you want the subject to have on the viewer?

    Get closer and closer to your true subject, changing your point of view, and removing elements from the scene until you get that shot that expresses your vision.

    You will find that your compositions improve as you go and you might find too that your best shot is your last shot.

    Post originally from: Digital Photography Tips.

    Check out our more Photography Tips at Photography Tips for Beginners, Portrait Photography Tips and Wedding Photography Tips.

    Make Your Last Shot Your Best Shot


    Digital Photography School

  • Q&A: “Why Does This Look Bad?”

    That's what reader Arjen P van de Merwe asks, from Malawi in southeast Africa.

    My first thought: Arjen, you are being too hard on yourself. A lot of people would have been quite happy with that photo. It's easy to forget how far you have come—and how fast—with respect to lighting your photos.

    You definitely made some good calls, and there are some additional opportunities you could taken advantage of. Let's talk about both, as fellow readers have something to learn from each. Read more »


    Strobist

  • Fujifilm XE-1 Review

    Fujifilm XE-1-front.jpg

    When the X-Pro1 was announced to a surprised market earlier in 2012 I then remarked on my scepticism at the release of a magnesium alloy bodied, mirrorless interchangeable lens camera.

    Then it sunk in and I added that other companies had performed ‘major rethinks about the future of upper level digital cameras: like Olympus with its retro OM-D and Nikon with its bare bones N1.’

    It was obvious that Fujifilm had done ‘a mighty rethink about gaps in the pro market and come up with a camera that has some pretty clever answers to some profound questions.’

    Since then there have been other models in the X-mount line and the XE-1 is the latest.

    Fujifilm XE-1-back.jpg

    Fujifilm XE-1-top.jpg

    Fujifilm XE-1 Features

    Make no mistake, this is a finely-engineered camera. To begin with the review camera looked right with touches of matte chrome set into a black metal body. Although I found the rubber speed grip to be a little small, the general feel of the camera is good, despite a body weight of over 600 grams with the f2.8/18-55m lens fitted — the first zoom designed for X-mount cameras.

    Fujifilm XE-1 Bicycle.JPG

    The external controls are easily discovered, with the die-cast magnesium top deck layout consisting of black text on chrome, while the rear surface has largish white text in black. Overall, it’s very film camera-ish!

    Fujifilm XE-1 Shutter speeds.jpg

    The nice touches in this department are a direct-select dial for the shutter speed, accompanied by a +/- two f stops exposure correction dial and power button. Frequently-used actions can also be assigned to the Function button, sited right next to the power button.

    Fujifilm XE-1-Menu.jpg

    Just over the lip of the top deck is a viewfinder select button that switches your view from turret to rear screen or you can auto select and let the approach of your eye trigger the former’s view.

    Not only is there a pop up flash set into the top deck but the nearby hot shoe also accepts external flash units. Immediately ahead of it (and pointing uselessly skywards!) is the L+R stereo microphone; my advice is to use a plug in external mic!

    Fujifilm XE-1 Sculpture 1.JPG

    The rear has buttons for selection of single frame or continuous shooting, AE and AF options, menu, macro shooting, display options, a quick access button to take you to direct selection of such functions as ISO, white balance, image size etc.

    Tucked away on the front, just beneath the lens is a three way switch for manual focus, single frame or continuous focus.

    External connections allow hook up for an external stereo mic, mini HDMI output plus USB and AV output.

    The 16.3 megapixel CMOS accounts for a large 4896×3264 maximum image capture, both in RAW and JPEG. This can deliver a 41×28 cm print.

    Movies in Full HD 1920×1080 can be shot. While the AF seems to function quite well in movie mode you can’t shoot stills mid video.

    An unexpected joy (for this film born and bred feller) is the aperture ring set into the lens: as you roll it around, it’s a joy (with the 18-55mm zoom anyway) to see the lens aperture shrink down to f22! How many digicams will allow you that pleasure!

    As with some other models, the XE-1 can shoot high quality motion panorama stills, sized up to 5120×1440 pixels. It’s an eery sensation to shoot one, as the camera chug-chugs along, snatching individual frames, then stitching them in camera. If you want to get into panos, I would only suggest that you practice, practice, practice! ‘Tis fun but t’ain’t easy!

    Fujifilm XE-1 ISO Tests

    Fujifilm XE-1 ISO 100.JPG

    Fujifilm XE-1 ISO 400.JPG

    Fujifilm XE-1 ISO 800.JPG

    Fujifilm XE-1 ISO 1600.JPG

    Fujifilm XE-1 ISO 3200.JPG

    Fujifilm XE-1 ISO 6400.JPG

    Fujifilm XE-1 ISO 12800.JPG

    Fujifilm XE-1 ISO 25600.JPG

    Right up to ISO 6400 the camera performed brilliantly. At ISO 12800 noise was evident and even more so at ISO 25600 but even this setting could be used!

    Fujifilm XE-1-Melons.JPG

    Fujifilm XE-1 Review Verdict

    Quality: well above average.

    Why you’d buy the Fujifilm XE-1: you have the skills to exploit it.

    Why you wouldn’t: the LCD screen does not tilt.

    The X-mount series of cameras goes from strength to strength. This sits easily into the lineup.

    A fine successor to the X-Pro1.

    Fujifilm XE-1 Specifications

    Image Sensor: 16.3 million effective pixels.
    Sensor: 23.6×15.6mm CMOS.
    Metering: Multi segment, centre-weighted, spot.
    Lens Mount: Fujifilm X.
    Lens Factor: 1.5x.
    Exposure Modes: Auto, Program AE, shutter and aperture priority, manual.
    Shutter Speed: 60 mins (Bulb); 30 sec to 1/4000 second.
    Memory: SD/SDHC/SDXC.
    Continuous Shooting: Approx 6 or 3fps.
    Image Sizes (pixels): Stills: 4896×3264 to 1664×1664.
    Movies: 1920×1080, 1280×720.
    Viewfinders: 12.5mm turret (2,360,000) and 7.1cm LCD screen (460,000).
    File Formats: JPEG, RAW, JPEG+RAW, MPEG4.
    Colour Space: sRGB, Adobe RGB.
    ISO Sensitivity: Auto, 100 to 25600.
    Interface: USB 2.0, HDMI mini, stereo mic.
    Power: Rechargeable lithium ion battery.
    Dimensions: 129×74.9×38.3 WHDmm.
    Weight: 350 g (inc battery, card).
    Price: get a price on the Fujifilm XE-1 (Body Only) or the Fujifilm XE-1 with 18-55mm Lens .

    Post originally from: Digital Photography Tips.

    Check out our more Photography Tips at Photography Tips for Beginners, Portrait Photography Tips and Wedding Photography Tips.

    Fujifilm XE-1 Review


    Digital Photography School

  • What is HDR and Aperture and Stuff? 30 Photo Terms You Must Know Letter-Perfect

    Falling in love with photography is easy. Being scared away by the highbrow photo terms is even easier. Crop-factor, aperture, depth of field… What the heck?! Come on, it is not that complicated, you just need a minute to settle it all down, step by step. Here’s a rundown in plain English of the most common terms you’ll hear or Continue Reading

    The post What is HDR and Aperture and Stuff? 30 Photo Terms You Must Know Letter-Perfect appeared first on Photodoto.


    Photodoto

  • Capturing the Northern Lights in Timelapse Video

    A guest post by Phil Hart – author of the Shooting Stars eBook (use code DPSTARS for a 25% discount).

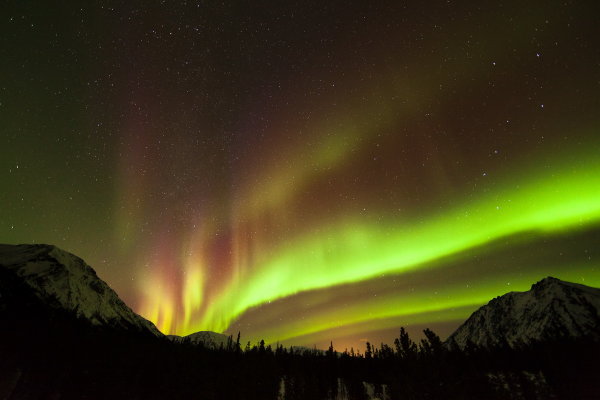
    In this post, I’d like to share the back story to a new video I have released after a nine week ‘extreme astronomy’ adventure in the Yukon earlier this year, where I went to capture timelapse footage of the Northern Lights (the ‘Aurora Borealis’).

    First the video, ‘Valentine’s Aurora’, which I hope you will enjoy with the lights down and the music up:

    Valentine’s Aurora from Phil Hart on Vimeo.

    The Location

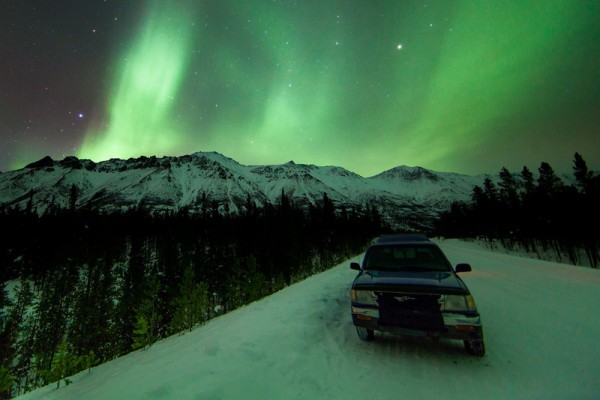
    All of the footage for this video (except the fisheye sequences) was shot on Annie Lake Road, south of Whitehorse the capital of Canada’s Yukon Territory. See this Map Link.

    It was the 14th February, and only my second night out on location away from home base where I was staying on the shores of Shallow Bay, Lake Laberge, to the north of Whitehorse. The weather was good during the day and I was confident of clear skies, so I made the trek an hour and a half south. There was nothing to indicate that aurora activity was going to storm that night, but that’s the nature of aurora. When you’re this far north you have to get out whenever the weather is good and capture whatever happens. Further south, you might like to monitor the forecasts on spaceweather.com.

    I could actually see aurora curtains low in the north even before the end of twilight, so I had an idea I was in for a great night, and had to get moving quickly.

    On location at Annie Lake Road: Canon 5D Mark II, 14mm lens, 30 secs, f2.8, ISO800

    Camera Gear and Exposure Settings

    I used four cameras to capture all the footage in this video:

    1. Canon 5D Mark II with 24mm f1.4 lens
    2. Canon 5D Mark II with 14mm f2.8 lens
    3. Canon 1100D (Rebel T3) with 10-22mm lens
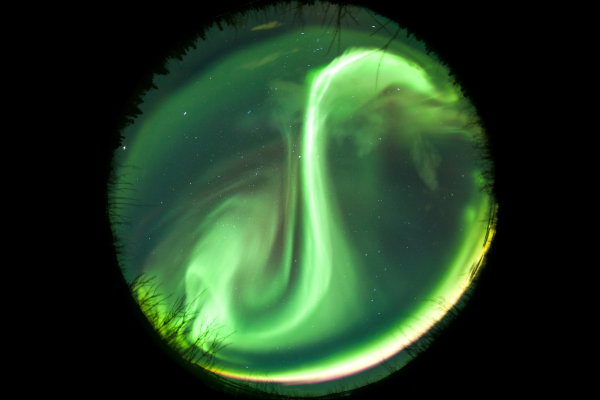
    4. Canon 5D (original) with Peleng 8mm Fisheye lens (running autonomously with an intervalometer back at Shallow Bay)

    Fisheye Aurora: Canon 5D, 8mm lens, 30 secs, f3.5, ISO800

    All of these lenses were used at their maximum aperture, as to capture the motion of the aurora requires exposures that are as short as possible. In general, exposures were ~6-8 seconds with the fast f1.4 lens and ~15-25 seconds with the slower lenses. But when the aurora was very bright and active, I was using exposures as short as ½ second with the f1.4 lens. In fact, there were actually a few minutes that night where I could record live video of the aurora, but that footage was too grainy to use in this compilation.

    Although I was recording long timelapse sequences of images very quickly, I still tried whenever possible to capture full size RAW files. Only when the exposures were short (<1 second) was I forced to shoot straight to JPG as the camera could not keep up otherwise. At the end of the nine weeks, I had nearly three terabtyes of data, which is quite a headache!

    Motion Control and Accessories

    • The 5D Mark II and 24mm lens were carried on an alt-azimuth panning mount with a custom controller, to create some of the panning sequences in the video.
    • The 1100D (Rebel T3) with 10-22mm lens was carried on a little Vixen Polarie, used in a horizontal panning mode, which provided for simple panning sequences.
    • The other 5D Mark II with 14mm lens was used on a standard tripod.

    These last two cameras were set to continuous shooting mode, and a simple push button remote release was used to fire off the shutter for as long as the button was locked down.

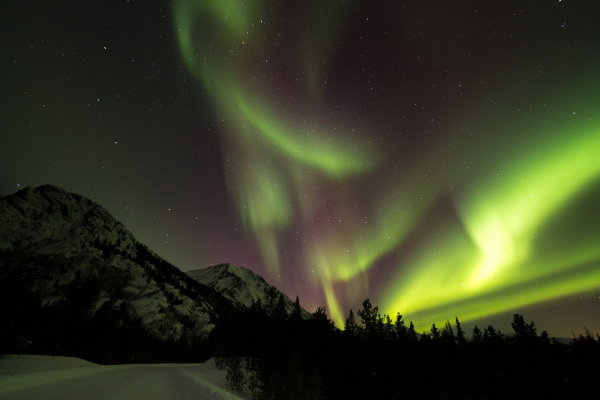
    Canon 1100D (Rebel T3), 10-22mm lens @10mm, 25 secs, f3.5, ISO800

    Composition

    With aurora, like other night sky photography and landscape work in general, it’s the combination of foreground and sky that makes an image. So I spent a lot of time looking for rugged mountains and other attractive foregrounds. But location scouting is quite difficult in the Yukon in the middle of winter, with very few roads open and clear. Despite several more weeks touring around after this, Annie Lake remained one of my favourite locations and it was one of the more accessible as well.

    One of the factors to consider when chasing aurora, and one of the advantages of this site, is to look for a low northern horizon to increase visibility when aurora activity is low, but interesting horizons around to the east and west for when activity increases.

    Landscape with low northern horizon: Canon 5D Mark II, 14mm lens, 15 secs, f2.8, ISO1600

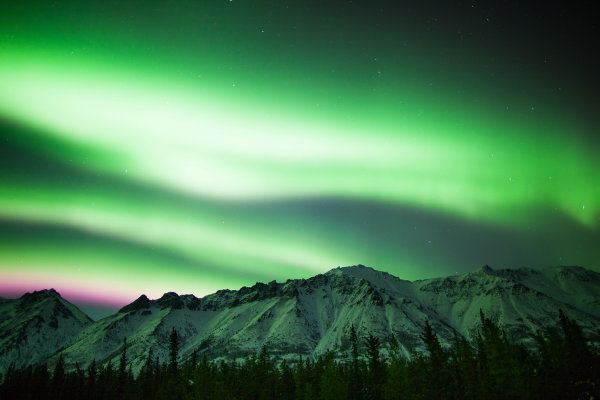
    Unless you resort to light painting, in general the foreground appears silhouetted against the aurora, so you need strong profiles (isolated trees for example, rather than a wall of them). But occasionally the aurora is so bright overhead that it can actually illuminate the scenery. You can see that in the image below. Other times you may have moonlight which creates a very different lighting environment, and turns the sky blue just like the daytime sky.

    Bright aurora illuminating the landscape: Canon 5D Mark II, 24mm lens, 5 secs, f1.4, ISO800

    Post Processing

    I learnt a lot as I began to process these Image sequences back home in Melbourne. To get the most out of them, I used Adobe After Effects to directly import the RAW image sequences. I also used the Neat Video noise smoothing plugin to reduce the appearance of noise without sacrificing too much detail. In some cases I also used Lightroom and LR Timelapse to smoothly vary some development parameters across the sequence, to cope with large variations in brightness of the aurora, before importing the sequence into After Effects. These frequent and often fast changes in brightess of the aurora is one reason why I often shot at lower ISO settings (~ISO800) than I normally would for night sky photography, to prevent clipping of bright areas of the aurora as much as possible.

    The Star Trail effect at the end of the video was created using the ‘Lighten’ blending mode in the freeware program StarStax by Markus Enzweiler, which I highly recommend.

    I hope you enjoy this Valentine’s Aurora video and a little of the behind the scenes story. Feel free to share it!

    Post originally from: Digital Photography Tips.

    Check out our more Photography Tips at Photography Tips for Beginners, Portrait Photography Tips and Wedding Photography Tips.

    Capturing the Northern Lights in Timelapse Video


    Digital Photography School

  • The Killer Clamshell – A Two Light Setup Guide

    Awesome Two Light Clamshell Setup – A Real Beauty

    Introduction

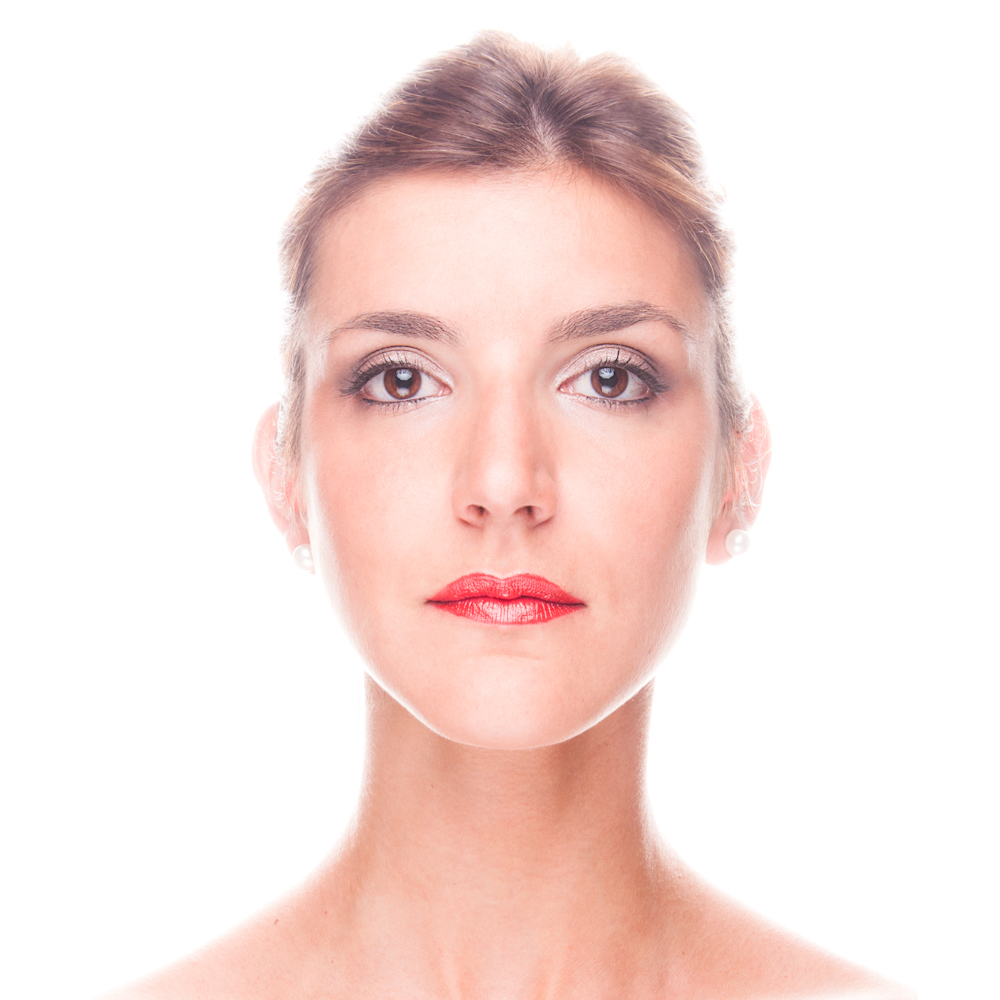
    If your just getting started in off camera flash and studio photography then single light setups are a fantastic, uncomplicated way of getting to grips with lighting techniques.  Despite the wide range of effects that can be achieved with a one light setup, working with multiple lights provides even greater range of creative options and my favourite multi light setup has to be the clamshell.  This lighting setup can be used to produce a soft wrapping quality of light; a perfectly white background and stunning catch lights resulting in a classic beauty look ideal for photographing female models.  Best of all its incredibly easy, so hopefully with the following guide you can also have a go at this great lighting setup.

    Setup & Equipment

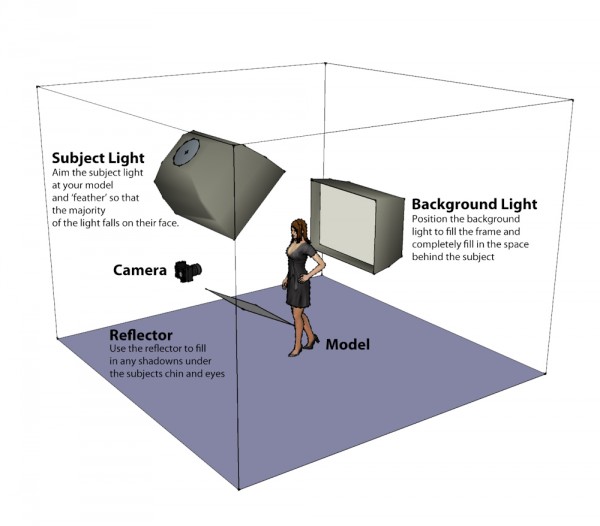
    The basic idea behind this setup is to use a single large light source both as a backdrop and to provide wrap around light.  The subject is then illuminated from above using a second light with any remaining shadows filled in using a flat reflector.

    For this setup you will need two light sources; ideally strobe heads although speedlights are also fine but might take slightly longer to recycle given the higher power required.  To achieve the soft quality of light both lights should be shot through large soft boxes, although if you don’t have these then you could us a large sheet as a background and something like an umbrella for the main light.

    The basic setup is as follows; the key point to remember is to ensure the backlight completely fills the background.

    Lighting Diagram – A Simple Two Light Setup

    Metering

    Metering for this shot is actually fairly simple and whilst a light meter can be helpful in speeding things up its easy enough to set the exposure for this shot by eye.  The main steps are as follows:

    • Start by leaving your flashes off and start with your camera settings.  Set a small aperture, (something like f8 or f11), a fast shutter speed (around 1/200 to 1/250) and set your ISO to its lowest setting.
    • Turn your back light on and starting with a low power take a test shot and check the image preview on your camera to see how ‘white’ the background is, a properly exposed background should be solid bright white.  A good way to check is to take a look at the image histogram, most of the reading should be to the very right hand edge of the graph indicating that the tones in the image are tending towards solid white.  If the background isn’t exposed properly increase the flash power and repeat.
    • Now its time to get your model in position and check the amount of wrap around light from the background.  Place your model in front of the back light and take another test shot.  Vary the distance between the subject and backlight to change the amount of light wrapping around your subjects head and shoulders.  The purpose of the wrap is to provide some separation and help add definition, so all you need to do is highlight the edges of your model.
    • Now turn your subject light on and take a test shot.  Check the overall exposure and vary the power/position of the light until your models face is correctly exposed.
    • Finally position a reflector below your subjects jawline and use this to bounce fill light into any dark areas of the shot in particular under your models chin, nose and eyes.

    Summary

    Hopefully the steps above are simple enough to convince you to give this lighting setup a try.   Not only is this a great way to try working with multiple lights but it also results in a really satisfying and flattering image and of course double the lights means double the creativity!

    Post originally from: Digital Photography Tips.

    Check out our more Photography Tips at Photography Tips for Beginners, Portrait Photography Tips and Wedding Photography Tips.

    The Killer Clamshell – A Two Light Setup Guide


    Digital Photography School

  • 20 Epic Fake Pictures that Have Fooled the Whole World

    Hey buddy! I just saw a photo of you naked! No, really.. it were you! Or maybe it’s a prank? No, it’s kind of other stuff that is called a fake photo. Let’s try to figure out what makes these photoshopped pictures a real virus. Here you’ll find a few interesting facts that can be used to show off your Continue Reading

    The post 20 Epic Fake Pictures that Have Fooled the Whole World appeared first on Photodoto.


    Photodoto

  • Studio Lighting: Building a Light Set-up

    Studio flash photography often appears to be complicated and confusing for the new photographer.  The tangled, twisted mess of light size, power, angle, position, direction, etc… can be daunting to say the least.  Not to mention the need for extra equipment such as backdrops, light stands, modifiers, reflectors and the lights themselves. Wow! Already seems like too much huh? You might find yourself thinking, “I can just use the giant light source in the sky that is available everyday and be done with all this other mangled mess of an armamentarium.”  At times I would not disagree with you, as the natural light from the sun is hard to beat and is in great abundance, however, when I look at how much my understanding of light and shadow has improved from my many unsuccessful studio lighting shoots, the value of learning this sort of lighting is tremendous. And yes I did say “unsuccessful shoots!”

    Strangely enough, when I got started with photography, studio lighting was one of the areas in which I was most interested. Not the easiest place to start I can assure you, but  it definitely does not need to be as awkwardly bemusing as it first appears. Now this article is not meant to be a full on detailed description of what lights or modifiers to buy or an in depth scientific analysis of the inverse square law complete with physics equations and Einstein like theorems.  It is more of a reason of why to get started with studio lighting and to break through any mental barriers that might be in your way.  I promise you, once you get your feet a little wet and wild in the studio, you will not only love it, but also find that you have a better eye for light even when you are out at the wee hours of the morning trying to capture that perfectly beautiful sunrise.

    To shoot my studio work, I use simple, durable yet economically feasible equipment.  I currently use a set of Alien Bees strobes from Paul C. Buff. There are a lot of other brands of strobes out there, but these have worked well for me and fit within my budget.  Now, you do not necessarily need to use strobes. Westcott has their Spiderlite TD continuous lighting system that also could suffice. Basically any system of lighting can work fine. You could use a couple of lamps with a shower curtain liner to diffuse the light if you want. Don’t get too hung up on the equipment at first, but try to understand how to position and control the lighting to get the desired results.  I am trying not to get pulled into a discussion about equipment, but admittedly some equipment is required. In order to move on, I would recommend getting a good book or two on studio lighting to give you a thorough description of some lighting basics. Two that I have personally found useful are Master Lighting Guide for Portrait Photographers, by Christopher Grey or Basic Studio Lighting: The Photographer’s Complete Guide to Professional Techniques, by Tony Corbell. There was also a nice post here on DPS recently called One Light Portraits: Simple Elegance, by Rick Berk.

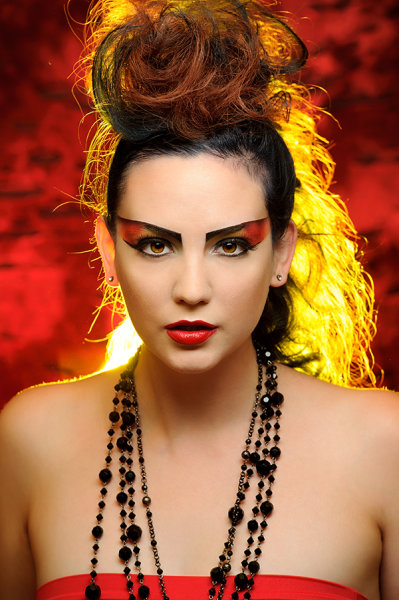
    Whew! Let’s move on and get into some of the nitty gritty of setting up a studio portrait shoot. Lately, I have been working on some creatively themed portrait shoots as a personal project.  The basics of what you need for a shoot are simple. You need a background and a willing model or subject. This can be a plain wall in your house and a close friend or even some fabric taped to the wall with a bowl of fruit on a table in front of it. My theme was fire, so first I went to the fabric store and found an interesting black/grey charred looking swath. A quick aside, if you want to find some really cool backgrounds in the U.S. go to a fabric store around Halloween and they will have some really great stuff.  Next, I got a hold of a local model, the fabulous Brittney and set-up a time for the shoot. I also hired the amazing Dina Bree Nast a local make-up artist here in Denver, Colorado. I must say, and this is just my own opinion, but if you have never hired a make-up artist for a shoot, you have to try it as the results are spectacular and it will reduce your post-processing time tremendously.

    Okay, the date, model, MUA and backdrop were set. Next and most importantly, how do I design the lighting set-up.  A little planning goes a long way with a studio shoot. When you are just getting started you do not want to have to deal with moving a lot of lights around or having your subject face the wrong way and have shadows in places where you do not want them. A sure fire way to avoid this is to first give your subject a stool or a chair to sit on. This will keep them in one place at the same distance and proximity from your lighting set-up and your background. Secondly, stick to one lighting set-up and limit the shoot to it. You want to focus on getting the shot that you want and not be constantly worried about fumbling with the lights. If you are more focused on the lights and everything else going on with the equipment, you will not pay attention to getting a great pose and expression and let’s be honest, the lighting can be less then perfect if you capture the right moment.  Finally, you would like to have an idea of what sort of depth of field at which you would like to shoot. If you want the background slightly blurred go with a wide open aperture of f/2.8-f/4. In my plan for this shot, I chose f/8 as I wanted to capture a bit of the look and texture in the background as I felt it complimented the shot. Additionally, I keep my ISO low which for my Nikon is 200 and my shutter speed I usually leave at 1/125 of a second. Thus, my camera settings are set already and I have not even taken a shot yet.
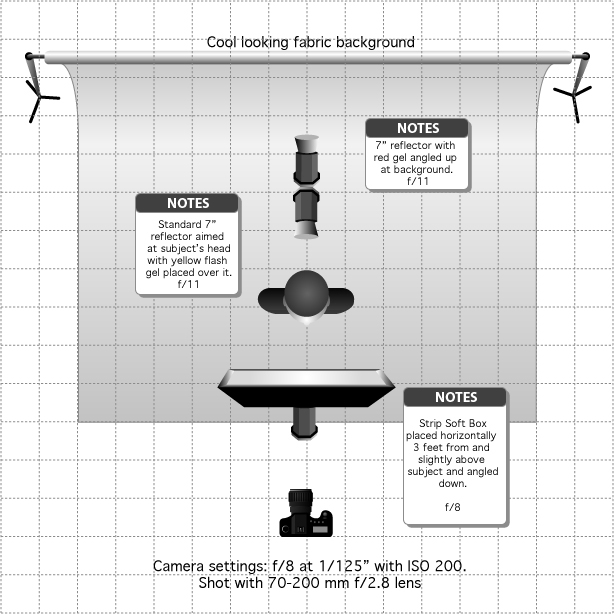
    I always start my lighting set-up with the position and exposure setting of the main light or the one that will be responsible for lighting the subject.  In this shot, I already know I want my aperture around f/8 so that I can capture that background detail. This already let’s me know where I want my main lights exposure to be set. Now, there are two ways to set the main light’s exposure. You can use a light meter or you can wing it by taking some practice shots and checking your histogram and adjusting accordingly. Either way works well even though many people have opinions about one way or the other. Personally, I use a combination of both. So what about position of the light?
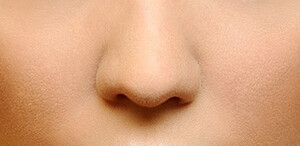
    To start out with, I think using a glamour or butterfly lighting set-up (named for the shadow pattern created beneath the subjects nose) is very easy and is incredibly flattering for the subject. To achieve butterfly lighting the main light is set directly in front and slightly above the subject with the light angled down toward the subject. As a beginner, having the light directly in front of the subject is useful cause if the subject turns their head one way or the other they will still always be within the range of the main light. I used a 36-inch strip softbox in this set-up placed about 2-3 ft from the subject in the horizontal position to achieve a narrow, soft beam of light that would not spill onto the background very much. Then I took a few shots to see what it looks like.
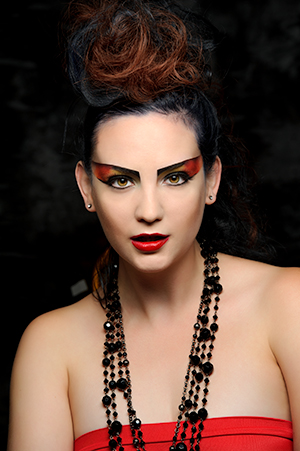
     

    As you can see with just the main light, the subject is adequately exposed, however, I cannot see the background and the subjects dark hair blends in so much with the background that you cannot see the outline of her hair. What does this tell me? I need to light the background as well as the hair to separate her from the background and gain some depth to the image. Since my theme was fire, I wanted to incorporate some colors that would support the theme. This made me think of reds, oranges and yellows. So to light the background I set a strobe just up off the floor angled up at the background with a standard reflector attached, however, I decided to place a red acetate gel over the light to give a little color to the background and support my theme. To set the power of this light I turned off my main light and took a few practice shots with only the background light on to see how it looked and adjusted the power of the light until I liked the look.
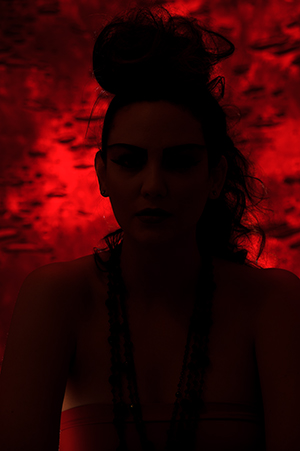


    Here you can see with only the background light, I have a nice subtle red glow to the background that also brings out the interesting texture to compliment the fire theme of the shoot. The background light also wrapped around the subject just a little bit, likely bouncing a touch off the white surface of the softbox in front of her, giving a red tinge to the shadows. If I did not want this extra red in the image I could have moved my subject farther form the background, but I liked the effect so I left it alone.

    Next, I needed to separate the subject’s  hair from the blending into the background.  I set up an additional light right behind the subject just below her shoulders and directed it with a standard reflector at the back of her head. I decided to add a yellow acetate gel over this light to hopefully give a bit of a fiery glow to the hair. Again I turned out the other lights and I took a few shots to see how it looked and adjusted it as needed.
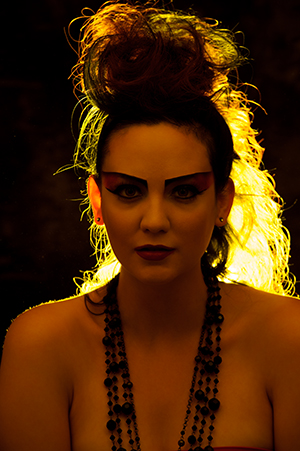


    As you can see, I now have a nice burning glow that highlights the outline of the hair and separates the subject form the background adding some depth to the image. I also get a little more of the yellow light reflecting of the strip softbox and filling in the shadows of the face with a bit of a golden tinge. When I looked back at the photo of the main light by itself I decided that this slight tinge would add some warmth into the shadow area and really compliment the photo. I have to admit this was a happy accident as a result of the light set-up.
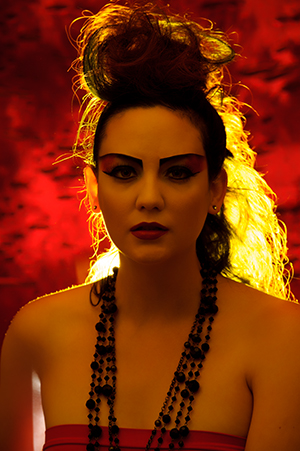


    Next, I took a few shots of just the background and hair light together to check how the two looked combined.

    What do you think? A pretty nice combination that provided the shot with the fiery look I wanted, while also serving to bring out the background and help the subject stand out. To be critical, I was not pleased with the illumination of the subjects right ear, but I figured I could work with angles possibly to make it more subtle. Finally, I turned the main light back on and took a few more shots to see how all three lights looked together. I was very pleased with the result and felt that the little bit of red and yellow that spilled over into the shadows of the subjects face really helped to compliment the look and bring it all together.  At this point the light and camera settings were never touched and all I had to do was shoot and make sure I got the pose and expression I wanted, which when working with someone like the experienced Brittney was super easy. Is the light perfect? Definitely not, but it all comes together to produce a nice unique portrait.
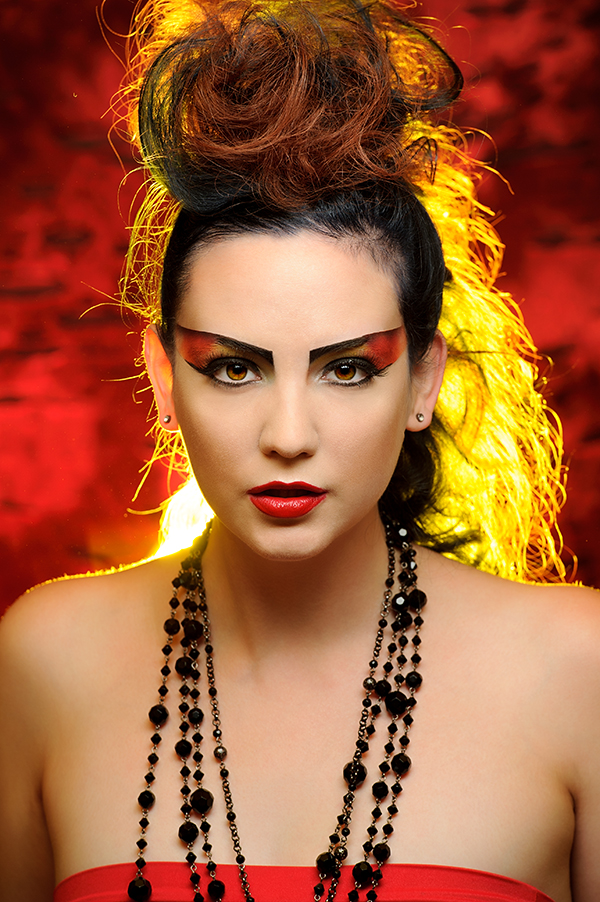
    I hope by going through my thought process step-by-step for this shot and by showing the effects of each light separately that it gives you a little insight into working with studio lighting and how you can construct an image one light at a time. Having total control of the lights is a bit scary, but once you start taking some baby steps with it, I promise you it will make all aspects of your photography better. Studio lighting is all about the direction and intensity of light and how it transitions and compliments into shadow. Wait, isn’t that what all photography is about? So go ahead and jump in head first. Inevitably, you will make a lot of mistakes, have many over and underexposed images, and end up with plenty of shots of which you are not proud, however, you will also absolutely get some fantastically, fascinating photos and learn a lot about the the interplay and visualization of light and shadows.  Plus, let’s be honest, don’t we have these same problems with any shoot? Any shot involves the light, background and subject and how we decide to capture and expose the image. Being able to control the light should actually make getting a great capture easier.

    Post originally from: Digital Photography Tips.

    Check out our more Photography Tips at Photography Tips for Beginners, Portrait Photography Tips and Wedding Photography Tips.

    Studio Lighting: Building a Light Set-up


    Digital Photography School

  • Amateur or Professional?

    Want to do some interesting reading? Do a Google search: “should amateur photographers charge a fee?” There is obviously a lot of expertise around the English speaking world on this topic – Google returned “about 2,760,000 results.”

    Some of those results are so naive they are absolutely funny. For example: “I have a digital camera which takes pretty good pictures…” and “Call a photographer in town and see what they say for advice on how much $ $ $ …” and a classic “You won’t incur (in) any expenses by using your digital camera.”

    As a professional with more than 20 years experience there are several things I have learned over that time. In order of the above statements I would respond with the following:

    • Cameras don’t take the picture, it is the person standing behind it,
    • Yes, I’m certain every professional photographer in town would be delighted to tell you how to establish a fee over the telephone; and
    • What a wonderful day it will be when we can get our equipment and learn our skills for free.

    This question of “how much do I charge” often revolves around the topic of weddings. The interesting point remains that one of the most difficult and high pressure disciplines of the entire practice of photography is … wedding photography. It is a one shot deal – bad pun intended.


      © Can Stock Photo

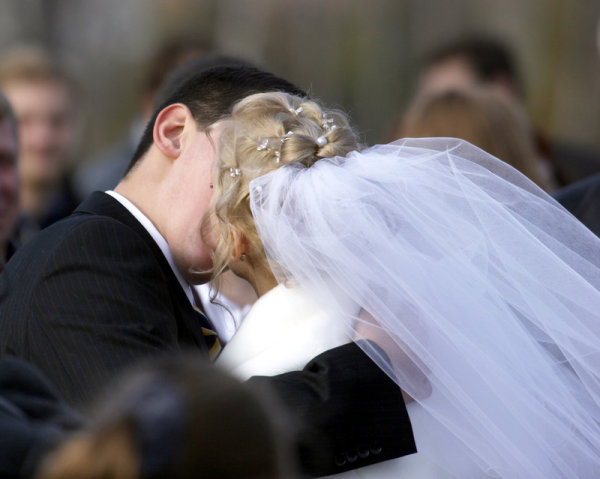
    Is this the work of an amateur?

    I know many photographers, myself included, that have tens of thousands of dollars worth of equipment and the knowledge to use it, know what we would have to charge to cover overhead costs even if we were doing it for free by not charging a creative fee, and know precisely what we pay in equipment costs every year; but, we wouldn’t touch a wedding job with a ten-foot barge pole. Simply put, it is not within our skill set. Wedding photography is very specialized.

    What I really don’t understand is why folks would either ask, or offer, to photograph a friend’s wedding. Don’t they understand that by working at their friends weddings they will not enjoy the ceremony or festivities that follow the ceremony?

    What happens when that well intended gesture goes south? Not only are you going to feel bad, your friend won’t have any pictures, and you run the risk of even losing a friendship from your well intended offering.

    Equally as bad, or even worse, what happens when a guest catches a toe in the strap of your camera bag, trips and falls and suffers a personal injury? You will no longer be considered a friend of the bride, but the wedding photographer who is ripe for a lawsuit.

    Another most likely scenario is that you decide to change lenses to capture that key moment; let’s say signing of the registry. In your haste to be ready you drop a lens, a lens you purchased just three months ago that cost $ 950. You want to cry as you look at it lying in pieces at your feet. Is your bride-friend going to pay for a replacement? Probably not. And because you are an amateur you most likely don’t have all-peril equipment insurance that would offset the replacement cost.

    Before offering your services it is paramount a review of the costs and liabilities that will be absorbed. There is a multitude of what if scenarios that has to be explored. Beyond the cost of equipment, beyond the cost of liability insurance and even beyond the cost of losing a potential friend, there are also questions regarding taxation and industry ethics.

    After reading all the above arguments suggesting why you should charge a nominal fee for your services you will have then entered another scenario. In most countries this fee will be considered income, and will be taxed accordingly. Should you decide to not report the income another topic enters the discussion. I suspect tax avoidance would not only come with potential legal consequences, but at its most basic form it raises questions of ethics.

    Professional photographers contribute to the local economy. They hire local students (most often aspiring photographers who desire to learn the profession before hanging out their own shingle), they pay various taxes, they pay studio rent, they pay insurance to local brokers, and a host of other expenses that most often support local service industries and overall economy. If enough weekend Rebels (they all shoot with Rebel’s, don’t they?) start shooting weddings for free that professional photographer will eventually have to close shop and the community loses the local jobs and economic spin-off the professional photographer supported.


    © Can Stock Photo

    Professional wedding photographers today often bring a reportage style as opposed to the traditional and formal approach.

    As I mention, I do not photograph weddings as I do not feel qualified. I also strongly believe that each of us has a moral obligation to ensure we do not undermine the capacity of our neighbour to earn a living, regardless of occupation.

    Before you agree to photograph that friend’s wedding, be honest with yourself, your friend, your neighbour and your community.

    Post originally from: Digital Photography Tips.

    Check out our more Photography Tips at Photography Tips for Beginners, Portrait Photography Tips and Wedding Photography Tips.

    Amateur or Professional?


    Digital Photography School
  • How to Sell Photos Online

    I personally know ten people making more than $ 10 000 per month who sell photos online. Just a fact from real life. Do you want to know how? I’m sure you have heard about microstock agencies – and about people who are actually making a living selling their photos or illustrations online. “Can I do the same?” you probably wonder. Continue Reading

    The post How to Sell Photos Online appeared first on Photodoto.


    Photodoto