Category: Photography

  • Stunning Portraits: Manipulating White Balance

    I am always looking for more interesting and unique ways to take interesting and beautiful portraits. It is a personal challenge for me to push my own creative envelope as much as possible so that I am constantly broadening my own bold and colorful style. There are so many ways to take a portrait the possibilities are almost endless and the range of emotional and psychological expressions that can be achieved are truly spectacular. Portraits can be editorial, lifestyle, fashion, glamour or extremely creative in style and the true wonderment of any portrait is the amazingly, maddening ability of the human face to portray expression in so many captivating ways. So let’s look at a more creative way to take a portrait that I think gives the final photo a simply stunning look.

    Before we get into the details of shooting, I think a little review of white balance is in order as this technique involves a basic understanding of the topic. Every light that we take photographs in, whether it be an incandescent light bulb indoors or the bright shining sun outdoors, is made of of a different spectrum of colors. Now when we look at objects under these light sources with our own eyes, we take it for granted that our vision compensates for all the different color casts of these lights amazingly well and we get a pretty standard representation of all colors in the scene. Basically, when we look at something that is supposed to be white in varying light conditions, our brain interprets the situation and our eye sees it as white. The camera works a little bit different.

    The camera sees color in a much different way and has a less sophisticated way to interpret colors under different lighting situations. This is where the white balance setting helps us out. Many photographers that I know tend to keep there cameras white balance on the automatic setting. With the automatic white balance setting, your camera searches for a white reference point in the scene you are shooting. Then all of the other colors are set to this reference point. Therefore, your camera tries to make an educated guess to ensure the colors are represented correctly in your photo. The problem is that sometimes the camera is wrong and we have to bypass the automatic settings and go to that very scary place of setting the white balance in a more manual way, either by using the preset settings that the camera contains or even, heaven forbid, we might have to use some sort of white balancing device to help set our colors. There is a wealth of knowledge on this subject and I encourage you to pursue this topic at your leisure. You can also click on the following links for a decent explanation and breakdown of white balance (DPS-Intro to White Balance and White Balance in Digital Photography). The take home message is simply that we have to be conscious of how our camera views color and understand that we might have to give it some help by changing our camera’s white balance setting.

    Now that we have introduced the concept of white balance let’s turn the tables on this subject and manipulate it to create some drama and eloquence in a portrait. The lighting setups for these portraits can be seen in the following diagrams:
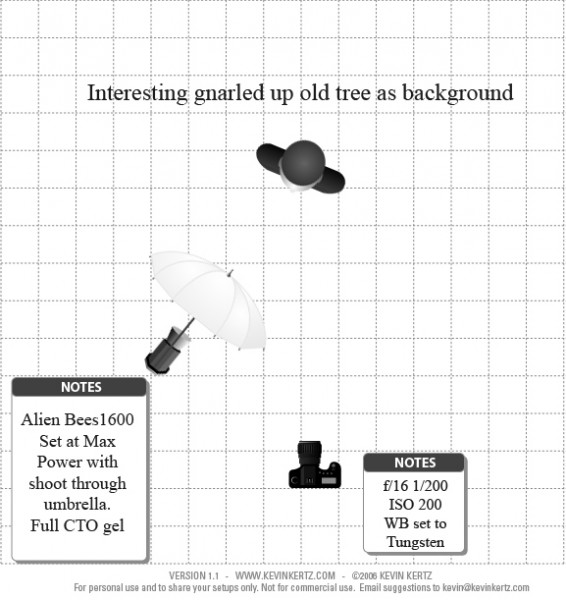
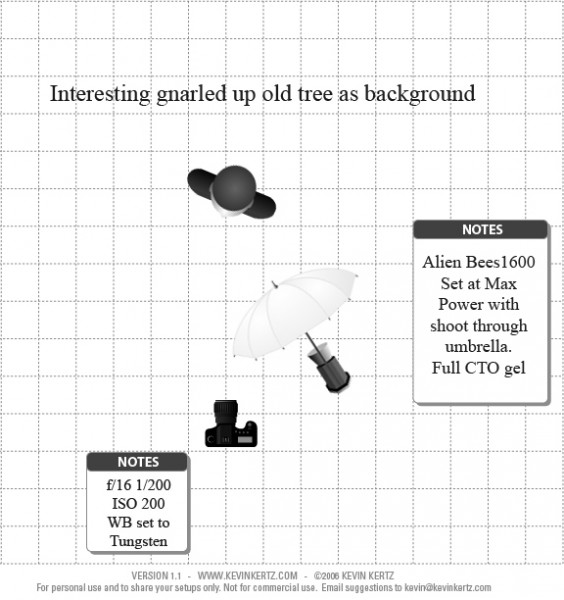
    Essentially, both diagrams are the same with the only difference being the placement of the light with the shoot through umbrella. I switched it from one side to the other just to see what sort of difference it made and concluded that both light placements worked just fine.

    The overall concept for the shot was to contrast the old, decayed tree with the young beautiful model (Brittney) and to highlight each with some warm and cool tones for effect. So where does one start with getting the camera settings and flash setup properly?

    First, lets talk about the manipulation of the white balance. I used an Alien Bees 1600 flash unit set at full power, covered with a full CTO (color temperature orange) gel, and modified with a shoot through umbrella. The CTO gel is commonly used to balance the color of light from the flash to that of a tungsten light bulb. Thus, when one is shooting flash in an indoor setting, the color of the flash matches the color of the light bulbs in the room and a camera white balance setting switched to tungsten will create a wonderfully balanced color palette in the photo. When used outdoors, a CTO gelled flash, combined with a white balance setting to tungsten, will balance the colors for anything upon which the flash falls. However, this tungsten white balance setting will also cause the sky and anything not receiving light from the flash to take on a majestic deep blue color cast that can be captivating. Compositionally, this simple white balance manipulation creates a mix of cool blue tones with warm orange tones that works fantastically well and makes the image pop.

    Now, if you find yourself a little anxious about using flash outdoors you should go ahead and relax cause you can definitely pull off this shot. Before you start shooting with any flash at all, the very first thing you want to do is meter the scene and reduce your exposure about 2 stops so that the background is underexposed. Doing this in full daylight requires a few considerations and I recommend shooting either in the morning or the evening so that the sun is not too high in the sky, otherwise you will have a hard time getting your flash to overpower the sun. Camera settings are pretty easy to figure out. First, the white balance needs to be set to tungsten to get the desired effect. You are shooting in daylight and want the background underexposed so low ISO is a must which in my case was 200. The shutter speed cannot be too fast as it can only be that of your flashes sync speed which in my case was 1/200 seconds. What does this mean exactly? If you set your shutter speed faster than your flash can fire, the shutter will open and close before any light from the flash can be seen by the camera and you will never capture your flash in the image. So the only real variable was the aperture in this case which in order to get 2 stops underexposed for the background had to be at f/16. Basically, the environment for the shoot had already dictated my camera settings.

    Since my camera settings were already determined, the only thing I needed to do was to turn on my CTO covered flash and adjust the power until I could see the effect in the image. Since I am shooting in daylight and trying to overpower the sun I knew I would need a lot of power from my flash and actually had brought a second flash unit just in case I needed more power then one flash head had to offer. I started with one flash about 5 feet from the subject at full power and took a few sample shots and it was just a little shy on power. I moved the flash as close to the subject as I could without it being in the frame (about 2.5 feet) and took a few more shots and it looked great. A few outfit changes and a serendipitous bit of sun flare from behind the tree and I had the makings for a stunning set of portraits. I hope this post encourages you to not only push your creative boundaries, but also to take a small step further into the excitingly surprising realm of flash photography.

    Post originally from: Digital Photography Tips.

    Check out our more Photography Tips at Photography Tips for Beginners, Portrait Photography Tips and Wedding Photography Tips.

    Stunning Portraits: Manipulating White Balance

    Digital Photography School

  • Sony Alpha SLT-A99 REVIEW

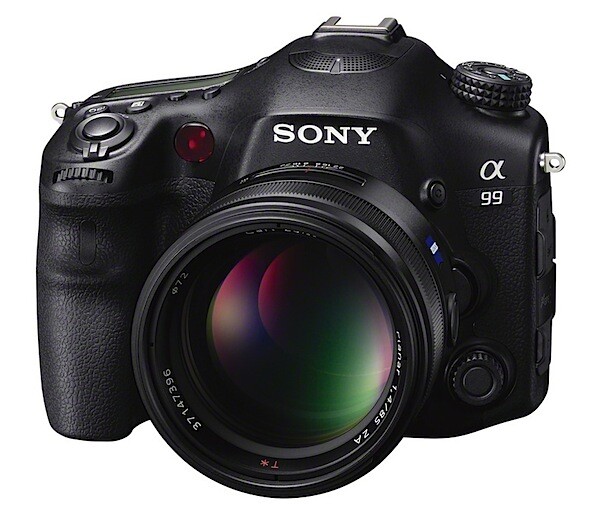
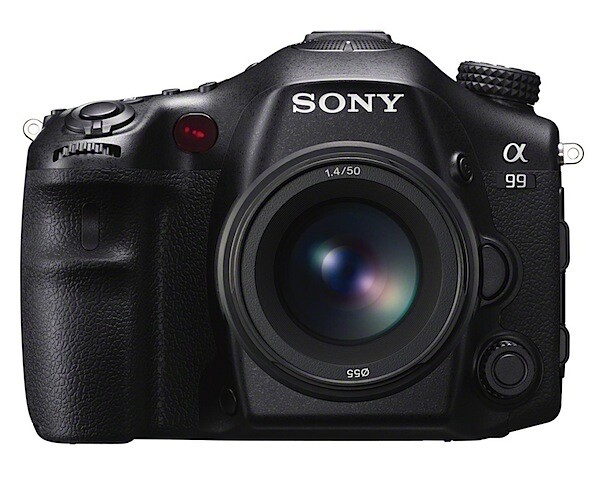
    Sony Alpha SLT-A99 front.jpg

    After a run of compact digicams it sure was a change of scenery to grasp this major one for review.

    However, I was surprised at how easily I fell into its working modes. Am I getting more camera-wise or is the Alpha SLT-A99 more user-friendly?

    I suspect the latter because, when you run your eyes over the exterior control points everything seems to be where you would expect it, clearly labelled and easy to use.

    Sony Alpha SLT-A99 1.jpg

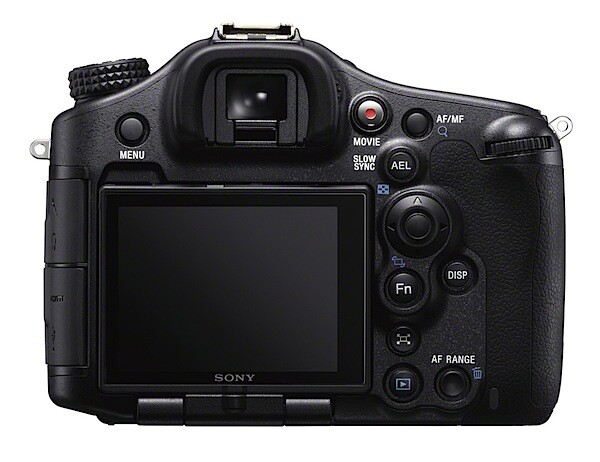
    Sony Alpha SLT-A99 rear.jpg

    Sony Alpha SLT-A99 Features

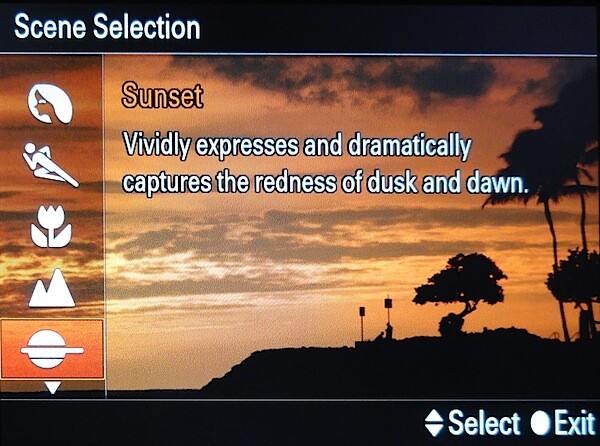
    At left on top is the mode dial with selection points for auto exposure, PASM, memory recall, scene selection (portrait, sports, sunset etc), sweep panorama, continuous shooting and movie recording options.

    Scene selection.jpg

    To the right of the top deck is the power lever, shutter button, exposure compensation, front control dial, exposure compensation, ISO setting, white balance and an LCD display.

    Rear: the familiar red movie record button, exposure lock, multi selector lever, Function button, display selector, focus magnifier, menu etc.

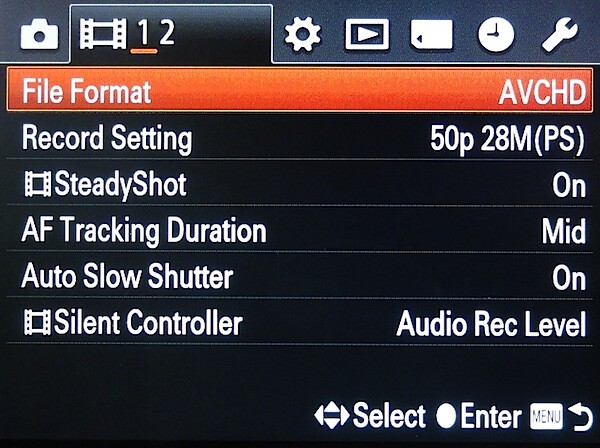
    Menu.jpg

    All of this means, once you’re familiar with the camera’s control layout, you need rarely delve in to the LCD finder menu.

    Sure, the camera’s heavy and bulky. It does have, after all, a full frame sensor. With the Carl Zeiss Vario-Sonnar f2.8/24-70mm lens the kit weighed in at 1.8kg. Not your average snapshot camera!

    This is of course Sony’s first translucent mirror camera to have a full-frame 35mm CMOS sensor, measuring 35.8×23.8mm.

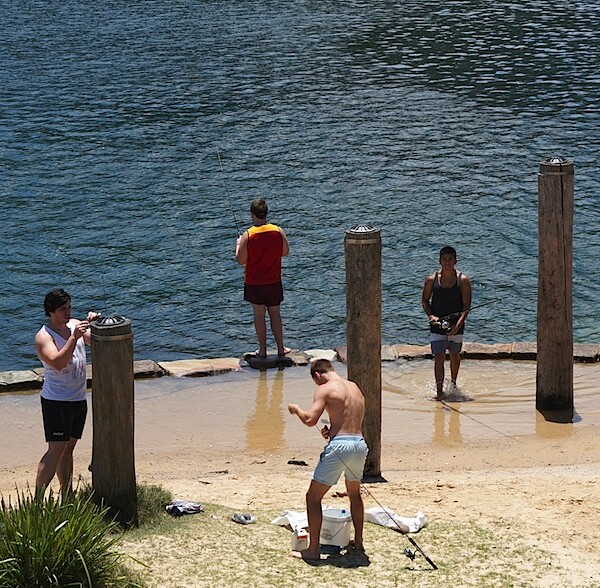
    Fishermen.jpg

    If you came in late, here’s a quick rundown of the SLT (Single Lens Translucent) feature: SLT stands for “Single Lens Translucent”, using a translucent mirror that allows roughly two thirds of the incoming light (the photo) to pass directly through it and onto the sensor; at the same time a smaller amount, approximately a third is reflected up to the camera’s phase detection autofocus (AF) sensor.

    The mirror does not flip up as in an SLR, but stays in place; this reduces the time to take a photo, and provides fast, full-time phase detection AF.

    The benefits include no mirror blackout, so no blackout when the shot is taken and faster shooting speeds … in this case up to 10 fps, depending on frame size (half or full frame).

    The negatives include the fact that the finder view is electronic and while, of excellent quality, is comparatively dim and the view quality does not compare with an optical prism finder. Also, there is a light loss to the CMOS, about a third of an f stop.

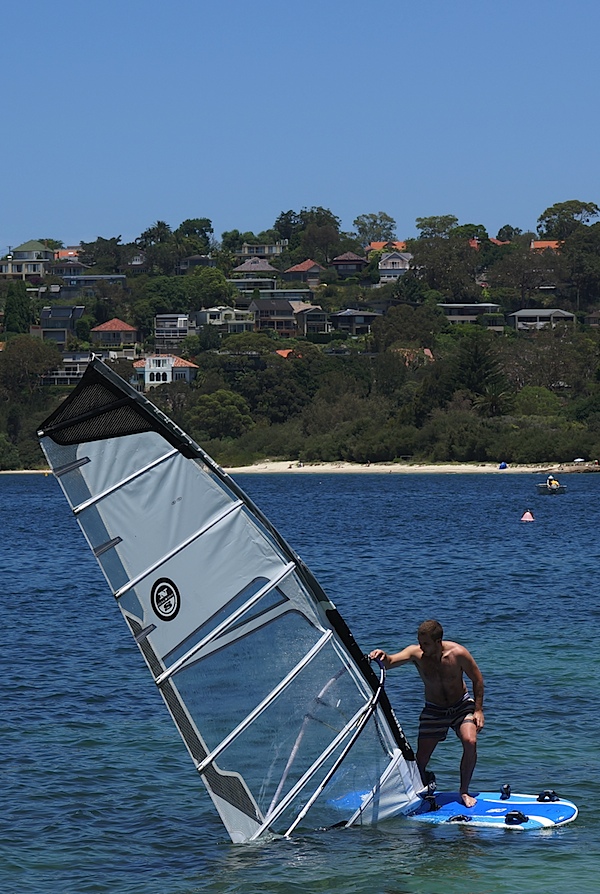
    Windsurfer 1.jpg

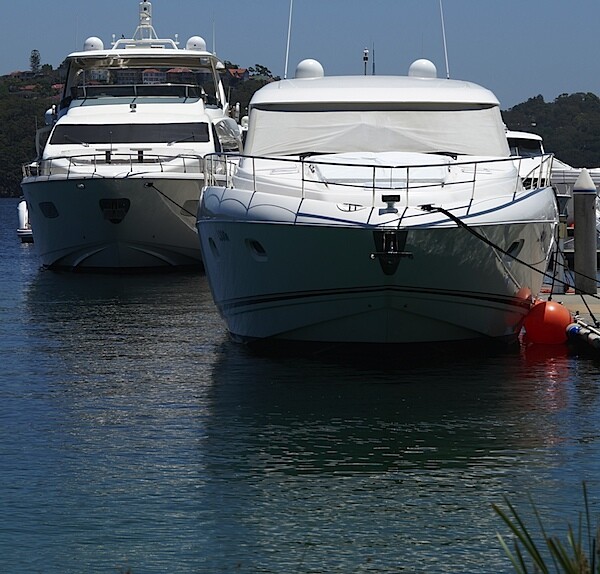
    Yachts 3.jpg

    The body is made from high rigidity magnesium alloy panels. The SLT-A99 is also described as ‘the world’s first DSLR with professional movie recording capabilities’, which neatly puts it up against Canon’s much-acclaimed (by video shooters) EOS 5D Mark III.

    The maximum image size is 6000×4000 pixels, or as a 46x34cm print. Movies can be recored as Full HD 1920×1080 pixels in either AVCHD or MPEG 4.

    Movie makers will appreciate a new feature that allows silent adjustment of exposure compensation, ISO sensitivity and metering methods, shutter speed, aperture and audio record levels during Full HD video capture.

    I found that the video system works quite well with AF and auto exposure, monitoring the scene continuously; but you will notice it sometimes fail to track AF correctly. You can’t shoot stills while capturing video.

    The auto focus system relies on a 19-point AF system with 11 cross sensors, complemented by a multi-point focal plane phase-detection AF sensor. Helping with moving subjects, this is complemented by a 102-point multi-point focal plane phase-detection AF sensor that senses subjects crossing the focal plane.

    This new AF control helps by allowing users to set the distance range recognised by the AF system and is explained by Sony as the situation where you can focus on distant sports action, even if you shoot through a nearby wire mesh fence.

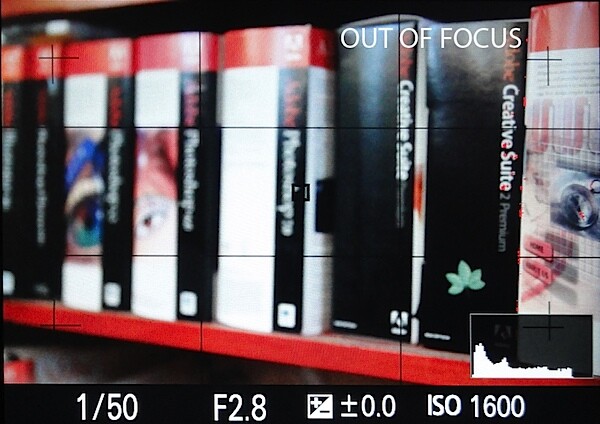
    Out of focus.jpg

    In focus.jpg

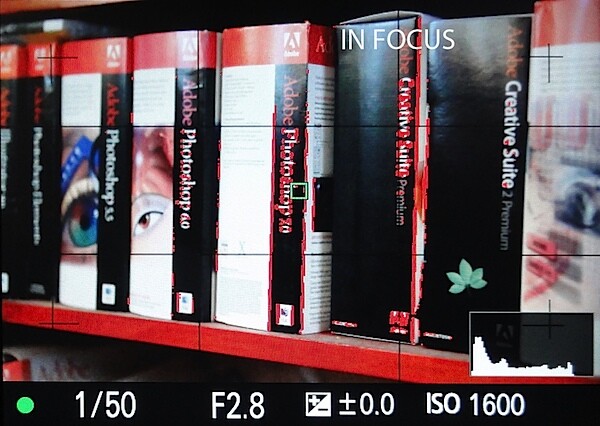
    One feature that caught my eye is the manual focus mode, switchable on the left side (viewable from behind) of the lens barrel. If focus is out, the screen view is of course, out of focus; if in focus the sharp areas of the subject are outlined in a bright colour: the default hue is red. No excuses any more!

    Appreciated by stills and video shooters, the LCD screen tilts 140 degrees upward and 180 degrees downward, then rotates 180 degrees clockwise and 90 degrees counter-clockwise. It is the only full frame DSLR with a vari-angle screen.

    There are two card slots for either the SD series or the Memory Stick Pro Duo range. You can record the same image on one only or both cards simultaneously. Other options include writing JPEGs to one and RAW images to the other; another is to record stills to one card and movies to the other.

    There is no onboard flash but there are still concessions to the less-skilled photographers who may embrace the SLT-A99: picture effect has an arsenal of renderings (toy camera look, pop colour, retro etc); smile shutter; auto portrait framing that crops face shots, saves the latter and the uncropped version.

    Sony Alpha SLT-A99 ISO Tests

    Sony SLT-A99 ISO50.jpg

    Sony SLT-A99 ISO200.jpg

    Sony SLT-A99 ISO400.jpg

    Sony SLT-A99 ISO800.jpg

    Sony SLT-A99 ISO1600.jpg

    Sony SLT-A99 ISO3200.jpg

    Sony SLT-A99 ISO6400.jpg

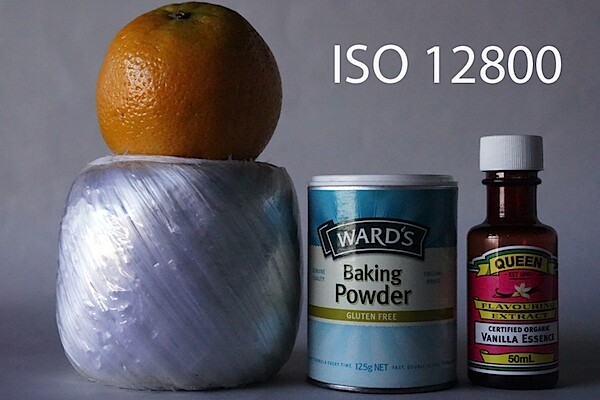
    Sony SLT-A99 ISO12800.jpg

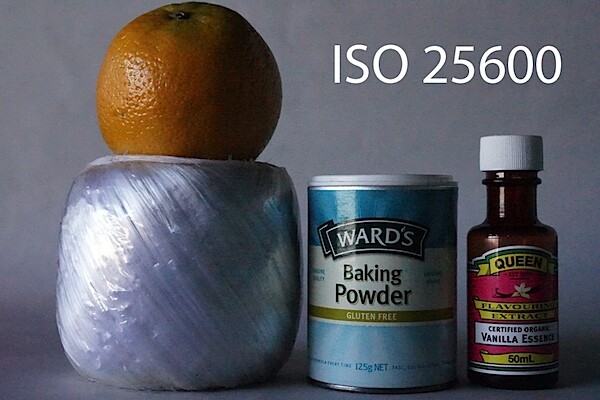
    Sony SLT-A99 ISO25600.jpg
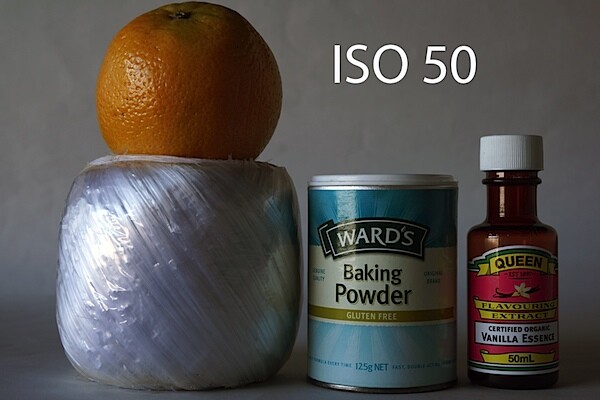
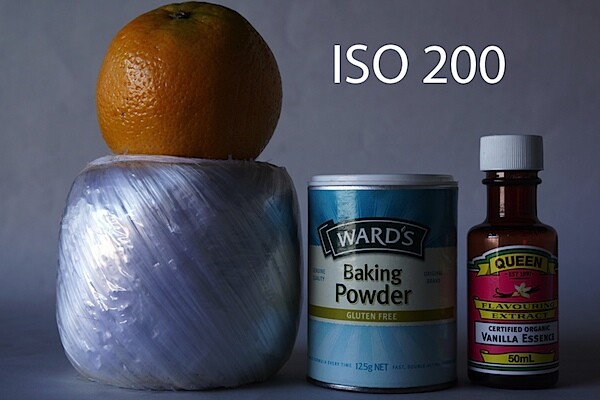
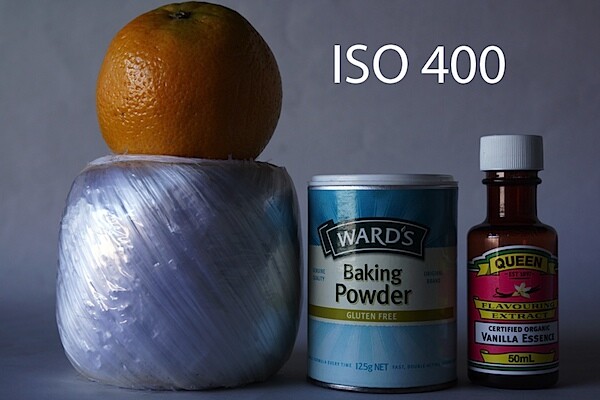
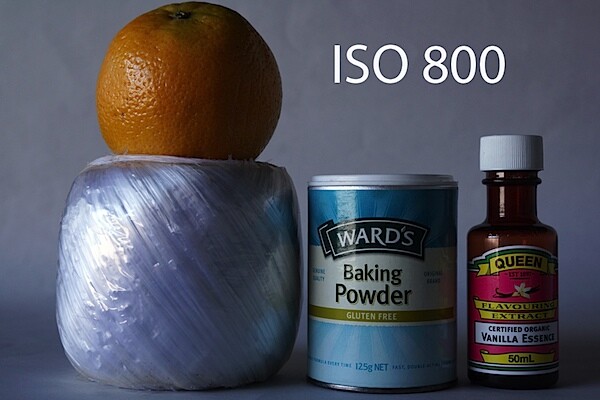
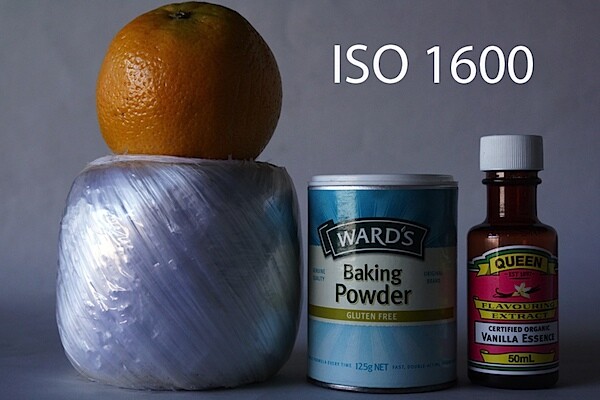
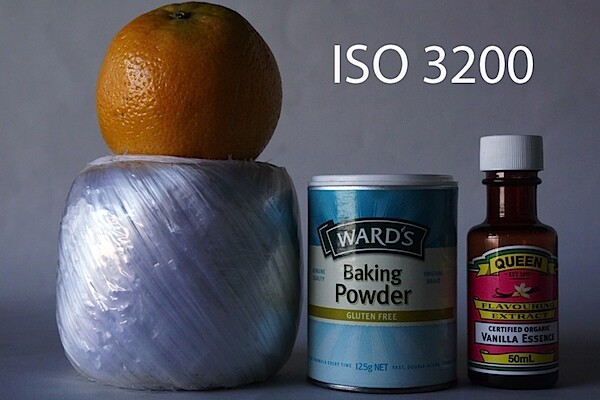
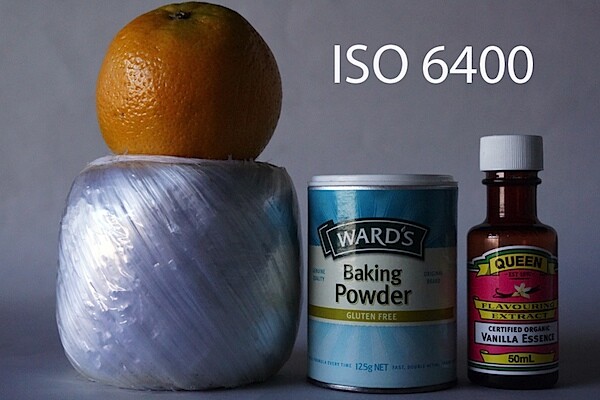
    All the way up to ISO 12800, the images appeared to be very useable with only a slight increase in noise at the latter level. By ISO 25600 you would expect the house to fall down but, while the presence noise is obviously higher the only objectionable factor to me is a slight loss of sharpness.

    Sony Alpha SLT-A99 Verdict

    Quality: razor sharp, fully saturated colour. Exceptional.

    Why you’d buy the Sony Alpha SLT-A99: excellent control layout; full frame quality; high speed continuous shooting; excellent video quality; rugged build; vari-angle LCD; GPS feature; in body stabiliser widens range of lenses.useable

    Why you wouldn’t: too heavy.

    A top performer from Sony.

    Sony Alpha SLT-A99 Specifications

    Image Sensor: 24.3 million effective pixels.
    Metering: Multi segment, centre-weighted, spot.
    Lens Mount: Sony A-mount, Konica-Minolta AF mount.
    Exposure Modes: iAuto, Superior Auto, Program AE, shutter and aperture priority, manual.
    Effective Sensor Size: 35.8×23.8mm CMOS.
    35 SLR Lens Factor: 1x.
    Shutter Speed (stills): 30 to 1/8000 second and Bulb. Flash sync: 1/250 sec.
    Continuous Shooting: 8 or 10 fps.
    Memory: SD/SDHC/SDXC, Memory Stick Pro Duo/Pro-HG Duo cards.
    Image Sizes (pixels): Stills: 6000×4000 to 2640×1488.
    Movies: 1920×1080 (60, 24fps), 1440×1080 (30 fps), 640×424 (29.97fps).
    Viewfinder: Turret electronic plus 7.6cm LCD screen (1,229,000 pixels).
    File Formats: JPEG, RAW (Sony ARW), JPEG+RAW, MPEG4, AVCHD.
    Colour Space: sRGB, Adobe RGB.
    ISO Sensitivity: Auto, 100 to 25,600.
    Interface: USB 2.0, HDMI mini, remote.
    Power: Rechargeable lithium ion battery, DC input.
    Dimensions: 147x111x78 WHDmm.
    Weight: 812 g (inc battery).
    Price: Get a price on the Sony SLTA99V Alpha SLT-A99 Body Only.

    Post originally from: Digital Photography Tips.

    Check out our more Photography Tips at Photography Tips for Beginners, Portrait Photography Tips and Wedding Photography Tips.

    Sony Alpha SLT-A99 REVIEW


    Digital Photography School

  • Let Them Run Around: Photographing Children

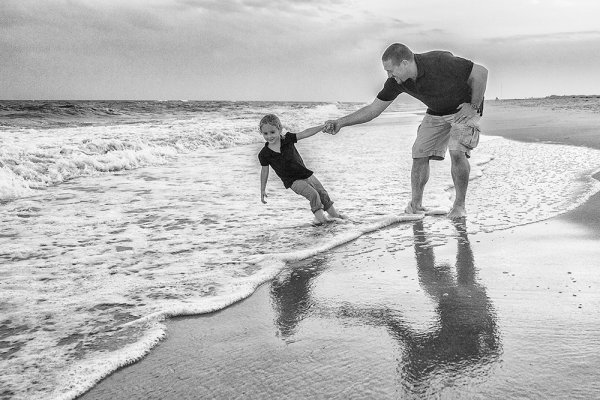
    The girl in this photo was like the Energizer bunny- she wouldn't sit still! This photo was taken as part of a family portrait session. The posed shots were challenging because three young children didn't want to sit still. Once we allowed her to play in the surf a little, we got much better shots of her.

    I am often asked by people, “What can I do to get my children to sit for a photo?” Children can be among the most compelling of subjects to photograph, and as a professional, one of the most profitable.  But children have this odd tendency to want to move around, and not sit still.  This can at times be frustrating when looking for that perfect portrait.  To combat this, as a photographer, a change in mindset is in order. Rather than trying to force the child to sit still, try allowing the children to move around.  Let them get involved in exploring their surroundings. No, you won’t get the traditional portrait of the subject sitting in front of the camera, but you may just get something better, more natural, and more fitting with the child’s personality.

    Children can sometimes be the hardest subjects to photograph because they become self conscious in front of the camera.  The worst thing I’ve ever heard a parent say to a child when being photographed is something along the lines of “Let’s see a REAL smile!”  Parents think they are helping but saying such things makes the child wonder what’s wrong with the smile they just gave, and the next one will invariably be worse.  By putting children in their own element, allowing them to explore, to play, you elicit a more natural response that shows their true personalities.

    This shot was taken in the child's own home. She was shy around the camera and wouldn't sit still for me. By allowing her to roam around, talk to me, get to know me, she let her guard down, and I was able to get some candid shots of her.

    One of the ways to encourage children to be themselves is to put them in a setting that they’ll want to explore. A studio setting, while great for the photographer, can be a nightmare for children.  The lighting, the stands, the backgrounds are at times intimidating and at others distracting.  If a child is going to be distracted, have them be distracted by something that will make a great picture. Often, when I am approached by people to photograph their children, I’ll suggest a setting like a beach, a park, or even their own bedroom. These types of settings put them at ease. Once they are at ease, a variety of shots, including the traditional portrait, can be captured.

    Another tack to take would be to schedule the session to specifically be a play session.  In the winter, with snow on the ground, a hillside with sleds can be an ideal setting for capturing children.  Bring a couple of sleds and let them have fun! Build a snowman! Have a snowball fight! In the summer, at the beach, playing in the water and in the sand provides a wonderful glimpse into children’s personalities. A pool will work just as well. Any park setting with a jungle gym is a great starting point for a children’s session. Let them climb, let them swing, let them get dirty.

    Get the kids out and let them play!  Just be sure you are ready with the camera when they do.

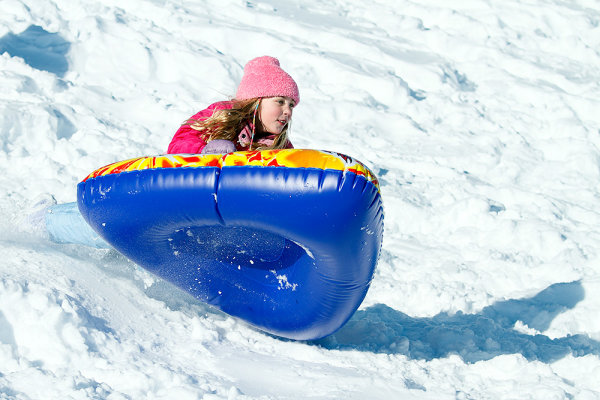
    In the winter, a snow-covered hillside can be the perfect setting for a children's session.


    Post originally from: Digital Photography Tips.

    Check out our more Photography Tips at Photography Tips for Beginners, Portrait Photography Tips and Wedding Photography Tips.

    Let Them Run Around: Photographing Children


    Digital Photography School

  • 3 Tips for Better Black and White Conversion using Lightroom

    Ever wondered how the professional photographers get those dreamy black and white or sepia toned images? Wonder why yours come out looking dull and flat looking?  I’m going to give you 3 tips to help you do better black and white conversions using Adobe Lightroom, and solve that problem!

    Today’s cameras are pretty smart, and many of them offer a black and white setting or shooting mode. I recommend using those to start, especially if you’ve never done any black and white (B&W) or if you are not currently doing any post processing or image editing on your files. BUT, if you have some experience with b/w photography, and you are processing your images, I recommend doing the conversion yourself as you have more control over the look of the final image.  I’m going to show you a few ways of converting them into B&W using Lightroom.

    Note:  for the most part these tips will work in Photoshop as well, using the Adobe Camera Raw features and sliders.

    First a quick note about my background. Back when I took my photography degree (dare I say, in 1987-88, and date myself) I spent the entire first year shooting black & white only, using a 4×5 view camera no less. I processed my own film and made my own prints. I spent a lot of time in a black & white darkroom, so I’m pretty well versed in how it works and how to control it to my advantage.

    To grab some info from those film days, it’s important to note and understand that your camera sees light and colours differently than does the human eye. Black and white film sees blue tones much lighter than our eyes, for example.  Coloured filters were used to shift how the B&W film “saw” and rendered the scene.  Using a red filter would lighten anything red in the image and darken blue tones.  So if you were a landscape photographer you’d often use a red filter to darken the sky and make it less washed out.   A green filter would lighten green and blue tones and darken red and orange.  So photographers used the appropriate filter to capture the scene as they envisioned it.

    In Lightroom and ACR (Adobe Camera Raw) in Photoshop you have the same tools at your disposal!  So without the use of filters, you can adjust how the scene is rendered in B&W.  That brings me to the first tip.

    Tip #1 – use the B&W mix to do your conversions

    In Lightroom’s Develop module (and ACR) there are a few ways that you can convert your images into B&W.  You can just pull the saturation slider all the way to left to -100. You can also do similar with the Vibrance slider, but it may not give you a 100% B&W image, depending on the image. Both of those options will give you a black & white result. However, they give you no control over how the colours render into the various shades of grey. A better choice, in my opinion, is to use the B&W mix, located on the third panel down on the right in Develop – see below.

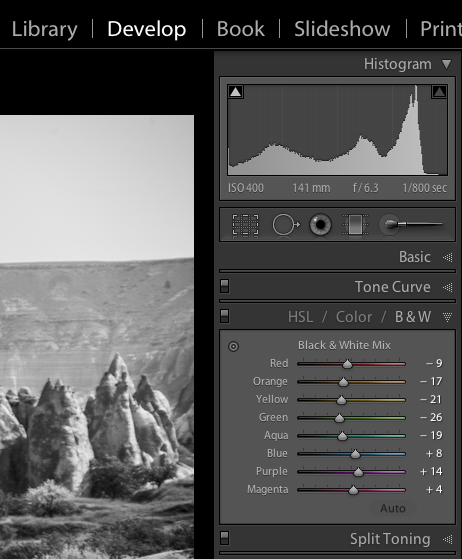
    Black and white mix panel in Lightroom Develop module

    Let’s take a look at an example using the same image.

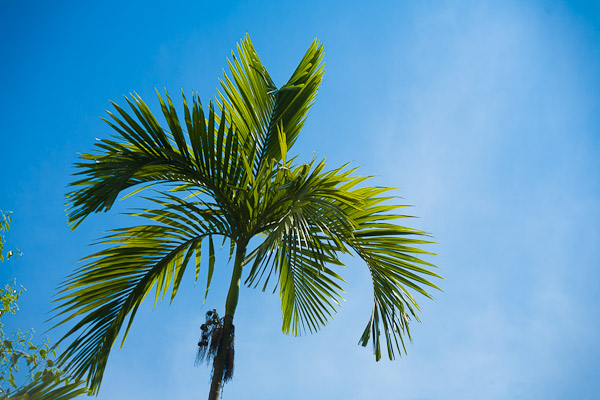
    Original colour image

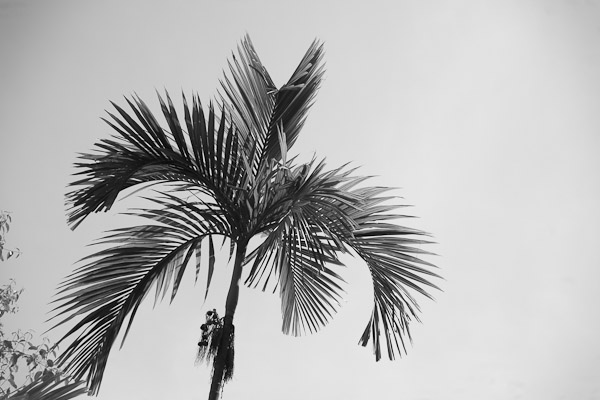
    B&W conversion done using the Saturation slider at -100

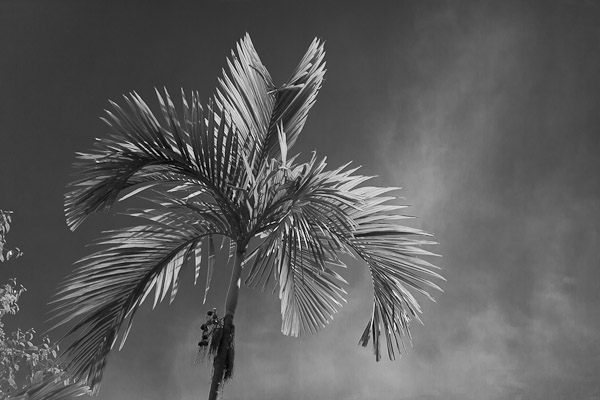
    B&W conversion done using the B&W mix in LR

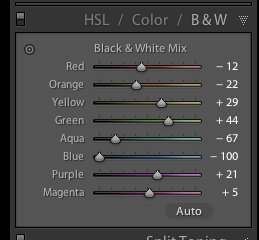
    In the images above, notice how the blue sky went really light using the desaturate method?  This is often the case when you have a lot of blue sky in an image, as I explained above.  Using the B&W mix and pulling a few of the sliders I was able to get very different tones.  This is what my sliders in the B&W Mix panel look like on the third image:

    Notice the blue slider is pulled all the way to the left to -100.  That is what is darkening my sky.  Also worth noting is the green and yellow sliders are moved in the opposite or plus direction.  This lightens both yellows and greens (most grass and trees are often a mix of green and yellow, sometimes more yellow than green).  I have not done any selective adjustments to darken the sky here, just the sliders you see to the right!  How very different this image is from the desaturated one, and so simple to do using this method!

    Also on this panel notice there is an “Auto” button.  Clicking it will allow Lightroom to apply a predetermined B&W mix for you.  You can also set up in your Lightroom preferences to apply that for you when B&W mix is selected, then you can just fine tune from there.  Otherwise all the sliders will start at “0″.

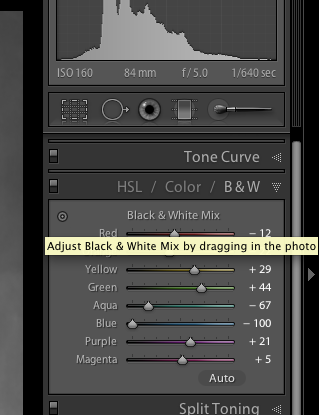
    Another little known trick for using these sliders is the funny looking little double circle thing on the top left.  As you move the mouse over it, you will see this:

    Adjust Black & White Mix by dragging in photo. So what on earth does that mean, you may wonder?!  If you click on the little circle your mouse pointer will now have little up and down arrows, as well as your cursor showing the same icon as you hover over the image. Click anywhere on the image, hold and drag, and it will adjust ONLY the colours that you’ve clicked on.   Drag up to move the sliders to the right (+) and drag down to move them to the left (-). How cool is that?!

    This is very helpful if you do not know which sliders to adjust.  Just select the area of your image you’d like to adjust the tones on and drag away!

    Tip #2 – don’t just stop there, add some punch

    Sometimes even using the B&W mix sliders the resulting image still looks a bit flat and dull looking.  Take it up a notch by adding some punch to your image.  I do the following to most of my B&W images:

    • increase the clarity:  if it’s a scenic I’ll push it quite far like +60 or higher, if it’s a person I keep it under +30 or they start to look a bit crunchy and overly wrinkled (especially if the photo is of your mom or your spouse, they tend not to be too happy about that)
    • lower the black slider, until it looks good.  Highly scientific, yes! Here’s a little trick for you as well using the Blacks slider:  if you click and hold the Opt/Alt button while you slide it, you will get to see exactly where your blacks are clipping (meaning going off the chart on the histogram and having no detail). You can use that information to make sure you have just enough blacks, but make sure you keep all the detail in important areas.
    • increase the contrast either using the Contrast slider or Curves

    Occasionally after making these contrast adjustments it will affect the overall image and you may want to go back and rework the B&W sliders a bit too.  It’s a dance, play them back and forth until you get a mix you like.   Here’s the final version of the image above, with contrast and punch adjustments applied.

    Notice how much more snap it has, while still maintaining that nice rich, dark sky!

    Secret to making great B&W images that the pros won’t tell you . . .

    Black!  That’s it.  Make sure you actually have some black, and some white in your image.  Check the histogram and use my little tip on seeing the clipped bits. Add contrast or increase the blacks, whites, or both to get a full range of tones.  No matter what the subject is in the photograph, having enough contrast to have pure white, and pure black is key to having a stunning B&W image.  Otherwise you’re just left with a bunch of grey mud.

    Tip #3 – creating selective coloured images

    There are a couple ways to make selectively coloured images, and also to create that faded look that is really popular. Once again you can use the Vibrance and Saturation sliders in the Basic panel, however they will affect colours in the entire image the same.  You can also use the Adjustment Brush and paint in a lower saturation onto parts of your image where you want to fade out the colour.  I use that method quite often, even on full colour images, to do tone control on items in the background that are distracting.

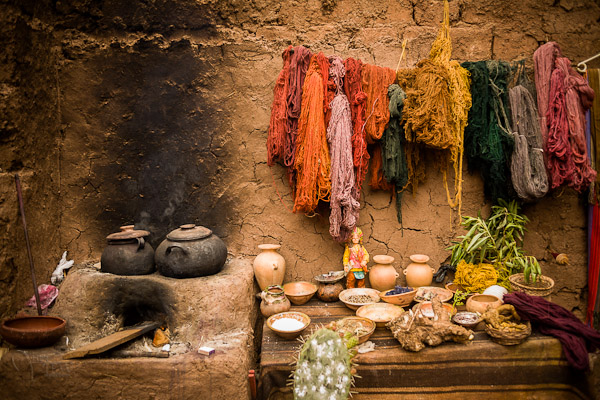
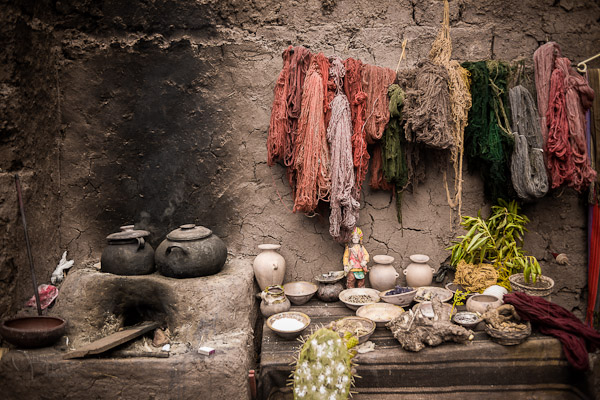
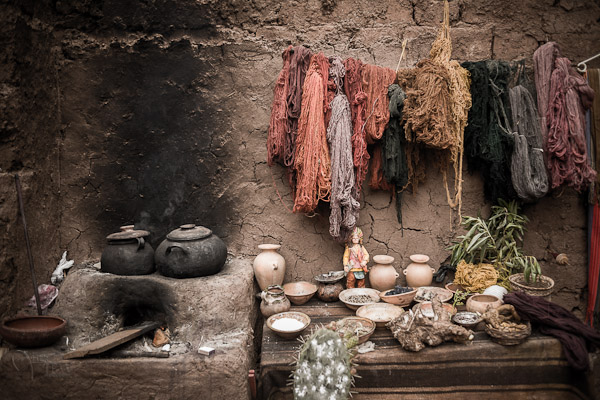
    Lastly you can use the sliders in the HSL panel.  By sliding selected colours to the left you can desaturate only those colours.  You can also use the little Click and Drag tool we used earlier to do the B&W Mix to click on your image and pick the areas to fade.   Here’s an example using each of these methods.  None is right or wrong, just give you a different look and some have more control than others.  Choose the one that works for you on in individual image basis.

    Original colour image

    Vibrance slider set to -75

    Saturation slider set to -75

    Adjustment brush used to paint in saturation at -75 to the whole image except for the wool

    HSL sliders used to desaturate by separate colours

    *Bonus Tip – making a nice duotone or sepia toned image

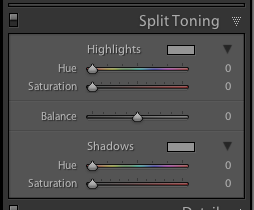
    A little extra bonus tip for you.  Adobe has made it super easy to create a really nice duotone (just means two tones, go figure!) image, which includes Sepia.  Just go to the Split Toning panel after you’ve done your B&W conversion, it’s the fourth one down.

    You will see sliders for both Highlights, and Shadows.  My personal tip on how to keep a nice clean sepia or toned image is to use ONLY the Shadows sliders and do not touch Highlights.  That will leave you with clean, crisp white highlights even after you’ve applied the toning.

    How to create the duotone

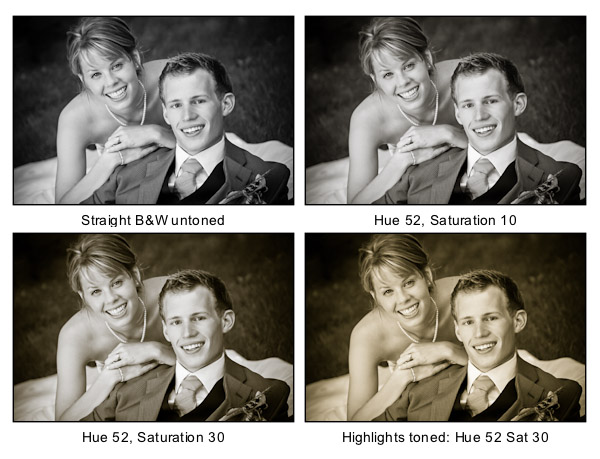
    First start by choosing the Hue slider (for Shadows).  If you want a nice brown colour, start with it around 40-45. Each image tones slightly differently, so start there and adjust to your taste and style.  You may notice that nothing happened, right?  That is because you need to increase the Saturation slider before the tone will show up.  The more you increase saturation, the deeper and more vibrant the colour tone will become.  Again, there is no right or wrong, it’s all about preference.  For a subtle, dark, chocolate brown try 10-20.  For a deeper colour go higher with saturation (NOTE: make sure the “balance” slider is set to zero)

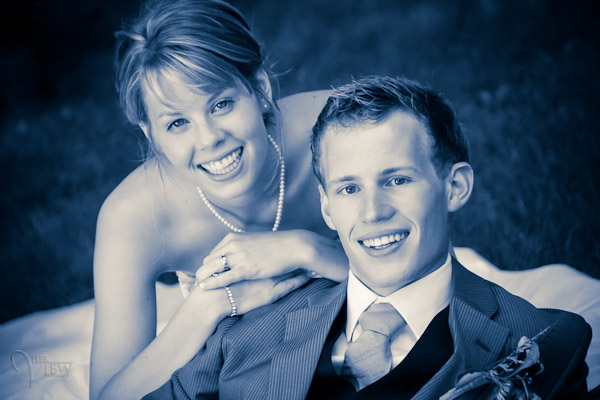
    If you want a different tone just move the Hue slider.  You can create some really neat affects this way including Blue Tone or a true Duotone.

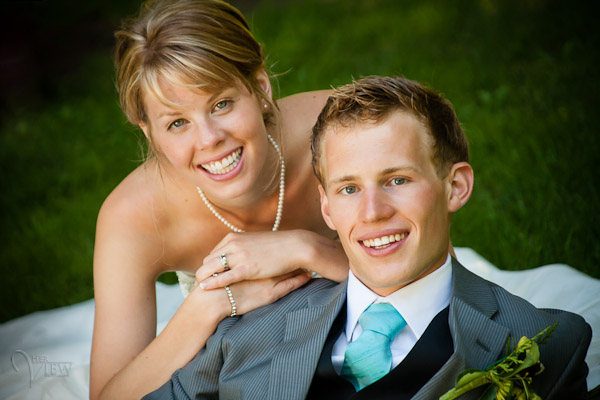
    Example using a portrait

    For this final example I’ll show all the steps we’ve just covered using a portrait.  This is applicable to any people photos, you don’t need to make portraits to use this information.

    Original colour image


    Notice the last image where I’ve added in colour to the Highlights and how it completely changes the look of the image. The whites have a yellow tint now instead of a nice clean look. I personally prefer the third one but there are times I do use this option. Do what feels right for your image, you’ll know what to do.

    A "duo" tone using different colours for the Highlights and Shadows. Shadow settings: Hue 232, Sat 70 – Highlight settings: Hue 52, Sat 37. I did move Balance to -27 to skew the colours more towards the Shadows as well.
    What next?

    As always I encourage experimentation.  If you have another way that you like better, that’s awesome!  Please share it with us if you will.  Another way to do some really quick B&W inside Lightroom is to find some good presets. There are literally tens of thousands of Lightroom Develop presets available for free on the internet.  Try a Google search for:   Free lightroom b&w presets.  Then just pick the ones you like and install them.

    Now get out there and go make some images and let’s see what you can do in Black & White!


    Post originally from: Digital Photography Tips.

    Check out our more Photography Tips at Photography Tips for Beginners, Portrait Photography Tips and Wedding Photography Tips.

    3 Tips for Better Black and White Conversion using Lightroom


    Digital Photography School

  • Top Ten Destinations in the World for Landscape Photography

    With so many beautiful and inspirational locations all over the world just waiting to be captured, knowing where to take your camera next can be a battle. From the breathtaking British Isles to the peaks of the picturesque Peruvian mountains, we’ve compiled a list of the top ten destinations in the world that every landscape photographer should add to their Continue Reading

    The post Top Ten Destinations in the World for Landscape Photography appeared first on Photodoto.


    Photodoto

  • A Wedding And A Cemetery by Joel Conner

    conner-photography-wedding-1

    © Joel Conner

    One of our weddings a few months ago had something what we had never experienced before. After shooting over 100 weddings, there is not much we have not seen. Our couple had a lovely ceremony, and after we were finished with more formal photos for the day, we took a trip to the cemetery so that the groom could lay a flower on his father’s grave.

    conner-photography-wedding-2

    © Joel Conner

    His father was a fire chief who had died some years ago, and even though it had been a while, the memory of his father was still very strong in the groom, his mother, and his sister. There were several things throughout the day highlighting how important he was to everyone. I have to be honest, I have experienced many emotional moments at weddings before, but after all this time, I am not sure that I have seen anything that hit so deeply. When they arrived at the grave, everyone was crying opening. It was so clear how much love everyone there had for each other and for their departed father, husband, and friend. It was very moving for everyone standing there…including myself. Even though there was pain involved, I could not be inspired by the overwhelming amount of love I say there among the friends and family.

    conner-photography-wedding-3

    © Joel Conner

    I am blessed to know that my images from this day are something they all will cherish forever, because it shows anyone who sees them that love continues even after tragedy.

    Joel & Shannon Conner are two of the top St Louis Wedding Photographers.
    Website: http://www.conner-photography.com

    dslrBlog

  • Shooting in the Twilight Zone

    For most photographers, the best time to shoot is during the golden hours – those times right around sunrise or sunset when the sky is full of drama.

    For me though, the best time to shoot is a little while after all that drama happens and all the other photographers have packed up and gone home – twilight – when the skies become calm and peaceful.

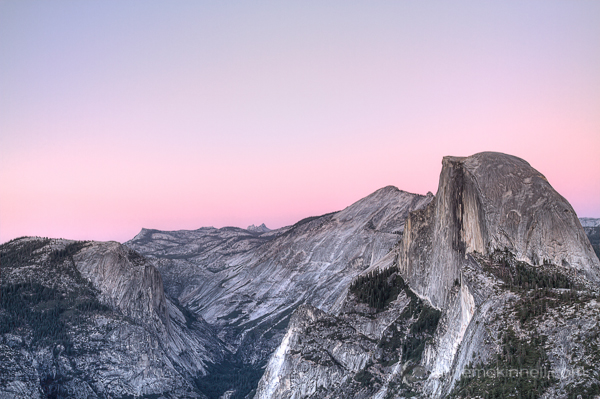
    Half Dome, Yosemite National Park, California

    Half Dome, Yosemite National Park, California

    The length of twilight varies dramatically depending on the time of year and your position on earth. At the poles twilight can last as long as 2 weeks! But generally speaking, twilight usually starts shortly after the sun drops below the horizon and continues for another 40-60 minutes or so before the sky is completely dark.

    During this time the sky still has plenty of rich colour but there is no longer any direct light. You might be surprised how much colour there really is in the sky during twilight since a camera’s sensor can pick up more light than we are able to see with our eyes.

    The images in this post demonstrate how different the sky can look between the early stages of twilight to the end of twilight.

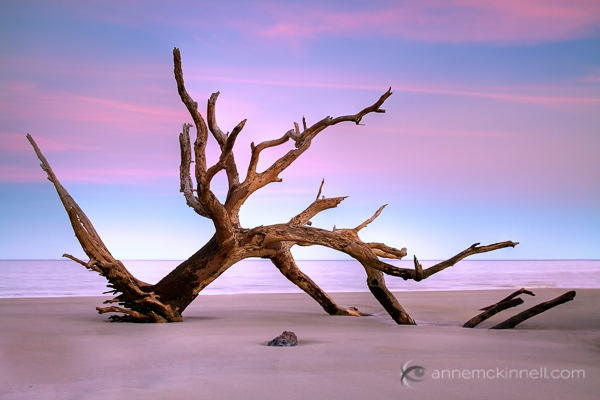
    Driftwood Beach, Jekyll Island, Georgia

    Driftwood Beach, Jekyll Island, Georgia

    I prefer to shoot twilight after sunset, but of course it happens in reverse order in the morning too!

    Assuming you are shooting after sunset, the first stage of twilight is when the subtle pinks begin to show in the sky. Slowly the blues will begin to appear. I love to shoot landscapes during this early stage when there is still a lot of ambient light so the land is not entirely dark.

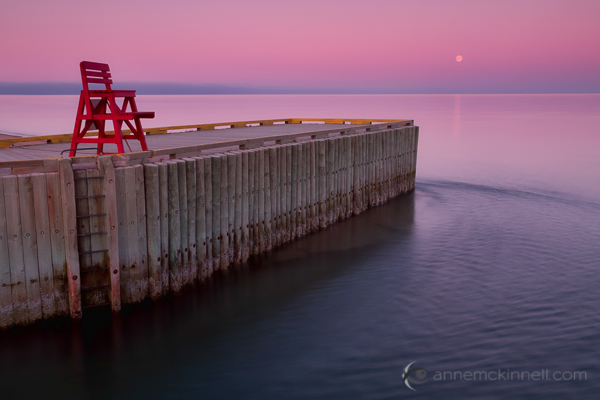
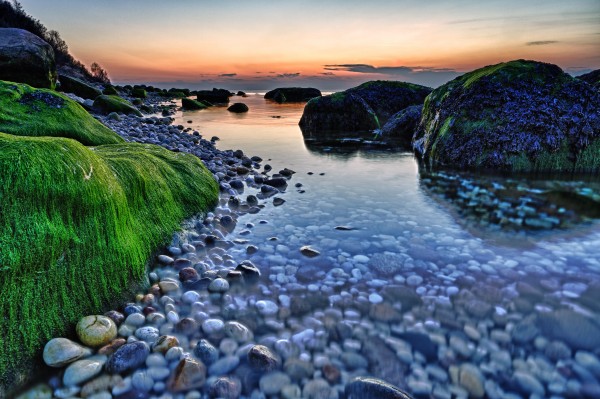
    Basin Head, Prince Edward Island, Canada

    Basin Head, Prince Edward Island, Canada

    During this early stage the sky is often much brighter than your subject which makes exposure difficult. It’s a great time to use high dynamic range (HDR) photography and blend multiple exposures to maintain detail in the landscape. Or, depending on the type of scene you are photographing, you can use graduated neutral density filters to even out the exposure.

    Soon the sky will begin to get darker and the pinks and blues will deepen. The exposure will even out so that neither HDR nor graduated neutral density filters are needed.

    Mule Ears, Bid Bend National Park, Texas

    Mule Ears, Bid Bend National Park, Texas

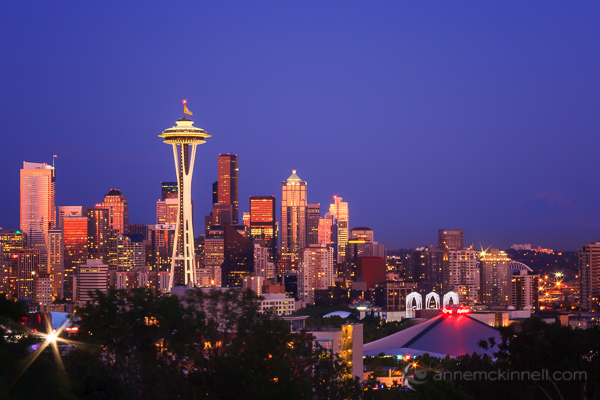
    During the later stages of twilight the pinks will fade and the blues will intensify to a dark cobalt shade. This is a great time to photograph cityscapes. The combination of natural light in the sky and artificial city lights is magical.

    Seattle, Washington

    Seattle, Washington

    To make the most of the limited amount of time you have to shoot during twilight, scout out your location before hand. Twilight doesn’t last long so you need to be prepared. If you can’t make a separate scouting trip at least go an hour or two early so you have plenty of time to explore before deciding what to shoot.

    Find a subject with a distinct shape and take some test shots to figure out the best composition and perspective. Keep your eye out for good foreground elements and any artificial light sources that might be present later.

    Tips:

    • Use a low ISO to reduce the amount of noise in the image.
    • Long shutter speeds will allow the camera to pick up lots of colour.
    • If there are city lights in your image use a small aperture, like f/22, to turn the lights into star bursts.
    • A tripod is an absolute requirement if you want a low ISO, long shutter speed, and small aperture.
    • You may need a polarizing filter and/or a graduated neutral density filter for the early stages of twilight.
    • Use a cable release and/or a 2 second timer so you do not introduce camera shake.
    • Use your mirror lock-up feature so the movement of the mirror does not introduce camera shake.
    • Your camera’s auto-focus may not work in low light conditions. If you set up ahead of time, you can use your auto-focus while there is still light in the sky and then turn auto-focus off to prevent your camera from attempting to refocus when it is is darker outside. Otherwise you will need to focus manually.
    • Use your histogram to ensure you are getting a good exposure.
    • Bring a flashlight so you can find your way home.
    • Wear or bring bug spray so the little bugs don’t ruin your good time.
    • Bring warm clothes! Don’t miss the perfect shot because you got cold and left too early.

    Shooting at twilight can sometimes take a little preparation and planning but the rewards are definitely worth it.

    Post originally from: Digital Photography Tips.

    Check out our more Photography Tips at Photography Tips for Beginners, Portrait Photography Tips and Wedding Photography Tips.

    Shooting in the Twilight Zone


    Digital Photography School

  • 300 “Best Photos of 2012? Blog Posts

    At the conclusion of every year I’ve adopted the tradition of reviewing my year in photos, picking my 10 best photos and evaluating those that were near misses. This exercise is something I’ve written about on DPS in  How to Top Your Best 2008 Photos and Year In Review: 6 More Ways to Top Your Best Photos and is something I consider to be critical to my success and growth as a photographer. On my blog I encourage my readers to adopt this exercise and to share their results in my annual Best of Photos blog project. In addition to benefiting from the underlying effort of evaluating your work and identifying areas of growth, accessing a list of best work by other photographers provides a spring of inspiration to launch participants into the new year.

    Participants in this years “Best Photos of 2012″ blog project spanned a spectrum of skill levels from hobbyists to professionals and covered a wide variety of genres including landscape, macro, nature, photojournalism, portraiture, event, wildlife, fine art photography and more. There are likely many names you’ll recognize below, some famous, and many others you won’t. I highly recommend visiting each entry as I have. Even after 6 years of running this blog project I’m blown away by the talent and creativity of those that take part. It is truly inspirational to see so much creativity and beauty. If your curious to see photos I personally enjoyed look out for the entries with *** next to them.

    If you have not yet taken stock of your 2012 photographs, it’s not too late. Share your best of 2012 photo sets from your blog, Flickr, 500px, Google+ or Facebook by adding a link in the comments below.

    Best Photos of 2012
    content courtesy of JMG-Galleries

    1. Best Photos of 2012 – JMG-Galleries – Jim M. Goldstein
    2. Portraits of 2012 – Janis Janums
    3. Dobson Central Photography – Ken Dobson
    4. The year in review – My favorite photos from 2012 – Ed Rosack
    5. Looking Back – 2012 in images. – Craig Ferguson ***
    6. Stories From Home – David Patterson ***
    7. My Favs from 2012 – Jess Wilson
    8. Exploring Light Photography – Chris Moore ***
    9. Top Photos of 2012 – Alex Filatov ***
    10. Mawpix Fotografie – Matthias Wassermann
    11. Favorite Photos of 2012 – Jerry Monkman ***
    12. Top Shots for 2012 – Lisa W. Hale
    13. Dave Wilson Photography – Best of 2012 – Dave Wilson ***
    14. Dynamics of Light and Shade – Richard Murphy
    15. Anasazi Photography’s Ten Favorite Photos of 2012 – Randy Langstraat ***
    16. Five Denver Colorado Images from 2012 – Neil Corman
    17. Best of 2012 – A Year in Review – David Richter ***
    18. Best of Belize 2012 – Tony Rath ***
    19. In the land of make believe (www.kushagra.in) – Kushagra Shrivastava
    20. Best of 2012 by Chris Irwin – Chris Irwin
    21. Five Favorite Photos – 2012 – Ecuadorian Adventures – Patty Lin
    22. My Top 10 Photos of 2012 – Michael Russell ***
    23. The Stormtroopers Are Coming! – Michael Toye ***
    24. My Best underwater photos of 2012 – Suzy Walker ***
    25. Alpenglow Images Photography – Greg Russell
    26. A Thousand Words – Craig L. Howe
    27. Dakotalapse 2012 – Favorite Photos – Randy Halverson ***
    28. Milan Hutera Photography – Milan Hutera
    29. Top Ten Photos of 2012 – Steve Cole
    30. My 10 Best Shots from 2012 – Robin Black Photography ***
    31. My Ten Favorite Images From 2012 – Rachel Cohen
    32. 2012 Year in Review – Brian Rueb ***
    33. Twelve From Twenty Twelve – Jacob F. Lucas
    34. Best photos of 2012 – Kris Taeleman
    35. Skolai Images – Carl Donohue ***
    36. Top 10 of 2012 – Joan Masdeu
    37. Free Roaming Photography – Mike Cavaroc ***
    38. My Faves of 2012 – Evan Gearing
    39. 2012 – My Year in Pictures – Jon McCormack ***
    40. Scott Shots Photography – 10 Best Photos of 2012 – Scott Thompson
    41. The Stentorian Image / Best Twelve Of 2012 – John Fujimagari
    42. My personal Top 10 photos of 2012 – Alexander S. Kunz
    43. Annika Ruohonen Photography – My Best Shots 2012 – Annika Ruohonen ***
    44. 10 Best Landscape Photos of 2012 – Cody Duncan ***
    45. 2012: The Year in Review – Bret Edge ***
    46. Edith Levy Photography – A Year in Review 12 From 2012 – Edith Levy
    47. Top 10 of 2012 – My 10 Best Landscape & Scenic Photos – Clint Losee
    48. Jonesblog – Bryan William Jones ***
    49. 2012 Top 10 Photos – Andrei Olariu
    50. Best photos of 2012 – Robert Kusztos
    51. Top 12 of 2012 – Ian McGillvrey ***
    52. Dave Reichert’s Best of 2012 – Dave Reichert
    53. My Favorites of 2012 – Dan Baumbach ***
    54. European insects and landscapes – Jeroen Mentens ***
    55. Vilda European nature photography – Vildaphoto
    56. Russ Bishop Photography | Nature Photo Blog – Russ Bishop ***
    57. “top 13 images – Denise Goldberg
    58. Top 12 of ’12 – Lon Overacker ***
    59. TKM Journal – 2012 Summary – Kent Mearig ***
    60. 12 for 12 – Robert Lussier
    61. Changing Perspectives – Jenni Brehm
    62. Views Infinitum – Scott Thomas
    63. My favourite shots of 2012 – Catalin Marin ***
    64. My Photo Blog – Ron Niebrugge ***
    65. My Best Photos: 2012 – D. Travis North
    66. 2012 Favorite Images – Rob Tilley ***
    67. Timages Gallery: The Best of 2012 – Tim Mulcahy
    68. Reading on a Sunny Santa Barbara Day – G. Kaltenbrun
    69. Best Photos of 2012 – My Photography Year in Review – Phil Colla ***
    70. 2012 – A Year In Twelve Images – Werner Priller ***
    71. Favorite photographs from 2012 – Mark Graf ***
    72. Reflective Images from 2012 – Rhoda Maurer
    73. Western Skies Top 15 From 2012 – Björn Göhringer
    74. Best of 2012 – Rick Holliday
    75. Best images of 2012 – Regis Vincent
    76. Top Photos of 2012 by Gary Crabbe / Enlightened Images – Gary Crabbe / Enlightened Images ***
    77. Top 10 Photos from 2012 – Ben Chase Photography
    78. Travel & Landscape Photography – Brent Huntley
    79. KennethVerburg.nl – Mijn top 10 foto’s van 2012 – Kenneth Verburg
    80. M van Renselaar – Matthijs
    81. Favorites – 2012 – Daniel Leu ***
    82. Favorite Images of 2012 – Jack V. Johnson ***
    83. Picture Day – 12 in 2012 – Michael Christoferson
    84. G Dan Mitchell Photography – G Dan Mitchell ***
    85. Best of 2012 – Elena Zeitler Photography
    86. Best of 2012 – Brad Barton Photography
    87. leavesnbloom | Scotland – Rosie Nixon ***
    88. My 10 Favorite Wildlife Photos of 2012 – Jim Coda ***
    89. Adventures Through the Lens: Looking Back – Rebecca R Jackrel ***
    90. Twelve from 2012 – Ed Cooley
    91. Best Photos of the Year…A Duel To The Death – Jim Lundgren
    92. My Top Ten Images From 2012! – Clark Crenshaw ***
    93. My Favorite Photos of 2012 – Sarah Marino ***
    94. 2012 – Year in Review (Sort Of) – Ron Coscorrosa ***
    95. Best Photographs of 2012 – Chuck Goolsbee
    96. My Ten Best Photos of 2012 – Mike Chowla
    97. Chuqui 3.0 – Chuq Von Rospach
    98. 2012 Top 10 by Mario Moreno – Mario Moreno ***
    99. My Top 10 Favourite Images of 2012 | John Dunne Photography – John Dunne
    100. Kirk Norbury – Nature Photographer – Kirk Norbury
    101. Kurt Lawson Photography – Kurt Lawson
    102. Mark Imhof Photographics – Mark Imhof
    103. Ralf Prien Photography – Ralf Prien
    104. 2012 – Favourite Shots – Chris Blizzard ***
    105. blackandwhite.ie – Neil McShane (aka Mononeil) ***
    106. Peter Carroll Photography – Peter Carroll
    107. 12 Best of 2012 – Dru Stefan Stone
    108. Top 10 Favorites of 2012 – Alan Dahl
    109. DigitizedChaos(2012) – Rian Castillo
    110. Lunch is Optional – Ken Trout
    111. My Top 10 Photos of 2012 – Jaymi Heimbuch ***
    112. Pat Ulrich Wildlife Photography – 2012 Favorites – Pat Ulrich ***
    113. A Photographer’s Journey: My Best of 2012 – Michael Burkhardt
    114. 2012 The Year’s Ten Best Shots – Gene Lowinger ***
    115. JSturr 2012 Top Images – JSturr
    116. Sara M. Skinner Photography – Sara M. Skinner
    117. Living Wilderness: Best of 2012 – Kevin Ebi
    118. Best of 2012 – Larry Rosenstein
    119. Best of 2012 – Dave Miller Photography
    120. latoga photography – Greg A. Lato ***
    121. Art in Nature – Best of 2012 – Floris van Breugel ***
    122. best of 2012 photos – jj raia – jj raia ***
    123. Fantasia Photography – Mara Acoma
    124. Anne McKinnell’s Top 10 Photos of 2012 – Anne McKinnell ***
    125. tingsgrove.blogspot.com – Mary Howell Cromer
    126. Best Photos of 2012 by Ilya Genkin – Ilya Genkin
    127. McPhedran Phocus – Averil McPhedran Hall
    128. Kyle Jones Best of 2012 – Kyle Jones
    129. Best Photos of 2012 – Chaz Curry Photography ***
    130. 12 Favorites from 2012 – Daniel Schwabe
    131. The View Through My Glass: My top 10 pictures of 2012 – Duffy Knox ***
    132. danielqua.de – Daniel Quade
    133. suriradha – Surendra
    134. A 2012 Review in 10 Pictures – David Lloyd ***
    135. Best 2012 – Jim Robertson ***
    136. abigailgossage.ca – Abigail Gossage
    137. Korwel Photograpy blog – Iza Korwel ***
    138. Sugar Mountain Photography: 2012 Favorites – Dale King
    139. Greg Clure Photography – Greg Clure
    140. Mike Dooley Photography – Mike Dooley
    141. Colleen Miniuk-Sperry Photography: Favorite Photos From 2012 – Colleen Miniuk-Sperry/CMS Photography ***
    142. Fred Mertz Photography – Fred Mertz ***
    143. Best Photos of 2012 by Kenneth Snyder – Kenneth Snyder ***
    144. Favorite Photos from 2012 – In the Field Photo Blog by Richard Wong – Richard Wong ***
    145. My favorite photos of 2012 – Kristal Leonard
    146. Best Photos 2012 by Stan Rapada – Stan Rapada
    147. Geoff Shoots the World – Site update and 2012 in Review – Geoff Billing
    148. Gentle Wit – Cyndy Otty
    149. Another Bird Blog – Phil Slade
    150. Best Insect Photos of 2012 – Alex Wild ***
    151. 2012 Bird Favorites – Lance Warley
    152. My 10 Favorites of 2012 – John W. Wall ***
    153. Focus Pocus – Alb
    154. Deb Snelson Photography – Deb Snelson
    155. My 12 Greatest Hits Of 2012 – David Leland Hyde/Landscape Photography Blogger ***
    156. The Carey Adventures – Peter West Carey ***
    157. Scenery – Aaron
    158. Andrew Thomas Landscape Photographer – Andrew Thomas ***
    159. 12 Months in 2012 – Petr Hlavacek | NZICESCAPES IMAGES ***
    160. All The Pages: Favorite Photos from 2012 – Mike Rodriquez
    161. Mike Fitton Photography – Mike Fitton
    162. North Metro Photo – Robert Nopola
    163. Jill Fineis Photography – Jill Fineis
    164. My 2012 in Review – Morkel Erasmus ***
    165. Best Photos Of 2012 – Daniel McNamara
    166. Artistic Landscape Photographer – Jason Matias
    167. My Top 12 Images Of 2012 – John Paul Caponigro ***
    168. 56×56 – My Favorites of 2012 – Jim Nickelson ***
    169. Neal Studios – Mike Neal
    170. Eliya’s top 10 of 2012 – Eliya Selhub
    171. Rob Dweck Photography Top 12 From 2012 – Rob Dweck ***
    172. Create. Evaluate. Iterate. – Tim Cooper
    173. RonaldSaunders.com – Ronald J. Saunders
    174. Top 10 favorites of 2012 – John Christopher
    175. Dima Barsky – Flickr – Dima Barsky
    176. Curiouser and Curiouser – Reebbhaa Mehta
    177. A Look Back on 2012 – My Top 10 Images of the Year – Ed McGuirk
    178. My Favorite Photograph of 2012 – Jeremy Richter
    179. Top 12 2012 Google plus – Patrick Ottoy
    180. Eiffel Tower during storm – Greg Summers
    181. Jeanne Hoadley Photography – Jeanne Hoadley
    182. Jaakko Paarvala Photography – Jaakko Paarvala ***
    183. Lisa Kidd Photography – Lisa Kidd
    184. In The Village: Best Photos of 2012 Entries – Andrew Hill
    185. Jaakko Paarvala Photography – Jaakko Paarvala
    186. Welliver Photography – Terry and Beth Welliver
    187. Top 12 Photographs of 12 – Matthew Scott Cooper
    188. Top 10 Images For 2012 – Kyle McDougall ***
    189. My Favorites 2012 – Alan Grinberg
    190. Top 12 of 2012 – Kristy Massey
    191. Carl-Johan Rådström Photography – Carl-Johan Rådström
    192. Olivier Du Tré Photography – Olivier Du Tré ***
    193. Around London in 2012 – Jono Hey
    194. Top 12 Photos of 2012 » blargmedia inc. – Ben Wong
    195. Duchess O’Blunt’s Favourites for 2012 – Duchess O’Blunt
    196. Adoring Nature by Vaibhav Tripathi – Vaibhav Tripathi ***
    197. Jason O’Rourke Photography – Jason O’Rourke
    198. 2012: Our favorite images of the year – Isabel & Steffen Synnatschke ***
    199. Landscape Astrophotography: The Best of 2012 – Brad Goldpaint ***
    200. Year in Review – Andrew S. Gray
    201. Wednesdays in Marblehead – Eyal Oren
    202. Top images from 2012 – Andrew McAllister ***
    203. Michael Frye Photography – Michael Frye ***
    204. 10 Favorite Photographs from 2012 – Seung Kye Lee ***
    205. My Top 10 Photos for 2012 – Neil Creek ***
    206. Tattoography by Alexandria Huff – Alexandria Huff ***
    207. Lenspiration – James Staddon
    208. Wayne Parris Photography – Wayne Parris
    209. Fine Art America – Steven Taylor
    210. John-Roy Photography – JohnRoyPhoto
    211. David Photography – David Pinsent
    212. Gotham City – Erfu Wang
    213. Best of 2012 Portfolio – Gary A. Piazza
    214. Grant Kaye Photography – Grant Kaye ***
    215. David Epps Photography – David Epps
    216. Cedarmeade Studios – Shaun Galang
    217. Sheldon’s Personal favorites of 2012 – Sheldon Heatherington
    218. Best of 2012 – Carina Potts
    219. Charles Guy Photo – Charles Guy ***
    220. Flickr Best of 2012 – Eric Hines
    221. My Best of 2012 – Adam Carter
    222. Best of 2012 – Ryan Andrew Dudik
    223. Top Ten Images of 2012 – Keith Nicodemus Photography
    224. My Creative Outlet – Tiffany Cornwell
    225. Adin Softic Photography – Adin Softi
    226. Journey of 2012 – Russell Hebert
    227. My best for 2012 – Joseph John Thalakkottor
    228. Top 12 for 2012 – Phyllis Whitman Hunter
    229. Michae’s best of 2012 – Michae E. Allen
    230. Daniel Stein Photography – Daniel Stein
    231. Bihter Guillory Photography – Bihter Guillory
    232. 10 Favorites of 2012 – Michael Rabon
    233. Flying Aardvark Ranch Gallery – Lori Ann Cole
    234. Jacob Fricks Photography – Jacob Fricks
    235. Best Photographs of 2012 – Amanda Fehring
    236. Brooks Photo Art – Brook Hoffman
    237. Today’s Photo – Sandy DeWitt
    238. Sean Parker Photography – Sean Parker ***
    239. Simple Memoirs from 2012 – Victoria Cruz
    240. Phil McGrew Photography – Phil McGrew ***
    241. 2012 Highlights – Brad Mangas
    242. Castle Graphics – Jan Kohl
    243. Andrew Savasuk Photography – Andrew Savasuk
    244. World Photo Creations: Best of 2012 – Scot D. Weaver ***
    245. People-2012 – Woodruff Laputka
    246. PriyankaP. Photography – Priyanka Patel
    247. PhotoActive Photography – Chuck Jackson
    248. Best of the Jersey Shore 2012 – Bill McKim
    249. Drecart Photographic Solutions – Derek Byrne
    250. Kichul Shin Photography – Kichul Shin
    251. Landscape and Fine Art Photographer Navin Sarma’s 10 Best Photographs – Navin Sarma ***
    252. ten of twenty twelve – Jaÿa Gascon
    253. My Best of the Best Photographs of 2012 – Adam Schwartz
    254. 2012 Retrospective – Joshua Cripps ***
    255. pakos.me – Jamie ***
    256. Best of 2012 by Jack Fusco – Jack Fusco ***
    257. Best of 2012 – Michael Johnson
    258. Andrew Scharlott Photography – Andrew Scharlott
    259. My Favorite Images of 2012 – Dora Miller
    260. Best of 2012 | Simon Ponder – Simon Ponder
    261. 2012 Favourites – Vasu Shanmugasundaram
    262. Best of 2012 album – Lindsey Williams
    263. Best of 2012 – Matt Infante
    264. Chris the Photog – Chris Hansen
    265. 10 Memories of 2012 – Chris Pritchard
    266. Peter Harris Photography – Peter Harris
    267. Anton Huo Photography – Anton Huo ***
    268. Out-n-About.de – Alexander Koval ***
    269. Daniel Hopkins Photography – Best of 2012 – Daniel Hopkins
    270. Flickr – massoud hasanzade
    271. Best of 2012 – Alister Benn ***
    272. 2012 Through the Seasons – Jim Patterson ***
    273. Favorite Photographs – 2012 – Sudheendra Kadri
    274. Romain Guy’s Best of 2012 on Curious Creature – Romain Guy ***
    275. Iceland news and more – Dori Sig ***
    276. JoshTrudell.com – Josh Trudell
    277. Best of 2012 – Clement Biger
    278. BillHornstein.com – Bill Hornstein
    279. Uncommon Depth: Best of 2012 – Roberta Murray ***
    280. Organic Light Pan – Youssef Ismail ***
    281. Stephen Weaver Photography Best of 2012 – Stephen Weaver ***
    282. Top 12 of 2012 – Chuck Kimmerle ***
    283. 2012 in Retrospect – Guy Tal ***
    284. Light, Sky, Land – Images by Matthew Cromer – Matthew Cromer ***
    285. On Landscape, 12 Significant photos – Tim Parkin ***
    286. 12 Best Photos of 2012 – Derrald Farnsworth-Livingston
    287. Year 2012 in Review and Favorite Images – QT Luong ***
    288. My Best in 2012 – Sohail Mamdani ***
    289. A Few of My Favorite Photos I Shot in 2012 – Austin Fausto ***
    290. Best of 2012 by Ivan Makarov – Ivan Makarov ***
    291. One Time Photos – Jason Taylor ***
    292. R/ZALDY Photography – Rizaldy Celi Jr. ***
    293. Doppler Photo: Best of 2012 – Omari Stephens
    294. My 2012 Best & Unique Landscape Photographs – Steve Sieren ***
    295. Rafael Rojas PhotoBlog – Rafael Rojas ***
    296. Reebbhaa Mehta Photography – Reebbhaa Mehta
    297. 2012 Collection – Matt Anderson
    298. FengLong Photography – Zachary Long ***
    299. My Best Shot of 2012 – Ron Palarca
    300. Yosemite Steve Natural History Filmmaker – Steven M. Bumgardner ***

    Post originally from: Digital Photography Tips.

    Check out our more Photography Tips at Photography Tips for Beginners, Portrait Photography Tips and Wedding Photography Tips.

    300 “Best Photos of 2012″ Blog Posts


    Digital Photography School

  • How to Get Your Lightroom Catalogue Perfectly Organized

    Did you know that ‘getting organized’ is one of the top ten New Year’s resolutions? It’s true! So let’s roll up our sleeves and get to tidying up your lightroom editing process. Lightroom, after all, is an archive of your work, a database of your creative content. Having a streamlined system will allow you to minimize your editing and post-processing Continue Reading

    The post How to Get Your Lightroom Catalogue Perfectly Organized appeared first on Photodoto.


    Photodoto

  • Selling Your Images As Art: 5 Tips To Getting Started

    As photographers, the highest compliment we can be paid is to have someone pay us for our vision and creativity.  For some, this means becoming wedding or portrait photographers, getting paid per event or session.  But what about those of us who enjoy shooting landscapes, or wildlife? Subjects that aren’t often paid for in advance? Aspiring photographers are often told they should try selling their work, but are unsure where to start. It’s relatively easy to set up a website, but getting potential customers there can be difficult.  So how do you get your work seen? What are the options?  Here are five tips to getting started.

    1. Establish an Online Presence
    This allows you to get customers when you aren’t otherwise selling your work.  The secret here is to go with a web presence that will allow you to be found when others don’t even know they are looking for you.  I use FineArtAmerica.com to host my website.  The beauty here is that all of my work gets entered into their database. I keyword my images, so they appear in pertinent searches by people who’ve come to the site looking for art to purchase. Visitors who know of me can use my own URL, but my guess is that few, if any of my sales actually have come from people visiting my personal URL.  There are other websites out there- Zazzle.com and RedBubble.comare two others. 
    I will admit I know very little about how they operate, so do some research before you commit to any of these websites.  One of the beautiful things about the online presence is that it can work with the other outlets I mention below.  It will allow you offer other sizes and products, such as canvas prints, that you may not keep in stock at an art show or be displaying in a gallery. It allows someone who saw you at a show, but wasn’t prepared to purchase, place that order a day, a week, or a month later.  With any of these sites, depending on how quick you are to upload your work, you can be selling within hours.

    Horton Point Sunset

    This image of a local point of interest on Long Island, NY would do well in a local restaurant, cafe, or art show but would probably not garner interest in a more national setting.

    2. Look Locally

    There are opportunities to sell your work everywhere.  That coffee shop on the corner. That new restaurant down the block.  Many local banks will occasionally show local artists’ work.  The local library will as well.  Prepare a portfolio and ask who to speak with at the establishment. 

    Be prepared to have your images printed, matted, and framed.  Work with the establishment to set up guidelines, commissions, and payment for the images.  The best images for this kind of use are images of local landmarks that compliment the restaurant, or images that work well with the restaurant or establishment’s theme.

    3. Besides local restaurants and cafes, local art galleries and framing shops are also a good bet

    Contact the gallery owners for their guidelines and ask how they like to review new submissions. I’ve found they all seem to work a little differently. Some galleries will charge a membership fee, or a rental fee for space. Most will have specific requirements for digital files, and commission structure will vary- the usual range is from 40%-60%

    4. Local art and Craft Shows

    These can be tricky, because you never know what kinds of buyers will show up.  It’s best to avoid shows that may be more crafty than artsy, but you’ll have to evaluate each show on it’s own merits. These are a good way to get your feet wet, as they tend to have low entry fees and less stringent requirements, but at the same time, you don’t get the kind of buyer who is necessary looking for fine art and is willing to pay top dollar for it.

    Local shows, like local eateries, tend to look for more local art.  My first show I showed up with lots of images from around the country in my travels.  The stuff that got the most interest was all stuff local to where I lived. You’ll want to have a variety of sizes, with most images matted and a few framed images.  While the larger images look great, it’s generally the smaller sizes that will sell better.

    5. A-list Art Fairs are the “Big Time”

    I have not ventured into this arena yet but have researched it thoroughly.  Sunshine Artist Magazine(subscription required) is pretty much the definitive resource for these larger art fairs. Each fair is different, with artists required to apply and be accepted into the show.  Application fees can be in the hundreds of dollars and apply to your booth fee if accepted. The applications are generally accepted months in advance, so planning is required.

    There are requirements for your booth layout as well.  Nothing about these shows is just thrown together at the last minute.  It is virtually a full time job to do such fairs, so be prepared for a commitment.  It is an expensive proposition as well.  You must have a stockpile of prints, framed and unframed, as well as a way to display them.  Several artists I know well have spent well over $ 1000 just on displays. That said, they can be lucrative as there are many who do make a good portion of their income doing such shows.

    An image of a national park or other nationally known landmark will have broader appeal.

    As I mentioned, it’s incredibly gratifying when someone is so taken with your work that they actually pay for it.  There are various outlets for you to get started in selling your work. All it takes is some commitment, and some time to get started.  Remember, ultimately,

    Post originally from: Digital Photography Tips.

    Check out our more Photography Tips at Photography Tips for Beginners, Portrait Photography Tips and Wedding Photography Tips.

    Selling Your Images As Art: 5 Tips To Getting Started


    Digital Photography School