Category: Photography

  • SEO For Photographers, Part 2: Where To Use Your Keywords

    If you’re serious about being in the photography business to make money, then you’ll definitely want your website to be found easily by the people who are looking for your type of services, which means paying close attention to search engine optimization. SEO for photographers can sometimes be a challenge, but that need not be the case. When used correctly, Continue Reading

    The post SEO For Photographers, Part 2: Where To Use Your Keywords appeared first on Photodoto.


    Photodoto

  • Magic Lantern Guide to Nikon D800/D800E Review

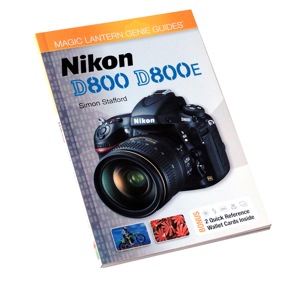
    Guide Nikon D800  800ELike many books and movies, if you’ve read the book you’ll want to see the movie.

    Similarly, if you own a Nikon D800/D800E you’ll want to read this guide book. Or even more significantly, if you’re thinking about buying one of these cameras, you will definitely want to read this book.

    No doubt you’ve already read my review of the remarkable Nikon D800E camera.

    Now, about the book ….

    Unlike some guide books that I’ve read, this one is all meat and no potatoes, no embellishments, no guff about what a wonderful camera it is, classic lineage etc.

    There is however a useful intro to explain the differences between the D800 and D800E models: the only difference being the structure of the filter array covering the image sensor.

    Having spent many hours poring over the Nikon manual PDF when reviewing the D800E I wish that I had seen this Magic Lantern guide first!

    You get an idea of the book’s helpful approach from the first diagrammatic, explaining the camera controls: clearly laid out, using an image of the camera’s top, sides and rear. Along with explanatory text, the camera pictures and text are close by, so you are not forced (as in the Nikon manual) to thumb through hundreds of pages.

    I have rarely found the manufacturer’s original manual to be 100 per cent useful so it’s gratifying to dip into a sample of this book and see how it treats an otherwise mundane function:

    ‘Mirror up: Locking the reflex mirror into its raised position helps to reduce the vibrations that can often occur, particularly at slow shutter speeds … once the mirror is raised, it is not possible to compose via the viewfinder, and TTL exposure metering and autofocus will not be possible.’

    Although the book totals only 128 pages, there is a heap of info within them, although some may find the small six point sans serif type a bit hard to read; it gets even worse when you get to the index at the back of the book where the text shrinks to 5 point type. To be hyper critical, the pictures are also a little on the small side.

    But … the info is simply written and leaves no detail unclear. Another extract: ‘Spot metering: This metering pattern is highly specific, as it covers a circle approximately 0.16 inch (4 mm) in diameter.’

    For good measure there are helpful paras on peripherals such as memory cards and batteries as well as outlines on the camera’s file formats, JPEG, RAW and TIFF.

    An area often skimped in makers’ manuals is the camera’s movie modes; this book answers this criticism by opening the whole subject, clarifying many topics such as shooting stills mid-movie as well as what operational info is displayed in Live View when video recording is under way.

    Useful ‘freebies’ are the six quick reference cards tucked into the book’s front and rear covers, carrying concise info on auto focus, setting ISO, flash ranges, sync speeds etc. Slipped into your pocket these would be enormously helpful on a shooting safari where carrying the whole book would be a problem.

    Overall, I wish that one brave manufacturer should step out of line and supply a manual such as this with the original camera … and not the pitiful publications normally tucked into the box.

    On the other hand, I do feel that the type size in Simon Stafford’s book is far too minuscule. I realise larger type would call for a bigger book or more pages, leading to an increased purchase cost but it would make the book far more accessible and useful.

    Details of Magic Lantern Guide to Nikon D800/D800E

    Author: S Stafford.
    Publisher: Pixiq.
    Distributor: Capricorn Link.
    Length: 128 pages.
    ISBN 978 1 4547 0401 0.
    Price: Get a price on Magic Lantern Guide to Nikon D800/D800E

    Post originally from: Digital Photography Tips.

    Check out our more Photography Tips at Photography Tips for Beginners, Portrait Photography Tips and Wedding Photography Tips.

    Magic Lantern Guide to Nikon D800/D800E Review


    Digital Photography School

  • Learning to See, Part III

    Read earlier posts in this series at “Learning to See – For Beginners” and “Learning to See Part 2“.

    The Hues and Use of Colour, Part II

    Colour is a means of expressing light. – Henri Matisse

    In the first installment of the “Hues and Use of Colour” we introduced a discussion on colour, albeit the two colours of black and white. By further exploring the work of Ansel Adams we discovered that black and white is not, well, just black and white, but varying shades of greys between the two extremes.

    I also hope your research led you to discover other great masters of the black and white print: Robert Maplethorpe, John Sexton and Edward Weston to name but a few. In your study you should have also witnessed how these world-class photographers were masters in the darkroom. Advanced photographers intimately understand that by controlling one shade of grey they are also effectively complementing the neighbouring tone.

    Visual perception of colour may not necessarily be truthful. This is amplified in illustration number one. As you look at the illustration do not over analyse, but ask yourself which circle is actually the whitest? Of course you are going to study the illustration and come to the conclusion that they are all of the same tone, even though the illusion is that the extreme right circle is brightest.

    Illustration 1


    Now look at illustration number two. Again, which is the brightest circle? I think you would agree the right-hand circle is the brighter.

    Illustration 2


    In illustration one, all of the circles are 100% white and the background is shades of grey ranging from 25% black on the extreme left square, through 50% black, 75% black and finally 100% black on the extreme right. With just two basic colours, and varying shades thereof, it is quite easy to see the simultaneous contrast. In illustration two the background square is either 100% white or 100% black, and the circle is 18% grey (+/- 3% to provide for the pattern detail). Simply by adding the pattern to the circle, and dramatically increasing the adjoining background variance in tone we can create an illusion of assimilated contrast. The two circles in illustration two are identical in all aspects.

    We can take this exact same theory and apply it to colour photography. Many photographers will use post-production software, such as Photoshop, and saturate a selected colour to increase the “punch” in the image. Based on illustration two principles could we not increase the tonal range of the supporting, or complementary colour to achieve the same result?

    But what are complementary colours?

    Before we get into a large debate and ongoing dialogue I want you to try a small experiment. The materials are quite simple: Print a full sheet of 8.5 x 11-inch paper as a solid bright royal blue. Have a second sheet of equal sized clear bright white paper at hand. Now, stare at the blue paper for a minute or so and then quickly move your eyes to the white paper. That white paper should show a yellow afterimage. That is because yellow is a complimentary colour to blue. Other complimentary colours are Green and Magenta, and, Red and Cyan.


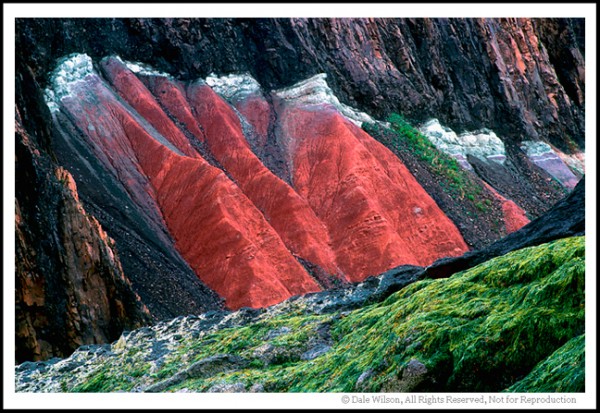
    An isolated detail of a shoreline cliff allows the reds to enhance the greens, or vice versa … depending on how you look at it. Location: Five Islands Provincial Park, Nova Scotia, Canada


    Now that we have started to think colour and how one colour can complement another, I want you to do a web search looking for some great colour imagery. Look at photographer websites, and their portfolios; a great start would be the work of Pete Turner, a true master of colour.  A couple of other “purveyors of colour” worth more than a cursory glance would be Jay Maisel and Eric Meola.

    I raise these great photographers works as I want the novice photographer to get ready for an introduction to the colour wheel in the next installment of “Hues and Use of Colour.” To truly be aware how one colour can affect its neighbour we have to understand the colour wheel and its theories, but not too much as we don’t want to take the fun out of making pictures.

    After all, if you are having fun you are doing it right!

    Post originally from: Digital Photography Tips.

    Check out our more Photography Tips at Photography Tips for Beginners, Portrait Photography Tips and Wedding Photography Tips.

    Learning to See, Part III


    Digital Photography School

  • Landscapes: Weekly Photography Challenge

    Landscape-ForegroundPhoto by OneEighteen

    This past week we’ve had a few tutorials on Landscape Photography so I thought it might make a good topic for this week’s challenge.

    So – your challenge is to take and share a landscape photo.

    Feel free to shoot whatever type of landscape image you like (and have available to you). For many of you it might be a snowscape, for others in the southern hemisphere it could be a http://digital-photography-school.com/5-quick-tips-for-coastal-photography“>beachscape, it could be a cityscape or anything else you like.

    Also feel free to photograph your landscape in any way/style – black and white, HDR, sunset – it is totally up to you.

    Once you’ve taken and selected your best landscape shot upload it to your favourite photo sharing site and either share a link to it or – embed it in the comments using the our new tool to do so.

    If you tag your photos on Flickr, Instagram, Twitter or other sites with Tagging tag them as #DPSLANDSCAPE to help others find them. Linking back to this page might also help others know what you’re doing so that they can share in the fun.

    Also – don’t forget to check out some of the great shots posted in our last challenge – Best Shot of 2012 challenge where there were some beautiful shots submitted.

    Further Reading on Landscape Photography

    • 11 Surefire Tips for Improving Your Landscape Photography
    • 4 Rules of Composition for Landscape Photography
    • 5 Tips for Shooting Landscapes with Greater Impact
    • 10 Landscape Composition Tips: Illustrated with Pictures from Eastern Washington
    • What Everybody Ought to Know about Landscape Photography

    Post originally from: Digital Photography Tips.

    Check out our more Photography Tips at Photography Tips for Beginners, Portrait Photography Tips and Wedding Photography Tips.

    Landscapes: Weekly Photography Challenge


    Digital Photography School

  • Using Backlight in Nature Photography

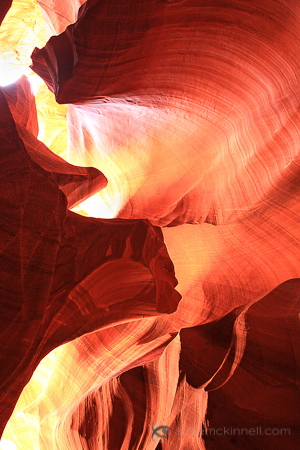
    Antelope Canyon, Arizona
    Backlight is when the sun is directly in front of you lighting the back of your subject.

    Shooting a backlit scene is more difficult technically but that is no reason to shy away from what can become a dynamic and energizing image.

    One of the strengths of backlight is that it emphasizes shape so you will want to find subjects with strong shapes.

    In this image of Antelope Canyon in Arizona, it would be hard to distinguish the shape of this part of the canyon wall had the sun not been high in the sky.

    Because it was mid-day, the light went straight down the slot canyon lighting up the canyon walls. I was at the bottom of the canyon shooting straight up, so my subject was backlit.

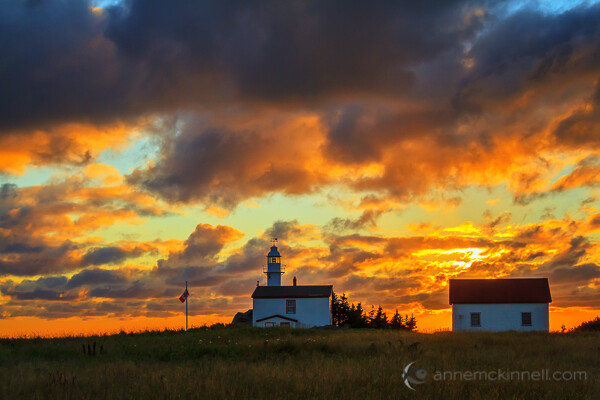
    Lobster Cove Lighthouse

    I always think of this image as the shot I almost didn't make. It was an after thought. My intention was to get down to the beach for a seascape and I was disappointed that I couldn't find a way down. As I went back to the parking lot feeling defeated I looked back and thought "I just have to capture that sky regardless of how boring those buildings are." When I looked at the photo on my computer afterwards I learned my lesson that an image only needs one really exciting element. I was able to bring quite a bit of detail out of the shadows in post-processing.

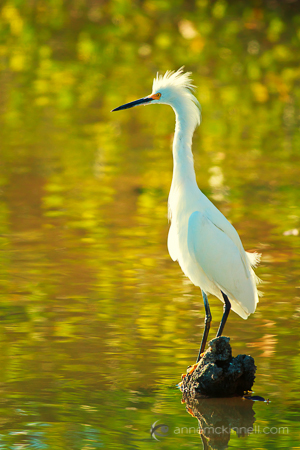
    Egret, Ding Darling Wildlife Refuge, Florida

    Backlight creates the rim light you often see in portraits but this effect works on wildlife too.

    In this image of an egret the majority of the light was coming from behind the bird, causing the feathers around the edge of the bird to glow, but there was still enough ambient light to capture detail in the front.

    When there is not enough ambient light to capture the details in the foreground you can use fill flash or a reflector.

    The part that can be technically more challenging when it comes to backlit scenes is getting the proper exposure. If you have your camera set to evaluative metering it will take into account the entire scene and try to determine the best exposure. This works great when you have a fairly evenly lit scene, but when you have a scene with high contrast it doesn’t work as well. Your camera can’t meter for both the bright areas and the dark areas at the same time.

    The solution is to switch to a different metering mode, such as spot metering, so you can tell your camera which part of the frame is important to you. You can choose to meter on the darker area to maintain detail in the shadows and let the highlights go completely white as I did in the photo of Antelope Canyon above. Or you can meter on the bright part of the scene and let the shadows go completely dark to create a silhouette.

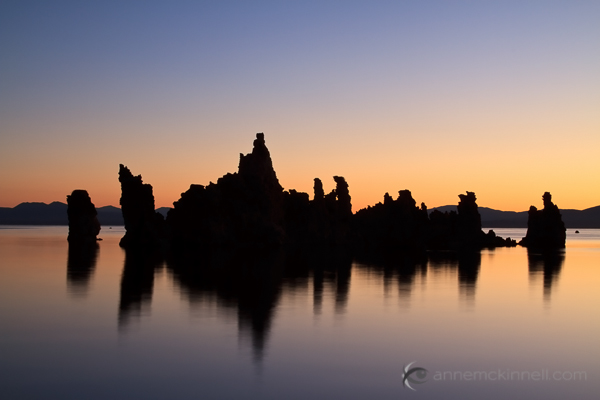
    Mono Lake Silhouette

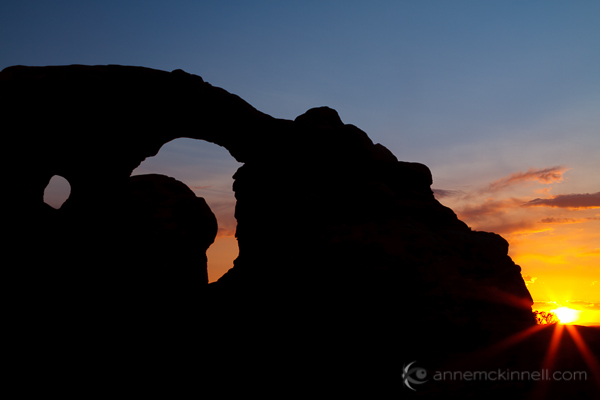
    One of my favourite techniques is to create a starburst effect in a silhouette image when the sun is still above the horizon. To do this, position yourself so that the sun is partially hidden behind an object and use a small aperture, like f/22.

    Arches National Park, Utah

    When the sun is in your frame it’s a good idea to use your live view on your LCD monitor to protect your eyes rather than looking through the viewfinder, especially if you are using a telephoto lens.

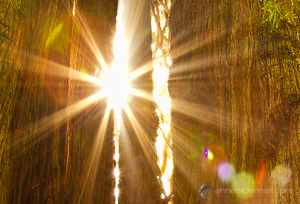
    Lens Flare
    Be sure to watch for lens flare when you are shooting directly into the sun. Lens flare is when the light hits your lens directly and reflects inside the lens causing bright streaks or polygonal shaped bright spots with rainbow colours to appear. This is not necessarily a bad thing but if you don’t like it you will need to shade your lens with a lens hood or your hand. Shading your lens is not usually possible when the sun is in your frame but you can reduce the lens flare by positioning yourself so the sun is partially behind an object.

    Tips:

    • Find a subject with great shape.
    • Change your exposure mode to spot metering.
    • Point your camera directly at the part of the scene you want to exposure for and use the exposure lock feature on your camera to set the exposure (check your camera manual to find the exposure lock function on your camera). Then you can recompose and press the shutter half way to set the focus while the exposure remains locked.
    • Use a small aperture to create a starburst.

    Once you master the art of setting the exposure for a backlit scene you will open the door to new possibilities by looking into the light.

    Post originally from: Digital Photography Tips.

    Check out our more Photography Tips at Photography Tips for Beginners, Portrait Photography Tips and Wedding Photography Tips.

    Using Backlight in Nature Photography


    Digital Photography School

  • How to: Gelling Large Light Sources

    Do you shoot with soft boxes, beauty dishes and/or umbrellas?

    If you shoot exclusively with small lights, you can just tape a couple of square inches of gel to your flash head, as with my permanently mounted warming gel seen above. No matter what the mod, the light is gelled before it gets there.

    But if you sometimes shoot with big lights, things can get a little more complicated. Here are some ideas to help you gel the big mods as efficiently as possible. Read more »
    Strobist

  • Meet The Photographers Who Write For Digital Photography School ~ Elizabeth Halford

    You’ve been reading their articles for months or years, have you ever wondered “Who are the photographers who write for DPS”? We thought it would be a good time to introduce them to you through a series of interviews. No worries, Darren will get his turn too.

    Today meet Elizabeth Halford.


    1. How long have you been shooting?

    I’ve been taking pictures since I was about 10 years old. I spent all my pocket money on film for my Kodak 110 instamatic. I’ve been seriously teaching myself photography since 2008.

    2. Do you have a full time job or are you a full time photographer?
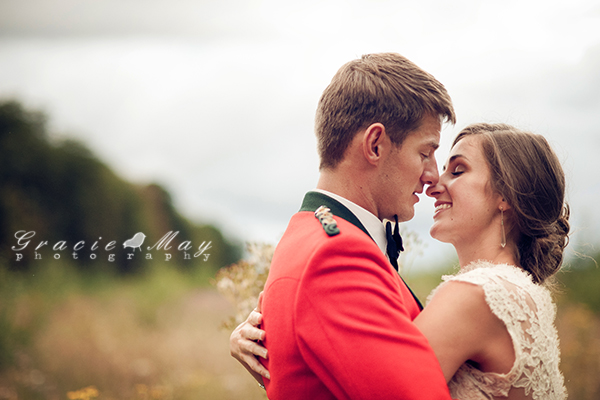
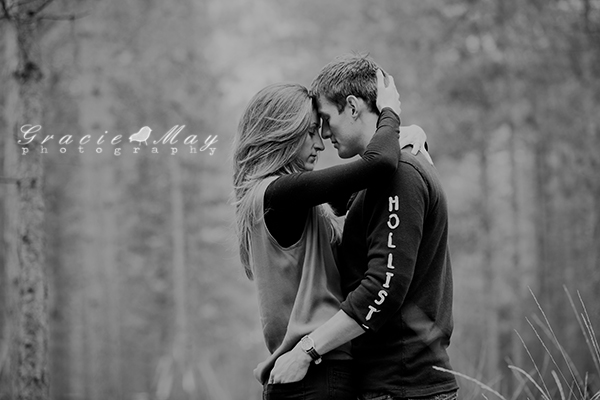
    I’m a full time photographer and blogger. I also have a hand in running a charity, Cure Rett.

    3. If you had to limit yourself to one genre of photography, what would it be and why?

    If I had to choose just one genre of photography, it would be children’s portraiture

    4. When did you start writing for DPS and why?

    I started writing for DPS in 2009 when I first started blogging about photography to keep my own site interesting. Darren hired me and so I was writing for DPS before I really even knew what blogging was all about! Thanks to that opportunity, I’ve built a really fantastic readership on my blog where I write about photography and business in “real.plain.english”. I learned from Darren that being nice to people online is a total win-win and that we highly underestimate the power of giving!

    5. What do you shoot with and what’s your favorite lens?

    I shoot with a Canon 5DmkIII. A 7D is my backup. My two favourite lenses are the 70-200mm f/2.8 L IS II and 50mm f/1.2. I wear a ShootSac to keep my lenses accessible while shooting.

    6. What would be your number one tip to any new photographer?

    Take pictures!

    7. What’s your next big project?

    Well one of my most exciting projects this year has been getting my branded car. It’s certainly made waves! I got the attention of Mini who went and branded one of their test drive models because they loved mine so much!

    My biggest project in 2013 will be my first live workshop “How to sell in Plain English” in March in Southampton to teach photographers how to do in person sales so they can actually make money photographing people! It ain’t rocket science!

    I’m also the key photographer on the Picture the Hope Photography Tour which is touring the UK to photograph girls with Rett Syndrome. Some of those shots can be viewed here on the blog I write about my daughter, Grace, who has Rett.

    8. Where can people go to find out more about you and your work?

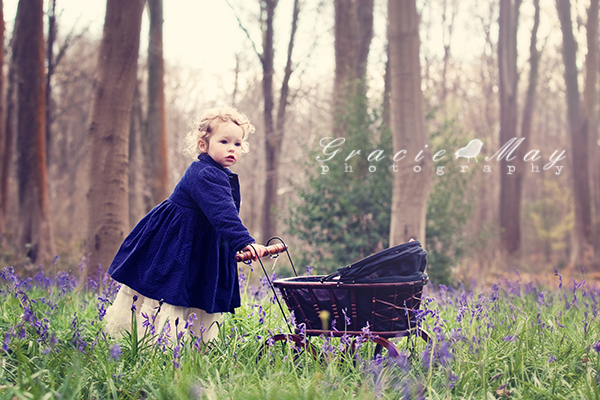
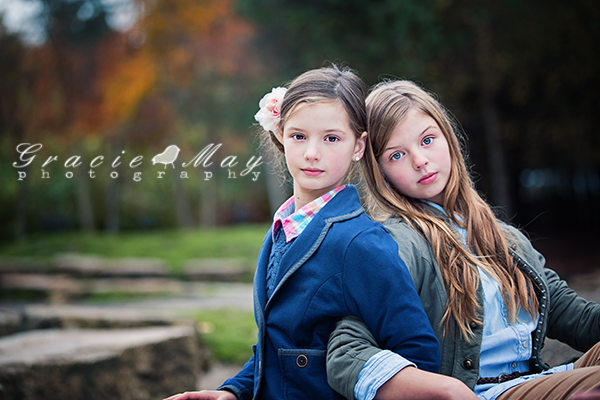
    To view my photography, you can visit www.graciemayphotography.com and to visit my blog for photographers, www.elizabethhalford.com. You can connect with me and my growing community on Facebook. My full story can be found here.

    Post originally from: Digital Photography Tips.

    Check out our more Photography Tips at Photography Tips for Beginners, Portrait Photography Tips and Wedding Photography Tips.

    Meet The Photographers Who Write For Digital Photography School ~ Elizabeth Halford


    Digital Photography School

  • 4 Uses for Lightroom’s Graduated Filter Tool

    The Graduated Filter tool in Lightroom 4 allows you to apply edits across an even gradient. In this article I will explain 4 ways to use the Graduated Filter tool to enhance your photos.

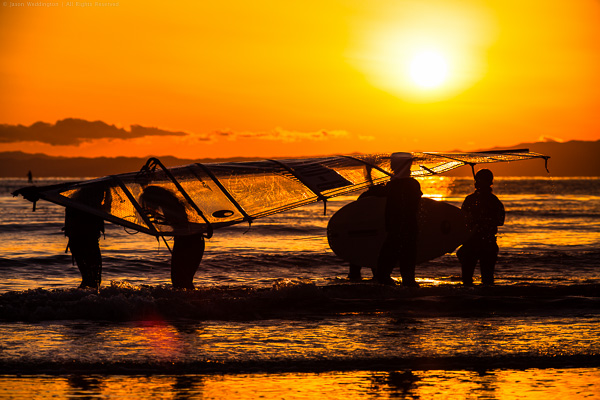
    Sunset in Kamakura Japan

    I used a Graduated Filter to adjust exposure on the left side of this photo. Read on to see how.

    Adding a Graduated Filter to a Photo

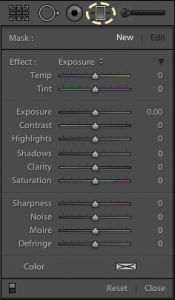
    Graduated Filter Controls

    1. Click the Graduated Filter tool, or use keyboard shortcut ‘M’
    2. Dial in the desired settings (exposure, color temperature, etc)
    3. Drag your mouse across the image, starting at the point where you want the filter to be the strongest. An easy way to remember this is that you start dragging your mouse from the area of the photo that you want to change. Create as large a gradient as you need to make the transition subtle.
    4. Adjust the size, position, and angle of the gradient, as well as its settings until you get the result you need.

    4 Uses for the Graduated Filter Tool

    1. Changing exposure on one side of the frame

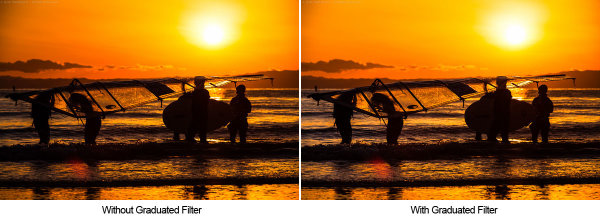
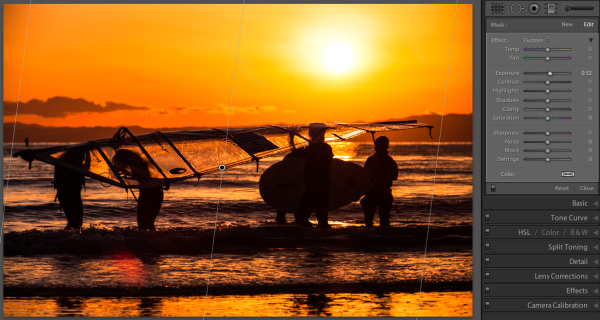
    In my own workflow, I use the Graduated Filter to change exposure more than for any other purpose. In Lr4 with the 2012 Process, you can control overall exposure, or target just the shadows or highlights. For this image of some sailboarders on a beach in Kamakura, Japan, I added a Graduated Filter to increase the exposure on the left side of the photo by about half of a stop.

    Graduated Filter used to change exposure

    I used a graduated filter to increase the exposure on the left side of the image.

    Graduated filter to change exposure

    This Graduated Filter increases the exposure on the left side of the image by about 1/2 stop

    2. Reducing atmospheric haze

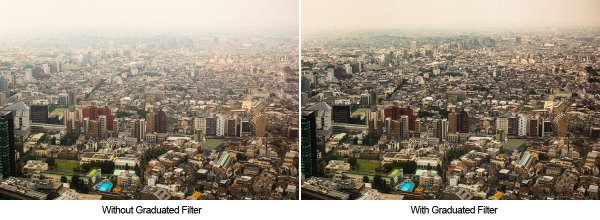
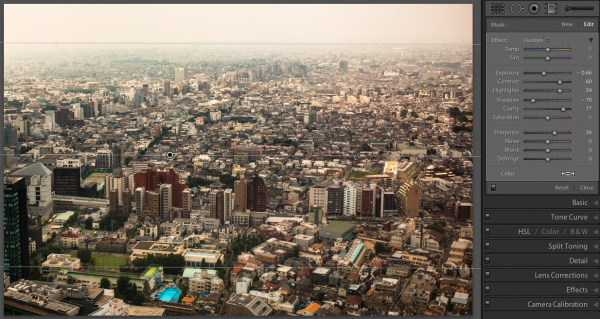
    Another good use for the Graduated Filter is in reducing haze in the distance for landscapes and cityscapes. I’ve found that increasing contrast, clarity, and sharpness across a vertical gradient can help reduce haze. Here, a Graduated Filter helps make the best of this image, shot on a particularly hazy day from the Metropolitan Government Building in Tokyo.

    Graduated filter used to reduce haze

    I used a Graduated Filter to reduce some of the haze and produce a final image with more detail.

    Graduated filter to help remove haze

    This Graduated Filter helps reduce the haze in the air.

    3. Selectively Adjusting White Balance

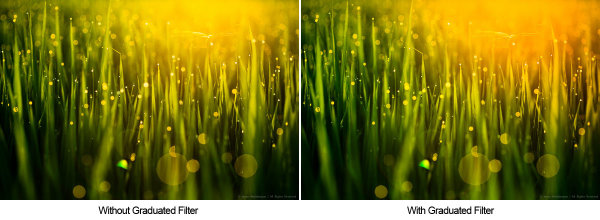
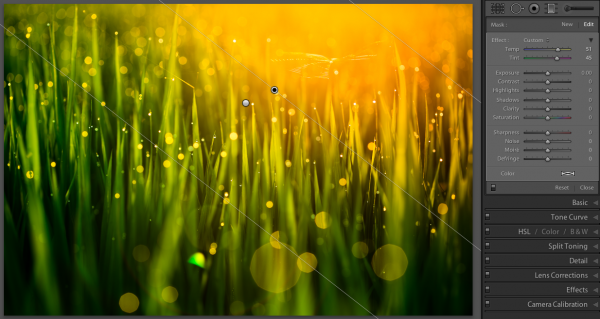
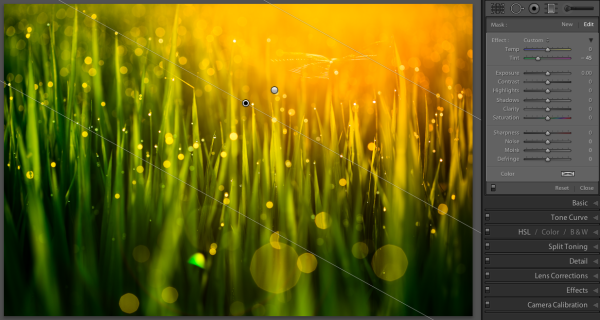
    Using the Temp and Tint controls in the Graduated Filter settings, you can adjust white balance across a gradient. This is an image of morning dew on rice plants in Takasaki, Japan. I used two Graduated Filters to separately enhance the sun flare and the rice grass.

    Graduated Filter used to selectively change white balance

    I used two Graduated Filters to separately emphasize the yellow and green tones.

    Graduated Filter to adjust white balance

    This Graduated Filter enhances the yellow and pink in the sunrise

    Graduated Filter to adjust white balance

    This Graduated Filter makes the grass more green.

    4. Customizing a vignette effect

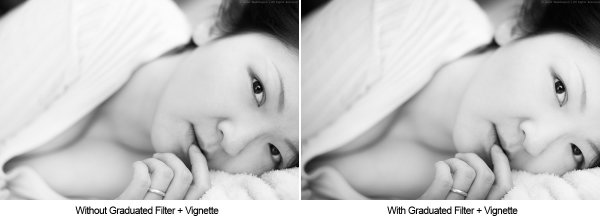
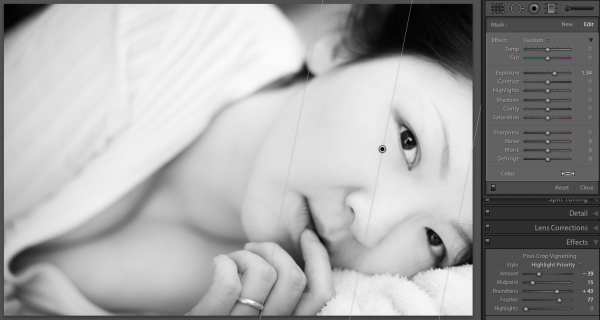
    This technique builds on #1 above, because we are actually manipulating exposure. But I mention it separately because it’s a combination of two Lightroom effects. In some portraits, I like to use a subtle vignette to draw the eye to the subject. But the standard post-crop vignette is not effective at drawing the eye toward one side of the frame.

    In these cases you can use a Graduated Filter to selectively modify the vignette, as in the natural light portrait below. A strong vignette darkens the outside of the frame, while an exposure gradient lightens the right side of the frame over the model’s face. This has the effect of pulling the viewer’s eye to the subject’s face.

    Graduated filter combined with a vignette

    I used a Graduated Filter to remove the vignetting on the right side of the frame

    This Graduated Filter counters the vignetting on the right side

    This Graduated Filter counters the vignetting on the right side

    I hope this article has been interesting and informative, and has given you a few ideas about how to use the Graduated Filter tool to enhance your images. I appreciate feedback, please comment below or feel free to connect with me through Facebook or Google+. I’ll do my best to answer questions and reply to comments.

    Post originally from: Digital Photography Tips.

    Check out our more Photography Tips at Photography Tips for Beginners, Portrait Photography Tips and Wedding Photography Tips.

    4 Uses for Lightroom’s Graduated Filter Tool


    Digital Photography School

  • 30 Examples of Amazing Shadow Art

    Making shadow puppets on the wall is something that we are all familiar with, but some people take it to a whole other level. But even beyond the shadow puppets and elaborate hand gestures lies another aspect of playing with shadows. A photographer knows the value of light and darkness, of shadow and depth. These examples show some amazing and Continue Reading

    The post 30 Examples of Amazing Shadow Art appeared first on Photodoto.


    Photodoto

  • 61 Amazing Kite Aerial Photography Images

    ZERO wind AutoKAP in Auyuituiq Park, Bafin Island

    Aerial Photography is something that many people would love to be able to do but find is out of their budget. One more affordable way to go about it is to try some Kite Aerial Photography (KAP).

    Hey batta batta!

    The 61 images in this post are all arial shots taken by strapping a camera to a kite to elevate it. It’s not something for the faint of heart as you are putting your camera at risk but the results can be pretty amazing in the right setting.

    Red Sea 1995

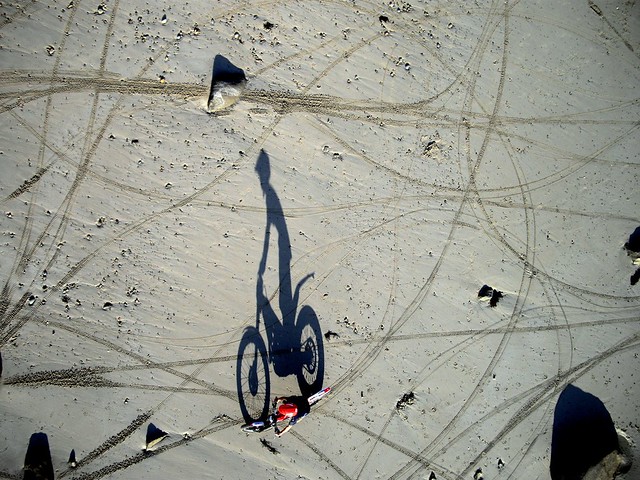
    KAP Trial Bikes @ Portinfer

    Getting up high with your camera attached to a kite gives a fresh perspective on a scene and can highlight patterns, textures and shadows that might not be evident to anyone at ground level.

    Aliens go to Braccagni I - R7573

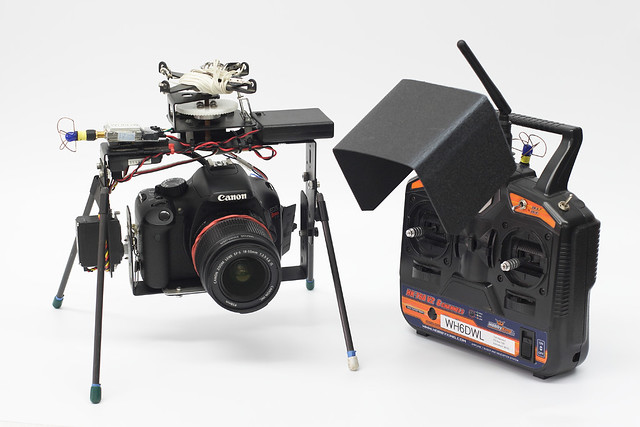
    Don’t just duct tape your camera to your kite though – most serious kite aerial photographers use purpose built rigging to get their shots like these:

    KAP Rig - July 2009

    KAP Rig as of 5 March, 2012

    There’s a heap of information on KAP online – Google it and you’ll be sure to find some great advice. Now back to some great Kite Aerial Photography images – Enjoy!

    Statue of Liberty 2009

    Untitled

    KAP of a hotel pool in Beberibe, CE, Brazil - 05

    Porto de Galinhas - Verde e Amarelo.

    Many Hondas!

    Stone fishing in Maupiti 15 of 16

    Le Mont Saint Michel (Manche-FR)

    Tom

    Autokap at the InterContinental Bora Bora Resort & Thalasso Spa Aug 03, 2008

    Coney Island Polar Bears usher in 2009

    wood national cemetery

    Power of Two

    Spinner-Dolphins-5680

    Phranang beach à Railay

    kites on ice

    Falcon Attacks (KAP Rig) @ The China Great Wall

    Reloj de arena 2 :)

    the chat

    KAP of a hotel pool in Beberibe, CE, Brazil - 03

    Lone Swimmer at Lido Beach, Florida

    Rice terraces, Sideman, Bali

    Mini golf overhead

    The Secret Life of Aliens

    Aliens go to Braccagni IV- R7929

    Children at Baltic Beach

    AutoKAP from the SV/Star Flyer

    MORNING_WALK

    Le Mont Saint Michel (Manche-FR)

    Champ de blé à Fontenailles (Calvados-FR)

    Durrat al Bahrain

    Ready to ride

    Hand Warmer

    4th of July, Jobos (img_6854+)

    Playa 2

    Umbrella Convention - Kite Over Avalon, NJ USA

    Choice seats

    strand puerto del carmen (6)

    Orthogonal - R4263

    Vazon Rakeart

    KAP 2012-10-14 Coney Island 13.19_20

    Campus panorama

    Phra Pha Daeng

    Kornkreis Edendorf

    KAP Trial Bikes @ Portinfer

    U.S. Pond Hockey Championships

    Piscine de Tipaerui

    Marken, buurtschap Rozewerf

    Full Crop Circle and String

    Checkered Flight

    Mont Saint Michel (Manche-FR)

    Waves III - R5839

    360° x 120° Panorama View of West Coast, Singapore

    Pineda de Mar 2

    The young woman and the beach

    boys on the barn

    combat

    Moisson à Maizières (Calvados-FR)

    Falaises d'Etretat (Seine Maritime-FR)

    Post originally from: Digital Photography Tips.

    Check out our more Photography Tips at Photography Tips for Beginners, Portrait Photography Tips and Wedding Photography Tips.

    61 Amazing Kite Aerial Photography Images


    Digital Photography School