Category: Photography

  • Studio Lighting Setups for Portrait Photography: Part II

    This is another in a series of articles on studio lighting that I put together with help from Karl Leopold at ImagesForever.net in Melbourne, Florida. Karl graciously opened his studio to me and patiently went through the basics of lighting a studio portrait. Last time we went over a fairly basic three-point lighting setup for studio photography and that was Continue Reading

    The post Studio Lighting Setups for Portrait Photography: Part II appeared first on Photodoto.


    Photodoto

  • On Assignment: Hiding Your Key with Fill

    I made this photo this past summer, and in revisiting it just learned two pretty important lessons: one a dumb luck success, one a total failure.

    Maybe take a moment to guess which is which before opening my psychological medicine cabinet to peek inside… Read more »
    Strobist

  • Master Professional HDR Photography

    Our friends at SLRLounge have released a 3-DVD guide, teaching you how to master professional HDR photography.

    • 13 Hours of Comprehensive Workshop Instruction
    • Create 25 professional HDR images using supplied RAW files
    • Master Bracketed HDR, In-Camera HDR, Single-Shot HDR, Panoramic HDR and more
    • 3 Photomatix Presets
    • Lightroom 4 Presets & Brushes

    You will also learn about using alternative software, like Aperture, Capture One, Nik HDR Efex and Photoshop

    The DVDs are in high definition at 720p, with software instruction at 1080p.

    As you can see, if you are looking to master HDR photography then this is the best educational resource around.

    The DVD set is selling for $ 149, but visit the HDR photography DVD page and click the discounts tab to see how you can save up to $ 30.

    dslrBlog

  • Showing Speed: Using Panning When Shooting Action

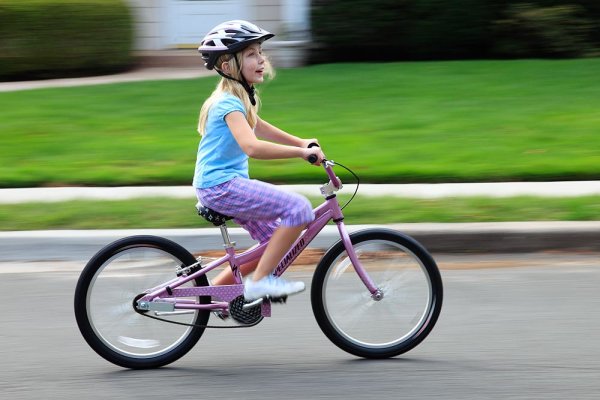
    Panning is a great way to capture children at play. Exposure is 1/15, f/13, ISO 100. Canon EOS 5D Mark II with EF 24-105 f/4L IS at 84mm.

    For the most part, photography is all about freezing a moment in time, stopping the action in front of you. But there are times when freezing the action fails to show the full story.  People move.  Often, at high speeds. Sometimes freezing the action fails to pay homage to the speed on display on the field, or the track.  Showing speed or motion is less important when shooting individual people in action, because a person in motion flexes muscles, contorts their expressions, creating a compelling image.  However, when photographing vehicles, such as in auto racing, the ability to show that speed is paramount.  If you use a fast shutter speed to stop the action, a car will simply appear as if it’s parked on the track.

    Panning is a simple technique for showing speed, but it requires some practice, and a willingness to experiement a little.  First of all, you’ll want to slow your shutter speed way down.  Easy enough in poor light, but on a bright sunny day, it becomes a problem.  There are a few ways to handle this.  First off, lower the ISO on your camera to ISO 100.  For panning, I like to set the camera to Shutter Priority mode.  This allows me to choose the shutter speed I want, and the camera will then set the proper aperture.If stopping down the aperture and lowering the ISO still don’t give you a slow enough shutter speed,  try using a polarizing filter on the lens. A polarizer will lower your exposure by two stops.  Another option would be a neutral density filter, which can be found in greater than 2-stop densities when necessary.

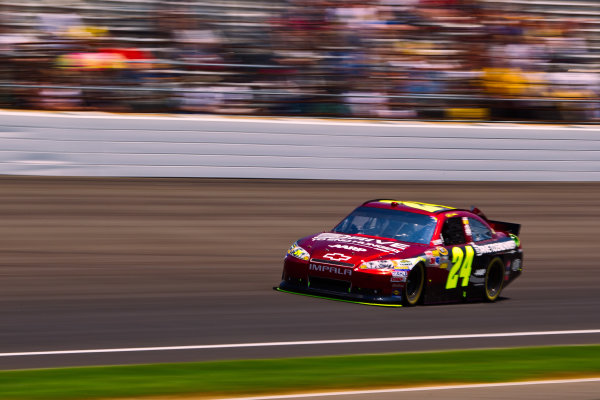
    A wide angle lens requires a slower shutter speed to create a dramatic panning effect, but with cars moving as fast as those at a NASCAR race, it doesn't have to be THAT slow! Exposure: 1/40, f/22, ISO 100. EOS 5D Mark II, EF 16-35L II at 35mm.

    Your shutter speed will vary dependent on the subject and the speed at which it moves. For an athlete running, it could be as low as 1/15 or 1/20.  When shooting auto racing, your shutter speed could be as fast as 1/125.  The slower the shutter speed, the greater the illusion of speed will be.  You’ll have to match the speed of your subject with your speed of panning the camera as the subject passes.  This can take some practice. The best way to practice that I’ve found is to stand on the sidewalk of a busy street and photograph passing cars at various speeds.  Set your drive to Continuous shooting and hold the shutter button down to take several exposures of your subject as it passes.

    It takes some practice, but try to pay attention to composition when positioning the subject in the frame.  When panning, it becomes very easy to focus solely on keeping pace with the subject, to the point that you end up simply placing it in the center of the frame.  Use the compositional aids in your camera to help you.  If your camera has a grid focusing screen, use that. If not, use the AF points that are etched in the viewfinder.

    Lens choice also impacts the way the pan looks.  A telephoto lens that compresses perspective will create more dramatic effect than a wide angle will, which means the wide angle lens will require a longer shutter speed to create the same effect as a telephoto. Experiment a bit with both to create different effects.

    Add panning to your action repertoire for a different take on motion in your photos!

    Exposure: 1/60, f/16, ISO 100. EOS-1D Mark IV, EF 100-400mm f/4-5.6L IS at 210mm.

    Post originally from: Digital Photography Tips.

    Check out our more Photography Tips at Photography Tips for Beginners, Portrait Photography Tips and Wedding Photography Tips.

    Showing Speed: Using Panning When Shooting Action


    Digital Photography School

  • 3 Minutes with Photographer John Lund

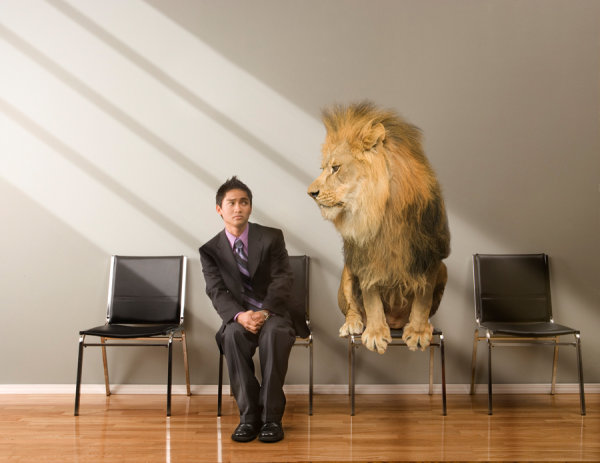
    Photoshop is both loved and hated in the photography world. Too much Photoshop can unleash the fury of the masses, but just the right amount can trigger inspiration, awe, laughter, and a variety of other emotions that make for a great viewing experience. One photographer who has made a career of balancing his photography and photoshop skills is John Lund who is today’s guest on “3 Minutes with…”

    1. Describe your photography in 100 words or less.
    I started out trying to be a writer, but when I did a job for Yachting magazine back in 1976, they paid me $ 200.00 for the writing and $ 2000.00 for the photography. I switched. Then, in 1990, this thing called Photoshop came along. Instead of paying my taxes I bought an Apple computer and traded Adobe some photos for their new program. The rest, as they say, is history! I quickly concluded that Photoshop eliminated the barriers between imagination and execution…I could now create whatever I could dream up. Today, twenty plus years later, I am still blown away by what can be done with digital imaging.

    2. What gear/software do you use?
    I use Canon cameras, Apple computers and Profoto and Speedotron lights.  The most challenging part of creating composites, at least for me, is getting the photography right. It helps to have the right equipment to get the parts you need. I’d rather use the power of Photoshop to create rather than “fix”.

    3. What’s one quick tip that you’d give people interested in animal portrait photography?
    In the kind of work that I do it is critical to be able to visualize your image. Once you have a clear vision you can break the image down into parts and steps. Then it is just a matter of doing it.  One of my biggest challenges is constantly adding images to my library for use in images that I haven’t dreamed up yet!

    4. What 3 Photography Sites or Photo blogs do you recommend?
    Sites like oneeyeland.com and 500px.com inspire me with all the breathtaking work that other photographers are doing, and Photoshelter is great for the nuts and bolts of making a career flourish in the Internet age.

    To view more of John’s photography visit his web site:
    JohnLund.com and blog.johnlund.com or follow John on Twitter & Google+

    Post originally from: Digital Photography Tips.

    Check out our more Photography Tips at Photography Tips for Beginners, Portrait Photography Tips and Wedding Photography Tips.

    3 Minutes with Photographer John Lund


    Digital Photography School

  • Include Clouds In Your Landscapes

    Generally speaking, we all love a sunny day. No too hot. Not a cloud in the sky.

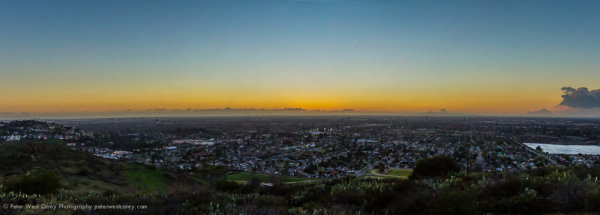
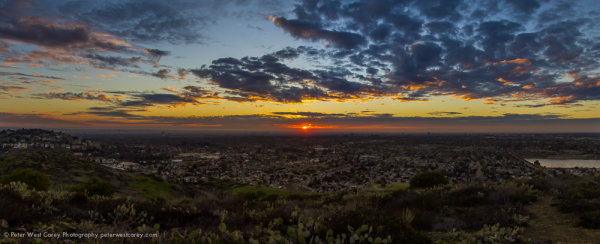
    By photographically speaking, clouds can be your best friend. They can add drama. But more importantly, they are often an important photographic element to help balance an image. To show you what I mean, take a look at these two photos taken from roughly the same spot in sunny Orange County, California.

    Now, I’ll grant you the argument that the second is more dramatic because of the sunset, but that element aside, can you see how the feel of the image changes when clouds are introduced? The background of the sky is nearly the same, with strong yellows at the horizon transitioning up to deeper blues in both images.

    This viewpoint is near my home and I go there often to watch the sunset. On the days with no or very few clouds, the sunset is still impressive. But on the evenings when clouds abound, especially at a variety of altitudes and forms, the sky brings more drama and gives a better show. And that translates to a better photograph.

    When you have a favorite subject or location close to where you live, be sure to visit it often when there are even small shifts in the cloud patterns. The results might amaze you.

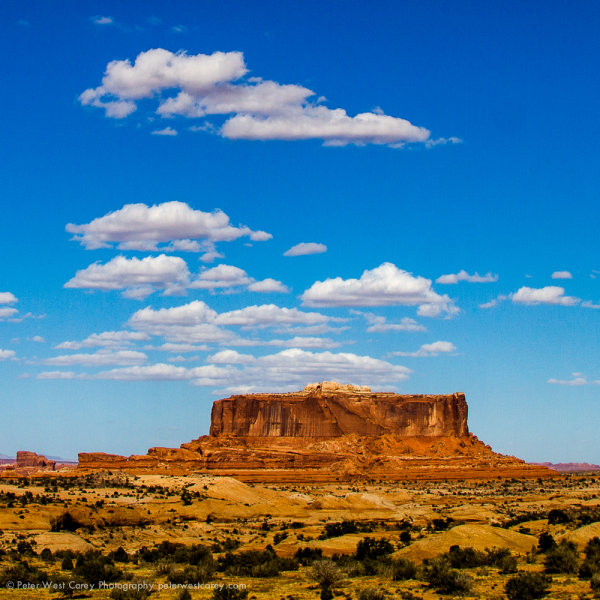
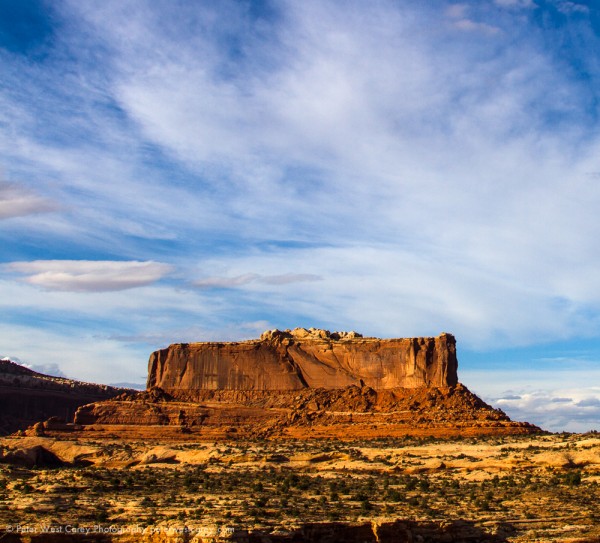
    Not only should you add some clouds, it’s also important to know how the clouds affect the mood of your photo. Here are two more photos, this time from outside Canyonlands National Park near Moab, Utah, of Merrimac Butte. Again, the angle is slightly different and so is the time of day, but both shots were taken on successive days at 2PM and 4PM respectively.

    It’s the mistake of beginning photographers to think their one shot of Yosemite or New York or anywhere with a sky is the “one” shot. That’s the wonderful thing about photography and this planet; weather and clouds play a big part in the mood in an image.If the clouds aren’t they way you want them, wait five minutes, an hour, a day or even a season to find the right mood for your image.


    Post originally from: Digital Photography Tips.

    Check out our more Photography Tips at Photography Tips for Beginners, Portrait Photography Tips and Wedding Photography Tips.

    Include Clouds In Your Landscapes


    Digital Photography School

  • Create a Warm, Sunset Mood Image in Lightroom 4

    Introduction

    This tutorial is a demonstration of the SLR Lounge Lightroom 4 Preset System. With over 200 presets, the LR4 Preset System has been critically acclaimed as the most powerful and intuitive preset system available for Lightroom 4. DPS users can get 10% off by using the DPS10 coupon code upon checkout. Click the link above to learn more/purchase.

    Overview

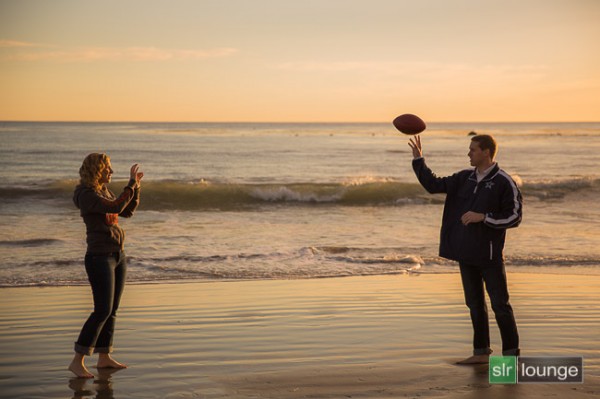
    In this Lightroom 4 tutorial, we will show you how to create a warm, sunset-toned look in Lightroom 4. It is a great look that can be applied to a late afternoon outdoor images. I particularly dig this look on shots like this one at the beach. We will also correct for uneven exposure across the image that is caused by the directional lighting of the sun.

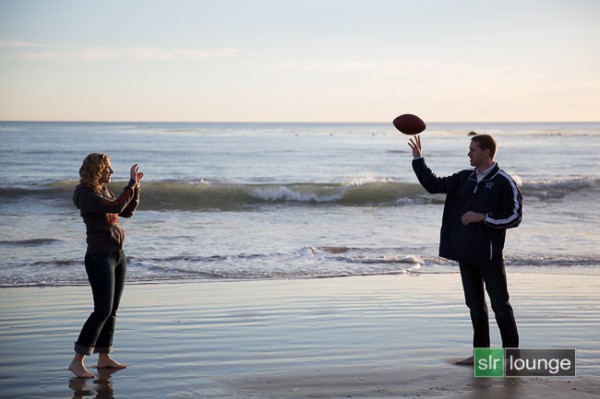
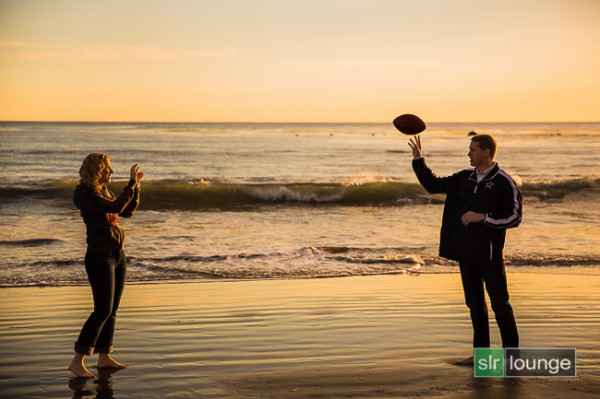
    Before and After Image

    Before
    After
    Lightroom 4 Preset System Mixology

    If you own the SLR Lounge Lightroom 4 Preset System, this effect can be achieved in 3 clicks as shown below. If you don’t own the preset system, please skip to Step 1 to learn how to do it manually.

    Lightroom 4 Presets

    00 MY MIXOLOGY – 10 SOFT PORTRAITS > 16 SP HDR Light
    01 BASE ADJUST – 00 EXPOSURE > 04 Darken -0.5
    01 BASE ADJUST – 40 SHADOWS BLACKS > 42 Heavy Brighten (+30, +60)

    Warm up Temperature and increase the Magenta in Tint to your liking. To see all the tweaks and adjustments applied, please continue on.

    Step 1. Applying our Basic Adjustments

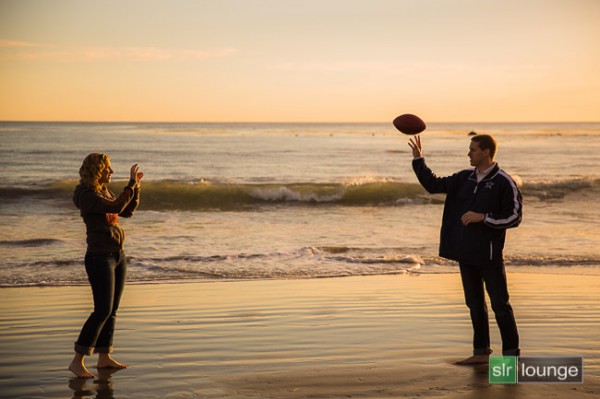
    This image from a recent engagement session was shot around 4pm late in December on one of our many SoCal beaches ;) . Although it was late afternoon, there were not a lot warm tones in the atmosphere, and the photo lacked dynamic range.

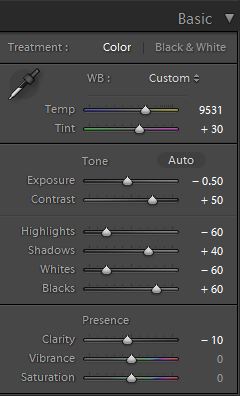
    So in the Basic Adjustment Panel, let’s warm up the image by raising the Temperature to between 8000K to 10,000K. Additionally, we want to add some Magenta Tint in order to keep the image from looking too green. Without the pink/red tones that will be added from boosting Magenta tones, we end up with an image lacking the rich warmth we desire. This is the one of the advantages of shooting in RAW, you can change the color temperature of the image at will.

    The background environment is also a little too bright and flat, and since we want a moodier shot, let’s lower the exposure by -0.50 stop and increase contrast by +50.

    Next, let’s expand the dynamic range of the image by decreasing the Highlights and Whites by -60 while lifting the Shadows and Blacks by +40 and +60 respectively.

    Finally, bring down the Clarity by -10. We will reintroduce Clarity with an adjustment brush to everything but the couple’s face, hair, hand, and feet.

    The Basic Adjustment Panel and the image should look similar to below.
    Step 2. Adding Additional Contrast via Curves

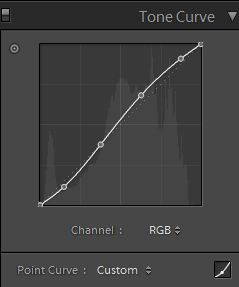
    In addition to adding Contrast in the Basic Panel, let’s add a slight contrast-boosting “S” curve that pulls down the shadows a bit and boosts the highlights up a bit.
    Step 3. Sharpening and Noise Reduction

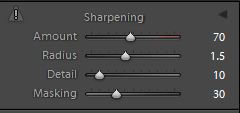
    Normally, if you are using the SLR Lounge Preset System, standard Sharpening amounts are automatically applied. Here is what we typically apply to our image:
    03b Sharpening

    Because we boosted the dynamic range and pulled up the shadows, we do need to apply some Noise Reduction. We use this setting for Noise Reduction:
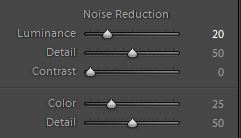
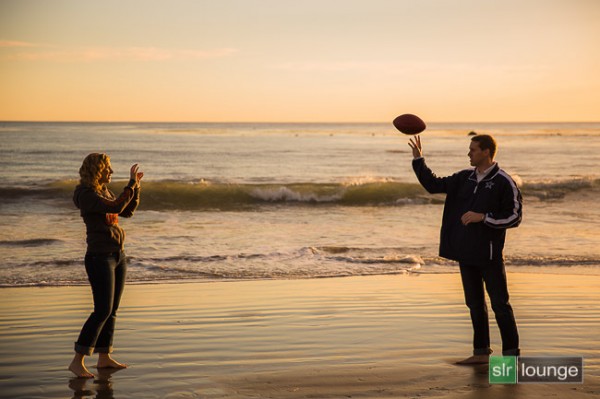
    03c Noise Reduction

    03 Sharpening and Noise Reduction

    Step 4. Opening up the Borders with Vignetting

    Finally, the brightness is not that even along the edges of the frame, so let’s add some Lens Vignetting at +30 Amount and +30 Midpoint to even out edge-to-edge brightness.
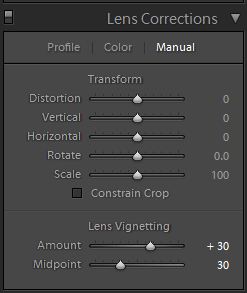
    04b Lens Correction

    Here is how your image should look like after applying all of these adjustments.
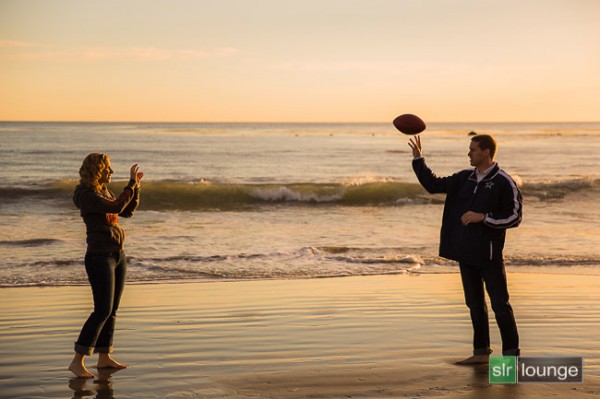
    04 Lens Correction

    That is it for the global adjustments, we are now going to use the adjustment brushes and graduated filter to add more clarity and contrast to the environment, as well as work on evening out the overall exposure.

    Step 5. Using Adjustment Brushes for the Sky and the Ground

    In the Lightroom 4 Preset System, there is an adjustment brush called the “Sky | Cloud | Ocean” that we apply to the sky, cloud, and ocean. The purpose of this brush is to increase the contrast and clarity. Additionally, this adjustment brush also increases saturation.

    Here are the settings for this adjustment brush:
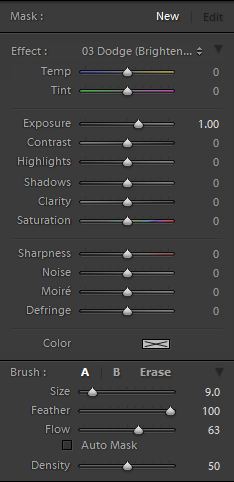
    05b Sky Cloud Ocean from SLR Lounge Lightroom 4 Preset System

    We want to apply this brush to the entire scene except for the couple’s exposed skin. The quickest way to accomplish this is to fill the entire scene with the brush, then use Erase brush at the bottom of the Brush Panel to remove the effect from their face, hair, hands, and feet.

    Hold Alt (Opt on OSX) while in the active brush to switch to the Erase brush.

    Because there is a lot of contrast between the subjects and their surroundings, you can use the Auto Mask to allow Lightroom to mask around the individuals.

    To make it easier to see what part of the image is being affected by the adjustment brush, press “O” on the keyboard to toggle the Mask Overlay. The adjustment brush is applied on any part of the image that is overlaid in red.
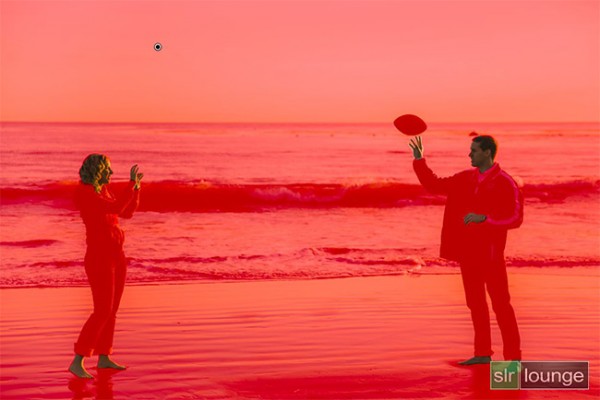
    05c Adjustment-Brush

    Once you are finished applying this adjustment brush, press “O” again to hide the overlay. Your image should have a punchier look that similar to the deep shadows of the setting sun.
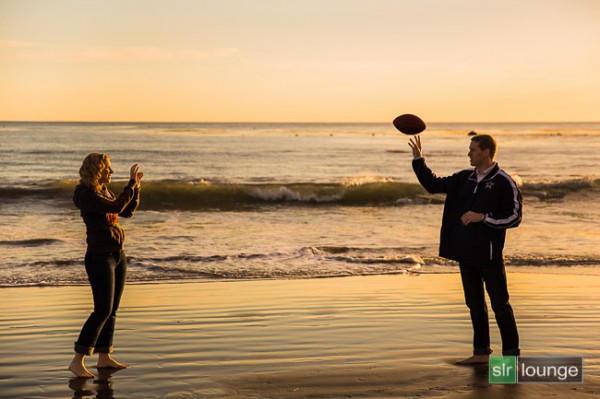
    05 Adjustment Brush

    Step 6. Using an Graduated Filter to Even Out Exposure on Left Side

    At 4pm, the winter sun had already started its decent to the horizon, which meant that light was beginning to fade quickly. Because the sun is lighting the scene from the far right, the left side of the image was a tad underexposed in comparison to the right side. We want to correct for this subtly, so we will be using a Graduated Filter to slightly brighten the left side of the frame.

    One final adjustment I would like to make to this image is just to remove the rock in the water that is just behind and above the male subjects head. But, given the size and position of the rock, this will best be done in Photoshop.
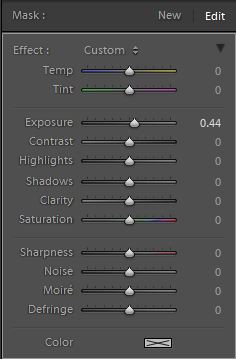
    06b Graduated Filter

    Final Before and After Images

    Finally, here are the before and after images comparing the original image to the new image with the warm, sunset mood look.

    Original

    Warm, Sunset Mood Image

    The Lightroom 4 Preset System

    The SLR Lounge Lightroom 4 Preset System is designed to enable users to achieve virtually any look and effect within 3-5 simple clicks. From basic color correction, vintage fades, black & white effects, tilt-shift effects, faux HDR, retouching, detail enhancing, and so much more. The sky is the limit with what has been dubbed the most powerful and intuitive preset system available. Click the link above to learn more/purchase.

    You can also purchase the LR4 Preset System as part of the 30 hour 3 DVD Lightroom 4 Workshop Collection set, containing every bit of education and tools needed to run a Lightroom 4 based photography studio.

    Post originally from: Digital Photography Tips.

    Check out our more Photography Tips at Photography Tips for Beginners, Portrait Photography Tips and Wedding Photography Tips.

    Create a Warm, Sunset Mood Image in Lightroom 4


    Digital Photography School

  • Can You Take Great Photos With An Inexpensive Digital Camera?

    There’s a myth out there, in the real world, that says “to take great photos, you have to have a great (read expensive) camera”. This has been a subject of debate for years amongst the gear heads and elitists in the world of photography. The bottom line: it’s simply not true. Anyone, anywhere, can make solid photos with just about Continue Reading

    The post Can You Take Great Photos With An Inexpensive Digital Camera? appeared first on Photodoto.


    Photodoto

  • How to Shoot Really Big Panoramas

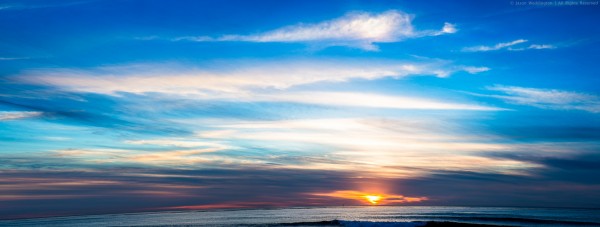
    The image below is a stitched panorama comprised of 7 separate frames, stitched together in Photoshop CS6, using the Photomerge feature. The full sized finished image weighs in at 85 megapixels. In this article I will share some tips for creating your own stitched panoramas.

    stitched panorama

    Sunset Cliff, San Diego, CA – 1/160, f/5.0, ISO 125, 70mm (Canon 5DmkIII, EF24-70mm f/2.8L USM)

    Shooting your Photos

    The first step in creating a stitched panorama with Photomerge is to shoot suitable images. Keep these points in mind:

    • Overlap the images – according to Adobe, the images should overlap by at least 40%, but no more than 70%. Outside of this range, Photomerge may not be able to align the files correctly.
    • Keep your settings constant – you need to keep focal length, focus point, and exposure constant throughout the series of images so that you can combine them later. The easiest way that I’ve found to do this is to take one shot on P, look at the camera settings, and then dial those settings in on manual mode. I also focus on a suitable object about 1/3 of the way into the scene, and then change the camera to manual focus so that the focus will be constant.
    • Shoot vertical – this is a little counter-intuitive since we’re making panoramas. It’s usually best to shoot vertical (portrait orientation). Since you’ll merge multiple frames together later to get as wide as you need, shooting vertical will give you a taller overall panorama. Also, you’ll need some of this vertical space for cropping. More on cropping later.

    Preparing your Files

    The next step in the process is to prepare your files for Photomerge. This is actually optional. If you shoot JPEG and you’re happy with your images straight out of the camera you can go directly to Photomerge in Photoshop. If you shoot RAW, process your RAW images in whatever program you use, and export full size TIFF or PSD files to a temporary location on your computer so you can open them from Photomerge.

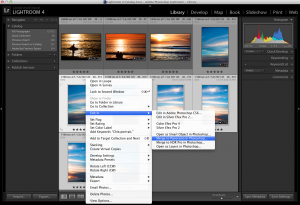
    Lightroom users: If you process your RAW images in Lightroom, you don’t have to export to disk, because you can send your files straight to Photomerge from Lr.
    1. Select the files
    2. Right-click and choose “Merge to Panorama in Photoshop…”

    from Lightroom to Photomerge

    Sending files straight to Photomerge from within Lightroom

    Merging your Panorama with Photomerge

    The next step is to open your images in Photomerge from within Photoshop, and stitch together your Panorama.

    (Lightroom Users: if you jumped to Photomerge straight from Lr, skip to step 4 below)

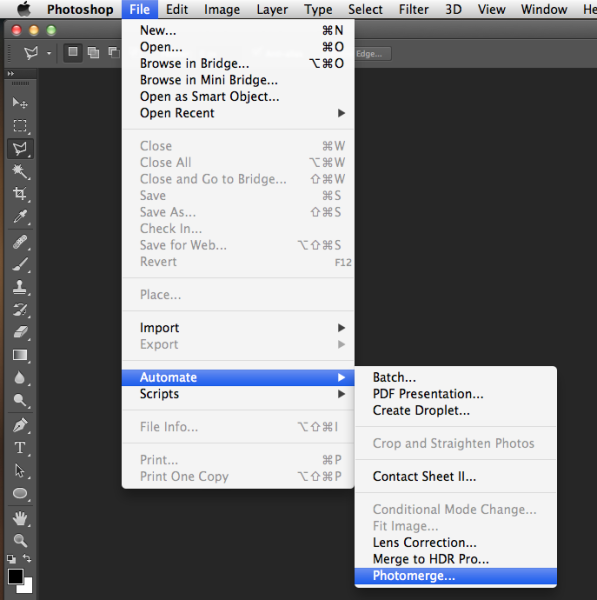
    1. From the file menu, chose Automate > Photomerge

    Launching Photomerge

    Launching Photomerge within Photoshop CS6

    2. Click “Browse” and navigate to the files you exported to a temporary folder in your drive.

    Browse for files

    Browse to the location where your files are located

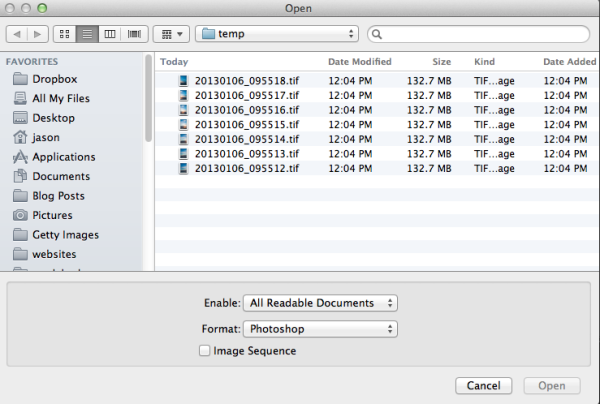
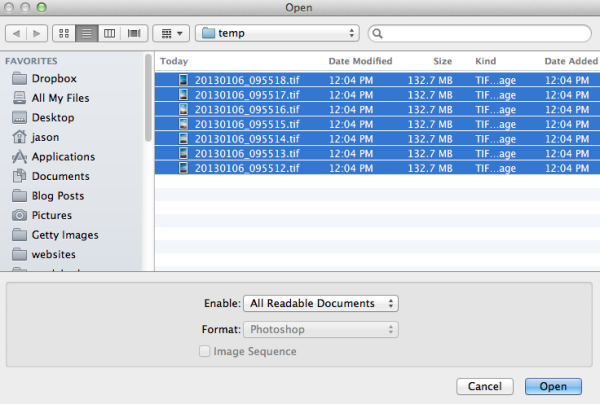
    3. Select all of the files and click “Open.”

    Select all files

    Select all files

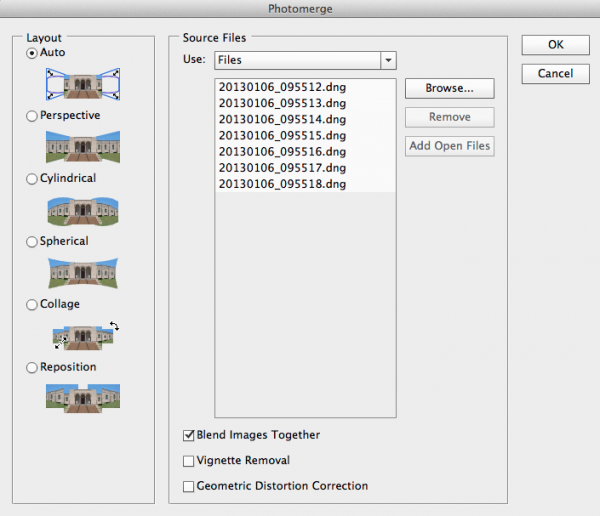
    There are several options under “Layout” on the left side of the Photomerge dialogue box, but I’ve had good success with Auto. For a detailed explanation of each of the options, check out the Adobe Help article here.

    Photomerge dialogue

    Photomerge dialogue

    If you noticed any vignetting or distortion in your source images, select the options to correct that during the Photomerge process. Personally I don’t use these two options, as I’ve noticed they slow down the Photomerge process exponentially. Instead I prepare my images in Lightroom and apply Lens Correction in Lr before sending my images to Photomerge. However these features are there if you need them.

    Photomerge options

    Photomerge options

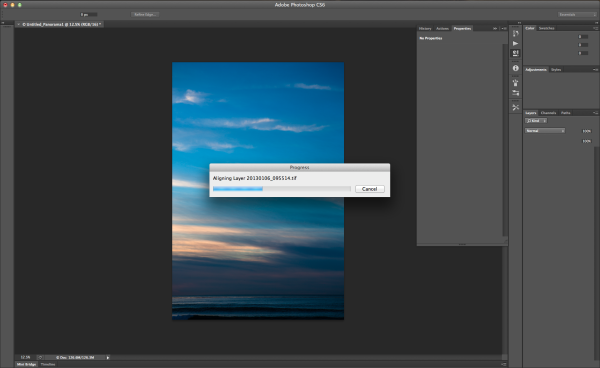
    4. Click OK and wait for Photomerge to complete.

    Photomerge working

    Photomerge working

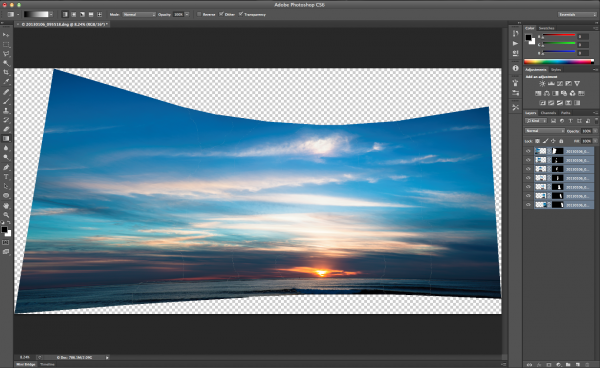
    5. When Photomerge finishes its magic, you will have a single panorama with each image in a separate layer. Zoom to 100% and check the seams between the images. If everything looks OK, flatten by navigating to the Layers menu and selecting “Flatten Image.”

    Panorama in separate layers

    Panorama in separate layers

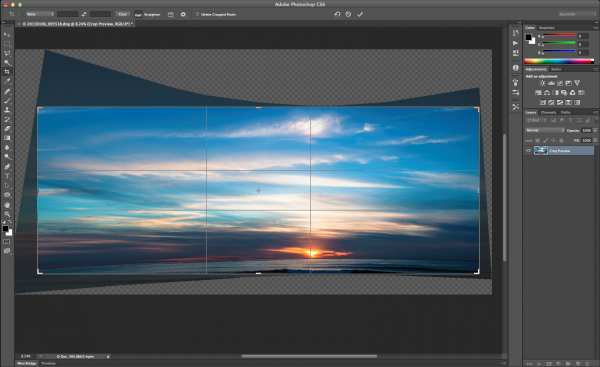
    6. Crop a rectangular composition from the center of your stitched panorama. This is where shooting in portrait mode really helps. There is a more vertical height to the photo and therefore more space available for cropping.

    Cropping your Panorama

    Cropping your Panorama

    Conclusion

    The Photomerge feature in Photoshop makes stitching Panoramas easy. For me, the hardest part is remembering to take advantage of this feature by shooting images when I’m out an about that I can later stitch together into a panorama. Next time you’re out shooting and the you can’t figure out how to fit the scene into your lens, try shooting multiple frames and stitching together a panorama when you get back to your computer.

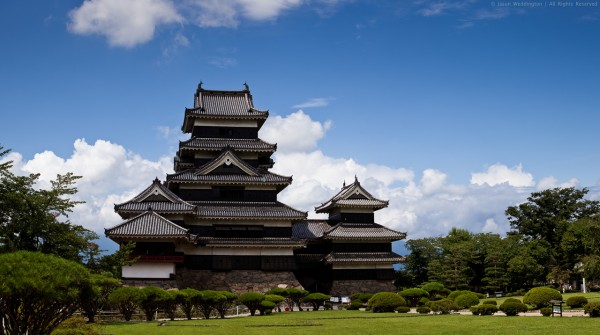
    Matsumoto Castle

    7-frame stitched panorama of Matsumoto Castle. Matsumoto City, Nagano Prefecture, Japan – 1/500, f/7.1, ISO 100, 70mm (Canon 5DmkII, EF70-200mm f/2.8L IS USM)

    I appreciate feedback, please comment below or feel free to connect with me through Facebook or Google+. I’ll do my best to answer questions and reply to comments.

    Post originally from: Digital Photography Tips.

    Check out our more Photography Tips at Photography Tips for Beginners, Portrait Photography Tips and Wedding Photography Tips.

    How to Shoot Really Big Panoramas


    Digital Photography School
  • Meet The Photographers Who Write For Digital Photography School ~ Valerie Jardin

    You’ve been reading their articles for months or years, have you ever wondered “Who are the photographers who write for DPS”? We thought it would be a good time to introduce them to you through a series of interviews. No worries, Darren will get his turn too.

    Today meet Valerie Jardin, born and raised in France and currently living in Minnesota, USA.

    1. How long have you been shooting?

    I picked up my first DSLR about 15 years ago. It wasn’t a life-long hobby like many other photographers. It has since become a true passion, almost an obsession!

    2. Do you have a full time job or are you a full time photographer?

    Valerie Jardin – Photographer, Instructor

    I am a full time photographer. I shoot mostly interiors for commercial clients, some food as well as lifestyle portraits. Most of my time and energy is now devoted to leading international photo workshops. Sharing the passion for this beautiful craft and teaching people to see is the most gratifying experience.

    3. If you had to limit yourself to one genre of photography, what would it be and why?

    I would have to pick street photography but more in the travel sense of the term. Including people in my frame to add life and a sense of place to my images. The quest for the story in a single frame is as exciting as the resulting image itself. I can spend days walking the street of any large city without tiring as long as I have my camera with me.

    4. When did you start writing for DPS and why?

    I started writing for DPS in 2010. I think it’s the teacher in me that drove me to writing articles to help other photographers learn from my mistakes and successes. My articles are all inspired by my own experiences. I love helping others and we are so lucky to be part of such a great global community of photographers from all walks of life.

    5. What do you shoot with and what’s your favorite lens?

    I shoot with a Canon 5D Mark II and my favorite lens is the 24-70mm f/2.8. Yet, I find myself traveling light and shooting mostly with the 40mm pancake lens when working on self projects or shooting street photography. I love that lens, it’s sharp and inconspicuous!

    6. What would be your number one tip to any new photographer?

    Go out with your camera as often as possible, everyday if you can. Shoot with intent and make every frame count.

    7. What’s your next big project?

    I am adding new photography workshops every year. I am running two workshops in Paris and two on the beautiful Normandy coast in France in 2013, those are all inclusive week-long workshops. I also offer weekend workshops in the US, San Diego in March and Minneapolis in June. I am also excited to announce a workshop in Melbourne, Australia to take place in February 2014! Ultimately for me it’s all about teaching and sharing my passion for this beautiful craft and hanging out with other photographers.

    8. Where can people go to find out more about you and your work?

    They can visit my website to see my commercial photography as well as my personal work. It also has links to everything such as my blog, my workshops, and social media platforms. I’m the most active on my Facebook page.

    I would like to thank Valerie for her contributions to the photography community through her writing on DPS and also for starting this round of interviews. We hope you come away from these short interviews with a better idea of who is writing for DPS. Please let us know how we are doing.

    Post originally from: Digital Photography Tips.

    Check out our more Photography Tips at Photography Tips for Beginners, Portrait Photography Tips and Wedding Photography Tips.

    Meet The Photographers Who Write For Digital Photography School ~ Valerie Jardin


    Digital Photography School