Category: Photography

  • How to Fix Timestamp Issues on Multi-Camera Shoots

    Introduction

    This tutorial has been transcribed from the SLR Lounge Lightroom 4 Workshop on DVD, a 14 hour Lightroom 4 A – Z guide with over 130 tutorials for mastering Lightroom from start to finish. The Digital download can be purchased from SLR Lounge while the physical copy is available through Amazon Prime.

    Overview

    Having multiple shooters at an event is beneficial because it allows the event to be captured at different angles. One shooter might catch something significant that another shooter missed; therefore, it is always good to have an extra pair of eyes while shooting a big event. However, having multiple shooters means multiple cameras and it is important that the timestamps in all the cameras used at the event are synced to one another. This will save you a lot of time in post-production when you have to cull and edit your images because the images from all the shooters will be organized together. You will be able to see the same scene shot at different angles, which can help you select the best image for each particular scene.

    But sometimes you might forget to have all the shooters sync up their cameras to one another prior to shooting. Trying to cull a multi-camera shoot with improper timestamp syncing will waste boatloads of time. But luckily, this time sync issue can be quickly fixed in Lightroom 4. This easy tutorial will show you how to correct the timestamps between multiple cameras so that you can have a quicker post-production workflow.

    Step 1: Identify the Lead Camera

    Bring up the Library filter by hitting “backslash” on your keyboard. Generally, the lead camera will be the one with the most images. However, once in a while, you might have a second shooter who takes more images than the lead shooter. You want to sync all other cameras to the timestamp in the lead camera. It is also important to filter by the Camera Serial Number so same-model cameras will not be grouped together. To select this category, click on the drop-down menu from one of categories in the Library filter and select “Camera Serial Number” as shown below.
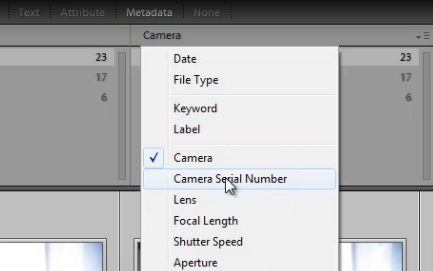
    Camera Serial Number

    Step 2: Identify the Moment to be Used for Synchronization

    Select the lead camera as I have done so below. To keep this tutorial simple, we have eliminated all but 23 images from the catalog. Most wedding catalogs will have thousands of images, but we don’t want to spend all our time hunting down images between cameras. So, while we are doing this demonstration with a small sample set of images, the same techniques apply, regardless of the size of the shoot.
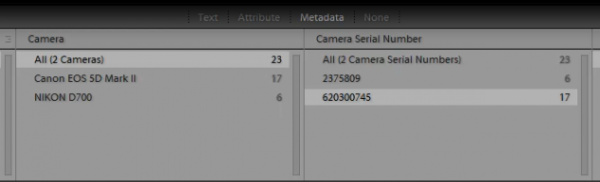
    Selecting Lead Camera
    Find a moment of the day that all shooters will have shot and preferably one that is easily recognizable as well. For example, the first kiss would be an important moment that all cameras should have shot and one that is easily recognizable. As you can see from the image below, I have selected the lead shooter’s shot of the couple’s first kiss. Switch to the Loop View of this image by double-clicking on it or by hitting “E.”
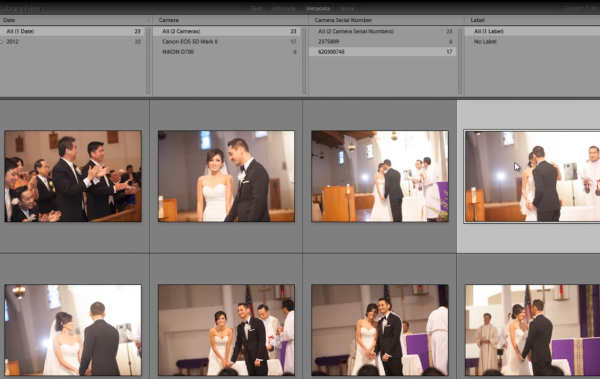
    First Kiss

    Step 3: Write Down the Timestamp Information

    Once in the Loop View, write down what time the shot was taken. The information should be at the top left of the image you have selected. If not, hit “I” until that timestamp is displayed. In my example, the shot was taken at 11:46:09 AM in the lead camera.
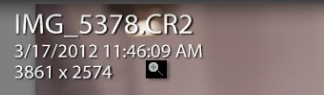
    Timestamp

    Step 4: Identify the Same Moment in the Other Cameras

    Go back to the Grid View by hitting “G.” Select your second camera in the Library filter, like I have done so below. Make sure no other filter is turned on so that all your images from any additional cameras appear.
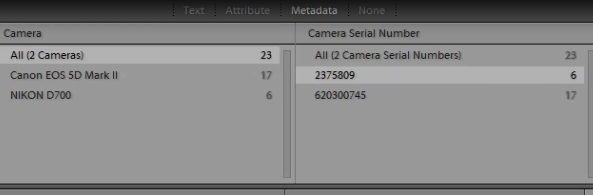
    Selecting Second Camera
    Select the image shot at the same moment as the one that we selected from our lead camera. Once you have that image selected, hit “Ctrl + A” on your keyboard to select all the images from the second camera. The first image that you selected is highlighted indicating that it is our key image as shown below.
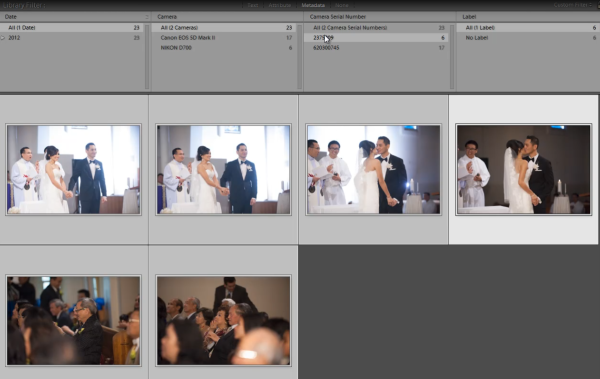
    All Images - Second Shooter

    Step 5: Edit the Capture Time

    Now that we have selected all of the images from our secondary camera with our “moment image” selected as the key image in this selection, we are ready to change the timestamp. To do so, click the “Metadata” menu at the top of the screen (make sure you are in the Library Module) and click on “Edit Capture Time.”
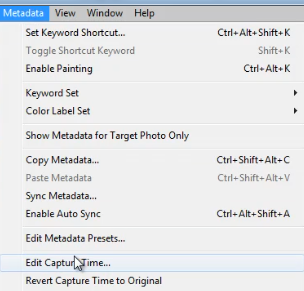
    Edit Capture Time
    Type in the exact time that you wrote down from the same moment on the lead camera (11:46:09 AM in our example). Make sure you write your timestamp in correctly because this change cannot be undone; it can only be changed again. When you are done, click on “Change All.”
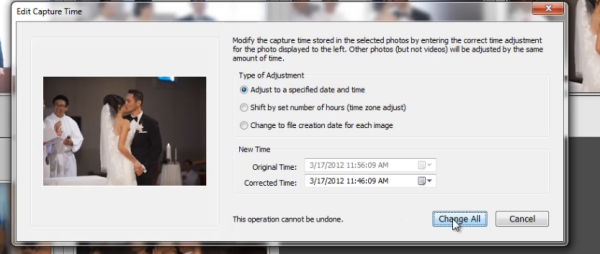
    Changing Timestamp
    Clicking “Change All” will adjust all images prior to the key moment, as well as after the key moment respectively. To check whether you changed the timestamps correctly, make sure all of your filters are off by selecting “None” next to “Metadata” in the Library filter. If you changed the timestamps correctly, your images should all line up chronologically. As you can see, I now have all my images from both angles lined up in order, as shown below.
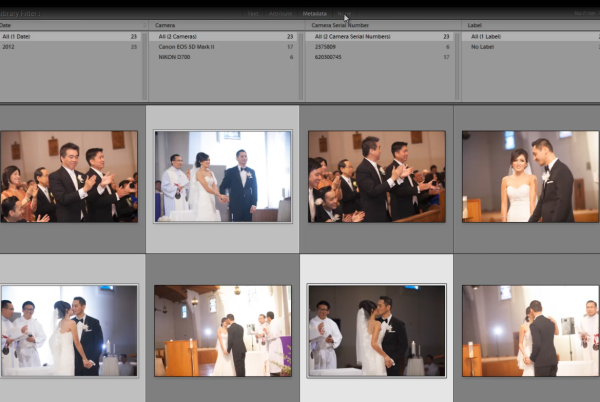
    Conclusion

    Once again, it is always best to sync your timestamps in your camera with all other shooters prior to the event. However, if you forget to do so, use this tutorial to fix your timestamp synchronization in Lightroom.

    Learn More with the Lightroom 4 Workshop Collection!

    This was a sample tutorial from the Lightroom 4 A to Z DVD which is one of the DVDs in the Lightroom 4 Workshop Collection. A collection of nearly 30 hours of video education teaching everything from Lightroom basics to advanced raw processing techniques.

    The LR4 Workshop Collection also includes the critically acclaimed Lightroom 4 Preset System which is designed to enable users to achieve virtually any look and effect within 3-5 simple clicks. From basic color correction, vintage fades, black & white effects, tilt-shift effects, faux HDR, retouching, detail enhancing, and so much more. Click the links above to learn more.

    Post originally from: Digital Photography Tips.

    Check out our more Photography Tips at Photography Tips for Beginners, Portrait Photography Tips and Wedding Photography Tips.

    How to Fix Timestamp Issues on Multi-Camera Shoots

    Digital Photography School

  • Quickly toggle Ai Servo Focus on the Canon 5D Mark III

    Here’s a quick tip for Canon 5D MkIII users.

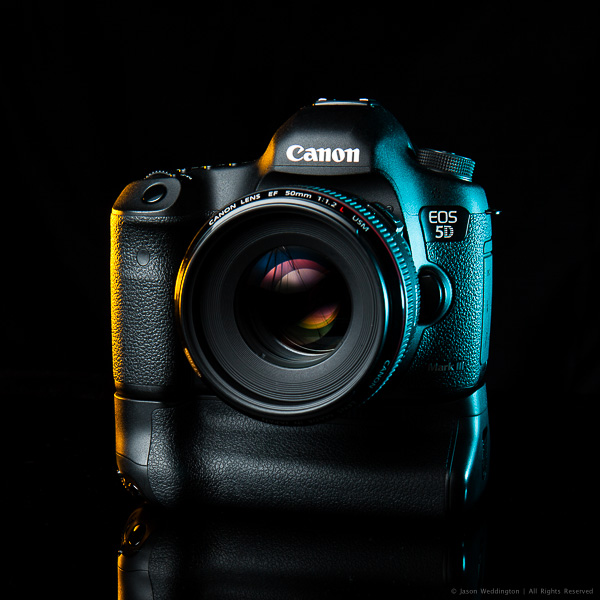
    Canon EOS 5D MkIII with EF 50mm f/1.2L

    Canon EOS 5D MkIII with EF 50mm f/1.2L

    If you don’t use this camera, this tip probably isn’t very helpful for you. Instead you might be interested to read about how I shot the above photo. Also, I recommend skimming through your camera manual to see what customizations are available. Customizing your camera’s button configuration can help taylor the camera to your shooting style.

    With the 5D Mark III, Canon added the ability for users to change the function of several of the buttons on the camera body. In addition to this new functionality, Canon also moved the Depth of Field (DoF) preview button. It’s now on the left side of the lens, in approximately the 8 o’clock position, as you look at the camera’s front.

    The new location of the DoF preview button and the ability to assign different functions to the standard buttons brings an interesting new shooting option. As I rarely use the DoF Preview Button, I’ve changed it’s function to toggle Ai Servo Focus when held down. To re-assign the DoF Preview Button to toggle Ai Servo focus mode on the 5D MkIII follow these steps:

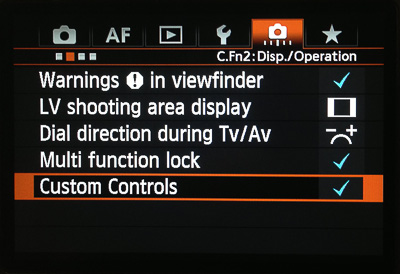
    1. Navigate to menu C.Fn2:Disp/Operation

    Step 1

    Step 1

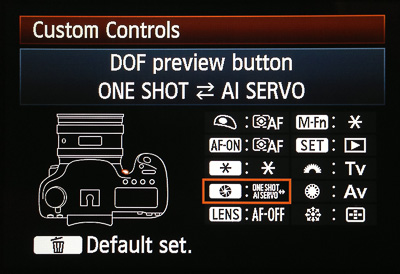
    2. Select the DoF Preview Button from the list of buttons

    Step 2

    Step 2

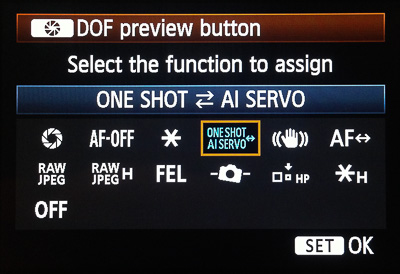
    3. Change the button’s function to ONE SHOT AI SERVO

    Step 3

    Step 3

    This customization allows me to stay in Single Shot AF mode, and toggle Ai Servo focus with my right ring finger if my subject starts moving. This is an incredibly flexible way to handle moving subjects and I like being able to toggle between two AF modes without moving the camera from my eye.

    Give this a try and let me know how you like it. It took me a couple weeks to train myself to use my ring finger to toggle Ai Servo, but now that I’m used to it, I love shooting this way. As always, you can find me on Facebook.

    Post originally from: Digital Photography Tips.

    Check out our more Photography Tips at Photography Tips for Beginners, Portrait Photography Tips and Wedding Photography Tips.

    Quickly toggle Ai Servo Focus on the Canon 5D Mark III


    Digital Photography School

  • Meet The Photographers Who Write For Digital Photography School ~ Rick Berk

    You’ve been reading their articles for months or years. Have you ever wondered: “Who are the photographers who write for dPS”? Today meet New York State photographer Rick Berk.

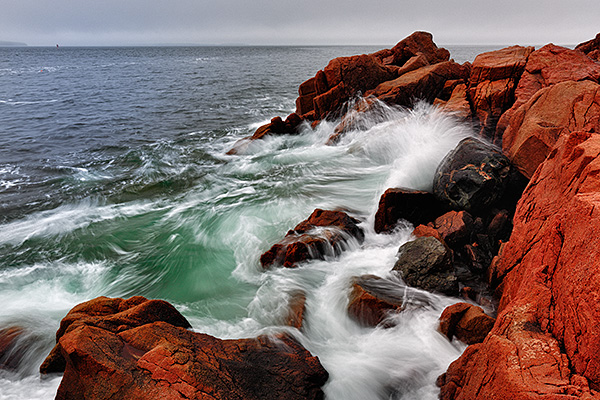
    05-09-12_Maine_0179

    1. How long have you been shooting?

    I’ve been shooting since 1992, so about 21 years now.

    2. Do you have a full time job or are you a full time photographer?

    I have a full time job within the photo industry, but my full time job is not that of a photographer, if that makes any sense.  I photograph for my own creative outlet, and as a part time job on the side.  Part time, I photograph weddings and portraits, and I shoot landscapes as a creative outlet.  I have a website set up to sell my fine art work as well.

    Rick-Portrait

    Photographer Rick Berk

    3. If you had to limit yourself to one genre of photography, what would it be and why?

    Probably landscape photography.  I love nature and the outdoors and love capturing nature’s beauty. And mountains never complain that you made them look fat!

    4. When did you start writing for dPS and why?

    I started writing for dPS in September, 2012.  A friend saw that they were looking for writers and suggested I apply.  I had taught photo seminars as part of my previous job and thought this would be a great way to continue to share my love for photography.

    5. What do you shoot with and what is your favorite lens?

    I shoot Canon gear. Right now my cameras of choice are the EOS-1D X and the EOS 5D Mark III. I’m not sure I can choose just one lens as my favorite.  My favorite landscape lens is the EF 24mm f/1.4L II, but I also love the EF 14mm f/2.8L II.  For portraits, I always go to the EF 85mm f/1.2L II.

    6. What would be your number one tip to any new photographer?

    Learn to do as much in camera as possible. I’m all for using Photoshop to complete the thought but there is a difference between “fixing” in Photoshop and enhancing in Photoshop.  I would rather spend more time shooting and less time editing.

    7. What’s your next big project?

    I haven’t planned anything yet for 2013, but I will have at least one or two trips dedicated to photography.  Right now I’m eyeing the Oregon coast, and possibly the Outer Banks of North Carolina.

    8. Where can people go to find out more about you and your work?

    My website.

    Alaska_2010_08_17_1221

    07-31-12_Heather_0278

    11-29-11_Christina_0237-Edit

    Julia_Jyoti_20120323_1286

    SG_Live_09-05-10_0600

    Post originally from: Digital Photography Tips.

    Check out our more Photography Tips at Photography Tips for Beginners, Portrait Photography Tips and Wedding Photography Tips.

    Meet The Photographers Who Write For Digital Photography School ~ Rick Berk


    Digital Photography School

  • On Facebook, The Square Format Photo is Now the King

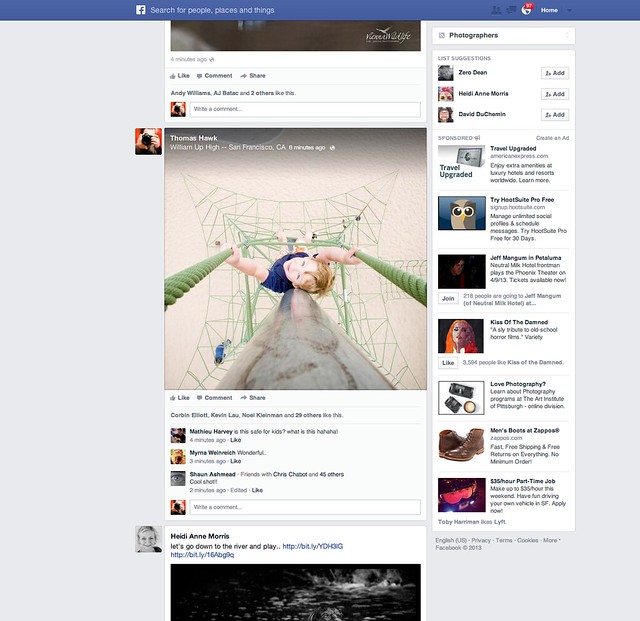
    On Facebook the Square Photo is Now the King

    I’ve been using the new Facebook News Feed for a little while now. One of the things I noticed about it today (and maybe new even since the News Feed launch) is that square photos are now king on Facebook.

    What do I mean by this? Square photos are the largest sized photos in the new Facebook News Feed. This is similar to how Flickr shows photos in our Flickrstreams.

    Google+ on the other hand tries to squeeze a square photo into a horizontal photo envelope, which makes the square photo on Google+ have little side bars on it and looks awkward, smaller and ugly.

    I, for one, welcome the new square format as the king of Facebook. The square crop is my favorite. What’s your favorite crop?


    Thomas Hawk Digital Connection

  • 6 Awesome Photo Contests in 2013 to Earn Fame and $30,000 in Prizes

    Whether you want publicity, recognition or a cash injection to boost your credibility, entering photo contests is a great way to fuel your photography career. With so many photography competitions popping up throughout the year it can be hard to know which ones are worth pursuing. Luckily for you we’ve compiled a list of the best contests to get involved Continue Reading

    The post 6 Awesome Photo Contests in 2013 to Earn Fame and $ 30,000 in Prizes appeared first on Photodoto.


    Photodoto

  • Delicate: Weekly Photography Challenge

    One Day I'll Fly Away..This week your challenge is to take a new photo and to share it with us on the them of ‘Delicate‘.


    Feel free to interpret the theme in any way that you wish. You could:

    • photograph a single delicate flower
    • photograph a newborn baby
    • photograph a delicacy (food)
    • photograph a person who is small and delicate

    Really it is up to you! The more you look the more you’ll find small, intricate, delicate things around you!

    Once you’ve taken your ‘Delicate’ image upload it to your favourite photo sharing site and either share a link to it or – embed it in the comments using the our new tool to do so.

    If you tag your photos on Flickr, Instagram, Twitter or other sites with Tagging tag them as #DPSDELICATE to help others find them. Linking back to this page might also help others know what you’re doing so that they can share in the fun.

    Also – don’t forget to check out some of the images posted in our last challenge – Lines challenge where there were some great images submitted.

    Post originally from: Digital Photography Tips.

    Check out our more Photography Tips at Photography Tips for Beginners, Portrait Photography Tips and Wedding Photography Tips.

    Delicate: Weekly Photography Challenge


    Digital Photography School

  • 5 Tips for Improving Your Portrait Photography

    Here are some techniques that you may not be aware of if you’re new to portrait photography. It takes practice, but being aware of these ideas can get you experimenting, and inspire you to try shots you might not have otherwise tried.

    1. Frame Tight

    Next time you’re watching a movie, pay attention to the close-up shots. See the top of anyone’s head? Probably not very often.

    Tightly framed natural light portrait

    Tightly framed natural light portrait

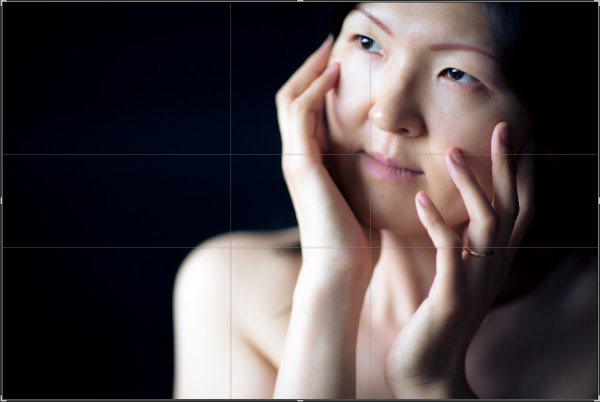
    Leaving too much space above the head is a common mistake in portrait photography. For a close-up portrait, just cut off the top of the head. You don’t need it. I know it feels weird at first, and to be honest, I would never have tried this if someone hadn’t told me to. But it works because we connect to faces, not the tops of people’s heads. Also cropping out the top of the head (either in camera or in post) brings the eyes higher in the frame and helps you achieve rule of thirds or golden section placement of the face in the frame.

    Tight portrait with golden-section crop overlay to show composition.

    Tight portrait with golden-section crop overlay to show composition.

    2. The eyes have it

    The eyes often look best when the iris is centered in the eye. Direct the subject’s gaze to position her eyes such that the iris is about centered. By centered, I mean centered from the camera’s point of view, not the subject’s point of view.

    Natural light portrait

    Natural light portrait with good eye position and catchlights

    I do this one of two ways, depending on the situation. If possible, I raise my left hand and have the subject follow my hand with her eyes until her eyes are positioned favorably. If this isn’t possible, I give directions like “keep your head still and just move your eyes a tiny bit to the left.”

    In addition to directing your subject’s gaze to position the eyes, also take note of the catchlights in the eyes. A large, soft light source will create the most attractive catchlight. Windows without direct sunlight shining through them work great, as well as clear open sky.

    3. Let the kids run wild!

    You’ve heard this before but I’ll mention it again. When photographing children, one of the best ways to get natural smiles and fun photos is to shoot them in their natural habitat, which probably isn’t a photo studio.

    Boy on a swing

    And he only kicked me once.

    Aside from a great portrait tip, this is also good all around practice to improve your photography skills. Kids at play are fast and unpredictable. Learning to frame, focus, and shoot before the moment has passed takes practice and patience.

    4. Watch the hands

    When it comes to portrait photography, hands are rarely neutral. Usually they are either adding to your photo, or taking from it. Make it a point to pay attention to your subject’s hands.

    When photographing women, showing the hand in profile with the fingers curled works well. Often this looks more feminine and alluring than showing the back of the hand. Consider this example:

    Natural light portrait

    For portraits of women, showing the hand in profile with the fingers curled often works well.

    Have you ever heard a subject complain “I don’t know what to do with my hands?” If you’ve ever stood in front of a large group of people to give a speech, then you know this feeling. When we’re put on the spot, it’s hard to do know what to do with our hands.

    If idle hands are messing with your portrait, then put them to work. Sometimes solving the hand problem is as simple as handing the hands something to handle. Think creatively about using a prop to give your subject something to do with her hands.

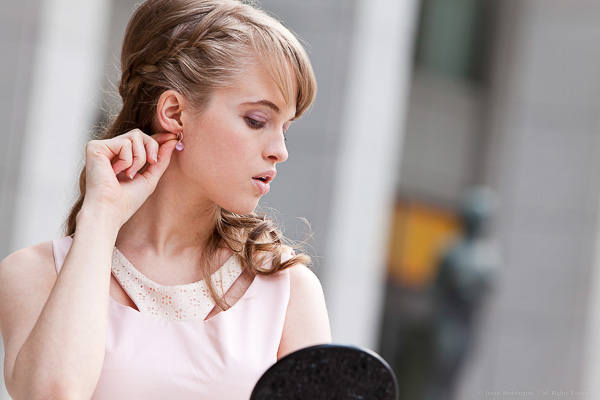
    Woman trying on an earring

    Woman trying on an earring

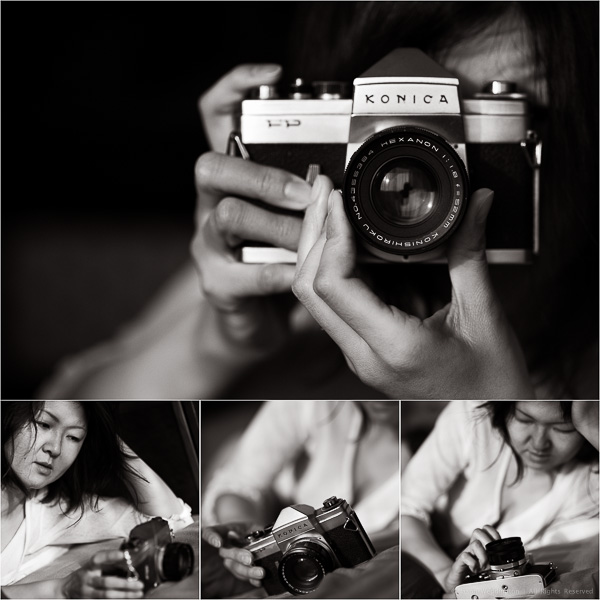
    Woman playing with a classic Konica

    Woman playing with a classic Konica

    5. Shoot into the sun

    Morning and evening are great times for backlit portraits. When the sun is low in the sky, you can use it as a rim light to highlight the subject’s hair. This works best if you can position your subject against a darker background, like a shaded area, without loosing the light on the subject’s head.

    Backlit portrait using the sun as a rim light

    Backlit portrait using the sun as a rim light

    I hope I’ve given you a few new ideas to try next time you set out to shoot a portrait. Let me know your thoughts on this article by commenting below or reaching out to me on my Facebook page. I do my best to respond to questions and comments.

    Post originally from: Digital Photography Tips.

    Check out our more Photography Tips at Photography Tips for Beginners, Portrait Photography Tips and Wedding Photography Tips.

    5 Tips for Improving Your Portrait Photography


    Digital Photography School

  • DEAL: Phil Steele’s ‘Lightroom Made Easy’ Course at 33% Off

    NewImageThe new deal over on SnapnDeals this week is one I know many dPS readers are going to enjoy – it’s 30% off Phil Steele’s Lightroom Made Easy Course – that’s just $ 33 (normally $ 47).
    Phil’s videos have made regular appearances here on dPS and are always really popular and this course contains 24 videos with hours of great instruction on using Lightroom (it covers both Lightroom 3 and Lightroom 4).

    If you’re new to Lightroom or feel overwhelmed by it – this course is for you!

    Here’s what you’ll learn in the course:

    Create Stunning Images

    Make your photos “pop” like the shots you see in magazines.

    Get More Done in less time

    Dramatically increase your photography output—zipping through photo processing tasks in minutes that used to take hours or days.

    Protect Your Copyrights

    Automatically embed hidden data in your photos to protect your images from theft or misuse—and to guarantee you get paid.

    Never Lose Another Photo

    Get your photos organized—whether you have one hundred or 100,000—so that you’ll never lose another image again.

    Retouch Portraits Like a Pro

    Quickly and subtly retouch portraits to remove imperfections, enhance beauty, and keep clients coming back.

    Create Instant Web Galleries

    Display your photos for clients or the public in impressive, customized galleries on your own web site—with just a few clicks.

    Remove Flaws and Defects

    Remove unwanted objects, blemishes, or unsightly sensor dust from photos.

    Share Photos Easily

    Instantly upload your edited photos to social sharing sites like Flickr, Facebook, Picasa, and more.

    Attract Search Engines

    Tag your photos with keywords to lure Internet search engines and boost your sales.

    Make Beautiful Slideshows

    Quickly create stunning slideshows, with music, for friends, clients, or presentations.

    Find the Right Photo When You Need It

    Use ratings, labels, categories, keywords, and names to make it easy to always find your best shots, or those most suited to a particular job or client.

    Do It All From One Easy Place

    Easily handle your entire photography workflow all from one place, quickly and efficiently. Use my secret ninja tricks and techniques to boost your productivity even more!

    This course is normally $ 47.00 USD but for the next 12 days Phil is offering it for just $ 33 along with a couple of great bonus videos.

    Get full details and pick up your copy here.

    Post originally from: Digital Photography Tips.

    Check out our more Photography Tips at Photography Tips for Beginners, Portrait Photography Tips and Wedding Photography Tips.

    DEAL: Phil Steele’s ‘Lightroom Made Easy’ Course at 33% Off


    Digital Photography School

  • Nikon D5200 Review

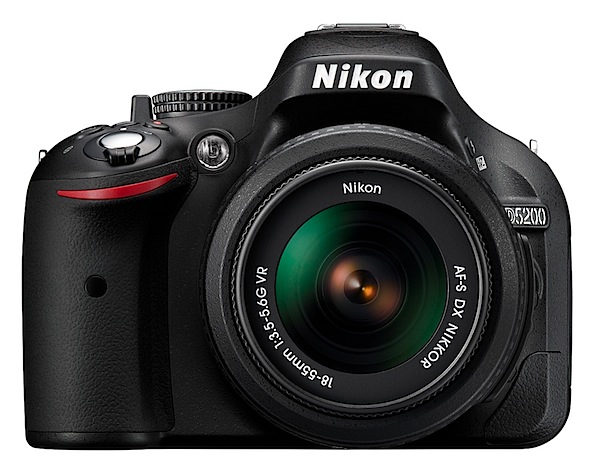
    Nikon D5200 front.jpg

    No matter what your ambitions or skill level are, this camera could arguably be an ideal option for many when it comes down to plonking the plastic on the counter or tapping the computer key to order offline. For many a budding photographer with ambitions a DSLR is the best game in town.

    None of those pesky MILCs or compact digicams can satisfy the hunger!
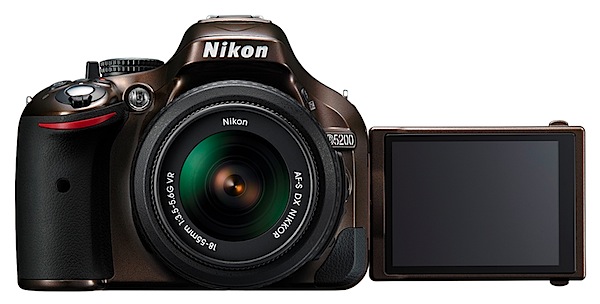
    Nikon D5200 LCD Front.jpg

    Besides, it’s a Nikon. And the specs are damn fine.

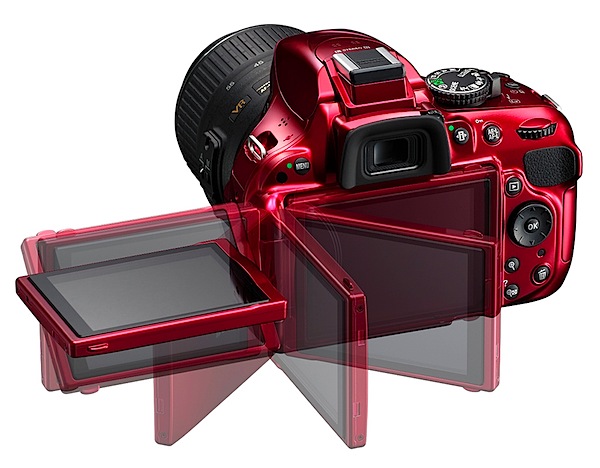
    Nikon D5200 LCD back.jpg

    Nikon D5200 Features

    True, the sensor is close to half the area of a 35mm full frame but, unless you’re going to indulge in heavy cropping or demand an enormous print output, the 23.5×15.6mm CMOS will work fine for many.

    Besides, the maximum image size of 6000×4000 pixels can lead to a print of 51x34cm at 300 dpi.

    Video in MPEG4 can be recorded at Full HD and 1920×1080 resolution.

    With the help of the vari-angle screen I made some nice, controlled camera movies in shooting video, with the AF system tracking accurately throughout the moves. However, shoot a still and the video shuts down!

    More

    • AF system: 39-point AF system with nine cross-type sensors.
    • Metering: the 2016 pixel RGB metering sensor provides data to the camera’s Scene Recognition System, which optimises exposure, autofocus and white balance immediately before the shutter is released.
    • Optical viewfinder.
    • 7.5cm (3-in) vari-angle LCD monitor has 921,000 pixel resolution which can be swung 180 degrees laterally and through a 90 degree vertical arc.
    • Compatible with Wireless Mobile Adaptor WU-1a.
    • Compatible with WR-R10 Wireless Remote transceiver and WR-T10 Wireless Remote transmitter to control key camera functions from a distance.
    • ISO range from 100 to 6400 with expansion to ISO 25,600.
    • Continuous shooting up to 5fps.
    • High dynamic range (HDR) using two images.
    • GPS compatible: records exact location when using the optional GP-1 unit.
    • 16 scene modes: night portrait, beach/snow, food etc.
    • Seven effects modes: night vision, colour sketch, miniature effect, high and low key etc.

    Cafe.jpg

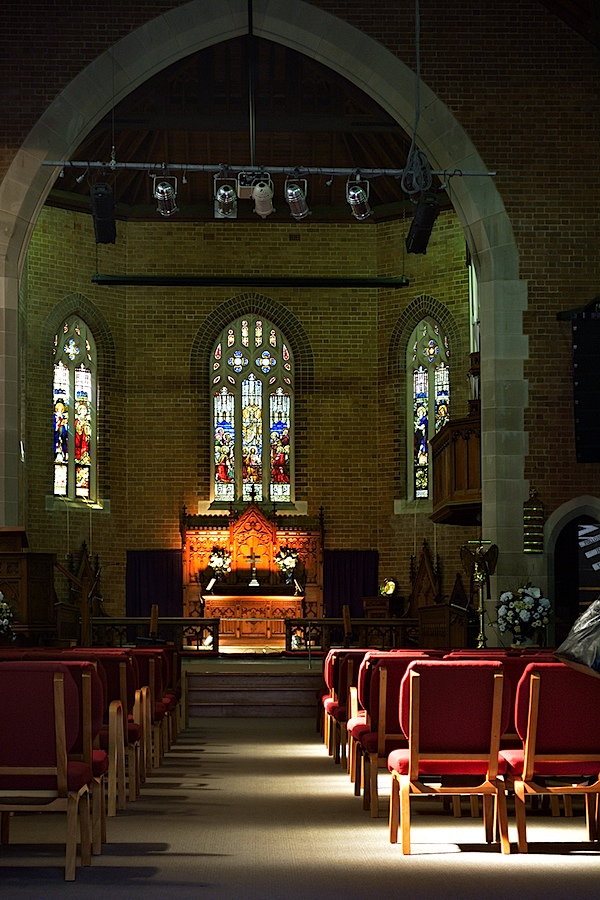
    Church interior.JPG

    Figures and beach 2.JPG

    Nikon D5200 Handling

    First, an anecdote: I like to grab a new camera, manual unread, and get shooting as soon as I pull it out of the box. OK all clear, nice, crisp display of the camera status on the rear LCD, here’s the ISO setting, current aperture, auto white balance in play etc etc.

    Look through the optical viewfinder, all clear and sharp. And I’ll bet you that this is the reason you’re reading this review and considering a DSLR!

    Now, where’s Live View?

    In my office’s subdued light it was hard to see at first: a small black lever hanging off the mode dial. And it works, summoning up the view on the LCD. And what a brilliant place to put it! I also found that you must be in Live View to record video.

    Back to the walk around: as befits its price level there’s not a jungle of external controls to bewilder the newbie or the timid.

    Left and near the top: menu button.

    Right and on top: power/shutter button; mode dial (PASM, scene modes, effects, macro etc); info button; exposure compensation; video record; single/continuous shooting and of course the Live View lever.

    Back off the top edge: information edit button which pilots you through the rear screen menu options; exposure and AF lock button.

    Rear: the multi selector wheel navigates around the rear screen options; replay; memory card access lamp; trash; screen zoom.

    Overall, the camera is quite compact for a DSLR and even with the review f3.5/18-55mm lens attached was not a big bundle to carry and handle. The prominent speed grip helps handling and most controls are close to an operative right forefinger. Sorry, southpaws!
    BTW in Live View the four way jog dial at the rear moves the AF outline around the screen. A big help.

    The screen menu layout is typically Nikon: clear and unmistakable without being a forest of text.

    Nikon D5200 ISO Tests

    Nikon D5200 ISO 100.JPG

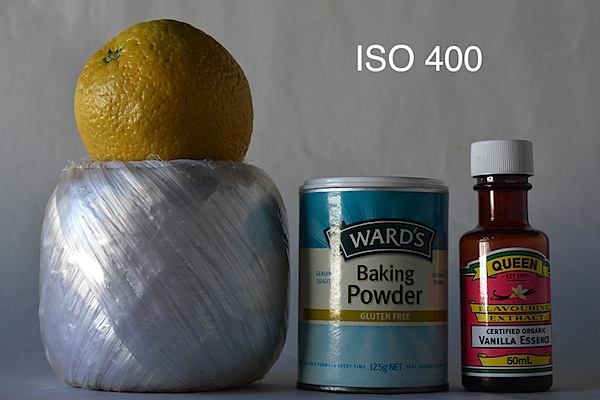
    Nikon D5200 ISO 400.JPG

    Nikon D5200 ISO 800.JPG

    Nikon D5200 ISO 1600.JPG

    Nikon D5200 ISO 3200.JPG

    Nikon D5200 ISO 6400.JPG

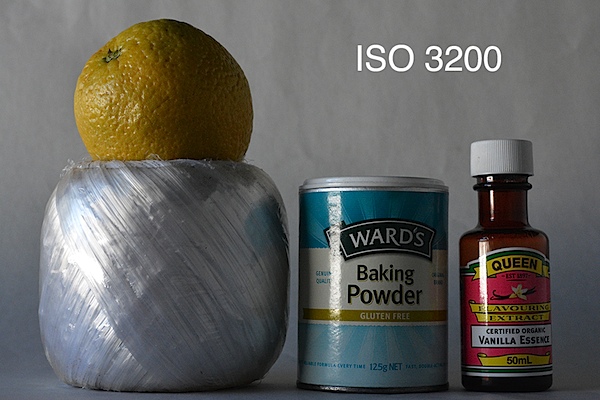
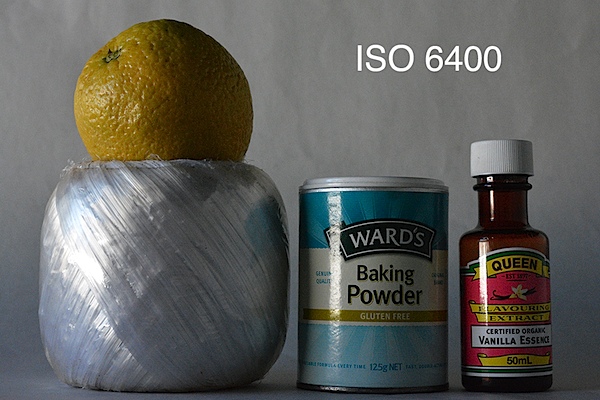
    In my view, the D5200 performed very well all the way up to ISO 3200 and I could quite happily use ISO 6400 for certain subjects that could ‘live’ with increased noise and a drop in sharpness, such as city lights etc.

    Nikon D5200 Review Verdict

    Quality: excellent.
    Why you would buy it: it’s a Nikon; well-priced DSLR; excellent video capture.
    Why you wouldn’t: you don’t want a DSLR!

    For a camera that I figure is very affordable for many people this has to be one of the best buys around: 24.1 megapixel capture, vari-angle screen; Full HD capture. Very appealing!

    Nikon D5200 Specifications

    Image Sensor: 23.5×15.6mm CMOS. 24.1 million effective pixels.
    Metering: Matrix, centre-weighted, averaging and spot.
    A/D processing: 14-bit.
    Lens Mount: Nikon F.
    Exposure Modes: Auto, Program AE, shutter and aperture priority, manual.
    35 SLR Lens Factor: 1.5x.
    Shutter Speed: Bulb, 30 to 1/4000 second. Flash X-sync: up to 1/200 sec.
    Continuous Speed: up to 5fps.
    Memory: SD/SDHC/SDXC cards.
    Image Sizes (pixels): 6000×400 to 2992×2000. Movies: 1920×1080 to 640×424.
    Viewfinders: Eye level pentaprism and 7.5cm LCD (921,000 pixels).
    File Formats: NEF (RAW), JPEG, NEF (RAW)+JPEG, MPEG4.
    Colour Space: Adobe RGB, sRGB.
    ISO Sensitivity: Auto, 100 to 6400. With expansion up to ISO 25,600.
    Interface: USB 2.0, AV, HDMI mini, DC input, external stereo mic, remote.
    Power: Rechargeable lithium ion battery, AC adaptor.
    Dimensions: 129x98x78 WHDmm.
    Weight: Approx. 555 g (with battery).
    Price: get a price on the Nikon D5200 (body only) or Nikon D5200 with 18-55mm f/3.5-5.6 AF-S DX VR NIKKOR Zoom Lens or Nikon D520018-105mm f/3.5-5.6 AF-S DX VR ED NIKKOR Zoom Lens or Nikon D5200with 18-55mm f/3.5-5.6G AF-S DX VR and 55-300mm f/4.5-5.6G ED VR AF-S DX NIKKOR Zoom Lenses + EN-EL14 Battery + 10pc Bundle 32GB Deluxe Accessory Kit.

    Post originally from: Digital Photography Tips.

    Check out our more Photography Tips at Photography Tips for Beginners, Portrait Photography Tips and Wedding Photography Tips.

    Nikon D5200 Review


    Digital Photography School

  • The Basics of a One Light Setup: A Lighting Tutorial

    Lately we’ve had a lot of readers asking for advice about simple lighting techniques for shooting portraits. Here’s a good video from TheSlantedLens that gives some good basic information on how to set up a one light setup.

    Further Reading

    • 6 Portrait Lighting Patterns Every Photographer Should Know
    • Studio Portraits – Getting Started with One Light
    • 5 Classic Lighting Positions for Portrait Photography

    Post originally from: Digital Photography Tips.

    Check out our more Photography Tips at Photography Tips for Beginners, Portrait Photography Tips and Wedding Photography Tips.

    The Basics of a One Light Setup: A Lighting Tutorial


    Digital Photography School