Category: Photography

  • Learning to See, Part VIII

    Consulting the rules of composition before taking a photograph, is like consulting the laws of gravity before going for a walk.  –Edward Weston


    To some photographers composition is an innate process, whereas to others it is a life-long learned challenge laden with frustration. Regardless of which category you find yourself, good composition is a learned skill that will enhance the overall aesthetic appeal of the end result.  While I subscribe to Weston’s notion, I also believe we first learn to crawl before walking.

    Our challenge is to learn how to use diagonal lines, contrast, simplicity, point of interest, and so on to allow us to translate the three-dimensional scene being photographed onto a one-dimensional plane while retaining the original perception of depth and movement.

    The first rule that we must accept is that there is no right way to take a picture. Regardless of the subject matter, you should always analyze your picture to ensure it answers the question: Does this picture satisfy my reasons for having made the exposure in the first place?  Should your answer be yes —congratulations.  If not — why not?

    The art of making a photograph can be broken down to its most basic and elementary form: Placing the point of interest in the most satisfying position within the frame to achieve the desired result. It really is that simple; everything from this point forward will evolve by way of personal technique.

    The first photographic rule that must be learned, and adhered to from this day forward, is the use of a tripod. It is unquestionably the most valuable piece of ancillary equipment you can have at your disposal. Only when your camera is firmly grounded with the flexibility and advantage of controlled movement can you then start to accurately study the scene in the viewfinder, thus ensuring all elements are properly placed in the scene prior to making the exposure. There have been many articles and reviews written on the multitude of tripod models available, please defer to those that are easily located by doing a web search.

    By recognizing that we want to photograph a particular scene or subject, we have also admitted to having identified the point of impact within that scene. Perhaps it is a lazy fox in big landscape, a detail of some mammal, a grey wolf peering from behind a tree, or perhaps the snow-capped mountains in some distant vista. Where we place that identifying feature within the viewfinder will unquestionably enhance the final impact of the image.

    One of the very first rules of thumb to be learned in composition is the utilization of the ‘Rule of Thirds.’ Essentially the viewfinder is divided into nine equal spaces by placing two equally spaced horizontal lines and two equally spaced vertical lines. Where these lines dissect each other will create the four ‘Points of Impact’ within the frame.
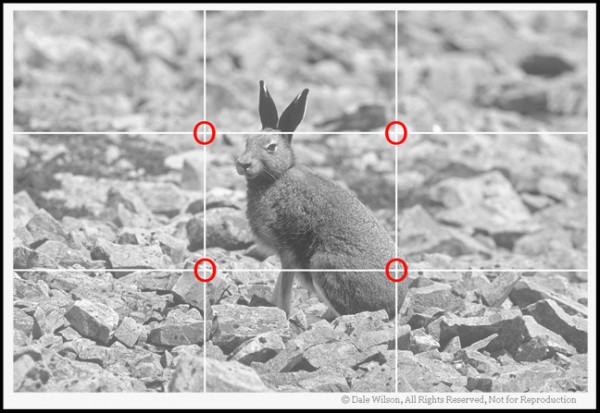
    Canada’s easternmost province of Newfoundland has the southernmost population of arctic hare in the world.  This fellow was located atop Gros Morne Mountain, and the photo was captured with little regard for composition. With uncontrolled animals (non-zoo setting) just get the shot first,and then concentrate on refining the image with the next frame. With gained experience you will soon find yourself intuitively placing the subject at the correct ‘Point of Impact’ as indicated here with red circles.

    Canada’s easternmost province of Newfoundland has the southernmost population of arctic hare in the world. This fellow was located atop Gros Morne Mountain, and the photo was captured with little regard for composition. With uncontrolled animals (non-zoo setting) just get the shot first,and then concentrate on refining the image with the next frame. With gained experience you will soon find yourself intuitively placing the subject at the correct ‘Point of Impact’ as indicated here with red circles.

    Regardless of subject matter, by placing our primary point of interest in one of the four ‘point of impact’ locations within the frame we will dramatically improve the dynamic and aesthetic appeal of the picture.

    What I would like you to do now is locate simple subjects in your backyard or neighbourhood park. Do not try to make complex pictures, but just a single subject on a plain background – perhaps a solitary tree against a sky background. While employing the “Rule of Thirds” place that tree, or other chosen subject, in each of the four “point of impact” locations. For the fifth photo of the tree, place it in the centre of the viewfinder. Which photo do you prefer and why?
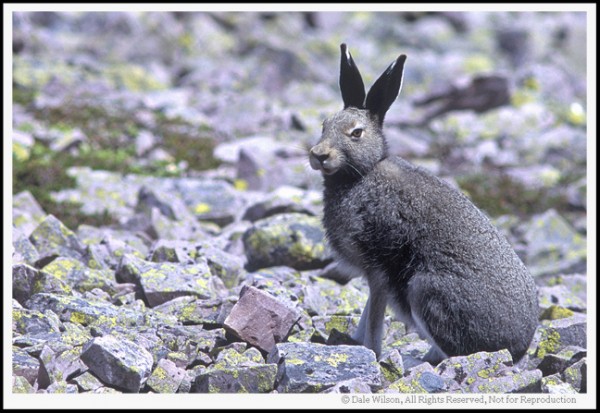
    Once this hare heard the mirror-slap on my medium format camera (Pentax 67) he was gone faster than a … well, shot at rabbit. Fortunately, due to the large film size I am able to crop the image and place the ‘Point of Interest’ (the hare) in the most pleasing ‘Point of Impact’ within the frame. When we are working with “living critters, including people” we will usually want to focus on the eyes and frame the animal in such a fashion to leave room for them to “look into the frame.”

    Once this hare heard the mirror-slap on my medium format camera (Pentax 67) he was gone faster than a … well, shot at rabbit. Fortunately, due to the large film size I am able to crop the image and place the ‘Point of Interest’ (the hare) in the most pleasing ‘Point of Impact’ within the frame. When we are working with “living critters, including people” we will usually want to focus on the eyes and frame the animal in such a fashion to leave room for them to “look into the frame.”


    As you go through this exercise, remember the most important rule in photography: Have fun. If, after all, you are having fun then you are doing it right.

    Post originally from: Digital Photography Tips.

    Check out our more Photography Tips at Photography Tips for Beginners, Portrait Photography Tips and Wedding Photography Tips.

    Learning to See, Part VIII

    Digital Photography School

  • Developing Your Photographic Style: Adding Power And Impact To Your Photography

    I’ve been working as a photographer for almost 2 years now. And looking back at this time, I can see a number of stages I’ve grown through. Each stage is characterised by what I believed is the most important element of great photography. And in this post I decided to analyse them and come to a conclusion on the benefits Continue Reading

    The post Developing Your Photographic Style: Adding Power And Impact To Your Photography appeared first on Photodoto.


    Photodoto

  • Destination: Alaska

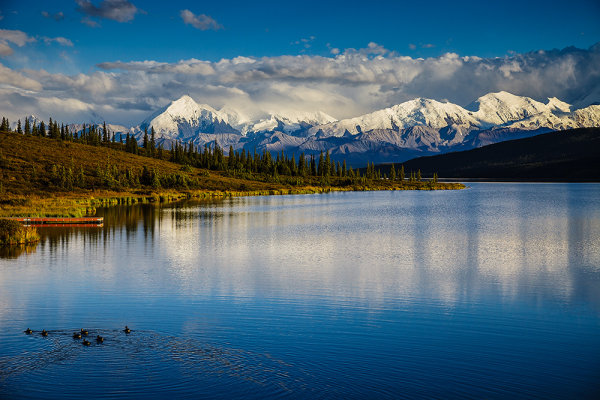
    Wonder Lake is the furthest point in Denali National Park that the park bus system will reach.  It offers a spectacular view of the Alaska Range, when the weather is clear.

    Wonder Lake is the furthest point in Denali National Park that the park bus system will reach. It offers a spectacular view of the Alaska Range, when the weather is clear.

    Over the years, as I grew as a photographer, I wanted to expand my horizons and photograph exotic and epic places. Tops on my list was Alaska.  I wanted to photograph the grandeur of the Alaska Range, of Denali, and the beauty of the nature and wildlife.  I found Alaska to be full of beauty and opportunity, but at the same time, a difficult place to photograph.

    The first challenge in photographing in Denali is the weather.  It is said that 80% of visitors to Denali National Park never see the mountain (known as Mount McKinley or Denali).  Denali (the mountain) generates its own weather pattern.  This was illustrated on my second visit there, when I camped at Wonder Lake for 4 days. I saw the mountain as I traveled in to the campsite on my first day, and saw it as I left the park on my way out on the 4th day.  The days in between, it was never seen again.

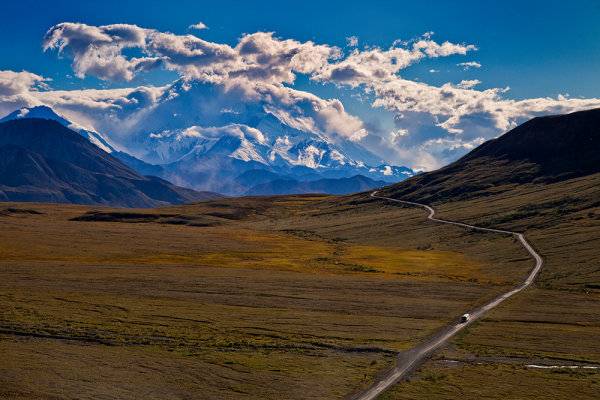
    This view, captured from the Eilson Visitor's Center, is one of the iconic views as you approach Mount McKinley. The clouds surrounding the mountain illustrate the weather patterns around the mountain.  The dynamic range of the scene was huge- without using graduated neutral density filters, this image would not have been possible in one exposure. I used a 3-stop soft-edged ND grad. EOS 5D Mark II, EF 24-105f/4L IS.  1/500, f/8, ISO 200.

    This view, captured from the Eilson Visitor’s Center, is one of the iconic views as you approach Mount McKinley. The clouds surrounding the mountain illustrate the weather patterns around the mountain. The dynamic range of the scene was huge- without using graduated neutral density filters, this image would not have been possible in one exposure. I used a 3-stop soft-edged ND grad. EOS 5D Mark II, EF 24-105f/4L IS. 1/500, f/8, ISO 200.

    The next challenge I found in Denali National Park is the range of contrast in the landscape. Even late in the day, The range from the bright sky to the foreground was huge. I found graduated neutral density filters to be essential in helping to control the dynamic range of an image. Generally the mountains would be in bright light, while the foreground would be several stops darker.  A 3 stop or 4 stop ND grad was perfect for bringing the two closer together.

    After spending all that money to get to this remote part of Alaska, I wasn’t about to let bad weather get in the way of my photography. As I mentioned, 80% of visitors to Denali don’t get to see the mountain.  The tallest peak in North America is obviously a major focal point when trying to photograph in Denali. When that’s taken away, it just means you have to work a little harder to find the shots. But Alaska is chock full of natural beauty, and there is no shortage of photos to be taken.

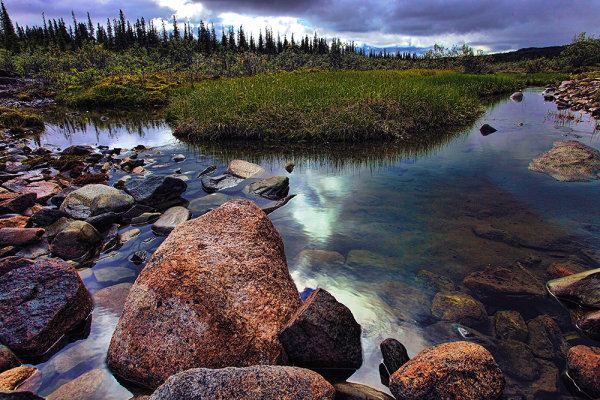
    After two days of rain, we ventured onto the McKinley Bar Trail to hike to the McKinley River. The mountain was obscured by clouds, so I looked for other shots I could take.  This creek on the McKinly Bar Trail offered a nice opportunity. I composed the shot to eliminate as much sky as possible, due to the flat cloudiness of it.  EOS 5D Mark II, EF 17-40 f/4L @ 23mm.  1/250 at f/11, ISO 400.

    After two days of rain, we ventured onto the McKinley Bar Trail to hike to the McKinley River. The mountain was obscured by clouds, so I looked for other shots I could take. This creek on the McKinly Bar Trail offered a nice opportunity. I composed the shot to eliminate as much sky as possible, due to the flat cloudiness of it. EOS 5D Mark II, EF 17-40 f/4L @ 23mm. 1/250 at f/11, ISO 400.

    One of the best things I did in Alaska was get a different point of view.  Flightseeing tours are offered within the park.  I took one with Talkeetna Air Taxi, which is based at Kantishna Air Field, at the very end of the park road.  It was a 1 hour flight, bringing me as close to the mountains as I’d ever get.  You’re forced to shoot through the plane’s windows, but the reflections are pretty well controlled. I used a 5D Mark II and EF 24-105 f/4L lens for the entire flight. That gave me enough range to not have to change lenses during the flight. The cloud cover was already moving in on this day, but we got some dramatic shots of peaks poking through the clouds, glaciers making their way through mountain passes, and kettle ponds on the tundra reflecting blue skies.

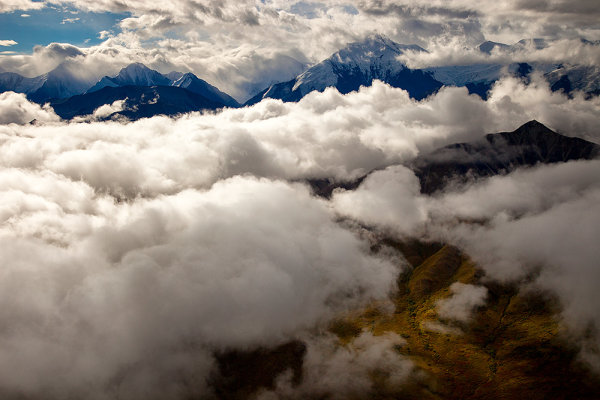
    This shot, taken from a plane at 10,000 feet, shows the kind of image possible on a flightseeing tour. 5D Mark II with 24-105 f/4L at 45mm. 1/1000, f/8, ISO 400.

    This shot, taken from a plane at 10,000 feet, shows the kind of image possible on a flightseeing tour. 5D Mark II with 24-105 f/4L at 45mm. 1/1000, f/8, ISO 400.

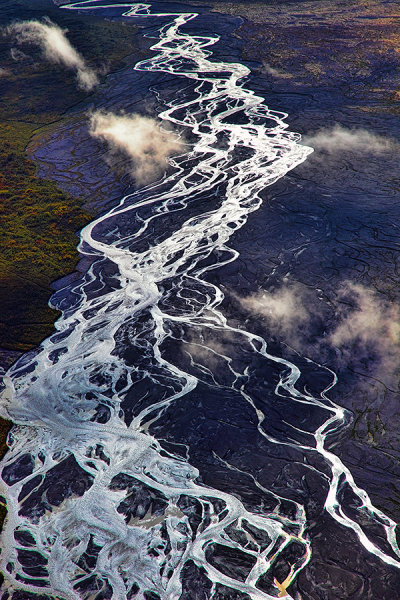
    The McKinley River flows through the tundra of Denali.  The silt deposited by the river changes its direction and creates these little strands. This shot was taken at 11,000 feet up. 5D Mark II, Ef 24-105 f/4L IS at 105mm. 1/500 at f/8, ISO 400.

    The McKinley River flows through the tundra of Denali. The silt deposited by the river changes its direction and creates these little strands. This shot was taken at 11,000 feet up. 5D Mark II, Ef 24-105 f/4L IS at 105mm. 1/500 at f/8, ISO 400.

    Wildlife is abundant in Denali, though you do have to get a bit lucky to see it.  The big five is moose, eagles, Dall sheep, bears, and caribou.  A long lens is a must.  To save weight in my bag, I used a 70-200mm f/2.8L IS II, with a 2x extender to give me an effective focal length of 400mm.  While we weren’t able to get close enough to any bears, we did get close to a wolf, Dall sheep, and a golden eagle that buzzed the bus we were on heading to our campsite. You’ll need to be ready as the wildlife doesn’t stay still for very long.  The bus drivers will stop whenever you ask as long as it’s safe, and you can hop off one bus and onto another if you decide to hike around some.

    To view more of my Alaska images, visit my website at www.rickberk.com.

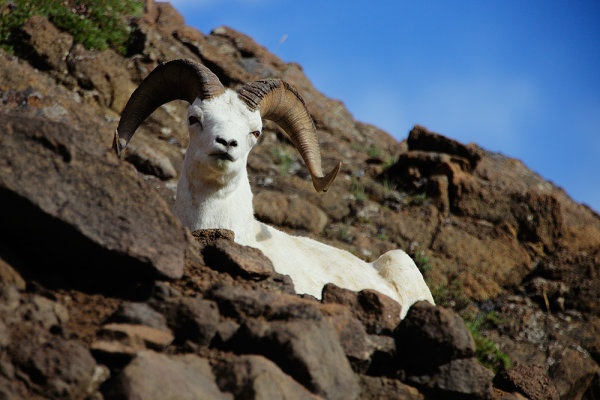
    This Dall Sheep was lounging just above Polychrome Pass. Using a 70-200 with a 2x extender, I was able to get in close and get a nice portrait. 5D Mark II, EF 70-200 f/2.8L IS II w/2x extender. 1/1000 at f/4, ISO 200.

    This Dall Sheep was lounging just above Polychrome Pass. Using a 70-200 with a 2x extender, I was able to get in close and get a nice portrait. 5D Mark II, EF 70-200 f/2.8L IS II w/2x extender. 1/1000 at f/4, ISO 200.

    Post originally from: Digital Photography Tips.

    Check out our more Photography Tips at Photography Tips for Beginners, Portrait Photography Tips and Wedding Photography Tips.

    Destination: Alaska


    Digital Photography School

  • BTS: Heisler Photographs Alonzo Mourning

    Having just spent a week with Greg in Dubai at Gulf Photo Plus, I have now heard him express the following thought multiple times:

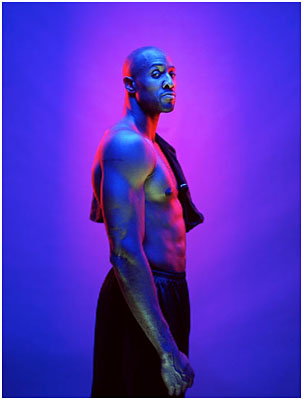
    There is light you create that is a photographic reaction to light as it exists in the world, and there is light you create just because it's cool.

    I think it's safe to say that this photo he made of NBA star Alonzo Mourning, for ESPN Magazine, is the latter. How he did it, below.

    Read more »
    Strobist

  • Melbourne Portrait Workshop: Limited Tickets Now on Sale

    Here at dPS we’ve been producing daily tutorials and tips for almost 7 years and in that time we’ve regularly been asked by readers if we’d ever run some live – face to face – training.

    Today I’m excited to announce our first ever live workshop – in Melbourne Australia (where our HQ is based).

    GinaMilica12-1WEB.jpgProfessional photographer Gina Milicia, author of our ‘Portraits, Making the Shot‘ will take you through everything there is to know about capturing pixel perfect portraits over a fun and informative day.

    A world-class portrait photographer in her own right Gina also has an amazing gift for making the all technical jargon easy to understand, and importantly help you apply it to your own photography.

    It’s sure to be a fun, inspiring and rewarding day.

    Tickets are now on sale via our Eventbrite Page.

    This workshop is strictly limited to 20 people.  We wanted to keep it small and intimate to ensure there will be a heap of personal interaction with Gina. So don’t delay grabbing your spot – we expect it to fill fast.

    Event Details

    • Date: Saturday 20 April 2013
    • Where: Gina Milicia’s studio in Kensington, Melbourne
    • Price: full price is $ 497 (AUD)
    • What: a full day with portrait photography pro Gina Milicia

    This is our first ‘hands on ‘ photography workshop and we are filling it with lots of practical exercises and information.

    What you will learn:

    • How to prepare for a shoot
    • Camera settings
    • Quality of light
    • Deciding on lighting style
    • Using a light meter and correct exposure for beautiful skin tone
    • Poses/ basic go-to poses
    • How to direct with confidence
    • Workflow
    • Basic post-production techniques

    Gina Milicia will be sharing her experience over 25 years of photographing celebrities and events.  At the end of the day you’ll be equipped to take stunning portraits of your own.

    Learn more (including seeing a FAQ and a rundown of the day) and Grab Your Tickets Today here.

    Post originally from: Digital Photography Tips.

    Check out our more Photography Tips at Photography Tips for Beginners, Portrait Photography Tips and Wedding Photography Tips.

    Melbourne Portrait Workshop: Limited Tickets Now on Sale


    Digital Photography School

  • Making a Photo: Infuse Yourself into your Photos

    Delicate Arch_073109_0045(sRGB-websize)As a hobbyist, self-taught photographer, I find myself often wondering about the esoteric nature of photography and what it is exactly that separates the average photographer from the professional or even world renown photographer. Is it technical skill, creative expertise, some sort of profound psychological perspective, post-processing acumen or just plain blind luck? In reality, it is likely a combination of all these things, but recently I have become more and more interested in the more introspective nature of photography and how powerfully creative and self-expressive it can be in shaping who you are as a photographer and a person.

    Recently, I read a fantastic article “5 Ways to Improve Your Photography Without Touching Your Camera,” by Richard Walker over on Lightstalking.com. When you get a chance you should definitely check it out. The article discusses the inferiority complex one gets after looking at amazing photos, once the feelings of self-doubt and negativity creep into your mind, as you ponder the fact that you could never take a photo as great as the one you are viewing. Now, I do not know about you, but this happens to me all the time. I am constantly striving to improve my technique and skill and wonder if there is some enigmatic factor that I am missing that is preventing me from really producing something magical. In fact, it has just been in the past two years that I realized the same concept that Richard Walker introduces in his article of “making a photo.” This is an important and elegant concept that we all need to learn and aptly apply to our photographic process.

    Making a Photo

    So what does “making a photo” mean? It means to take some time and reflect upon that which your are shooting. Think about what it is you want your photo to look like prior to taking the shot. Pre-visualize the final product and refine your composition, lighting, angle, or background. It involves planning and thought prior to pressing the shutter so that you already have your personalized interpretation in mind. This is such an important concept. I cannot even express what an epiphany this was for me and have definitely been able to see my own progression as a photographer as I have transitioned from snapping photos and started creating them. So how does one start this process?

    Botanical Gardens_091209_0103(sRGB-websize)

    Know Thyself – The process of artistic creation starts with yourself. You need to really analyze what makes you tick and drives your motivation to be able to express it in your photography. Are you a hopeless romantic, edgy and adventurous, calm and serene, or just downright crazy? As you can imagine each of these personality types would create a different photo based upon what they find inspiring. Really turn the microscope onto yourself and start unravelling the threads of your emotional and psychological make-up. It is truly a fascinating process and will open up and expose that creative core that is necessary to start inspiring your photography.

    Likes and Dislikes – Analyze your own photographic likes and dislikes. Keep a running file folder of photos that you have seen or found that you admire or that inspire you. Group them in separate monthly folders so that you can see how your likes change as you grow as a person. More importantly, and often forgotten, you should do the same thing (although to a lesser extent) with photos that you dislike. It is critical to understand what you do not like in a photo just as much as it is to comprehend what it is you like. Somewhere between these likes and dislikes is your own vision or desired artistic niche.

    Visualization – Once you have an idea of who you are and what you like, use it to transform your photographic process. When you are getting ready to take your next photo, think about the shot for a few minutes and how you want it to look after post-processing. Consider the angle you are shooting at, the depth of field, available lighting and shadow, the colors involved in the scene and the emotive glimpse of self expression that you want to portray. If you are going for sad and lonely you might want a solitary subject with lots of dramatic soft shadows and a more drab color palette. If you want edgy and adventurous you might capture some action with harsh contrast and bring out the details of the scene with a lot of contrast added in post-processing. Basically, you need to know where you are going with the shot so that you can get there in the end.

    Execution – The last step is the easiest and most gratifying of them all. By this point, you have a bit of a concept and feel for your shot. Now all you have to do is make the photo. Using your pre-visualized plan, start shooting. Take a few shots and study them and see if you are getting what you want. Refine the shot. Play around with white balance a bit a see how it changes your shot. Expose for highlight in the scene or for shadow and see how it changes the mood. Work the composition some and most of all enjoy the process and make sure you are accomplishing your goal for the shot.

    Moose_Jun302010_0019(sRGB-websize)

    When you stop taking photos and start making them, it is definitely a gradual process. You will not notice the results right away. In fact, you will likely try it a few times and want to abandon the process as foolish cause you find yourself struggling. Just remember, it takes time, practice, persistence and most of all confidence. It is not going to happen overnight. Stay positive and keep working at it. Analyze the problems you think you are having or how your vision is not being captured by your photos. Take your time and embrace the learning process. Soon you will be looking at your photos and start seeing a few glimpses of your vision. This will progress further and further and eventually you will have that one magical defining moment where you are looking through your viewfinder and you recognize your vision, your hope, your dream, and yourself in that one perfect click of the shutter. You my friend have just made a photo!

    Portland Trip-497(sRGB-websize)

    Post originally from: Digital Photography Tips.

    Check out our more Photography Tips at Photography Tips for Beginners, Portrait Photography Tips and Wedding Photography Tips.

    Making a Photo: Infuse Yourself into your Photos


    Digital Photography School

  • South Platte River at Fort Lupton – Northern Colorado Paddling

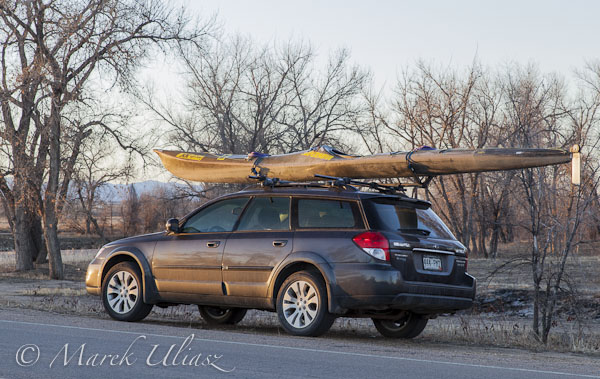
    Subaru Outback and JKK Supernova kayak><br />
I haven’t paddled my JKK Supernova kayak since 2012 Missouri River 340 race. I decided that to rinse some Missouri mud off.</p>
<p><img decoding=

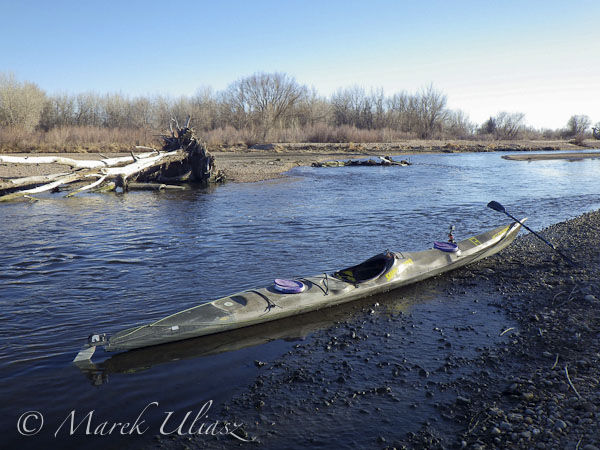
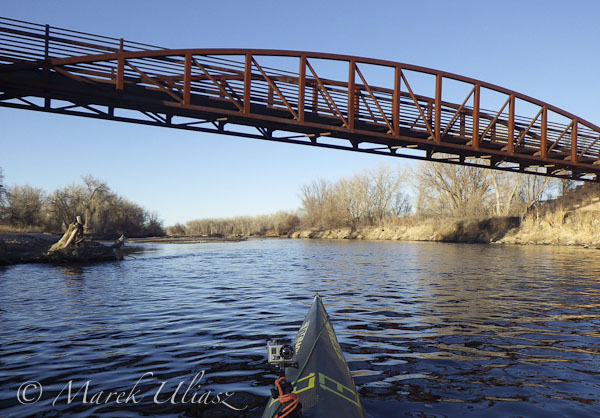
    Paddling upstream with GoPro camera mounted in the front deck.

    paddling South Platte River

    About 2 miles upstream of Fort Lupton. The river was shallow, fast, twisty, stinky … Near perfect! I had a great workout.

    South Platte River at Fort Lupton
    Back to Fort Lupton.

    I have paddled JKK Supernova starting at Fort Lupton several times this winter. It seems that my driving time from Fort Collins is about 45 minutes and is not longer than driving to Kersey below Greeley. I didn’t try to paddle my SUP since some spots were too shallow for a fin.


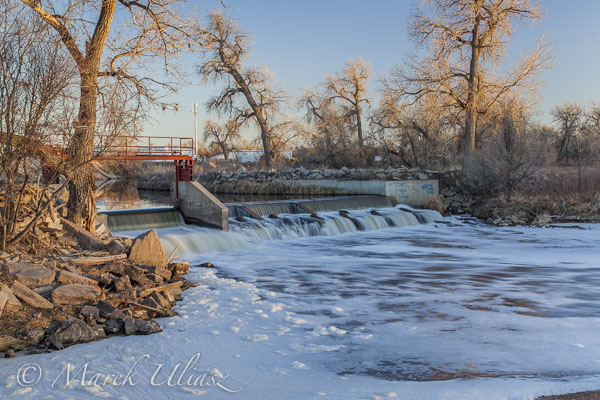
    This is a diversion dam just below Fort Lupton. I’ve paddled the river between Fort Lupton and the confluence wit St Vrain Creek. There are 7 dams in this short section. Maybe, it’s a time to run it just for documentary purposes, certainly, not for recreation. It feels like a packrafting project.

    Related posts:
    South Platte River below Denver, Colorado – GPS/photo river guide


    paddling with a camera

  • Portrait Photography: Secrets of Posing & Lighting [Book Review]

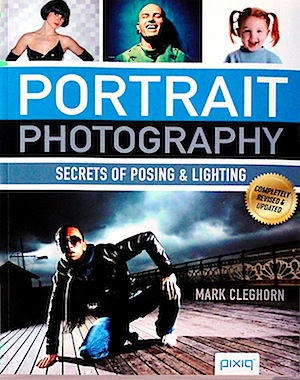
    Portrait Photography.jpgPortrait photography, IMHO, is up there in degrees of difficulty with wildlife and sports/action photography … but at least, when faced with a tiger or a pole vaulter, you don’t have to face a possibly irate subject when you’ve finished the shot. Hopefully!
    With portrait photography you not only have to face the sitter during and after the session but you also have to deal with that particular person if they’re also the client!

    The book’s author Mark Cleghorn has been a pro photographer for over 30 years, specialising in ‘creative’ wedding and portrait photography. He is a member of a number of pro associations and has won a number of awards for his work as well as running many training workshops and seminars.

    In Cleghorn’s view ‘Understanding the fundamentals of posing and lighting is crucial to successful portrait photography.’

    You might also add the stricture — KISS! His own personal motto is ‘Natural light before reflector, reflector before flash, and flash as a last resort.’ He also suggests you should understand how to use and manipulate natural ambient light before you complicate things with technology …. Got me!

    The chapter headings are informative:

    • So much equipment, so little money.
    • Poses and expressions.
    • Studio lighting made simple.
    • Creative lighting techniques.
    • On location.

    First up, choosing a camera and lenses. The advice is that while a bulky, expensive medium format camera gives a better quality of image and delivers huge file sizes that are perfect for advertising, they are overkill for a simple portrait.

    The DSLR is a preferable choice due to its comparatively reasonable cost, moderate size, along with access to a wide range of lenses and access to complete camera control.

    This is followed by a rundown of the three types of flash available: accessory, shoe-mounted; power pack kits; monolights. Considerable detail is given on how to modify their flash output, the use of gels, metering, softboxes, reflectors, snoots and spotlights, diffusion, etc.

    A key chapter covers posing and expression, which is where the human interface is at its most important and Cleghorn displays his extreme knowledge of the human figure and how to show it off at its best: ‘Every pose … starts with the feet, as it is the way in which the subject stands that determines whether or not he or she looks comfortable.’

    His advice on how to photograph children is golden: keep things simple, allow the expressions to tell the story, work on the same level and, with very young children, encourage them to move around the studio, make it seem like a game.

    And how to cope with problems like a subject’s bald head, spectacles, double chins, squinting and those who are obviously overweight, disabled subjects, those with ‘sleepy eyes’, big ears or noses and (with couples) differing heights. The advice is magic!

    Moving on to lighting, there’s detailed discussion on how to place lights, control fill, hair and backlights and control their output. Low, mid and high key lighting is covered in considerable detail, with excellent examples shown.

    Some off the wall techniques are demonstrated, like the projection of another image onto the subject, introducing a surreal effect. The use of a single light source and softlight are discussed as well as the role of the cross processing effect achievable in Photoshop.

    Quite a few pages are given over to the searching for and use of suitable locations, natural exteriors and shooting in the home.

    I often wonder, having read such a useful book, as to the sanity of such a high end and obviously successful photographer in this field in giving away such seriously useful hints, tips and advice.

    This is the ‘go to’ book on the subject!

    Author: M Cleghorn.
    Publisher: pixiq.
    Size: 28x22x1cm. 128 pages.
    ISBN 978 1 4547 0243 6.
    Price: get a price on Portrait Photography: Secrets of Posing & Lighting at Amazon (currently 36% off).

    Post originally from: Digital Photography Tips.

    Check out our more Photography Tips at Photography Tips for Beginners, Portrait Photography Tips and Wedding Photography Tips.

    Portrait Photography: Secrets of Posing & Lighting [Book Review]


    Digital Photography School

  • Why Making Mistakes is Good for your Photography

    A Guest Contribution by Draycat

    It is said the longest journey starts with a single step. The unfortunate part of life is that sometimes that step will cause you to fall, or you may even find you are walking in the wrong direction. But such things are normal and natural in life, and these are often the experiences that we learn the most from. A baby will fall down many times as he/she learns to walk. The falling down is part of the process of learning to walk, and without it the baby will never learn.

    It is the same for photography, from the first day you pick up a camera you will make mistakes.

    • You may spend a day shooting only to realise that your camera was on the wrong setting and instead of shooting full size RAW you’ve been shooting the smallest size jpg
    • you may leave the house with all your equipment prepared only to take the first shot and realise that you forgot to put a memory card in the camera (and find the nearest place to buy one is miles away)
    • you may take lots and lots of pictures which look good in the camera’s LCD, only to find they are all soft when you see them on your computer screen – you didn’t realise at the time because you didn’t zoom in and check on the camera’s LCD.

    These are just a few of the mistakes that I have made since I’ve been shooting, and after each one I generally felt foolish and sometimes demoralised. I felt like my photographic journey had taken me no where while everyone else flew past me with their great camera skills.

    But if you speak to any of the great photographers in world, present or past, they will smile and tell you that they made exactly the same mistakes, and many more besides.

    They will tell you that they often learned more from their mistakes than from their successes. Often when we make mistakes we are too hard on ourselves, and beat ourselves up about how stupid we were, or how foolish we feel. This photographer or that photographer would never do such a thing, but the fact is that we all do.

    The truth is that it isn’t about the mistakes you make, but rather about how you deal with those mistakes.

    If you look at them and work out how they happened, what you did wrong, or what you forgot to do then it becomes a learning experience – something that will ultimately help you to be a better photographer. In a shoot I once wanted a little motion blur in a dance section.

    I shot at 1/15 of a second, and on my small LCD camera screen the images looked ok. When I got home and put them on my main monitor, they were all a little too blurred. The next time I shot in a similar situation I set my camera to 1/25 of a second and made sure I got what I wanted by zooming in on the LCD on the camera, and I got exactly what I wanted. It was a learning curve and now in that situation I know exactly what to do or rather what not to do.

    On the other hand, if you make a mistake and beat yourself up about it constantly it becomes something negative. It will create fear and actually stop you from moving forward. When you encounter a similar situation instead of going in there with a good idea of what not to do, you will instead do everything possible to avoid the situation altogether. Can you imagine a baby thinking ‘this walking stuff is just too difficult and falling down is painful. Who needs walking anyway, crawling is perfectly good enough. I’ll just stick to this crawling stuff in future.’

    Being a good photographer is as much about learning what not to do as it is learning what to do.

    Without making mistakes we could never become well rounded photographers, so the next time you make one when you shoot and you feel frustrated, walk around for a while and think about learning to walk. Then, get up, work out what you did wrong and then go and try it again.

    Draycat is British photographer, teacher and writer currently based in Tokyo, Japan. See more from him at his Website on Twitter on Facebook and on Youtube.

    Post originally from: Digital Photography Tips.

    Check out our more Photography Tips at Photography Tips for Beginners, Portrait Photography Tips and Wedding Photography Tips.

    Why Making Mistakes is Good for your Photography


    Digital Photography School

  • Tips for Objective Evaluation of Composition

    Composition is one skill within photography that we can probably never master, but just continually develop.  The composition we choose when taking a photograph, i.e. where we choose to place the boundaries of the frame, the perspective we choose to employ from the chosen focal length, how we choose to arrange objects within a scene etc, all influence the way a viewer interacts with the image, and so are all crucial to the success of any given image.

    When a composition of an image is broken down to the most basic level, it can almost always be considered as the balance and interaction between different shapes, patterns and light within the scene.  It is very easy to critically assess the photographs of others in this way within a couple of seconds of laying eyes on them, however, how often do we apply that objective critique to our own images?

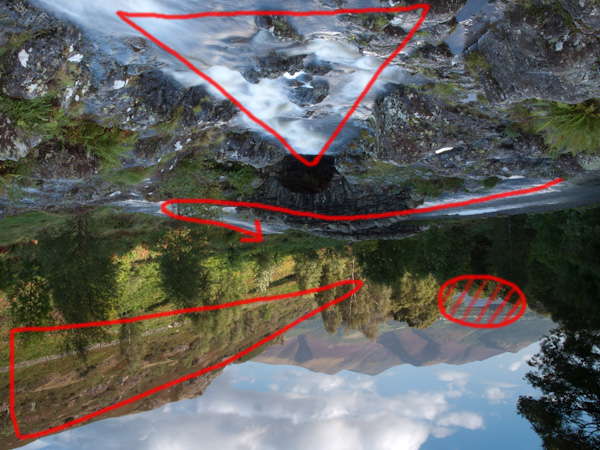
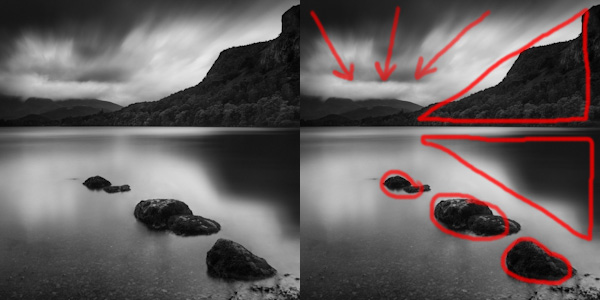
    Here I've outlined the major components that contribute to the composition of this image, namely the three stones leading in from the foregound, the two blocks of dark tone acting as triangles drawing in from the right, and the movement in the clouds leading the eye in from the top of the image

    Here I’ve outlined the major components that contribute to the composition of this image, namely: the three groups of stones leading in from the foregound, the two blocks of dark tone acting as triangles drawing in from the right, and the movement in the clouds leading the eye in from the top of the image.

    Personally, there are times when I find it very difficult to ‘see’ my own images in this way as I can have a strong emotional attachment to the image that can cloud my judgement.  What do I mean by emotional attachment?  One of the big draws of photography for me is to be outside, amongst nature, seeing scenes unfold in front of me that no-one else is witnessing at that point in time.  Therefore, after photographing an awe-inspiring sunrise across a landscape, it can be difficult for me to separate the resulting image from the experience of being there whilst taking the image – I can end up seeing my images through ‘rose tinted’ glasses and not judging them with the objectivity that others will.

    One effective way to overcome this is to not process images immediately, but to leave them for a few days or weeks until the memory of that moment of taking the photographs isn’t quite so fresh in your mind.  That way, you will see the image with fresh eyes, as others will.

    Another method I find very useful is to rotate the image by 180°, i.e. turn it upside down, during post processing.  When you do that, the image in front of you no longer resembles the landscape that you captured, but instead resembles the series of shapes and patterns the make up the composition of the landscape.  When the image is upside down, it becomes very easy to be objective about how well balanced elements within the landscape are and to see the distribution of positive/negative space; therefore it becomes easier to decide where to crop an image or to see where you may need to dodge/burn to help direct the eye to the points of interest.

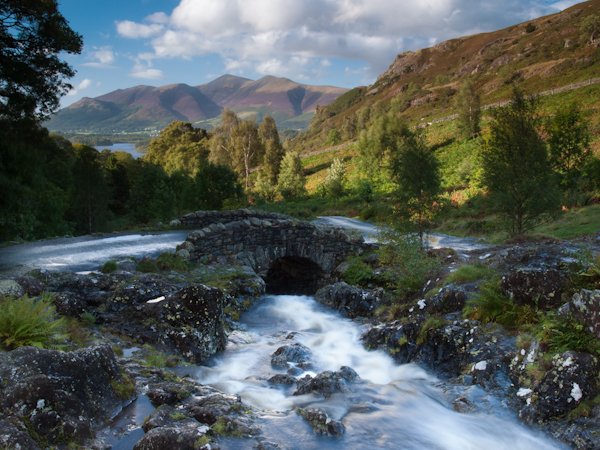
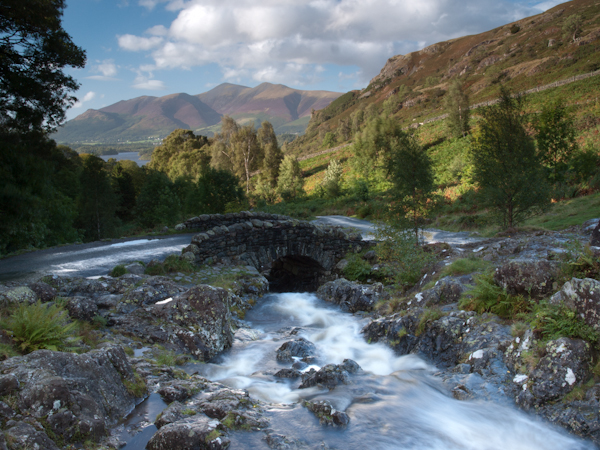
    An image from the Lake District, UK, straight out of the camera.  It is a very busy landscape, with a lot going on

    An image from the Lake District, UK, straight out of the camera. It is a very busy landscape, with a lot going on, so I needed to whether the composition works as is, or if any additional processing could help lead the eye of the viewer.

    By turning the image upside down, it is easier to distill the key components of the composition, namely: the cascade of water running towards the bridge, the road over the bridge to lead the eye further into the scene, and the hatched circle of interest in the background, being pointed towards by the triangle of well lit trees

    By turning the image upside down, it is easier to distill the key components of the composition, namely: the cascade of water running towards the bridge, the road over the bridge to lead the eye further into the scene, and the hatched circle of interest in the background, being pointed towards by the triangle of well lit hill side.

    The final image, with processing influenced by the upside-down evaluaiton

    The final image, with processing influenced by the upside down evaluation.

    So, if you haven’t tried this before, give it a try the next time you’re processing images and I think you’ll be surprised how useful it can be, and not just with landscapes either.  Do you have any other tips for ensuring you are evaluating the composition of your images objectively?  If so, please share them in the comments.

    Post originally from: Digital Photography Tips.

    Check out our more Photography Tips at Photography Tips for Beginners, Portrait Photography Tips and Wedding Photography Tips.

    Tips for Objective Evaluation of Composition


    Digital Photography School