Category: Photography

  • Converting Images to Black and White Properly

    Header Image

    by: David Wahlman of Wahlman Photography

    Recently I was asked about the process of converting images to black & white; namely when to know the image would be good for it. So in this post I’m going to talk about when to convert an image to black & white and then how to do it in Photoshop without loosing quality.

    When To Create A Black & White Image

    There are about three ideas that come to my mind when I evaluate whether I should convert an image to black & white (here on referred  to as b&w).

    1. First of all, and somewhat obviously, what is your desired outcome? Is your client specifically asking for b&w images? Are you entering a b&w photo contest? Are you doing a gallery set of b&w (because, generally speaking it doesn’t look too good to have just one or two b&w mixed in with colors. You want a good balance.)? Like I said, it should be pretty obvious that your outcome needs to be considered, but it was worth saying.
    2. Second, you should consider the value range of the image. In photography the term “value” speaks of darks vs lights. So when I say to judge the image’s value range, I’m talking about if you have deep blacks and bright whites. What’s your dynamic range like? For the most part, ‘flat’ images don’t look very good in b&w. Traditional b&w have good contrast and well spread value all across the histogram. So, if your image has these elements, then it may be a good choice for converting into a b&w.
    3. I’ll be doing a post soon on color theory and color relationship, but if you have odd colors or colors that don’t work well together, then it may be a good candidate for being converted to b&w. Let’s just face it, some colors don’t really work well together. B&w may be a good way to avoid these colors but keep the great shot.
    4. Just a tip, if you squint your eyes while looking at an image, you will see less color and more of the total value. This can be good for getting an idea of if your image has good value range.

    How To Convert A Color Image To Black & White

    Alright, now lets talk about how to convert your image, because there is a right and wrong way. You may get the same result, but if you do it wrong you actually loose quality (to be technical, you sacrifice bytes of information). For this article I’m going to be talking about using Adobe Photoshop. There is conversion software that you can buy, but for all intensive purposes, why pay extra when you can do it in Photoshop really easily.

    Step 1

    If you found an image that you want to convert, then step one would be opening the image in Photoshop. For my example, I’m using one of my wedding photographs that you may have seen on my website. It was shot during the first dance and I just really love this photo in b&w.
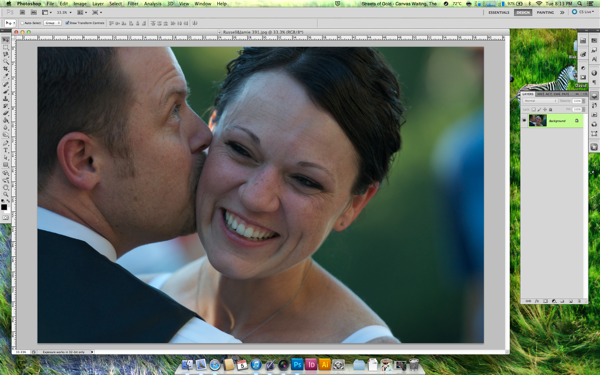
    Screen Shot 2013 03 05 at 8 13 48 PM

    Step 2

    Screen Shot 2013 03 05 at 8 13 57 PMNext, most people would try to go to the top menu, go to Image>Mode and change the color profile to “Grayscale.”

    Don’t do this!

    Long story short, you’re actually changing the color profile, which means you will lose pixel information in your colors. You don’t want that; you want to retain as much information in your image as possible.

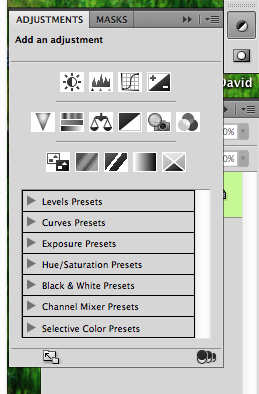
    What you want to do is use the black & white adjustments. You can access this either by going to the top menu to Image>Adjustments>Black&White or in your side bar click on the adjustments button (as shown in picture) and then click on the b&w icon, which is the black and white box divided diagonally.

    Step 3

    Screen Shot 2013 03 05 at 8 14 10 PMOnce you’ve clicked this, you should see adjustments for the value of each color (see image). Notice that Photoshop has kept track of colors in the image. It’s just displaying them as b&w, but your keeping the information in tack.

    This also gives you more control on editing your b&w cause you can adjust it by color section now. Be aware, that you don’t want to push the limits on these colors too much, you’ll start to see ‘clipping’ in gradient colors such as skies. You’ll see it in your preview as you do it, then you’ll know what I’m talking about.

    Step 4

    After this, you can use these other adjustments (which act as smart layers, if you know what that means. It’s a good thing) to adjust the image how ever you need; exposure, contrast, levels, curves, filters, etc.

    Step 5

    After you’ve done all the editing you feel you need to do you should hopefully have an image you’re pleased with as a final. From you there you can save it however you need and depending on your desired outcome. 
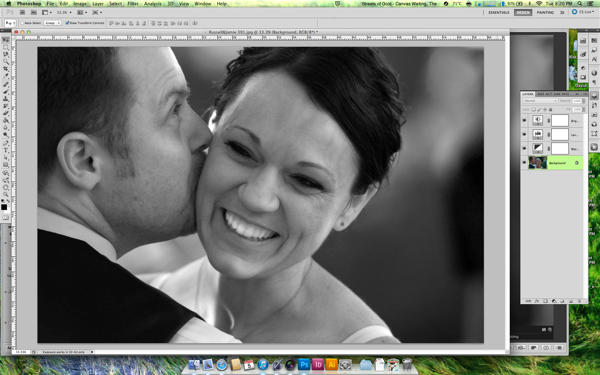
    Screen Shot 2013 03 05 at 8 20 12 PM

    If you found this article helpful or interesting, please share it with friends and family by using the media share buttons below. Thanks

    David Wahlman is a wedding and portrait photographer from Redding, CA. He works all around California and is aiming to get into destination photography. You can see his best work at www.wahlmanphotography.com and follow his updates on his facebook page.

    Post originally from: Digital Photography Tips.

    Check out our more Photography Tips at Photography Tips for Beginners, Portrait Photography Tips and Wedding Photography Tips.

    Converting Images to Black and White Properly


    Digital Photography School

  • Sunlight: Weekly Photography Challenge

    16-05-10 Last Of The Summer (Wine)In the last week on dPS we’ve posted a couple of tutorials that focus upon the ‘Sun’ in different ways with our posts Using the Sun as a Compositional Element and How to Use Sunset Light to Light Portraits.
    So – today I’m issuing you with a challenge that could allow you to practice those techniques (and a followup to last weeks Silhouette challenge). Your challenge is to take and share a photo that fits into the theme of ‘sunlight’.

    Feel free to take the theme in any direction – it is intentionally broad. You may choose to take a portrait by sunlight, take advantage of the Golden Hour, shoot a sunset or sunrise, shoot in the midday sun or even experiment with capturing some artistic lens flare.

    It is totally up to you.

    Once you’ve taken your ‘Sunlight’ image and have upload it to your favourite photo sharing site either share a link to it or – embed it in the comments using the our new tool to do so.

    If you tag your photos on Flickr, Instagram, Twitter or other sites with Tagging tag them as #DPSSUNLIGHT to help others find them. Linking back to this page might also help others know what you’re doing so that they can share in the fun.

    Also – don’t forget to check out some of the images posted in our last challenge – Silhouette challenge where there were some great images submitted.

    Post originally from: Digital Photography Tips.

    Check out our more Photography Tips at Photography Tips for Beginners, Portrait Photography Tips and Wedding Photography Tips.

    Sunlight: Weekly Photography Challenge


    Digital Photography School

  • The 10 Ultimate Camera-Care Tips for Beginners and Experts Alike

    The most important thing you can do for your camera is to take care of it well. If you look after your camera properly, it will reward you with a long life. A lot of people know how to take pictures, but not everyone knows how to extend the life of their camera through proper care. If you want to Continue Reading

    The post The 10 Ultimate Camera-Care Tips for Beginners and Experts Alike appeared first on Photodoto.


    Photodoto

  • Using the Sun As A Compositional Element

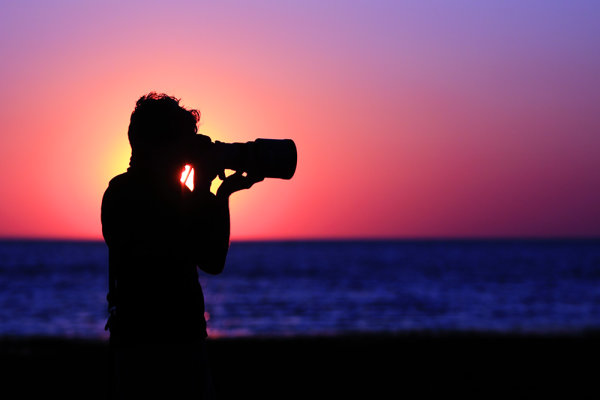
    As the sun set on Massachusetts Bay, I turned and saw my buddy Joe lining up a shot. I walked around him until the sun was directly behind his head, and dialed my exposure way back to -2 stops to create the sihouette. Canon EOS 50D, EF 70-200 f/2.8L IS USM. ISO 100, 1/6400, f/2.8. Shot in Av mode at -2 exposure compensation.

    As the sun set on Massachusetts Bay, I turned and saw my buddy Joe lining up a shot. I walked around him until the sun was directly behind his head, and dialed my exposure way back to -2 stops to create the sihouette. Canon EOS 50D, EF 70-200 f/2.8L IS USM. ISO 100, 1/6400, f/2.8. Shot in Av mode at -2 exposure compensation.

    For the most part, as photographers, we avoid shooting into the sun for fear that we’ll get some unsightly flaring.  The sun DOES present some exposure challenges, and of course, flare is a concern, but by carefully composing your shot, and properly exposing, including the sun in your images can create stunning results.

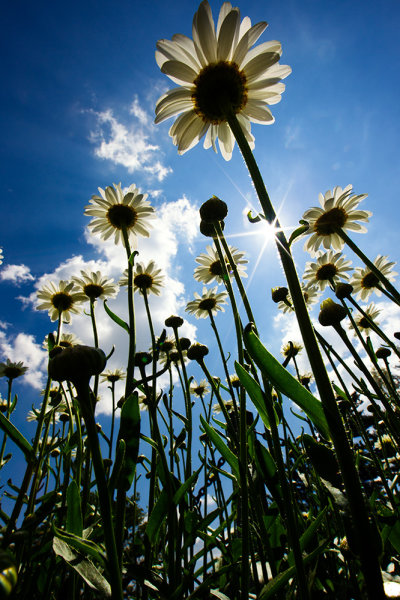
    The first secret to using the sun is about positioning.  When you can, position the sun behind something else in your image. In the image of the photographer above, this gives the effect of a halo, helping create the silhouetted image.  By using exposure compensation to darken the exposure, I kept the sun from blowing out, and darkened the main subject into the silhouette. I then adjusted the white balance and color saturation to get the final result. Because the image was shot at f/2.8, the sun appeared as a giant ball in the image. In another example, the image of the daisies, a wide angle lens was used to make the sun smaller in the image, and was then positioned just behind the stem of the daisy. Because the image was shot at a smaller aperture, f/22, the sun appears as a star rather than a ball.  One of the cool things that happens when shooting into the sun with a wide angle lens at a small aperture is that the light falls off in the areas away from the sun, creating dramatic skies that go from near white by the sun, to deep blue in the corners.

    This image of daisies was shot with the EOS-1D Mark IV and EF 14mm f/2.8L II. Exposure was 1/100, f/22, ISO 100. Aperture Priority.

    This image of daisies was shot with the EOS-1D Mark IV and EF 14mm f/2.8L II. Exposure was 1/100, f/22, ISO 100. Aperture Priority.

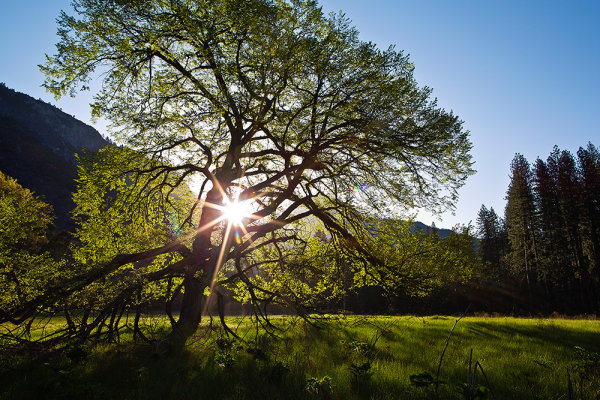
    Shooting into the sun does pose some exposure challenges.  Shooting into such a bright light can cause underexposure.  That’s not necessarily a problem if you’re going for a silhouette, but if you want some detail in the subjects that are backlit by the sun, you’ll need to dial in some exposure compensation to counter the brightness of the sun.  In the image of the Elm In Cook’s Meadow, the image at what the camera said was the proper exposure was a bit dark, and devoid of shadow detail.  Thankfully, for this image, I shot several images at varying exposures (also called bracketing). The image you see here was shot at +1.6 exposure compensation, in aperture priority mode.  This allowed for a level of detail in the shadow areas, while not allowing the highlights to blow out.

    For this shot in Yosemite National Park, I shot in Aperture Priority, with exposure comensation set to +1.6.  EOS 5D Mark III, EF 24mm f/1.4L II. ISO 100, 1/30, f/16.

    For this shot in Yosemite National Park, I shot in Aperture Priority, with exposure comensation set to +1.6. EOS 5D Mark III, EF 24mm f/1.4L II. ISO 100, 1/30, f/16.

    By bracketing your exposures, you can see how changing your exposure will affect the look of the image.  Normally, I set my aperture and bracket my exposures by changing shutter speed, as I will generally know what I want my depth of field to be.  There are times to try it the other way, setting your shutter speed and adjusting your aperture. This will affect your depth of field, however, so be aware of what’s in focus and what’s not.  Your final option is to adjust the ISO.  The risks here are that when you raise the ISO to achieve the overexposure, you run the risk of introducing unwanted noise into your image, depending on how high you set the ISO.  This technique can give your several options when working with the contrast ranges you deal with when shooting into the sun.

    Don’t be afraid to include the sun in your shots, using it as a strong compositional element. Too often we forget to use the sun in the image, simply using its light.   Including the sun in the shot creates new possibilities that can make for some dramatic images.

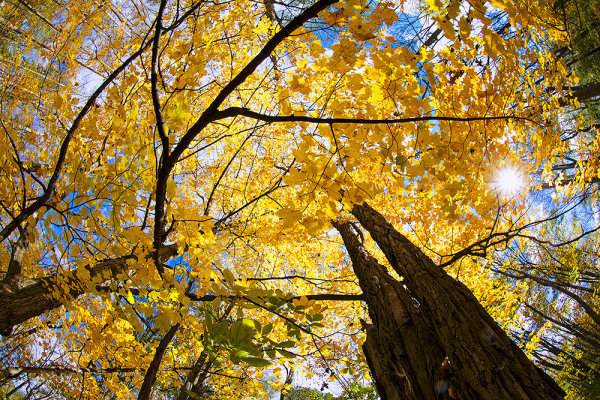
    This shot of the canopy of autumn leaves in upstate NY was taken with a fisheye lens. The sun shining through the gap in the leaves added just the touch of drama I needed. EOS-1D X, EF 8-15mm f/4L.  1/60, f/16, ISO 100.

    This shot of the canopy of autumn leaves in upstate NY was taken with a fisheye lens. The sun shining through the gap in the leaves added just the touch of drama I needed. EOS-1D X, EF 8-15mm f/4L. 1/60, f/16, ISO 100.

    Post originally from: Digital Photography Tips.

    Check out our more Photography Tips at Photography Tips for Beginners, Portrait Photography Tips and Wedding Photography Tips.

    Using the Sun As A Compositional Element


    Digital Photography School

  • Save 33% on ‘The Photographers Workflow’ by Gavin Gough

    photographers-workflow.pngOne of the most popular deals that we had in last years 12 Photography Deals of Christmas campaign was when we offered a discount on renowned travel Photographer Gavin Gough’s eBook – The Photographer’s Workflow.

    Readers fed back that getting this insight into Gavins digital workflow was really valuable.

    So over at SnapnDeals we asked Gavin if he’d mind bringing back the deal this week.

    For the next 7 days you can again pick up this popular eBook at 33% off.

    This great resource is perfect for anyone looking for a system to manage the digital photos that they take and if you’re anything like me, that’s quite the task due to the number of images that I take on a given week!

    What Gavin describes is based upon use of Lightroom (an amazing tool that I use and recommend) and once you set yourself up with the principles described in this eBook you’re going to save yourself a heap of time and will also put your mind at ease your images will be safe and backed up too!

    What do You Get with the Photographers Workflow?

    This is more than just an eBook – here’s what you’ll receive:

    1. a 10 chapter eBook (130 pages) – a comprehensive guide to establishing a reliable and consistent digital photography workflow.
    2. 65 Lightroom 4 Development Presets to help give your processing a more consistent linear structure
    3. A series of Lightroom Smart Collections which build a step-by-step workflow for managing digital photographs
    4. Links to a series of free, online video tutorials to help you visualise what Gavin teaches in the eBook

    The thing that I particularly love about Gavin’s approach is that he not only gives you the theory but he gives you tools and also scatters through his eBook practical exercises for you to DO that will help you set up your own workflow.

    Not only that you get to see what he’s talking about with the videos and many diagrams and screenshots in this eBook.

    The Photographer’s Workflow is Gavin’s professional workflow. It’s the system he use every day to manage his digital photographs. In it he shares the structure, principles, presets that he’s acquired over ten years as a professional photographer and it will literally save you hours of time and give you a lot of peace of mind!

    Save 33% Today

    The Photographers Workflow is normally priced at $ 30 but today you can pick it up with a 33% discount and get all of the above parts of this great resource for just $ 20 when you pick it up through SnapnDeals here.

    Post originally from: Digital Photography Tips.

    Check out our more Photography Tips at Photography Tips for Beginners, Portrait Photography Tips and Wedding Photography Tips.

    Save 33% on ‘The Photographers Workflow’ by Gavin Gough


    Digital Photography School

  • Lens Hoods: Everything You Ever Wanted to Know

    Phil Steele recently released a good video on the topic of Lens Hoods that I thought readers might enjoy.

    It covers everything from the why, when, and how of using Lens Hoods.

    Just a reminder – Phil currently is offering 30% off his Lightroom Made Easy online course for just a few more days on SnapnDeals.

    Post originally from: Digital Photography Tips.

    Check out our more Photography Tips at Photography Tips for Beginners, Portrait Photography Tips and Wedding Photography Tips.

    Lens Hoods: Everything You Ever Wanted to Know


    Digital Photography School

  • 10 Tips How to Avoid Blurry Pictures when Shooting from a Kayak

    Pentax Optio WG3 waterproof camera Compact waterproof digital cameras like Pentax Optio W-series or Olympus Tough series are popular among paddlers. They may not offer the highest image quality among point-and-shoot cameras, but they still produce decent pictures. Most importantly, you can photograph in conditions where other cameras are better kept in a dry case or box.
    However, new camera owners are often getting pretty bad, blurry pictures and are really disappointed with a purchase. Shooting on water from a kayak or canoe requires some extra efforts and practice from a paddling photographer. Here are a few tips which may help. This is an update of my old post written 5 years ago. Cameras are getting better, but, I believe, the tips below are still valid. I have been using Pentax Optio waterproof cameras starting from the original model WP, then W10, W30, and, currently, WG2 is attached to my life jacket.

    1. Use the automatic mode

    I do not have any special settings for my camera. On water I use exclusively the P (program) mode. Of course, in addition to the P mode I use the movie mode and interval drive mode quite often.
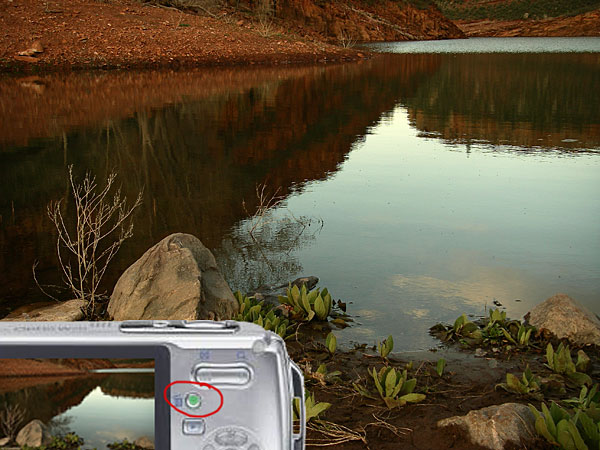
    You can program the green button to do useful adjustments without a need to go through a setup menu. I am using two functions assigned to the green button: exposure correction and, much less often, white balance setups. Typically, I underexpose my shots to avoid overexposed areas with wash out details. Coincidentally, it shortens the exposure time which helps to avoid blurry pictures, but this is not a main purpose of this adjustment.

    2. Keep the camera steady

    This is the most important tip. However, it is not so easy when paddling, especially, when water is not calm. Ideally, you should hold the camera in both hands. In addition, it is quite easy to shake the light and small camera just by pressing a shutter button.

    3. Use a paddle shaft to stabilize the camera

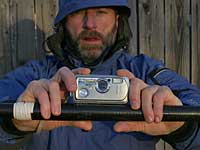
    Here is a short video clip demonstrating how I am doing it.
    This technique really helped me when I was starting to paddle a tippy Sisson Nucleus kayak. You can achieve two goals: to stabilize the camera and to stabilize your kayak. You have your paddle ready for bracing. This technique does not work with strong, gusty winds.

    You can go further with this idea and attach or mount your the camera more permanently to your paddle – see a camera cradle by Mark Sanders.

    4. Use a self timer

    The 2 second selftimer available in Pentax Optio is very useful to avoid shaking the camera when pressing the shutter button. I recommend it, especially, when you are holding the camera with one hand (shooting on an extended arm or from some unusual angles).

    5. Keep your lens clean of condensation, water drops, water residue

    I keep my camera in a small neoprene pouch attached to my life jacket and usually do not have problems with water or dirt on my lens. The camera is always on a tether. Shooting with a camera mounted on a deck and exposed to splashes is another story.

    6. Pay attention to light and sun position

    Try to shade you camera lens from a direct sunlight to avoid a lens flare. Do not shoot against the sun.

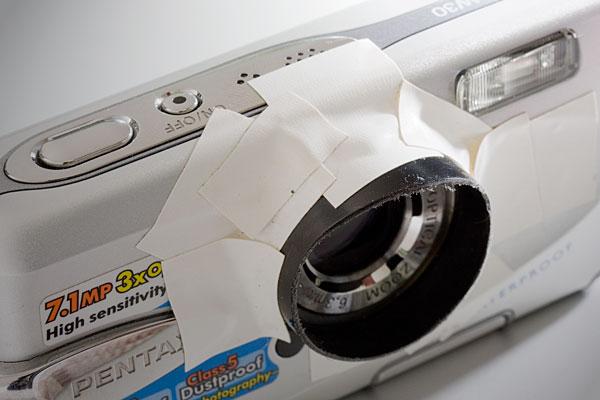
    It is possible, at least for Pentax, to glue (epoxy) some step-up rings and to attach lens hood to your camera. I am using much simpler solution: an improvised lens hood attached with an electric tape to the camera.

    You can expect the best “sweet” light for shooting when the sun is low, so after the sunrise and before sunset. Do not expect too much from this camera in low light conditions, but do not give up with shooting as soon as the sun is down. Consider shooting some silhouettes or water reflections then.

    7. Use flash

    Sometimes, I use flash to add light to objects in my fore plan. Usually, a soft flash option works better for a kayak deck. Be aware of any reflective tape on your kayak or gear.

    8. Shoot multiple frames

    Don’t limit yourself to a single shot for a given scene. Repeat the shot. Try different angles, horizontal and vertical format. You will increase your chances to get that great shot. Digital memory is cheap. You can always erase unsuccessful pictures later.

    9. Photoshop …

    Downloading pictures from the camera to your computer is not the end of your work as a photographer.
    Use Photoshop or other image editing software to post process your pictures. Most often, I rotate my pictures to make horizon horizontal, adjust the exposure with levels, crop and resize them, and, finally, apply some sharpening. You cannot save completely blurred pictures in Photoshop, but you can improve most of them.

    10. Practise

    There are no reasons not to take and use the camera wherever you go. It is small and waterproof. Experiment and have fun.

    Time to to time it is useful to browse through the camera manual. You may find something new and exciting in a jungle of all these options and settings.

    More tips?

    Could you share tips from your experience with a kayak or canoe photography? Are your on water pictures worse than these shot on land?

    Some related articles where I am sharing my experience from paddling and shooting with Pentax Optio WP, W10 and W30 cameras:

    • Pentax Optio W20 Waterproof Camera Review, Tips, and Sample Photos
    • Kayak Photography: Using Your Paddle to Stabilize the Camera – Video Clip
    • 7 Tips on Kayak Photography: How Did You Shoot It?
    • No Viewfinder? 10 Tips on Shooting Pictures without Viewfinder
    • Is Pentax Optio W10/W20 the Paddler’s Camera? Many Boats, Many Cameras …
    • Kayak Photography Links – Tips and Hints for Paddling Photographers


    paddling with a camera

  • How To End Exposure Problems and Master Metering Modes in 5 Minutes

    You pull out an impressive piece of equipment. Her eyes widen. Did she lick her lips? The pressure’s on now. Yes, she definitely licked her lips. When you declare with total confidence, to a beautiful woman, that you’re a  photographer, there are potential benefits and downsides. Suddenly she wants you to take photos of her in the night sky, with Continue Reading

    The post How To End Exposure Problems and Master Metering Modes in 5 Minutes appeared first on Photodoto.


    Photodoto

  • 10 Tips To Get Over Photographer’s Block

    Going through a creative rut can be frustrating, and sometimes scary, but it is usually temporary. Photographer’s block can happen to you at any time. It’s up to you to turn it into a positive experience and grow in the process.

    Get lost on purpose! Don’t think about what you are going to shoot, just get out with your camera. Something will trigger your photographic eye along the way.

    Get lost on purpose! Grab your camera with no goal in mind and you will soon see something that triggers your photographic eye.

    1-Push yourself, take risks and make mistakes.

    The saying is not that we learn from our successes, but that we learn from our mistakes! Experiment with different techniques and genres and don’t be afraid to fail.

    2-Get out of your comfort zone.

    Try something that seems completely out of character for you. If you are a rather shy person, go out and shoot some street photography or make street portraits of strangers! You never know whether you are going to love it or hate it until you try it.

    3-Spend time with other photographers.

    More often than not, we are the only ‘photography nut’ in our family. It can be very frustrating at times but we cannot force others to love the craft as much as we do. As long as your family is supportive of your passion, don’t expect them to share your excitement every time you see something that turns you on photographically. Get together with other photographers by joining or creating a photo walk group in your area. You will get your fix and grow as a photographer by seeing and learning something new with each outing.

    4-Take a class.

    Whether it is in a physical classroom or online, taking a photography class can help you get your groove back. Participating in a workshop, whether it’s a day long in your hometown or a week-long adventure in an exotic location, will definitely help motivate you.

    5-Seek inspiration.

    Visit museums and art galleries. Look at photography and other art forms such as paintings and sculptures. Pick up a large book of photographs from artists you’ve long admired and slowly page through it, paying attention to the composition, light and story. Look at the work of emerging artists on line. The goal is to immerse yourself in something beautiful.

    6-Become a mentor.

    Go out with someone who just picked up a camera and help them get started. I can guarantee you that sharing your love for photography and technical knowledge with someone who is just learning will rekindle your creativity. You will learn something in the process and feel really good about yourself.

    7-Get lost on purpose!

    Don’t think about what you are going to shoot, just get out with your camera. Something will trigger your photographic eye along the way.

    8-Pick a theme.

    It may be as simple as photographing the color yellow, reflections in puddles or people walking their dogs. Leaving the house with a theme in mind will keep you focussed and turn your photo walk into a treasure hunt.

    9-Start a project.

    Commit yourself to a long term project such as a 52-week project or a series of self portraits. Get extra motivation by doing it as part of a group via your favorite social media platform.

    10-Try new gear!

    Borrow or rent a new lens for a weekend. Try something fun like shooting with a fish eye lens or a tilt-shift. Easier yet, you can experiment with a camera phone and fun Apps!

    Conclusion

    It’s okay to take a little break too! Remember that creativity is a process, not a result. A creative block is not something to fear. It is part of being an artist.

    Please share your experience with the readers of Digital Photography School. Thanks!

    Post originally from: Digital Photography Tips.

    Check out our more Photography Tips at Photography Tips for Beginners, Portrait Photography Tips and Wedding Photography Tips.

    10 Tips To Get Over Photographer’s Block


    Digital Photography School

  • The Simple Light: How to Take a Great Passport Photo

    Fact: most people on the planet—including roughly two-thirds of Americans—do not have a passport.

    Without a passport, you won't be traveling internationally any time soon. And even if you have no immediate travel plans, just having a passport is kinda like having a muscle car at a red light. You won't always squeal tires when the light turns green, but you know you could.

    If you have never held a passport before, it's a neat feeling when it arrives in the mail. For perhaps the first time, you feel like a citizen of the world. Merely having the possibility of international travel is better than not having a passport and being guaranteed you can't go.

    Even better, unlike your crappy driver's license or student I.D. mugshot, your passport photo is something you can control. So if you are gonna be a jet-set traveler, you may as well look good doing it.

    Read more »
    Strobist