Category: Photography

  • How to Lose Control of Your Photos With Getty Images

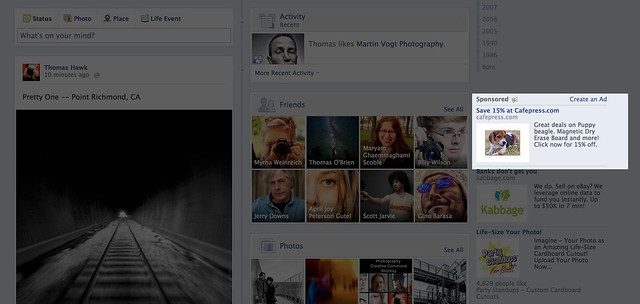
    Facebook Thomas Hawk Image

    Last week photographer Remi Thornton penned a post about why he quit working with Getty Images. Remi alerted photographers to a new scheme by Getty Images whereby they were “loaning” photographer images (without pay) to Cafe Press for marketing purposes. The idea is that Cafe Press could use photographers’ images without paying, unless a sale was made, then a photographer might receive a royalty.

    Allowing Cafe Press free use of photographers’ images for marketing did not sit right with Remi or other photographers, Remi felt that Cafe Press should have to pay a royalty for using the image at all and not get to use the images to market Cafe Press for free.

    On March 25th, I submitted my own resignation to Getty Images. Shortly thereafter on March 27th I received acknowledgement from Getty along with the following:

    “As per your recent request where you expressed your desire to terminate your outstanding contract with Getty Images, this is your official notice of termination of the Agreement between yourself and Getty Images, which had a Commencement Date of 3/11/2009.”

    A few days later my images disappeared from Getty’s website for sale.

    One would think that upon termination with Getty Images, the pilfering of images by Cafe Press would cease, but not so. Not only are my images still up for sale with Cafe Press (being marketed in a large font as “Thomas Hawk Gifts”), Cafe Press is additionally ADVERTISING them to me to buy on Facebook (again without pay — see image above).

    Even though I no longer have a relationship with Getty and have NEVER had a relationship with Cafe Press, they want to sell me a dry erase board of a dog image of mine. I can also buy a wine charm thing or a beer coaster if I want.

    I’m sure in the super fine print of my contract with Getty there is some loophole that is allowing this, but frankly it’s bad enough that Getty is allowing Cafe Press to market our images without pay. To further allow our images to be marketed in Facebook ads (again, without pay) seems a bit far fetched — especially when my relationship with Getty is supposed to be terminated. And why is Cafe Press specifically targeting me on Facebook trying to sell me my own images?

    I have no idea how long my images must remain for sale at Cafe Press, but this just serves as an example of how a photographer can lose control over their images with Getty.

    I wonder how much money Getty was paid to allow Cafe Press to use our images for free on Facebook?

    I’d ask Getty what the deal is in the Contributor forum, but alas, I’ve been permanently banned from the Contributor forum for daring to criticize Getty’s paltry 20% payout.


    Thomas Hawk Digital Connection

  • Perseverance and Patience Will Payoff

    When I look at my collection of photographs, my favourites are always the ones I really had to work for.

    75% of the time I photograph what is in front of me, what is there when I get there, and I make the best of whatever weather conditions and light are present. But the other 25% I chock up to sheer stubbornness, or in other words, perseverance and patience.

    Fire Wave, Valley of Fire

    Recently I was in Nevada in the Valley of Fire State Park where I stayed at an RV park that was an hour away from the park entrance. I spent hours doing research about the park and learned about a specific location I wanted to photograph called “Fire Wave” which was not on the park maps.

    It took about 1.5 hours to drive to the trail head and another half an hour or so to hike there (it sure seemed longer in the heat). When I got there, the light was just terrible. It was a grey sky day. I was hoping at the last minute the light would break through and give me the drama I wanted but it didn’t happen.

    What was worse was a group of rude photographers who had also discovered the location. Usually I find other photographers are helpful to each other, staying out of each other’s way, and taking turns making images. But not these people. They were purposefully leaving bags and tripods in the way of specific points of view while they were photographing a different point of view, preventing other photographers from getting the shot. They were all together and I believe they drove out from Las Vegas for the day, so I guess they felt they owned the shot.

    It just wasn’t to be. But I persevered.

    A couple of days later I tried again. Another 3 hour drive round trip, another $ 10 park entrance fee, another hike in even greater heat to a place I had already seen, but this time it was different. There were a few other photographers there, but they were nice people. There was some lovely light, some puffy clouds, and I got the shot.
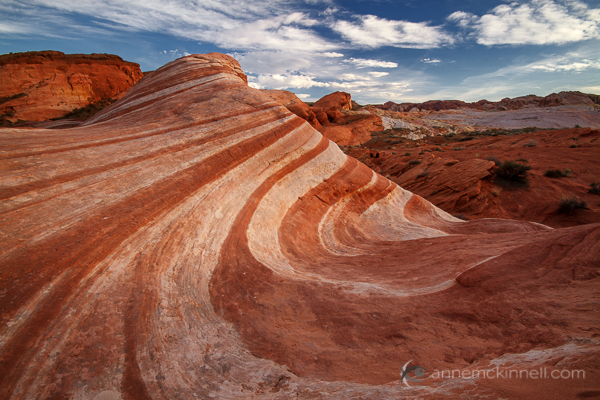
    Fire Wave at the Valley of Fire State Park, Nevada, by Anne McKinnell

    Ding Darling Wildlife Refuge

    When I visited Florida, I really wanted to make some images of wading birds with reflections. It was one of the dream images I always wanted to make — the image I had in my mind before I ever went to Florida. In hopes of getting the shot, I rented a lens specifically for the occasion.

    First I did a trip out to the park one afternoon to scout the location and figure out where I might be able to make such a shot. I found a section of water that was somewhat protected from the wind where a few birds were hanging out and I figured it was a good candidate.

    The next day I got up long before the sun rose and drove to the park to be there as soon as it opened in the morning. I drove along the park drive to the location I picked, got my gear out, positioned myself on the shore, and waited. I waited and waited and nothing happened. Eventually the light got bright and the wind came up and there was no longer a possibility of getting the shot I wanted. I went on to make other images, but I didn’t get the one I really wanted.

    So I went back the next morning and did the same thing. Drove to the location, got my gear out, sat and waited and waited. This time some birds came, but so did the wind and while I got some nice images, I still didn’t get the one I dreamed of.

    So I persevered and went yet again. I think the man who opens the park gate in the morning was wondering why I was the first person there three days in a row. But on the third day, my fourth visit, it was as calm as calm can be. The light was perfect. I sat motionless waiting and waiting and then payoff!! I got three birds with perfect reflections: a spoonbill (this is the image I always dreamed of), a wood stork and an egret.
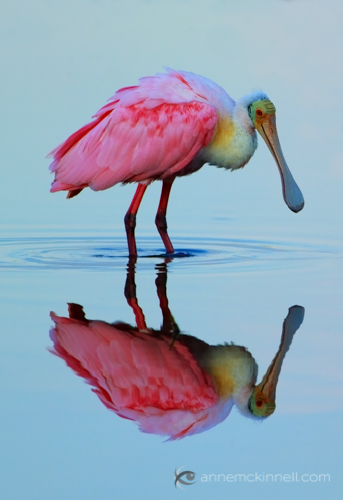
    Roseate Spoonbill at the Ding Darling Wildlife Refuge, Florida, by Anne McKinnell

    Never have I had a bigger payoff for my stubbornness.

    Bandon Beach

    At Bandon Beach in Oregon, I wanted to make an image of the sun setting behind the rocks. There was lovely colour in the sky, but just as the sun starting making its descent towards the horizon the wind came up. It got windier and colder and I got pelted with sand and soaked with sea spray until finally I was the only photographer left on the beach. I was shivering cold, but determined to make the image I wanted.

    I used a UV filter on my lens to protect it from the ocean spray that soaked everything and the blowing sand that felt like a sand blaster. I was getting the odd image, but they were always clouded with water, salt and sand. I turned my lens away from the wind as best I could, blocking it with my body, cleaned it and quickly put the lens cap on.

    Then I got everything set up exactly the way I wanted it, quickly removed the lens cap, and took the shot. Then I repeated that whole process with cleaning the filter and quickly taking the lens cap off to make the image. Rinse and repeat — literally!

    Finally, after about twenty attempts, I got a clean shot that was just what I wanted, made only moments before it would have been too late.
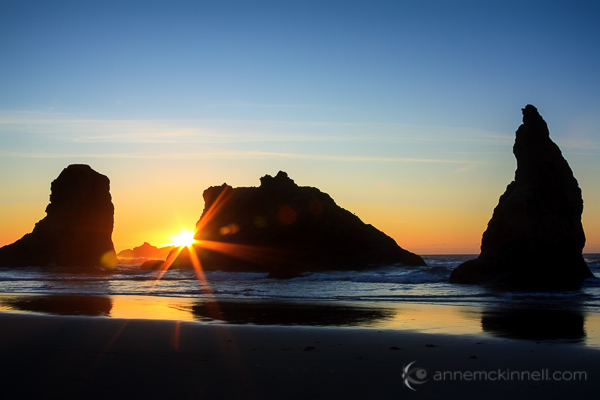
    Sunset at Bandon Beach, Oregon, by Anne McKinnell

    Occasionally getting a great image is pure luck. Usually we can make pretty good images at any time by using the light to our advantage. But more often than not I find the images that hit it out of the park are the ones I really worked for — when I planned everything out, persevered by going back to a location again and again, and tested my patience by waiting for the right light and enduring sea spray, blowing sand, freezing cold, or bug bites.

    Those are the occasions that had the biggest payoff. Now, when I look at my collection, those are the images I am most proud of.

    Post originally from: Digital Photography Tips.

    Check out our more Photography Tips at Photography Tips for Beginners, Portrait Photography Tips and Wedding Photography Tips.

    Perseverance and Patience Will Payoff


    Digital Photography School
  • How to Easily Create Selective Color Using Lightroom

    This is a guest post by: John Davenport

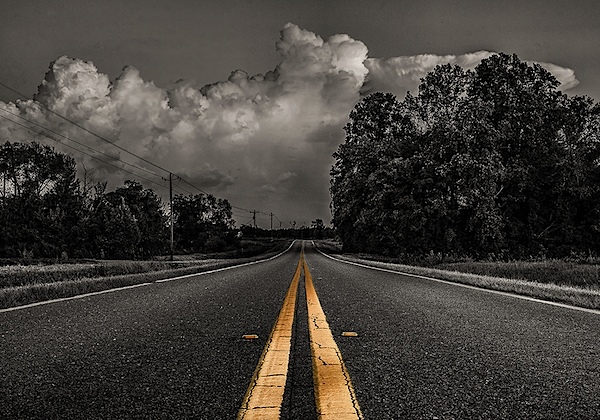
    Selective color photography has been around for ages. It’s something that has been used in the movies – Schindler’s List and Sin City come to mind – and more recently Chase Freedom and Budweiser have used it in their ad campaigns to highlight their products. So even if you dislike selective color, or if haven’t given it much thought, you have to admit it’s a great technique to use when you’re trying to draw attention to a certain subject and is something useful to have in your tool belt.

    Today I’m going to show you how to create simple selective color images using only Lightroom as your processing software.

    What Makes a Good Selective Color Image?

    Double Yellow.jpg

    First we need to make sure we know what to look for when we’re out photographing our subjects because selective color photography is not something suited for every situation. Whether you’re a landscape photographer, a portrait photographer, or someone shooting on the city streets it’s important to keep the idea in the back of your head that selective color shouldn’t be forced.

    Typically you’ll want to pull a vibrant color out of a rather drab scene so fall foliage can work really well, blue eyes in portraits are a very common theme, bright dresses and clothing work well too.

    One final point is that you should make sure that whatever you’re keeping in color adds value to the photograph and isn’t something that will detract from the overall scene.

    How to Create Selective Color in Lightroom

    One of the limitations of Lightroom is that it does not have the ability to do true layers like Photoshop does. We can get around this for selective color processing by working with the HSL tab and working with the Adjustment Brush tool. In short, what we’re going to be doing today is turning the saturation down on all the colors and areas of the photograph that we don’t want color in. The following is a step by step guide on how I created the image at the top of this post.

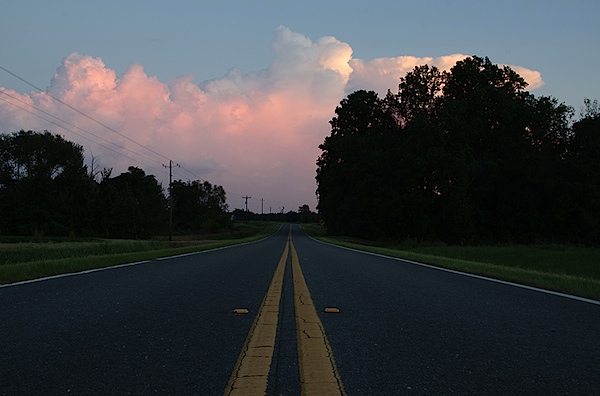
    Here’s the original image for your reference.

    original.jpg

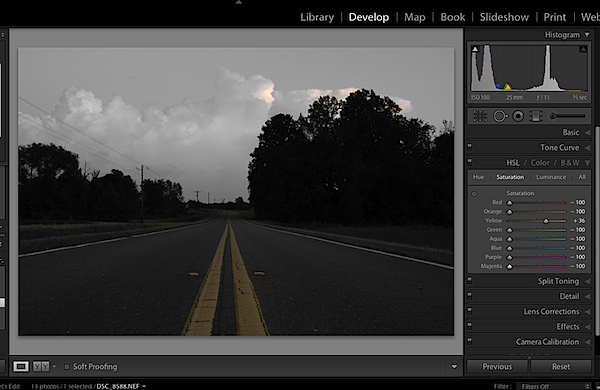
    The first step would be to go into the HSL tab in Lightroom and remove the saturation from all the colors you don’t want in your photograph. In my case I wanted to keep yellow so all the other sliders have been pulled to the far left.

    Screen Shot 1.png

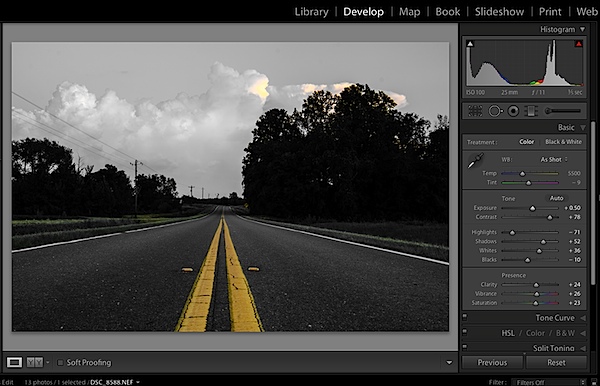
    Next step would be to tune the image to your liking – this is a rough tuning just something to get you close to where the final image will be. Simply go into the Basic editing tab of Lightroom and get the overall image set up how you like. You might notice as you do this, some colors start creeping back into the photograph, that’s okay we’ll fix this in the next step.

    Screen Shot 2.png

    Cleaning up any colors that have reappeared after your tuning process can be done easily with the Adjustment Brush. Simply create a new adjustment brush layer and turn the saturation to the far left. Paint anywhere you don’t want color. If you accidentally paint over something you want to keep switch to the erase mode and go back over that area until you get it right.

    Screen Shot 3.png

    After you get to this point it’s up to you to finalize the photograph for your own unique look with final touches and cropping.

    I find that this workflow does a good job at creating selective color images without the confusion and time consuming nature that dealing with layers in Photoshop has. Of course it should be noted that with a program like Photoshop you’ll have a lot more control over your selective color processing, but for many of us this Lightroom trick is a great alternative.

    Let’s Hear From You

    Now that we’ve learned how to perform selective color edits I’d love to hear what your opinions are of this kind of processing do you use it? Do you hate it? Have you ever done this kind of thing in Lightroom before?

    John Davenport is an avid amateur photographer who shares daily photos on Facebook. For more tips on Lightroom editing check out John’s weekly series which focuses on how to edit photos in Lightroom.

    Post originally from: Digital Photography Tips.

    Check out our more Photography Tips at Photography Tips for Beginners, Portrait Photography Tips and Wedding Photography Tips.

    How to Easily Create Selective Color Using Lightroom


    Digital Photography School

  • 6 Easy Ways to Give your Photographs a Compelling Narrative

    Everybody loves a good story. Knowing this fact is what separates a good photographer, from an exceptional one. With this knowledge, a photographer has a whole breath of tools at their command to trap the viewer, and cause them to be spellbound! Below I have listed 6 of the best ways to give your photographic approach the artistic edge of Continue Reading

    The post 6 Easy Ways to Give your Photographs a Compelling Narrative appeared first on Photodoto.


    Photodoto

  • Grab our Food Photography Guide for just $7 [24 Hours Only]

    snapnfood3 weeks ago we released a brand new mini-guide to Food Photography over at our sister site – SnapnGuides.
    The guide was released with a 30% off early bird discount (bringing the price down to just $ 7) and today I just wanted to let dPS readers know that that discount ends in just on 24 hours time.

    This ‘http://www.snapnguides.com/’ guide will:

    • break down all the important aspects of photographing food
    • give you practical advice on what gear to use
    • show you how to leverage available light
    • teach you how to use simple props to great effect
    • illustrate how to use different composition techniques and shooting angles to take great food images
    • help you to develop your own style of taking delicious photos of the food you make and eat

    If you were thinking about grabbing a copy here’s the link to save 30% for the very last time.

    In 24 hours the price will go up.

    Post originally from: Digital Photography Tips.

    Check out our more Photography Tips at Photography Tips for Beginners, Portrait Photography Tips and Wedding Photography Tips.

    Grab our Food Photography Guide for just $ 7 [24 Hours Only]


    Digital Photography School

  • Tips for Shooting Landscapes with a Telephoto Lens

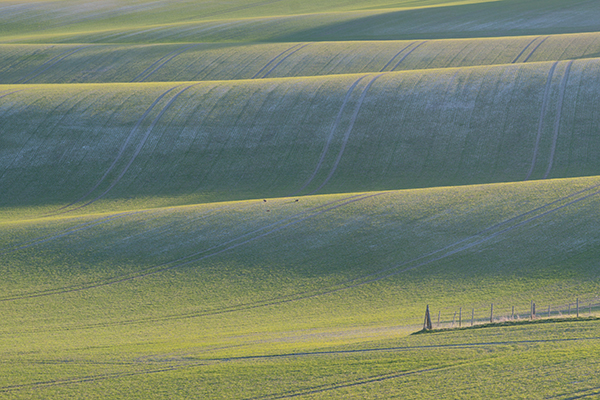
    Landscape photography is often synonymous with wide-angle lenses, strategically placed foreground elements and all encompassing vistas that stretch from the very near to the very far.  There is no doubt that using that approach can create wonderful images that lead the viewer through a grand landscape however there is also merit in taking a different approach and using a telephoto lens.

    Telephoto Landscape - Rolling Farmland

    This rolling farmland was isolated using a focal length equivalent to 280mm, f/13, 1/200s, ISO 200, using a tripod

    Often, when photographing a landscape, there is a particular element of the scene that has caught your eye and made you want to capture the image.  With a telephoto lens, it is possible to isolate that key element and bring it to the fore of the composition, rather than let it get lost amongst the other distractions introduced when shooting with a wide angle.  You will find that a telephoto lens will also compress the perspective of the landscape, brining distant objects much closer, giving a different sense of scale to when using a wide-angle lens.

    The approach taken to shoot landscapes with a telephoto lens is similar to when using a wide-angle lens, though there are some additional considerations.  Here are a few tips to help you along the way:

    1. Composition: Look for a strong feature of the landscape and try to isolate it within the frame, leaving out unnecessary elements that detract from the composition, for example, the sky – we often feel the need to include the sky within landscape images, however if it doesn’t add significant interest, or would detract from the main element, why not leave it out?

    2. Sturdy support: You will want to use a sturdy tripod to ensure you can shoot without suffering from camera shake.  Telephoto lenses are very sensitive to the slightest movement so a solid support is key to capturing sharp images.  If shooting handheld, a good rule of thumb is to aim for a shutter speed quicker than ‘1/focal length’ to avoid camera shake however depending on the available light that is not always possible, hence the recommendation for a tripod.

    3. Camera shake: Utilise ‘mirror lock-up’ or a remote shutter release (even both) to further reduce the chances of vibrations.  When the shutter is pressed, the movement of the mirror can introduce vibrations that can cause loss of sharpness, so the ‘mirror lock-up’ feature (found within the menus of most DSLRs) introduces a small delay between lifting the mirror and opening the shutter.

    4. Image Stabilisation: Switch off any image stabilisation features on the lens or within the camera body.  That feature that you rely on when shooting handheld can actually introduce camera shake if left on when your camera is mounted on a tripod, and when using a telephoto lens, those movements will be exaggerated and result in a softer image.

    Telephoto Landscapes - Tuscan Sunset

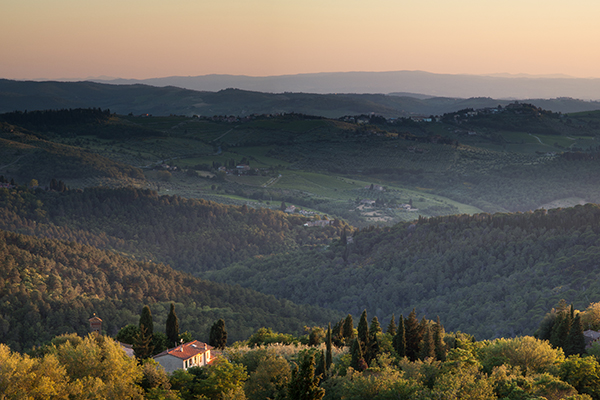
    A Tuscan landscape captured using a focal length equivalent to 120 mm

    5. Aperture selection: Be aware of the optimum aperture required to capture the scene in sharp focus.  When the subject is distant, a large depth of field can be easily achieved (even with a telephoto lens) so consider using apertures within the ‘sweet spot’ of your lens (typically f/8 to f/11).

    6. Filters: If you do chose to incorporate the sky within a telephoto landscape you may find that the dynamic range of the scene is greater than your camera can capture in one shot.  Typically, you may use graduated neutral density filters to overcome this, however it is more than likely that the diameter of your wide-angle lens will differ to your telephoto lens, meaning you may not have the appropriate filter ring size to use with your telephoto lens.  Adapter rings are fairly cheap to buy and keep in your camera bag just in case, otherwise think about capturing bracketed exposures (exposed correctly for the sky and land) in order to blend them together later on.

    Telephoto Landscapes - Panorama

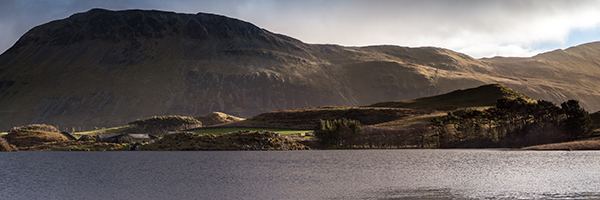
    A panorama stitched from 7 images taken at a focal length equivalent to 100 mm.

    7. Panoramas: Telephotos lenses are great for capturing panoramas as there is very little distortion due to focal length.  This means you can zoom in even further on a feature within the landscape and capture a number of images to stitch together into one panoramic image (even though the final field of view may not actually be that wide).

    Seeing compositions that work with a telephoto lens may be challenging initially, however it won’t be long before you start isolating elements of the landscape in your minds eye.  A good exercise is to go out and challenge yourself to shoot landscapes with only your telephoto lens.  You will find that the change of focal length may be refreshing as even local landscapes can be transformed to something unfamiliar when seen through a telephoto lens.

    Post originally from: Digital Photography Tips.

    Check out our more Photography Tips at Photography Tips for Beginners, Portrait Photography Tips and Wedding Photography Tips.

    Tips for Shooting Landscapes with a Telephoto Lens


    Digital Photography School

  • Ugandan Prayers by Ryan Estes

    Last year I was asked to accompany two other people from my church to Uganda, to meet with a man named George Byabagambi who oversees a large number of churches, an orphanage, and various other ministries. My job was photographic, to communicate the need and opportunity our community at home might have to partner with him in his work.

    424Uganda

    We spent a lot of time in small villages, meeting and talking with people, and spending time in their churches and communities. At one point we were forced to head inside because of a violent storm that rolled through. About a hundred people crammed into a tin-roofed church, and we could hear next to nothing because of the sound of rain on the roof.

    324Uganda

    I love this image because it shows how people can be in poverty and yet give so much at the same time. In this picture, adding to the cacophony were the voices of everyone in the building crying out at the same time in prayer for some of our friends in the U.S. who were suffering from cancer.

    396Uganda

    I was crammed into a small corner of the building with a wide-angle lens, trying to capture some sense of what was happening in the room. One of my favorite details is the oversized suit the man in the center is wearing, as so much of their clothing is donated from the West, but of course when choosing suits in Uganda, a tailor is rarely available.

    The second two images were taken just a bit earlier, before the storm forced us inside.

    Ryan Estes is a Philadelphia portrait photographer.

    dslrBlog

  • Warm Your Big Flash at the Source with Glass Shells

    Remember when we talked about gelling your light mods, and how some almost aren't worth the trouble?

    If you frequently light people with large soft boxes, you can choose to warm your light up right at the source. Read more »


    Strobist

  • Fine Tune Your Exposures With Spot Metering

    The metering systems of today’s digital cameras are light years beyond cameras of just 10 to 15 years ago. What this means is that in many situations, the camera’s meter, left to its own devices, is going to do an excellent job at getting a good exposure. While evaluative (or matrix) metering and center-weighted average metering take into account the entire scene, albeit in different ways, spot metering mode provides a tool for metering only the part of the scene you as the photographer consider most important.

    I used spot metering on this image  due to the sun setting over her shoulder, making the sun and sand exceptionally bright behind her. By metering on the model's shoulder, I was able to maintain detail in the shadow areas, without hurting the drama of the lighting.

    I used spot metering on this image due to the sun setting over her shoulder, making the sun and sand exceptionally bright behind her. By metering on the model’s shoulder, I was able to maintain detail in the shadow areas, without hurting the drama of the lighting.

    Spot metering is especially helpful when the subject is much brighter or darker than the background, and the subject does not make up a majority of the image.   Most cameras, when set to spot metering, are set to measure an area of the image as small as 1.5% of the total image area.  This varies from camera to camera, so check your manual for the exact specification.  In addition, while most consumer cameras use the center of the image for spot metering, usually defined by a circle in the viewfinder, others allow for tying spot metering to the active AF point, which then ties your choice of focus point to the meter.

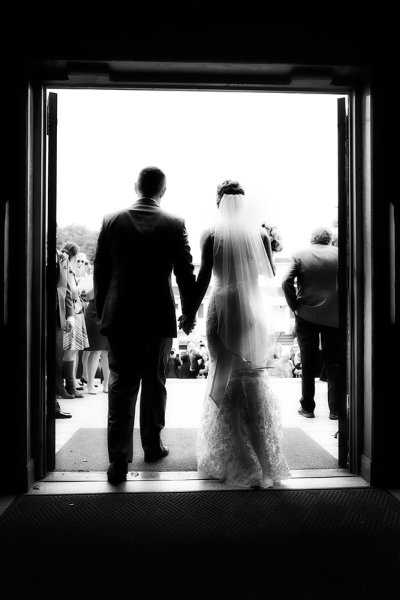
    When I saw this shot I immediately knew what I wanted.  I did not want to completely lose the detail in the dress, but I did want a near-silhouette effect to add to the mood of the image.  Using the spot meter, I metered off the sky, and then dialed in +1/3 of exposure compensation to bring back some dress detail.

    When I saw this shot I immediately knew what I wanted. I did not want to completely lose the detail in the dress, but I did want a near-silhouette effect to add to the mood of the image. Using the spot meter, I metered off the sky, and then dialed in +1/3 of exposure compensation to bring back some dress detail.

    Generally, if you’re spot metering, and your camera’s spot meter is at the center of the image area, you will have to use Exposure Lock as well. This is because if the meter only works at the center of the image, and the area you’re metering is NOT the center of the image, you will need to recompose after metering.  Exposure Lock ensures that your exposure is locked in once you have metered the scene, before you recompose the shot. Exposure lock is generally activated by pressing a button on your camera while metering.  It will then hold the exposure you locked in, at least until you release the shutter button.  Some cameras will hold the metered reading until you deactivate Exposure Lock. On Canon cameras, Exposure Lock is achieved by pressing the (*) button.  On Nikons, exposure can be locked by pressing AE-L.

    When you’re dealing with a high contrast situation, such as a bright background with a dimly lit subject, or a dark background with a brightly lit subject, switching your metering mode to Spot Metering can be an easy way of ensuring that your exposure is exactly where you want it.

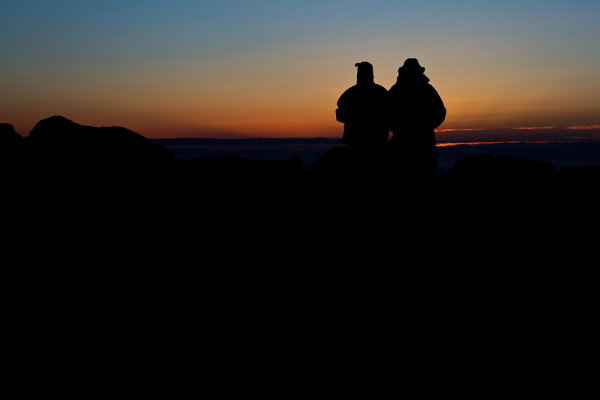
    I was shooting the sunrise on Cadillac Mountain in Acadia National Park when I spied this couple sitting on a rock.  I moved around behind them, and spot-metered on the sky. Because the meter tries to make the metered area a mid-tone, I knew it would silhouette my subjects perfectly.

    I was shooting the sunrise on Cadillac Mountain in Acadia National Park when I spied this couple sitting on a rock. I moved around behind them, and spot-metered on the sky. Because the meter tries to make the metered area a mid-tone, I knew it would silhouette my subjects perfectly.

    Post originally from: Digital Photography Tips.

    Check out our more Photography Tips at Photography Tips for Beginners, Portrait Photography Tips and Wedding Photography Tips.

    Fine Tune Your Exposures With Spot Metering


    Digital Photography School

  • How to Take Amazing, Beautiful Photos Any time of Day…or Night

    When I first started in photography nineteen years ago, Photo Law dictated that you dare not show your face shooting outside after 8 a.m. or before 4:30 p.m. My Prime Appointment was 7 a.m. Well, I’m here to tell you , those days are over. No one needs to get dressed up in their best clothes and drive an hour Continue Reading

    The post How to Take Amazing, Beautiful Photos Any time of Day…or Night appeared first on Photodoto.


    Photodoto