Category: Photography

  • How to Photograph a Steaming Cup of Coffee

    Ever wanted to photograph a steaming cup of coffee?

    Steaming Coffee 01

    Maybe not – but it could be a fun little evening project to hone your skills.

    Here’s a video from the team at Learn my Shot to show you how to do it.

    Post originally from: Digital Photography Tips.

    Check out our more Photography Tips at Photography Tips for Beginners, Portrait Photography Tips and Wedding Photography Tips.

    How to Photograph a Steaming Cup of Coffee


    Digital Photography School

  • Getting Landscapes Sharp: Focus Stacking

    A key aspect of successful landscape photography is image sharpness.  Usually, it is desirable to ensure that all elements of a scene, whether close or far, are captured in sharp focus.  This can prove to be challenging and, if not achieved with the click of the shutter, cannot be corrected later during post processing.

    One approach that is often taken is to use the smallest aperture available, e.g. f/22, to obtain the largest depth of field.  Whilst maximising the depth of field is a good intent, using such a small aperture will actually result in softer images due to an effect known as diffraction.

    Most lenses are at their sharpest when used at apertures between f/8 and f/11 and whilst hypefocal focussing may allow you to capture an entire scene acceptably sharp in one image using these apertures; it is always still a compromise between a number of factors and there will be times when you cannot generate enough depth of field to capture a whole scene at optimum sharpness.

    That is where focus stacking comes in.

    Focus stacking is the technique of stacking (or blending) a number of images that have been focussed at different points throughout a scene to give a final image that contains the sharpest portions of the originals, seamlessly blended into one.  It isn’t as laborious as it sounds and can give really good results, rendering scenes far sharper than possible in just one exposure.

    Focus Stack Initial Image

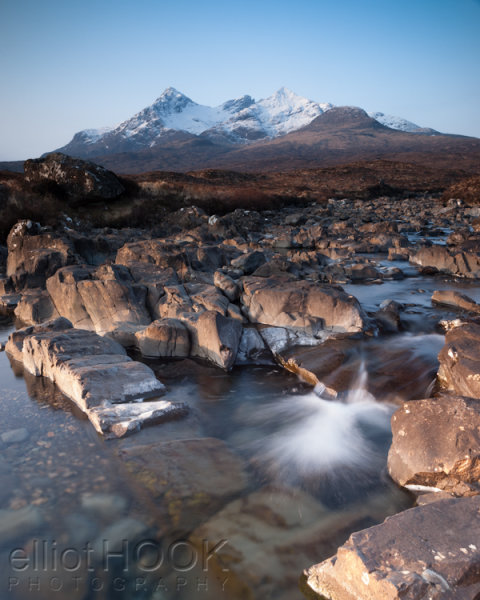
    The initial image, shot at f/8, lacked front-to-back sharpness as there was not sufficient depth of field. ISO100, f/8, 2 secs

    In the field…

    As you will be stacking the images into one, aside from the point of focus, you want the individual photographs to be identical in all other respects.  Therefore, it is best to have the camera positioned on a tripod and use a remote release.

    Using your optimum aperture (can easily be determined for a given camera/lens combo using focus charts, however you will most likely find that f/8 is a good starting point), take the required number of images focussed at different points throughout the frame.

    A minimum of two images are required, i.e. one focussed for the foreground and one focussed for the background, however an additional third image, focussed for the middle ground can also be a good idea.

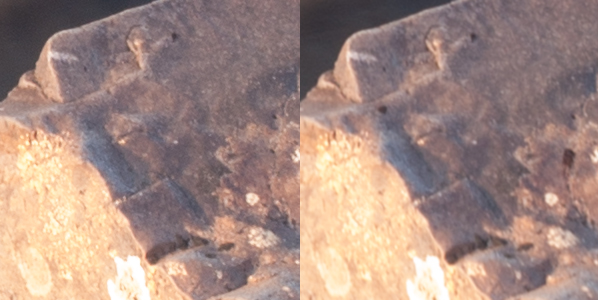
    Focus stack comparison foreground

    A comparison of a 100% crop of the foreground from two images, one focussed for the foreground (left) and one focussed for the background (right).  Both shot at ISO100, f/8, 2 secs.

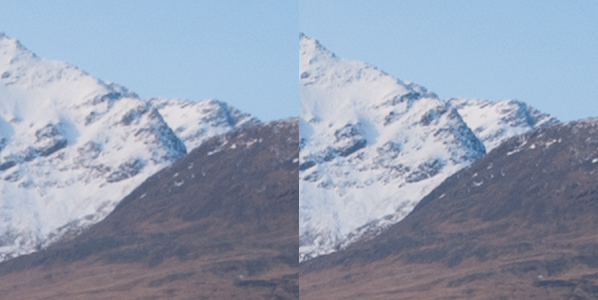
    Focus stack comparison background

    A comparison of a 100% crop of the background from two images, one focussed for the foreground (left) and one focussed for the background (right).  Both shot at ISO100, f/8, 2 secs.

    Back at home…

    Open the two images in Photoshop and create a new file that contains both images as different layers, in the one file (to make life easier, name the layers accordingly, e.g. near, far).

    Select both layers and go to Edit > Auto-Align Layers to ensure both images overlay perfectly.  Select the ‘Auto’ option, and deselect the ‘Vignette Removal’ and ‘Geometric Distortion’ options.

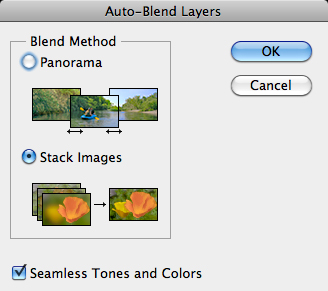
    Then select Edit > Auto-Blend Layers, and choose ‘Stack Images’, ensuring ’Seamless Tones and Colours’ is selected.

    Focus stack auto blend dialog box

    The Auto-Blend dialog box

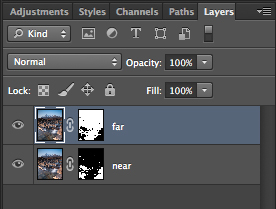
    At this point, Photoshop will determine the sharpest portions of each image to incorporate into the final image, and apply a mask to each layer.  Below you can see the layer masks applied to the two images.  In this instance, you can see the rocks in the lower portion of the image are the main area selected by the layer mask for the ‘near’ layer whereas the rocks in the middle distance and the background mountains are incorporated from the ‘far’ layer.

    Focus stacks layer masks

    The automatically generated layer masks, applied to each layer, includes the sharpest portions of each layer (shown in white).

    It is worth checking the image at 100% zoom to ensure that there are no strange artefacts caused by poor blending of any moving grasses or branches.  These can be fixed by manually painting white or black on to the relevant layer mask (remember: white reveals, black conceals).  For those using Elements, if you are only using 2 or 3 images, it is possible to do the blend manually using layer masks and white/black gradients.  In some instances, it actually gives better results, with fewer ‘blending artefacts’ to do the blend manually.

    Once you are happy with the blend, merge the layers to give your final, focus stacked image.

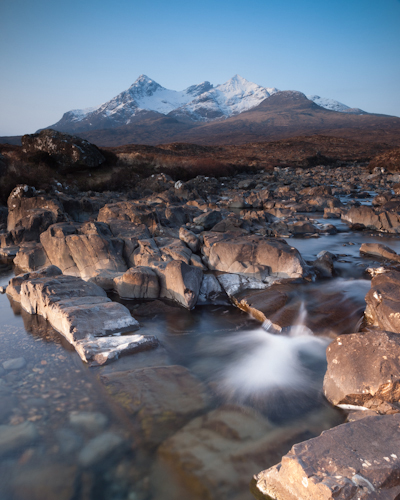
    Focus Stack final image

    The final image with good sharpness from the foreground rocks right through to the mountains in the background

    It may not be immediately apparent when showing images at web resolutions, but the difference in the overall sharpness when using optimum apertures and focus stacking is astounding when printing images.  To be able to focus stack, it only takes a little more forethought when out capturing the scene, and a few short processing steps when back at your computer so why not give it a go the next time you are out photographing landscapes.

    Post originally from: Digital Photography Tips.

    Check out our more Photography Tips at Photography Tips for Beginners, Portrait Photography Tips and Wedding Photography Tips.

    Getting Landscapes Sharp: Focus Stacking


    Digital Photography School

  • A New Life by Carlos Urbina

    First of all this is a very personal photo because he is my baby in his birth, I will not write anything of medical conditions, my wife or my personal feelings, I will try just narrate, if I can, an objective photographic feeling about taking this event. The truth is that it is very difficult taking this picture because I was totally scared, I had been in my other two sons births and I thought I could have some experience but the event transcended me again, First I had to attend the operating room rules you have to change your cloth and leave all your things in the changing room, I left even my lens cap, I set my Camera in time priority mode to 1/200 and set my ISO to 1600 and flash off I thought I was ready.

    a-new-life-by-carlos-urbina

    A nurse called me and instructed me to wash my hands, but without my lens cap the water splashed all over my lens, I tried to clean my lens with the coat but it was an awful clean, but there wasn’t time I entered the operating room and my wife was there with all the crew of doctors, I took my wife´s hand and I wasn´t able to be stable with one hand and all the stress and I was trying first of all not to be intrusive. On the other side, and also comes to mind that time I think the camera helps a lot because it gives me a “scenic task” and it made me to lose some stress thinking in the situation, but personal feeling transcends everything and I forgot about the photos and just thank God everything was fine.

    Sunrise in my D day

    The second image was taken I think 15 minutes after my baby´s birth I was alone in the hospital room, alone, euphoric walking side to side of the room and I went to the window and a beautiful sun was raising behind the trees joining me in my loneliness, but the sight from that building wasn’t so beautiful, so I switched to a 100-300 lens and shot bracketed pictures for taking as much sun as I could.
    Sometimes, if not always, the events are much greater than the images, but the images are great keeping these events latent.

    Photographer since 1993 also electronic engineer and actor, I was born in Mexico City in 1974 and I had traveled to different parts of Mexico seeking to discover its wonders.
    http://www.flickr.com/photos/curbina74/

    dslrBlog

  • 8 Photo Projects in Your Own Backyard

    A Guest Post by by Kim Manley Ort

    One of my photography mentors, Freeman Patterson, says, “If you do not see what is around you every day, what will you see when you go to Tangiers?”

    This one line has transformed my photography. As a matter of fact, I enjoy photographing from my home base as much as or more than my travels.

    The mark of a great photographer is not what equipment they have, but how well they see. Patterson teaches visual design for photography, and the first step is to really pay attention and see the underlying form of what is actually there.

    You can start in your own backyard (or anywhere around you if you don’t have a backyard) to develop this capacity for seeing.

    Your travel photographs will never be the same again.

    Here are 8 ideas for photography projects that can be done in your own backyard.

    1. What Strikes You?

    1-Hosta.jpg

    Sit or stand in a favorite spot in your house or yard and just notice what is around you.

    What catches your eye?

    It could be the way the sun reflects on your deck, or squirrels playing in the trees. It could be the color or shape of a piece of fruit on your table.

    Spend 15 minutes photographing what strikes you from different angles and perspectives.

    To add to this exercise, think about why it struck you. What do you like about it? What does that say about you? Yes, the photograph always reflects the photographer. But, that’s a whole other story.

    For me, I loved the color and curving lines in this image. I was struck by the way the new hosta leaf was cradling the crinkled, dead leaf. I moved in closer so that the color would fill the screen.

    2. Photograph the light

    2-Vase.jpg

    Pay attention to the light. Light is the main tool for photography. It can make or break your image. So, a good photographer will always be noticing the light. Dusk and dawn are great times for checking out the light.

      What is its quality (soft and hazy or sharp and direct)?

    • What direction is it going?
    • What type of shadows is it creating?
    • What is it highlighting?

    Photograph these highlights and shadows rather than objects.

    I am fascinated by reflections and there was so much going on in the water in this vase. The monochromatic tone of the whole image caught my eye too, with the little touch of green leaves added.

    3. Shoot from a different perspective

    3-Sunflower.jpg

    Do you have a dog or cat? Try photographing from their perspective. Get at their level and try to figure out what they see.

    If you don’t have an animal, pick an ant or a squirrel or a plant or a tree or a bird. This will get you trying new angles and heights.

    In this case, I got down low, and used a shallow depth of field to get the soft background of sky and trees, and photographed the sunflower from the side.

    4. What’s growing?

    4-TreeSeasons.jpg

    What is growing right now in your yard? Trees are a wonderful subject any time of the year. If it’s too cold to go outside, photograph your indoor plants or buy flowers and spend time indoors photographing them.

    A long-term project is to photograph a tree every day for a year. Put all of the photographs together in a slideshow, speed it up and watch the changes before your eyes.

    In this collage, I photographed my favorite tree in the neighborhood in all four seasons and then stitched together this grouping. I’m so glad I did this project, as this tree was recently cut down to make way for a new house.

    5. Where’s your favorite place at home?

    5-Books.jpg

    Everyone has one. Photograph your favorite place and show what makes it special. Spend ten or fifteen minutes capturing what you love about it.

    Here I photographed the books on my bedside table. I have a few favorite reading places in my house, and each one has a pile of books, either in process or waiting to be read. I get nervous if the pile gets too small.

    6. Find lines and shapes.

    6-Lines.jpg

    Inside or outside your house, photograph lines (or specific shapes) anywhere you find them.

    This is a really fun exercise because lines and circles are everywhere. They are the building blocks of visual design, so this project is good training for seeing the underlying form of what you’re photographing.

    It also helps you take the labels off of things and see them in new ways. Here, we know this is a computer keyboard, but what attracted me were all of the lines I could see, as well as the squares around each key.

    7. What do you eat?

    7-RedCabbage.jpg

    Photograph your meals: the ingredients, the preparation process, the final plate or a particular food. Fruits and vegetables are especially good subjects.

    Food is sensual. Try to capture that in your photography.

    My bi-monthly organic produce delivery always provides great photographic subjects, like this red cabbage. Here, I was drawn to the color and shape, rather than the object as a whole. It gave me new appreciation for this vegetable that doesn’t get a lot of love.

    8. What’s up?

    8-BlueSkyCloud.jpg

    This is an easy project. Just look up, wherever you are. What do you see?

    Photograph the sky from your front or back door. Try this for a week or more and notice the different views you are presented with every single day. You’ll find that it is vastly different every single day.

    Looking up doesn’t have to mean just the sky. It could a light fixture, a roofline, or a ceiling fan. It could be the tops of the trees as you lie flat on your back. Use your imagination.

    Well, what are you waiting for? Get shooting!

    Kim Manley Ort photographs in her own backyard in Indianapolis, Indiana. She is a member of Art IN Hand Gallery, a cooperative of 20+ artists in Zionsville, Indiana.

    Her favorite quote is by Hui Neng, “The meaning of life is to see.” You can follow her blog and upcoming workshops at Be Inspired.

    http://365daysofinspiration.com/
    http://twitter.com/kimmanleyort
    http://facebook.com/kimmanleyort

    Post originally from: Digital Photography Tips.

    Check out our more Photography Tips at Photography Tips for Beginners, Portrait Photography Tips and Wedding Photography Tips.

    8 Photo Projects in Your Own Backyard


    Digital Photography School

  • How Many dPS Readers Have Had Photography Training? POLL RESULTS

    Last week on dPS our reader poll asked readers if they’d ever done any kind of photography training (a class or course). The results from over 66,000 readers are in and interestingly over 60% of us have never done any formal training (whether it be online or offline).

    Photography courses

    Those of you who have done some training – what was it and how did you find it?

    Those of you who have never done any training – where did you learn? Was it just through practice, magazines, websites, friends, books… or something else?

    Post originally from: Digital Photography Tips.

    Check out our more Photography Tips at Photography Tips for Beginners, Portrait Photography Tips and Wedding Photography Tips.

    How Many dPS Readers Have Had Photography Training? POLL RESULTS


    Digital Photography School

  • Next Version of Adobe Photoshop to Be Branded Photoshop CC, Includes Awesome New Motion Blur Sharpening Tool

    Today Adobe announced a new branding of their flagship Photoshop product to be released later this year, Photoshop CC. The new version will only be available via a monthly subscription to Adobe’s Creative Cloud and will not be sold as a traditional boxed application that consumers can purchase.

    Probably the most anticipated new feature in the next iteration of Photoshop is a revolutionary new image sharpening tool that focuses on fixing camera shake issues.

    The new tool analyzes images that are out of focus due to the slight movement or motion that takes place while a shutter is open. There are lots of reasons why photographers may find camera shake in their images. Many images shot slower than about 125th of a second are susceptible to camera shake unless you’re on a tripod or have a very steady hand. Telephoto shots, especially can be problematic.

    With the new version of Photoshop CC, Adobe uses an algorithm to try and detect which direction the camera was moving that produced the shake. They then try to account for the movement back into the direction of a steady image without camera shake. This new sharpening tool won’t help you with other types of focal blur issues, like lens position, but it does address a fairly common issue dealt with by photographers.

    Adobe had previously offered a sneak peak of this new technology in a video that they posted to Youtube. Watch the video and you’ll be impressed.

    What makes this interesting to me is that there are a lot of old images that I’ve taken in the past that now will suddenly become salvageable.

    This new technology advancement should be yet another reminder to photographers why they should save ALL of their images, even the bad ones that they don’t think they can use. With technology advancements in image processing, I’m finding more and more images that I’d previously dismissed due to problems. Whether previous Adobe noise reduction tech or newer tech like this new sharpening tool, it pays to save all of your images no matter what. Storage is cheap and you never know when you may need that image that you never knew you needed at the time. Even years after you are dead, those images may be important to someone, somewhere for some reason.

    While the camera shake feature is the sizzle of the new Photoshop upgrade, there are several other enhancements they have made to the program as well including, smart Sharpen (new technology promising more realistic sharpening without halos or noise) and new upsampling tech (this helps make your photos look better when you make them larger than you processed them).

    The biggest news though is Adobe’s moving Photoshop 100% into the Cloud and 100% by subscription. You’ll still be able to purchase Photoshop CS for the time being, but it won’t have the new features available in CC.

    Pricing varies by type of customer but starts at $ 49.99 a month per person for individuals. Existing Creative Suite customers, students, and teachers will get a discount to $ 29.99 a month. Creative Cloud has a lot more applications than just Photoshop and also includes Lightroom and a whole suite of other Adobe Creative applications. It also includes integration with Behance, a portfolio site for creatives that Adobe recently purchased.


    Thomas Hawk Digital Connection

  • BaltoWash, June 7/8th: One-Day Blogging/Social Media Intensive

    Next month, for first time in two years, I'll be teaching a class in the U.S. But it won't be about lighting, or even photography.

    During the Flash Bus dates in 2011, we spent about 15 minutes of my session going into an organic approach to blogging and social media. In particular, we discussed how to create positive feedback loops between your online and real-world ecosystems. This small aside created a surprising amount of feedback and interest.

    As a result, I have been teaching a full class each year since on the subject at GPP in Dubai. On June 7th and 8th, I'll be teaching a current version of this class in the Baltimore/Washington, DC area.

    Who is this appropriate for? A wider range than you might think.

    Read more »
    Strobist

  • What Really Happens When a Fuji X100s “Syncs” at 1/4000th of a Sec

    For leaf-shutter flash geeks only: high-speed Phantom v1610 video of a Fuji X100s shutter not-quite-really syncing at 1/4000th of a sec.

    Sorry, I know many of you will be bored to tears by this. But the full technical article photographer Kevin Housen developed around this video (and others, at different shutter speeds) will really peel the onion for you if you want to know about the demonstrable quirkiness of this camera and ultra-high speed sync.

    -30-


    Strobist

  • The Photographic 100: One Hundred Places You Must Shoot Before You Die

    They say that imitation is the sincerest form of flattery. And that is true of our subject today, a list to end all lists, and what I like to call the Photographic 100. Admittedly, I’m a bit of a foodie, and regularly read a few coffee and food blogs to get my fill of the subject. Recently, a post by Continue Reading

    The post The Photographic 100: One Hundred Places You Must Shoot Before You Die appeared first on Photodoto.


    Photodoto