Category: Photography

  • Canadian Travelogue – Newfoundland – Cape Spear


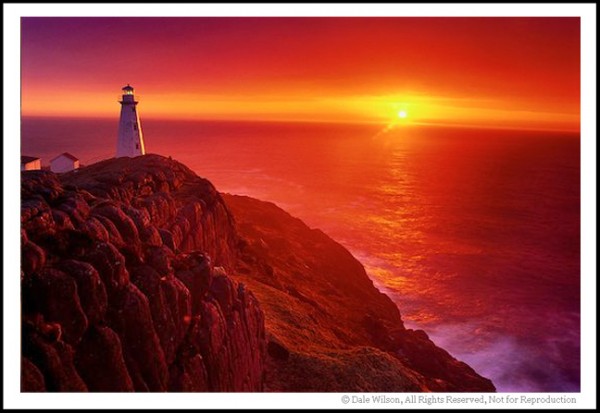
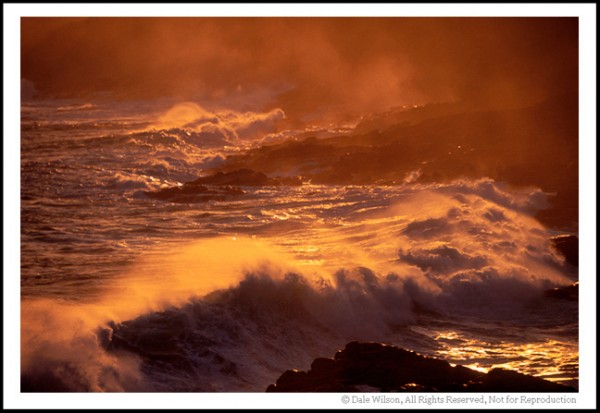
    Cape Spear is the most easterly point of land in North America, so you may have the distinction of photographing sunrise here before anyone else on the continent.

     the Cape Spear shoreline is one of the most easily accessible and perectly orientated for early morning shoots. Yet, it still warrants extreme safety.

    The Cape Spear shoreline is one of the most easily accessible and perectly orientated for early morning shoots. Yet, it still warrants extreme safety.

    Tourists usually take the 15 minute drive along Highway 11 from downtown St. John’s to the Cape Spear National Historic Site to see Newfoundland’s oldest lighthouse, constructed in 1835, and of course to view the sunrise. But even at such early hours, photographers wishing to make images of a natural seascape with the presence of “humanoids” will face challenges.

    Non-photographers have every bit as much right to be here as photographers, so the easiest solution is to side-step the challenge. As you top the hill and for the first time see the two lighthouses, you’ll notice a small parking lot to your immediate left that overlooks a small cove. Although you could go the extra distance of about 200 metres to the literal easternmost point if land on the continent, you might do better to stay here and make wonderful pictures of crashing surf without unwanted people interrupting the picture-making process.

    I have found that an ebb tide, nearest its lowest point, along with relatively high winds, is ideal conditions for capturing the eastward looking seascape.  As the waves crash against the reefs we need only use an 80-200mm zoom lens to compose striking images. June may offer an added bonus of icebergs, if the weather and winds are right. Typically along the eastern Canadian coast, September and October usually brings stronger winds, and indeed hurricanes, which means even bigger waves.

    Study your viewfinder image carefully, as there is a small outbuilding with a power line at the extreme north tip of land that has the uncanny ability to find its way into your picture. With careful in-camera cropping this landscape image eyesore can be eliminated.

    There are two lighthouses at Cape Spear, this is the new working light. The historic light is just a stones throw away.

    There are two lighthouses at Cape Spear, this is the new working light. The historic light is just a stones throw away.


    I know you’ll enjoy one of my favourite locations in eastern Canada to photography the seascape. Before you leave, though, walk out to the lighthouses. After all, you’ll want to say that you were to the easternmost point of land in North America.

    On your drive back to St. John’s, you deserve to take a slight detour.  As you return via the Blackhead road drive about 7 kilometres until you see another road to your left; the sign should say Maddox Cove – Petty Harbour.  You will want to drive to Petty Harbour, which is approximately 11 kilometres from the Cape Spear National Historic Site.

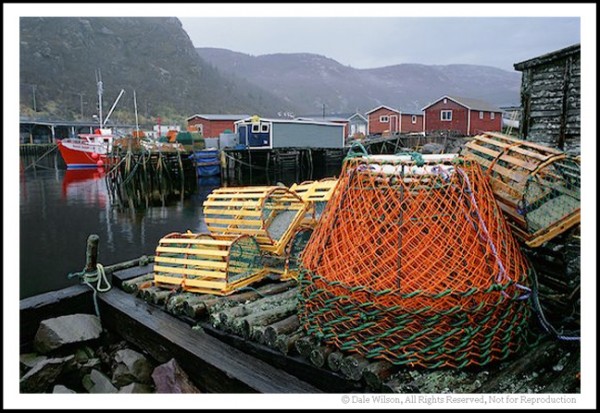
    Petty Harbour is the quintessential Newfoundland fishing village.  The smells and sounds are reminiscent of days past, and few locations along the eastern coast of this province offer such easy and exquisite photo opportunities. Be prepared for fog and wet weather, but in my opinion this just adds to the mystique of the place.

    The quintessential hishing village of Petty Harbour. Just park your car and have fun walking around the small harbour.
    The quintessential hishing village of Petty Harbour. Just park your car and have fun walking around the small harbour.

    Parking your car will be challenging – there were no cars and urban planning was not a consideration when the first settlers planted roots here in 1598. The village is small so it is possible to park in a designated spot, or the church parking area and walk back to the wharf area. As with most areas in eastern Canada, you should be safe if you don’t block a driveway to either home, pasture or outbuildings.

    Whereas Cape Spear is going to provide great seascapes, Petty Harbour is going to provide incredible fishing village scenes.   The producers of the 1977 film Orca also thought so when they brought Bo Derek, Richard Harris, Charlotte Rampling and supporting cast here to shoot this feature film.

    Once finished shooting and enjoying Petty Harbour, you have the option of backtracking to St. John’s or continue west on the only road leaving town (Long Run Road) until you come to the Bay Bulls Road, where you will make a right hand turn and then continue to St. John’s.

    -DW

    Postscript: All images were shot on Fuji Velvia film with Nikon cameras, colour enhancing, colour polarizing and split-graduated filters. There has been no digital enhancing of saturation or contrast. 

    Post originally from: Digital Photography Tips.

    Check out our more Photography Tips at Photography Tips for Beginners, Portrait Photography Tips and Wedding Photography Tips.

    Canadian Travelogue – Newfoundland – Cape Spear


    Digital Photography School

  • Do You Take a Digital Camera With You Everywhere? [POLL]

    Last week I wrote a post exploring 3 stupidly simple reasons why most people’s photography doesn’t improve – the first reason being that they don’t take their camera with them.

    A lot of people agreed – so I thought it might be interesting to run a poll to see how many of us DO take a camera with us all the time.

    We ran this poll over four years ago so it’ll be interesting to see if anything has changed since then.

    Note: There is a poll embedded within this post, please visit the site to participate in this post’s poll.

    Feel free to share more about your answer in comments below!

    Post originally from: Digital Photography Tips.

    Check out our more Photography Tips at Photography Tips for Beginners, Portrait Photography Tips and Wedding Photography Tips.

    Do You Take a Digital Camera With You Everywhere? [POLL]


    Digital Photography School

  • My Most Common Portrait Mistake

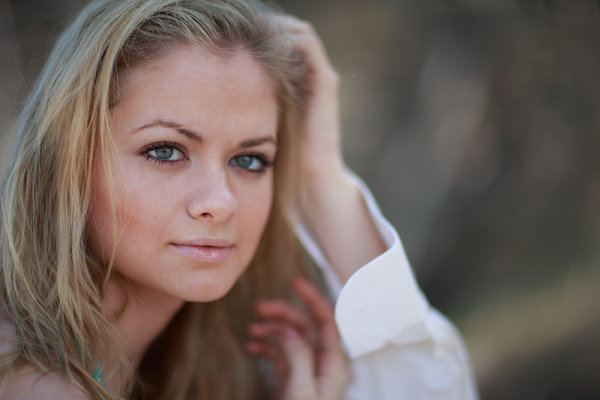
    Here, I managed to avoid making the mistake, by having my subject keep both eyes on the same plane.  The look is striking, in that the depth of field drops off immediately and the image softens dramatically after the area of sharp focus around the eyes.

    Here, I managed to avoid making the mistake, even though I shot the lens wide open at f/1.2,  by having my subject keep both eyes on the same plane. The look is striking, in that the depth of field drops off immediately and the image softens dramatically after the area of sharp focus around the eyes.  Exposure was 1/6400, f/1.2, ISO 200. Camera was EOS-1Ds Mark III, with EF 85mm f/1.2.


    We all make mistakes.  Even the best photographers I know make a mistake now and then. And usually, we all have one we can’t get seem to stop making. For me, it’s a different mistake for each type of photography, whether it’s a portrait, a landscape, or some other type of photography.  The secret to getting better as a photographer is overcoming these mistakes and to stop making them.

    When shooting portraits, my biggest problem isn’t lighting, or posing.  My problem is with my own settings, especially when using my favorite portrait lens. That would be the Canon EF 85mm f1.2L II.  This is a lens with incredibly smooth bokeh, and a unique look, especially when shot wide open. And I do love to shoot it wide open.  But it does require some extra care when doing so, which leads to my most common mistake.

    When shooting the 85mm f/1.2 wide open (or even close to wide open), and close up, your depth of field is paper thin. If you were to focus on an eyelash, the eye itself would be out of focus. It’s that unforgiving. When done right, it creates a beautiful image, where the eyes are the sole focus. When done wrong, it ruins the image beyond repair.  The mistake is easily fixed; it just requires that you pay attention as the pose shifts, adjusting the aperture to give you the proper depth of field. In addition, if that paper-thin depth of field is what you want, simply adjust the pose so that it works for the shot.

    This is probably my least favorite mistake, in that it’s not something that can be fixed in post.  Sometimes things happen quickly and it’s not possible to turn the dial that quickly. But sometimes taking a deep breath, and mentally running through the settings, is a good way to ensure you get the shot you want.  Is my shutter speed fast enough? Or slow enough? Do I have enough depth of field? Or too much? Is my ISO too high for the lighting conditions?  Or not high enough? It’s a mental checklist that can take only a second, but can ensure that you get the image you want.

    In this image, also shot at f/1.2, because the model's eyes are not on the plane, the right eye drops out of focus.  The effect is disconcerting, and a mistake I make more than I'd like. It would be so easy to turn the aperture dial and stop down enough to give me the proper depth of field. I just need to remember to do that.

    In this image, also shot at f/1.2, because the model’s eyes are not on the plane, the right eye drops out of focus. The effect is disconcerting, and a mistake I make more than I’d like. It would be so easy to turn the aperture dial and stop down enough to give me the proper depth of field. I just need to remember to do that.  Exposure was 1/4000, f/1.2, ISO 100. Camera was the EOS-1D X, with EF 85mm f/1.2L II lens.

    For this image, I stopped the lens down to f/5.6. This game me enough depth of field to keep both eyes sharp, while the background remained out of focus.

    For this image, I stopped the lens down to f/5.6. This game me enough depth of field to keep both eyes sharp, while the background remained out of focus. Exposure for this one is 1/100, f/5.6, ISO 100. EOs-1D X with EF 85mm f/1.2L II.

    Post originally from: Digital Photography Tips.

    Check out our more Photography Tips at Photography Tips for Beginners, Portrait Photography Tips and Wedding Photography Tips.

    My Most Common Portrait Mistake


    Digital Photography School

  • Photography Bucket List – Cinque Terre, Italy

    In this second installment of my ‘Photography Bucket List’ series we’re going to cover arguably one of the most beautiful places on earth; the Cinque Terre region on Italy’s west coast. I had the opportunity to visit this region on my first trip to Italy back in late 2011 and ever since then I’ve been waiting for the opportunity to get back.

    A Quick Note On Traveling to Far Away Places

    Chances are that if you’re reading this, you don’t live in or around Italy. A lot of people I talk to just accept that they will never get to travel to a place like this because it’s either too far away or too expensive to get there. Well I think that’s a load of crap. These places are a lot easier to get to than most people think, and a lot cheaper to stay in too. Life is what you make of it. If you want to go to Italy, make it a goal. Start saving up right now. Think of ways to raise money for it. Do research to find cheap plane tickets, cheap hotels or hostels. I can tell you right now that it will be worth every penny. Traveling, whether to Italy or any other part of the world, is an investment in who you are as a person.

    “The world is a book and those who do not travel read only one page.”
    Augustine of Hippo

    “You are the same today that you’ll be five years from now except for two things: the people you meet and the books you read.”
    Mac McMillan

    About the Cinque Terre

    The Cinque Terre is a rugged portion of coast on the Italian Riviera. It is in the Liguria region of Italy, to the west of the city of La Spezia. “The Five Lands” is composed of five villages: Monterosso al Mare, Vernazza, Corniglia, Manarola, and Riomaggiore. The coastline, the five villages, and the surrounding hillsides are all part of the Cinque Terre National Park and is a UNESCO World Heritage Site.

    Over the centuries, people have carefully built terraces on the rugged, steep landscape right up to the cliffs that overlook the sea. Part of its charm is the lack of visible corporate development. Paths, trains and boats connect the villages, and cars cannot reach them from the outside. (source: Wikipedia)

    My Experience

    Riomaggiore at Dawn | © James Brandon

    During my stay in the Cinque Terre, I opted for a quaint little hotel in the town of Riomaggiore. I did extensive research on each of the five regions and settled on Riomaggiore for several reasons. The first reason was the scenery and the rugged landscape of this southernmost town in the Cinque Terre. The shoreline here is dramatic to say the least with it’s rocks shooting straight up out of the water and the homes built up along the cliffside. The boats in the harbor belong to the villagers who go out fishing every day and sell their catches to the local restaurants and families. The second reason was just how small and uncrowded Riomaggiore looked. Now don’t get me wrong, all of the towns are small and quaint, but Riomaggiore looked more so than the others. And I was right! My goodness this town had so much character and charm. The locals were so nice and welcoming. The little coffee shop had the best cappuccinos of my life. The restaurant across the street had incredible pizza and local beer and wine.

    The terrain of Riomaggiore is not for the faint of heart. If you’re looking for a town to just relax at and take it easy, this one is not for you. Getting around by foot anywhere in Riomaggiore is not easy. The streets are incredibly steep and getting anywhere requires hiking. In fact, after a few days my calves and feet were so tired that it was even hard to walk downhill! But I didn’t care, the beauty of this town made it all worth it.

    Where To Stay, Where To Eat

    My wife and I stayed in Riomaggiore at the Locanda dalla Compagnia. You won’t see this hotel in the picture above as it’s around the corner and up the hill about 100 yards or so, right next to the church. The staff was incredibly nice and accommodating. We got in to Riomaggiore past dark on our first night and weren’t able to call ahead like we were supposed to. Therefore, the hotel lobby was closed and locked. We were freaking out. This was our first stop in Italy. We had just been on a plane for about 11 hours. Spent an entire day in the crazy city of Milan and then a 3 hour (if I remember correctly) train ride to Riomaggiore on two different trains. So when we finally got to our hotel at the end of a very long day, only to find it closed and locked, in a foreign country with all of our luggage, we were a little frustrated! Luckily for us, there were two young men drinking coffee in the lobby who let us in. They were from Israel and it was their last night in town. They unlocked the door to the lobby and let us use the phone to call the hotel owner who had left a note for us to call when we got in. The lady arrived about 15 minutes later and led us to our room. Phew! The view from our hotel was incredible. Although in town and away from the coast, we had a view of the main street in Riomaggiore looking down over the church. The room was a decent size with a small kitchen area and a big enough bathroom and I think we paid around 80 euros a night for it.

    Boats floating in Riomaggiore’s harbor | © James Brandon

    As far as food goes, just pick a place! I can’t for the life of me remember the names of all the places we ate at and tried. In fact, I think just finding a place and trying it out is half the fun in a place like this. In the main part of town (around the corner in the picture above) there’s a small little place that serves great espresso and breakfast in the morning. It’s right across from another restaurant that has a covered patio eating area outside. I couldn’t even find this place on Google!  The fact is, it doesn’t matter where you go. We only ate at one bad restaurant during our entire trip to Italy and it was so bad that we laugh about it to this day (it was in Bellagio on Lake Como). It was just part of the experience.

    Things To Do

    Oh there’s plenty to do! Traveling between the towns in the Cinque Terre is easy and there are several ways to do it. The easiest is by train. For just a few euros you can travel to any town you’d like and be there in just a few minutes. You can also travel by boat or hike along a trail that connects to each town. I would love to have hiked the entire trail but we ended up just doing the stretch from Riomaggiore over to Manarola; a hike along the edge of the cliffs overlooking the Mediterranean called the Via Dell’Amore (Pathway of Love). The towns in the Cinque Terre were extrememly isolated from eachother and the outside world until the past century. After WWII the trail between Riomaggiore and Manarola was established as a meeting point for girls and boys from the two villages and so the name came to be. The trail is breathtaking to say the least and I highly recommend taking the time to do it.

    You can also take a dip in the mediterranean at any of the beaches, lay out and get a tan, shop at any of the local stores and galleries, or just spend the day exploring without any plans (my favorite).

    A home in Riomaggiore | © James Brandon

    Other Parts of the Cinque Terre
    Elia-Locardi-Beautiful-Vernazza-Italy

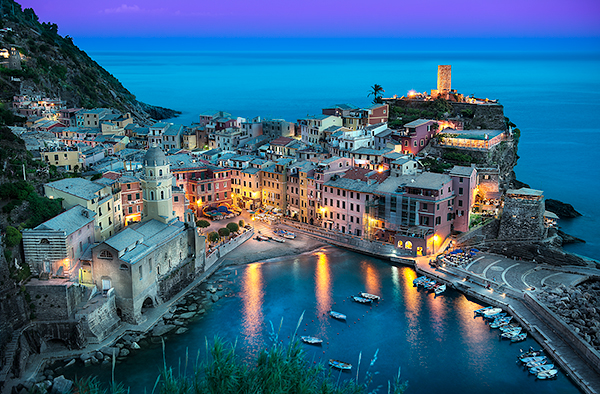
    The Beautiful Vernazza | © Elia Locardi. Click image to see bigger!

    Riomaggiore is just one of five towns in the Cinque Terre. Each town has it’s own charm, it’s own look and feel. While Riomaggiore is my personal favorite, Vernazza comes in a close second. Vernazza is probably the most well know of the five towns and probably the most photographed as well. It was also nearly destroyed back in 2011 by a flood and is just now getting back to normal. Most people I talk to who have been to the Cinque Terre stayed in Vernazza. It’s also Rick Steve’s favorite of the five towns.
    Dreams In Color | © Elia Locardi. Click image to see bigger!

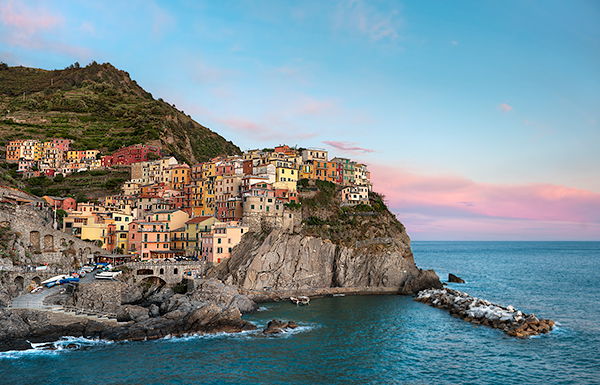
    Dreams In Color | © Elia Locardi. Click image to see bigger!

    The next on my list would be Manarola (seen above). This town is also very rugged, like Riomaggiore with a much larger coastline. It also may be the oldest of the towns in the Cinque Terre, with the cornerstone of the church, San Lorenzo, dating from 1338.

    A sculpture carved out of the cliffs at a castle in Monterosso | © James Brandon

    Right behind Manarola on my list is Monterrosso. This town is probably the best town to stay in if you just want to relax and walk around. It’s very flat, has a great beach that stretches along the coastline and the town itself is quite huge. Probably the biggest of the five. We spent one evening here and had a great time. The reason it’s so low on my list is just that it’s not as dramatic, photographically speaking, as some of the others. You could easily spend a week here and get several portfolio quality shots, but it’s hard to rate these towns when they are all so amazing!

    Last on my list would be Corniglia. Again, Corniglia is an amazing town and incredibly beautiful! The only reason it’s last is because it’s the only town in the Cinque Terre that isn’t on the coast. Instead, it’s nestled up in the cliffs surrounded by vineyards and terraces.

    Conclusion

    I hope everyone reading this will get a chance to visit this place in their lifetime. I (along with so many other photographers) have fallen in love with this place and can’t wait to go back some day soon. The scenery is jaw dropping, the people are nice and welcoming, the food is spectacular, the water warm enough to swim in, the weather perfect for hiking between towns and all the rest of Italy is just a quick train ride away. Folks…this place has it all!

    Huge thanks to Elia Locardi for providing a couple of images for this article. His website Blame The Monkey is a great resource for any photographer and I highly recommend checking it out.

    If you’ve been to the Cinque Terre region or are planning on going, be sure to chime in below! You can also find me on Twitter if you have any questions. Cheers!

    Post originally from: Digital Photography Tips.

    Check out our more Photography Tips at Photography Tips for Beginners, Portrait Photography Tips and Wedding Photography Tips.

    Photography Bucket List – Cinque Terre, Italy


    Digital Photography School
  • Change is Good

    Google Co-Founder Sergey Brin Sports the New Google Glasses at Dinner in the Dark, a Benefit for the Foundation Fighting Blindness -- San Francisco, CA

    If you want to make enemies, try to change something.

    – Woodrow Wilson

    I’ve been watching with great interest over the past few weeks as the naysayers seem to have gone CRAZY overboard trying to bash Google Glass every chance they can. I’ve seen articles in Wired and on CNN and on blogs, etc., all stating how terrible Google Glass is. Oh NO, geeky white dudes are wearing Google Glass! This will never work! Oh no, someone wore a pair into the shower! Oh no, I will punch someone in the face if they try talk to me with them on — all sorts of gibberish.

    There’s nothing like change to bring out the absolute haters.

    It seems like every time something comes out that represents change, people freak the fcuk out.

    It’s not enough to say, “oh no, this thing is not for me.” People have to go absolutely overboard, talking about how horrible some new thing is for everybody ELSE.

    I remember when I waited in line overnight (with my pal Robert Scoble, probably today’s biggest Google Glass cheerleader) for the very first iPhone. Robert’s son Patrick was the very first person to buy an iPhone at the Palo Alto store.

    I’m not sure I’d ever been mocked by people so much. “You waited in line overnight to pay HOW MUCH?” for a stupid phone??? People thought the iPhone was the dumbest thing ever. “Why would you ever need a phone to surf the web?” “Why would you pay so much for a phone?” They laughed at me for camping out overnight to get the first generation phone — even though camping out overnight in front of an Apple store has been one of the most fun things I’ve ever done. Getting to hear Apple luminaries like Andy Hertzfeld and Bill Atkinson talk about Apple’s early days was a blast! It’s where I first met the awesome guys from SmugMug. Was it dorky and geeky? Sure, but whatever.

    Read some of these early quotes about the iPhone when it first came out. Even though some of us loved it early, so many more were so “doom and gloom” on it. Now, of course, everybody loves the iPhone and the whole generation of Android and other smartphones that followed.

    I remember when Twitter first came out. People hated that too. “Twitter is still a fad, and according to a study out today, it looks like it’s popularity may soon fade,” wrote BusinessWeek. People constantly mocked Twitter — “who wants to read a dumb post about what someone had for breakfast,” they’d say. I hopped on Twitter right away while so many of my friends refused to join. Those same friends now complain about how everybody else has more followers than they do.

    The same naysayers took umbrage with Google+. Despite being named earlier this week as the second largest social network, the “change is bad” crowd hated Google+ when it came out. How many articles out there were written about Google+ being a ghost town? My good friend Trey Ratcliff passed 5 million followers on Google+ earlier this morning. That sure is an awful lot of ghosts if you ask me.

    I’m having the best time on Google+. I’ve met some of the most talented and interesting photographers in the world, I’ve been on tons of great live hangouts and photowalks, and it’s been the best designed social network I’ve ever been a part of. I’m glad I joined it the first day it was available to the public.

    When one of my heros, William Eggleston, had the first color photography show at MOMA in New York, a lot of people hated that too. Many people called it the most hated fine art photography show ever. Ansel Adams, the most famous photographer in the world at the time, even wrote a letter to MOMA curator at the time, John Szarkowski, trashing the change that Eggleston represented. Now everybody loves Eggleston and color photography is firmly established as a photographic fine art aesthetic. Just last month the Independent called him the world’s greatest living photographer.

    I remember when I first started posting my photos online at Flickr back in 2004, their first year in existence. So many photographers gave me a hard time. They kept going on and on about how my photos would be “stolen.” “Who the hell cares,” I’d answer back. Now everybody posts their photos online, everywhere.

    So what is it about Google Glass, the iPhone, Twitter, Google+, color photography, photo sharing that scare people so much? What is it that brings out the naysayers and haters?

    It’s simple. Most people hate change. Most people fear change. Most people hope the world around them never changes and turns into something else. They are afraid that change will take their job, or their income, or somehow hurt them. A lot of these people are also lazy. They groan about having to learn a new thing or technology. They worry they will be left behind. So it’s easier for these people to bash whatever is new and interesting and jump on the anti-change bandwagon.

    As far as Google Glass goes, I have no idea if it’s going to be a hit or not. I do think it represents an interesting new tool to use for street photography and I’m excited about trying them out myself at some point. I think it’s dumb though to see article after article by scared people trying to talk the rest of the world out of them. Articles that try to paint them as dorky or geeky or creepy. These are just more of the same old complainers/haters who hate every new thing that comes along.

    Change is good. Don’t let the naysayers tell you otherwise. The next time somebody brings up some new idea, check yourself. Instead of immediately starting to bash it, resist that urge and keep an open mind. Every so often you just might be surprised.

    Oh, and personally speaking, I think journalists that like to bash change are far, far, more dorkier than bloggers who like to take showers with their Google Glass on. ;)


    Thomas Hawk Digital Connection

  • Transport: Weekly Photography Challenge

    This week your photographic challenge is to shoot and share a photo or two on the theme of transport.

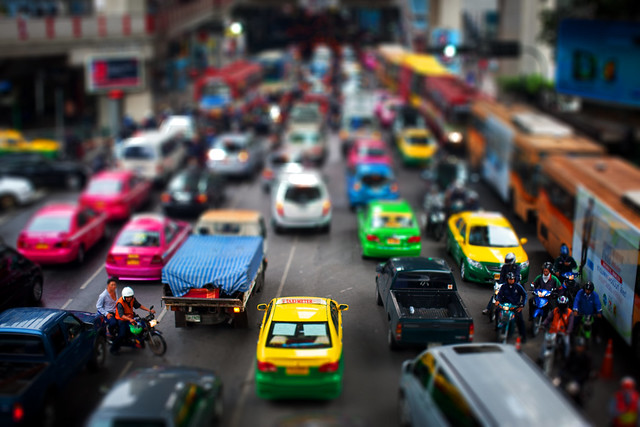
    biG miNiaTURe wOrLd

    Feel free you take any approach you like – you can photograph a car, bus, plane, bike, horse and cart, skateboard, train, hand glider…. if you travel with it you can photograph it.

    Feel free also to shoot it from inside the transport, outside the transport, with it moving or at a stand still… it’s totally up to you!

    Can’t wait to see what you come up with this week!

    Once you’ve taken your ‘TRANSPORT’ image and have upload it to your favourite photo sharing site either share a link to it or – embed it in the comments using the our new tool to do so.

    If you tag your photos on Flickr, Instagram, Twitter or other sites with Tagging tag them as #DPSTRANSPORT to help others find them. Linking back to this page might also help others know what you’re doing so that they can share in the fun.

    Also – don’t forget to check out some of the images posted in our last challenge – Simplicity challenge where there were some great images submitted.

    Post originally from: Digital Photography Tips.

    Check out our more Photography Tips at Photography Tips for Beginners, Portrait Photography Tips and Wedding Photography Tips.

    Transport: Weekly Photography Challenge


    Digital Photography School

  • Light Painting Part One – the Photography

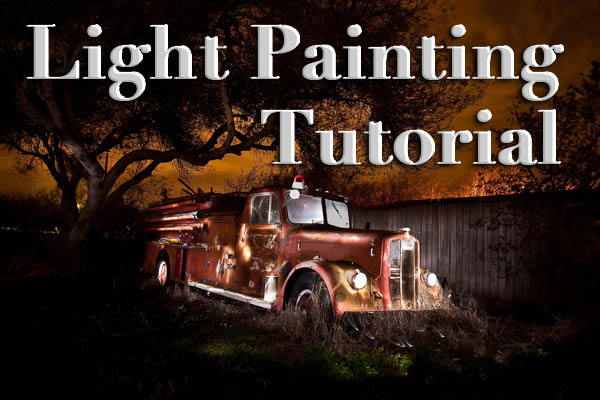
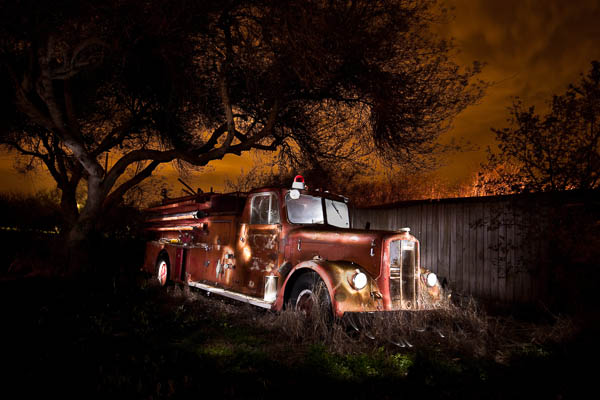
    "1956 Le France Pumper"

    I teach a night photography class and I find that many people who’ve never tried it imagine it to be a lot harder than it really is to get spectacular results. In this two part series I’m going to take you through step by step how I created the image above using light painting techniques that are actually quite easy.

    PART ONE – THE PHOTOGRAPHY

    In this article, Part One, I’m going to go through everything you need to know so that you can go out and create some images using this technique. In Part Two I’ll take you through combining multiple exposures, like I’ve done for this shot, using Photoshop to create the final photograph. It’s really not that hard and I’ll do it one step at a time so you can follow along with my screen shots after each step.

    WHAT YOU’LL LEARN IN THIS ARTICLE

    • Recommended equipment
    • Camera basics (how to set up your camera)
    • Finding a good subject
    • Getting started (set up, preparation and starting points)
    • Lighting, how to do light painting and some tips
    • Potential problems and how to avoid them

    EQUIPMENT FOR NIGHT PHOTOGRAPHY

    Night photography is not that difficult but there are a few essential pieces of equipment needed to do the job right. Here is a list of mandatory and optional items:

    The “Must Haves”

    • a DSLR, or camera with manual settings that include “Bulb”
    • a camera that shoots RAW format images (not mandatory but highly suggested)
    • a sturdy tripod that is not affected by wind
    • an electric cable release or remote trigger (could be called either) with a locking mechanism or timer
    • at least one extra battery for your camera (long exposures and cold eat up batteries quickly so you may run through two or more in a night)
    • a lens hood or shade for your lens

    The “Really Nice to Haves” – not essential, but sure handy

    • a digital watch or timer (or remote that has a timer) I use my iPhone
    • a penlight or small flashlight (your cell phone can work in a pinch) to be able to check camera settings and find an item in the bottom of your bag OR a headlamp like the kind hikers wear, is a better option for hands free operation
    • a powerful flashlight like a Maglite for light painting (I use an incandescent one, LED will produce a bluer tone light)
    • a speedlight or portable flash unit can also be used for light painting (you don’t need a fancy one, even an old Vivitar 283 or 285 will do the trick)
    • rain covers for your camera bag, camera, and yourself (weather can change quickly at night but you can get some great shots in bad weather if you’re prepared – you dry easier than your camera, keep that in mind!)
    • A friend to tag along. Helpful if you’re doing night photography in an urban setting. It’s someone to help pass the time, but also watch that your gear doesn’t grow legs and walk off while you’re digging in the camera bag for something. Or someone to stand guard over the camera gear while you’re off painting with light in the scene.

    CAMERA SETTINGS

    • File format –  shoot raw whenever possible lighting at night can be odd colors
    • White balance – I generally choose “incandescent” or “tungsten” White Balance Preset when doing light painting because I know that will balance correctly for my flashlight. I let the rest of the scene fall where it may color wise
    • Focus – your camera has a hard time focusing at night and will “hunt” unless you find focus and lock it for all your exposures.  If your camera has back button focus capabilities I’d suggest using that, if not you can focus and then turn it to manual focus so it doesn’t attempt to refocus when you hit the shutter release. You can try to focus using manual but keep in mind if your camera can’t see in the dark, neither can you!  So to achieve focus use your flashlight, and if you have a friend along, get them to light up the part of the object you want to focus on. Then either use your auto focus and lock it, or manually focus and then don’t touch it!
    • Manual mode or BULB – for exposure set it to manual. That way the camera is not trying to guess the correct exposure. We’ll be setting it and leaving it for the most part – just like our focus. For exposures longer than 30 seconds (30″ on your camera) you’ll need to find and use your BULB setting. On many cameras it is right after 30 seconds on the shutter speed scale, one some there’s a B option on your mode dial on top of your camera.
    • ISO – how low can you go?!  This is where it gets counter intuitive because your gut may be telling you that it’s dark out so you need a higher ISO, right?  Well in certain situations like shooting the moon, a starry sky, or northern lights where you want a faster shutter speed – then you might need a higher ISO. But for this purpose and most of the times you are on a tripod it is always best to choose the lowest ISO possible. Noise in your image increases with changes in 3 things:  higher ISO, long exposures and in blue or dark areas of your scene. We’re already pushing the long exposure boundaries and night is ALL blue – so keeping the ISO low will minimize the noise best we can.

    Light-painting-015FINDING A GOOD SUBJECT

    Night photography can produce some great images, but it can be a bit tricky to find a location and compose your shots in the dark.  It is best to go out ahead of time and find a spot, then return to it later, about 30 minutes before you actually want to start shooting.  That will give you time to find it, get set up and be ready.   Here are some tips for finding a good night subject suitable for painting with light.

    • Old barns and abandoned cars and trucks in fields make great subjects, and often are appropriate for some painting with light.  If you need to cross someone’s land to get to there, make sure to get permission BEFORE you head out.  Trespassing is not cool and could lead to  lot of problems including getting arrested, or worse, which you certainly don’t want.
    • If you want to shoot the moon, star trails, or do light painting you’ll need to get out of the city.  You may have to drive quite a while to get far enough away so that the city lights do not contaminate your shot.  As you will be exposing for several minutes or longer, the city lights may show up on the horizon if you are not far enough away. (the city lights are a factor in my example in this article which gave me some limitations, and the orange fire in the sky – more on that later)
    • Start with a smaller subject that you can light in one exposure and work your way up to bigger ones like this firetruck or an old barn that will take a few shots and need compiling. An old bicycle is a great starter subject. Buy one at a flea market or junk yard and take your own prop wherever you want and plop it into your scene.  Just remember to take it with you as you’ll want it again later and littering isn’t cool either.

    Light-painting-014

    GETTING STARTED – SETTING UP

    1. Set up your camera on tripod with remote attached or set up to fire the camera
    2. Turn off any image stabilization (IS or VR) on your lens
    3. Turn OFF “long exposure noise reduction” unless you have a lot of patience. What it does it takes a second exposure of equal length of just black, then merges it with your shot to get rid of the noise. But if you’re doing a 2 minute exposure, you have to wait another 2 minutes to review your image and be able shoot again. I don’t use it, and because we’re on a low ISO noise shouldn’t be a big factor
    4. ISO low – ideally 100 or 200
    5. Aperture – start around f/5.6 – depending on your scene, then adjust from there if you want more or less depth of field.  Keep in mind the smaller aperture you use, each stop you close down doubles the amount of time you need to be painting and exposing. So a 60 second exposure at f/5.6 becomes an 8 minute exposure at f/16!
    6. Shutter speed – start around 60 seconds. I’ve done enough night photography to know that’ll get you pretty close for most moonlit scenes. You may have to adjust faster (shorter exposure) or longer depending on whether it’s a full moon, or there’s some stray light in the scene, and how bright your flashlight is.
    7. Focus using the flashlight – then lock your focus.

    LIGHT PAINTING – HOW TO DO IT

    Basically what you do it set your camera on Bulb, open the shutter using your locking release and walk into your scene and start lighting the objects in the camera view using your flashlight. It sounds simple but can be quite tricky to get just the right amount of light in different places, not get yourself in the image, and still get a good overall exposure. Here are a few tips or starting points, then you just need to experiment and adjust as you go.

    Setting up your base exposure

    • Before you start “painting” take a test shot, without the flashlight, of the scene as it is with no additional light added
    • Review that image and make sure you have a good overall exposure of the scene, with it perhaps just a little on the dark side (histogram should be mostly inclined to the left side)
    • When you are happy with the exposure, adjust your settings so that you have a long enough shutter speed to easily get into the scene and light the subject with your flashlight before the shutter closes (at least 30 seconds). You may have to go to a smaller aperture to do so.
    • Once you know your exposure and your shutter speed is at least 30 seconds long, you can get started. If you can bring a friend along they can press the shutter release for you, so you can go in and out of the scene without returning to the camera after each shot to press it again. Or a wireless remote comes in handy here too.
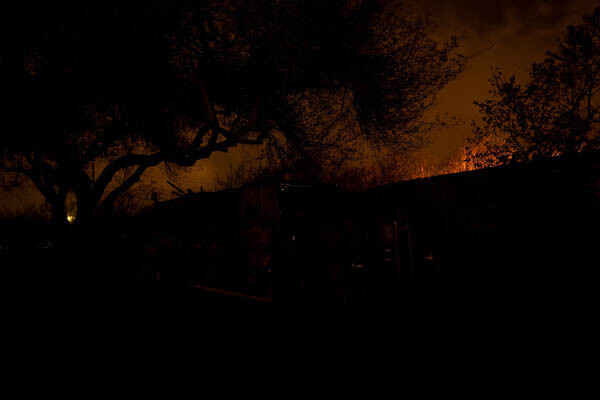
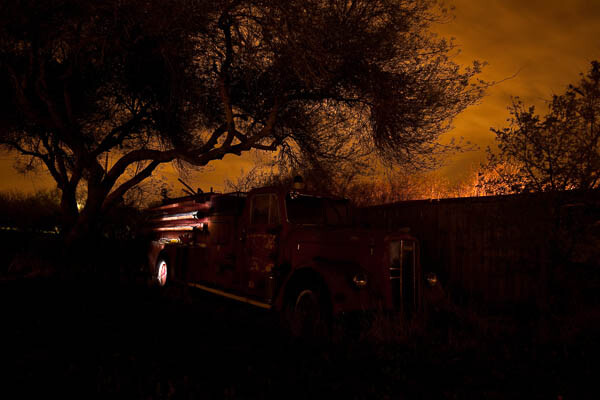
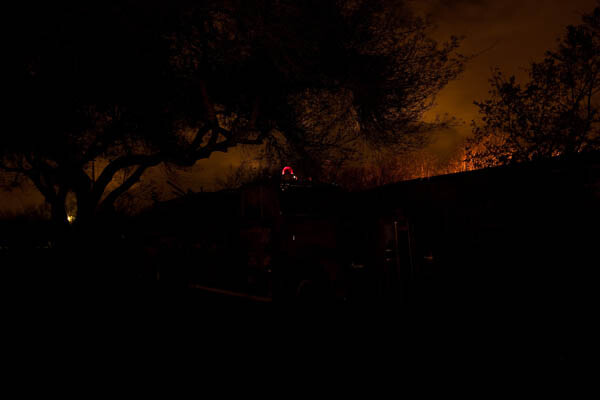
    First shot to establish the base exposure. ISO 100, f/5.6 for 30 seconds.

    My first shot to establish the base exposure. ISO 100, f/5.6 for 30 seconds.

    Adding the flashlight – tips for light painting

    • To keep yourself invisible, always make sure the flashlight is aimed at the subject, and that you do not light up yourself, dark clothing helps too.  Also keep moving during the whole exposure.  Don’t stand in one place for more than a couple seconds or you will show up as a ghost in that spot.
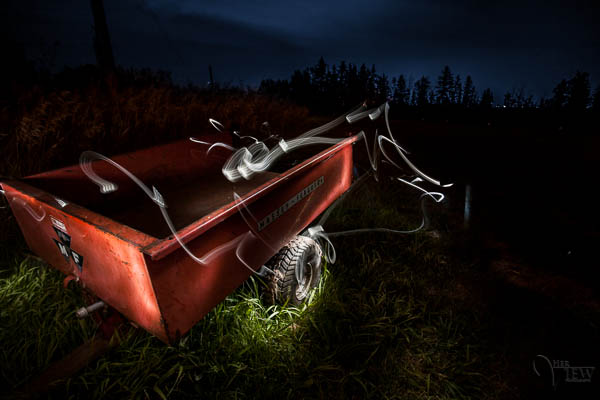
    • Don’t aim the flashlight back towards the camera, unless you want what I call “light bugs”. Sometimes you can use that technique on purpose to create streaks of light and outline your subject, and that can work well also.  See the image of the little red wagon above for an example of light bugs. I believe I accidentally had my headlamp on while I painted and it made the light bugs – but I kind of liked it so I kept it. Happy accidents are great!
    • Keep the light moving the whole time so as not to create any harsh lines or bright spots. I like to make outlines of the shape of my subject or parts of it. Discover what works for you.
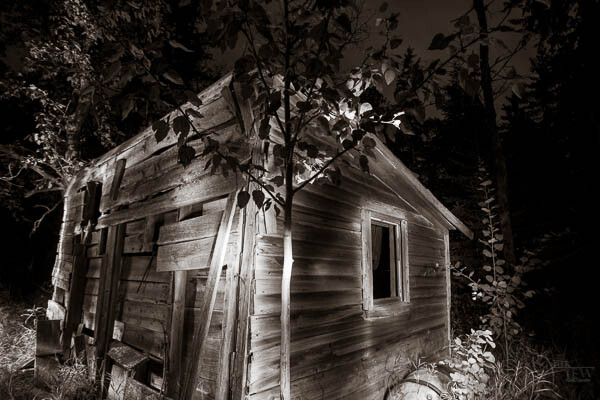
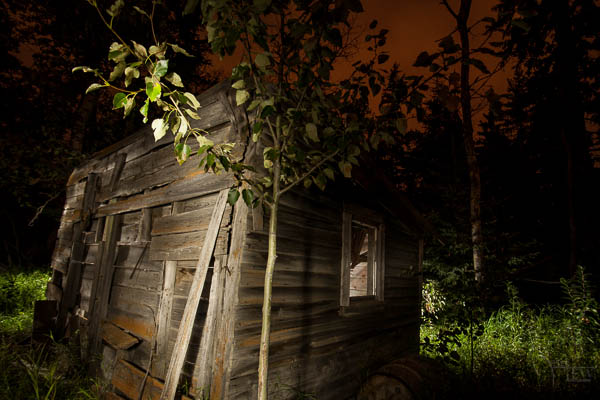
    • For a more defined and abstract look to your light painting you must come in a REALLY close to the subject!  By that I mean about 1-2 feet away from the subject. YES you are going to get right into the scene. But if you keep moving, and keep your light moving you will not show up in the photo. (see the b/w of the old shack above for an example of this look and technique). Also make sure your flashlight beam is focused to a small area – that’s why I like the Maglites, they focus down to a small spot.
    • For a broader more even light keep the flashlight beam wide and stand back from the subject a bit (4-8 feet) and light it from the side to create a nice cross light and texture on the subject. (see the color image of the old wooden shack below for an example of this affect)
    Light-painting-017

    Light painted from a few feet away from the shack with a wider beam flashlight

    REVIEW YOUR IMAGE AND DO IT ALL AGAIN

    Back in the days of film, painting with light was much harder.  There was no way to determine if any of the exposures were correct or not.  To paint a whole scene you had to get it right in one frame or exposure.  Now with digital we have the benefit of testing and seeing what we’re doing and compensating on the next shot.   You can even paint a scene in stages, or sections, and build them all into one image later in Photoshop.  I’ll cover how to do that in Part Two.

    The things you want to look for in your first image are:

    • How did you do with your flashlight painting? If it was too bright in one area and not bright enough in another, just be conscious of how much time you spend on one spot and adjust accordingly.
    • If it is overall too dark or light, you may need to adjust your exposure time or your aperture.
    • If the flashlight isn’t showing up well enough you might need a longer exposure time (just go from 30 seconds to 60 and try again) to allow you to paint slower and cover more areas better.
    • If you want the light more even, back up and use a wider beam.
    • If you want it more focused and like outlines, get closer.
    • Did you get any light bugs you didn’t want?  (turn off your headlamp!)
    • Did you get a ghost of yourself or a body part?
    • Generally look for any problems or areas you want to correct.  Take note and do it again, and again, and again – until you’re happy with it.
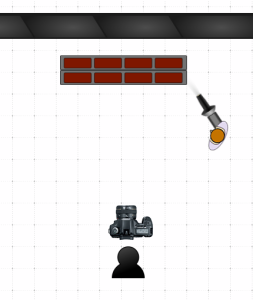
    Set up showing how close I got to the firetruck

    Set up showing how close I got to the firetruck

    MAKING A MULTIPLE IMAGE COMPOSITE – SHOOTING FOR IT

    Now that you’re ready to progress to a larger subject we’ll look at how to shoot multiple images of the same subject, so that you can merge them together in Photoshop later. The ONLY thing you’re going to do different than what you just did in the lessons above – is paint the subject in sections. That’s it!

    For the firetruck image I actually shot about 30 different exposures. I didn’t end up using them all but I wanted to make sure I had my based covered and had options. That’s the beauty of putting them together later – you do NOT have to get it perfect in one shot! Let’s take a look at a few of my images from that shoot.

    Lighting the back area where the hoses are.

    Lighting the back area where the hoses are and the back tire

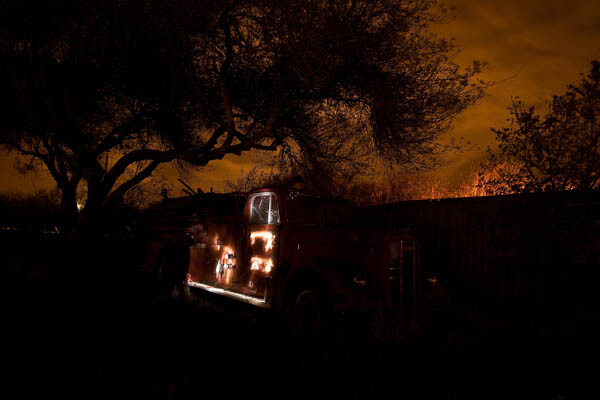
    Lighting the side panel and running board.

    Lighting the side panel and running board, notice how I’ve highlighted certain areas

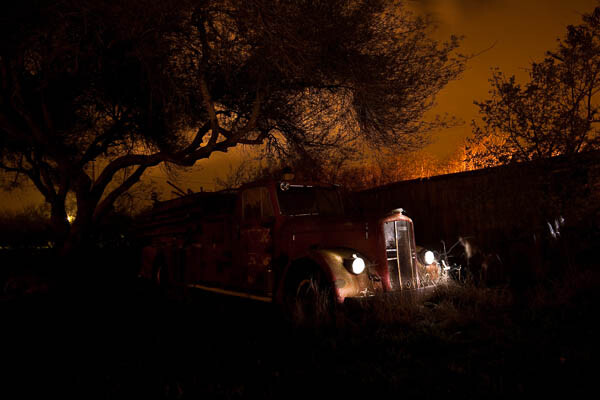
    Lighting the front grill and headlights - to get headlights to look like they're on, put the flashlight right up to the glass and just rotate it around for a bit.

    Lighting the front grill and headlights – to get headlights to look like they’re on, put the flashlight right up to the glass and just rotate it around for a bit.  Notice the light bugs on the right here? We’ll handle those in part two.

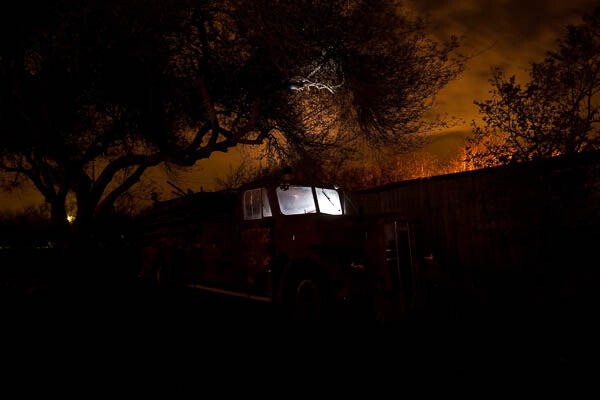
    Lighting up the windows from the inside!

    Lighting up the windows from the inside! A little of the tree branch too.

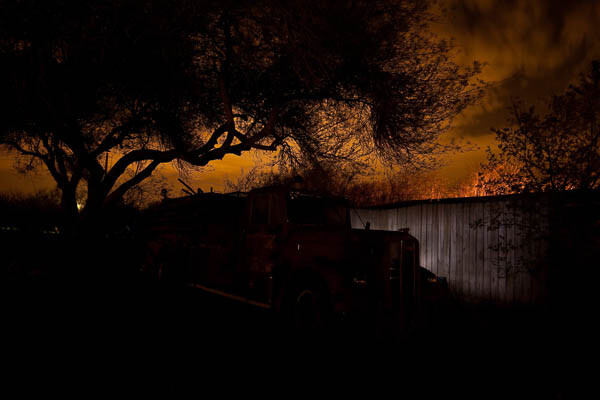
    Lighting the fence behind the truck to give it separation

    Lighting the fence behind the truck to give it separation

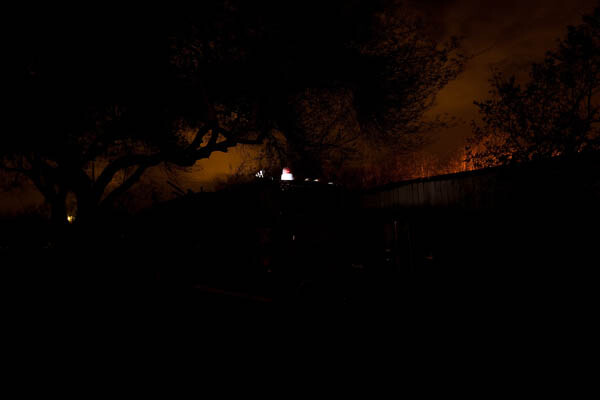
    Turing on the cherry light that makes it a firetruck!  Don't forget the details like this!

    Turing on the cherry light that makes it a firetruck! Don’t forget the details like this!

    Lighting the "cherry" from behind to make it glow red

    Lighting the “cherry” from behind to make it glow red

    You get the idea right? Cover it well, then just to be sure, do it again. I think we were there (my husband was the button pusher, I ran the flashlight) about an hour an a half just doing this one shot. It was such a unique subject, and we had full permission to be there and be photographing it at night that I wanted to take full advantage of it. That it was a beautiful night and this stuff is just so much fun for me that once I get started, I lose all track of time.

    Wrapping up

    Well I was a bit long winded on this tutorial, I hope you are still with me. I wanted to make sure you had all the details you need to go out and try this yourself. I fully expect you to do so and be ready with some images for Part Two when we are going to take our multiple shots and combine them to get something that looks like this in the end.

    Action plan steps

    1. get the right gear
    2. find a good subject, get permission if need be
    3. set up your camera using the starting settings
    4. take your base exposure test shot
    5. add your flashlight and light painting
    6. review and continue

    COME BACK FOR PART TWO!

    "1956 Le France Pumper" Corpus Christi, Texas

    “1956 Le France Pumper” Corpus Christi, Texas

    Post originally from: Digital Photography Tips.

    Check out our more Photography Tips at Photography Tips for Beginners, Portrait Photography Tips and Wedding Photography Tips.

    Light Painting Part One – the Photography


    Digital Photography School
  • DSLR Camera Reviews 2013: Which DSLR To Buy?

    The goliaths of the digital SLR world are Canon, Sony and Nikon. When progressing to this photographic level of awesome picture taking, deciding on your first Professional DSLR is a very important decision. And due to all the varying DSLR camera reviews available on the internet it can prove to be a somewhat daunting one! It’s All About The Loyalty Continue Reading

    The post DSLR Camera Reviews 2013: Which DSLR To Buy? appeared first on Photodoto.


    Photodoto

  • Is This the Future of Umbrellas?

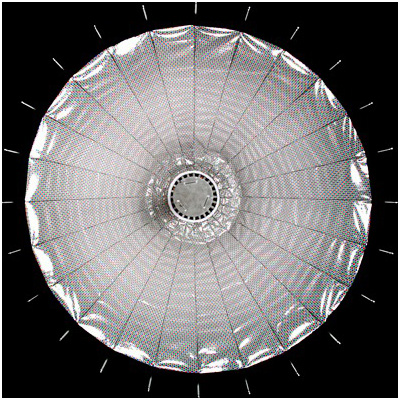
    See this umbrella? It's very different than the typical reflector in one very specific way. And it's being touted as being way better for digital sensors.

    Can you tell what's different about it? Probably not without looking at it close-up…

    Read more »
    Strobist

  • What’s In My Bag- Landscapes

    I’m often asked by beginning photographers about what I use to shoot my photos, whether it’s landscapes, portraits, sports, or some other subject.  Most often, they are referring to the camera used, the lenses, maybe the flash. But the truth is that there’s more to taking great photos than just the camera.  The truth is, the contents of my bag changes dependent on what I plan to be shooting. I’ve compiled a list of items that are always in my bag when I’m on a landscape photo outing, along with how they’ve helped me in my quest for better photos.

    1. My Three-Legged Friend

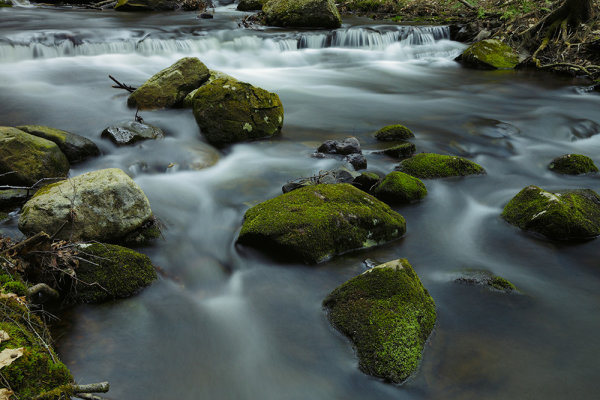
    Without a tripod and neutral density filters, I couldn't possibly hope to capture this image. Using a 6-stop ND filter, exposure was ISO 100, 10 seconds, at f/16.

    Without a tripod and neutral density filters, I couldn’t possibly hope to capture this image. Using a 6-stop ND filter, exposure was ISO 100, 10 seconds, at f/16.

    The truth is, I’d be lost without a tripod on a landscape outing. I currently have two I use regularly. Which ones I use is far less important than the process of choosing a tripod. Too often, beginning photographers skimp on the tripod purchase, going for something cheap that doesn’t suit their needs, and in the end, their images suffer. First and foremost, a tripod needs to support the weight you plan to put on it. This means taking the total weight of your camera and heaviest lens, and making sure your tripod will support that weight.  The fact is, a heavy tripod will better support the weight you put on it, but in today’s world a premium is put on lighter weight. Carbon fiber tripods are lighter weight and generally support heavier loads than aluminum tripods, but at a higher expense. One of the tripods I use is a Manfrotto XPro B, with an Arca Swiss B1 ball head.   This tripod and head combination weighs over 6 lbs., but is rock solid in any conditions. The tripod legs are rated to support 15.4 lbs, and the head is rated to support over 90 lbs! My other tripod is a Gitzo 1541T Traveler with an Acratech GPss ball head. The legs are rated to hold 17.6 lbs, and the head is rated to hold 25 lbs.  This is a smaller setup that folds down to about 20″, and weighs less than 3 lbs. This is what I use when I fly, or when I am hiking longer distances. The thing to realize about a tripod is that a good one is built to last. If you take care of it, a tripod can last a lifetime of shooting.

    2. Stepping Up A Level

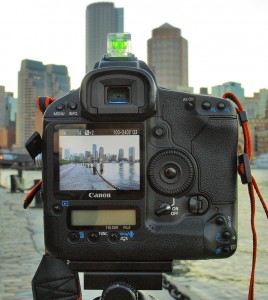
    My trusty bubble level always reminds me to be sure my camera is straight. Nothing annoys me more than a crooked horizon line!

    My trusty bubble level always reminds me to be sure my camera is straight. Nothing annoys me more than a crooked horizon line!

    These days, just about every DSLR out there has a built-in electronic level, a feature I simply LOVE.  However, sometimes in the heat of the moment I will simply forget to level my camera properly, since the built-in level isn’t always visible on the screen.  Because of this, I still carry a hot-shoe mounted spirit level in my bag.  It’s hard to miss it sitting on top of the camera, and it always reminds me to be sure the camera is level.  And yes, while some tripods do have levels built-in, they aren’t always easy to see, and depending on where they are mounted, it may indicate the legs are level, but doesn’t mean the camera is level because the head can still tilt.

    3. Filters

    I’m a big fan of using neutral density filters and graduated neutral density filters for landscape work.  I have a set of Schneider filters that I use with a Lee filter holder. The Schneider filters are not cheap.  They are optical glass, heavy, and high quality. There are more economic options available in Lee-style filters, including Cokin, Formatt, and Lee.  The filters I use are 4×5 size, which allows me to adjust the horizon on the graduated filters based on my composition. My kit consists of 3-, 4-, 5-, and 6-stop ND filters, and 2-,3-, and 4- stop grads, which come in both hard and soft-edged styles.  Which style you use is dependent on the scene in front of you.  I also have a circular polarizer I use often for controlling reflections and cutting haze.

    4. Flashlight

    I often find myself shooting before the sun rises, and after the sun sets. This means hiking to and from my location in the dark. A flashlight can be a lifesaver in these situations.  In addition, at times I go out to shoot night landscapes, to get stars in the sky, or the moon. If there’s no light in the foreground and I’d like some, a flashlight is the perfect way to paint some light back in.  I also carry a headlamp in my bag so I can work handsfree and have a light on while digging around in my bag.

    5. Step-Up Rings

    When you have lenses that have different diameter front elements, it can be maddening to have to buy filters for each lens. An easy workaround for this is to buy step-up rings.  I have a complete set that covers from 52mm up to 82mm.  I then simply purchase the filter for the largest lenses I own and use the step up rings for smaller lenses. Much easier and more cost effective than buying filters to fit each lens.

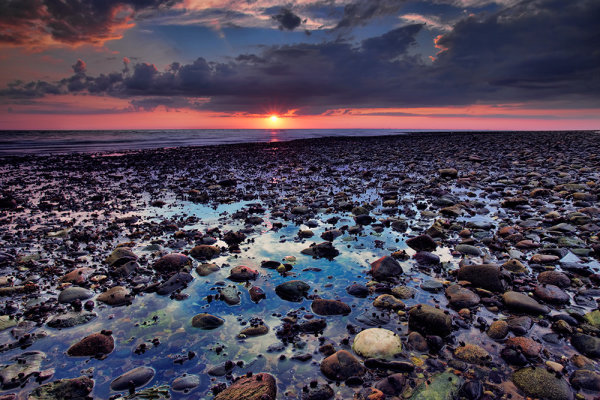
    For this image, I used a 4-stop hard edged ND grad, to bring the sky back within the dynamic range of the camera. I used the hard edge here because there was nothing intersecting the horizon from the foreground, which made it very easy to line up the darkened edge with the horizon out on the bay. Exposure was 1.3 seconds, ISO 100, f/16. EOS 5D Mark II with EF 17-40 f/4L.

    For this image, I used a 4-stop hard edged ND grad, to bring the sky back within the dynamic range of the camera. I used the hard edge here because there was nothing intersecting the horizon from the foreground, which made it very easy to line up the darkened edge with the horizon out on the bay. Exposure was 1.3 seconds, ISO 100, f/16. EOS 5D Mark II with EF 17-40 f/4L.

    Post originally from: Digital Photography Tips.

    Check out our more Photography Tips at Photography Tips for Beginners, Portrait Photography Tips and Wedding Photography Tips.

    What’s In My Bag- Landscapes


    Digital Photography School