Category: Photography

  • 10 Shortcuts of the Commonly Used Features in the Library Module of Lightroom 4

    Introduction

    This tutorial has been transcribed from the SLR Lounge Lightroom 4 Workshop on DVD, a 14 hour Lightroom 4 A – Z guide with over 130 tutorials for mastering Lightroom from start to finish. The Digital download can be purchased from SLR Lounge while the physical copy is available through Amazon Prime.

    Overview

    This quick article will go over 10 shortcuts of the commonly used features in the Library Module of Lightroom 4. Knowing these simple shortcuts can greatly speed up your workflow!

    (Note:  Apple users, just pretend that “CTRL” is “CMD”.  😉

    1. Lightroom 4 Module Shortcuts

    There are a total of 7 Modules in Lightroom 4 and each corresponds with numbers 1-7. To switch to a Module, hit “Ctrl + Alt + 1-7.”

    “1” is the Library Module, “2” is the Develop Module, “3” is the Map Module, and so forth. For example, if you want to go to the Develop Module, hit “Ctrl + Alt + 2.”

    01_lightroom-module-shortcuts

    Another quick way to get to the Develop Module is by simply hitting “D.” You can also get to the Library Module through the different Library View Modes, which brings us to our next shortcut.

    2. Library View Modes

    There are 4 Library View Modes in Lightroom 4: Grid View Mode, Loupe View Mode, Compare View Mode, and Survey View Mode. To access the Grid View, hit “G.” To get to the Loupe View, hit “E.” Hit “C” for Compare View and “N” for Survey View. If you are in a module other than the Library Module, hitting any 4 of these Library View Mode shortcuts will bring you back to the Library Module.

    3. Import/Export Shortcuts

    To import images into Lightroom, hit “Ctrl + Shift + I.” This will bring up the Import Dialogue Box. Hit “Ctrl + Shift + E” to bring up the Export Dialogue Box to export your images out of Lightroom.

    4. Photoshop Shortcut

    Sometimes we need to finish editing our images in Photoshop. We can take our images from Lightroom into Photoshop by selecting the image and then hitting “Ctrl + E.” Once you are done with your image in Photoshop, hit “Ctrl + W.” This will bring you back into Lightroom, where you will see both your Photoshop copy and Lightroom copy of your image in your Lightroom catalog.

    5. Left/Right Panels Shortcuts

    The boxes on the right and left sides of Lightroom 4 are referred to as Panels. Like the Modules, the Panels also correspond to a number. The Left Panels correspond with the numbers “0-4” and include the Navigator Panel, the Catalog Panel, the Folders Panel, the Collections Panel, and the Publish Services Panel.

    To expand or collapse a Left Panel, hit “Ctrl + Shift + 0-4.” The Navigator Panel is “0,” the Catalog Panel is “1,” the Folders Panel is “2,” and so on. Below, you can see that only the Navigator Panel is expanded and the remaining Panels are collapsed.
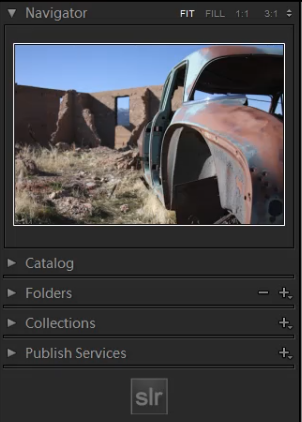
    02_lightroom-left-side-panels-shortcuts

    The Right Panels correspond with the numbers “0-5.” To expand or collapse a Right Panel, hit “Ctrl + 0-5.” The Right Panel includes the Histogram Panel, the Quick Develop Panel, the Keywording Panel, the Keyword List Panel, the Metadata Panel, and the Comments Panel. The Histogram Panel is “0,” the Quick Develop Panel is “1,” the Keywording Panel is “2,” and so forth. As you can see below, none of the Panels have been expanded.
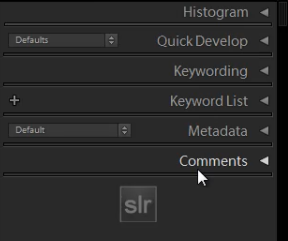
    03_lightroom-right-side-panels-shortcuts

    6. Target Collection Shortcuts

    Since we just discussed the Panels shortcuts, we will go over a Target Collection, which can be found in the Collections Panel (“Ctrl + Shift + 3”) in the Left Panel. A Target Collection is a useful tool because it helps us organize our photos quickly by using a hotkey. You can set a previous collection as the Target Collection, or you can create a new collection and set it  as the Target Collection.

    To create a new collection, click on the “+” sign next to Collections in the Left Panel. Select “Create Collection.”
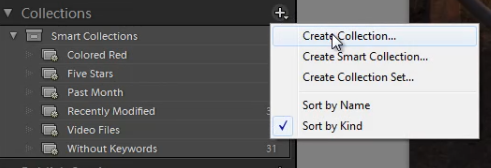
    04_create-new-collection

    Once you have hit “Create Collection,” the Create Collection Dialogue Box will appear. Once you have named your collection, hit “Create.”
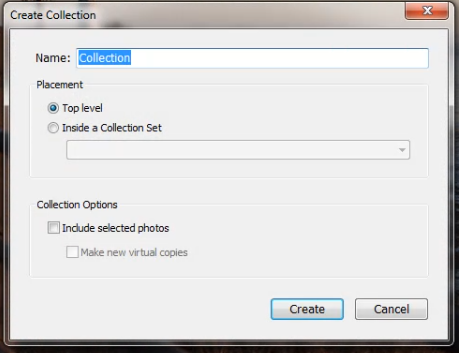
    05_create-collection-dialogue-box

    Right-click on a collection and hit “Set as Target Collection” to set the collection as your Target Collection.
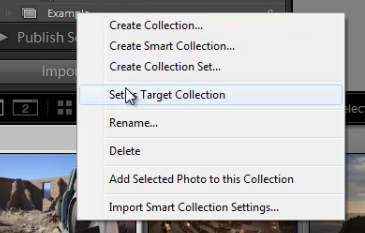
    06_set-as-target-collection

    Once you have selected a collection to be your Target Collection, a “+” sign will appear next to the collection you have selected to remind you which collection is your “target” for the Collection hotkey. Now, simply hit “B” to add any image to your Target Collection!

    For example, you might have created a collection for your portfolio images. Set that collection as your Target Collection, and then whenever you are looking through your latest photo shoot and you see one that is portfolio worthy, just hit “B” to add it to your portfolio!

    7. Rotate Left/Right Shortcuts

    To rotate multiple images at once, go to the Grid View (“G”). Once you are in the Grid View, select your images by holding down “Ctrl” while clicking on your images. To rotate your images to the left, hit “Ctrl + [.” To rotate your images to the right, hit “Ctrl + ].” You can also rotate individual images by using the same shortcuts.

    8. Flag Shortcuts

    Some people use flags as their culling system. For example, selecting an image as a pick means that we will deliver the image. Rejecting an image means that we will not deliver the image. Simply hit “P” to flag an image as a “pick.” If you want to remove the flag, hit “U.” To reject an image, hit “X.”

    Or, to simply increase or decrease the flag status of an image, just hit Ctrl and either the up or down arrow.  This is by far the fastest way to go go from image to image and flag keepers (with just one hand!) by using the left and right arrows to navigate and the Ctrl-up/down key combination to pick or reject your images…

    9. Star Rating Shortcuts

    The following are the shortcuts for the Star Rating in Lightroom 4.

    • “1” = 1 star
    • “2” = 2 stars
    • “3” = 3 stars
    • “4” = 4 stars
    • “5” = 5 stars

    Simply select an image and hit “1-5” to give the image a star rating. To reset Star Ratings on your images, hit “0.”

    10. Color Label Shortcuts

    The Color Labels in Lightroom 4 correspond with the numbers six thru nine. Red is “6,” Yellow is “7,” Green is “8” and Blue is “9.” There is also a Purple Color Label but to label an image Purple, you need to go into the Edit Menu, as shown below.
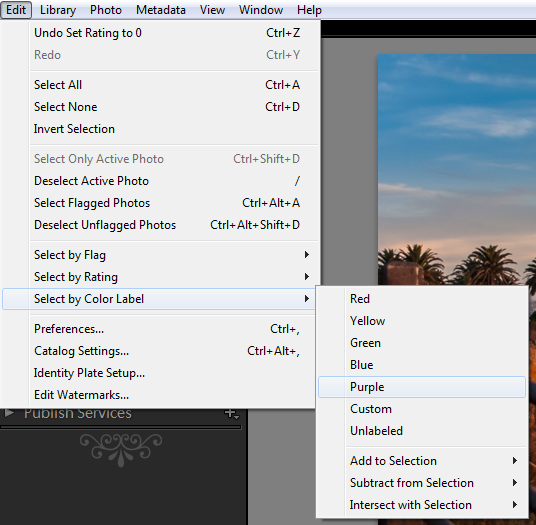
    07_lightroom-purple-color-label

    If you want to remove a Color Label, hit the corresponding number again. So for example, if your image is already color labeled Green, hit “8” again to remove this Green Color Label.

    Learn More with the Lightroom 4 Workshop Collection!

    This was a sample tutorial from the Lightroom 4 A to Z DVD which is one of the DVDs in the Lightroom 4 Workshop Collection. A collection of nearly 30 hours of video education teaching everything from Lightroom basics to advanced raw processing techniques.

    The LR4 Workshop Collection also includes the critically acclaimed Lightroom 4 Preset System which is designed to enable users to achieve virtually any look and effect within 3-5 simple clicks. From basic color correction, vintage fades, black & white effects, tilt-shift effects, faux HDR, retouching, detail enhancing, and so much more. Click the links above to learn more.

    Post originally from: Digital Photography Tips.

    Check out our more Photography Tips at Photography Tips for Beginners, Portrait Photography Tips and Wedding Photography Tips.

    10 Shortcuts of the Commonly Used Features in the Library Module of Lightroom 4

    Digital Photography School

  • Portraits on an Overcast Day? Use a Reflector

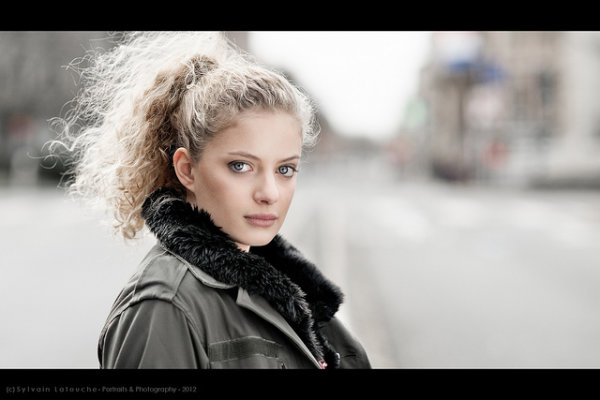
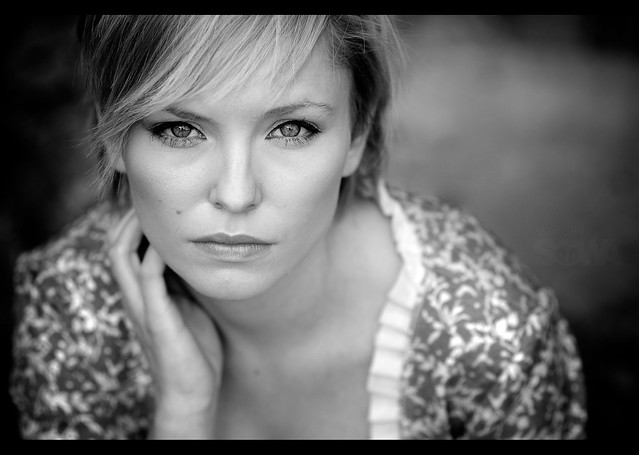
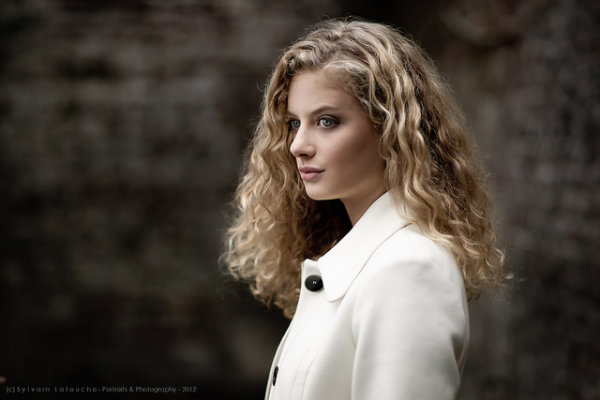
    Photographer: Sylvain Latouche. Shot with a Sony A850 and a 105cm silver circular foldable reflector.

    Photographer: Sylvain Latouche. Shot with a Sony A850, 85mm lens and a 105cm silver circular foldable reflector.

    As we head into Autumn here in Australia the days are becoming shorter and we’re seeing more and more overcast days. While some might say the weather is poor – this is one of my favourite times to shoot portraits out doors.

    Overcast cloudy days present photographers with some beautiful soft and even light with the loads acting as a big natural diffuser.

    This also means you can position your subjects almost anywhere as there’s little direct light which can open up great creative possibilities.

    One of the key tools to have at your disposal on these kinds of days is a reflector (they come in all kinds of shapes, sizes and colours – grab one of the affordable 5-in-1 sets here if you’re just starting out) to help to bounce some of that lovely soft light up into the face of your subject.

    This adds more light into the scene to help with exposure but also fills in any shadows that may be cast (often under the chin, nose etc).

    In general you’ll want to position your reflector below and angling the reflected light back up towards the subject to fill in what shadows their may be – but do experiment with positioning the reflector at different distances and angles from your subject to see what impact that has.

    Check out some of the following examples – all shot on overcast days with nothing more than a reflector (click the photos to be taken to the photographers page).

    Photographer: Sylvain Latouche. Shot with a Sony A850, 85mm lens and 105cm silver circular foldable reflector.

    Photographer: Sylvain Latouche. Shot with a Sony A850, 85mm lens and 105cm silver circular foldable reflector.

    wondering...

    Photographer: Marcin Sowa. Shot with a Nikon D300, 85mm lens and reflector.

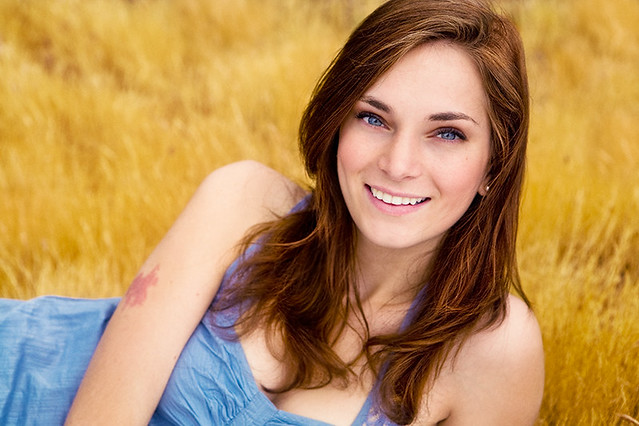
    Photographer: Casey Lee. Shot with Canon EOS 30D, 50mm lens and a Gold Reflector.

    Photographer: Casey Lee. Shot with Canon EOS 30D, 50mm lens and a Gold Reflector.

    Senior Portrait 1 - Tamara (Color)

    Photographer: Paul Ryan. Shot with Canon EOS 5D, 24-70mm lens and a Silver Reflector.

    Post originally from: Digital Photography Tips.

    Check out our more Photography Tips at Photography Tips for Beginners, Portrait Photography Tips and Wedding Photography Tips.

    Portraits on an Overcast Day? Use a Reflector


    Digital Photography School

  • Road Trip! 19 Remarkable ‘Road’ Images

    Image by Sippanont Samchai

    Roads… they’re all around us but I’ve never really considered them to be in my most photogenic subjects list. But maybe I need to rethink that!

    Image by Ben Fredericson

    Image by fatboyke

    Image by Berenice Decados

    Image by Paolo Margari

    Image by Tambako the Jaguar

    Image by ecstaticist

    Image by Tricky

    Image by Etrusia UK

    Image by joiseyshowaa

    Image by Pörrö

    Image by Bartek Kuzia

    Image by Matthew Fang

    Image by gari.baldi

    Image by eir@si

    Image by Shahram Sharif

    Image by Martino’s doodles

    Image by purplemattfish

    Image by MSH*

    Share a link to your favorite ‘road’ photo in comments below.

    Post originally from: Digital Photography Tips.

    Check out our more Photography Tips at Photography Tips for Beginners, Portrait Photography Tips and Wedding Photography Tips.

    Road Trip! 19 Remarkable ‘Road’ Images


    Digital Photography School

  • Facebook Survey, May 2013

    Facebook Survey, May 2013

    Yesterday I was prompted by Facebook and asked if I wanted to take a survey on my Facebook page. I said yes and took the survey. Here are the questions that Facebook asked me. Maybe this survey gives some insight into what they are thinking about in terms of public perception and product development. I don’t know anything more about the survey. I don’t know who it was targeted towards, how many people were given it, or any other demographic or statistical data.

    1. Do you manage the Facebook page or public profile you were just visiting?

    Yes, I manage this page by myself
    Yes, I manage this page along with 1-4 other people
    Yes, I manage this page along with more than 4 people
    No, I do not manage this page

    2. What is your role in managing this Facebook page or public profile?

    I am the public figure this Facebook page or public profile is about
    I am an Account Manager — I work for a third-party management firm
    I don’t manage the page directly — I make partnership and business decisions
    Other

    3. Do you manage your Facebook page or public profile using the Facebook website or app, or do you use a tool such as HootSuite, CoTweet, or Seesmic?

    I primarily use the Facebook website or app to manage my Facebook page or public profile
    I primarly only use another tool such as HootSuite, CoTweet, or Seesmic to manage my page or public profile
    I use both the Facebook website or app and another tool equally

    4. Approximately how many fans or subscribers does your page have?

    5. Approximately how often do you post from your Facebook page or public profile?

    Multiple times per day
    About once a day
    2-6 days a week
    About once a week
    2-3 times a month
    About once a month
    Less often than once a month

    6. About what percent of the time are the posts composed by the public figure this page is about (rather than another person or agency posting on the figure’s behalf)?

    Less than 20%
    Between 20% and 40%
    More than 40%, but less than 60%
    Between 60% and 80%
    100%
    I don’t know

    7. If you were to post something to your page, approximately what percent of your Facebook fans would you expect to have the post show up in their news feed?

    Less than 20%
    Between 20% and 40%
    More than 40%, but less than 60%
    Between 60% and 80%
    More than 80%, but less than 100%
    100%
    I don’t know

    8. What percentage of Facebook’s engineering resources do you think are dedicated to increasing revenue (versus developing new products and improving on existing products for our users)?

    Less than 20%
    Between 20% and 40%
    More than 40%, but less than 60%
    Between 60% and 80%
    More than 80%, but less than 100%
    100%
    I don’t know

    9. Relative to other initiatives, how important is your Facebook page or public profile in meeting your business objectives?

    Not at all important
    Slightly important
    Somewhat important
    Very important
    Extremely important

    10. Please indicate how important each of these metrics is to you when you are trying to evaluate the overall success of your Facebook page or public profile.

    (Choices offered were: not at all important, somewhat important, very important)

    Referral traffic (e.g. website visits)
    Content engagement (e.g. video views, likes, comments on posts)
    Increased reach (e.g. fanbase growth)

    11. Do you agree or disagree with the following statement? My Facebook page or public profile helps me to accomplish my business objectives

    Strongly disagree
    Somewhat disagree
    Neither agree or disagree
    Somewhat agree
    Strongly agree

    12. Do you agree or disagree with the following statement? I am happy with the level of engagement my fans have with my Facebook page or public profile

    Strongly disagree
    Somewhat disagree
    Neither agree or disagree
    Somewhat agree
    Strongly agree

    13. Overall, how satisfied are you with the rate at which you acquire new Facebook fans?

    Completely dissatisfied
    Very dissatisfied
    Fairly dissatisfied
    Neither satisfied nor dissatisfied
    Fairly satisfied
    Very satisfied
    Completely satisfied

    14. Overall, how satisfied are you with managing a Facebook page or public profile?

    Completely dissatisfied
    Very dissatisfied
    Fairly dissatisfied
    Neither satisfied nor dissatisfied
    Fairly satisfied
    Very satisfied
    Completely satisfied

    15. In your opinion, what amount of improvement, if any, is required to make the page or profile management tools Facebook provides you excellent?

    Huge improvement
    Much improvement
    Some improvement
    Slight improvement
    No improvement

    16. Do you manage a public page or profile on any other social media platforms?

    No, I do not manage a public page or profile on any other sites
    Yes, I manage a page or public profile on at least one other site

    17.On what other social media platforms do you manage a public page or profile?

    Instagram
    Google+
    Twitter
    Pinterest
    Tumlbr
    Other (fill in)

    18. On which service do you most often post

    Instagram
    Google+
    Twitter
    Pinterest
    Tumlbr
    Facebook
    Other (fill in)

    19. Compared to your consumer facing experiences on other platforms, how satisfied are you with your experience managing a Facebook page or public profile?

    More satisfied
    About the same level of satisfaction
    Less satisfied

    20. How important is it to you to be able to manage your Facebook page or public profile from a mobile device?

    Not at all important
    Slightly important
    Somewhat important
    Very important
    Extremely important

    21. When you publish content from a mobile phone, what device do you typically use?

    Tablet (such as iPad)
    Windows phone
    iPhone
    Android phone
    Blackberry
    I never publish from a mobile device
    Other (fill in)

    22. In your opinion, what amount of improvement, if any, is required to make the Facebook page and public profile administration experience excellent?

    Huge improvement
    Much improvement
    Some improvement
    Slight improvement
    No improvement

    23. In what ways would you like to see the Facebook page and public profile administration experience improve? (select the TOP 3 improvements you’d like to see)

    I would like to be able to post additional types of content
    I would like to be able to post more easily
    I would like to know more about my fans
    I would like my fans to share more of my posts with their friends
    I would like to be able to test which posts perform best
    I would like to drive more traffic to my primary website
    I would like my posts to reach more fans
    I would like to see everything my fans are saying about me/the public figure
    I would like to see how the activity of my fan base compares to that of other public figures
    I would like to be able to use hashtags
    Other (fill in)

    24. Please share any additional feedback you may have about your experience as a Facebook page or public profile administrator.

    25. We would like to hear more about your experience with Facebook in the future. Would you be interested in receiving additional surveys on this topic?

    25. Would you be interested in participating in a brief phone interview on this topic?

    Thank you.


    Thomas Hawk Digital Connection

  • Leaf Shutter + ND + Flash: A Fuji X100s Daylight Primer

    Right about now I feel like Alice in Wonderland, holding the "drink me" cup. Having a leaf shutter, a built-in 3-stop neutral density filter and a real chip in a compact camera is opening up a whole new world of possibilities.

    But with these possibilities come some quirks, some compromises and a few technical things to be mindful of. What you need to know about leaf-shutter compacts and daylight flash, below.

    Read more »
    Strobist

  • Photo Printer Reviews: 10 Best Photo Printers of 2013

    It doesn’t seem that long ago since we had to go down to the local photo shop to extract all our snaps… and then back again to pick them up. Back then you would have the option of 24 hours standard or one hour express photo processing times. These days, things have changed quite drastically, and waiting for photographs to Continue Reading

    The post Photo Printer Reviews: 10 Best Photo Printers of 2013 appeared first on Photodoto.


    Photodoto

  • 3 Stupidly Simple Reasons Why Most People’s Photography Does Not Improve

    Image by Darwin Bell

    I’m presuming that this article will not apply to most of us… but after 3 conversations in the last week which revealed the same photography problems in 3 different people – I thought I’d better jot them down.

    Warning: none of this is rocket science sometimes the basics need to be said!

    1. You don’t Take Your Camera With You

    If you don’t practice using your camera you’re unlikely to ever grow in your understanding of and skill in photography and if you rarely have it with you – you’ll not get that practice.

    Does that mean you need to lug your DSLR and all your cumbersome gear around with you all the time?

    Maybe – I have friends who are never without their main camera – but if that’s just not practical, at least make sure you have a smaller point and shoot or even a decent camera phone with you at all times. While the quality of the images you take might not be as great with these cameras – at least you’ll be practicing your composition, thinking about light, color and other aspects of photography.

    2. You’re Going too Fast

    Many of us lead life at such a fast pace that we rarely stop to see the opportunities right before us to take wonderful images.

    You can carry your camera around with you 24/7 for the rest of your life but unless you learn to slow down and to look at the world a little differently you may never actually use it.

    As a result – I guess one of the tips I find myself giving to some that I talk to is to find ways to slow down – or at least slow down temporarily to set aside time to be a bit more intentional about photography. It might start by taking a walk with the main objective of doing some photography but could also be something bigger like a weekend away with your camera or even taking a photography class or tour.

    For me its about building photography into your daily rhythm and in time it starts to become a more natural thing as you get in the habit of seeing life a little differently.

    3. You are Worried what Others Will Think

    I’ve come across quite a few people lately who suffer from ‘framing paralysis’.

    They take their camera with them and they even slow down enough to see the photographic opportunities around the – but there’s just something that stops them lifting their camera up to frame the shot.

    When I dig a little I’ve found in most of these instances the person is simply worried about what others around the will think if they use their camera. Will they look stupid? Will people think that they’re photographing them?

    Its a feeling I’ll admit to having myself in the past and when I asked about it on our Facebook page the other day it seems that it’s quite common.

    I guess the key to moving through framing paralysis is to grow your confidence as a photographer. For me the more photos I took and the more I began to exercise the discipline of taking images the easier it got. Another friend of mine got over his paralysis by finding a photography buddy to go out with – two of the taking shots somehow seemed less confronting than him doing it alone.

    What do You Think?

    Of course the above are very simple things that hold many people back and there are bound to be others that readers here at dPS might have experienced. I’d love to hear from you on two fronts:

    1. what other simple things hold you (or other photographers) back from improving?
    2. what tips and solutions would you give others facing these problems?

    I’m looking forward to hearing more from the dPS community on this!

    Post originally from: Digital Photography Tips.

    Check out our more Photography Tips at Photography Tips for Beginners, Portrait Photography Tips and Wedding Photography Tips.

    3 Stupidly Simple Reasons Why Most People’s Photography Does Not Improve


    Digital Photography School

  • Histograms: Your Guide To Proper Exposure

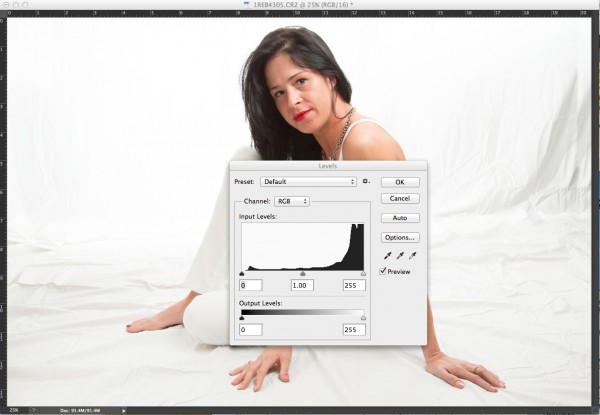
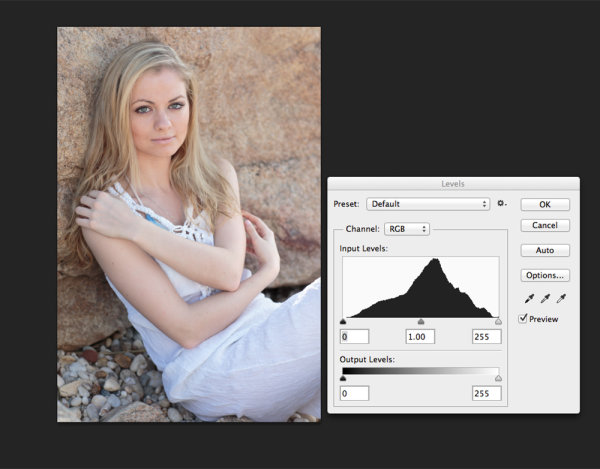
    The finished image was a nice, high key portrait. See below for details on the histogram.

    The finished image was a nice, high key portrait. See below for details on the histogram.

    To many newbie photographers, getting the proper exposure in camera is the biggest challenge they face. While letting the camera do the work for them turns out fine most of the time, there are many times where the camera can require some help.  Knowing just how to give your camera that help is key to getting an image you’ll want to keep.  The best way to judge an exposure (or a potential exposure, when using Live View) is to use your camera’s histogram.

    In this high key portrait, the histogram shows a majority of pixels on the right side, representing brighter pixels. This is to be expected due to the white background and outfit worn.

    In this high key portrait, the histogram shows a majority of pixels on the right side, representing brighter pixels. This is to be expected due to the white background and outfit worn. The pixels in the middle of the histogram represent the subject’s skin tones, while the small dark peak on the left represents her hair. Notice also, that this histogram does show some highlight clipping. In some images, this may be a problem, but since this is a high key portrait and the background is the bright white area, and the skin tones are good, this is not a problem for this image.

    A histogram, in it’s simplest terms, is simply a graph showing the brightness levels of pixels in the image. The right side of the graph represents bright pixels, while darker pixels are shown on the left side.  Pixels representing midtones are in the middle, of course. A histogram runs, from left to right, showing values from 0- black, to 255- white.  The height of the histogram represents how many pixels are recorded at a given brightness level. The primary aspects of the histogram that one should be concerned with are the left and right edges.  Any pixels that recorded as bright white (255) or as pure black (0), would be pushed up against the edge of the graph.

    Since a histogram is simply a representation of the tonal range of a given image, there really is no right or wrong histogram. The histogram will change based on the tones in an image. A high-key portrait, for example, would show pixels mainly to the right side of the histogram. A low-key image would show pixels mainly to the left side of the histogram. An image with a wide tonal range would show pixels across the entire histogram.

    As I mentioned, when judging exposure, the primary areas of the histogram to be concerned with are the right and left edges. Pixels in these areas are rendering as bright white, or dark black.  Generally speaking, unless an image is intended to show bright white or pure black areas, pixels pushed up to the very edge of the histogram could indicate an exposure problem.  This is also known as “clipping”. For instance, when a large number of pixels are pushed against the right side of the histogram, in essence, being cut off by the edge of the histogram, it is said that the highlights are clipped.

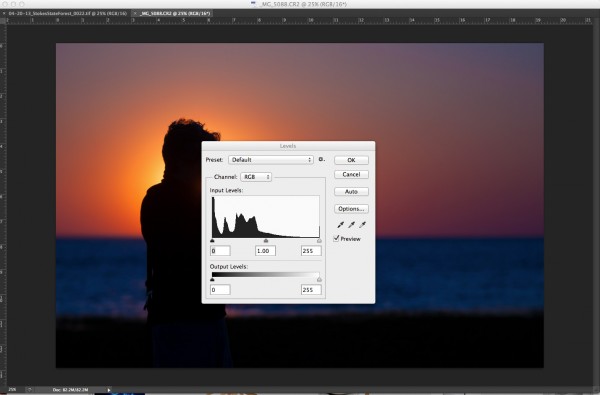
    In this image, since the subject is in silhouette, and there are lots of dark tones, we expect to see most pixels on the left side of the histogram.

    In this image, since the subject is in silhouette, and there are lots of dark tones, we expect to see most pixels on the left side of the histogram.

    When judging the histogram, one must take into account the subject matter of the image. If the image should show bright white areas, yet the histogram shows the pixels as rendering more middle grey, due to the way the camera’s meter sets the exposure, you can then use exposure compensation or adjust your exposure manually to increase exposure and achieve the desired result.  The same is true for darker images that the camera overexposes because the meter is trying to achieve middle grey.  By reducing exposure, either manually by changing your shutter speed, aperture, or ISO, or by using exposure compensation, you can darken the image to achieve the desired image. The histogram of this new image will reflect the change to exposure.

    Now, here’s the big secret. If you use Live View on your camera, you can view a live histogram, that will update and reflect changes in exposure when your exposure changes. This means you can judge what your current exposure is, and watch in real time how changes to that exposure will affect your image. It’s a great way to get a feel for how even a slight adjustment in shutter speed, aperture, or ISO can affect your exposure.

    This portrait shows more midtones than anything else, so we see more of a classic peak near the center of the histogram, with the pixels falling off as they get to the edges of the histogram. You can see that neither the highlights or shadows are clipped .

    This portrait shows more midtones than anything else, so we see more of a classic peak near the center of the histogram, with the pixels falling off as they get to the edges of the histogram. You can see that neither the highlights or shadows are clipped .

    Post originally from: Digital Photography Tips.

    Check out our more Photography Tips at Photography Tips for Beginners, Portrait Photography Tips and Wedding Photography Tips.

    Histograms: Your Guide To Proper Exposure


    Digital Photography School

  • NYC by Sally Wanless

    When I went over to NYC for the first time back in 2010, I was super excited. I thought I’d be forever taking shots of Times Square and the surrounding well-known landmarks. The funny thing is when i got to New York, once I sussed the city out a bit and got on the bus to head to Central Park; they head along Via Brooklyn Bridge – which is where this shot was taken, just approaching the other side of Brooklyn Bridge. That day it was absolutely baltic, and it wasn’t a hop on/hop off type, so in order to get any shots on the way, you had to be on the top deck, and just be cold. The bus was in pretty tattered condition, but you know what, that made things better (for me!, probably not others trying to get a clear image!) I have always loved the graphic design type of things, and all the scratches on the windows made a dramatic mark onto the buildings when photographed. It was a fairly dingy, dark area, very unlike Times Square and the like. It all added something to it, Even the empty seats, with the Brooklyn skyline in the distance and looking very grey, it emphasised the real grungy, cold look of it all.

    nyc

    Since this was taken, I recently went back over again, (February 2013) and I have produced a NYC series, check it out at on my website under new york/ongoing.

    IMG_3243

    New York is certainly a city that excites your imagination and when submerged, you definitely feel the buzz of the place, whether you’re in Times Square, Greenwich Village, Battery Park or Murray Hill. There is always something happening, every area is so completely different and that is one of the reasons i think that i love going there, with a camera in tow to be producing new work because it is generally like an on the go Photography Documentary.

    IMG_3212

    The two other images below are from the New York Series. All the images are black and white – though i do delve into colour too. There is something about stripping back the colour from the city that is always in colour to give it a more simplistic approach and look.

    Scottish born Photographer
    http://www.sallywanless.com

    dslrBlog