Category: Photography

  • 5 Steps to Building More Powerful Images

    A Guest Contribution by Dan Bailey

    We photographers seem to have it easy. Whereas most artists spend anywhere from hours, to months to years to manufacture their creations, we can simply point, press and be done. However, that kind of convenience doesn’t necessarily translate into great imagery.

    Shooting powerful photos that have lasting visual appeal requires more than just pointing and clicking; it takes applying some fundamental compositional methods that are designed to simplify your compositions and actively engage your viewers. Here are five steps that will help you strengthen the visual impact of your imagery.

    1. Use Awesome Light

    Photography is all about light, and it’s the first thing that will make or break the shot. Not matter what you’re shooting, any and every subject will look better in great light. When we think of good light, we often think of Magic Hour, or the stretches of time during sunrise and sunset. As a general rule, shooting during these times will usually give excellent results.

    However, be open to shooting at other times of the day, or even using other lighting sources. Fog, diffused window light or a camera flash can all make for compelling illumination. If you become proficient at wrangling the light, you can create great photos under any conditions.

    NFLD HIK 100A

    2. Have an Identifiable Main Subject

    First and foremost, your image should have have a main subject. Period. It needs to be about something. The most powerful photographs are built around a single element that serves as the focal point of the shot. As a photographer, your job is to draw your viewer into the frame, and if you don’t give them something to lock onto, their eyes will wander aimlessly around your picture trying to figure out what they’re supposed to see. If you don’t know what your picture is about, then your viewer won’t either and they’ll just move on.

    DSC8929

    3. Use Relationships to Tell the Story

    A powerful photograph tells a story, which essentially means that it communicates some specific message or invokes an emotional response from the viewer. The best way to do build this story is to establish relationships between your main subject and the other elements inside the frame.

    The job of these secondary elements is to compliment, reinforce or contrast the main subject in some way. An effective secondary subject can be as simple as a strong, out of focus background that gives a sense of place, or it can be two or three other things in the photo that give your subject something to play off of and help to establish the narrative of how your subject “fits” within the world of your frame.

    Adding strong secondary elements to your photo also gives your viewer something else to explore as their eyes scan the image, and more importantly, it gives them something to think about. Anytime you activate your viewer’s brain, you’ve gone a long way towards creating a compelling image.

    UTH 100

    4. Create Tension Through Framing

    Depending on how you place your subjects in the frame, you determine the experience by which your viewer scans and respond to what’s in your photograph. The human eyes and brain are hard wired to see and recognize patterns, colors and imperfections in the world; it’s how we evolved to identify our surroundings and spot things like food and danger.

    By using a mix of hot and cool colors and by placing your subjects in seemingly random areas in the frame, you cause an inherent uneasiness in your viewers. Their eyes will scan your image, trying to find patterns and that may not exist, and so they’ll keep looking, tracking back and forth between your different subject elements, and darting across broad patches of negative space in order to make sense of the photo. By contrast, if your composition is too perfect, or too balanced, your viewer will quickly spot this nice, easy pattern and move on. That’s not what you want.

    DSF0787

    5. Don’t Show Everything

    A common mistake with beginning photographers is to try and show too much. This leads to cluttered, boring images that do little to engage the viewer’s brain. As I said in number 2 above, in order to create a powerful photo, you need a main subject. However, I didn’t say that you had to show the whole thing.

    Abbreviating your subjects can be a very powerful method towards creating a compelling shot. Especially if I they’re things that we’re all familiar with. If you only show part of a subject, you automatically activate your viewer’s imagination as they try to picture the rest in their mind. Photography is a two way street: You have creator and viewer, and if you bring your audience into the process, you invite them to become more connected to your shot.

    Remember, good photography isn’t about perfectly reproducing your subject, it’s about creating a visual representation that communicates the ideas or emotions that you had about the scene right when you pressed the shutter.

    DSC2259

    Further Reading

    Makingcover125For more creative photography tips, I invite you to check out my eBook Making The Image – A Conceptual Guide to Creating Stronger Images. I’ll even give you a special price! Use discount code DPS you can get eBook for 50% off.

    Dan Bailey is a full time professional outdoor, adventure and travel photographer based in Alaska. When he’s not off exploring in the mountains, writing about photography, or flying his little yellow bush plane, he can sometimes be found lurking in the forums right here at DPS.

    Check out his blog and find him on Facebook and Google+.

    Post originally from: Digital Photography Tips.

    Check out our more Photography Tips at Photography Tips for Beginners, Portrait Photography Tips and Wedding Photography Tips.

    5 Steps to Building More Powerful Images


    Digital Photography School

  • 3 Questions to Answer Before You Fly into Adobe’s New Creative Cloud

    Adobe’s announcement of their decision to switch to a subscription-only model has sparked off hot debates on whether they are justified in making this move. The Internet is flooded with concerns expressed by users of Adobe software – especially Photoshop – on whether they can now afford to continue using the software. Doing so will mean they would have already Continue Reading

    The post 3 Questions to Answer Before You Fly into Adobe’s New Creative Cloud appeared first on Photodoto.


    Photodoto

  • Is that a Workshop, Tour or Seminar [Part II]

    In our previous post on this topic we learned that the photo workshop is primarily a teaching venue, with a very structured curriculum leading to measureable outcomes. The keynote teacher and/or assistant instructors should be available upon demand and continuously be pushing, cajoling and exciting you to advance your skill set.  The workshop is all about learning.

    The photo tour was borne as a hybrid from the conventional tour business that blossomed in the 1970’s.  While travelling tourists enjoyed the convenience of having another labour over the details of accommodation, meals and destinations, many tour administrators recognized a need to cater to niche markets that included an array of interests and hobbies. Specialized tours were developed to meet all types of sundry from participating in archaeological digs to experiencing the daily life of Zulu tribes. Somewhere in the middle was the hobbyist photographer whose key interest was in photographing the A to Z’s of the planet, and having someone else attend to all the details.

    So what should we be aware of when researching for the right fit in a tour company?


    A good tour company should have an itinerary and support staff that puts you front-and-centre with the attractions and characters at the right time of day to maximize your photo opportunities.

    A good tour company should have an itinerary and support staff that puts you front-and-centre with the attractions and characters at the right time of day to maximize your photo opportunities.

    Almost all photo tours that pique an interest involve travel to some remote location, usually out of country and more often than not to another continent.  While Canadians might like to travel to Asia, for example, many Asians like to travel to Canada.  Common wisdom would suggest that an Albertan could probably put together a more complete tour package of the Canadian Rockies than an administrator in Shanghai, for example. Conversely, that same Shanghai administrator should be more thorough in developing a week long traverse of the Great Wall of China than our friend from Jasper.

    This is not to suggest that non-nationals cannot, and do not, provide great experiences to other countries – many do, but, many more do not.  It is essential you review their credentials to gain informed insight with the administrator’s familiarity of the geography being visited.

    Most importantly, ensure the itinerary has been developed with the photographer in mind.  Many tour operators simply don’t understand that photographers want to have the option of being on location no less than 30 minutes prior to sunrise. Likewise, how can we be enjoying dinner when the mother of all sunsets is happening just beyond our spreads of Peking Duck or prime Alberta beef.

    Review that itinerary as you might research the merits of a particular car purchase. Relentlessly research the web for everything you can locate about the company, this particular destination, the tour leader, language interpreters if necessary, accommodations, meals and dietary concerns, maximum number of participants, modes of transportation and are they certified and insured, any mobility concerns you might have, sleeping arrangements, and so on.

    Is the tour leader a photographer from whom you think you could have fun? Is that photographer also known to freely share his insights, vision and passion to craft? Many tour companies only hire the well known photographer as an aid to marketing and selling the tour.  Did the photographer have any input toward the tour development and itinerary?  How many times has this company and/or tour leader been to these destinations; what is their familiarity with local customs and traditions?

    Be wary of the quasi-photographer who is developing and leading a tour to a new destination. More often than not he is only looking to make a few bucks to augment his own cost of adding that destination as another notch in his prize belt. By the same token there are photographers who offer fabulous small group excursions, just be wary and use the telephone to interview this photographer/leader.

    The photo tour is all about the experience – be that destination, cultural, or a myriad of other experiences and interests. The photographer- leader might offer an evening or two of presentations, and maybe some informal one-on-one time while out enjoying the sites, but bear in mind the photo tour is not about tutelage but experience.

    With good research and due diligence you can ensure that a photo tour meets your expectations and helps fulfill the most important mandate: having fun.  Always remember, if you are having fun you are doing it right!

    Part III — the seminar.

    Post originally from: Digital Photography Tips.

    Check out our more Photography Tips at Photography Tips for Beginners, Portrait Photography Tips and Wedding Photography Tips.

    Is that a Workshop, Tour or Seminar [Part II]


    Digital Photography School

  • How to Select the Perfect Nikon DSLR for Your Needs

    An article by +Sean Ogle

    Selecting a new DSLR can be really overwhelming, especially if you’re a first time buyer.

    Not only do you have to decide between brands, but then you have to decide between models, lenses, and accessories – all of which can lead to a daunting experience.

    That being said, the goal of this post is to help make that decision a little bit easier.
    91Ns138GTAL._SL1500_.jpg

    Why Nikon?

    I’ve been shooting Nikon since I first got into DSLR photography about 5 years ago. When I bought my first camera (a D5000), the decision was a relatively simple one: my dad had some Nikon lenses and I didn’t have much money!

    Now a few years later I’m as happy with that decision as ever. Nikon’s consistent lens mount size over the years allows you to use lenses going back to the 70s and 80s on many of Nikon’s newest DSLR bodies – meaning you can get quality used glass, at a relatively inexpensive price.

    That’s a conversation for another day, however.

    The bottom line is, you’re going to get a great camera with an excellent assortment of lenses with either Nikon or Canon. If you have friends or family members that shoot one or the other, and you’ll be around them often, that’s a good enough reason for me to choose either brand.

    But since I shoot Nikon, today’s post is all about how to select the best Nikon camera for you!

    Get Past the Hype: Things that Don’t Matter

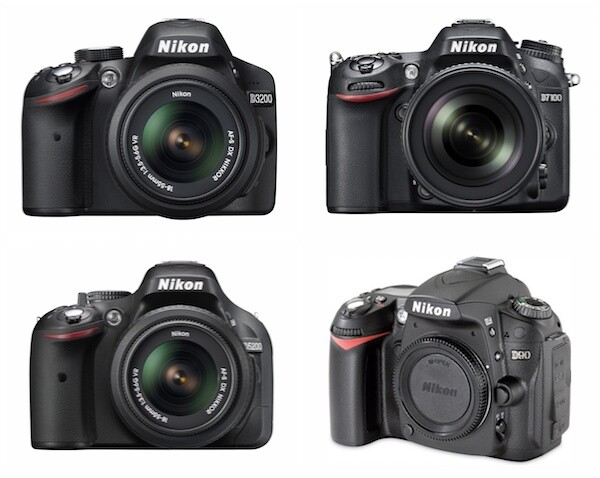
    At the time of this writing Nikon has 4 cameras that you may be deciding between: The D3200, D5200, D90 or D7100. These are the most up to date models, and in some cases you may be considering one that’s a generation older in order to save money – we’ll talk about that.

    However before we start going into the individual models, I’d rather start out by listing a couple things that you should absolutely stop paying attention to – by doing so, you’ll make your decision a lot easier.

    Megapixels

    Chances are if you haven’t bought a camera in a while, the very first thing you look at when selecting a camera is the megapixel count.

    Stop. Please.

    These days any new camera will have more than enough megapixels for what you need. Even one on the lower range that has 10-12 will have enough detail for you to blow up your images to poster size with no major issues, and seriously, how often are you doing that?

    It may be nice to have the flexibility, but once you hit 24 megapixels the files sizes are huge. On my D7100, I rarely, if ever, shoot at the highest quality level, simply because it just isn’t practical.

    Full Frame Vs. Cropped Frame

    New to photography? Then you don’t even look at a full frame sensor. In other words, for a Nikon camera you can immediately stop paying attention to the D600, D800, or D4.

    Why?

    They’re big. They’re expensive. And unless you’re a professional shooter, they’ll be overkill for what you’re looking for.

    So save your money for some new lenses and stop thinking about those altogether.

    To help set your mind at ease even more, you should know that Nikon’s cheapest DSLR the D3200 has image quality that in most shooting situations will be close to as good as that on their most expensive camera, the D4. Most of what you’re getting with more expensive cameras is more options, on camera controls, and other things professionals need and you probably don’t.

    Video

    This may matter for a select few of you, but for most of you, it should be a non-issue.

    Bottom line, have you ever actually shot video on a DSLR? Most beginners haven’t. It’s not easy.

    The sound is awful, the auto-focus doesn’t work in a usable manner, and it’s nothing like using your phone or a camcorder.

    If you want a good camera that does video, check out a pocket camera like the Canon S110 – which shoots excellent video and is easy to use.

    If you know what you’re doing and have some extra gear, then a DSLR can be a great way to break into a more professional video setup. But if all you want to do is film your kids, you’d be best looking elsewhere.

    Does that all make sense? Great, glad we’ve got that cleared up. Now, let’s get you a camera!

    Finding the Best Camera for Your Needs

    Rather than regurgitate all the technical specs of each camera for you, I’m going to look at the different type of users of Nikon cameras and then help you find a camera based on what you identify with the most.

    Best Photo Quality at the Cheapest Price Possible?

    As I mentioned earlier, for most applications, in good light, the quality from an entry level DSLR will rival that of their more expensive counterparts. So if all you really want is good image quality and aren’t wanting to break the bank, then pick up the Nikon D3200.

    If you’re really concerned about price, you can probably find refurbished models, or the older D3100 which is still a great camera. If you go with that, you’re sacrificing some build quality from the higher end cameras, and the screen is a much lower resolution than the newer model.

    Don’t get the D3000, there was nothing very impressive about it.

    NIkon D3200 Krabi, Thailand

    NIkon D3200
    Krabi, Thailand

    Experienced DSLR User Wanting to Upgrade, Without Breaking the Bank?

    Let’s face it, price is an issue for most of us. So let’s say you’re ready to move past your D3100 or D5000 you’ve had for a couple years, to something more representative of your experience level. You’ve got a few lenses, but still don’t want to overspend.

    Consider a D7000. It’s not the newest camera on the block, but the image quality will be comparable to the D7100, and many of the updates that were made will be negligible to the average user.

    I’ve seen body only D7000 going for as low as $ 649, which is almost half the cost of a new D7100.

    The D7000 is a big step up in terms of features and build quality from any of the cameras in the 3000 or 5000 line, so don’t shy away from this just because it’s a couple years old.

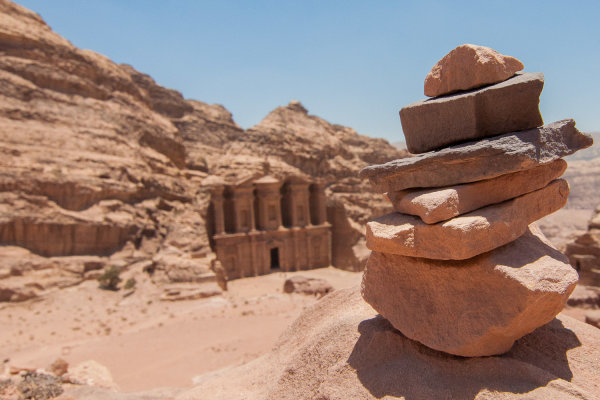
    It’s also worth noting that while it’s 5 years old, the D90 is widely available and is a great camera for the price. It lacks some of the features of the newer D7000 line, but is a great step up from Nikon’s entry level cameras in terms of controls.
    Nikon D90 Petra, Jordan

    Nikon D90
    Petra, Jordan

    Beginning HDR Photographer?

    You can do HDR with any camera that allows you to set manual controls, however if you’re serious about it, you’re going to want something that has bracketing built in.

    This means your camera can automatically take 3 images at varying exposures, usually one at normal exposure, then one underexposed, and finally one over exposed.

    You can then use HDR software to create one perfectly exposed image.

    The D3200 doesn’t do bracketing, so for the beginning HDR photographer you’ll want to pick up a D5200 or if money is more of a concern a D5100. A few years ago I learned HDR on my D5000 while traveling through Thailand, and it was a great intro camera. It had a menu system that I was used to with a point and shoot, but a customizable function button that let me easily turn on bracketing.

    Experienced HDR Photographer?

    If you’re a more experienced HDR photographer, then you should just pick up the D7100.

    There are a couple key features that make this a better camera for HDR.

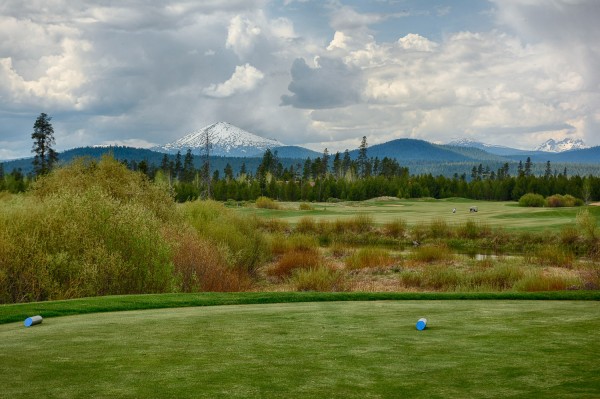
    First, you can take 5 shot brackets. As you get better at HDR, you’ll learn that 3 brackets often isn’t enough to get the range of light you need. The D7100 makes it easy to add two more shots.

    It also shoots at up to 7 frames per second, so if you’re trying to take brackets on the fly and don’t have a tripod – this will get you much better results (although you should still use a tripod).

    The plethora of on camera controls and customization abilities suits itself to a more experienced photographer and will make setting up shots much easier.

    Worth noting that the D7000 only does 3 exposure brackets, so in this case I think it’s worth checking out the D7100.
    Nikon D7100 HDR Sunriver, Oregon

    Nikon D7100 HDR
    Sunriver, Oregon

    Upgrading from Point and Shoot to first DSLR?

    If you’ve been using a point and shoot your whole life, upgrading to a DSLR can be a bit of a daunting task. Don’t worry though, it doesn’t have to be!

    The great thing about the D3200 for beginners is that it’s very menu based. The camera can do much of what it’s bigger siblings can, but much of it is still in easy to navigate menus – just like in your point and shoot. There’s even a question button that will explain what different features of the camera do if you’re unsure.

    If you’re wanting to have a little more control, but still keep the familiarity of a menu based camera, then the D5200 is worth taking a look at. It will definitely give you more room to grow than the D3200.

    Nikon D5000 Havana, Cuba

    Nikon D5000
    Havana, Cuba

    Have a Lot of Nikon Lenses from Your Film Days 20+ Years Ago?

    For instance my aunt has an old 50mm f/1.2 that I’ve been trying to obtain on “long term loan” for awhile now. This lens wouldn’t have metered on either my old D5000 or D90. With either the D7000 or D7100 however, almost any lens from 1977 or newer will both meter and autofocus.

    So if you have a plethora of old lenses, don’t sell them off just yet, you may just need a new camera body.

    Want Professional Features, but On a Budget?

    Here you have a couple options. You may be tempted to snag a used D300 for less than the price of some of the newer cameras. On the surface this seems like a great idea. You’re getting incredible build quality, more manual features, and a less expensive price – but I’d think twice about doing this.

    The D300 is an old camera. Many advancements in camera tech have been made, and you’ll get better photos and many more usable features in a D7100 than one of Nikon’s older cameras.

    Stick with the D7100 which is still almost half the price of the cheapest full frame camera the D600 – and they’re essentially the same in terms of features.

    Nikon D7100 Sunriver, Oregon

    Nikon D7100
    Sunriver, Oregon

    Looking to Do More Serious Video and Photography?

    If you’re really serious about video, I hate to say this, but consider switching to Canon. I’m a Nikon guy through and through, and I also do a lot of video. The video quality on a D7100 or even D5200 is incredible. But there are certain features that become a bit of a deal breaker. Specifically, you can’t change aperture in Live View.

    If you’re going to be doing a lot of video with your new camera, this will prove to be a major annoyance. Not to mention there are many more resources out there for Canon DSLR video – believe me, I’ve looked.

    The Bottom Line

    Nikon makes great cameras, has a huge, supportive community, and there really isn’t a wrong choice. Whatever you decide to buy will take fantastic photos and give you room to hone your skills.

    It’s also important to keep in mind that you’ll probably end up buying a new camera body every few years, but it’s the investment in high quality glass that will really help you build out your photography arsenal.

    So if you don’t already have a few lenses, consider going one notch lower on the camera and using the extra money to pick up an extra lens or two – your photos will thank you.

    +Sean Ogle is an HDR photographer and entrepreneur. He specializes in helping people build small businesses that allow them to do more of the stuff they like to do. He also golfs way more than the average person probably should. DPS readers can grab his book 50 Tips to Improve Your HDR Photography for free here.

    Post originally from: Digital Photography Tips.

    Check out our more Photography Tips at Photography Tips for Beginners, Portrait Photography Tips and Wedding Photography Tips.

    How to Select the Perfect Nikon DSLR for Your Needs


    Digital Photography School

  • 3 Reasons to Shoot Vertical Aspect Landscapes and 6 Tips on How to Shoot Them

    A Guest Contribution by Todd Sisson – author of our brand new Landscape Photography eBook (currently 33% off for 7 more days only).

    The majority of landscape images are photographed in the horizontal aspect. I guess this because the horizontal format approximates the way in which we perceive ‘reality.’ However landscapes look stunning in the vertical format and often the unique characteristics of the upright format suit a scene better than a horizontal* composition. I am guilty of undershooting verticals these days, primarily for commercial reasons, but in any given shooting situation I try to remind myself to seek both a vertical and a horizontal composition from a scene.

    Here’s why I think you should photograph vertically and some quick tips for successful upright image making.

    Reason One: Verticals are Easy to Learn

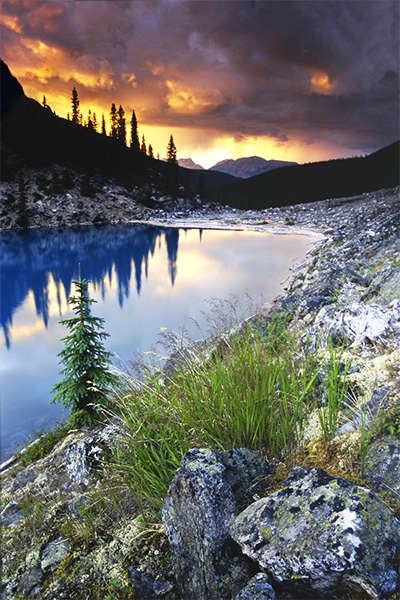
    Vertical composition using a wide angle or ultra-wide lens is the fast track to making interesting landscape images. My first successful landscapes were all vertical compositions where I found a moderately photogenic foreground object and used this to lead into the greater scene. To this day I find it easier to frame up an interesting sunset in the vertical format. I use rocks, grasses, flowers – just about anything with form to introduce the viewer’s eye to the scene.

    Moraine Lake, Alberta Canada (1997).  Nikon F601, Nikkor 24mm, f/16, (shutter speed unknown), Fuji Velvia and most importantly, Lee 3 stop GND filter.  This was the first image that I ever made that actually turned out how I thought it would!  Note that foreground elements don't have to be spectacular to work, they just have to be well arranged in the frame and complement the rest of the scene.  When I was learning, I found it easier to eliminate foreground distractions and make a 'tight' composition in the vertical format. As a result, I shot far too many verticals in my early days and very few good horizontal images...

    Moraine Lake, Alberta Canada (1997). Nikon F601, Nikkor 24mm, f/16, (shutter speed unknown), Fuji Velvia and most importantly, Lee 3 stop GND filter. This was the first image that I ever made that actually turned out how I thought it would! Note that foreground elements don’t have to be spectacular to work, they just have to be well arranged in the frame and complement the rest of the scene. When I was learning, I found it easier to eliminate foreground distractions and make a ‘tight’ composition in the vertical format. As a result, I shot far too many verticals in my early days and very few good horizontal images…

    Reason Two: Vertical Compositions can be more Dynamic

    In this dPS blog post, I explained the principles of ‘dynamic landscape compositions’. What I didn’t reveal in that article (for some inexplicable reason) was that vertical compositions can often accentuate the dynamic qualities of an image – particularly when using an ultra-wide lens.

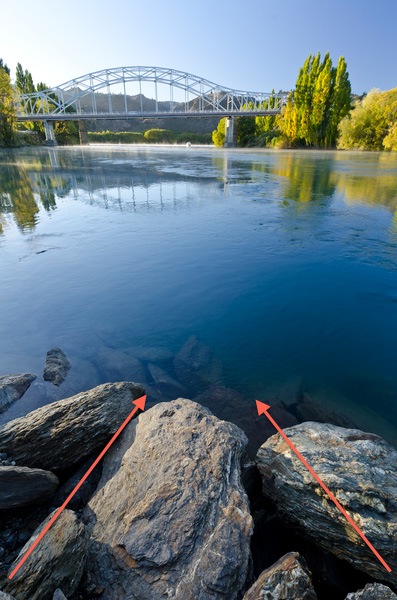
    The Clutha River at Alexandra (it's not wonky, the bridge slopes downhill...).  Nikon D7000, Nikkor 12-24mm f/4 DX, Marumi Polarizer. 12 mm, f/11, 1/13th, ISO100.  The vertical format accentuated the leading lines present in the foreground rocks.  Getting low and tilting down on an ultra-wide lens distorts and extends the perceived length of leading lines in the foreground.

    The Clutha River at Alexandra (it’s not wonky, the bridge slopes downhill…). Nikon D7000, Nikkor 12-24mm f/4 DX, Marumi Polarizer. 12 mm, f/11, 1/13th, ISO100. The vertical format accentuated the leading lines present in the foreground rocks. Getting low and tilting down on an ultra-wide lens distorts and extends the perceived length of leading lines in the foreground.

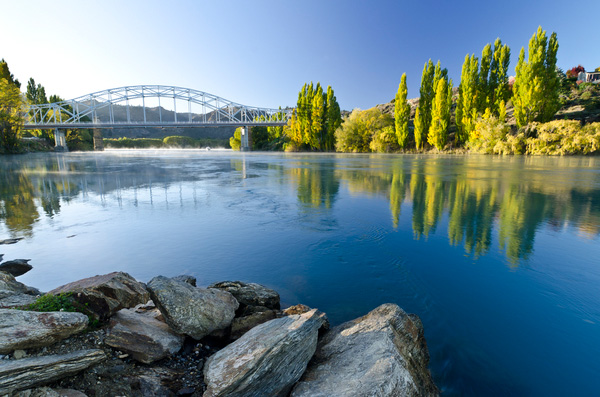
    The Clutha River at Alexandra (the bridge still slopes downhill – I promise!).  Nikon D7000, Nikkor 12-24mm f/4 DX, Marumi Polarizer. 12 mm, f/11, 1/13th, ISO100.  When shooting horizontally, the bridge and trees would not be in frame if we used the same camera angles and proximity that were applied in the vertical format. In this case I had to step back and recompose to include everything, which reduced the dynamic impact of the rocks.

    The Clutha River at Alexandra (the bridge still slopes downhill – I promise!). Nikon D7000, Nikkor 12-24mm f/4 DX, Marumi Polarizer. 12 mm, f/11, 1/13th, ISO100. When shooting horizontally, the bridge and trees would not be in frame if we used the same camera angles and proximity that were applied in the vertical format. In this case I had to step back and recompose to include everything, which reduced the dynamic impact of the rocks.

    Reason Three: Verticals Sell Well

    In the introduction I polluted the artistic sanctity of the article by mentioning ‘commercial reasons’. Five years ago we made most of our living from selling postcards of our images – horizontal postcards vastly outsell vertical postcards, and they fit better on a display stand, so I found myself inadvertently locked into a horizontal mindset (as I mentioned last week, deep thought and self-awareness are not my strong point). This sales trend is definitely mirrored in our website where the bulk of our print sales are horizontal.

    However, In the past year we have ramped up our stock photography activity and this is one area where vertical images sell extremely well – especially for editorial usage and magazine covers where the format works beautifully with the vertical layout of printed media. Consequently, we are shooting a lot more vertical images. You may not be a full-time photographer but there are myriad ways to earn money from your photographic hobby these days, don’t leave money on the table – shoot verticals along with your horizontal compositions.

    Vertical Shooting Tip 1: Get Low and Close

    As I noted in the previous image, getting low and close accentuates the visual power of leading lines and dramatically increases the visual weight of foreground features. To go low you will need to use a tripod that has no centre column in order to get super close to the ground, I have detailed our tripod advice here which may be of interest if you are perplexed by the ins and outs of the tripod purchasing process.

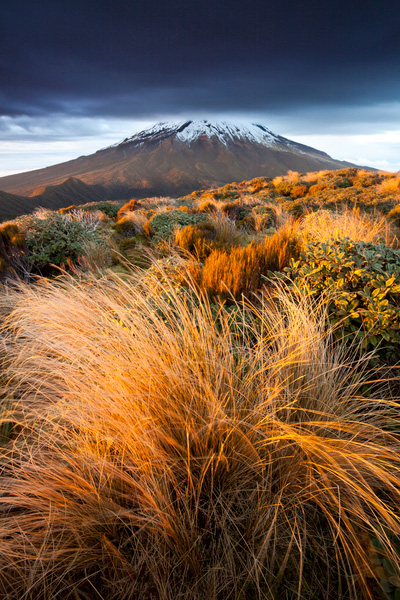
    Mount Egmont New Zealand. Canon 5d mkii, Canon 17-40mm f/4 ultra-wide, Marumi polarizer. 17 mm, f/16, 1 sec, ISO100. By getting implausibly close to the foreground grass in this scene I have eliminated other distracting elements, increased the visual weight of the grasses and accentuated the leading lines in the bottom right of shot. As well as being close, I was also very low to the ground while making this image.

    Mount Egmont New Zealand. Canon 5d mkii, Canon 17-40mm f/4 ultra-wide, Marumi polarizer. 17 mm, f/16, 1 sec, ISO100. By getting implausibly close to the foreground grass in this scene I have eliminated other distracting elements, increased the visual weight of the grasses and accentuated the leading lines in the bottom right of shot. As well as being close, I was also very low to the ground while making this image.

    Vertical Shooting Tip 2: Get High and Close

    When using an ultra-wide lens it is possible to include the full sweep of a scene and accentuate the visual dynamics of the image by getting above the foreground elements and composing vertically. To achieve this you will need a tripod that extends well above the height of your subject matter and then angle the camera downwards.

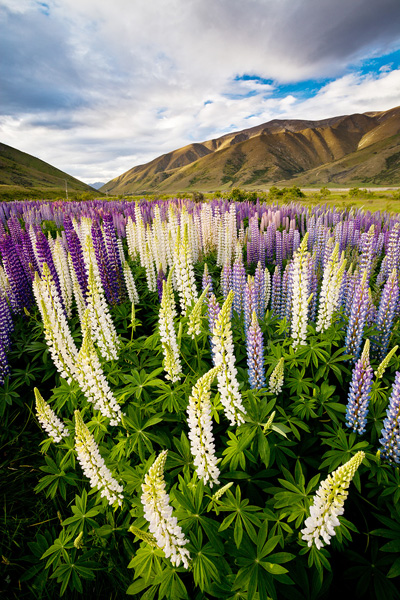
    Lupine flowers, Mackenzie basin New Zealand (by Sarah Sisson). Canon 5d mkii, Canon 17-40mm f/4 ultra-wide, Marumi polarizer. 17 mm, f/16, 1/8th sec, ISO100. Sarah had to fully extend her tripod and stand on a box in order to get the camera above these chest high lupin flowers.  The high perspective meant that all of the meadow is visible  and accentuated the space between flowers in the foreground.

    Lupine flowers, Mackenzie basin New Zealand (by Sarah Sisson). Canon 5d mkii, Canon 17-40mm f/4 ultra-wide, Marumi polarizer. 17 mm, f/16, 1/8th sec, ISO100. Sarah had to fully extend her tripod and stand on a box in order to get the camera above these chest high lupin flowers. The high perspective meant that all of the meadow is visible and accentuated the space between flowers in the foreground.

    Vertical Shooting Tip 3: Break down the Composition

    When composing strong verticals I tend to ‘break down’ the scene into foreground, midground and background (the same thinking helps with horizontal images of course). A good composition will contain interest in all three of these visual zones – which roughly approximates the rule of thirds compositional guidelines.

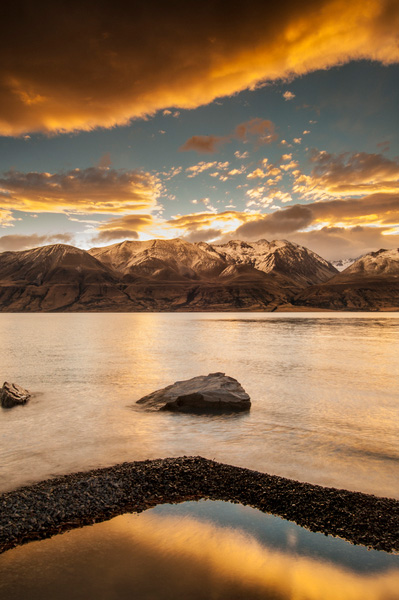
    Lake Pukaki New Zealand.  Nikon D800e, Nikkor 17-35mm f/2.8 ultra-wide lens, Marumi Polarizer and Singh Ray 3 stop GND filter. This image has layers of visual interest in the foreground (gravel bar and rocks) mid-ground (reflected color & mountains) and the background (the sky). Note that the terms foreground, mid-ground and background align loosely with the principles of the rule of third – I find that I shoot more in sync with the rule of thirds for verticals than horizontals.

    Lake Pukaki New Zealand. Nikon D800e, Nikkor 17-35mm f/2.8 ultra-wide lens, Marumi Polarizer and Singh Ray 3 stop GND filter. This image has layers of visual interest in the foreground (gravel bar and rocks) mid-ground (reflected color & mountains) and the background (the sky). Note that the terms foreground, mid-ground and background align loosely with the principles of the rule of third – I find that I shoot more in sync with the rule of thirds for verticals than horizontals.

    Vertical Shooting Tip 4: – Leave some Space

    Having just referred to the dreaded rule of thirds, I feel it my duty to throw a spanner into the works. Try messing with your vertical compositions by leaving ‘too much’ empty space. Dead space can look cool and graphic designers love it for dropping text into (sales tip).

    Lone cabbage tree, Taranaki New Zealand.  Nikon D7000, Nikkor 16-85mm DX, Marumi Polarizer. 35 mm, f/11, 1/20h, ISO100.  I think that vertical images often look great with plenty of empty real estate (I am a gleeful recidivist breaker of the rule of thirds). This image has sold several times as an interior page with text dropped over the sky portion.

    Lone cabbage tree, Taranaki New Zealand. Nikon D7000, Nikkor 16-85mm DX, Marumi Polarizer. 35 mm, f/11, 1/20h, ISO100. I think that vertical images often look great with plenty of empty real estate (I am a gleeful recidivist breaker of the rule of thirds). This image has sold several times as an interior page with text dropped over the sky portion.

    Vertical Shooting Tip 5: Try Telephoto Verticals

    Telephoto verticals are a particularly attractive compositional option, particularly around mountains. Because the long edge is oriented top to bottom you can exploit telephoto compression more effectively (by allowing more foreground into the frame at longer focal lengths and emphasizing the height differential across the scene).

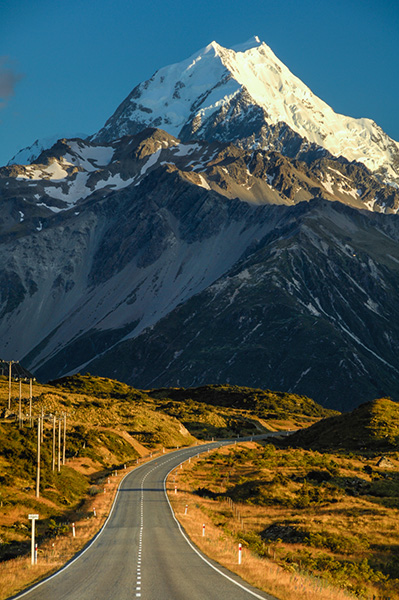
    The road to Mount Cook New Zealand.  Nikon D7000, Nikkor 70-200mm f/2.8 Vrii, Marumi Polarizer. 135 mm (202mm 35mm equivalent), f/11, 1/15h, ISO100. The vertical aspect exaggerates the effects of telephoto compression in scenes like this.

    The road to Mount Cook New Zealand. Nikon D7000, Nikkor 70-200mm f/2.8 Vrii, Marumi Polarizer. 135 mm (202mm 35mm equivalent), f/11, 1/15h, ISO100. The vertical aspect exaggerates the effects of telephoto compression in scenes like this.

    Vertical Shooting Tip 6: Invest in an L-Bracket

    An L-bracket or ‘L-plate’ is an L­-shaped (surprise, surprise!) tripod mounting plate that wraps around your camera body. This allows you to effortlessly mount your camera in the vertical orientation without having to flop the ballhead’s mounting point over on it’s side. Never again will you have to fight gravity and adjust tripod legs in order to get the camera leveled when shooting vertically – genius!

    You will find a bit more information on the benefits of L-plates here on our website.

    *I use the terms vertical or horizontal because the commonly used ‘portrait’ and ‘landscape’ terminology makes me abnormally irascible and grumpy. These terms are a nonsensical hangover derived from a Windows 95 printer options dialog box (maybe this riles my inner Mac Veteran). After all, a portrait can be photographed vertically or horizontally and likewise a landscape…..

    Todd & Sarah Sisson are full-time landscape photographers based in Central Otago New Zealand. They are the authors of our new eBook Living Landscapes: A Guide to Stunning Landscape Photography.

    Their work can be found as fine art prints & canvas prints at www.sisson.co.nz  They can be found on Facebook, Google Plus and Twitter.

    Post originally from: Digital Photography Tips.

    Check out our more Photography Tips at Photography Tips for Beginners, Portrait Photography Tips and Wedding Photography Tips.

    3 Reasons to Shoot Vertical Aspect Landscapes and 6 Tips on How to Shoot Them


    Digital Photography School

  • Peak Design Capture Camera Clip v2 review

    You may have read the article we wrote on Peak Design’s Leash & Cuff a little while back? The crazy bunch at Peak Design are at it again, this time with a version 2 release of their primary product, Capture

    GET CAPTURE v2.0 ON KICKSTARTER

    As of right now, 4,875 people have backed their current Kickstarter for over half a MILLION dollars!… Amazing crowd supported project! Well, being a Peak Design Pro, I’m very lucky to already be using Capture v2.0 and wanted to pen an article about it and how it has changed from version to version and how it could help you.

    Peak_Design_V2_Simon_Pollock

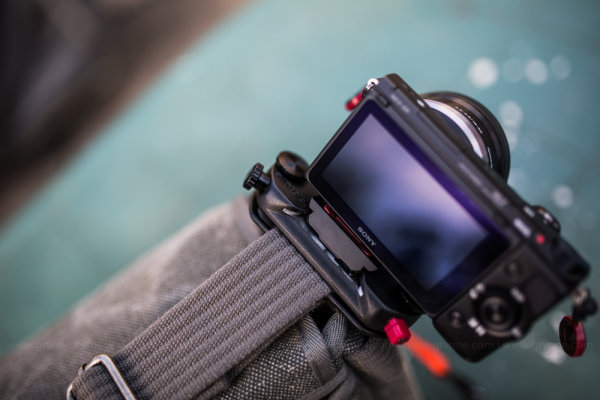
    A brief catch up – what is “Capture” …well, in very basic terms, Capture is a device that you can attach to pretty much any belt / bag strap / backpack shoulder strap etc, that allows you to quickly and securely mount your camera on that device via the included baseplate. So if you want to go hands free while you’re out shooting, you simply slot your camera into Capture and you’re good to go, then when you see a photograph you want to make, on press of a button and you’re firing. You can see the image above, I have my little Sony NEX 5r mounted on the shoulder strap of my thinkTankPhoto Retro 7 camera bag, it makes it so easy when I’m down the park with my 3.5 year old – I can run, kick, jump, swing and hide with my hands free, then, when he’s doing something awesome like climbing a massive tree, I can whip the camera out of its little metal home and SNAP, I’ve capture my moment.

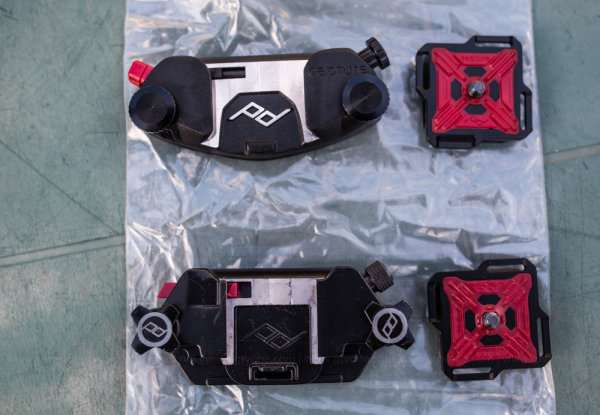
    In the photograph below, you can see some of the changes from version one (bottom) to version two (top) including the following (based on my two weeks solid use and not the specs on the website)

    • Easier ‘mouth’ where you slide your camera in – makes slotting your camera away easier (in my opinion) 
    • No more sharp edges / less round edges – while I love and still use v1.0, the v2.0 feels…grown up..
    • The red button you use to release your camera now has a little simple twist lock to stop accidental ejection..
    • The screw (top right of units) now secures the camera plate solid, so you can actually use Capture on top of a monopod / tripod..
    • Capture now has the ability to mount little cameras such as GoPro so you can use capture to shoot yourself falling off your bike – etc!

    Capture_Peak_Design_V1_vs_v2_Simon_Pollock

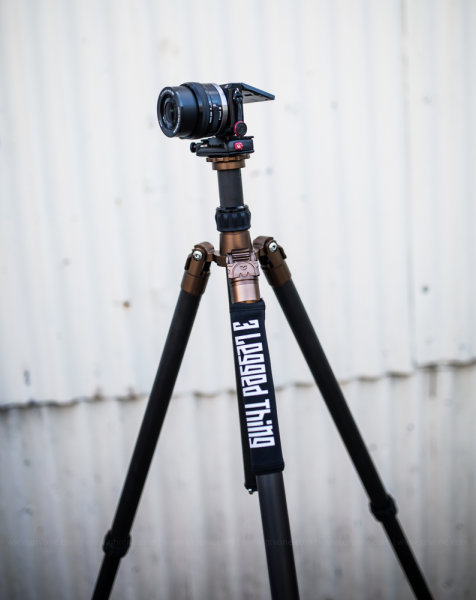
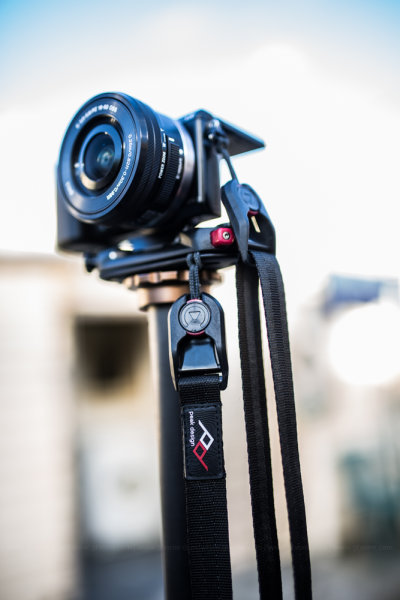
    Here’s a couple of photographs that show you how you can use Capture for the top of a tripod or monopod and in the second photo you can see the Sony is tethered with Peak Design’s “Leash”

    Peak_Design_Simon_Pollock

    Capture being used to mount the Sony directly onto the 3LeggedThing tripod furniture

    Peak_Design_Simon_Pollock

    Capture being used to mount the Sony directly onto the ‘Bob’ 3LeggedThing Monopod furniture

    I’m use Capture v2.0 and v1.0 with Peak Design’s Leash and Cuff system (for those among you that are saying…ohhh, I might drop my camera… you can’t!)

    Take a look at the version two Capture camera clip system video on KickStarter and see for yourself… If you have any questions about how the clip works, what I shoot with it / my workflow / how I use Capture, please don’t hesitate to ask in the comments below.

    –Sime


    Post originally from: Digital Photography Tips.

    Check out our more Photography Tips at Photography Tips for Beginners, Portrait Photography Tips and Wedding Photography Tips.

    Peak Design Capture Camera Clip v2 review


    Digital Photography School

  • 7 Tips That Will Take Your Vacation Photography To A Whole New Level

    It’s summertime…and the living is easy! This is the time of year for spending more time outside, soaking up those blessed, golden rays of sunshine and hitting the beach. Of course, it’s also the time of year when you’re likely going on vacation, meaning vacation photography takes center stage after many months of you working hard and keeping your nose Continue Reading

    The post 7 Tips That Will Take Your Vacation Photography To A Whole New Level appeared first on Photodoto.


    Photodoto

  • Why are my Buildings Falling Over? A Short Guide to Perspective Distortion and Correction in Photography

    A guest contribution by Misho Baranovic, co-developer of the Perspective Correct app and author of the iPhone Photography DPS eBook .

    Perspective Photo1

    I’ve read a lot of perspective correction articles over the past few days and my head is spinning from the technical explanations, illustrations and equations.   In this article, I’m going to keep it simple and talk about the role that perspective plays in photography.  

    What is Perspective?

    Perspective is one of the many ways that the human eye can judge depth within a scene.  Perspective is something that we can see with one eye (monocular) rather than two (binocular).  It refers to the angle and location of parallel lines within a scene.  The eye registers depth when parallel lines start moving towards each other (converging).  An example would be standing on a straight road, looking down the road, and noticing how the road narrows as it gets further away from you.

    Perspective Photo2

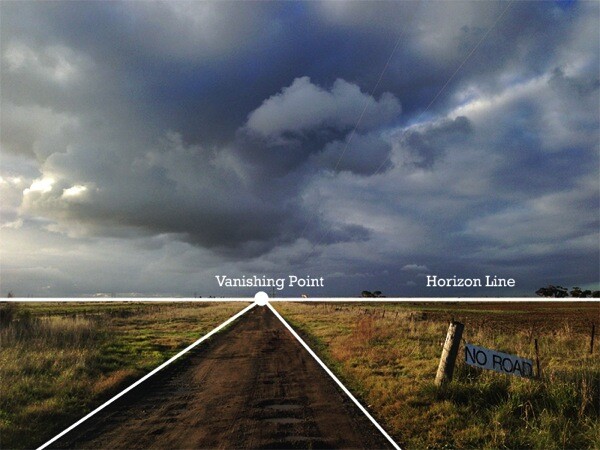
    In art and photography, Linear Perspective refers to the way lines are drawn and captured to show an objects perceived size within space. In short, how we translate real world depth into a flat picture. Linear Perspective is made up of two basic concepts, the horizon line and vanishing point.  The horizon line represents the viewing angle of the observer.  Vanishing points are the point (on a horizon line) where parallel lines meet (converge). For example, the point where the two sides of the straight road meet (as shown below).

    Perspective Photo3

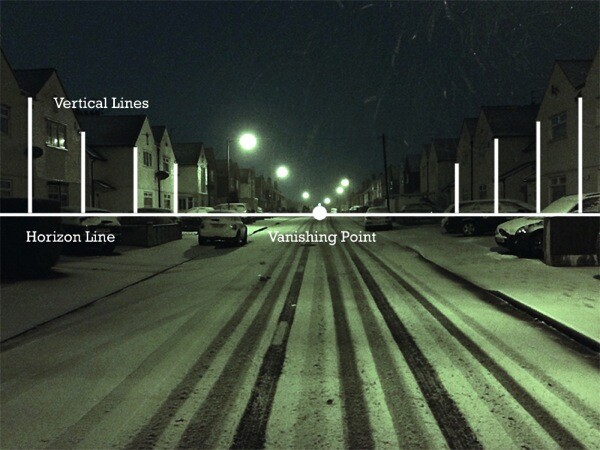
    One of the key visual cues in Linear Perspective is that vertical lines and edges remain vertical in the scene. The only time you would have vertical lines coming together is if you are trying to show a triangular or pyramid shape within the scene, like the angle of a building’s roof or the shape of the Eiffel Tower.

    Perspective Photo4

    Since the start of photography, camera and lens makers have focused on replicating the visual cues of Linear Perspective in order to make photos look as ‘true to life’ as possible. Nearly all modern lenses are rectilinear – they capture straight lines in a scene as straight lines in a photograph.  Whether wide angle or zoom, DSLR or iPhone, lenses are designed to keep lines straight, which helps the eye judge depth within a two dimensional scene. The fisheye is the most popular non rectilinear lens as straight lines are shown as curved from the extreme field of view.

    Perspective Distortion

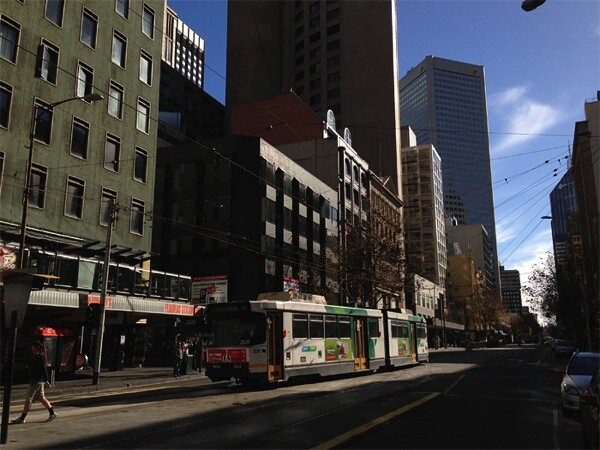
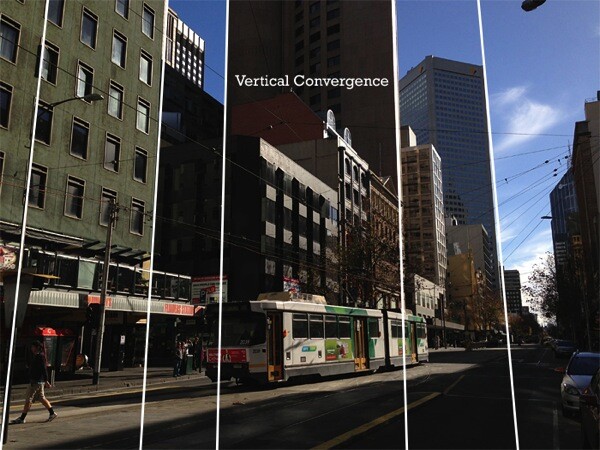
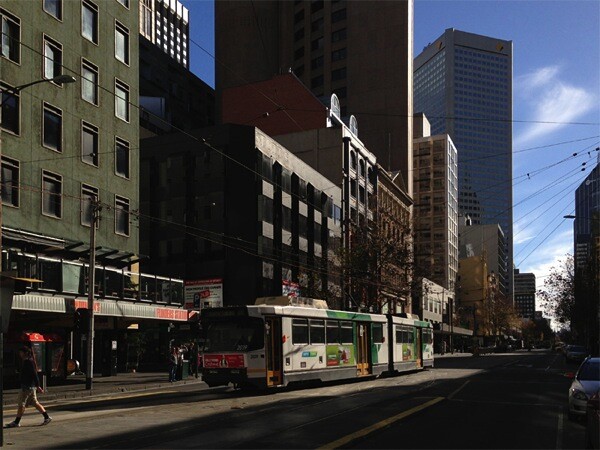
    For this article I’m going to focus on only one form of photographic perspective distortion – perspective convergence or keystoning.  This form of distortion is very common across architectural, street and travel photography.  It’s most often seen when tall buildings ‘fall’ or ‘lean’ within a picture. This distortion has become so common that most people have stopped noticing it within their pictures or just think it has something to do with the focal length of their lens. For example, you can see the extent of the vertical convergence below when the verticals are outlined in white.

    Perspective Photo5

    Perspective Photo6

    For a number of photographers, vertical convergence and distortion are unpleasant and unwanted because they don’t conform to Linear Perspective cues where vertical lines remain vertical.  This makes the scene look different to how we think it should look.  While this distortion can be used creatively, corrected photos often look ‘right’ to the viewer (see below).

    Perspective Photo7

    Why does Distortion Happen?

    It’s actually pretty simple.  As mentioned, modern lenses are designed to show straight lines.  However, this only works when we the camera is pointed straight at (in line) with the object that is being photographed. This is because the distance between the camera and object remains the same.  As soon as the camera is titled then the distance changes.  Let me explain, if I’m trying to capture a tall building straight on with my camera I can only get the bottom section – vertical lines are straight but I’m missing the rest of the building. Now if I angle the camera higher I can get the whole building into the frame but now the vertical lines (sides of the building) are converging.  Why?  It’s because the top of the building is now further away from the lens than the bottom – just like the road receding into the distance.

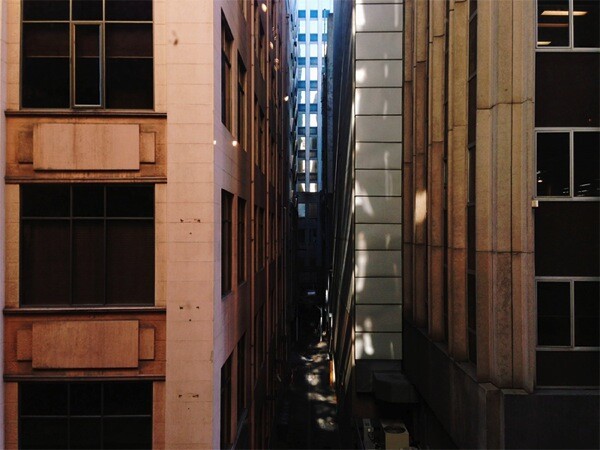
    So how do you take a photograph of a tall building without this happening?  There are a few ways.  The most obvious is by changing your viewpoint.  You need to get higher to shoot more of the building front on, with the mid-point being the best place to capture the maximum amount of the structure.  You could shoot out the window of a neighbouring building, or if there is nothing around you could spend some money on a crane!

    Perspective Photo8

    This photo was taken from the third floor of a neighbouring block. You can see that all the verticals in the photo are straight.

    If you can’t physically get higher then you can change your viewpoint in two other ways.  One is with the help of shift lenses the other is through perspective correction software.

    Shift Lenses

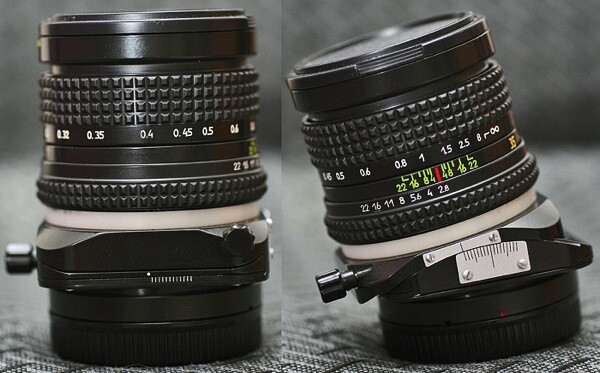
    The ability to shift the position of the lens has been around since the beginning of photography.  The original view cameras (created in the 1840s) used a bellows system which let photographers change the position (shift) the lens in relation to the film. The shifting mechanism acted like a mini elevator, moving the photographer’s viewpoint higher and lower. Historically, shifting in order to correct perspective convergence was seen as an important part of the capture process, just like focus, shutter speed and aperture. Shifting was possible because the lens captured a much larger (circular) field of view than the film. The same way that modern shift lenses work.  Modern shift lenses are commonly used by architecture photographers to limit vertical convergence on large buildings. However, these lenses can only be used on DSLR or medium format cameras and can also be very expensive (upwards of $ 1,000).

    Perspective Photo9

    Here you can see the mechanical shift mechanism on an SLR lens – Photos by Bengt-Re

    Software Correction

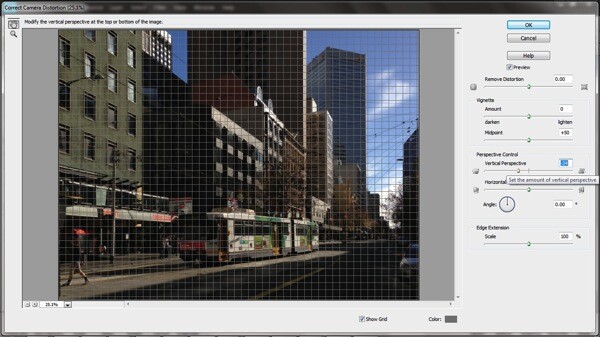
    In recent years, digital technology has been able to replicate this shifting process, artificially changing the photographer’s viewpoint.  Software like Photoshop, Lightroom or Gimp reworks the pixels in an image in order to straighten vertical lines in turn reducing distortion.  Most of these programs allow you force the image back into a ‘correct’ position through either sliders or by selecting and dragging a corner.  One of the downsides of the software is that significant adjustments require resampling of the image, often reducing sharpness in parts of the photograph.  

    Perspective Photo10

    Camera Distortion Correction with Photoshop Elements 11

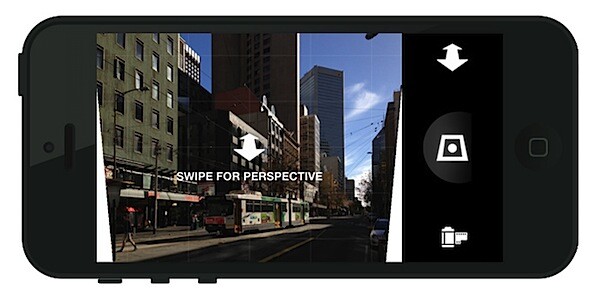
    For photographers that either shoot or edit photos on their mobile phones, the Perspective Correct app for iPhone uses the touch interface to adjust both vertical and horizontal convergence within an image.  For example, an up/down swipe on the screen represents the same movement as the shift mechanism on a lens. 

    201308011644.jpg
    While it’s easy to overlook, small perspective adjustments can often be the difference between good and great urban and architectural photographs.

    …………………………………….

    Perspective Correct is the first app to offer live perspective adjustment of your photos and is available for download from the Apple App Store for US $ 1.99

    Post originally from: Digital Photography Tips.

    Check out our more Photography Tips at Photography Tips for Beginners, Portrait Photography Tips and Wedding Photography Tips.

    Why are my Buildings Falling Over? A Short Guide to Perspective Distortion and Correction in Photography


    Digital Photography School

  • Canadian Travelogue – Nova Scotia – Peggy’s Cove

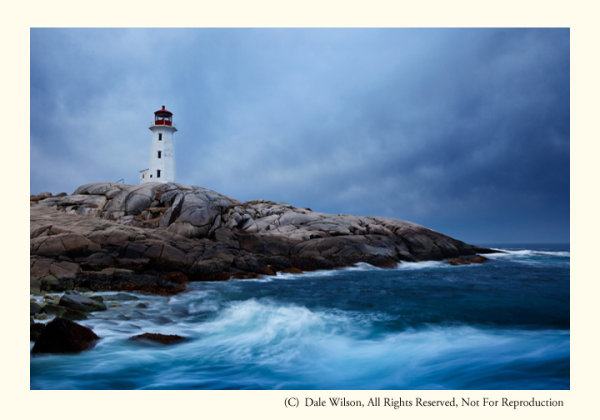
    No location in Canada’s Ocean Playground is more quintessentially Nova Scotian than Peggy’s Cove. It’s all there: a lighthouse, pounding surf on large granite outcroppings and a tranquil working fishing community. And it’s only 50 kilometres from Halifax, the largest city in Atlantic Canada.

    Early spring is a great time to photograph one of the most photographed lighthouses in the world, should you want images without people in the picture

    Early spring is a great time to photograph one of the most photographed lighthouses in the world, should you want images without people in the picture

    The only land route to Peggy’s Cove is Highway 333, starting at Armdale, and then routes along to coast and eventually joins Highway 103 at Upper Tantallon to the west. You then turn right onto Highway 103 and drive east back to the western reaches of Halifax at Bayers Lake. The coastal drive from Armdale to Peggy’s Cove along Route 333 is by far the most scenic and interesting, offering may little side trips to the not too distant shoreline and coastal communities.  You will have no difficulty locating Peggy’s Cove itself: it’s one of the top tourist destinations in all of Canada, so road signage is abundant.

    Photographers who desire images of the lighthouse without people milling about will have their patience taxed to the limit. The task will be almost impossible in the peak tourist season of July and August, and just plain difficult at any other time of the year … except maybe the coldest days of winter. I find April is a good time as most of the snow will have melted and it is still too early for people to be thinking about visiting this Atlantic sentinel. Additionally, what little foliage there is will still be brown and this is typically a good month for storm clouds that create interesting and supportive notions of why a lighthouse is there in the first place.

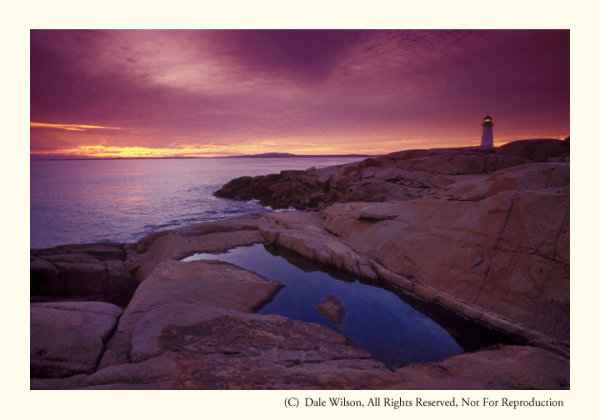
    The best approach to photograph the village and the lighthouse is to arrive in early morning and “play tourist,” making pictures as you meander around the harbour. You can easily spend several hours just following your nose, and there is a large restaurant on site for that moment when the light gets too harsh. Make sure to re-visit in the evening –after a noon-day nap, of course—and leave yourself lots of time to find the perfect location to get the classic lighthouse-against-the-sunset photograph.  Should you stake out a vantage point on the south side of the lighthouse there is a better chance you will be able to eliminate people from the image with creative camera positioning and sight angles. From a low elevation the camera’s line of sight will be just over the heads of the tourists who sit on the rocks enjoying the last rays of the day.  The other classic view is from the water’s edge just to the north of the little cove in front of the lighthouse itself, immediately below the restaurant. Be aware, from here you will almost be guaranteed there will be people in your picture.

    By staying to the south of the light, it is possible to keep the camera low and avoid people from creeping into the frame. Challenge yourself to look for creative images as well as portaits of the light.

    By staying to the south of the light, it is possible to keep the camera low and avoid people from creeping into the frame. Challenge yourself to look for creative images as well as portaits of the light.

    When travelling along the shoreline anywhere in Atlantic Canada, but especially so in Peggy’s Cove, be astutely aware of your surroundings, rogue waves are common and have called unwary visitors to the depths to dwell with King Neptune. So, please, be careful and mindful of the signage; if those rocks are black or wet you are too close to the water’s edge. The Atlantic Ocean is huge and powerful, and its combers deserve, and demand, your respect.

    Now get out there and enjoy one of the most photogenic places in all of Nova Scotia, and Canada. You won’t be disappointed.

    Post originally from: Digital Photography Tips.

    Check out our more Photography Tips at Photography Tips for Beginners, Portrait Photography Tips and Wedding Photography Tips.

    Canadian Travelogue – Nova Scotia – Peggy’s Cove


    Digital Photography School

  • Dust and Fight: Behind the Scenes of This Spectacular Photo Series

    Last year we shared a behind the scenes video that showed some of what went into shooting this amazing ‘dust’ and ‘dance image’.

    dust-dance.jpeg

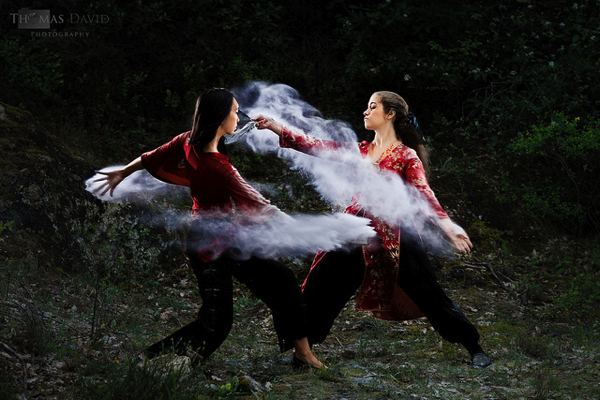
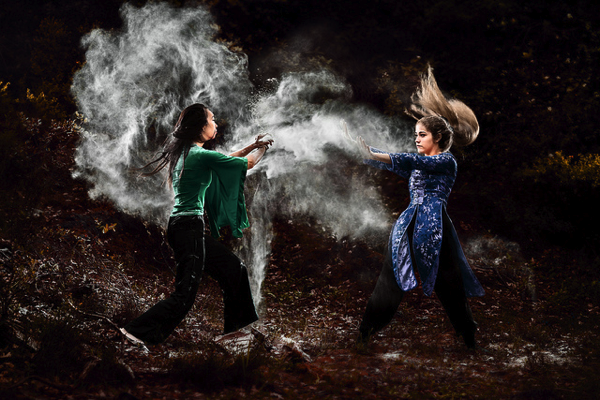
    Since then photographer Thomas David has shot another great series of dust photos – this series was shot outside and has more of a martial arts/fight theme.

    NewImage

    NewImage

    See the full series of images here on Flickr.

    And as with last time – here’s a behind the scenes video to show you a little more of how it was taken:

    Behind the Scene video for the “Dust and Fight” photoshoot from Tom on Vimeo.

    Update: check out this post at The PhoBlographer with a heap more information on how the series was shot.

    Post originally from: Digital Photography Tips.

    Check out our more Photography Tips at Photography Tips for Beginners, Portrait Photography Tips and Wedding Photography Tips.

    Dust and Fight: Behind the Scenes of This Spectacular Photo Series


    Digital Photography School