Category: Photography

  • Interview with Burn Magazine

    Today, burn Magazine published a wide-ranging interview I did with Magnum (and NatGeo) photographer David Alan Harvey.

    David has long been one of my photographic idols/compass points. We met in person for the first time in San Miguel D’Allende, Mexico in 2010 and became fast friends. He is my sounding board for anything photo-journalistic or documentary in nature. And I am always happy to discuss the web and vertical ecosystems with him, usually at about 2:00am, and over drinks.

    This interview is essentially one of those free-form discussions, transcribed and uncut. It took place on the back stoop of a hotel in Dubai earlier this year. You can read it here.

    And if you have any interest at all in documentary photojournalism and on the off-chance have not yet discovered burn, OMG are you in for a treat. Dave’s compass point is absolutely pure, which is why that web magazine has quickly become the place to go to learn about documentary photography and documentary photographers. Enjoy.


    Strobist

  • 10 Tips for Creating Great Family Portraits

    Hood-August2013-0212-Google

    With my background being in classic style studio portraiture (aka “boring”), and 25 years experience photographing portraits and weddings, I have a few tips up my sleeve for you. If you’ve never done a family or group portrait before don’t be intimidated. Be honest with the family and tell they you’re just learning, I bet they’ll be willing participants to help you out and they get some nice photos in exchange.

    With a little planning, doing a family portrait should be fun for both you, and the family you’re photographing. Here are 10 quick tips to help you have a successful and fun photo session.

    SUMMARY – 10 TIPS FOR BETTER FAMILY PORTRAITS

    1. Use a tripod when possible
    2. Shoot in Manual exposure mode
    3. Lock the focus or use manual focus
    4. Arrange people with heads staggered
    5. Allow kids to be kids and get goofy with them
    6. If it bends, bend it – how to help people pose
    7. Pose people to flatter them
    8. Lighting is key – get some in their eyes
    9. Expression is everything!
    10. Have a little fun with it and let go

    Let’s take a look at each in more detail.

    Heise-0005fsm

    #1 USE A TRIPOD WHENEVER POSSIBLE

    “Ugh”, I already know what you’re thinking. A tripod cramps your style. It’s too heavy and cumbersome. Your style is more free flowing. That all may be true and in some cases (like photographing kids running or doing more documentary style photography) it may be better to shoot hand held.  However, just consider another side of the coin.

    When being photographed  most, if not all, people are nervous. Yes nervous! Some are down right scared, and some would even go as far to say that they “hate it”. So it is part of your job to help your subjects feel more comfortable and relaxed. That can be hard to do when you’re also nervous, especially if you’re new to portraits. But there’s a big advantage of putting that camera on the tripod.  Two actually.

    #1 – it automatically forces you to slow down. That’s a good thing. You can check your settings, review the composition, and exposure to make sure you’ve got everything right. All to often it’s easy to get carried away once you put the camera up to your eye and forget to check something only to see later you had the wrong White Balance, or ISO was 6400, or you accidentally shot Small JPG. Slow down, avoid an “oops”.

    #2 – it allows you to get your eye away from the camera so you can actually make eye contact with your subjects. They are very real people and they feel even more uncomfortable staring straight into your lens than they do looking at you. You can make gestures to get kids attention, or make faces. But you’ll get way better expressions by interacting with them than you will looking through the viewfinder. Try it!

    Hood07-034f

    #2 SHOOT IN MANUAL EXPOSURE MODE

    Assuming that you are setting something up, choosing the time of day and the location carefully, you have control of all the elements. Meaning, once you get set up the exposure should not need to change. But if you put it in Aperture or Shutter priority, depending in the metering mode selected, the camera could choose a slightly different exposure for each frame. You do NOT want that! Consistency is very important.This post is sponsored by our partners Wigs

    Inconsistent exposures create more work in post processing, as you have to even them all out. It also can cause a slight color shift, increase noise (if underexposed) and other undesirable things. To keep your exposures consistent through the whole shoot, use Manual Mode. Just remember that each time you change the pose, location, etc, you need to check exposure again. I just fire off a quick test shot, review the histogram, adjust if necessary and continue.

    #3 LOCK THE FOCUS

    Just as you do not want the exposure to change from frame to frame, neither do you want the focus to be adjusted. Assuming you’ve taken #1 to heart and are using a tripod, you will not be moving. Likely if you’ve posed your group in a relatively static position, they will not be moving. Not much anyway. We are only concerned with moving closer to, or further away from the camera. So . . .

    Set your camera up to do one of the following: use focus lock, back button focus, or use manual focus. With any of those options the focus will not change from shot to shot. If you use the shutter button to focus and someone moves a little bit so that the focus dot hits the background, you got another “oops”. If you aren’t sure how to do this, consult your camera manual.

    Bonus tip: If your camera has video capabilities you have a neat way of doing manual focus. Turn on the Live View so you can see the image on your screen. Hit your “zoom” button (it may have a magnifying glass or a “+” sign on it) once or twice. The image on the screen will zoom in (your lens doesn’t) so you can see what is in focus which allows for much most precise manual focusing. Press zoom again to return to normal view and turn off Live View.
    Liebel-002-600px

    #4 STAGGER THE HEADS

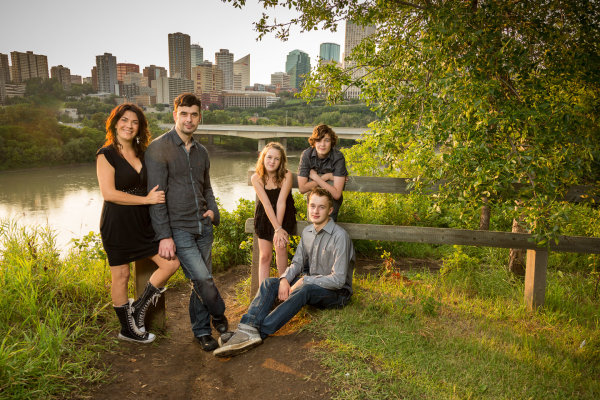
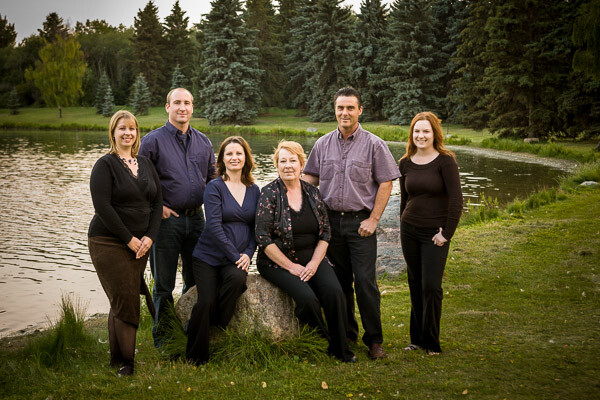
    You may or may not have heard this one before, or perhaps you weren’t 100% what it meant. What you want to avoid is a boring straight line, row, or column of heads. Diagonal lines are more dynamic and add interest to an image, so try to do that with the people in your grouping.

    Imagine there is a line drawn from each face to the next. Try and position them so that no head is directly on top of, or beside (same level) another. Make diagonal lines not totem poles. Use props to seat some people or bring some small folding stools. Have some people sit down, or stand up on something. Use what is naturally in the environment to pose them, or if you have nothing available just arrange them so the heights are staggered.

    Stevens-017

    #5 IF IT BENDS, BEND IT

    This is a general rule when photographing any people and it’s a good one. People tend to stand stiff and rigged when you position them, so you need to get them to bend a few body parts to look more natural. Nobody naturally stands stiff as a board. Here are a few starters

    • get them to shift their weight to one foot and stick out one hip, away from the camera
    • get them to put a hand in a pocket, I usually recommend thumb out otherwise they have a tendancy to shove their hand to the bottom of the pocket also not looking natural
    • OR hook a finger on their belt or a belt loop
    • if they are sitting lean forward a bit and put weight on one hip
    • if standing against something have them cross one foot over the other, toe down
    • if sitting (males) put one knee up, foot flat on the ground (make sure they rotate so you aren’t looking straight into their crotch

    You get the idea. The best way to get someone to do any of this is to do it yourself and have them mirror you. Face them, do the pose you want them to do, and have them mimic it exactly.
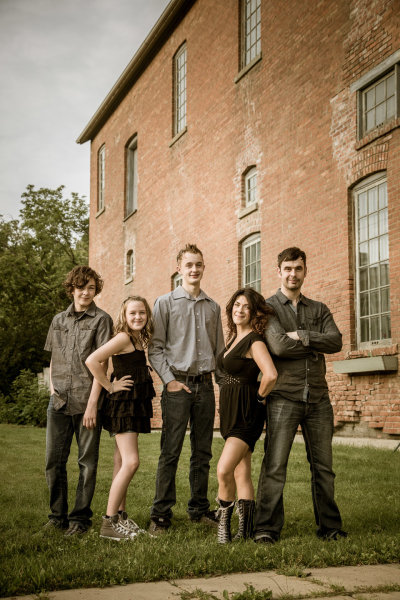
    Hood-August2013-0129-Google

    Example of bending body parts. The girls did a much better job here than the guys but even the arms bent at the elbow helps. Some people are stiff and you may have  a challenge with them. Just do your best.

    #6 LET KIDS BE KIDS

    I’ve found that often parents will tell their kids “you need to be good and smile” before a photo session. For many kids that puts too much pressure on them to “perform”. I usually prepare my parents by getting them to tell their kids this instead:

    We’re doing to the park to take some photos. It will be a lot of fun.

    That’s it! No expectations other than fun. Then prepare yourself. Bring along props, get mom to bring one of their favourite toys or books. I usually have a hand puppet and bubbles in my camera bag along with my gear. If the kids don’t want to sit and smile don’t force them. Then them run around and be kids for a while and shoot that. Play with them, make it fun. Then they may cooperate and sit for a bit a few minutes later.

    When I’m photographing kids I make a total idiot of myself. I make funny noises, I sing songs (I’m really bad but they don’t care), I make fish faces, I play peek-a-boo behind the camera.  I run back and forth to the camera with the puppet. I lie on the ground, I stick my butt out. Kids are the ones that have life the right way around, it’s us adults that ruin it. Let them be kids, let them have fun. Then be ready to capture it when it happens.
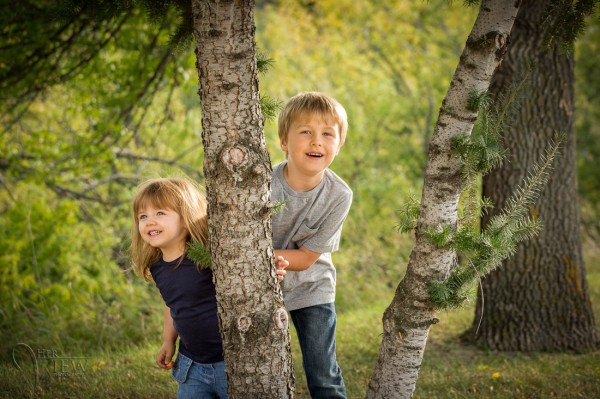
    This was a game of peek-a-boo around the tree.

    This was a game of peek-a-boo around the tree. Look at those genuine smiles! You can’t force those.

    #7 POSE PEOPLE TO FLATTER THEM

    Here’s the bottom line – if mom thinks she looks fat she isn’t going to like them no matter how great the lighting and expressions (see #8 and #9 below). So get this one right.

    Be aware of people’s perceived “flaws” and work with them. A list of some quick tips.

    • If someone has a bigger bottom half, don’t pose them walking away from the camera using a wide angle lens.
    • For double chins take a slightly higher camera angle, above their eye level. Making them look up stretches it out and minimizes the chin/neck area
    • A bump on a nose will show up when they face one way and not the other (usually) study their face to find out which way to shoot them
    • When you have a couple that has a huge height difference get the man (usually the taller one) to stand with his feet further apart. That will make him slightly shorter, closing the gap a bit.
    • For really heavy people (or those overly self-conscious of their weight) use the lying down in the grass pose and pile the kids on top. Works great every time. Hides tummies, stretches out chins and makes the kids closer in size because it’s just faces.
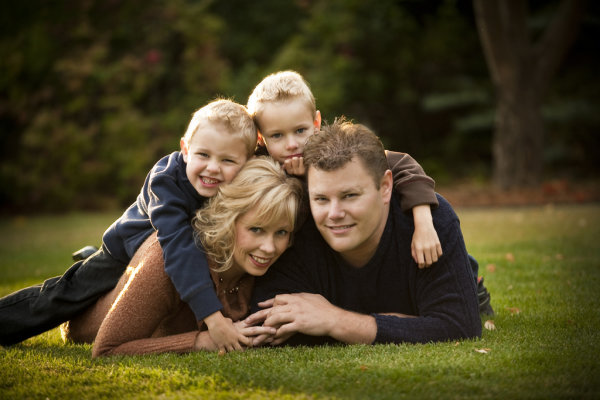
    The lying in the grass, pile on top pose. Great for families with small children.

    The lying in the grass, pile on top pose. Great for families with small children. This family didn’t need the pose to correct anything, it’s also just fun having the kids jump on top and squish mom and dad.

    #8 LIGHTING IS KING – GET SOME IN THEIR EYES

    Light can make or break any photograph, portraits are no different. The very derivative of the word photography is “drawing with light”. The biggest thing you want to make sure you do for portraits is get light into your subjects’ eyes. There are many ways to do that and that’s a whole huge topic but there are a few things you can do to set yourself up to start off with good light.

    • Choose the time of day to do the portrait! Ideally late evening about an hour before dusk is the best time for portraits. Why because the sun is lower on the horizon and you don’t get the harsh overhead light you do at midday. It’s more directional and usually a bit diffused if there’s haze on the horizon.
    • If you can’t shoot at dusk, find some shade. Get your family out of the sun, BUT make sure you don’t get the background lit up. Bright areas in the background will draw attention away from the subjects. Look for areas in the shade of large buildings, or under large trees.
    • Avoid using an overcast day simply because the lighting is even and less harsh than bright sunlight. While it is true the light is softer and less harsh, the direction isn’t great. Overcast days give you direct overhead lighting and dark eyes, especially anyone with deep eye sockets.
    • Add some light using a reflector or a flash if need be. Again this is a whole other class on lighting but learn to know when you need more light on their faces. If you cannot see a catchlight (the lightsource reflected in their eyes) then there isn’t enough light in their faces.

    Just as important as getting some light in the eyes is having it come from a good direction. We’ve established overhead isn’t good direction, neither is straight from camera. So turning on your built-in pop flash isn’t going to give you good light. Neither is sticking a speedlight on top. Light direct from the camera angle flattens the subject, that is not what you want. You want the light to come from the side more, 30-45 degrees from camera is a good starting point. To learn more about this read my article on the 6 Lighting Patterns Every Photographer Should Know.
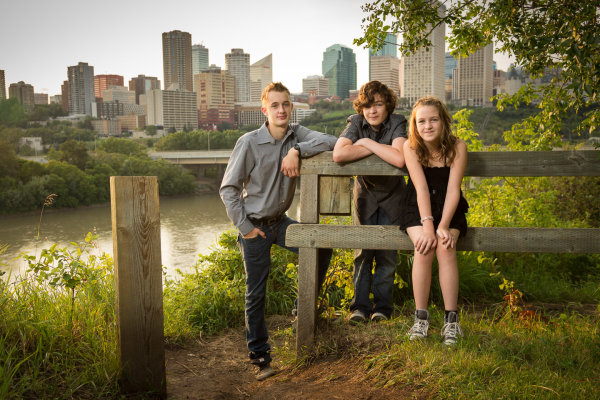
    This was done just before sunset. The sun is coming just over their shoulders on the left. I used a flash in an umbrella also to the left to add light to their faces, without it they'd be in shadow.

    This was done just before sunset. The sun is coming just over their shoulders on the left, behind them. I used a flash, bounced into an umbrella also to the left to add light to their faces, without it they’d be in shadow.

    #9 EXPRESSION IS EVERYTHING

    So if lighting is king, getting the right expressions is everything! You can totally screw up the lighting, and the pose, but if you get them laughing or making “that” face – it’ll be a big hit!  So how do you do that?

    See #1 first of all. Then look at #6. Being a photographer means that sometimes you have to also become a comedian, or a clown. Knowing the right thing to say or do to make people smile is mostly experience. Sometimes you’ll get tough adults too. The dad in the photo above by the brick wall pretty much has the same expression all the time. I’ve known this family and photographed them for 13 years, they’re friends too. So I know I can bug him a little bit or get out the ducky to have some fun at his expense.

    If there are small children or babies involved make sure to get their attention. It even helps to have an assistant, tell them to bring Grandma along or a friend to help out. But what always happens is you get the kids all looking and smiling, and what are the parents doing? Looking at the kids!  Oops again! I always tell the parents, “no matter what keep looking at me as I make a total fool of myself, do NOT look at your child”.
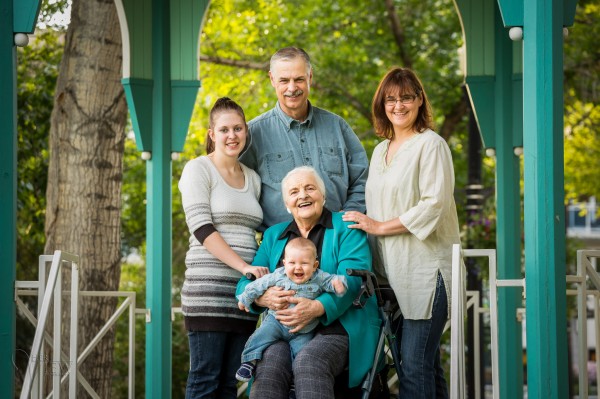
    Stamhuis-0038-Google

    Baby laughing, everyone else followed instructions and looked at me, success!

    #10 HAVE A LITLE FUN WITH IT

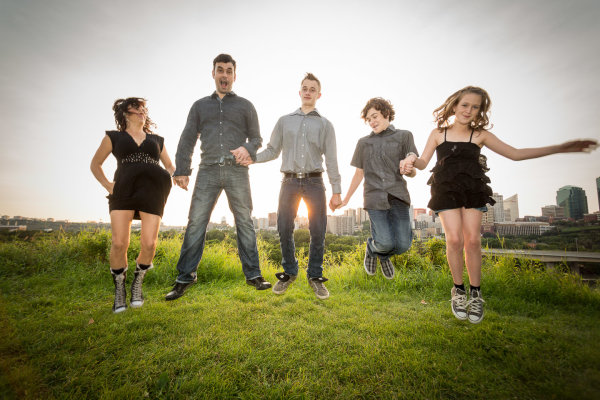
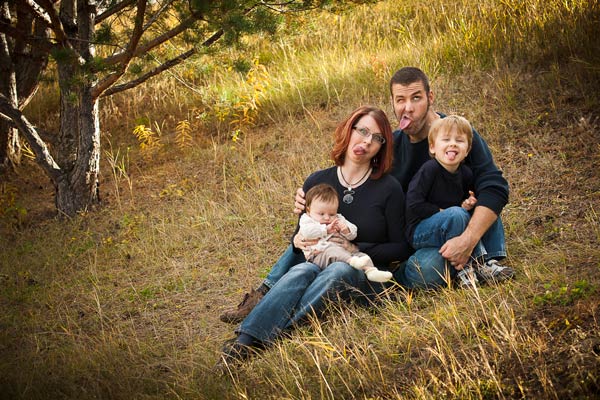
    Last tip is to no take yourself so seriously. Create a few really whacky shots at the end of the session (or even in the middle if the energy seems to be fading). Tell them to do a group squish and really get them to squish. Often they will start laughing and as they pull apart you grab the shot. Do a pile on down in the grass. Ask them to jump in the air or make goofy faces (you make one too). It breaks the tension and lightens up the mood.

    I volunteered my time at an event called Help Portrait last year that has photographers, make up artists and organizers giving their time to create portraits for people that otherwise couldn’t afford a professional one. They ended up sending most of the families to me, initially because I had the biggest area to do the group photo and later because the other photographers said I was the best with the kids.  To see some of my photos from that event go to Help Portrait, Edmonton  2012. 
    Dino-Park-0131-600

    I was making a similar face!

    Hood-August2013-0263-Google

    My off camera flash stopped working so this is direct from camera, not my first choice. But we were all tired and I thought this would be fun so we just went for it. Notice dad has a new expression!

    BONUS TIP

    Get the family to think about what they are going to wear. Some people disagree with my point of view on that, which is totally fine. But if you want to read more about it go to Clothing for Portraits.

    Get out there and photograph some families and have fun!


    Post originally from: Digital Photography Tips.

    Check out our more Photography Tips at Photography Tips for Beginners, Portrait Photography Tips and Wedding Photography Tips.

    10 Tips for Creating Great Family Portraits


    Digital Photography School

  • 10 Books for Photographers That Can Inspire You

    There are countless books for photographers available to us, and every photographer should have a library of books which provide them with useful information about different techniques as well as books to inspire them in their work. Subject matter varies widely between different photographers, but the list below is a general core set of books which cover a range of subjects Continue Reading

    The post 10 Books for Photographers That Can Inspire You appeared first on Photodoto.


    Photodoto

  • The Winner of our Living Landscapes Prize Pack Is….

    Over the last few weeks as part of the launch of our Living Landscapes eBook we were offering one buyer of this new eBook the chance to win a $ 1500 USD photographic Prize pack.

    The randomly selected winner gets a rotation180° Professional Deluxe Camera Bag (worth $ 500) plus $ 1000 USD towards some new lenses!

    The winner has just been drawn and is… Ami Kim!

    Congratulations Amy – we’ve just sent you an email with details of how to get your prize.

    Thanks to everyone else who picked up our new Landscape Photography eBook (one of the fastest selling eBooks we’ve ever launched)!

    Post originally from: Digital Photography Tips.

    Check out our more Photography Tips at Photography Tips for Beginners, Portrait Photography Tips and Wedding Photography Tips.

    The Winner of our Living Landscapes Prize Pack Is….


    Digital Photography School

  • Composition and Negative Space

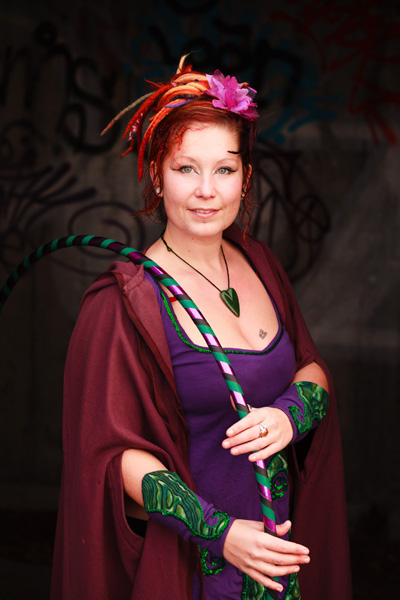
    Composition and negative space

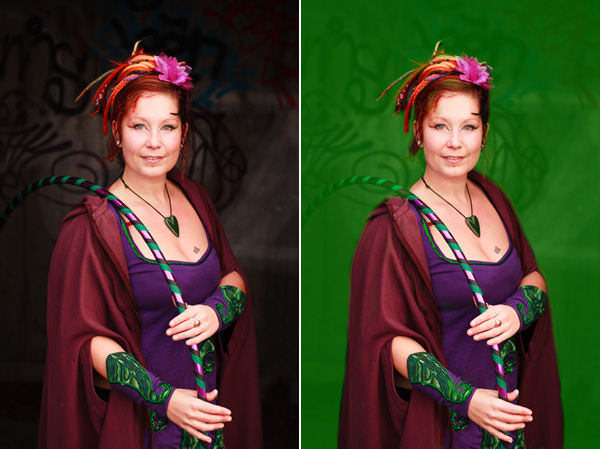
    In portraiture, negative space is the area around the main subject of your photograph. The portrait above has negative space – it is the dark area around the model. I’ve highlighted it below in green so you can see exactly what I mean:

    Composition and negative space

    There’s a quote in photography attributed to photojournalist Robert Capa:

    “If your photographs aren’t good enough, you’re not close enough.”

    A lot of the time, that’s good advice – many portraits can be improved by getting in closer to the subject, either physically or with a longer lens, so the model dominates the frame. When it comes to photographing people, it also helps to get closer emotionally to your models, by establishing a rapport or connection that enables you to take deeper, more insightful portraits.

    But there are also times when the environment around your model can contribute to the composition. Sometimes the subject needs room to breathe. This is when you can create an interesting image by backing off and including more negative space.

    There is nothing to stop you getting in close to your model and making a portrait, and then stepping away and including more of the environment to make use of the negative space. This is called working the subject, and is the process of exploring the photographic possibilities by varying focal length, shooting distance and other factors.

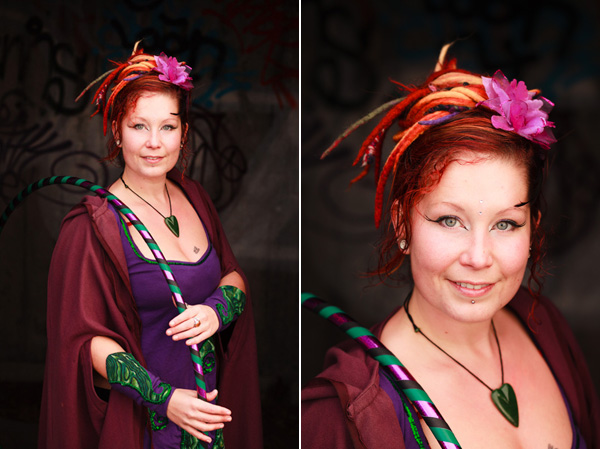
    In addition to making the portrait above, I also got in close during our shoot. Here’s a close-up portrait, side-by-side with the first so you can see the difference. See how the close-up also uses negative space, just in a different way:

    Composition and negative space

    Please note there is no right or wrong here, no simple rule to tell you what to do. You have to take each situation on its merits and find the best way to make a good portrait of your model. But, it always helps if you keep the composition as simple as possible. In the examples here, the negative space is ‘empty’. There is detail if you look closely, but nothing to distract attention away from the model.

    Other subjects

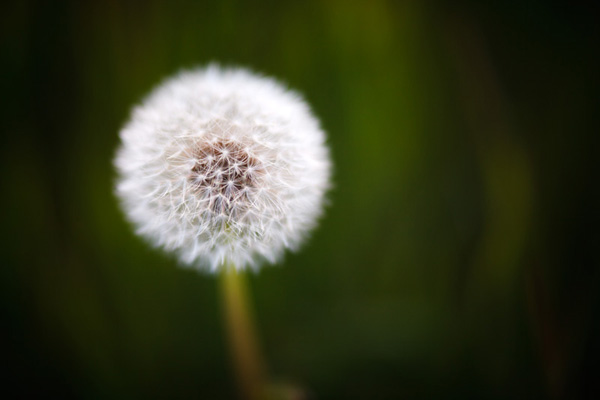
    This technique also works with subjects other than portraits. Here is an example with a photo of a dandelion. Note the principle of simplicity has come into play again. I used a wide aperture (f2.8) to ensure the background is blurred:

    Composition and negative space

    Here’s an example of a landscape photo that uses negative space in the composition. It works because the blue and orange colours in sky add atmosphere and mood:

    Composition and negative space

    Finally, here is a black and white photo I took in Argentina a few years ago. I was attracted by the textures in the door and the wall, which I knew would come out well in black and white. Note the use of rectangles in the composition. The door is a rectangle, so is the door frame, and so are the paintings hanging on the wall. They are all contained in another rectangle – that of the 35mm frame. The negative space provided by the wall (which I darkened in post-processing to emphasise the effect) accentuates the rectangular shapes in the image.

    Composition and negative space

    Mastering Photography

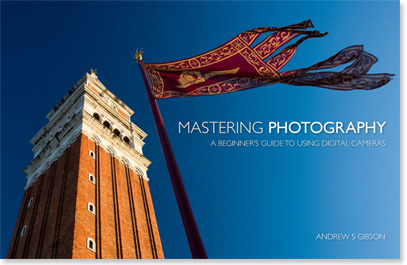
    My latest ebook, Mastering Photography: A Beginner’s Guide to Using Digital Cameras introduces you to digital photography and helps you make the most out of your digital cameras. It covers concepts such as lighting and composition as well as the camera settings you need to master to take photos like the ones in this article.

    Composition and negative space


    Post originally from: Digital Photography Tips.

    Check out our more Photography Tips at Photography Tips for Beginners, Portrait Photography Tips and Wedding Photography Tips.

    Composition and Negative Space


    Digital Photography School

  • 3 of My Favorite Photography Books

    We are all familiar with the old refrain, “Those who can, do.  Those who can’t, teach.  Those who can’t teach, teach gym.”  I’m still not sure about that last part, but I think by now we’ve pretty much debunked the middle part.  The photography world is full of incredibly successful, highly talented photographers who willingly and eagerly pass along their knowledge and expertise to a new wave of hobbyists, enthusiasts, and professionals.  From workshops and photo walks, to seminars and tutorials, there is a lot of solid information to be found.  As great as live face-time with many of these photographers is, however, it’s not always feasible, possible, or even affordable.  As amazing as a five-day seminar at a four-star hotel in the Virgin Islands might sound, in my world things like food, shelter, and a growing 12-year-old son have to come first.

    That’s when I hit the books.  And I’m not talking about an e-book or an on-line forum or magazine (not that there’s anything wrong with them).  I’m talking about an actual collection of pages, bound together in a single unit, containing useful information and insight.  Something I can highlight and bookmark.  But just like not every workshop is everything it’s cracked up to be, not every book is full of secrets bound to catapult you to the next level.  I’ve amassed a fairly sizable photography library over the years.  Some have been disappointing, while others have been worth every penny.  My philosophy on photography books is simple.  A photography book is worth its price tag and earns a permanent place on the shelf if I learn even just one or two things that can noticeably impact my photography in a positive way.  Regardless of whether it is geared towards shooting, editing, or running my business, a good photography book will have at least one shiny nugget that changes the way I do things.

    In no particular order, these are three of my favorites.

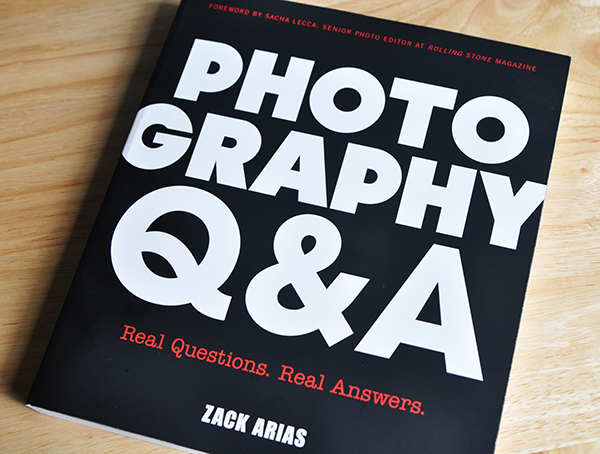
    1.  “Photography Q&A – Real Questions. Real Answers,” by Zack Arias

    I had the pleasure of writing the first published review of  Zack’s book back in June.  Since then, I have re-read it cover-to-cover twice.  In August of 2012, Zack, an Atlanta-based commercial/editorial photographer, embarked on a mission to save us all from really bad advice.  He launched his popular Tumblr blog, “Phtography Q&A – Ask Me Anything About Photography”, with the goal of answering 1,000 reader-submitted questions.  It was this collection of questions and answers that became the rough draft for the Q&A Book.   There are several things I love about this book.  For starters, it’s not about any one topic.  The questions range from gear, lighting, and confidence, to portfolio-building, submitting your work, and selling yourself.  I wouldn’t call this a book about photography,  but I would call it a book about being a photographer.  Covering topics as widely varied as the photographers who submitted them, PQ&A reads like you’re sitting across the table from Zack, having a beer, as he shares not only his advice and expertise, but the personal experiences that taught him those lessons in the first place.

    JJG-001

    I summed up my original review like this: “While this book may help improve your photography, I think its greater goal will be improving your quality of life as a photographer– or at least the quality of your head space.  If you’re anything like I am– still grappling with crises of confidence, fighting and clawing through creative and practical ruts, or still occasionally convinced that ‘my photography/business will skyrocket if I can just buy THAT,’ then this book is for you.”

    Our playing field has changed drastically in recent years.  PQ&A cuts to the chase and tells it like it is.  The advice you’ll find in these pages is worth way more than the price tag.

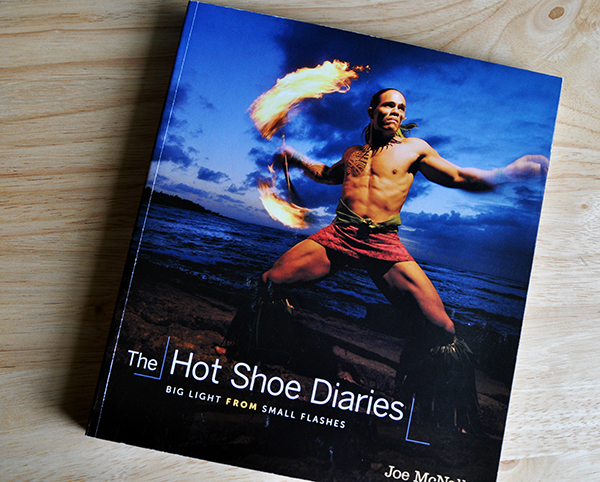
    2.  A Tie Between “The Moment it Clicks” and “The Hot Shoe Diaries,” both by Joe McNally

    Joe McNally has to be one of the most dynamic photographers and educators working today.  And no, I’m not exaggerating.  If you’ve ever had the privilege of attending one his seminars you know what I’m talking about.  If you haven’t, read both of these books.  Both are written in Joe’s signature conversational style and will leave you chomping at the bit to get out and put what you’ve learned into practice.

    A typical Joe McNally seminar or workshop tends to be filled with sentences that begin with things like, “The photo editor at National Geographic once told me…” or “My editor at Life Magazine used to say…”  These are your cues to start feverishly writing down every word that follows.  “The Moment it Clicks” is an entire book of these one-liners, with each two-page spread combining Joe’s words of wisdom with a stellar photograph and the story behind it to illustrate the point.

    JJG-004

    “The Hot Shoe Diaries” should absolutely be required reading for anyone who even gives passing thought to off-camera flash.  I know I sound like a gushing fanboy when I say this book changed my life, and I’m okay with that.  With sections like “Up to Your Ass in Alligators,” “Strobe Strategy,” and “Do You Have a Bedsheet?” you know that a whole heap of knowledge and information is about to fall in your lap.  As with “The Moment it Clicks,” each lesson is illustrated with one of Joe’s amazing images.  One of the most valuable sections comes at the very beginning of the book.  “What I Use…and Why and When I Use It” sets the stage for each of the many off-camera flash lessons.

    JJG-006

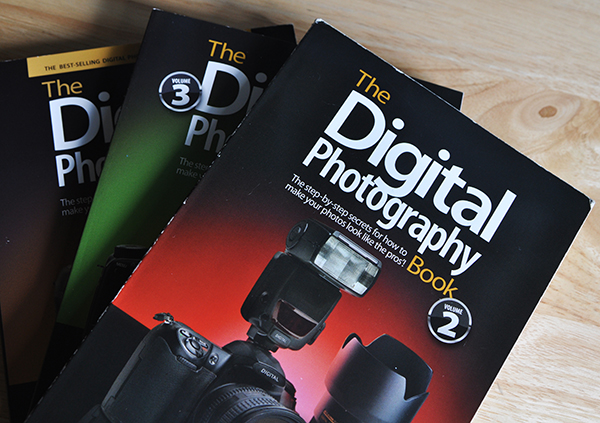
    3. “The Digital Photography Book – Volume 2,” by Scott Kelby

    The name Scott Kelby has pretty much become synonymous with photographic education, from shooting to post production, and everything in between.  There are currently four volumes in this series.  Volume 2 is my favorite.  Just like the other authors mentioned here, Scott Kelby lays it all out on the table, sharing his setups, his experiences, and why he does things the way he does them.  Each chapter (all named “Shoot ________ Like a Pro”) sets out with a singular goal– to improve a specific aspect of your photography.  Topics include flash, portraits, landscapes, weddings, travel, and macro.  There is also excellent information on “Building a Studio from Scratch” and “Pro Tips for Getting Better Photos,” as well as Scott’s “Recipes to Help You Get ‘The Shot.’”

    JJG-008

    Photography is one of those things where you only get better by doing it.  A LOT.  You can read all the photography books you can get your hands on, but until you get out there and repeatedly apply what you’ve read (over and over again), nothing is going to change.  I’ve chosen the three (okay…four) books here for three very different reasons.  Scott Kelby’s “The Digital Photography Book” series is bursting at the seams with useful information for the beginning to intermediate photographer looking to take their photography to the next level.  Nobody beats Joe McNally when it comes to teaching everything from the basics to the finer points of off-camera flash, but you need to have a solid foundation and firm grasp of certain photographic principles before tackling advanced lighting techniques.  Zack Arias’ book departs from the traditional photography book in that it is less about technique and more about getting your photographic head screwed on straight.  All three are important, and all three will benefit every photographer at some point on their journey.

    Post originally from: Digital Photography Tips.

    Check out our more Photography Tips at Photography Tips for Beginners, Portrait Photography Tips and Wedding Photography Tips.

    3 of My Favorite Photography Books


    Digital Photography School

  • B-Grip Camera Holster Review

    10428898-origpic-b69c54
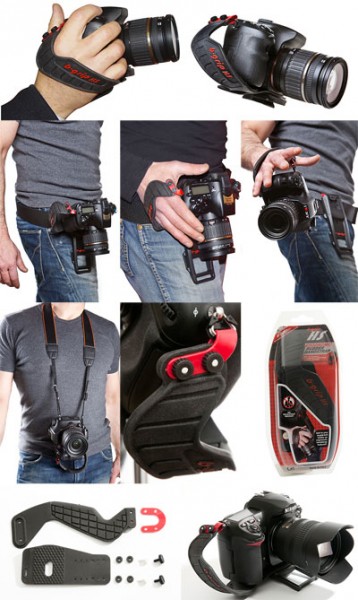
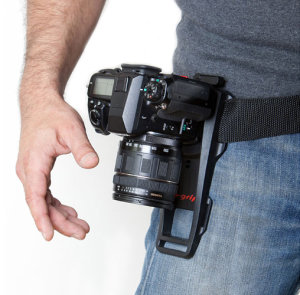
    The B-Grip (short for “belt grip”) is a way to carry your camera on a belt, rather than around your neck. The camera is carried around in the holster with a quick release plate that’s easily accessed when you’re ready to shoot. It’s best paired with the hand strap also available, and it is this pair which I was sent for review by a local reseller. I tested this grip out on the busy weekend of an anime convention which I attend every year and usually take about 1000 photos a day for each of the two days. For Saturday I used the B-Grip. For Sunday I switched back to my preferred strap, a Sun Sniper strap. This way I was able to get a good comparison of the two.

    Pros

    • It looks damn sexy! I posted the product photo to my facebook page when I got the holster for review and the most common comment was how cool/badass/sexy it looked. For a photographer who needs to look cool, this will not harm your image one bit.
    • This will save your neck and shoulders, as the weight of the camera and lens is moved to your hips, which can carry that weight far more easily. The advertising says “carry your camera comfortably”, and it is comfortable!
    • When holstered, the camera is very secure. I was concerned at first but after putting it all together I could see there was no way the camera would come loose. It’s probably more secure than a standard strap, since it doesn’t swing about.
    • The experience of going hands-free without worrying where a dangling camera might go if you bend over or turn around is a liberating one.

    Cons

    JU0157HSWebDual

    • The major problem I faced with the holster is the necessity for a strap you slip your hand into before you can remove it from the holster. The alternative is no strap which means your own hand’s grip is the only thing stopping the camera from hitting the ground. I think that’s too risky, especially when trying to holster/unholster your camera.
    • The strap is a thick, flexible, slightly grippy rubber. It’s a little tricky to adjust to the right size, and can be quite difficult to put your hand into when you’re even a little bit sweaty.
    • The event I was shooting had me stopping to take photos every couple of minutes, so I was constantly holstering/unholstering my camera. I started leaving my hand in the grip all the time, and then I just stopped holstering it altogether, so I ended up always holding the camera in my hand and as a result my arm became tired.
    • Not only did this make my arm tired, but it also meant my hand wasn’t free. It took a few seconds to lift my shirt (which naturally fell over the holster), holster the camera and take my hand out of the grip in order to get my hand free. Long enough to be awkward when offered a hand to shake.
    • There’s an optional extra attachment for the grip on the camera that allows you to mate the plate for the holster onto a tripod mount. This is a solution for photographers who want to swap between handheld and tripod, but the adapter is plastic and I prefer metal for tripod plates.
    • Also, the grip is not compatible with my panorama head. This may not be a problem for many photographers (although stills/video shooters may have a similar issue), but the attachment is slow and fiddly enough – with some small plastic nuts used which could easily be dropped and lost – that I’d rather never have to remove the B-Grip from my camera.
    • Every time I wanted to sit down I had to slide the camera and belt around to my side, which then got in the way a bit.

    Thoughts

    • I really like the concept of the holster mount, and the benefits are very nice indeed, however for the types of photography I do and the relatively burdensome process of adding and removing the B-Grip from the camera, I don’t think it’s suited to me.
    • I can imagine this being a great tool for a street photographer for example. You could walk around for hours, the camera securely stashed out of the way and not swinging about, then slip your hand in the grip when you come across a photo opportunity. Once you’re done, holster the camera again and go on your way.
    • It’s very true that you need the right tool for the right job, and there are many jobs which demand many different tools. The B-Grip is not a tool for the jobs I do however.

    bgrip-friend-g-media-res

    Conclusion

    • I find it hard to do a fair review of this holster, as I feel that it simply wasn’t a tool that benefited me, yet for another photographer it could be exactly what they need.
    • There are some annoyances, such as the finicky wrist strap and a slower process to add/remove the camera attachment than I’d rather.
    • The parts that did work for me – the weight of the camera being supported on my hips, being completely hands free and not worrying about a camera swinging around on a strap – were truly a liberating feeling.
    • For the right photographer, this could be a dream come true. But not for me. I’ll be sticking with my Sun Sniper.
    • To keep all of my reviews consistent I’ll still give the B-Grip a score, but please interpret it in the context of what I said above: 6/10

    If you regularly find yourself in a situation where you carry your camera with you and stop for occasional shots, or have to have your camera secure without the possibility of it swinging around, the B-grip is a great solution. You can pick one up at Protog.

    If you’d like to see early impressions and photos from other camera gear that I’m reviewing, pop over to Facebook and like my page. I post that kind of thing regularly!

    Post originally from: Digital Photography Tips.

    Check out our more Photography Tips at Photography Tips for Beginners, Portrait Photography Tips and Wedding Photography Tips.

    B-Grip Camera Holster Review


    Digital Photography School
  • 4 Ways To Make Money As A Photographer

    Wouldn’t it be nice to make money doing something you love – even if it were just enough to cover the costs of that hobby?

    I’m going to share with you four ways that I have personally used to try and make money as a photographer. I’ll share with you my experience with each, advice on getting started, and whether or not I was successful in my attempts. I’ve also found a few more posts on DPS that will help you find more information on a few of these topics if they peak your interest.

    The Wedding Photographer

    Sneak Peak-7

    Wedding photography is probably one of the more profitable ventures – I know for me even having only photographed one wedding I’ve made more in that one day than the other three methods I’ve tried combined. It has a relatively low cost to entry and if you’re lucky enough to be in or know a lot of people in their early to mid 20s you have a pontential gold mine of a client base to tap.

    I recently was asked to photograph my sister’s friend’s wedding and after some convicing I finally said yes. Instantly I felt the pressure of the task before me. Even though I had nearly a year to prepare before the big day it still felt like I had a mountian to climb. Now I’d suggest that if you don’t feel this pressure when you’re about to photograph your first wedding then you probably shouldn’t be photographing a wedding. It was this pressure that pushed me to get help and make sure that I did the best I possibly could with the experience that I had.

    Four words of advice if you’re going to try breaking into wedding photography

    • Don’t do it for free – No matter who it is! If it’s the president of your company or some stranger off the street find a price that works for both of you and be happy with it. Wedding photography is a lot of work and a lot of responsibly. These photographs will have value to your client (even if they’re not the ones she has on her Pinterest board) because they will be the photographs that freeze this day in history.
    • Find a mentor – You’ll want to do the best that you possibility can and if you’ve never photographed a wedding let me tell you you’re not prepared. There is a million things that you need to know and the best way to learn these things is by doing. I found a great professional photographer who’s been in the business for decades and he allowed me to shadow him on two weddings prior to mine – it was the best thing I ever did!
    • Rent your gear – Odds are if you’re just starting out you won’t have top of the line gear – which at a wedding does make a difference. You’ll need something sharp and fast to get the best quality shots, but you don’t have to invest thousands of dollars in your first go. There are plenty of places that will rent you all the gear you want for a couple hundred dollars for a weekend. For example I rented a Nikon D600 and a 24-70mm f/2.8 for under $ 170 for 5 days for the wedding that I photographed.
    • Communicate Often – Stay in communication with your bride and groom. Find out their vision, what they expect of you, and who they want featured in their album. The better the relationship you have with your clients going into the wedding the better the photographs will be.

    These are four of the most important ways to get started in wedding photography, but by no means is an exhaustive list of wedding photography tips. Here’s the first post in a great series here on DPS about wedding photography for more information.

    The Real Estate Photographer

    0

    Okay so the global economy is still pretty much in the ICU, but things are starting to look a little better right? After all the housing market is slowly starting to come back to life and as it does there’s an opportunity here for a photographer to make some money on the side photographing interior and exterior shots for real estate agents to use in order to sell the house.

    I’ve only done this once and I wasn’t even really looking towards this as an option, but out of the blue a real estate agent who helped me buy my house contacted me after seeing the photographs I share on Facebook and asked if I’d be interested – I agreed to give it a shot.

    Again – don’t fall for the working for experience line here if you’re serious about making money the worst thing you can do is start out giving your time away for free so come up with a price and stick with it. The going rate for real estate photography is going to change based on region so you might want to see if you can find local rates in your area.

    A Couple Ideas for Pricing Your Real Estate Shoot

    • A Flat Fee – Exterior only typically will be a simple job so you’d probably charge a flat rate for this. If they want interior shots too then you might want to charge on a per room basis.
    • Fee + Commission on Sale – I’ve seen this done before too, but typically you’ll have to have more of a reputation to demand a commission on the sale of the house. That said it’s worth a shot.
    • A Variable Fee – Set your rate based on the property. If you photograph a shack that’s going for less than $ 50,000 dollars you’d probably have a lower rate than if you were photographing something that’s listed for $ 1.5 million.

    The best part about this type of photography is you don’t really need too much gear. A DSLR, a wide-angle lens and a tripod will go a long way. Here’s a post with a bunch of DPS reader comments on the subject of entering the real estate photography business if you’re interested in more information.

    The Stock Photographer

    stockphoto

    I’ll be honest here and tell you that I’ve only given stock photography a very half hearted attempt. I signed up for one of the many agencies out there and submitted a handful of my photographs – they didn’t sell – and I gave up.

    It’s a very hard industry to break into if you’re just starting out because the agencies typically will feature popular photographer’s work first. One point I’d like to make is that you have to keep in mind that the photographs people are looking for are ones that will help them sell a product or service to their clients and therefore you have to think about that when you take your photos.

    Just because I failed at selling anything through a stock agency doesn’t mean it’s not a good source of income for you. After all there are people out there who make good money with stock photography and that’s the main reason I chose to include it in this post.

    So if you’d like to know more about getting into stock photography read this article on DPS it’s much more involved than what I’ve gone over here.

    The Fine Art Photographer

    The Fog Rolls In2

    Fine art photography is probably the most competitive and most difficult avenue to break into due to the fact that the market is saturated with photographers trying to sell their photography and the fact that wall space is limited (we all only have four walls in each room to hang photographs on and typically we want those photographs to mean something to us).

    Key Points to Think About as You Get Started

    • You’ll Need a Fan Base – Typically people aren’t going to buy a photograph from someone they don’t know or recognize. The best way to start selling your photographs as art is to build a fan base – I’ve done this through sharing my photos on my Facebook page.
    • Quality is Huge – If your sunset photographs look like the ones that dad took on the last family vacation then you’re not going to sell anything. Read more about how to avoid becoming part of the sunset paparazzi here.
    • Uniqueness Will Sell – As a continuation on quality the more unique you can develop your style to be the more likely you will set yourself apart and be able to sell prints to the fan base that you’ve built and even beyond.

    Ways To Sell Your Photography

    Okay so now that we’ve gone over some of the basics of what you’ll need to do before you even begin to sell your photography how do you actually go about selling it?

    • Direct Sales – If you can build a very loyal and close nit community of people in your town, college, or place of work you might be able to generate sales in this manner. Also, many local coffee shops will allow you to hang your work on their walls for a commission on sales (this is how I got my first print sale). It benefits them in that they get free art to hang on their walls and you get to have a lot of eyes on your photographs. 
    • Online Sales – Smugmug and Zenfolio are the two names that come to mind when I think about online sales (read about why I chose Zenfolio here). There are some other places as well like Etsy, Fine Art America and Redbubble which don’t offer as many features and typically will take a larger percentage of your sale. Again while all of these places will allow you to host your photographs, offer shopping cart options, and even print and ship the photo to your client they won’t promote it for you so we’re back to the first point above about needing a fan base to sell to.

    Are you making money with your photography? If so are you using one of the options listed above or do you do something else? Share below!

    Post originally from: Digital Photography Tips.

    Check out our more Photography Tips at Photography Tips for Beginners, Portrait Photography Tips and Wedding Photography Tips.

    4 Ways To Make Money As A Photographer


    Digital Photography School
  • Add Impact to Your Photos by Including Shadows

    In music they say the spaces between the notes are just as important as the notes themselves. Similarly in photography, it can be the spaces that are not in the light that add impact to an image.

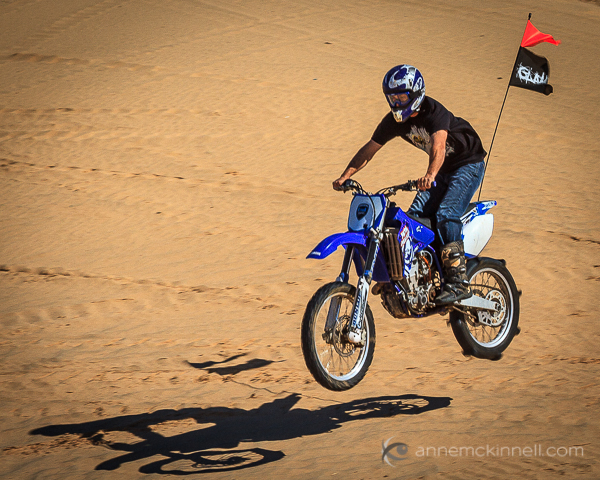
    Imperial Sand Dunes, California by Anne McKinnell

    If it were not for the shadow cast by the dirt bike, it might be difficult to tell it was off the ground.

    Shadows help tell a story and enhance the mood and visual power of a photograph. In fact, they can be so interesting, that they “overshadow” the subject itself!

    By focussing your attention on the shadows, you can create beautiful compositions full of contrast, form, and minimalist simplicity. An object and its shadow will strengthen each other. Sometimes you might even want to cut the object out entirely, and play with capturing only the interesting shadows that are cast by it.

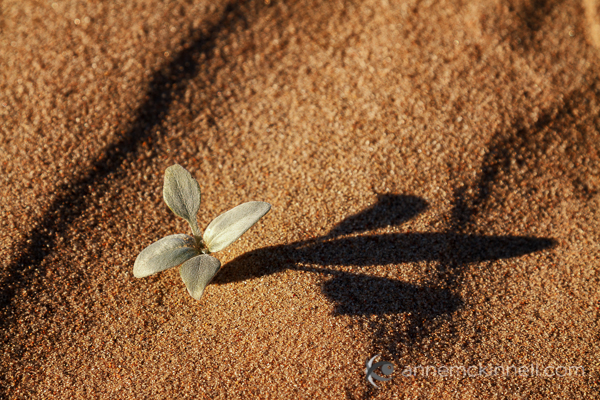
    A small plant and it's shadow by Anne McKinnell

    In this image of a small plant, it is really the shadow that is the main subject for the image would have very little interest without it.

    Photographing shadows works best with strong, simple shapes that make interesting graphic designs such as flowers, sharp lines, or even human beings. After all, who hasn’t taken a picture of their own shadow as it stretches out across the sidewalk in front of them?

    You can use shadows compositionally the same way you would use any other element in the scene: as leading lines, patterns, curves that guide the eye into the scene or to create a balance of negative and positive space.

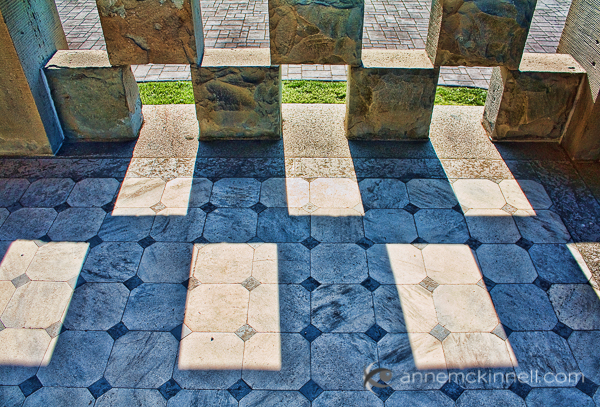
    Sandstone blocks and shadows by Anne McKinnell

    Look for patterns created by shadows. Here, an interesting pattern is formed by the sandstone blocks and their shadows.

    Exposing for the Shadows

    If you put your camera on an automatic mode (even aperture or shutter priority mode) and try to photograph a shadow, it’ll probably come out too light. This is, after all, what cameras are designed to do – expose with enough brightness to see detail. Of course, this isn’t always what we want, and shadows are a prime example of when you need to manually change your exposure to make sure the shadow remains in darkness.

    There are a few ways that this can be done:

    • Set your camera to manual mode. This is for advanced photographers. On manual mode, you’re responsible for setting your aperture, shutter speed, and ISO value. If you’re not sure what settings to use, you can copy them from the values on your auto setting and then tweak them as you go.
    • Use EV compensation. If you take a shot and see on the LCD screen that it is too bright, you can simply locate the camera’s EV (exposure value) compensation button. Almost every camera will have one, even point-and-shoots and camera phones; it is denoted by a square with a (+/-) symbol. Using that, you can simply turn the exposure up or down to be brighter or darker, as you see fit, and if you’re using live view it will probably render directly in the display. If the shadows come up too bright, just lower the exposure compensation a little to deepen them.
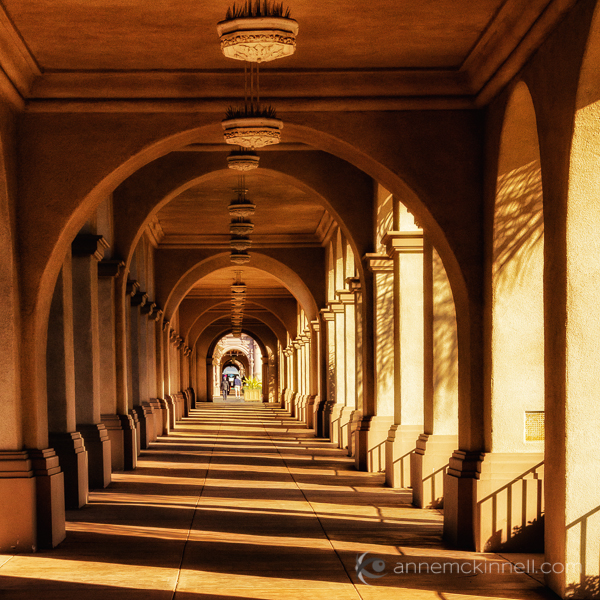
    The El Prado Pedestrian Walkway, Balboa Park, San Diego, California, by Anne McKinnell

    Late afternoon sidelight created a pattern, an interesting repetition of lines, in this arcade.

    • Lock down your exposure. If you have a DSLR, it probably has an exposure lock feature, though it may need to be configured in the camera’s menu. Using exposure lock, you can fill your frame with the part of your scene that’s not in shadow – or else some well-lit mid-tone – and let your automatic exposure calculate for that. Then you lock it in by pressing the AE-L (auto-exposure lock) button on your camera. This will freeze the settings as they are, so you can recompose the image to include the shadow and the camera won’t re-calculate and brighten the exposure to account for them. This way, you’ll get perfectly exposed highlights and deep shadows. Alternatively, you can simply note the settings, dial them in to manual mode, and bypass the exposure lock altogether.
    • Bracket your shot. When you bracket your image, you take several shots at different exposures. Mid-range cameras and higher will have this feature built in – it might feature a dedicated BKT button, or the option might be available in the menu. If so, you’ll be able to select how many pictures to take and how many stops of difference between them. This makes it simple to take three exposures, for example, one with the exposure the camera thinks is correct, one underexposed by one stop and one overexposed by one stop. If this feature is not available, it can be achieved through changing the settings in manual mode, or by taking several shots with different EV compensations.
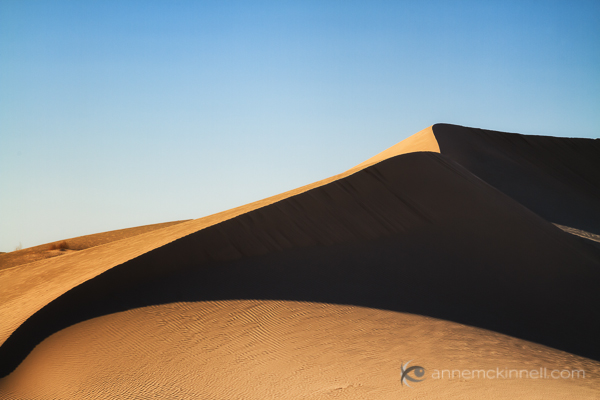
    Imperial Sand Dunes, California by Anne McKinnell

    In this image of a sand dune, the shadow adds form to the dune and creates a strong and balancing line in the image. I made this image mid-afternoon during a scouting trip. It turned out much better than the image I made of the same location later in the day when the right side of the dune was entirely in shadow.

    Next time you’re out shooting, make a point of noticing the shapes of the shadows. Challenge yourself to actively use them to create mood, to add dimension to your subject, or to take center stage in a creatively crafted composition.

    Post originally from: Digital Photography Tips.

    Check out our more Photography Tips at Photography Tips for Beginners, Portrait Photography Tips and Wedding Photography Tips.

    Add Impact to Your Photos by Including Shadows


    Digital Photography School
  • Secondary Point of Interest: Weekly Photography Challenge

    Earlier this week we published a post on composition of images in which author Matt Dutile introduced the concept of adding a second point of interest to your photos to give your image a natural viewing progression.

    Adding a secondary point of interest can not only add more interest in your image but reinforce a theme or perspective argues Matt.

    NewImage

    A number of people commented that they’d not considered this technique before so we thought this might be a fun weekly challenge – taking photos that not only have a single point of interest – but which have a second one.

    Check out Matt’s post and then head out with your camera to practice the technique.

    Once you’ve taken your ’2nd Point of Interest’ photos upload your best ones to your favourite photo sharing site either share a link to them even better – embed them in the comments using the our new tool to do so.

    If you tag your photos on Flickr, Instagram, Twitter or other sites with Tagging tag them as #DPS2NDINTEREST to help others find them. Linking back to this page might also help others know what you’re doing so that they can share in the fun.

    Also – don’t forget to check out some of the great shots posted in last weeks Black and White Landscapes challenge – there were some great shots submitted.

    Post originally from: Digital Photography Tips.

    Check out our more Photography Tips at Photography Tips for Beginners, Portrait Photography Tips and Wedding Photography Tips.

    Secondary Point of Interest: Weekly Photography Challenge


    Digital Photography School