Category: Photography

  • The Zen Guide to Photographing Stars Like the True Master You Are!

    Our fascination with the stars has lasted for eons. So it is no surprise that so many photographers rotate their lens into a vertical postion to capture these natural wonders! But as many of you may have already found out, photographing stars can be a little tricky, as many factors come into play, and certainly the most irritating is that, Continue Reading

    The post The Zen Guide to Photographing Stars Like the True Master You Are! appeared first on Photodoto.


    Photodoto

  • Shooting With Intent

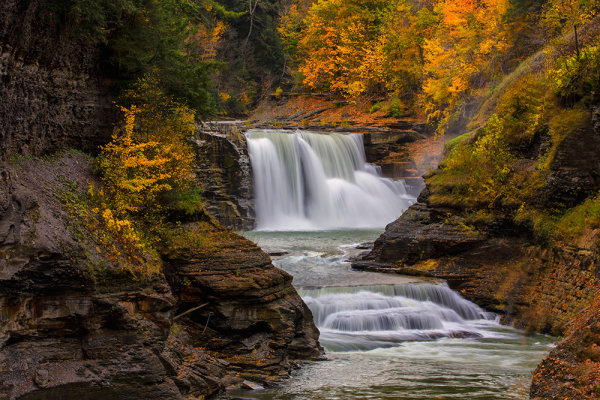
    For this image of Lower Falls in Letchworth State Park in New York, I knew I wanted a creamy look to the falls.  They were flowing well so I knew a moderately slow shutter speed would give me what I wanted.  I also knew as I composed it that I wanted the falls framed by some of the gorgeous colors of the fall foliage.  I set my exposure based on two things- I wanted a slow shutter speed and I wanted deep depth of field. EOS 5D Mark III, EF 70-300 f/4-5.6L, ISO 100, f/25, .3".

    For this image of Lower Falls in Letchworth State Park in New York, I knew I wanted a creamy look to the falls. They were flowing well so I knew a moderately slow shutter speed would give me what I wanted. I also knew as I composed it that I wanted the falls framed by some of the gorgeous colors of the fall foliage. I set my exposure based on two things- I wanted a slow shutter speed and I wanted deep depth of field. EOS 5D Mark III, EF 70-300 f/4-5.6L, ISO 100, f/25, .3″.

    A good friend of mine is passionate about photography, and she recently acquired a reminder of the way she approaches photography.  A tattoo that wraps around her bicep that states simply “Shoot With Intent”. This is one of the biggest lessons a beginning photographer can learn.  It’s very easy to go out with a camera, set it on AUTO, and come back with some nice, perhaps even great images.  Today’s cameras make that fairly easy, even without shooting on full auto. If you’re using aperture priority or shutter priority, just allowing the camera to come up with an correct exposure, you can still great images without considering all aspects of the exposure.  However, without considering all aspects of the exposure and allowing the camera to make decisions for you, you’re not really shooting with intent.

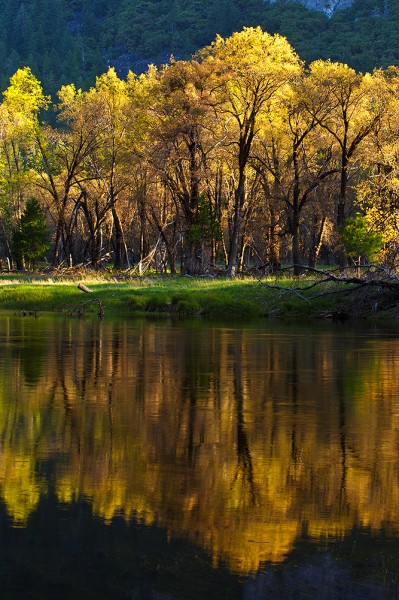
    I wanted to capture this image of trees reflected in the Merced, but the water was undulating just enough to cause problems with the reflection. A slower shutter speed helped smooth the ripples and give me a better reflection. EOS 5D Mark III, EF 70-300 f/4-5.6L, ISO 100, f/16, .3".

    I wanted to capture this image of trees reflected in the Merced, but the water was undulating just enough to cause problems with the reflection. A slower shutter speed helped smooth the ripples and give me a better reflection. EOS 5D Mark III, EF 70-300 f/4-5.6L, ISO 100, f/16, .3″.

    Shooting with intent means you take into consideration all aspects of the image you’re creating.  It starts with the lens you choose to put on your DSLR and carries all the way from subject and composition, to shutter speed, ISO, and aperture, you think through every aspect of the shot, and how those variables will affect the image.  Let’s assume you’ve chosen a lens, a subject, and decided how you want to compose the image, since those are the two most basic aspects of creating an image. You look through the viewfinder, or on the LCD screen, and you decide where things should go in the frame.  That’s about half of the decisions you need to make right there.

    Next, you need to consider the three aspects of exposure- aperture, shutter speed, and ISO.  This is a balancing act where you need to prioritize what’s most important to you. Take your aperture. Let’s say you’ve decided you want everything in focus. You’ll want to select a smaller aperture, say, f/11 or even f/16 to provide the greatest depth of field.  But then what about your shutter speed?  If you’re in Aperture Priority mode, the camera will figure that out for you.  But if there’s something moving in the shot- trees blowing in the wind, a waterfall, or waves on the ocean, or even people- is that something you want to just leave to the camera?

    You can still be in Aperture Priority  and pay attention to your shutter speed.  Let’s assume you’re shooting a water feature. If you want smooth, misty water, you’ll know you need a slower shutter speed.  But how slow?  That depends on what the water is doing, and on how you want the water to look. That’s where your INTENT comes in.  If you still want some definition in the water, you’ll want a slightly faster shutter speed that allows for that. How fast depends on how fast the water is moving. If you want that milky look to the water, you’ll want a slower shutter speed.  Again, how slow depends on the water’s movement.

    The point is, before just allowing the camera to set the shutter speed, or the aperture, or anything else, regardless of what mode you’re in, figure out what it is you really want out of this capture.  Decide what your intent is, and double check what the camera is doing to be sure that your intent is carried through.  And if it isn’t?  Change it.

    Make sure your images say what you meant to say. Be sure your intent is clear.

    Post originally from: Digital Photography Tips.

    Check out our more Photography Tips at Photography Tips for Beginners, Portrait Photography Tips and Wedding Photography Tips.

    Shooting With Intent


    Digital Photography School

  • How to Restore Old, Damaged Photos

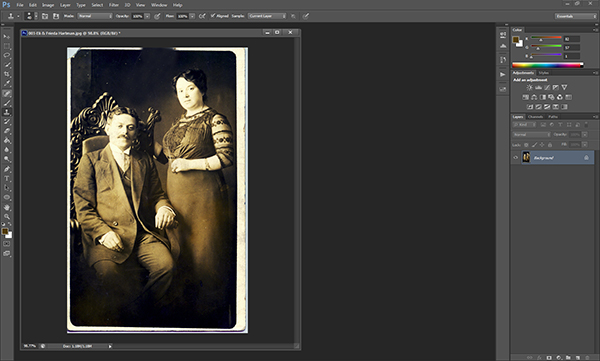
    Perhaps one of the most important things we do as portrait photographers is preserve memories.  While the digital era and its ever-evolving technology have made it easier to ensure that the photos we take today will last longer than their analog counterparts, there are still things we can do to help preserve memories captured before the advent of the pixel.  Several years ago, I came across a sizable collection of very old family photos and started scanning them.  Unfortunately, some had already been damaged to one degree or another.  Fading, creasing, staining, and tearing had all left their marks, and the fact that some of these photos were close to 100 years old did not help their cause.  At first I wasn’t sure what to do about them, but closer inspection made it clear that restoring many of these photos would not be as difficult as I initially thought.  With the help of only three or four Photoshop tools, I was able to bring this photo of my great grandparents back to life.

    STEP 1 – ASSESS THE DAMAGE

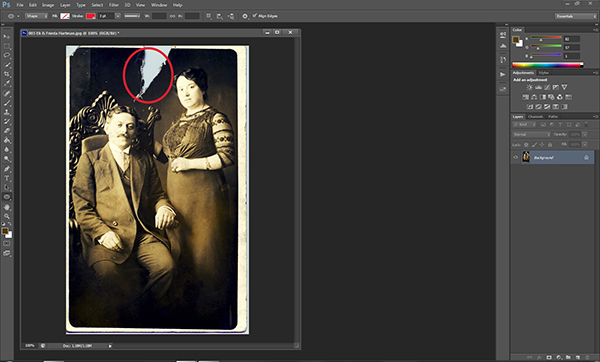
    Once the image has been scanned, open it in Photoshop to assess the damage and formulate a plan.  A good rule of thumb when editing any sort of photo is to tackle your global edits first, before worrying about specific target areas.  I like to make overall tonal adjustments first.  If I clean up dust, rips, and creases first, I run the high risk of those imperfections reappearing later when I adjust tone and contrast to the entire image.

    Step 1.  Open the image in Photoshop and assess the damage.

    Open the image in Photoshop and assess the damage.

    STEP 2 – LEVELS & CURVES

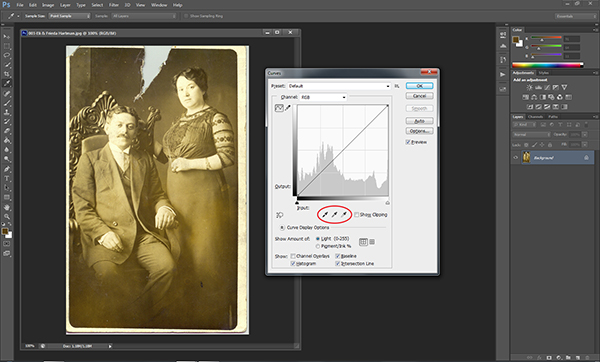
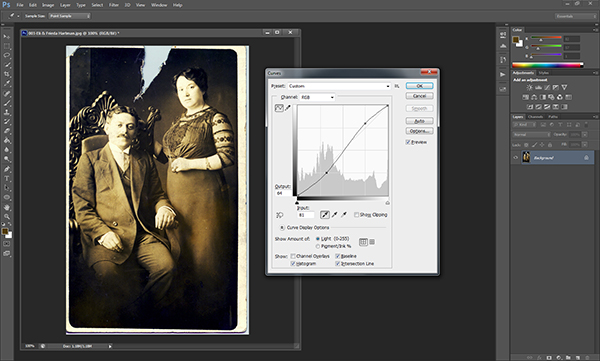
    As with almost everything in Photoshop, there are so many ways of doing just about everything.  When I first started doing this kind of work I used the Levels adjustment.  I prefer using the Curves adjustment, though, because it lets me set the levels and adjust the contrast from within the same dialog.  By using the droppers below the graph, you can do a quick Levels adjustment, bringing the tone of the image back under control.  Using the black dropper, I click on what I see as one of the darkest points in the image.  You’ll see an immediate improvement in the overall appearance of the photo.  For purposes of fixing this photo, I don’t need the white or gray droppers.   Once I’ve adjusted the levels by setting the black point, I tweak the contrast of the entire image by creating a slight “S” curve.  Don’t panic if you push the adjustment too far.  You can turn the “Cancel” button into a “Reset” button in any Photoshop dialog box by holding down the ALT/OPTION key.

    Select the black dropper on the left and click on the darkest part of the image to adjust the levels.

    Select the black dropper on the left and click on the darkest part of the image to adjust the levels.

    Adding a slight “S” curve will add some needed contrast.

    STEP 3 – TACKLE THE DETAILS

    As far as global adjustments go, this particular image really only needed a small levels and curves adjustment.  Once that’s been addressed, we can zoom in on the image and start addressing the details.  For this photo, the next step is dealing with that big tear at the top.  For this part of the repair I’m relying on the Clone Stamp tool (keyboard shortcut: S).  Be sure to zoom in kind of tight to make sure you have a good view of the area.  You’ll be using the tool to sample similar nearby pixels to copy and fill in the damaged area.  Start with the edges and work your way in towards the middle and then up towards the top.  Be sure to change your sample area as you cover more of the tear in order to ensure that the tones and shading are consistent.  Don’t worry about keeping a straight edge at the top of the photo.  We’ll be cropping that out later.

    006-Repair Rip1007-Repair Rip2

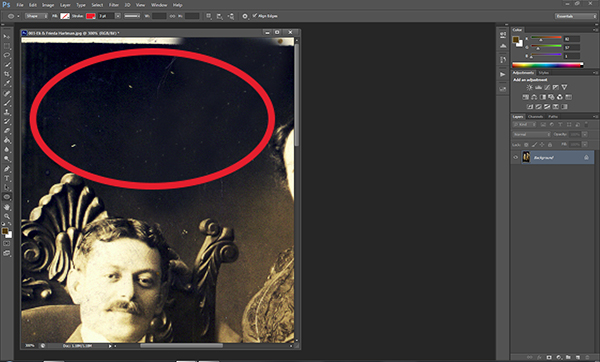
    Now it’s time to zoom in really tight and deal with small things like dust, scratches, stains, and creases.  In earlier versions of Photoshop, the best tool for this part of the job was the Clone Stamp, and in some situations that might still be your best bet.  Ever since the introduction of the Spot Healing Brush, however, cleaning up dust and scratches has never been easier.  The spot healing brush reads the surrounding pixels and uses that information to cover up and repair minor damage.  As with all detail adjustments, be sure to zoom in pretty tight.  This will let you make the repair with fewer and– more importantly– less noticeable clicks.

    Use the zoom tool to make sure you get rid of the small imperfections.

    Use the zoom tool to make sure you catch all of the small imperfections.

    010-Dust Cleanup

    STEP 4 – CROP FOR A CLEAN EDGE

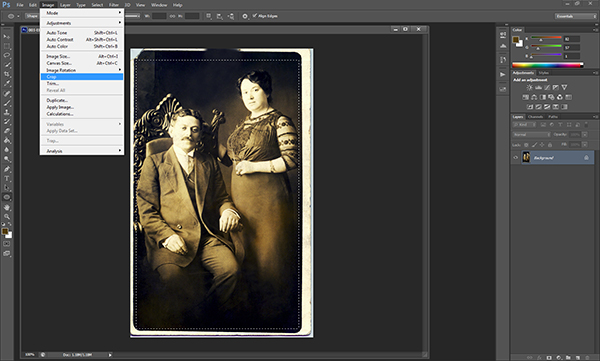
    Once we’ve addressed the damage we’ll zoom back out and use the Marquee tool to crop out the extraneous edges of the original scanned photo, creating new, clean edges.

    013-Crop Image

    STEP 5 – ADMIRE YOUR RESULTS

    Rescuing a memory is always gratifying.  I never knew the people in this photo, but I know that without them I wouldn’t be here.  That alone makes the time spent restoring this photo well worth it.  With a little practice, edits like this will become a streamlined process.  Don’t be afraid to try it.

    015-Before & Aftercopy

    Post originally from: Digital Photography Tips.

    Check out our more Photography Tips at Photography Tips for Beginners, Portrait Photography Tips and Wedding Photography Tips.

    How to Restore Old, Damaged Photos


    Digital Photography School

  • Basic Skin Smoothing in Photoshop

    I’ve always said that the best Photoshop is the Photoshop you never even notice.  I encourage my students to get it right in the camera, because my belief is that imaging software is a tool, not a crutch.  To quote commercial/portrait photographer Zack Arias, “If you find yourself saying, ‘I’ll just fix that later in Photoshop,’ stop what you’re doing and slap yourself as hard as you can.”  When people look at my portraits, I want them to see the personality.  I want them to see the emotion.  I want them to remember a moment in time.  What I don’t want is for them to look at my work and say, “Wow, great editing!”

    In a perfect world, the photo shoot goes flawlessly.  The photos are creatively lit and bring out my subject’s personality.  It’s an intersection where subject and photographer come together in a collaborative effort that creates images needing almost no post production.

    But since I don’t live or work in anything even remotely resembling a perfect world, Photoshop has become a necessary tool in the arsenal.  A levels adjustment to tweak the blacks.  Maybe a curves layer to bump the contrast.  I try to keep it subtle.  If you are shooting landscapes, it’s easy to let the artist run amok with color and special effects.  HDR?  Sure, go for it!  As a portrait photographer, though, you have to be very careful about not taking the editing and manipulation too far.

    What do I mean by “too far?”  Have you ever seen a post-processed portrait where the whites of the eyes are so white that the subject looks like something out of a sci-fi movie?  What about skin so smooth it looks like plastic, totally devoid of any texture?  Any edit that pushes the bounds of reality is– in my opinion– “too far.”  I know there are people who disagree,  but my philosophy is this: whether you are coming to me for wedding/engagement photos, press photos for your band, or a head shot for the dust jacket of your latest book, we are coming together to make a portrait– not a semblance of a portrait.

    Like I noted earlier, if I’ve done things properly, my portraits shouldn’t need much processing once they come off the camera.  Usually cropping/sizing.  Maybe a contrast tweak.  And maybe just a little attention to the skin.  But skin has texture.  It has pores.  It can be tricky, so here’s how I handle it.

    This is a very old test shot from just before I went professional ten years ago.  Not exactly my finest hour– the pose is a bit awkward, there are multiple hot spots, the background is a mess– I could pick this photo apart for hours.  It is, however, a great image for demonstrating a skin smoothing technique.   There are a lot of different ways of doing this.  I’m not going to tell you that my way is best, but I am going to  tell you that my way is best for me.  It’s a pretty basic, straightforward approach, so it might end up being best for you, too.

    First, let’s open up our image in Photoshop.  I’m doing this in Photoshop CS6 (No Cloud yet for me!), but I’ve been using this method for years, so you should be fine, regardless of which version you are using.   Step One is zooming in on our target areas.  Any adjustments you make in Photoshop will be less noticeable if you work on an enlarged view.  You’ll be making smaller, more direct adjustments, and you’ll have a better idea of when to stop.
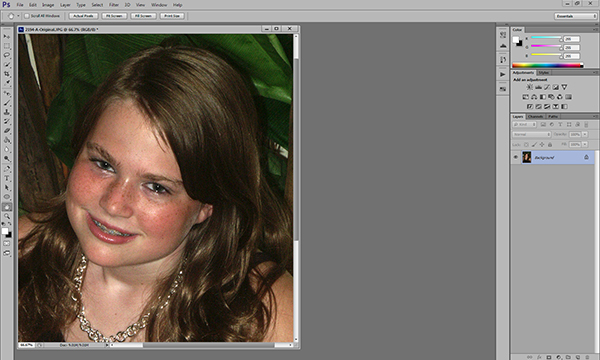
    Zooming in lets you make more direct, subtle changes.

    Zooming in lets you make more direct, subtle changes.

    Once we’ve zoomed in on our target areas, we duplicate the layer and add a 20-pixel Gaussian blur in the Filters menu.  You’ll immediately see the entire image go very soft.  In the Layers palette, reduce the opacity of the layer to 50%.
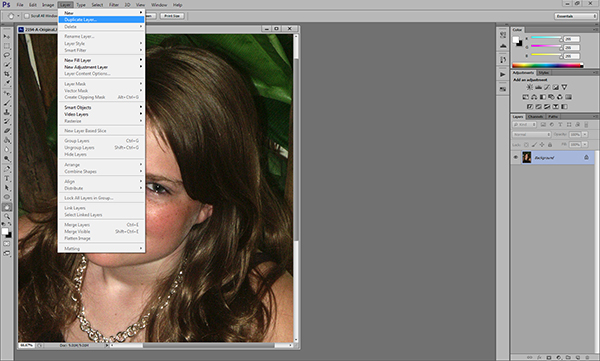
    Duplicate the background layer in the Layers Menu.
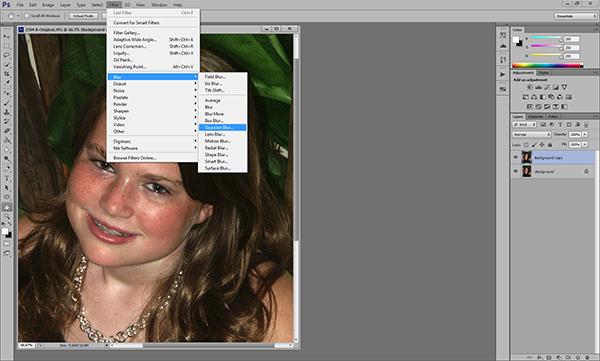
    Duplicate the background layer in the Layers Menu.

    Add a Gaussian Blur.

    Add a Gaussian Blur…

    ...and adjust it to 20 pixels.

    …and adjust it to 20 pixels.

    Next we are going to add a layer mask.  Don’t be intimidated.  The only thing a layer mask does is either hide or reveal the effects of the layers below it.  More on that in a little bit.  We are going to add the layer mask by holding down the ALT/OPTION key and clicking the Add Layer Mask icon at the bottom of the Layers palette.  You’ll see your image go back to its pre-blur appearance and a small black box will appear next to the layer thumbnail.
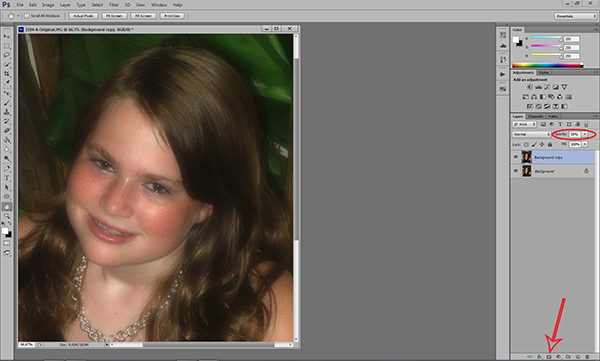
    Reduce the opacity of the layer to 50% and add a layer mask.

    Reduce the opacity of the layer to 50% and add a layer mask.

    Next, select the brush tool.  You can use the bracket keys to adjust the size of the brush.  Pressing the SHIFT key while using the bracket keys will adjust the hardness/softness of the brush.  You’ll definitely want a brush with softer edges.  This will allow your facial edits to blend for a more natural look.  Hard brush edges will stand out.
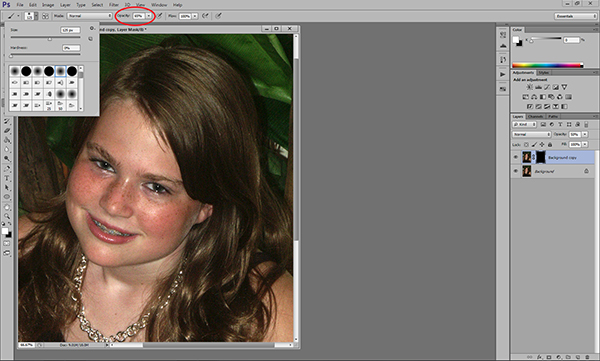
    Select a soft, white brush and adjust the size.

    Select a soft, white brush and adjust the size and opacity.

    Make sure you are using a white brush.  The opacity of the brush will dictate the overall affect.  The closer you are to 100%, the closer you will be to the original Gaussian blur and we don’t want that.  I generally work with an opacity between 50%-70%.  I usually work at the higher end on female portraits and the lower end on males.  Experimenting with various opacities will show you how they affect the overall look of your image.  If you think you’ve chosen the wrong opacity, simply switch the brush color to black and go back over what you’ve done.  This will replace the part of the layer mask you’ve just removed.  Then readjust your opacity, switch the brush color back to white, and continue with your edits.

    Before we go any farther, let’s take a look at what exactly is happening.  When we duplicated the layer and added the blur, creating the black layer mask only covered the blur– it didn’t remove it.  By using a white brush on the black layer mask we are removing parts of the mask, revealing the blur underneath only where we need it.  You’ll notice these areas appearing on the layer mask thumbnail.
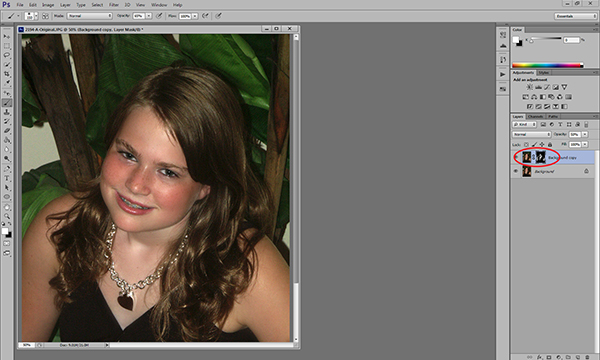
    You'll see the effects of your brush strokes on the layer mask.

    You’ll see the effects of your brush strokes on the layer mask.

    Be careful to not brush over features like eyes and lips.  In a good portrait, facial features– the eyes particularly– should be sharp.  You do need to make sure, however, that you are consistent in your edits.  For instance, if I’ve smoothed the forehead and cheeks, chances are that the neck and shoulders are going to need some attention, too.  One sure-fire way to bring attention to your edits is to be inconsistent.  You don’t want some sort of imaginary line between retouched and non-retouched areas drawing attention to them.

    The end result is a subtle, but noticeable change.

    The bottom line is that skin has texture.  If you over-smooth it you will be left with a portrait that draws attention to the edits, rather than the person.  How much is too much is subjective, but keep in mind what I said earlier about going too far.  This is a technique where a little bit can go a long way.  What I really like about it is that it lets you make these edits in a subtle way, leaving you with a natural-looking portrait.

    Post originally from: Digital Photography Tips.

    Check out our more Photography Tips at Photography Tips for Beginners, Portrait Photography Tips and Wedding Photography Tips.

    Basic Skin Smoothing in Photoshop


    Digital Photography School
  • 4 Quick Tips to Notice the Supporting Cast of Your Landscape Scene

    Recently I took a stroll through my photo archives as a way of bench-marking my progress as a photographer and something dawned on me – I’ve begun to overcome a very troublesome disorder for photographers known as Single Subject Blindness.

    Single Subject Blindness

    Have You Ever…

    Come home from photographing something spectacular only to have ever photograph you upload be of that one spectacular subject? I mean there’s nothing wrong with this problem – after all you are still getting a photograph of one spectacular subject, but could you have gotten more? Done something else? Seen the scene differently?

    So when you think back to some of your recent photo adventures – Have you ever photographed a dramatic sunset and walked away with photographs of only the sunset? Have you ever hiked deep into a forest to photograph a waterfall to walk away with only photographs of the waterfall itself? This is what I’m calling single subject blindness and it is something I’d like to mention today and talk about how I avoid it.

    Thin Ice

    There’s Nothing Wrong With Main Characters – But They Aren’t The Full Story

    I do want to mention that there’s nothing wrong with capturing the main characters of your scene, the sunset, the waterfall, the expansive mountain range etc, but I do think that if that’s all you’re photographing when you go out on a shoot you’re missing a big part of the scene around you – the supporting cast!

    I’ve done this myself for many years – I’ll get caught up in a scene and return to my computer to see what I’ve captured only to find every photo looks the same. Lately I’ve begun to catch myself doing it in the field and I’ve found a couple of ways to break the habit.

    It’s not easy though – The thing is just like in the movies, a great book, or a dramatic play the main characters draw your attention, and keep it. The supporting cast is there to move the story along, but not necessarily be the story – however, they can make for very compelling and interesting subjects when isolated and taken separately. So while we can still photograph our main subjects I think it’s also important to find ways to steer our focus from the obvious subjects to those which are more subtle.

    So How Do You Steer Your Focus?

    There’s no denying that it’s hard to ignore the main character of your photo shoot – after all many times it’s the reason where there in the first place. If you want to have a chance to photograph the supporting cast of your scene you have to find the strength to divert your focus, even if only for a moment, from that main event. Here are four quick tips that I use to get myself noticing the smaller details of a scene – if you can think of more tricks leave them in the comments below!

    Supporting Cast

    4 Quick Tips to Notice the Supporting Cast of Your Scene

    1. Step back – It’s no secret that stepping back from you camera from time to time can be a huge benefit in improving your photography. It can help you see the entire scene as a whole, it can help you see different compositions of the subject you’re photograph, and yes it can even allow you to find and isolate the supporting cast of your scene which you might have otherwise missed with your eye glued to the viewfinder. 
    2. Close Your Eyes – Take a minute or two and close your eyes. I love doing this when I’m in the middle of no where, sometimes I’ll even spin myself in a couple circles and really try to disorientate myself (make sure you can find your way home before you try this though). The reason this works is because it causes you to really focus in on your location when you open your eyes to find your bearings. You’ll have a new view of your surroundings and this will help you see something that you didn’t notice before.
    3. Don’t Get Caught Up – I once woke up an hour before dawn in the middle of winter after a snow storm and drove to a frozen lake to photograph sunrise. I took nearly 150 shots during the 45 minutes I was there and ended up with one photograph – the one of the dock above. Of the photographs I took 95% of them looked exactly like the one above. I was cold, tired and very disappointed I didn’t make an effort to photograph other subjects during that shoot, but realized it wasn’t that I didn’t make an effort it was simply that I was caught up in photographing one subject instead of diverting my attention to other smaller details in the scene before me.
    4. Set an Alarm – If you know you’ll have a problem with number three try setting a timer. Allow yourself only a predetermined amount of time to get the shot you want from your main subject, and then once that time is up, spend the rest of your shoot looking for interesting supporting characters. This tip works wonders and it has a two fold effect – one due to the time crunch to capture the shot of your main subject you’ll find yourself working harder to get the shot you want in as short amount of time as possible, two it gets you looking for other interesting details in the scene you’re photographing.

    Have You Ever Been Afflicted With Single Subject Blindness? What have You Done to Fix It?

    I’d love to hear your own take on this and what you’ve done to avoid the problem in the comments below!

    Post originally from: Digital Photography Tips.

    Check out our more Photography Tips at Photography Tips for Beginners, Portrait Photography Tips and Wedding Photography Tips.

    4 Quick Tips to Notice the Supporting Cast of Your Landscape Scene


    Digital Photography School
  • Catch the Moon: 100 Magnificent Moon Photos You Have Never Seen Before

    The moon is at her full, and riding high, Floods the calm fields with light. The airs that hover in the summer sky Are all asleep tonight William C. Bryant Since the beginning of the world the Moon has always attracted humans with its magic light. So many years of history had passed before the first step on the Moon Continue Reading

    The post Catch the Moon: 100 Magnificent Moon Photos You Have Never Seen Before appeared first on Photodoto.


    Photodoto

  • Composition and the Power of Line

    Composition and line

    Lines are all around us in photography. Conscious use of line can add depth or dynamism to your composition. Let me show you what I mean. Take a look at the following image:

    Composition and line

    It’s an okay landscape. l like it, but it’s nothing special. Maybe what it lacks is a sense of depth. Now compare it to this landscape:

    Composition and line

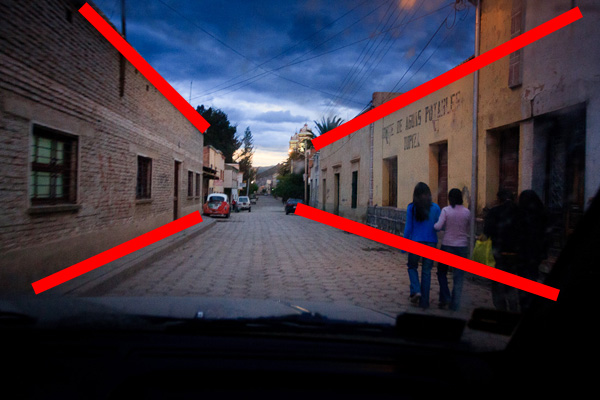
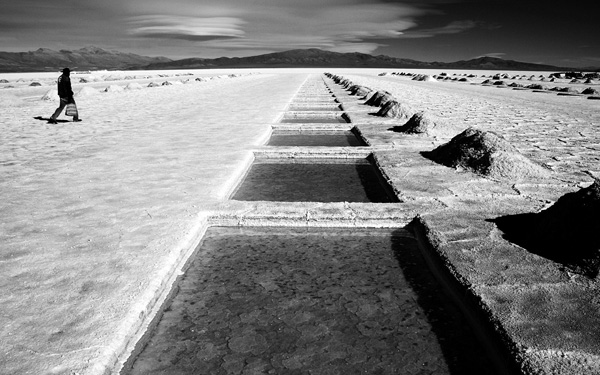
    See how three-dimensional it looks by comparison? The lines in the composition create the illusion of depth. They converge as they disappear into the distance creating a sense of distance and space. I’ve marked the lines so you can see them clearly:

    Composition and line

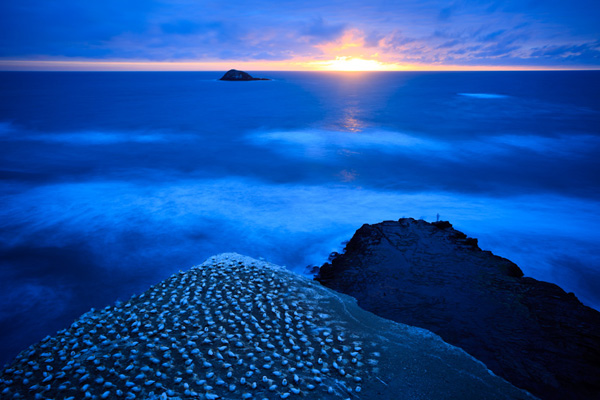
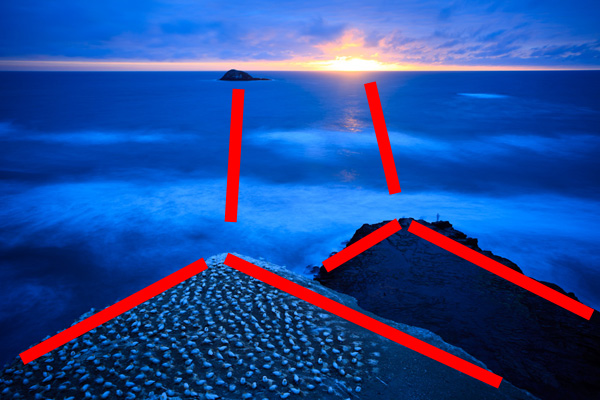
    Not every landscape has lines that are so easy to find. Most of the time they are more subtle. In this landscape, the triangular shapes of the rocks in the foreground are like arrows that point to the island in the distance and the setting sun:

    Composition and line

    It is almost a case of implied line, rather than actual line. The shape of the rocks is a visual clue that directs the eye along invisible lines to the horizon:

    Composition and line

    Let’s look at this image again in a different way. There is a strong horizontal line in the distance created by the horizon. What happens if we crop the image to a panorama? The ‘feel’ of the photo is completely different. Horizontal lines direct the eye from side to side and create a sense of stability and peace. The panoramic crop emphasises that:

    Composition and line

    Composition and line

    Whereas in the original image the implied lines create a sense of motion. The composition is more dynamic. The principles here are:

    • If you want to create a landscape with a peaceful, tranquil feel, then use horizontal lines.
    • If you want to create a more exciting, dynamic landscape then use diagonal lines.
    • In landscape photography, wide-angle lenses emphasise lines that lead from the foreground to the horizon.

    Line outside the landscape

    Line comes into play in subjects other than landscapes. You need to train your eye to look for lines, and then figure out ways to use them in your composition. Remember lines are not just straight. They can be curved, they can even be implied. Here’s a photo I took with a very powerful diagonal line that creates a dynamic, exciting composition:

    Composition and line

    Composition and line

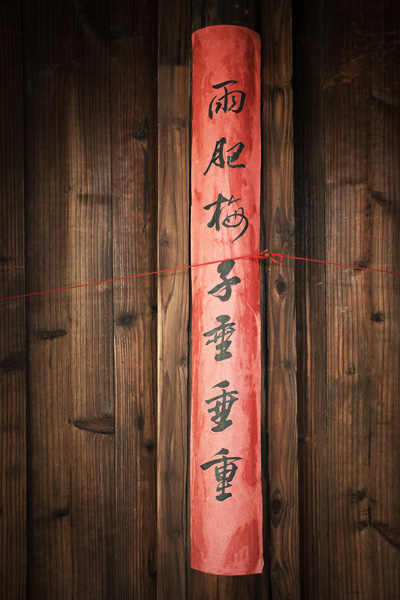
    Next, here’s a photo that uses a strong vertical line. The line created by the shape of the red sign is echoed by the lines in the wooden wall. The red string creates another line that intersects the others. See how the vertical line isn’t nearly as dynamic as the diagonal line in the previous image?

    Composition and line

    Composition and line

    Lines in portraiture

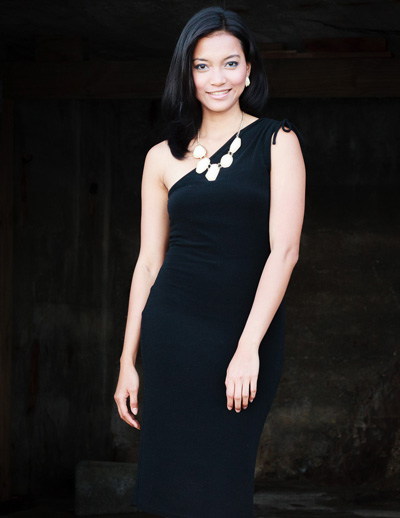
    The most obvious use of line is in landscape photography, but is it useful in portraiture? I think so, although again it’s a case of subtle use of line. In this example, the woman’s arms create lines that lead the eye up through the image to her face:

    Composition and line

    The lines are created by tonal contrast – her arms are a light tone and contrast strongly against her black dress and the dark background:

    Composition and line

    Final thoughts

    Lines are all around us and are a very useful tool that can help you create strongly composed images. One way of making the most out of line is to keep the composition of your images as simple as possible. A busy image has lots going on that may distract the eye from elements such as line. Simplifying the composition makes elements like line stronger and more effective.

    Mastering Photography

    Composition and line

    My latest ebook, Mastering Photography: A Beginner’s Guide to Using Digital Cameras introduces you to digital photography and helps you make the most out of your digital cameras. It covers concepts such as lighting and composition as well as the camera settings you need to master to take photos like the ones in this article.

    Post originally from: Digital Photography Tips.

    Check out our more Photography Tips at Photography Tips for Beginners, Portrait Photography Tips and Wedding Photography Tips.

    Composition and the Power of Line


    Digital Photography School

  • An Introduction to the Inverse Square Law

    I don’t know about you, but I was never much of a math student.  I needed a tutor in high school for both geometry and physics.  I chose a double major in college (Journalism/English) that required no math.  I practiced law for fourteen years, where any math I needed was either pretty easy or done on a calculator.  Even when I ditched my briefcase for a camera bag and embarked on a new career, I felt pretty secure in the knowledge that confusing math had no place in the world of photography.

    And then the Inverse Square Law reared its ugly head.

    It didn’t jump out and attack me right away.  No– the Inverse Square Law is much too cunning for that.  It was patient.  It bided its time.  It waited for me to get comfortable in my new skin a professional photographer.  It waited for me to feel secure in my knowledge and execution of studio lighting and off-camera flash.  And then it showed itself.

    We all deal with light.  It is the defining element of what we do.  We capture light in a box and use it to tell a story.  Some photographers put themselves in the “natural light” category, while others work their magic with a firm grasp of off-camera flash.  While the Inverse Square Law comes into play more often with strobes, it is absolutely a concept that applies to every light source, and therefore affects every photographer.

    So, what is it?  In all of its overly technical glory, the Inverse Square Law– as it applies to photography– is an equation that relates the intensity of a light source to the illumination it produces at any given distance.

    Huh?

    Regardless of how you classify yourself as a photographer, you already know that light travels.  It can be diffused.  It can be reflected.  It can be deflected.  But it travels.  This means that over time and distance its intensity can and will diminish.  What does that mean for your photography?  It means that doubling the flash-to-subject distance reduces the light falling on the subject to one-quarter.  Logically, we might assume that doubling the distance would reduce the power by half.  In actuality, however, doubling the distance reduces the power by 75%  More simply put, the Inverse Square Law is used (among other things) to determine the fall-off– the difference in illumination on a subject as it moves farther away from the light source.

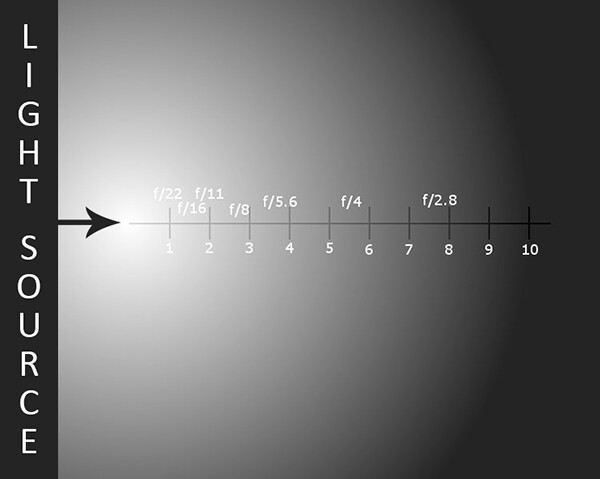
    Let’s take a look at a graphic that will help us get our heads around this.  We are looking at a blank wall approximately ten feet long, illuminated with a single light source.  Meter readings along the wall show the progression of one-stop increments.  Notice how we move one stop from f/22 to f/16 in a matter of inches, yet we move one stop from f/4 to f/2.8 over the course of a few feet.

    The Inverse Square Law relates the intensity of a light source to the illumination it produces at any given distance.

    The Inverse Square Law relates the intensity of a light source to the illumination it produces at any given distance. One-stop increments are spread over a wider area the farther the light travels.

    Now that we understand what the Inverse Square Law is and how it affects the intensity of light, how do we apply it to our photography?  Let’s assume that we are photographing a family of four on our wall.  If we position them closer to the light– let’s say in the f/8 – f//11 range– we are going to have a lot of contrast between the subjects.  Those closer to the light source catch the brunt of the light and may be overexposed, while those further from it could be underexposed.  The variance in the light over such a short distance means the light falling on our subjects will be very uneven.  If, on the other hand, we move our family down the wall to the 7- or 8-feet mark, we have a wider area in which to achieve a more even exposure across the group.

    Remember, though, that the same principles apply not only to our subjects, but to the relationship between the light source and the background as well.  If we are photographing our imaginary family with a plain white wall for a background, simply moving them closer to or farther away from the wall will affect whether the wall appears white, gray, or even black.

    So far, we’ve discussed what the Inverse Square Law is and how it applies to off-camera flash.  But what about natural light?  The same concept applies, whether you are using window light, a reflector, a sunset, or any other non-electrical light source.  The principles of how light travels do not change just because the light in question has no batteries.  Doubling your subject’s distance from the window, for example, is going to result in the same 75% drop in intensity that you will experience with strobes or speedlights.

    So, what’s the bottom line?  The best advice I can give about the Inverse Square Law is to simply be aware of it and understand its potential impact on your photos and lighting setups.  The more you understand light and how it behaves, the better equipped you will be to efficiently compose and create consistent images with less trial and error.


    Post originally from: Digital Photography Tips.

    Check out our more Photography Tips at Photography Tips for Beginners, Portrait Photography Tips and Wedding Photography Tips.

    An Introduction to the Inverse Square Law


    Digital Photography School
  • On Assignment: Saving Florida’s Springs

    On Assignment: Springs Eternal

    We spend a lot of time on f/stops, shutter speeds, lighting ratios and the like around here. But none of these things — none — matters when compared against another variable: What can you actually accomplish with your photography?

    Long-time readers will be familiar with Florida-based nature photographer John Moran from previous article on Strobist. Always an advocate of nature, he has been one of natural Florida's most eloquent voices for conservation. Now he's taking that fight to the next level, aiming his cannons —and his Canons — at one critical target: saving Florida's natural springs.

    What a person with a camera, a few lights and a vision (and a help from his friends) can accomplish, below.

    Read more »
    Strobist

  • Seeing and Street Photography

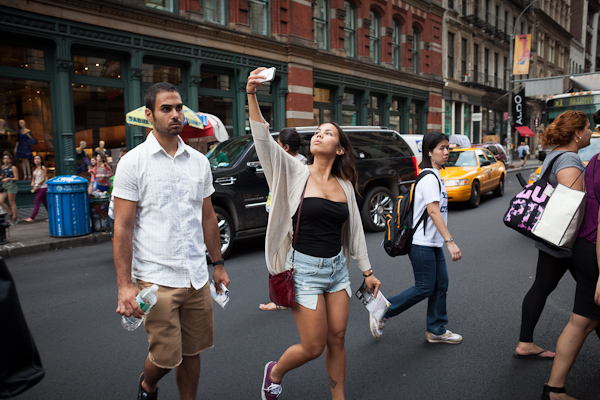
    The Pose of a Generation.

    The Pose of a Generation.

    The next time you are out shooting street photography, try this.  Put your camera down at your side and just look around for awhile.  Watch things happen and let moments develop in front of your eyes.

    It sounds simple but it goes against our natural instincts to throw the camera in front of our face every time we see something remotely interesting.  That is especially true with digital.

    The camera is the tool, but it can get in the way sometimes.

    The camera can be easy to hide behind and it can become a crutch.  It’s so easy to rev the engine and just start clicking away, trying to capture everything.  Meanwhile, in the haste the most important moments go unnoticed.

    Most of the work that goes into capturing a good photo is done before you put the camera to your eye and after you take it away, in editing.  You need to see the photograph or the potential for a photograph with your eyes before you can get to the point of trying to capture it.

    The key is to hold back, slow yourself down and scan the area until you finally see something,  Then you can pounce.  Often, just seeing something isn’t enough and you’ll have to wait for the situation to develop further.

    Always think, can this be better?

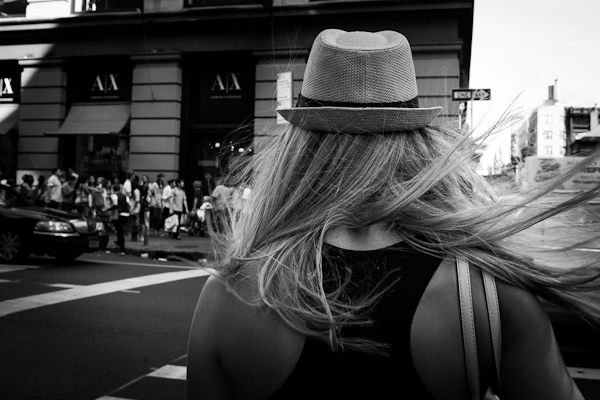
    Gust, SoHo.

    Gust, SoHo.

    It’s better to be proactive instead of reactive.  You need to see the potential for a moment before it occurs.  Of course there will be great images that will suddenly spring out at you and you will have to photograph them as fast as you can, but that’s only a fraction of the time.

    An important tip is to try to notice people from further away, especially in a crowd.  Scan the area and go from person to person.  If you’re only first noticing people as they are 8 or 10 feet away from you, then there’s nothing you can do but react.  Yes, some brilliant photos are created this way, of course, but if you instead focus on the people coming towards you from say 25 feet away, then you’ll have much more of a chance to get in position and capture the moment if it occurs.

    The camera is just a tool to capture what your eye sees.  And the more your eye is able to see without the camera, the better your photographs will be.

    Post originally from: Digital Photography Tips.

    Check out our more Photography Tips at Photography Tips for Beginners, Portrait Photography Tips and Wedding Photography Tips.

    Seeing and Street Photography


    Digital Photography School