Category: Photography

  • Natural Light Portraits: Made In The Shade

    One of the easiest ways to start shooting portraits is to use natural light.  There’s no added expense of buying speedlites or strobes, or even continuous lighting. You don’t have to decide where to put the lights, because let’s face it, nature has decided for you.  There are still challenges however, and those challenges must be overcome to successfully pull off a natural light portrait.  One of the biggest challenges is what to do when the natural light just is not pleasing.  Maybe it’s midday sun and the light is too harsh, or maybe it’s later in the day and direct sun is shining right in your subject’s eyes. In my post “Sun Too Harsh? Modify it!”, I discussed ways to use reflectors and scrims to modify natural light to get a more pleasing look.

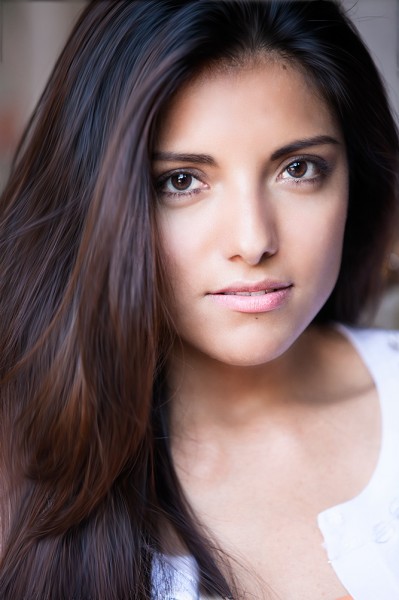
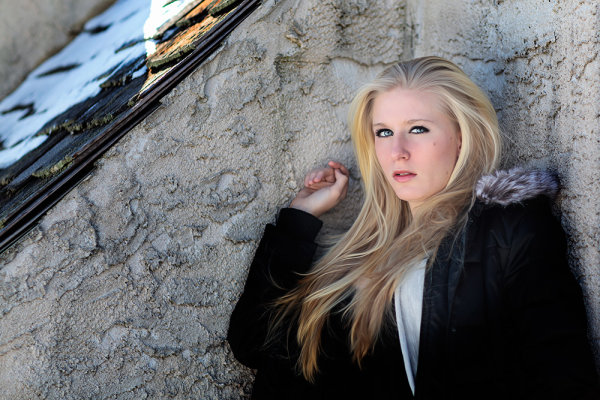
    This image was taken on a bright sunny winter day, with snow on the ground. I didn't have a reflector- the snow helped with that thankfully.  But the sun was too harsh to put her directly in it.  The solution was to go behind one of the nearby buildings and use that softer light to illuminate her face. EOS 5D Mark II, Ef 85mm f/1.2L II. 1/2000 at f/2.2, ISO 160.

    This image was taken on a bright sunny winter day, with snow on the ground. I didn’t have a reflector- the snow helped with that thankfully. But the sun was too harsh to put her directly in it. The solution was to go behind one of the nearby buildings and use that softer light to illuminate her face. EOS 5D Mark II, Ef 85mm f/1.2L II. 1/2000 at f/2.2, ISO 160.

    But what happens if you don’t have a reflector or a scrim? Well then you have it made in the shade! Find some shade, and you’ll find some soft, indirect lighting that can help you create beautiful portraits.   Look for a large tree with overhanging branches. Or a doorway. Or an overpass of some kind.  Anything that gets you out of direct sun, and into indirect light. It does you no good if there’s no light getting to your subject, but once you find a place with indirect lighting, you’re all set.

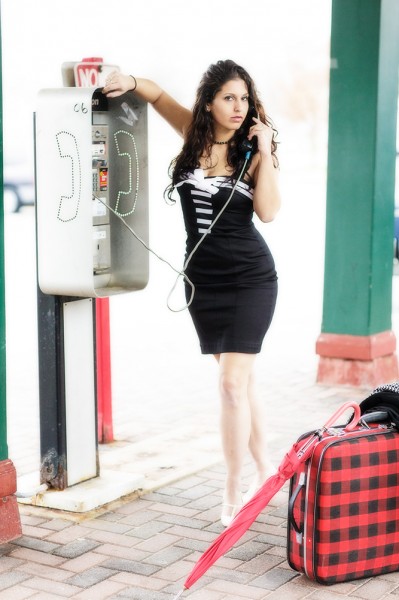
    Here, the subject was positioned under the overhang of a train station.  Because it was an open overhang, the background is lit brightly, creating more depth. EOS-1D X, EF 85mm f/1.2L II. 1/1000, f/2.8 at ISO 640.

    Here, the subject was positioned under the overhang of a train station. Because it was an open overhang, the background is lit brightly, creating more depth. EOS-1D X, EF 85mm f/1.2L II. 1/1000, f/2.8 at ISO 640.

    The light will be soft and even- and very pleasing.  The background will likely go a little darker depending on where you found your shade, be it under a tree, where it might be brighter, or in a doorway or behind a building. Look around, see what you can make happen. And just because your subject is facing out towards the light, doesn’t mean you need to be.  Walk around your subject- get that soft light hitting from the side, as well as the front. Just keep your subject positioned so the light is hitting the mask of the face, including the eyes. Just because the light is not pleasing doesn’t mean all is lost. Sometimes, all you need to do is find some shade.

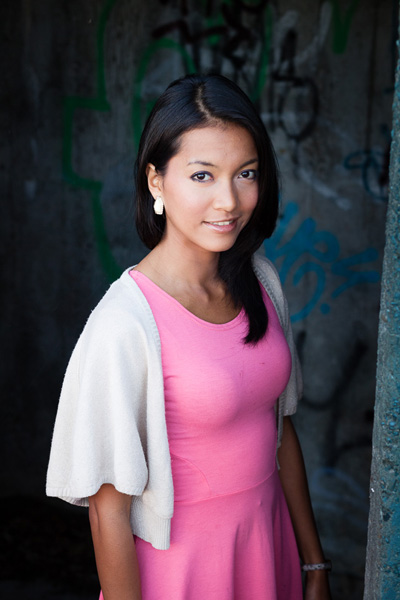
    This shot was taken in Central Park in New York City, near Strawberry Fields.  There is a walking path that goes under a large footbridge, creating a tunnel. The day was a typical summer day, bright and hot. The sun was far too harsh. We moved to the opening of the tunnel and I let the light wash in on her face.  I turned her slightly so the light came from the side a bit, creating some shadow on the left side of her face. EOS 5D Mark II, EF 70-200 f/2.8L IS II. ISO 800, 1/250, f/2.8.

    This shot was taken in Central Park in New York City, near Strawberry Fields. There is a walking path that goes under a large footbridge, creating a tunnel. The day was a typical summer day, bright and hot. The sun was far too harsh. We moved to the opening of the tunnel and I let the light wash in on her face. I turned her slightly so the light came from the side a bit, creating some shadow on the left side of her face. EOS 5D Mark II, EF 70-200 f/2.8L IS II. ISO 800, 1/250, f/2.8.

    Post originally from: Digital Photography Tips.

    Check out our more Photography Tips at Photography Tips for Beginners, Portrait Photography Tips and Wedding Photography Tips.

    Natural Light Portraits: Made In The Shade


    Digital Photography School

  • Q&A: China Answers!

    Upon reading the post earlier this week asking for a male-male hot-shoe-to-mini coiled sync cord, reader Shirley Lu, of Guangzhou, China noted in the comments:

    If this cable is 10 meters, maybe it will have a delay on signal transfer. And other point is the cost of a 10-meter cable is much higher than a set wireless triggers.

    Great question (er, comment), Shirley. I am so glad you posted it. And especially so, considering a quick look at your screen name shows you work at Pixel Enterprises, a Chinese lighting gear manufacturer. (Welcome!) My answers are below.

    Read more »
    Strobist

  • How to Photograph Mixed Skin Tones

    by Elena Wilkins

    If you ever had my family as your clients, you could feel a tad lost at how to photograph us. Why? Well, there are three of us, and we come in a wide range of skin tones—from my fairly light skin, to my husband’s, pretty dark and handsome; our child fits right in between. We are a true colored family—a perfect fusion of all tones—a photographer’s conundrum, or, maybe even, a nightmare!

    Who do you expose for? The mom? The child? Or the father? All three of us would need different camera settings… or a few tricks to make magic happen.

    Because very few photographers get enough experience to properly shoot families like mine, or people of darker color in general, and even fewer know to properly process such images to perfection, we always find it hard to find the “perfect” photographer for us. I remember the first time I organized a multi-photographer photo shoot in the Northwest (Washington State), and brought my husband to it—he was everyone’s favorite model to practice on, since he happened to be the very first person of darker hue for most of the photographers at the event. Since I am the photographer and often the subject in our family images, I have been able to perfect these skills.

    In this post I will share a few of my tricks, which helped me successfully satisfy not only my picky taste, but many of my darker complexion clients, as well as families, much like mine, with mixed skin tones.

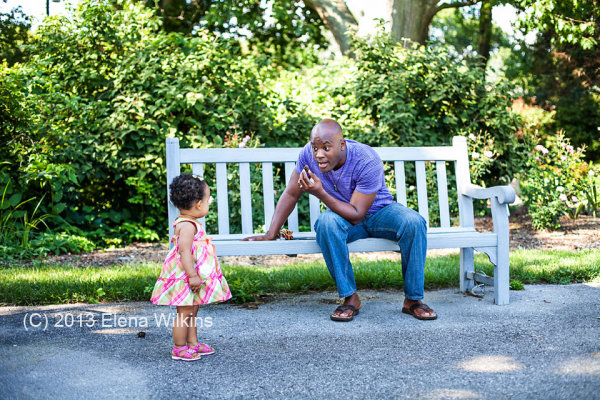
    But first, meet my colorful family.

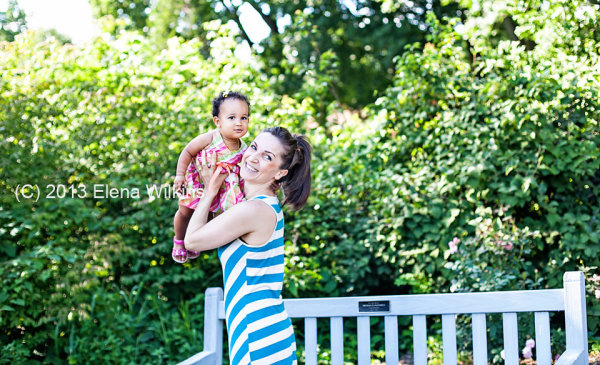
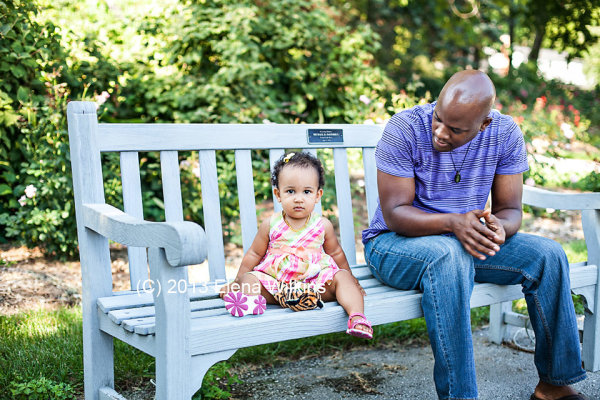
    My perfect child. It is the mother’s right to think that her child is the cutest and most perfect :) .

    How-to-Photograph-Mixed-Skin-Tones-5

    The beautiful duo—both loves of my life.
    How-to-Photograph-Mixed-Skin-Tones-4

    How-to-Photograph-Mixed-Skin-Tones-3

    Things to keep in mind for this post:

    1. as a photographer, I use only natural light—I shoot almost exclusively outside, on location, and barely ever use fill flash, even with darker skin people;
    2. studio techniques for photographing people of color or mixed skin tones might be slightly different—I will not be covering them in this post;
    3. I do not use reflectors, since I shoot solo, but they might be helpful, if you have an assistant;
    4. I shoot RAW, so that I could easily adjust highlights and shadows in post processing;
    5. when I refer to people of color, I mean ALL people, since all of us are of some color :) ,
    6. I live by a motto: get images right in the camera as much as possible to cut down on post processing time—I usually spend no more than 30-60 seconds per image in post processing.

    5 Tips and Tricks to Photograph People of Color

    1. It’s all about clothing

    If at all possible, I ask my dark skin complexion clients not to wear white clothing. It makes life easier. In cases of wedding, as you can imagine, this is not an option. Sometimes I do have clients who want to be wearing white clothing specifically—I never say no! I will discuss how to make those images magical in post processing shortly.

    During my initial consultation with clients, we discuss best clothing options for the shoot, depending on the look we want to achieve and the mood they want to create. Often my clients come with a few sets of clothing to the shoot and a wide range of jewelry (for the ladies, and I help them coordinate to create the best, and the most magical images.
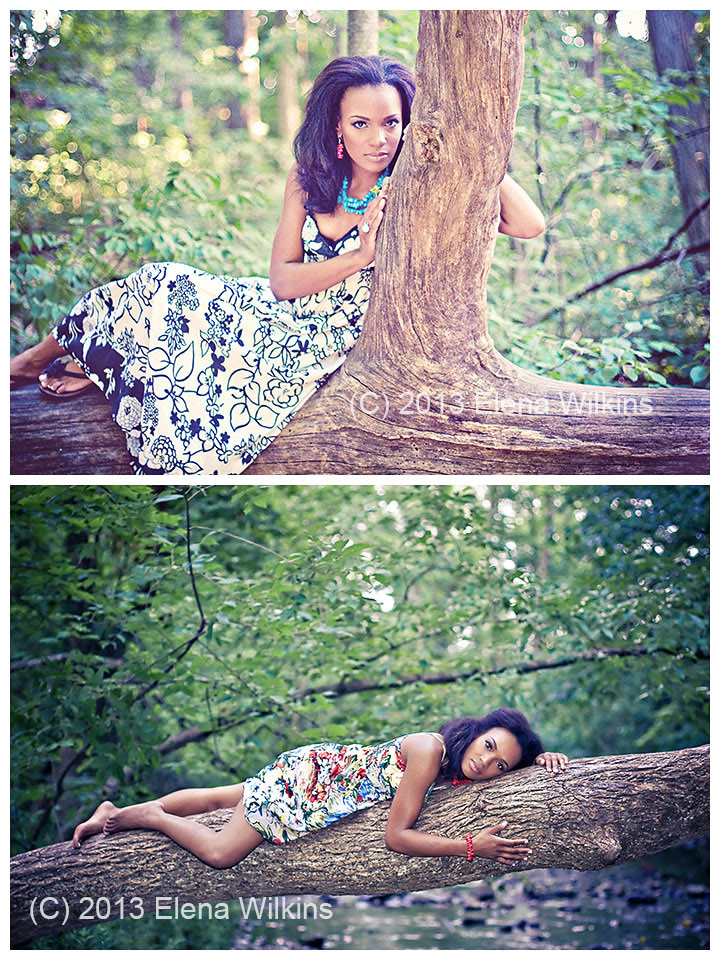
    I coordinated every piece of clothing and accessories for this shoot, at my client’s request

    I coordinated every piece of clothing and accessories for this shoot, at my client’s request

    2. Away from Bright Lights

    I love to shoot either early in the morning or in the evening, when the sun goes down, lavishing its golden rays to create perfect magic. In cases, especially with weddings, if that is not an option, and I have to shoot in the afternoon sun, I look for evenly shaded areas, so there is no competition between the natural light and my subjects’ skin. If all else fails, I do use fill flash.
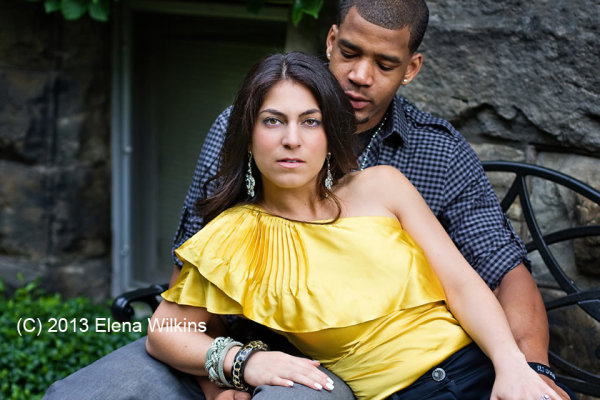
    This image was shot in an evenly shaded area, away from harsh light. I exposed for Francesca’s face.

    This image was shot in an evenly shaded area, away from harsh light. I exposed for Francesca’s face.

    3. Expose for the Skin

    When shooting a darker skin complexion person, expose for the face. Get the face right, and the rest of the image will fall into place.

    If she is wearing complimentary colored clothing, concentrate on getting perfect skin tone, so you won’t need to spend too much time in post processing, and also have something to show your client during the shoot to inspire her with her beauty.
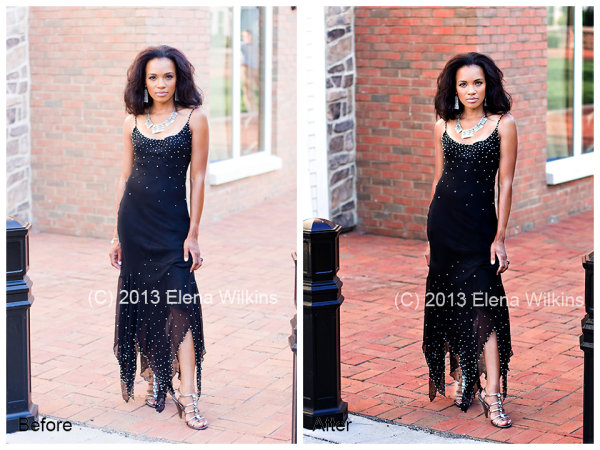
    Courtnee’s face was my focus; the brick, as gorgeous as it is, was easily darkened back to its beauty in post processing with a quick action and a few brush strokes

    Courtnee’s face was my focus; the brick, as gorgeous as it is, was easily darkened back to its beauty in post processing with a quick action and a few brush strokes

    4. Balancing Whites and Darker Skin Tones

    If your clients are wearing light clothing, especially true with weddings, make sure not to blow out highlights, so you can adjust it in post processing. This is why I shoot RAW, without exception, when it comes to weddings. I want to make sure I still can tone down my whites in post processing.
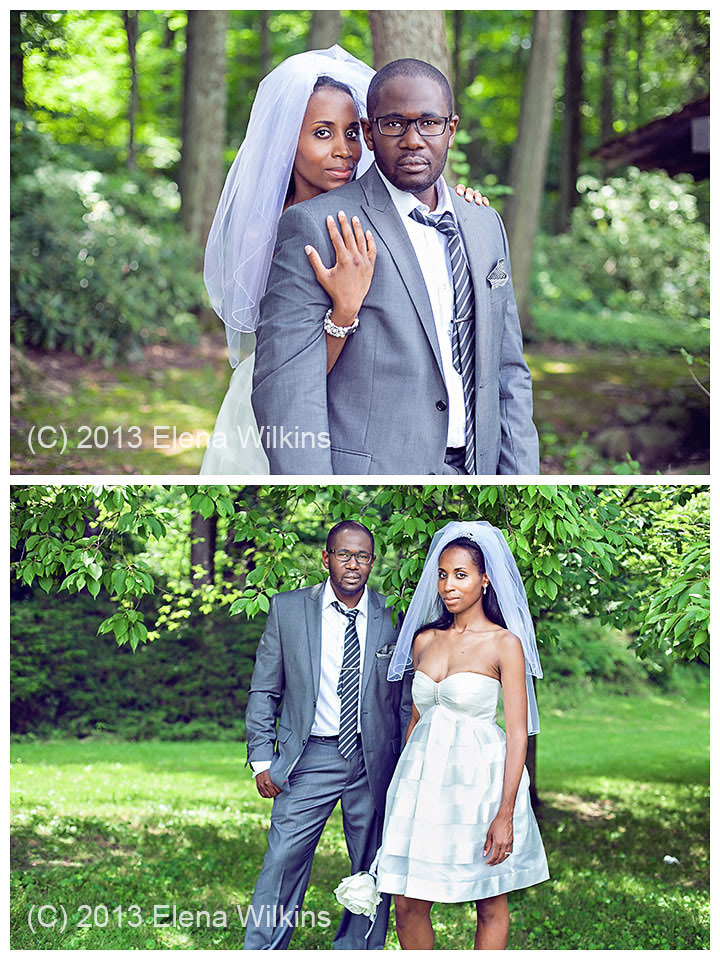
    In these images I focused on my clients’ faces, making sure not to blow out whites, so I would still get detail in the dress, the shirt and the veil in post processing. In post processing, I used Bridge/Camera Raw, I brought down highlights and whites, bumped shadows, and then finished magic in Photoshop, selectively processing areas of the images that needed extra attention.
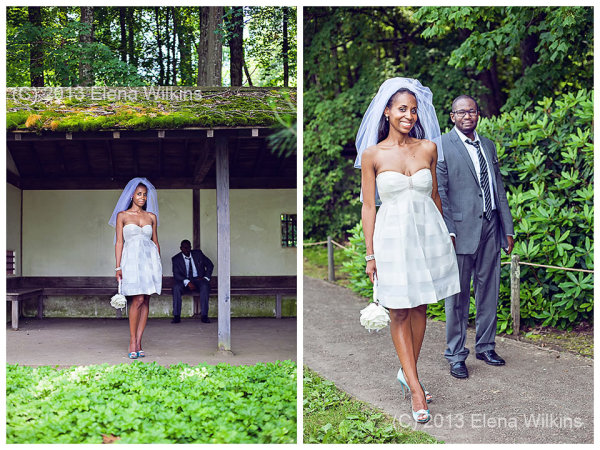
    In these images I focused on my clients’ faces, making sure not to blow out whites, so I would still get detail in the dress, the shirt and the veil in post processing. In post processing, I used Bridge/Camera Raw, I brought down highlights and whites, bumped shadows, and then finished magic in Photoshop, selectively processing areas of the images that needed extra attention.

    In these images I exposed for Candice, since she was the focal point of the images, and ensured that whites were not blown out, so they could be fixed, if needed, in post processing

    In these images I exposed for Candice, since she was the focal point of the images, and ensured that whites were not blown out, so they could be fixed, if needed, in post processing

    In this image of my little girl, she was facing away from direct light, I made sure to get her face just right, in camera, which left some of the highlights in her dress just a tad too bright. Not to worry! I was able to fix that in post processing, in less than 20 seconds!
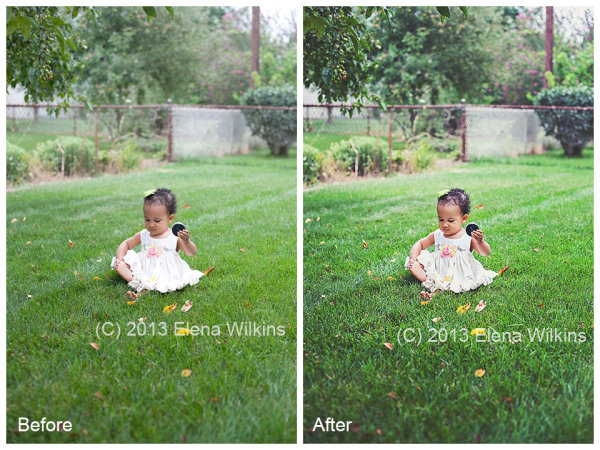
    In this shot, since she was facing direct light, I made sure not to blow out highlights, so, her face turned out a tad darker, but the dress was not blown out. In post processing I lightened the face and darkened the dress. The image turned out magical, although she might not have been too happy to be interrupted for the image during her playtime.
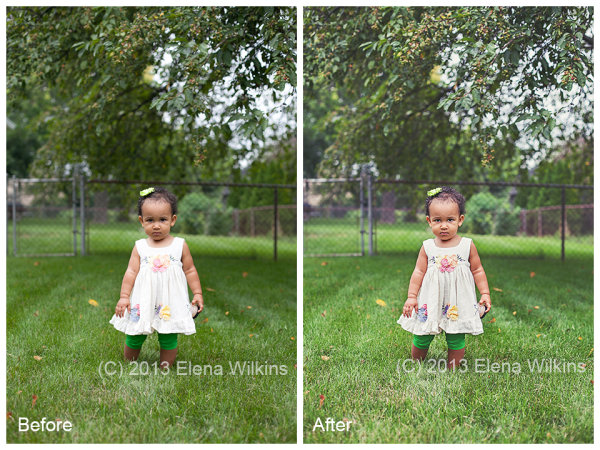
    In this shot, since she was facing direct light, I made sure not to blow out highlights, so, her face turned out a tad darker, but the dress was not blown out. In post processing I lightened the face and darkened the dress. The image turned out magical, although she might not have been too happy to be interrupted for the image during her playtime.

    I will mention actions used in processing these two image at the end of the post

    I will mention actions used in processing these two image at the end of the post

    5. Go for the Mid-Range: Photographing Mixed Skin Tones in the Same Image

    If you are photographing people of different skin tones in the same image, go for the mid-range; the rest can be adjusted in post-processing. I always make sure that the lightest person is not too light, while the darkest person is not too dark. If the lightest person turns out too light, you might have a case of blown highlights, and no Photoshop tricks will fix that. If the darkest person turns out too dark and you will try to adjust it in post processing, there might be too much digital noise on that person’s face, compared to the rest of the image.
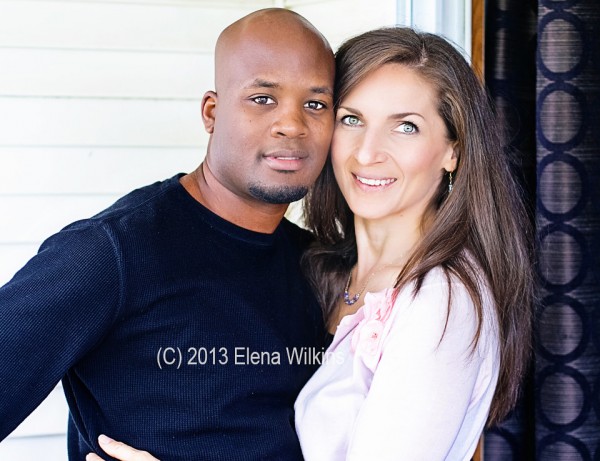
    When I photograph my husband and myself, I usually take a couple of test shots to make sure I do now pale completely next to him. Having over ten years of experience, however, these days I normally do a quick test shot with just him in it, since I know how I would look next to him.

    When I photograph my husband and myself, I usually take a couple of test shots to make sure I do now pale completely next to him. Having over ten years of experience, however, these days I normally do a quick test shot with just him in it, since I know how I would look next to him.

    Magic Happens in Post Processing

    How to Post Process Images with Mixed Skin Tones

    While batch processing is the best thing since sliced bread, as you can imagine it is not always possible in situations such as I just described. Batch post-processing can be done only to a point—you could not just throw all images of clients with mixed skin tones into Lightroom and have magic happen. Some selective image post-processing (processing only parts of the images) will need to be done.

    Most of us are visual people, so instead of trying to explain something with a thousand words, I created a ten minute video to show you how I photograph and post-process images of clients with mixed skin tones to perfection.

    How to Photograph Mixed Skin Tones from Elena Wilkins on Vimeo.

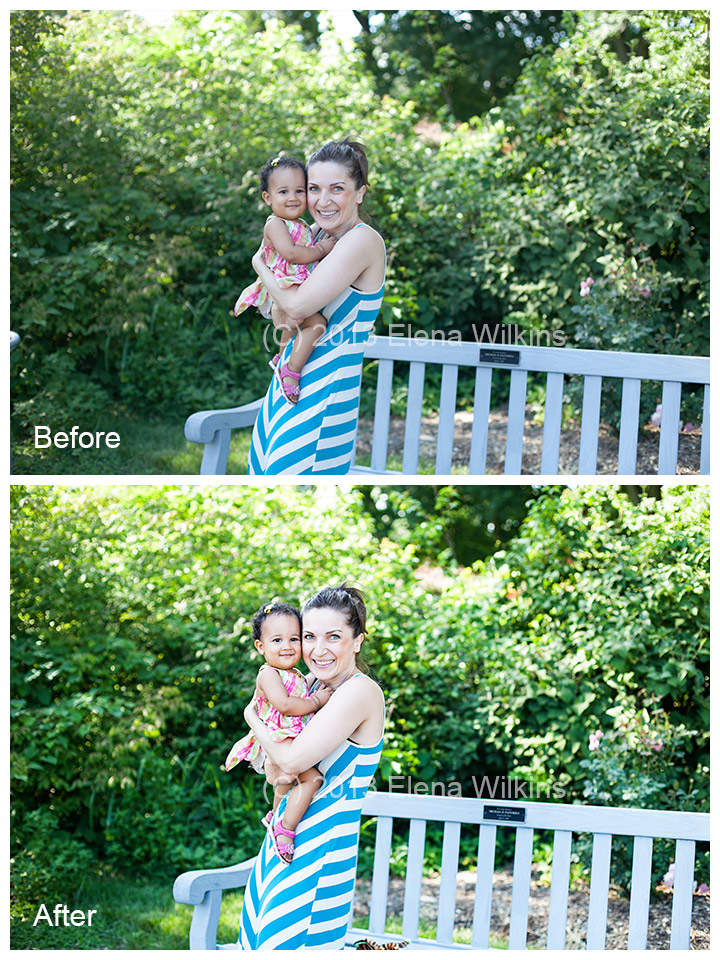
    Here are the images used in the video, and, as promised, a list of actions I used in post-processing.
    How-to-Photograph-Mixed-Skin-Tones-2

    Actions used:

    • Boost action from Pioneer Woman Set 1 (used to boost tones for the entire image)
    • Touch of Light | Touch of Darkness by MCP Actions (used selectively)
    • MCP High Definition Sharpening action by MCP Actions (used for the entire image)
    • Polished Picture Sparkling Eyes by Polished Picture (used to sharpen eyes only)
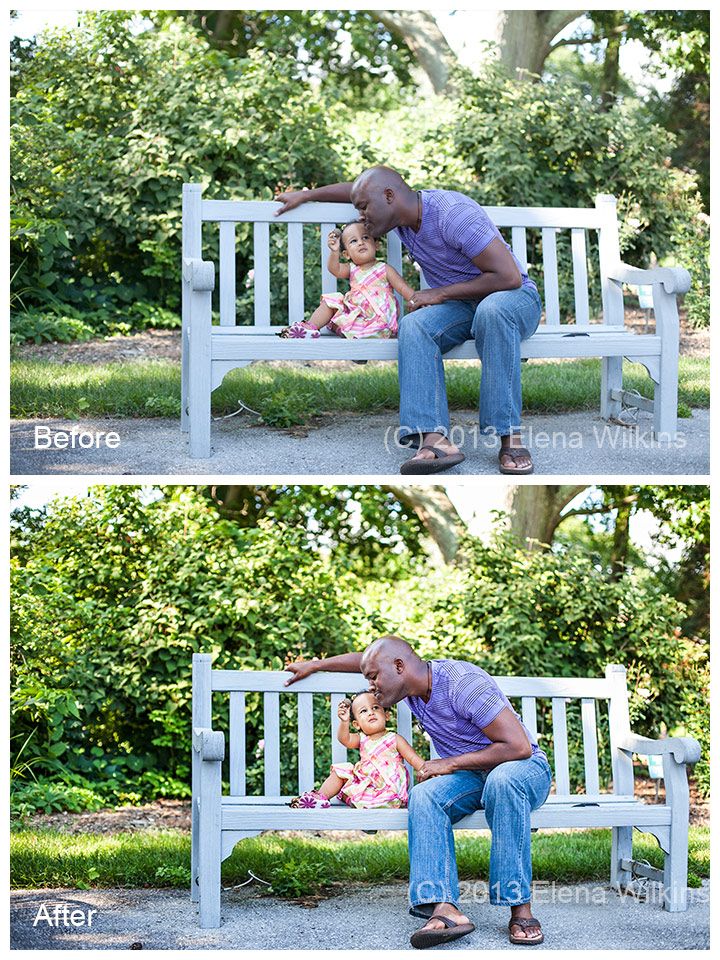
    same set of actions used to process this image

    same set of actions used to process this image

    In the two images of my little girl, after adjusting them in Bridge/Camera Raw (I decreased highlights to -82, bumped up shadows by +50 and added contrast at +24), I used the same actions as in these images, with an addition of:

    • Polished Pictures Funky Curves (Ruby curve at 40% and Matte curve at 25%, I then painted back her face at 60%).

    I hope that having read this post you will feel more equipped to photograph people of color and know how you can create magic in post-processing.

    Happy Shooting!

    Elena Wilkins is a lifestyle and wedding photographer. Since becoming a Mom, she took a break from full-time photography, concentrating on raising her baby and running a health and nutrition blog Vegalicious, which is filled with images of delicious foods and her colorful family. She still photographs occasional weddings and sessions, dedicating herself to serving people who need her expertise the most—people of color and families with mixed skin tones. She is getting ready to relaunch her photography web-site, Color Fusions, which she will dedicate to sharing tips and tricks of the trade, and serving her colorful clients.

    Post originally from: Digital Photography Tips.

    Check out our more Photography Tips at Photography Tips for Beginners, Portrait Photography Tips and Wedding Photography Tips.

    How to Photograph Mixed Skin Tones


    Digital Photography School
  • DEAL: 30% Off Phil Steele’s Photoshop Basics Online Course

    NewImageOver on our sister site – SnapnDeals – we have a great offer running right now – it gets you 30% off Phil Steele’s Photoshop Basics for Photographers course.
    Many of your have taken Phil’s other courses and will be familiar with his helpful videos so will know that he always delivers great training for photographers.

    Over 13 easy to understand modules this course will teach you how to take your photos to the next level with some simple post production techniques in Photoshop.

    Normally the course is $ 47 but with this Snapn’ Deal it is just $ 33.

    Check out full details of what’s included here.

    PS: if you’re interested in weekly promotions like this just add your email address to the field below and we’ll send you a weekly update of all new deals.

    It’s free, we don’t share your details with anyone and you’re welcome to unsubscribe any time if you don’t find the deals to be for you.

    Post originally from: Digital Photography Tips.

    Check out our more Photography Tips at Photography Tips for Beginners, Portrait Photography Tips and Wedding Photography Tips.

    DEAL: 30% Off Phil Steele’s Photoshop Basics Online Course


    Digital Photography School

  • Samurai Girl Composite: Behind the Scenes Post Production Walk Through

    by Tom Di Maggio

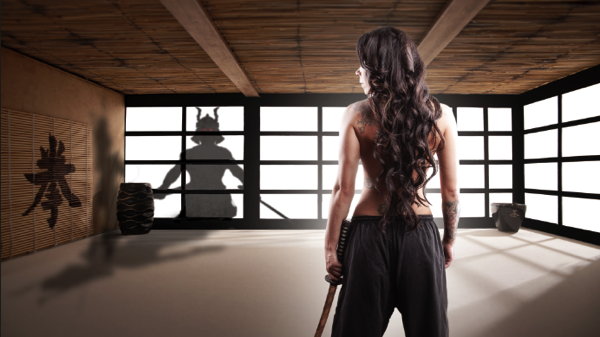
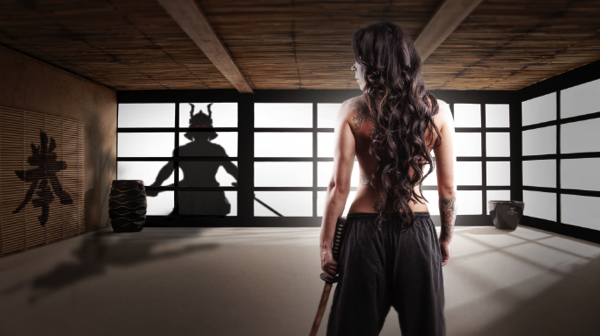
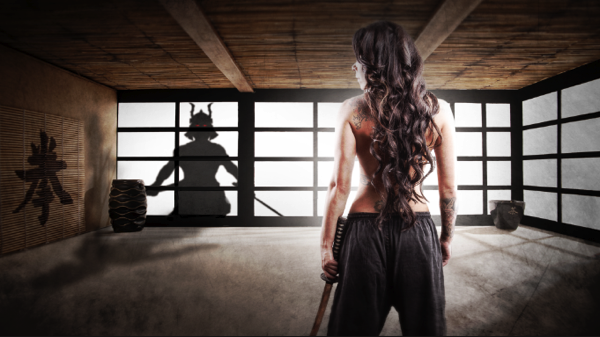
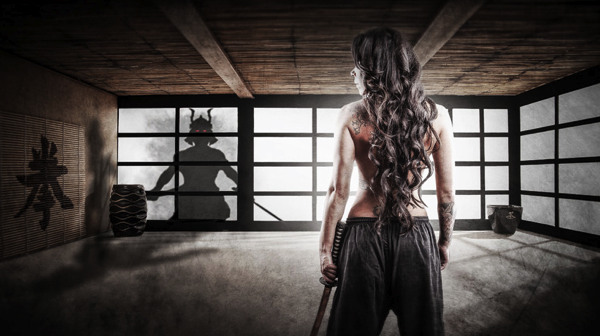
    In this article I’ll show you how the “Samurai Girl” picture was done step by step. In addition there is a speed art video at the end of the article that shows the whole process from start to end in a 05:47 minutes Youtube video. It should make the whole process clearer.

    Feel free to send me your questions via email at tom@purple-monkey.com

    1 Base Image Jessica

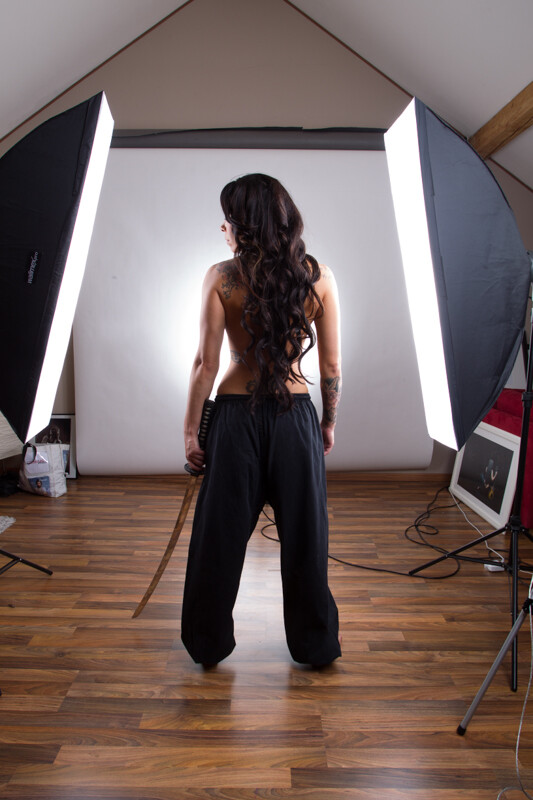
    Here is the image as it was shot. Before I start to extract the subject I use a technique to create that look on my models that consists of 6 Layers. I will write a separate tutorial on that topic, as it will deviate too much from the point of this tutorial.

    2 Model Liquify copy

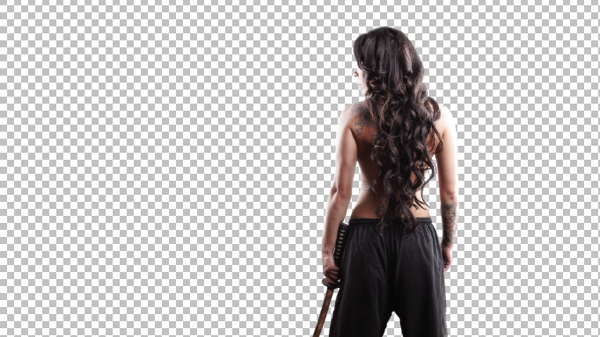
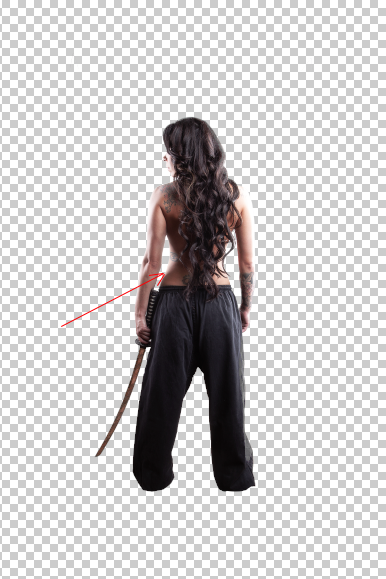
    I started with cutting out Jessica from the background. When you know that you are going to extract the subject for a photo manipulation or composite, make sure you shoot them on a background that will create an nice contrast around the edges. It will make your life a lot easier for the extraction process. The method I use to extract my subjects varies a lot depending on the need and the situation. The tools I usually use are the Pen Tool, Brush, Refine Edge, Lasso, Quick Selection and the Blending Option effects. In this case I used a mixture of Pen Tool, Brush and Refine Edges.

    3 Mask

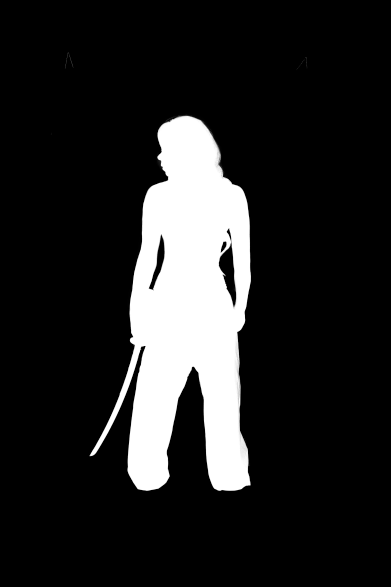
    Here is a picture of the finished mask. I like to check the mask for imperfections by “Alt” clicking on the layer mask.. What I also do a lot is to check the mask against a white and a black background. I will usually show you all the imperfections on the mask especially fringing. If the extraction looks good against both backgrounds, then you can be sure that you won’t need many adjustments anymore against your final background.

    4 Integrate into Image

    I usually work on picture in the 16:9 format. Sometimes I quickly sketch my ideas on a piece of paper or on the iPad. I basically gives me an idea about the composition of the image. As soon as Jessica was extracted from the background I moved her over to the canvas using the move too. I scaled her down and positioned here approximately. I slightly corrected her position once the background was inserted.

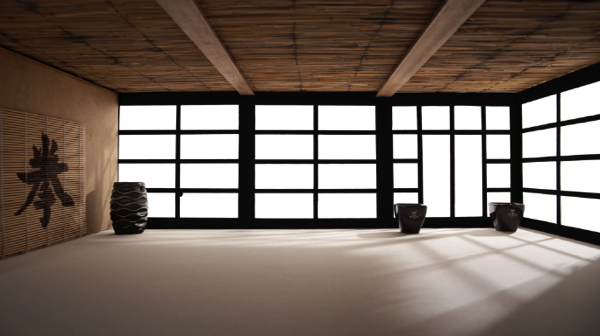
    5 Original BG

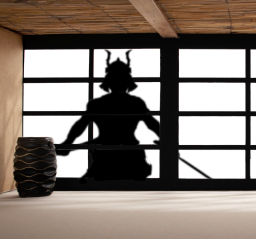
    At this point I also imported my background in order to see what color corrections would be needed to integrate Jessica into it. When I opened the stock image for my background I saw some things that would need modification.

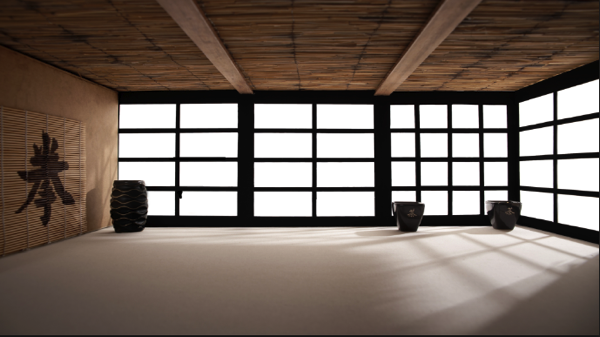
    7 Corrected Bg

    I didn’t like the doors on the right side as it would look weird when Jessica would be in position. So I just added some horizontal bars to solve that issue.

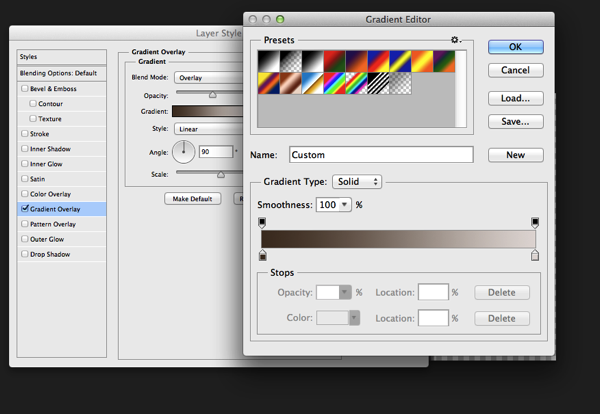
    6 Gradient for Model

    The first step I used to integrate Jessica was a Gradient map. The colors I used for the shadows was a sample of the wooden door frame (very dark brown) and for the highlights I used a sample of the Tatami. I lowered the opacity to about 45% to achieve an acceptable value. It’s important when you use this method that you use colors that are already present in the palette of the image.

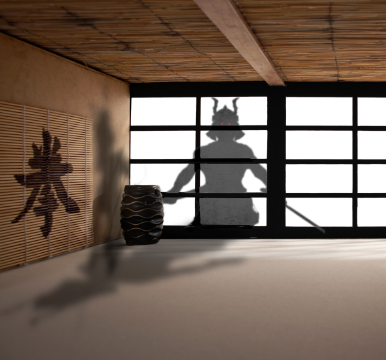
    8 Samurai

    Next step was to integrate the Samurai. I’ve build the Samurai out of several stock photos and used an adjustment layer to darken it to complete black. I used a layer mask to hide the wooden frame of the window.

    9 Samurai Eyes

    In order to make it more realistic I’ve added a dirty texture on top of the Samurai with a blending mode Overly and I slightly blurred him, since what we actually see is a shadow on the fabric. I then added the eyes with the brush tool and some subtle outer glow effects.

    Next step was to create the shadows on the floor and the wall. I duplicate the Samurai Layer and used distort and warp to adjust it’s shape. I also painted the shadows onto the barrel, in the original picture the barrel was brightly lit from the right side. Since the Samurai is standing in front of it, the light source would be blocked.

    13 Overlay Color

    To blend everything together I use a simple technique that is not well known out there. I merge all the Layers together onto a new Layer ( Shift+Ctrl+Alt+E (PC) or Shift+Command+Option+E (Mac) ) and then use the Blur Average Filter. Switch the blend mode to overlay and reduce the opacity until the color matches. I then used the Tilt-Shift filter to align the average depth of field of Jessica to the background.

    14 tilt Shift and Light

    Finally I created a new layer on top of it change it’s blending mode to overlay and painted with a soft black brush around the samurai and around Jessica in order to direct the viewers eye through the picture. A last step was to lay a grungy texture in overlay over the whole image and reduce it’s opacity quite a bit.

    15 Final

    I try to do a maximum in Photoshop in terms of light and shadows. But when I finish an image I always have some fun in Lightroom with some presets or simply play around with the sliders. Some times I end up not using any of it, but most of the time I find some settings that adds value to the overall image. Now there is no secret to this, I just play around with Clarity, Blacks, Temperature, and Contrast until I see it going somewhere. In this case I added some contrast, quite a bit of Clarity and slightly desaturated the image.

    16 Final LR

    Here’s the video of the whole process dialed up to about 1000%

    Check out more of Tom Di Maggio’s work at his websites at TomDiMaggio.com, Purple-Monkey.com” and on Facebook.

    Post originally from: Digital Photography Tips.

    Check out our more Photography Tips at Photography Tips for Beginners, Portrait Photography Tips and Wedding Photography Tips.

    Samurai Girl Composite: Behind the Scenes Post Production Walk Through


    Digital Photography School

  • 8 Ways to Make a Difference with Volunteer Photography

    There is a well-known saying: “Love what you do, and you never work a day in your life.”  For professional photographers, we can imagine that, more than likely, this holds true for them.  There’s no doubt that the reason we are involved with photography, whether it be for hobby or by trade, is because it is an enjoyable activity, and Continue Reading

    The post 8 Ways to Make a Difference with Volunteer Photography appeared first on Photodoto.


    Photodoto

  • So You’re Going to Shoot A Wedding: Part 3 of 3 [editing, etc.]

    It’s done.  You survived it.  It was the longest day of your photography career, you’re exhausted, and all you can think about is how right I was (it’s cool—I get that a lot).  But…….You. Did. It.  And chances are you didn’t get locked in a bathroom,  or miss the kiss, or have a complete equipment failure, or faint face-first into the cake.  You shot a wedding.  What’s next?

    IMG_0651b

    Back-up everything.  Possibly several times

    As no-brainer as this is, when I shoot portraits, I’m not a diligent about it as I should be.  I’m more of a “cross my fingers/hope for the best/fly by the seat of my pants” kind of gal in most areas of my life.  But a wedding is different.  Good luck explaining to a new bride that your laptop played a vanishing act with the images and you need her to re-do the whole wedding for photographic purposes.  It’s my greatest fear.  My greatest fear used to be a complete equipment failure at a wedding, but then I had that happen a few weeks ago and somehow survived it, so I’ve graduated my fear list a bit.  As soon as I get home from a wedding, no matter that I can barely see straight, I upload everything to my computer, and then back-up everything to an external drive or disc.  Additionally I don’t erase my memory cards until I need them again and I have cloud storage.  Because I’m neurotic like that.  Weddings are often thousands of images and this takes both time and space.  Having both of those things is yet another factor in the expense of wedding photography (see: never shoot a wedding for free).  In most other areas of my life, I am totally okay with just hoping for the best and surrounding it with good thoughts.  But this isn’t one of them.

    IMG_0594b

    Give a sneak peek

    These images are going to take you a long time to go through, edit, and deliver.  Unless you have some sort of crazy amazing one day editing process, which if you do, I’m going to need you to email that to me immediately.  While everyone is anxious to see pictures, no one is more anxious than a still-glowing bride.  Give them a little taste and buy yourself some time to ice your camera-strap-indented neck and regain clear vision.  Social media is a fabulous option for this if it’s available to you.  That way everyone can see them and fawn over how great the images are, giving you a little boost of confidence and the newly minted couple a little attention—both of which work in your favor for the long editing road ahead.  (Oh friend, it’s a long road.)

    IMG_4988b

    Decide if you are interested in doing this again

    Every wedding I have ever shot has led to at least one referral.  In general, I don’t photograph weddings.  Yet, there I am, every summer, finding myself wanting to pass out from heatstroke with a 10 pound black box in front of my face.  Why?  Because I’m a sucker.  I suppose I could tell you that it’s because I love weddings and true love and all that, but the truth is: I’m a sucker.  Throw a few compliments at me and I’ll do about anything that doesn’t involve roller coasters.  I hate roller coasters.  (I also hate those rides where you spin on something that’s spinning.  I’d like to have a long talk with the guy who thought that was a good idea for your internal organs.)  Even if you didn’t hand out a single business card……even if you don’t have a single business card…..they will find you.  Unless you were a miserable human being to be around (I don’t judge—I’ve been there), you will get a call about another wedding.  Decide right now if this is something you ever want to do again so you can handle that call that will come later.  There is nothing wrong with saying no, thank you.  It might not be your cup of tea.  Or quad carmel latte (I’m becoming a really expensive coffee date lately).  There is also nothing wrong with having loved it.  The point is that you need to decide quickly because there is literally a barista of sorts waiting on your order and she has a whole line of impatient people behind you and a smoke break coming up.

    IMG_0231b

    Don’t overdo it

    The last wedding I shot came in at just shy of two thousand images.  There were 26 guests, and that’s including the dog ring bearer.  I shot for less than 4 hours.  I’m an over-shooter.  I know this.  In my defense: WHAT IF I MISS SOMETHING???  For this said wedding I have no less than 40 images of “the kiss”.  Truth?  They all look the same.  Don’t get me wrong—it was an amazing kiss.  Record books, in fact.  But, those 40 images I shot in probably 30 seconds of time all look pretty much the same.  Yet I want them to see every one!!!  What if they love one that’s slightly different than another??  What if the clouds moved just a bit and it makes for the best of forty?  I don’t know.  What I do know is that to the average person, all 40 of those images look exactly the same.  Pick one, edit it to loveliness, and move on.  No one knows you have forty of them.  And likely, no one cares.

    IMG_3669b

    Deliver the images with deserved fanfare

    I personally don’t do any printing; if you book a session or a wedding with me, your flat fee includes my time, the finished (edited) high resolution images on a disc, and a full printing and usage release.  This is how I have been doing it for years and I find that not having to mess with an 8×10 print of this one or a 5×7 of that one or marking-up my printing costs to cover everything is a much easier way of doing things.  And easy works best for me because I am a terrible insomniac (see numerous references to coffee above) and when I get overwhelmed with work (which is often), I go lock myself in my closet and cry a little.  However, just handing over a disc feels like a near let-down when I’ve been editing for weeks and, as previously mentioned, spent an extremely long and tiring day just shooting the images.  I like a little fanfair, and because wedding photography is such an investment, I think my clients should get a little ribbon and bow.  Or maybe a horn section.  Depends on what I have access to at the time.  I like to put together a “highlight” slideshow of 50 or so of the images that the couple can send to their friends and family to watch online.  Additionally, I usually put together a little gift of sorts to give along with the disc—maybe a large print that I put in a readymade frame or for a smaller wedding, I might print off 4×6 prints of each image and put these in a pretty box so theycan make awedding album easily.  It honestly just depends on the couple and what I charged.  My goal here is only to hand them over something more lovely than a cold silver flat circle.

    lynsey_peterson22

    Wedding photography was never my goal, nor do I consider myself a wedding photographer.  I have never advertised or marketed for it, though I have shot about 70 of them in the last decade.  It’s tough—I’m not set-up to be a wedding photographer, both from an equipment and time perspective, yet I find myself doing several a year even still.  All joking aside, I don’t EVER take on a wedding just for the money or just out of wanting to do something wonderful for a loved one.  Every wedding I have ever shot I only ended up there because I truly felt that I was the best person for the job.  Many times I was right (this isn’t a time to be humble), but a couple times I was wrong and it makes for a painfully long event day and editing process.

    IMG_7294b

    The reason wedding photography is met with such passion by veterans and hobbyist alike is because it’s a big deal; there are no re-dos, no second chances.  It’s a type of photography that is all it’s own.  So only shoot the weddings where you feel confident that you and the couple feel similar about the end vision.  Only shoot the weddings where you genuinely like the couple; if you wouldn’t want to have a beer with them, you’re not going to want to spend a 10 hour day with them.  Only shoot the weddings that will give you more than a paycheck, whether that be experience, a day of fun, or that good feeling of doing something wonderful for someone else and knowing you did a good job.  It doesn’t matter if you believe in true love or soul mates, it doesn’t matter if you feel like weddings are too over-the-top and unnecessary, it doesn’t matter if one of the biggest highlights was the free piece of cake (I’m a big fan of cake), what matters is that you went in there knowing that you were the person for the job, that you stayed there feeling like you were doing a great job, and you left there happy to have done it.

    me at jillandty

    Tired and glad for it to be over, but happy to have done it.

    Post originally from: Digital Photography Tips.

    Check out our more Photography Tips at Photography Tips for Beginners, Portrait Photography Tips and Wedding Photography Tips.

    So You’re Going to Shoot A Wedding: Part 3 of 3 [editing, etc.]


    Digital Photography School

  • Why Analog Photography (Still) Rocks!

    by Matthias Hombauer and Karl Blümel from “The Analog Docs”.

    015 The Analog Docs

    We are two professional music and wedding photographers and we shoot digital when necessary. However, we clearly see the point of going back to analog like a lot of pros are doing nowadays. In this post, we would like to discuss the benefits as well as the drawbacks of film photography from our point of view. 

    Since we love film, we decided to start our own project named “Analog Docs“, where we exclusively use analog medium format cameras. 

    The following points are true for all analog camera systems.

    001 The Analog Docs

    1. The Look

    Ok, let’s face it. Film shooters will tell you how much they love this special look of film. This is similar to music lovers who tell you that vinyl sounds more organic than a CD. A lot of digital shooters try to imitate this look on their digital files – but you can hardly get there. Film has an incredible colour palette and a huge dynamic range of detail in both highlights and shadows. So why imitate when you simply can shoot analog?

    005 The Analog Docs

    2. Film will make you a Better Photographer, Promise!

    When shooting film, you are bound to know exactly what you are doing. You have to nail the exposure, how you frame the picture and how to direct the model so that he or she doesn’t have his or her eyes closed in the moment you release the shutter. Every picture costs money and believe us, you want to be sure to know your camera beforehand. Furthermore, most of the cameras have got only manual focus lenses and you need an external light meter to get the right exposure. This sounds a little bit frightening to someone who has experience only in digital photography. It’s a steep learning curve but it’s absolutely worth it.

    006 The Analog Docs

    3. Film is a Time Saver

    When we are shooting digital, we return from a job with hundreds of pictures, which have to be sorted out and post-processed (we always shoot RAW). With film, we come back with 40 pictures and most of them are awesome. We have outsourced the developing and scanning process of our films and get them sent from our photo lab. Once you know how to handle the different films like Fuji or Kodak already in the camera, you will save a lot of time with post-production. Honestly saying, there is almost no post-processing necessary and you can spend more time on doing the things you love, too.

    008 The Analog Docs

    4. Film Gear is Cheap (but this Might Change in the Future)

    20 years ago, a professional medium format camera was as expensive as a car. Today you can pick a Mamiya, Hasselblad or Fuji for a decent price and you’ve got an awesome camera, like the pros were/are using. For Contax cameras, this is another story. The price is skyrocketing in the second hand market, cause it is the most popular camera for wedding photographers nowadays. However, you can also acquire an old 35mm camera for a few bucks and get the whole analog experience with it. 

    009 The Analog Docs

    5. BOKEH Madness

    BOKEH (Japanese for ‘blur’) is the way “the lens renders out-of-focus points of light”. And this seems to be the search for the Holy Grail for every portrait photographer. There are tons of articles and discussions going on in the web about which lens is the best. The bigger the aperture is, e.g. 1.2, 1.4, the narrower is the depth of field. This makes you just focus on the eyes where the eyelashes are already out of focus. The quality of BOKEH on a medium format camera looks different than a 35mm camera system. So therefore we love our medium format cameras to get this special out-of-focus look. 

    010 The Analog Docs

    6. Forget to search the Rumours Sites

    One advantage of these old cameras is that once you bought them you don’t have to satisfy your needs to have the newest equipment for it: It’s as simple as that: There will not be new stuff released. Most of the cameras we use are 30+ years old and everything you need is available on the second hand market. And there are also a lot of reviews about the equipment in the web, which make it easier to decide which system you should get. Additionally, these cameras are built like tanks and they are of superior quality compared to the newest DSLRs.

    016 The Analog Docs

    Advantages:

    • the look
    • you will become a better photographer
    • film saves you time 
    • it’s still cheap (when you know what you are doing)
    • gorgeous BOKEH

    Disadvantages:

    • old camera systems, sometimes no service for them
    • you have to calculate per picture
    • it takes more effort to get your pictures

    017 The Analog Docs

    To us as professional photographers, the advantages are still striking. We provide the best quality you can get from a camera to our clients, which is the most important point. As said in the beginning, we are also shooting digital when needed. When shooting for newspapers and magazines, the time pressure to deliver the pictures won’t always allow for the analog option. However, the best magazine photographers like Martin Schoeller or Dan Winters are still shooting film. 

    Sure, there is the option of digital medium format cameras, which are gaining wide popularity in the scene. The prices are dropping but they are still in the 30 000$ range. Compared to digital, buying an analog medium format system is a no-brainer.

    019 The Analog Docs

    So the final question you should ask yourself is: What do I use my camera for?

    If you are a sports or newspaper photographer, then shooting film might not be the best choice. But for all of you who want to shoot great portraits, landscapes or architecture and you are willing to learn more about the craft of photography, you should definitely give film a chance.

    Matthias Hombauer (Ph.D.) and Karl Blümel (MD) are both professional photographers based in Vienna/Austria. They are founder of “The Analog Docs”. They also have a facebook fanpage.

    Post originally from: Digital Photography Tips.

    Check out our more Photography Tips at Photography Tips for Beginners, Portrait Photography Tips and Wedding Photography Tips.

    Why Analog Photography (Still) Rocks!


    Digital Photography School

  • The Magic of Soft Light

    Soft light photo

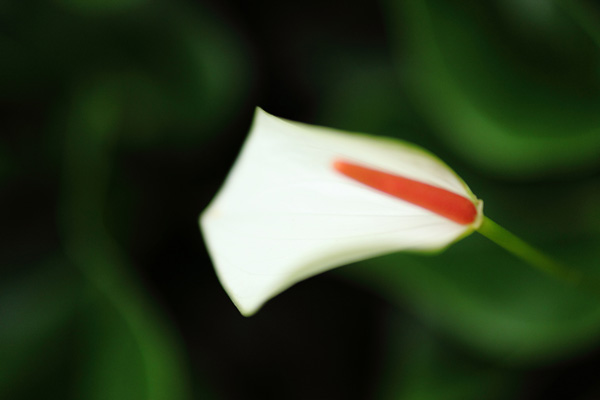
    Soft light is beautiful. It is a gift from nature that helps you create interesting images using high quality light. You’ll find soft light in the shade on a sunny day, during twilight after the sun has set, or all around you on a cloudy day.

    Soft light photo

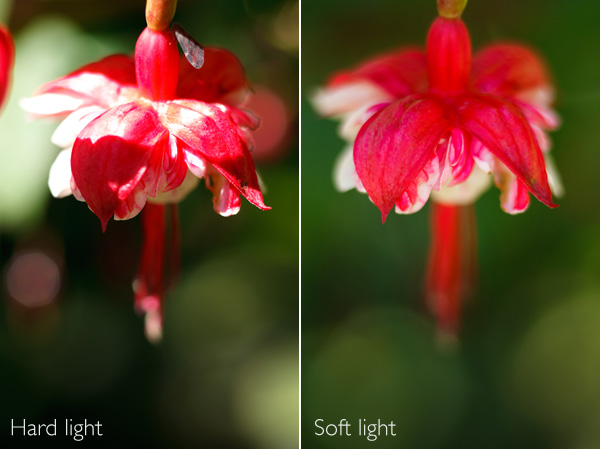
    Let’s take a look at these two photos to see the difference between hard light and soft light. I took the first in direct sunlight in the afternoon. The light is hard and it’s not a good a photo. The contrast is too high – it’s not possible to get good detail in both highlights and shadows.

    I resolved the problem by holding a reflector, still in its cover, between the flower and the sun. Actually, it doesn’t matter what I used, the purpose is to cast a shadow over the flower and the background. That means the flower is now lit by soft light, not hard light. Aesthetically, the photo is completely different. The even lighting means that the brightness range of the subject falls is reduced to something that my camera’s sensor can handle comfortably. There are no shadows. The flower is evenly lit, and that gives me nice deep colours. The quality of light has gone from hard and ugly to soft and beautiful.

    That’s the power of soft light.

    I’m not saying all hard light is bad, and that all soft light is good. What’s important is the match of subject to light. This flower needed to be photographed in soft light to bring out its beauty. Some subjects suit hard light better – I will explore those in a future article.

    So, where else does soft light come in useful?

    Soft light photo

    If you’re shooting close-ups, soft light lets you capture colour and detail and avoids bright, distracting highlights or high contrast. Again, the quality of the light is beautiful and suits the subject.

    Soft light photo

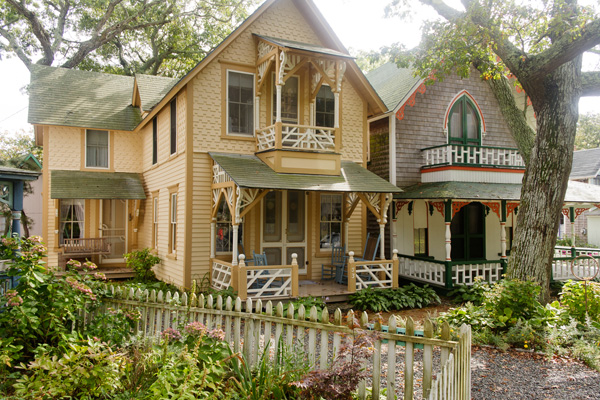
    Soft light doesn’t have to be completely shadowless. Sometimes the sun is out, but the air is hazy and the light has a soft luminous quality. The light is hard enough to cast shadows, but they are not very deep. The light in this photo has that quality. See how the light is coming from behind the houses, but isn’t strong enough to create strong shadows. This kind of light seems to work well when the subject is backlit.

    Soft light photo

    Finally, soft light is absolutely beautiful for portraits, especially of women. I’m a little surprised by how many people, photographers and models included, think that sunny conditions are ideal for taking photos of people. Not true! Especially if the sun is the only light source – admittedly the use of a reflector can help compensate for the hard light of direct sunlight. You can also get good results in direct sunlight by using flash to fill the shadows or even overpower the sun. But that’s another article.

    If you are taking photos in natural light only, then head for the shade. On a sunny day, the light bounces off any surfaces lit by the sun and into the shadows. It’s like shooting with an enormous, and completely free, reflector. The light is soft and beautiful and creates amazing catchlights in the model’s eyes. The portrait above has these qualities in abundance.

    Mastering Photography

    Soft light photo

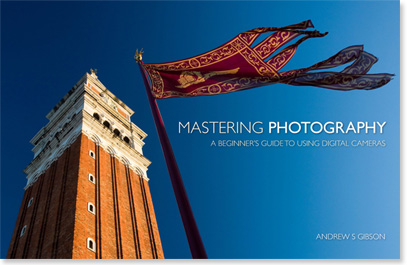
    My latest ebook, Mastering Photography: A Beginner’s Guide to Using Digital Cameras introduces you to digital photography and helps you make the most out of your digital cameras. It covers concepts such as lighting and composition as well as the camera settings you need to master to take photos like the ones in this article.

    Post originally from: Digital Photography Tips.

    Check out our more Photography Tips at Photography Tips for Beginners, Portrait Photography Tips and Wedding Photography Tips.

    The Magic of Soft Light


    Digital Photography School

  • Panasonic Lumix DMC-FZ70 Review

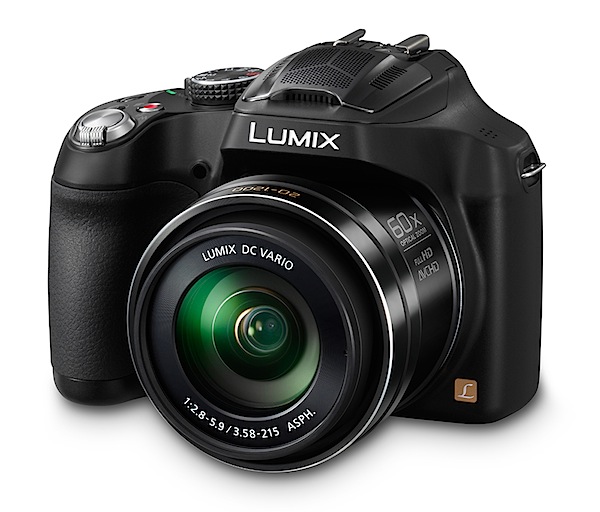
    Panasonic Lumix DMC-FZ70.jpg

    What a whopper! It looks like a compact digital camera but sure as hell offers far more than your average CDC.
    Narrabeen lake tele 2.JPG

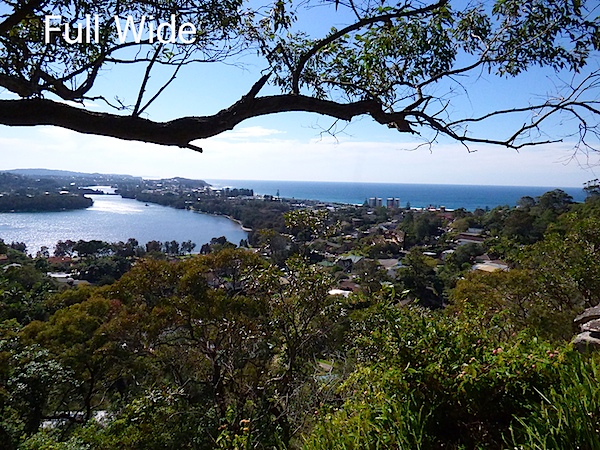
    Narrabeen lake wide 1.JPG

    The 60x zoom runs all the way up to a 35 SLR equivalent of 1200mm but — note this! — it begins from a super wide 20mm equivalent. That means you can shoot close shots of sports players from the sidelines and then cover cramped interiors with the same camera. You can also buy a 1.7x tele conversion lens that will take the focal length to 2040mm! Beat that!

    The maximum image size is 4608×3456 pixels, large enough to make a 34x29cm print.

    Video can be shot in either AVCHD or MPEG4 formats at Full HD 1920×1080 pixel resolution. But no, you can’t shoot stills mid video recording.

    Another spec to die for is a 9fps continuous shooting rate at full resolution; moderating this is a continuous rate of 5fps with full AF in play.

    Panasonic Lumix DMC-FZ70 back.jpg

    Panasonic Lumix DMC-FZ70 top.jpg

    Panasonic Lumix DMC-FZ70 Features

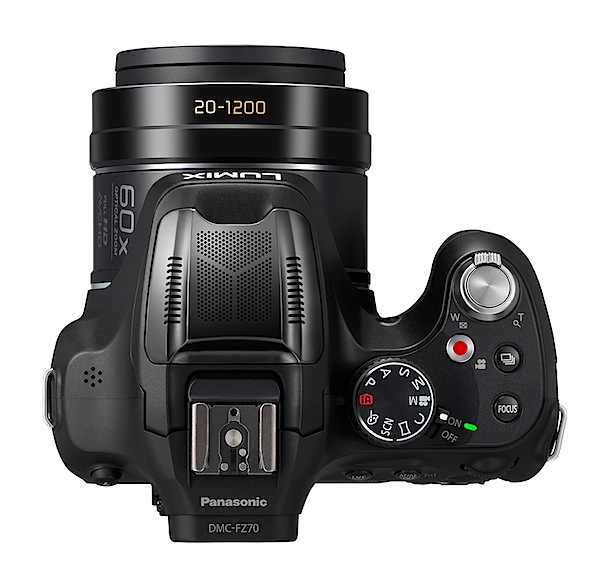
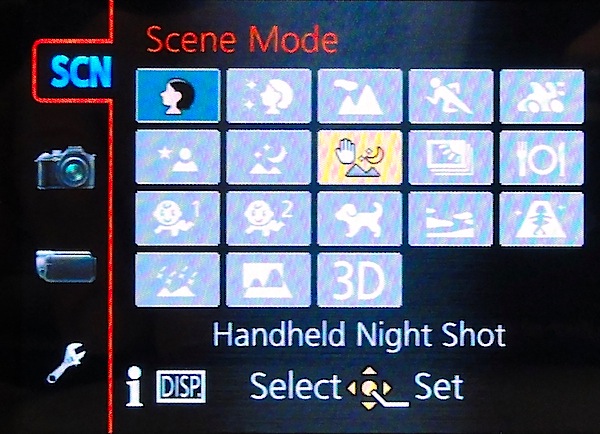
    Controls: the top deck houses the mode dial with positions for intelligent auto, PASM, creative video, custom mode, scene mode, panorama shooting, scene and creative control modes.
    Scene mode.JPG

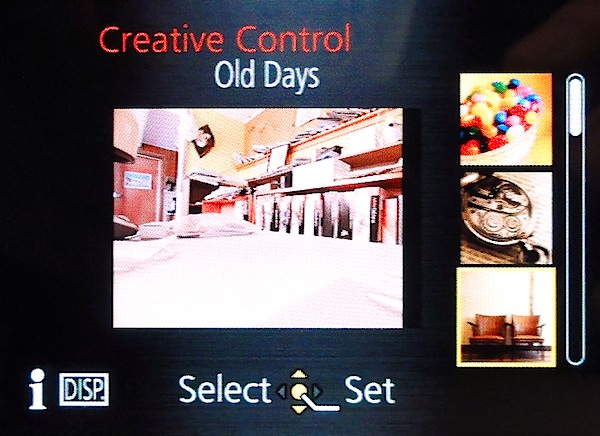
    Creative control.jpg

    In scene mode you can choose from portrait, scenery, panning, HDR and 14 other settings. This feature alone should tell you heaps about the intended market: those with tonnes of ambition but little real photographic knowledge.

    Creative control takes you further and into a re-rendering mode that can impart to a picture the feelings of a retro or old days look, high or key, sepia, dynamic monochrome, impressive art, high dynamic, cross processing plus a miniature or toy effect plus quite a few others.

    Close to the mode dial is the shutter button, encircled by the zoom lever; the red video record button; a burst shooting button; and finally, a button that can lock in focus mid shoot … haven’t seen one of these before.

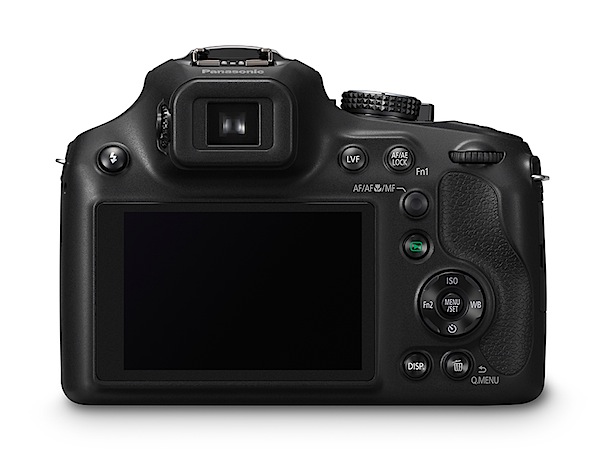
    The camera’s rear has the flash activation button at extreme left; top viewfinder focus; a button to switch between the turret finder and the rear LCD screen; one to lock focus and exposure; the rotating rear dial that takes you through selection of settings; replay; the four way jog dial that offers control of ISO, white balance, self timer and function selection; centred is the menu button.

    Lower are buttons for display options and access to a quick menu.

    Battery and memory card are loaded via a door at the base of the camera.

    I found the control arrangement to be entirely logical and non-confusing.

    Menu.jpg

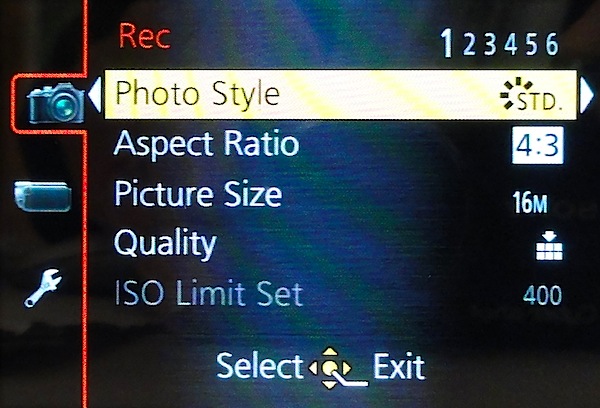
    The menus are similarly well laid out and abundantly clear in their intent.
    Narrabeen lake island.JPG

    Family and kayaks 1.JPG

    Some Notes

    I had taken temporary ownership only a matter of hours before I took it out on a shooting essay: I found the camera to be well-balanced and easy to operate, even tapping controls during a video shoot.

    The zoom needs special mention: don’t think for a moment that you can hand hold it with the focal length anywhere past 10x. No way José!

    The zoom action is smooth and, amazingly, provides minimal steps along way. The stabiliser is most effective. A fine effort.

    Notable is the wind noise protection thanks to a special wind shield built onto the microphone’s housing.

    The rear LCD screen is of course virtually useless for viewing outdoors, so the top viewfinder comes in to play, although it offers less resolution.

    The panorama mode offers four options: pan left or right; pan up or down.

    Startup Time

    It took two seconds to power up and let me take my first shot. Follow ons came in as fast as I could tap the button.

    Distortion

    No problems at the wide or tele ends of the zoom. A fine piece of glass.

    Panasonic Lumix DMC-FZ70 ISO Tests

    Panasonic Lumix DMC-FZ70 ISO 100.JPG

    Panasonic Lumix DMC-FZ70 ISO 400.JPG

    Panasonic Lumix DMC-FZ70 ISO 800.JPG

    Panasonic Lumix DMC-FZ70 ISO 1600.JPG

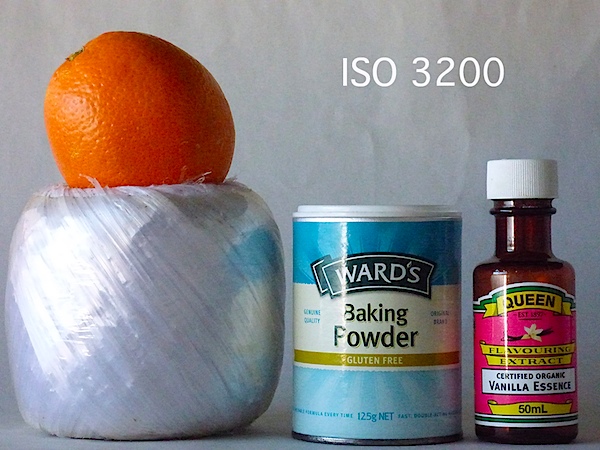
    Panasonic Lumix DMC-FZ70 ISO 3200.JPG
    Only by ISO 1600 did some noise appear but with sharpness still acceptable; by ISO 3200 a blue colour cast appeared over the image, with noise up and sharpness down.

    Panasonic Lumix DMC-FZ70 Review Verdict

    Quality: average.
    Why you’d buy it: that 60x zoom! excellent AF and stabiliser action; feels good in the hand.
    Why you wouldn’t: bulky for some.

    I well remember handling my first camera with a 10x lens …it was a Kodak I think! I thought the world had taken a turn for the best. Now look where we are!

    Top gear.

    Panasonic Lumix DMC-FZ70 Specifications

    Image Sensor: 16.1 million effective pixels.
    Sensor: 11mm CMOS (6.17×4.55mm).
    Metering: Multi, centre-weighted, spot.
    Lens: Leica DC Vario-Elmar f2.8-5.9/3.58-215mm (20-1200mm as 35 SLR equivalent)
    Exposure Modes: Auto, Program AE, shutter and aperture priority, manual.
    Shutter Speed: 8-1/2000 second.
    Memory: SD/SDHC/SDXC plus 200 MB internal.
    Image Sizes (pixels): Stills: 4608×3456 to 480×480.
    Movies: 1920×1080, 1280×720, 640×480.
    Continuous Shooting: 9fps max.
    Viewfinder: Turret (202,000) and 7.6cm LCD screen (460,000).
    File Formats: JPEG, RAW, MPO 3D, MPEG4, AVCHD.
    ISO Sensitivity: Auto, 100 to 6400 (with boost).
    Interface: USB 2.0, HDMI mini.
    Power: Rechargeable lithium ion battery.
    Dimensions: 130x97x118 WHDmm.
    Weight: 606 g (inc battery).
    Price: Get a price on the Panasonic LUMIX DMC-FZ70 at Amazon.

    Post originally from: Digital Photography Tips.

    Check out our more Photography Tips at Photography Tips for Beginners, Portrait Photography Tips and Wedding Photography Tips.

    Panasonic Lumix DMC-FZ70 Review


    Digital Photography School