Category: Photography

  • Splendid Fall Photography Tips and Tricks to Make The Most Of This Gorgeous Season

    Fall is indeed a magical time for everyone. With the air becoming clean and crisp, you get to dust off your overcoats and walking boots. You’ll hear the chopping of the wood that will see everyone though the winter months. But there is nothing more recognizable with the season of autumn than the colors associated with the falling of the Continue Reading

    The post Splendid Fall Photography Tips and Tricks to Make The Most Of This Gorgeous Season appeared first on Photodoto.


    Photodoto

  • A Review of the Think Tank City Walker 30

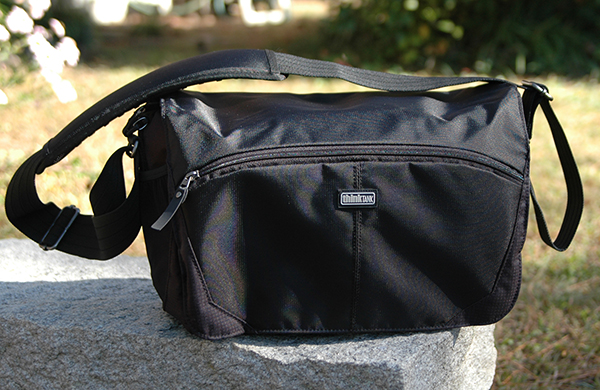
    All in all, this was a pretty good summer– except, of course, for the trip that didn’t happen.  I was supposed to hit the road with some friends last month, but events beyond our control pulled the rug out from under us at the last minute.  My bags were packed.  I was ready to go.  The taxi was waiting outside my door.  OK– not really, but my Think Tank City Walker 30 really was packed and I am all out of cheesy musical metaphors.  I took a few shots of this pretty amazing bag before I unpacked it and thought I’d share a few impressions.  I see so many articles about packing gear for travel and it’s always some big rolling case that fits an entire studio’s worth of equipment and a sherpa to roll it.  But what about a simple bag full of basics?

    This is my eighth Think Tank bag (Hey– don’t judge me…I can quit any time I want!) and I’m pretty sure it’s quickly becoming my favorite.  I generally don’t write “fresh-out-of-the-box” reviews.  I prefer to put a product through its paces for a while before formulating an opinion or recommendation.  But since the 30 is a larger version of the City Walker 20 that I’ve been using for about ten months, I think we’re in the clear.  Certain things jump out at you when you pick up any Think Tank bag, and the City Walker messenger-style bags are no exception.  Superior construction is at the top of the list.  Even a light-weight bag like the City Walker is obviously built to last.  Everything from the zippers to the straps are designed with efficiency, durability, and comfort in mind.

    CityWalker30-001

    The Think Tank City Walker 30

    So, what’s the big deal about yet another shoulder bag?  Besides its soft-sided, light-weight design, the entire City Walker line boasts the one thing I love most about Think Tank bags– it doesn’t scream, “Hey, I’m a camera bag!  Come steal me and my $ 8,463.75 worth of gear!”  Conceived with the needs of the urban street photographer or photojournalist in mind, the CW is also perfect for any photographer looking for a way to travel light– regardless of whether it’s on assignment, vacation, or a day out with the family.  As with all things Think Tank, there is an abundant supply of pockets, compartments, and dividers, and the dedicated interior laptop/iPad pocket is a huge welcome addition.  But perhaps the coolest feature of this camera bag is that it doesn’t have to be a camera bag at all.  The entire padded gear section can be removed, converting from camera bag to messenger bag or overnight bag (and back again) quickly and easily.

    CityWalker30-006

    The padded gear section is held in with Velcro and is easily removable.

    Fresh out of the box, the City Walker doesn’t look like it’s going to hold all that much, but it really does.  Here’s a quick look at the gear I had packed for the trip, with plenty of room to spare.

    CityWalker30-003

    Packed and ready to go.

    1.    Laptop

    2.    Memory cards (Think Tank Custom Pixel Pocket Rocket)

    3.    SB800 Speedlight in an internal side pocket

    4.    16-35mm lens

    5.    Nikon D90 with 24-70m lens attached

    6.    70-200mm lens

    7.    Two Think Tank DSLR battery holders

    8.    CapturePRO Camera Clip from Peak Design

    9.    Included Think Tank rain cover in an internal side pocket

    10.    NOT pictured, but stashed in the pockets:  Business cards, notebook,, pens, lens cloth, AA’s, miscellaneous cords, chargers, and Peanut m&m’s.

    The fact that you can completely remove the gear section adds some great diversity.  It actually wasn’t until my trip got cancelled that I realized I can completely pack for a long weekend with nothing more than my two City Walkers– some basic gear in the 20 and clothes in the 30 (or the other way around).  This photo shows almost a week’s worth of clothes and other essentials in the 30 with plenty of room to spare.

    CityWalker30-007

    Whereas I use different bag and configurations for different jobs and assignments, the City Walker 30 could easily be that one go-to bag for some professionals, as well as serious hobbyists and amateurs looking for a reliable, durable, comfortable bag with quick access to all of the gear.

    As a travel bag it would be tough to be beat.  I’ll let you know next summer.

    Post originally from: Digital Photography Tips.

    Check out our more Photography Tips at Photography Tips for Beginners, Portrait Photography Tips and Wedding Photography Tips.

    A Review of the Think Tank City Walker 30


    Digital Photography School

  • How to Create this “Fight Club” Inspired Portrait using One Light

    By Gina Milicia – author of our brand new Portrait Lighting eBook.

    Firass MAINWEB

    Welcome to Fight Club. The first rule of Fight Club is: you do not talk about Fight Club.” -Chuck Palahniuk, Fight Club

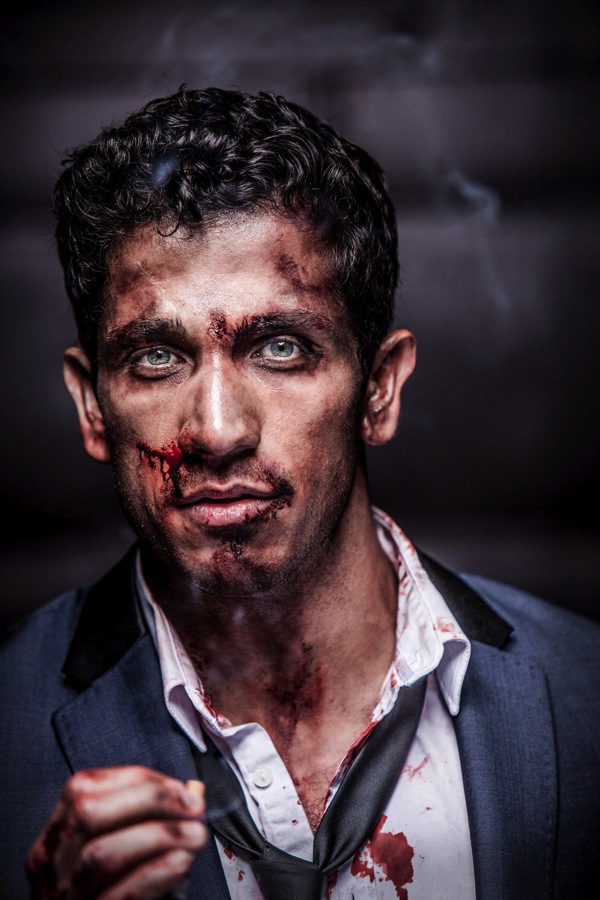
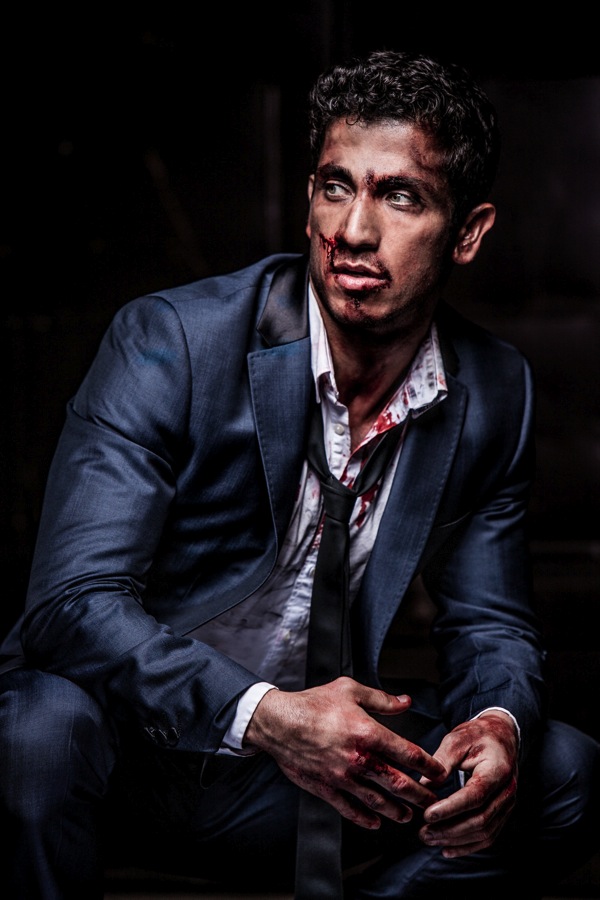
    Australian actor Firass Dirani in my Fight Club inspired shoot @firassd (twitter) @firazzle (Instagram).

    Australian actor Firass Dirani in my Fight Club inspired shoot @firassd (twitter) @firazzle (Instagram).

    Most of my inspiration for photo shoots comes from Movies, art and popular culture.

    Ever since I saw the movie Fight Club I’ve always wanted to do a fight Club inspired shoot.

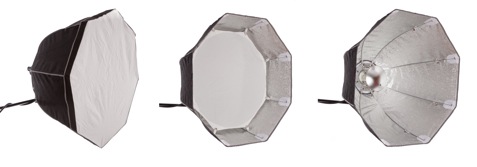
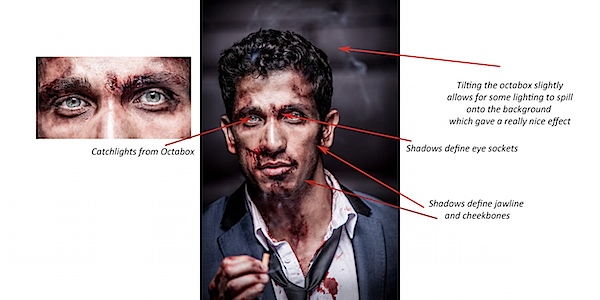
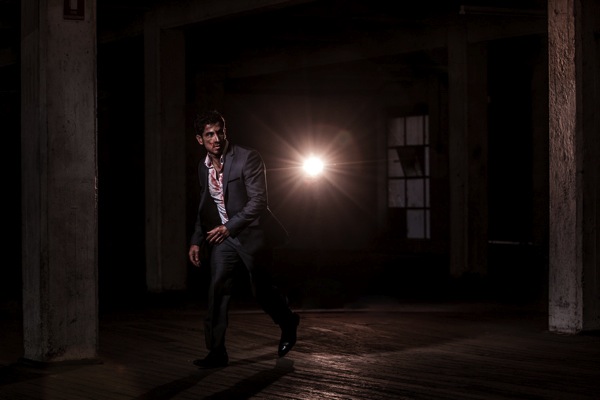
    My aim was to create a really cool, gritty, edgy looking shot. I could have achieved this look using several different techniques but opted for my new Rotolux deep Octabox with my Elinchrom Ranger Quadra battery operated light system.

    Firass 643web

    For this shoot I worked with Melbourne make up artist Mia’Kate Russell an incredibly talented special effects make up artist. Her brief was to make Firass look like he’d just been in an old school fistfight – busted up but still looking incredibly cool.

    If you are thinking of trying something like this then I suggest you check out your nearest school of hair and make up. Special effects make up like Mia used on Firass is taught at these schools and students are often looking for the opportunity to test out their skills.

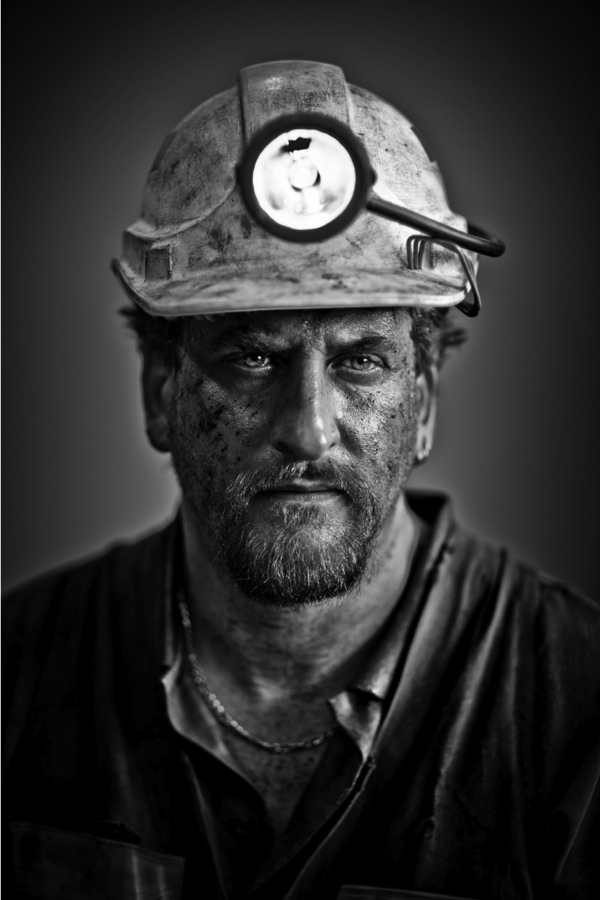
    Another version you may like to try is to just scuff the face up using dirt to give that gritty look. That’s the technique I used for this shot of Lachy Hulme who was playing a trapped minor in the TV Movie Beaconsfield.

    Portrait shoot

    A good Make Up artist will take your portraits from OK to amazing. This is definitely a relationship you should invest in and nurture.

    201309021410.jpg

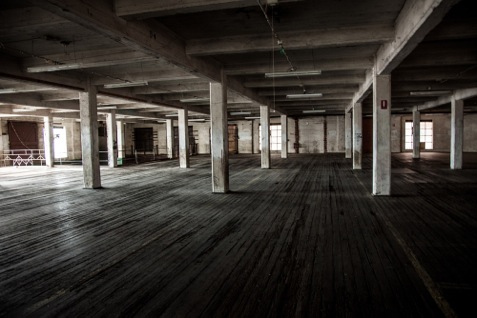
    The location I chose was an old warehouse near my actual studio. I had gone out scouting a week earlier. It’s important that you always have your locations worked out ahead of time rather than hoping it will all fall into place on the day of the shoot.

    Some places will incur a hire fee to work in others you may get permission by finding the owners and just asking (which is exactly what I did to get access to this amazing warehouse!)

    201309021413.jpg

    If a softbox and a beauty dish got married and had babies they would probably have little rotolux deep octaboxes. I love these light shapers because

    They combine the softness and narrow spread of a soft box with the beautiful bone structure defining qualities of the beauty dish. It’s the best of both worlds.

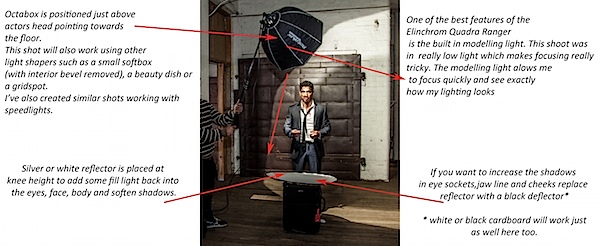
    For this image of Firass I converted my Octabox to a beauty dish by removing the outer diffuser and inner bevel and adding the beauty dish attachment.

    I could have also just used a beauty dish but I prefer this softer style of lighting.

    Here’s some visuals on how I took the shots (click to enlarge).

    Firass_MAINWEBDIAGRAM.jpg

    FirassBTSW.psd

    For this shot I’m using my:

    • Canon 1DS MK111, with my 70-200mm f2.8L series Lens
    • 2x Pocket wizards
    • I used fill flash from my Elinchrom Quadra lights with a Rotolux Deep Octabox

    My settings for this shot are:

    • ISO is set to 100
    • Lens focus length is 200mm
    • Aperture is F/ 4* @ 1/200th of a second**

    * I selected a wide aperture of F4 on my long lens because I wanted my background to be out of focus. I could have shot wide open at f2.8 but decided to play it safe at f4 as I find it really difficult to get my models eyes sharp at f2.8 using a long lens and focusing in low light.

    ** I shot at a very fast shutter speed of 1/200th sec because I wanted to keep my background really dark and moody.

    This shot would also work using a Speedlight + Softbox without internal bevel.

    If you want to increase the amount of shadow in eye sockets, jawline and cheekbones remove the reflector or replace it with a black cutter.

    And here’s one more shot from the shoot.

    Firass walking

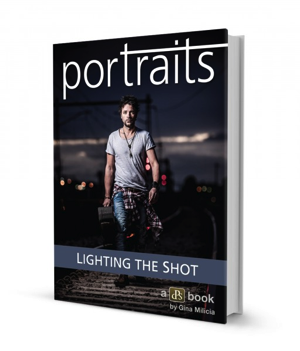
    Get more portrait lighting tips from Gina’s new dPS eBook – Portraits: Lighting the Shot.

    Lighting_468x190px

    Post originally from: Digital Photography Tips.

    Check out our more Photography Tips at Photography Tips for Beginners, Portrait Photography Tips and Wedding Photography Tips.

    How to Create this “Fight Club” Inspired Portrait using One Light


    Digital Photography School

  • 7 Tips for Photographing Kids

    kids-photography-tips-dps-10

    Notice something about the title of the article? It doesn’t say how to take “portraits” of kids! Kids, especially those five and under, pretty much dictate how the photography session is going to unfold, and it usually involves moving. Fast! Over the years my style has evolved from format portraiture with medium format film camera (which is NOT conducive to movement) to 35mm, and finally to digital. Digital allows much more freedom of motion and with a few tips you should be on your way to some great photos of kids. 

    THE SEVEN TIPS :

    • have patience
    • be ready
    • get down to their level
    • using natural light or flash
    • choose your focus mode carefully
    • be a goofball
    • let them run the session, don’t try and control it

    #1 HAVE PATIENCE

    When photographing kids sometimes you get a whole lot of nothing for a while, or they may be shy to start, or play coy. Even kids that know you may decide they don’t want you to take their picture and say so. My three year old niece did just that when I spent the day photographing her. “Don’t take my picture Auntie!” she said as soon as I pointed the camera at her. She’s a regular ham for the camera usually and I knew she’d warm up. Eventually she was giving me “the wave” that you see below which sort of means “don’t take my picture but I’m going to act like I’m the star anyway just in case you do”.

    So if you get this kind of behaviour don’t rush or force it. Just keep hanging out with them, play and interact and eventually they’ll come around. A couple hours later she was telling me to take her photo.  kids-photography-tips-dps-14

    #2 BE READY

    This is almost a given, but be ready for anything with kids! Expect the unexpected and be ready to shoot it. One of the things I say to my students is that photography is about being in the right place, at the right time, with the right lens on – there’s a lot of truth to that! So learn to anticipate what might happen, and where you need to be to capture it. Have the right lens on and make sure your settings are all good. Be ready technically, and in all other aspects. Be ready to move fast if this happens:

    Oh yes she did!

    Oh yes she did!

    I fired off two shots and then she fired right at me with the water gun and I had to turn to protect the camera. I however, took a direct hit in the backside. Luckily it was a nice warm day and it was refreshing. I got the shot, saved the camera from drowning and had a lot of fun with her.

    Here’s another of my nephew at the same age. My sister was watering the flowers, nobody knew he was going to do this. Be ready!

    kids-photography-tips-dps-04

    Part of being ready also means to stop looking at the images on the back of your camera! If you are looking there you are missing something happening live. You can review them later, so stop chimping! 

    We set her up with the streamers but being ready meant making sure I get it all in the frame and capture it when she throws it in the air.

    We set her up with the streamers. So being ready here meant making sure I got it all in the frame and captured it when she threw it up in the air.

    #3 GET DOWN ON THEIR LEVEL

    When you photograph little ones doing so from an adult perspective makes them look even smaller. Getting down to their level puts you more on equal ground. Get in the mud or sandbox with them, don’t stand over top looking down. Crawl around on the floor and play trucks.

    Get down to their level literally, and figuratively. You nee also to get skilled at holding your camera and playing, coloring, or any number of other interactive things with the child.

    kids-photography-tips-dps-06

    We tied the dinosaurs together, I had to hold them sometimes while I was shooting.

     #4 USING NATURAL LIGHT AND FLASH

    “When should I use flash?” is a common question I get in my photography classes. My answer to that is two part:

    1. if there isn’t enough light, add flash
    2. if the light isn’t “good”

    Part one, not enough light, is fairly obvious. It’s too dark if you have the aperture on the lens as wide open as it goes, and you are still getting a shutter speed that’s slower than your lens focal length (see Tips for getting Sharper images for more info on that). It helps to use a lens with a large aperture either an f/2.8 zoom lens (but they’re pricey) or even better an f/1.8 prime lens like the handy little 50mm f/1.8 or 85mm f/1.8.

    But what about part two, what is “good light”? How do you know if you have bad light? 

    That part is a bit subjective but tough lighting situations like backlighting, or strong overhead light would be some times where you might want to add flash to balance out the light or overpower the natural light entirely. I tend to use flash to supplement natural light whenever possible, and to try and correct the lighting where necessary. Notice the image above – there is NO flash used for that image. The light coming from the windows in the living room on the right provided a nice soft directional light on his face. Selecting a large aperture allowed me to use that light.

    Now look at the image below. Can you tell if there was flash used or not?

    kids-photography-tips-dps-07

    Flash was used here, bounced off the ceiling but aimed slightly back.

    Flash was used for the image above because the windows behind him were leaving his face in deep shadow. So I used a flash bounced off the ceiling, angled slightly behind me. Avoid direct flash whenever possible as it flattens out the subject and produces harsh shadows. Bouncing off walls and ceilings is ideal if you can do so. In this case I aim my flash backwards slightly as well so the result isn’t light coming straight down on him and making dark eyes. I use this technique a lot at events, even with 15-20′ high ceilings.

    #5 CHOOSE YOUR FOCUS MODE CAREFULLY

    Capturing moving subjects of any kind requires the right camera settings, practice and trial and error. Most cameras have different Focus Modes – read your manual to find out more. Select the one for continuous or tracking focus. What that means is the camera does not lock focus when you push the shutter button halfway down. Instead it “tracks” any moving objects as they come nearer and farther away from you. If you hold the shutter button down the camera continues to look for focus and if the object is moving towards you some cameras actually anticipate their speed and prefocus in front of them so when you press the shutter fully your image is sharp. There are too many camera brands and models and each are different and offer different choices, so I can’t tell you what to choose. Just know that when shooting moving objects you want the tracking option.

    You may also want to shoot in burst or high speed shooting mode. That’s when you press the shutter all the way down and hold it, the camera takes multiple images until you let go or the camera can’t hold any more information. Most SLRs have this feature but vary in the frames per second rate they are capable of shooting. Even three frames per second will give you more options than just shooting a single frame at a time.

    This was shot using the tracking focus mode - on my Canon that's called Servo

    This was shot using the tracking focus mode – on my Canon that’s called Servo

    Another example using focus tracking. I keep the camera pointed at him and the button partly pressed and it follows him with focus.

    Another example using focus tracking. I keep the camera pointed at him and the button partly pressed and it follows him with focus. Make sure to get out of the way of errand water sprays during water fights!

    #6 BE A GOOFBALL

    I’ve often been told that I’m good with kids during sessions because I get silly with them. I make fart noises and silly faces. I play with puppets with them. I get down in the sand and play. Too often we adults worry about our dignity and how we “look” – throw all that out the window and get over yourself and let go a little, Give yourself permission to be a GOOFBALL for a little while. Who knows you might actually have some fun!

    The image below happened because we were blowing raspberries at each other and having a face making competition of sorts. He won, but I got the shot! He was also soaking wet from running through the hose several times and the read dye in his hair was running down his forehead, which just adds to the image!

    kids-photography-tips-dps-05

    #7 LET THE CHILD RUN THE SESSON

    Really, you will never be in control anyway so why not relinquish it right from the start and call a spade a spade. The child is in charge and will run the session, so the sooner you accept that the more fun you’ll both have. Here’s a few DOs and DON’Ts.

    • DON’T try and make them do anything
    • DON’T get upset with them if they don’t follow your plan
    • DON’T, for heaven’s sake yell at them, especially if they are your kids or family. That will only serve to make them hate getting photos done and they will make it even harder next time. That only leaves the child feeling like they’ve been bad and you frustrated.
    • DO go with the flow. Take whatever happens and go with it.
    • DO be ready. See #2 above!
    • DO approach it from a perspective of having fun, not one of getting the best photos. The second is a product of the first.
    kids-photography-tips-dps-16

    You must test the chalk to make sure it writes don’t you know! So serious.

    I was literally putting my bag in my car to leave, camera all packed away when the sidewalk art began and the light was so perfect. So out came the camera again! This image follows pretty much all the points above: be ready, get down on their level, use the natural light when it’s good, play with them.

    I just can’t resist good light! I have a slight case of Photography Compulsion Syndrome, perhaps you suffer from it too?

    ACTION PLAN

    If you photograph kids or have some of your own, go out and practice using these tips and tell me how you did. Do you have any additional tips you’d like to add, please share in the comments below.

    Now get out there and go do some photography! Happy shooting.

    Cheers, Darlene

    Post originally from: Digital Photography Tips.

    Check out our more Photography Tips at Photography Tips for Beginners, Portrait Photography Tips and Wedding Photography Tips.

    7 Tips for Photographing Kids


    Digital Photography School
  • Olympus PEN E-P5 Review

    Olympus E-P5.jpg

    The Olympus PEN E-P5 sure took some getting. Following a briefing by Olympus it was two months before I actually got my sticky fingers on one in the review-atorium. And even then I had to fight, persuade and jollify every Olympus contact I had. It seems every man, beast and journalist wanted a P5.

    So, what’s so special?

    I know it has nothing to do with photography and camera technology, but this little number sure pulls the heart strings in the retro stakes.

    Coinciding with the 50th anniversary of the legendary PEN F film camera, the PEN E-P5 is a digital update of a classic that offers much in digital capture. Its all metal cased body shrieks of Olympus classic — and even a touch of Leica!
    Olympus E-P5 back.jpg

    The review camera was supplied with the f2.0/12mm, f1.8/45mm and the f1.8/17mm lenses.

    Olympus PEN E-P5 Features

    Pretty stunning specs:

    • 16.05 million effective pixels
    • Live View CMOS.
    • Mechanical shutter runs from 60 seconds to 1/8000 second; Time and Bulb exposures.
    • Time lapse shooting of stills or movies. Set a time interval between 1 second to 24 hours, setting how many shots the camera will capture in a series (1-99).
    • Built-in Wi-Fi.
    • 5-Axis Image stabilisation.
    • Focus peaking emphasises the contours at the point of focus in white or black.
    • LCD screen can be tilted to face upwards at an 80 degree angle and downwards at a 50 degree angle.

    The maximum image size is 4608×3456 pixels, enough to make a 39x29cm print.

    Video can be shot in MPEG4 format, up to Full HD 1920×1080 resolution. If you shoot stills in the middle of a video recording, the latter stops.

    The stabiliser works remarkably in video shooting but you have to watch focus; a tap on the shutter button and AF comes to heel!

    Handling: the camera is nicely balanced in the hand, thanks to a moderate sized speed grip at the right edge. Whilst you could operate the P5 one-handed, it feels better with two.

    Pocketability: camera body will fit into one pocket; a lens or two should fit into another.

    Controls: pop up flash is to the left, with its switch just beneath; external flash and accessory shoe mid deck.
    Photo story 1.JPG

    Photo story 2.JPG

    The mode dial has positions for auto and PASM; movie settings; the novel photo story setting.
    Scene mode.JPG

    Art Filter.JPG

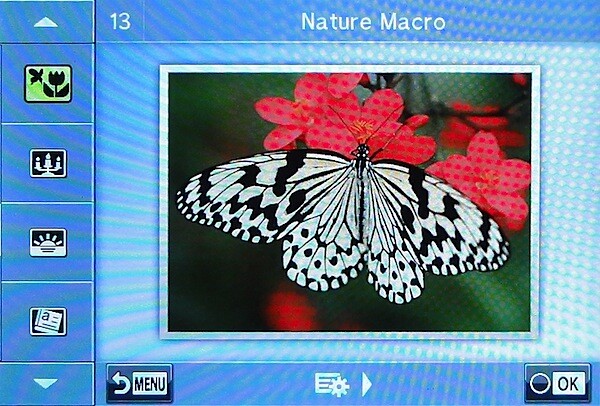
    Then there are 23 scene modes, including landscape, children, macro, fish eye etc; here are also found 12 Art Filters: Pop Art, Light Tone, Diorama etc.

    Photo story: in this fun mode you can shoot multiple shots, then combine them into a single image. Over this you can add handwritten text.

    Still on the top deck: the shutter button; on/off lever; and a function button.

    On the leading and rear edges are found two dials: when rolled, the for’ard, sub dial can adjust such matters as ISO setting and exposure compensation; the rear, main dial is used to adjust aperture value or white balance.

    Put another way: when shooting manually, moving the dial at the front of the camera adjusts the aperture while the back dial affects exposure time. At rear, the dial changes the ISO value and white balance.
    Menu.JPG

    Shooting tips.JPG

    Rear: video record button; a two position lever (see below); menu; info; four way jog dial offering access to exposure compensation, flash options, burst shooting and self timer, AF area positioning.

    Lower down are found the replay and erase buttons.

    Carving 2.JPG

    Narrabeen lake 4 Dramatic tone.JPG

    Tree 3 Key line.JPG

    The big deal with the P5 is the ease in which it can be linked with a smart device, such as an iPad or smart phone. You can synchronise the screens of the smart device and the E-P5 so you can mirror the camera’s LCD view on the smart device, then control it by touching the smart device display as if it were your camera. Great for self-portraits and for remotely shooting dangerous subjects like wildlife that may be startled or even turn on you! You can even use your smart device to embed GPS info into your shots.

    There is no turret finder on the P5, but you can acquire an optional hi def VF-4 viewfinder, with an impressive 1.48X magnification, a high res 2.36 million dot LCD.

    Olympus PEN E-P5 ISO Tests

    Olympus Pen E-P5 ISO 200.JPG

    Olympus Pen E-P5 ISO 400.JPG

    Olympus Pen E-P5 ISO 800.JPG

    Olympus Pen E-P5 ISO 1600.JPG

    Olympus Pen E-P5 ISO 3200.JPG

    Olympus Pen E-P5 ISO 6400.JPG

    Olympus Pen E-P5 ISO 12800.JPG

    Olympus Pen E-P5 ISO 25600.JPG
    Only by ISO 3200 was noise becoming an issue. At ISO 6400 still looking good and sharp. At ISO 12800 noise was up but still useable IMHO. At ISO 25600 noise well up but, for certain subjects, useable.

    Olympus PEN E-P5 Review Verdict

    Quality: above average
    Why you’d buy the P5: plenty of control.
    Why you wouldn’t: too good for run-of-the-mill snap-shooting!

    I liked the P5 but felt some of the controls unnecessary: like the two control dials.

    Olympus PEN E-P5 Specifications

    Image Sensor: 16.05 million effective pixels.
    Metering: Multi pattern, centre-weighted averaging, spot.
    Effective Sensor Size: 17.3×13.0mm (22.5mm diagonal) Live MOS.
    Lens Mount: Micro Four Thirds.
    35 SLR Lens Factor: 2x.
    Shutter Speed: 60 sec to 1/8000 second, Time, Bulb. Internal/external flash sync: 1/320/250 sec.
    Continuous Shooting: 9 fps.
    Memory: SD/SDHC/SDXC cards and Eye-Fi.
    Image Sizes (pixels): 4608×3456 to 640×480. Movies: 1920×1080, 1280×720, 640×480.
    LCD Screen: 7.6cm LCD (1,037,000 pixels).
    File Formats: JPEG, RAW, JPEG+RAW, MPEG4.
    Colour Space: sRGB, Adobe RGB.
    ISO Sensitivity: Auto, 200 to 25600.
    Interface: USB 2.0, HDMI mini, AV, accessories.
    Power: Rechargeable lithium ion battery, DC input.
    Dimensions: 122.3×68.9×37.2 WHDmm.
    Weight: 420 g (inc battery and card).
    Prices: Get a price on the Olympus E-P5 (body only) or Olympus E-P5 17mm with a f1.8 and VF.

    Post originally from: Digital Photography Tips.

    Check out our more Photography Tips at Photography Tips for Beginners, Portrait Photography Tips and Wedding Photography Tips.

    Olympus PEN E-P5 Review


    Digital Photography School
  • The Ultimate, Detailed History of Photography That Will Blow Your Socks Off!

    Although everyone understands the importance of photography in our daily lives, very few know about how this seemingly magical art form developed. The following is a detailed look into the long history of photography that has lead to the cameras we know and love today. 500 BC – 1700s Beginning back in China and Greece around 500 BC, ancient philosophers Continue Reading

    The post The Ultimate, Detailed History of Photography That Will Blow Your Socks Off! appeared first on Photodoto.


    Photodoto

  • Discover the Secrets of Beautiful Portrait Lighting

    NewImageToday I’m excited to announce the launch of a new dPS eBook – Portraits Lighting the Shot – by Gina Milicia.

    In January of this year we released a brand new Portraits eBook called Portraits: Making the Shot.

    It was an ebook written by renowned Aussie celebrity portrait photographer Gina Milicia on the basics of how to shoot amazing portraits that reflect the true character of your subject.

    The overwhelming response from readers of the eBook was that Gina had created a valuable resource that was helping thousands of photographers to improve their portraiture – but they wanted more.

    One of the biggest requests that we’ve received since releasing ‘Making the Shot’ was for some teaching on ‘Lighting’ portraits.

    Using light effectively can be the difference between a portrait that captures the true spirit of your subject and one that simply records a moment.

    Based upon this feedback we immediately began work with Gina to create a guide to lighting portraits.

    I’m pleased to announce that it is ready for you to download today at a limited time Early Bird price of just $ 14.99 (25% off).

    What’s Covered in This eBook?

    • The Rules:  The ten golden rules to to live by (when lighting a portrait).
    • The Gear:  The gear you need, might need and actually don’t need.
    • The Way:  How to ‘see’ the light, by using the ‘force’ in a non nerdy way.  This section is GOLD.
    • The Style:  Understand Gina’s style, but importantly how to use all your new skills to create your own.
    • Troubleshooting:  How to handle those tricky lighting scenarios.
    • Building the shot:  Build your shot, one light at a time

    Get full details on this valuable new eBook here or buy it directly by clicking the Download it Now button below.

    jQuery(document).ready(function(){
    jQuery(“a.lightbox-54528″).colorbox({className: ‘dark id54528’, onLoad: function() { jQuery(‘.id54528 #cboxClose’).css(‘display’, ‘block’); }, fixed: true, initialWidth: 500, initialHeight: 100, inline:true, width: 650, href:”div.lightbox-54528”});
    });

    download_it_now_lighting

    jQuery(document).ready(function() { jQuery(‘div.lightbox-54528:gt(0)’).remove(); });// < ![CDATA[ // < ![CDATA[ // < ![CDATA[ function EJEJC_lc(th) { return false; } // ]]>

    Post originally from: Digital Photography Tips.

    Check out our more Photography Tips at Photography Tips for Beginners, Portrait Photography Tips and Wedding Photography Tips.

    Discover the Secrets of Beautiful Portrait Lighting


    Digital Photography School
  • Setting The Mood By Adjusting Your White Balance

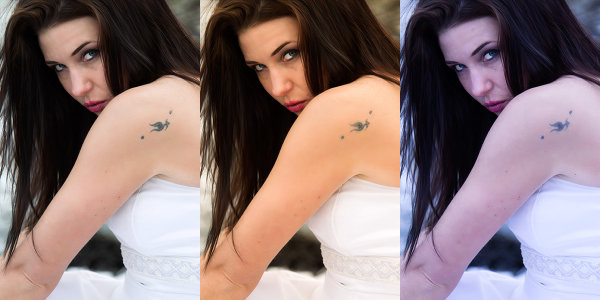
    This set of images was taken from a RAW file, with the white balance adjusted using Kelvin white balance in Adobe Camera Raw. The first image was set to Auto in camera. The middle shot was warmed up by setting the white balance to 7500°K, and the third shot was cooled off by setting the white balance to 4000°K. EOS-1D Mark IV with EF 24-105 f/4L IS. 1/200, ISO 100, f/4.

    This set of images was taken from a RAW file, with the white balance adjusted using Kelvin white balance in Adobe Camera Raw. The first image was set to Auto in camera. The middle shot was warmed up by setting the white balance to 7500°K, and the third shot was cooled off by setting the white balance to 4000°K. EOS-1D Mark IV with EF 24-105 f/4L IS. 1/200, ISO 100, f/4.

    Photographers often deal with a variety of light sources, each of which has it’s own color cast.  When compared to daylight in the middle of the day, tungsten lighting, like that which comes from traditional incandescent bulbs, looks yellow.  Standard fluorescent lighting looks green.  Light in shade, or on a cloudy day will have a bluish cast compared to midday sun.  These color casts are referred to as the color temperature of the light.  Color temperature is measured in degrees Kelvin.  To beginners, color temperature will appear to be a bit backwards.  From 2000°K to about 3000°K are warm tones, and above 5000°K are cooler tones, getting progressively more bluish as the color temperature goes higher.  Midday sun tends to be at around 5500°K – 6000°K, while the sun at the horizon is warmer, at about 5000°K. Overcast daylight will be around 6500°K, and shaded daylight will be around 7000°K.

    In this landscape shot, The first shot was processed using the Auto white balance setting, which chose 7500°K.  The second shot was processed to a much cooler tone at 4500°K, and the last shot was processed setting the Kelvin white balance at 11250°K.  EOS-1D X, EF 14mm f/2.8L II. Exposure: 0.5", f/16, ISO 200.

    In this landscape shot, The first shot was processed using the Auto white balance setting, which chose 7500°K. The second shot was processed to a much cooler tone at 4500°K, and the last shot was processed setting the Kelvin white balance at 11250°K. EOS-1D X, EF 14mm f/2.8L II. Exposure: 0.5″, f/16, ISO 200.

    Thankfully, today’s digital cameras have a tool to correct for the different color casts created by the various light sources we encounter.  For beginners, using the Auto White Balance setting is an excellent start. The camera will try to neutralize the color cast caused by different light sources and give the image a pleasing balance. However, while a neutral color balance is often desirable, there are times when as artists, we may want to use the white balance tool to creative effect.

    You can choose what kind of mood you want to set before shooting if you like, by choosing a preset white balance. Most cameras offer Auto, Daylight, Cloudy, Shade, Fluorescent, Tungsten, Flash, Custom, and Kelvin temperature white balance settings.  These settings will neutralize the color cast from the light source they are designed for. For instance, Fluorescent neutralizes the greenish cast given off by fluorescent light.  Custom white balance is a user defined setting where you tell the camera what in the scene should be white, and the camera corrects to make it so. Finally, the Kelvin white balance setting allows you to choose the color temperature of the light source you are shooting in.  If you choose to use the presets in lighting other than what they are designed for, your image will be warmer or cooler, depending on your setting and the available light.

    For all of those settings, the camera is simply looking to make white look white.  While that may be what you want, by intentionally setting a different white balance, you can add to the mood.  Choosing  Shady or Cloudy white balance will warm up your image, and choosing tungsten will cool your image. This type of thing is done constantly in movies and television shows to help set the mood.  Photographers as well choose their white balance to set the mood.  A cooler color cast gives the image a colder, harsher feel, while a warm color cast is generally seen as inviting.

    If you shoot only JPEG, you’ll be stuck with whatever white balance you had selected at the time of shooting, so if you want to change the mood by adjusting your white balance, you’ll have to choose to do this beforehand.  However, if you shoot RAW, the white balance can be adjusted after the fact, using whichever RAW converter you choose.  You’ll be able to choose from the presets that are loaded in the camera, click in the image to determine what color should actually be white, or you can simply select Kelvin white balance, and using a slider, adjust the white balance in degrees Kelvin and see what the different color temperatures look like.

    By taking control of the white balance, you give yourself another tool that can alter the mood of your images and allow you to better communicate what you want to say with your image.  Not every image will benefit by shifting the white balance setting, and there will be some photographers who will be adamant that you should always shoot to the “correct” white balance.  As the artist, this is your time to exercise your creative license and do what feels right to you.

    Post originally from: Digital Photography Tips.

    Check out our more Photography Tips at Photography Tips for Beginners, Portrait Photography Tips and Wedding Photography Tips.

    Setting The Mood By Adjusting Your White Balance


    Digital Photography School

  • On Assignment: Don’t Deny the Obvious

    We give a lot of attention to light mods around here: big ones, little ones, hard ones, soft ones, umbrellas, soft boxes, grids and the like. But sometimes the best light mod is no light mod at all — especially indoors, with neutral walls.

    In that environment, often the smart choice is just to stick your bare speedlights on stands and go.

    Read more »
    Strobist

  • Photographing A Same-Gender Wedding or Ceremony

    Recently there has been several big changes in the way the US handles same-sex marriage.  Now, I don’t write about politics, which I think is lucky for all of us in the same way that I don’t cook is lucky for the people I live with.  I write about photography and people.  I also don’t make predictions about laws and the world, mainly because I’m not sure what I’m going to have for dinner tonight and as I write this, it’s almost 8pm (cereal is always a safe bet at this point though), but I will say this: as same-gender marriage becomes more accepted and recognized, the need for photographers who will happily and professionally photograph these weddings as they would any other, will increase.  And I hope to be one of the first photographers in my area a couple thinks of for these jobs.

    IMG_3782b

    I have been lucky enough to photograph several same-sex weddings and commitment ceremonies.  For this article, I will be referencing the beautiful wedding of Jeremy and Randy, who when I asked, were thrilled to allow me to show their images.  I met these wonderful men because Jeremy’s mother placed a hefty bid on a “photography event” that I had donated to a non-profit for their annual fundraiser auction.  I had no idea what would be the outcome and I couldn’t have been more thrilled that this lovely woman won my random donation that to be honest, I got a little bullied into.  I was certain that I would end up photographing some D list celebrity in the famous mountain town where I donated the “prize” and often worked in.  Or maybe that I would be asked to do something crazy and/or scary and have no way to back out.  Like a scuba diving photo shoot.  (I’m terrified of scuba diving.  I think.  I’ve never actually tried.  But I certainly don’t want to.)

    Instead I ended up fourteen thousand feet above sea level on a beautiful September day.  I hauled up the cake and live butterflies awaiting their ceremony release who I talked to the whole 30 minute drive, telling them that all would be well and shhhh, shhhhhh…….your wing flapping is making me nervous!.  But that’s another article I may write someday titled “Hauling Live Previously Frozen Butterflies Is Not For The Weak Of Heart”.  Anyway…..I am a photographer that proudly photographs same sex weddings and unions.  I am not gay myself.  I am not some crazy liberal (well, maybe a little).  I am a person who believes that when any two adults love each other and want to announce that and celebrate it and make promises in front of their friends and families and perhaps feed us all cake in the meantime, that’s a pretty special thing that needs to be documented.  And if you’ll have me, I’m thrilled to be the one to do it.

    Here are six tips for photographing a same-gender wedding or ceremony:

     IMG_2824b

    IMG_2847b

    1. It isn’t any Different

    It’s two people that love each other.  And if you signed up for this, it’s like any other wedding you’ve ever done or been to.  Simple as that.  Show up, do your job, eat cake.  If there is even a small part of you that doubts you can do this (beyond the normal doubt that many of us photographers have at any given moment), pass on the job and allow a photographer that can to do it.

    IMG_2870b

    IMG_2840b

    2. Find your Groove

    Okay, I lied.  It’s a little different.  Only because we have been programmed to think that it’s different.  The truth is, it may take you a bit to figure out the specifics.  But you will.  I’m as open-minded as they come and truly believe we should be allowed to love (and marry) whoever we want.  None of this changes the fact that I only have a few gay friends, most of which aren’t close friends, and all of which I haven’t been around them and their romantic partner or dating life much.

    So while it doesn’t bother me a bit, seeing romantic gestures between two people of the same gender is still a somewhat unfamiliar concept to me.  But here is the other truth: I’m not a sappy person by nature and witnessing public displays of affection between any two people makes me a little nervous.  At any wedding I photograph, there is a moment of dread realizing that I will be watching kissing and non-stop declarations of love all day.  In all fairness, this may be because I am a cynical single person.  And my therapist may have mentioned something about intimacy issues.  I assume that’s mainly because I’m perfect in every other way and she had to make something up to prolong the relationship.  At any wedding, at some point I am able to brush off the cynicism and give in to the beauty of two people pledging to each other.

    IMG_3050b

    IMG_2831b

    3. Realize the Gravity of what you’re Doing

    You will likely never shoot a ceremony or event where you are more appreciated.  I asked Jeremy what the difference is when hiring a photographer for a same-sex wedding; I fully expected to get back a response about how I needed to realize that it wasn’t any different.  

    Instead, he told me this:  ”The act of asking a photographer to do my wedding was in itself anxiety-provoking. I wasn’t worried about them being booked already, but rather of them not approving of my wedding at all! A wedding can be even MORE emotional for same-sex couples, because chances are at some point in their lives they were sure this day would never be possible.” Weddings are a great deal of pressure, but at a same-gender ceremony you have the added bonus of being pre-approved. Just by being happy to do it, you have made the couple incredibly happy. The images you take are beyond the wildest dreams of the couple because they likely haven’t thought their wildest dreams are possible.

    IMG_3688b

    IMG_3669b

    4. Find out the Details Beforehand

    At most of the weddings I have shot, I have done nothing more than exchange a few emails with the couple and possibly taken engagement photos. There aren’t a lot of odd pieces of a wedding that I haven’t seen after having shot so many; divorced parents, possible drunk relatives, non-traditional requests, a roomful of unclothed bridesmaids, rain, unclothed bridesmaids in the rain.…..I’ve seen it all. Though in this situation, I want to know if there are specific relatives that I maybe need to be aware of.

    For example, both of Jeremy’s grandfathers are extremely conservative and yet showed up to the wedding anyway after saying that they wouldn’t. This created a very emotional piece for everyone who was aware. You can’t prepare for every possible situation, but get as many details as you can beforehand. It’s more prep work, but it will serve you well in the long run.

    IMG_3885b

    IMG_3887b

    5. Educate Yourself

    Many same-sex weddings don’t adhere to traditional wedding outlines. Know beforehand if there will be anything specific happening in their ceremony that might be important. There many be similarities, but there is often an entire separate set of emotions that happen. Know in advance that this is more than just a wedding day; this is a celebration that most thought never could happen.

    IMG_3712b

    6. You mustn’t Worry about it!

    I spend most days worried that at some point, I’m going to make an idiot out of myself. This is because most days, at some point, I make an idiot out of myself. At a same-gender weddings I worry quite a bit that I am going to put my foot in my mouth and say something insulting that I in no way meant insulting. If I ever have, and I seriously wouldn’t put it past me, no one has ever mentioned it. This tells me two things:

    1. that it’s possible people are just used to my flavor of obnoxiousness at this point, and…
    2. there is room for a bit of putting your foot in your mouth. While plain out rudeness is of course unacceptable, if you slip-up don’t stress about it.

    My grandmother used to always say “You worry too much! You mustn’t worry about it!”.

    She also used to say “All the beautiful clothes in your closet and that is what you decided to wear?”, but I prefer to concentrate on the good things.

    Be sensitive to the event, but chances are if you got this far into in, it’s for good reason. At this wedding, I accidentally referred to Jeremy as the bride several times. And each time he teased me that he was likely the worst Bridezilla I’ve ever come across.

    He wasn’t. Not even close.

    Post originally from: Digital Photography Tips.

    Check out our more Photography Tips at Photography Tips for Beginners, Portrait Photography Tips and Wedding Photography Tips.

    Photographing A Same-Gender Wedding or Ceremony


    Digital Photography School